1
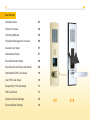
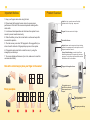
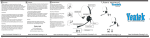
Sun Castle Global Precision Technology Co., Ltd
Taichung Headquarters
No. 1-3, Lane 1010, Zhongshan Rd., Shengang Township, Taichung
County 429, Taiwan (R.O.C.)
TEL: +886-(0)4-25629136-8 FAX:+886-(0)4-25624697
Taipei Office
2C09, No. 5, Sec 5, Xinyi Rd., Taipei City 110, Taiwan (R.O.C.)
TEL: +886-(0)2-27296294 FAX:+886-(0)2-87862174
China Office
Room 807, Area C, Xinxin Jingdi Building, Jiahe Rd., Huli, Xiamen
361009, China
TEL: +86-(0)592-5236752 FAX:+886-(0)592-5281985
ST Series User Manual
User Manual
Important Notes
03
Product Overview
04
Unlocking Methods
05
Fingerprint Management Overview
06
General User Setup
07
Administrator Setup
07
New Administrator Setup
08
New General User Setup with Admin
09
Administrator PIN Code Setup
10
User PIN Code Setup
10
Single-Entry PIN Code Setup
11
PIN Code Reset
11
Optimum Volume Settings
12
Factory Default Settings
12
Important Notices
Product Overview
1. Keep your fingers clean when using the lock.
2. Please keep the fingerprint sensor clean to ensure proper
performance of the lock. We recommend periodic cleaning with a
cotton cloth.
3. 5 continuous failed operations will shut down the system for one
minute to prevent unauthorized entry.
4. When the battery is low, the lock will emit a continuous beep after
a successful operation.
5. The lock memory can store 150 fingerprints. We suggest that you
store at least 2 valid sets of fingerprints per person in the system.
6. If fingerprints and codes fail to unlock the door, try using the
emergency override keys.
7. To ensure optimal performance of your lock, make sure to read the
user manual carefully.
Light: Blue light - operation success. Red light operation failure. Purple light - setup mode.
Keypad: PIN codes consist of 4-8 digits.
Confirm/Exit Button
Keyhole Cover: use the magnet on the key chain/key
provided in the package and turn the keyhole cover 90
degrees clockwise to remove it.
Factory Default Settings: press the Up and Down
Buttons simultaneously for 2 seconds until you hear a
long beep. The Up button is the Select Button and the
Down Button is the Confirm Button.
Here is the correct way to place your finger on the sensor:
Fingerprint Recognition Sensor
Wrong examples
The keyhole cover of
the ST8 looks like this.
Please press the cover
to open.
Use the magnet to remove
the keyhole cover.
Emergency override key
Unlocking Methods
Fingerprint Management Overview
1. Using fingerprint recognition: press # and then place the finger
on the sensor.
Factory Default Settings
Press the Up and Down Buttons on the back of the lock simultaneously until
you see the blue light and all the general user fingerprint will be deleted.
2. Using PIN Code: enter an assigned PIN code and press #.
Fingerprint Management
3. Using the Mechanical Key: use the magnet on the key
chain/key provided in the package and turn the keyhole cover 90
degrees clockwise to remove it. Then use the key to open the door
manually.
There are 2 types of fingerprints: Administrator fingerprints and general user
fingerprints.
Simple Management - General Users Only
All users are equal, no administrators needed.
Door Lock Status
Status
Add users without having to enter an administrator’s fingerprint.
You can only delet users by resetting the lock to factory defanlt setting.
Sounds
Light
Operation Success Blue
1 beep
Operation Failure
Red
3 beeps
Setup Mode
Purple
2 beeps
Low Battery
Red
5 long beeps
Door Open
1 beep after a valid PIN code/fingerprint is entered
indicates that the door is open.
The door locks automatically 1.5 seconds after the
lever returns to the original horizontal position.
Door Closed
Advanced Management - General Users with Administrators
There are 2 categories of users for users for fingerprints management: general
users and administrators.
Types of Fingerprints & PIN Code
Types
Fingerprint Memory
Quantity
Function
150 (50 persons) Unlocking the door
Administrator fingerprints 12 (4 persons)
Administrator PIN Code 1 set
Adding/overwriting fingerprints
User PIN Codes
Unlocking the door
2 sets
Adding/overwriting PIN Codes
Notice
Memory function: there is no need to reset the fingerprint and PIN-Code after
battery replacement.
When using the advanced management mode, you cannot go back to simple
management mode.
To delete all users and general user fingerprints, please restore factory default
settings. Please note that the administrator fingerprints will remain in the
memory.
Fingerprint Setup
I. Fingerprint Setup
A. Setup as a general user: directly add new fingerprints, without
administrator authentication
1. Press and hold the Down button on the back panel (for 2 seconds) until a number
appears on the display panel and then release the button, the number on the display
panel will be 1 at this stage. Press the Down Button again to confirm.
2. There will be 5 short beeps, followed by a long beep; the front panel will light up,
then place your finger on the fingerprint recognition sensor until you hear a long beep
and a purple light comes on.
3. Take your finger off the fingerprint sensor, and then place it back on the fingerprint
sensor again until you hear a second long beep. Repeat the process a third time until
a third long beep.
4. When the blue light comes on, you'll know that setup is complete.
Symbol indication
U : setup complete
: setup failure
F : memory is full. If new fingerprints are required, restore the system to factory
default settings before entering new fingerprints.
B. Advanced Administrator Setup
1. Enhanced fingerprint lock administrator mode, the presence of an administrator is
needed when adding new users.
2. 1-4 administrator user logins can be created
3. Administrator fingerprints cannot be deleted
a. Setup as Administrator
1. Press and hold the Down Button on the back of the panel (for 2 seconds) until the
display panel lights up and digits appear; release the button after a number appears
on the screen; this number will be 1 at this stage.
2. Press the Up Button once to enter the number 2 and press the Down Button and #
to confirm until you hear a beep as reconfirmation.
3. The back light displays the numbers 1 through 4, which represent the 4
administrator fingerprint identities. Please press the Up Button to select the number
you want. If the indicator light keeps flashing, it means that there is already fingerprint
identity stored in that location. Press the Down Button to select the number you want.
4. You will hear a long beep following 5 short beeps, and the front panel will then
light up. Place the finger on the fingerprint sensor until you hear a long beep and
the purple light comes on.
5. Take your finger off the fingerprint sensor, and then place it on the fingerprint
sensor again until you hear a second long beep. Repeat the process a third time
until a third long beep.
6. When the blue light comes on, you'll know setup is complete.
Attention
An administrator fingerprint cannot be deleted after it has been setup in the
system, but it can be replaced by other administrator fingerprints.
Once an administrator fingerprint is setup, this administrator fingerprint must be
input before any new user fingerprints can be added.
b. Setting Up New Administrators - Using Administrator
Fingerprints
1. Press and hold the Down Button on the back of the panel (for 2 seconds) until
the display panel lights up and a number appears. Then, release the button; the
number 1 will appear at this time.
2. Press the Up Button once to select the number 2 and press the Down Button
and the # Button until you hear a beep as reconfirmation.
3. The back light will display the symbol " " and request the input of one of the
existing administrators' fingerprints.
4. Input the new administrator fingerprint. The back light will display the symbol
"U" indicating that input is successful. The symbol " " indicates recognition
failure.
5.The back light displays the numbers 1 through 4, which represent the 4
administrator fingerprint identities. Please press the Up Button to select the
number you want. If the indicator light keeps flashing, it means that there is
already fingerprint identity stored in that location. Press the Down Button to select
the number you want.
6. You will hear a long beep following 5 short beeps, the front panel will then light
up. Place the finger on the fingerprint sensor until you hear a long beep and the
purple light comes on.
7. Take your finger off the fingerprint sensor, and then place it on the fingerprint
sensor again until you hear a second long beep. Repeat the process a third time
until a long beep
8. When the blue light comes on. Your setup is ocmplete
Fingerprint Setup
c. Adding New User with Administrator Already Setup
1. Press and hold the Down Button on the back of the panel (for 2 seconds) until
the display panel lights up and digits appear; release the button after a number
appears on the screen; this number will be 1 at this stage.
2. Press the Down Button to confirm.
3. The back light will display the symbol " " and request the input of one of the
existing administrators' fingerprints.
4. Input the new administrator fingerprint. The back light will display the symbol
"U" indicating that input is successful. The symbol " " indicates recognition
failure.
5. You will hear 5 short beeps followed by a long beep, and then the front panel
will light up. Place the finger on the fingerprint sensor until you hear a long beep
and the purple light comes on.
6. Take your finger off the fingerprint sensor, and then place it on the fingerprint
sensor again until you hear a second long beep. Repeat the process a third time
until a third long beep.
7. When the blue light comes on, you'll know setup is complete.
Attention
Please roll the tip of your finger slightly during the setup process to make sure the
sensor will be able to verify the fingerprint.
PIN-Code Setup
There are three types of PIN codes.
1. The Administrator PIN Code: 1 set, required before any type of code change
can take place.
2. User PIN code: 2 sets
3. Single Entry PIN Code: 1 set, expires after a single use.
1. Administrator PIN Code Setup
(no.)
(Admin PIN)
(Confirm) (Exit)
(1) Input factory default administrator code (123456) and then press # (purple
light).
(2) Wait for 2 beeps to sound then press *00.
(3) Press the intended admin PIN code (consists of 4-8 digits), and then press
# to confirm.
(4) Press # again to exit the system.
* The Administrator PIN code cannot be 123456 or 000000.
* If a red light appears during this process, it means the setup has failed.
* A blue light indicates successful operation.
* We strongly recommend that you change the administrator code immediately
upon receiving this product.
2. User PIN Codes Setup
There are 2 User PIN Codes for the locks of the ST Series.
(admin PIN)
(no.)
(PIN)
(Confirm) (Exit)
(1) Input Admin PIN Code and then press # (purple light).
(2) Wait for 2 beeps to sound then press *01 or *02 .
(3) Press the intended PIN code (consisting of 4-8 digits), and then press # to
confirm.
(4) Press # again to exit the system.
Optimum Volume Setting
PIN-Code Setup
Single-Entry PIN Code Setup
(admin PIN)
(no.)
(PIN)
(Confirm) (Exit)
(1) Input Admin PIN Code and then press # (purple light).
(2) Wait for 2 beeps to sound then press *03
(3) Press the intended single-entry PIN Code (consisting of 4-8 digits), and
then press # to confirm.
(4) Press # again to exit the system.
A temporary PIN code cannot be 000000 or 123456.
PIN Code Reset
(no.)
(PIN)
(Confirm)
(no.)
(silence)
(Exit)
(admin PIN)
(no.)
(low)
(Exit)
(admin PIN)
(no.)
(medium)
(Exit)
(admin PIN)
(no.)
(loud)
(Exit)
1. Input Admin PIN Code and then press # (purple light).
2. Wait for 2 beeps to sound then press *04 .
3. Press the Volume Number (00 - silent, 01 - low, 02 - medium, 03 - loud)
4. Press # to exit the system.
The preset PIN Codes cannot be deleted but they can be
overwritten.
(admin PIN)
(admin PIN)
(Exit)
(1) Input Admin PIN Code and then press # (purple light).
(2) Wait for 2 beeps to sound then press *00/*01/*02/*03 (the PIN you want to
replace).
(3) Press the intended PIN code (consisting of 4-8 digits), and then press # to
confirm.
(4) Press # again to exit the system.
Factory Default Settings
Press the Up and Down Buttons on the back of the lock simultaneously
until you see the blue light and all the general user fingerprint and PIN
codes will be deleted.
Contact Us
Troubleshooting
Problem
Continuous beeps and red light
when entering fingerprints
Cannot setup fingerprint
Continuous beeps after
successful operation
No reaction when entering PIN
code
Indication
1. The fingerprint is not stored yet.
2. The fingerprint may not be stored
correctly
3. The fingerprint sensor needs to be
cleaned
Advanced Management is set up.
Add/Overwrite new users with
administrator authentication.
Low battery alert. Replace the
battery immediately.
1. Battery is dead.
2. 3 consecutive PIN code entry
errors. Please try again after 1
minute.