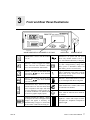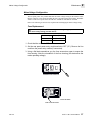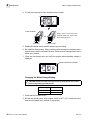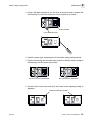
1
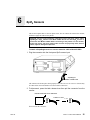
Model 515B and 515C Pulse Oximeter User’s Manual This manual covers Model 515B (Cat. No. 6500-00) and Model 515C (Cat. No. 6550-00) April 17, 1996 Catalog No. 6500-23-02/6550-23-02 Novametrix Medical Systems Inc. Wallingford, Connecticut, U.S.A. 06492. Copyright 1995, 1996. All rights reserved. No part of this manual may be reproduced without the written permission of Novametrix Medical Systems Inc. Printed in U.S.A. R Rev. 02 Revision History 29-Mar-95 Release at revision 00 11-Apr-95 Updated to revision 01; corresponds to software version 02 17-Apr-96 Updated to revision 02 (R-N389). Addendums A and B incorporated, also Single Patient Use SpO2 sensor information added, use with software version 04. Model 515B/C User’s Manual ii [This page intentionally blank.] iii Model 515B/C User’s Manual Rev. 02 G Guarantee Equipment manufactured or distributed by Novametrix Medical Systems Inc., is fully guaranteed, covering materials and workmanship, for a period of one year from the date of shipment, except for certain disposable products and products with stated guarantees other than one year. Novametrix reserves the right to perform guarantee service(s) at its factory, at an authorized repair station, or at the customer’s installation. Novametrix’ obligations under this guarantee are limited to repairs, or at Novametrix’ option, replacement of any defective parts of our equipment, except fuses, batteries, and calibration gasses, without charge, if said defects occur during normal service. Claims for damages during shipment must be filed promptly with the transportation company. All correspondence concerning the equipment must specify both the model name and number, and the serial number as it appears on the equipment. Improper use, mishandling, tampering with, or operation of the equipment without following specific operating instructions will void this guarantee and release Novametrix from any further guarantee obligations. Service Department For factory repair service, call toll free 1-800-243-3444 In Connecticut, call Collect (203) 265-7701 Telex 956-054 Facsimile (203) 284-0753 Caution: Federal (U.S.A.) law restricts this device to sale, distribution, or use by or on the order of a licensed medical practitioner. Copyright 1995, 1996, Novametrix Medical Systems Inc. This document contains information which is proprietary and the property of Novametrix Medical Systems Inc., and may not be reproduced, stored in a retrieval system, translated, transcribed, or transmitted, in any form, or by any means, without prior explicit written permission from Novametrix Medical Systems Inc. Rev. 02 Model 515B/C User’s Manual iv Service Policy Novametrix Medical Systems Inc. will provide Warranty Service Support to its customers within 48 hours of receiving a telephone request for technical support. This 48 hour period begins once a service request is placed through the Factory Technical Support Department in Wallingford, Connecticut. Novametrix provides factory direct technical support to its customers through a technical support group located in Wallingford, Connecticut and company service representatives located throughout the United States. All Technical Support for Novametrix products is provided “Factory Direct.” Novametrix provides 24 hour a day technical support accessibility via telephone numbers (800) 243-3444 or (203) 265-7701. After hours technical support requests (before 8:00 AM and after 5:00 PM Eastern Time) will be responded to promptly by the Technical Support On-Call staff. It is suggested that any person calling in for technical support have the inoperative equipment available for preliminary troubleshooting as well as product identification. Novametrix reserves the right to repair or replace any product found to be defective during the warranty period. Repair may be provided in the form of replacement exchange parts or accessories, on-site technical repair assistance or complete system exchanges. Repairs provided due to product abuse or misuse will be considered “non-warranty” and invoiced at the prevailing service rate. Any replaced defective material is expected to be returned to Novametrix within 10 days of being provided in order to avoid additional charges. Exchanged material should be returned promptly and directly to Novametrix using the return paperwork and shipping label(s) provided. Transferring return materials to local sales or dealer representatives does not absolve return responsibility. Novametrix manufactures equipment that is generally “user serviceable” and can usually be repaired with the replacement of a plug-in electro-mechanical assembly by the clinical end user. When repair parts are provided, the recipient can call into Novametrix for on-line replacement assistance and repair assurance. In the event a replacement part requires increased technical capability, Technical Support may request Biomedical assistance, provide on-site technical support or complete replacement equipment. If the customer requires the return of their original product, the exchange material will be considered “loaner material” and exchanged again after the customer equipment is repaired. Novametrix promotes customer participation in warranty repairs should they become necessary. This program allows for customer training and a smooth transition into self-maintenance after warranty, which can provide substantial cost savings on repairs throughout the product’s life. The Novametrix Technical Support Department can provide technical product support at a level appropriate to most customers protocol and budget requirements. Please contact the Technical Support Group at Novametrix for additional information. Additional Novametrix Technical Support Programs: • Focus Series Technical Training Seminars • Test Equipment and Test Kits • Service Contract / Part Insurance Plans • On-Site Technical Support • 24 hr. telephone support • “Demand Services” Flat rate parts-exchange, Flat rate return for repair Time and Material, Full warranty, discounted replacement sensors. v Model 515B/C User’s Manual Rev. 02 C Contents Section Title Page 1 Description ................................................................................. 1 Principles of Operation ....................................................................... 1 Trademark Acknowledgments ............................................................ 2 2 Patient Safety ............................................................................. 3 Indications and Usage ........................................................................ 3 Warnings ............................................................................................. 4 Cautions .............................................................................................. 5 3 Front and Rear Panel Illustrations ........................................... 7 4 Preparing For Use ...................................................................... 9 Monitor Power Up ............................................................................... 9 Monitor Power Down ......................................................................... 10 Battery Operation .............................................................................. 11 Long Term Storage ..................................................................... 11 5 Monitor Operation .................................................................... 13 SpO2 and Pulse Rate Displays ......................................................... 13 Pulse Activity Bar .............................................................................. 14 Plethysmogram Display .................................................................... 14 Alert Limit Violations ......................................................................... 15 Alert Limits ........................................................................................ 16 Manually Setting Alert Limits ....................................................... 16 Auto Alert Limits .......................................................................... 17 Audible Alert Muting .......................................................................... 18 Alert Volume Control ......................................................................... 18 Pulse Beep Volume Control .............................................................. 19 Contrast Control ................................................................................ 19 Resetting to Factory Defaults ............................................................ 20 6 SpO2 Sensors ........................................................................... 21 OxySnap™ Connectors .................................................................... 22 Finger Sensor ................................................................................... 22 Finger Sensor Quick Check .............................................................. 23 Y-Sensor ........................................................................................... 24 Y-Sensor Application using Y-Strip Tapes, or Foam Wrap ............... 25 Y-Sensor Application using Ear Clip ................................................. 27 Rev. 02 Model 515B/C User’s Manual vi Y-Sensor Quick Check ..................................................................... 29 Single Patient Use SpO2 Sensors .................................................... 29 Single Patient Use SpO2 Sensor Application ................................... 30 Single Patient Use SpO2 Sensor Quick Check ................................. 32 7 Troubleshooting ....................................................................... 33 8 Maintenance ............................................................................. 35 Cleaning and Sterilization ................................................................. 35 Monitor ........................................................................................ 35 Finger Sensor ............................................................................. 35 Y-Sensor ..................................................................................... 35 Y-Strip Tapes and Single Patient Use SpO2 Sensors ................ 36 Ear Clip ....................................................................................... 36 Battery Maintenance ......................................................................... 36 Mains Voltage Configuration ............................................................. 37 Fuse Replacement ...................................................................... 37 Changing the Mains Voltage Setting .......................................... 38 9 Specifications ........................................................................... 41 Pulse Oximeter ................................................................................. 41 Principle of Operation ................................................................. 41 SpO2 (Oxygen Saturation) .......................................................... 41 Pulse Rate .................................................................................. 41 Sensors ....................................................................................... 41 Plethysmogram (Model 515C only) ............................................ 41 General Specifications ...................................................................... 41 Alerts ........................................................................................... 41 Display ........................................................................................ 42 Physical ...................................................................................... 42 Electrical ..................................................................................... 42 10 Accessories .............................................................................. 43 vii Model 515B/C User’s Manual Rev. 02 1 Description This manual is written for users of the Novametrix Model 515B or 515C Pulse Oximeter. The Model 515B/C provides reliable continuous measurement, display, and alerts for oxygen saturation (SpO2) and pulse rate. The monitor can be powered from its rechargeable internal battery or from the AC Mains. Principles of Operation The Model 515B/C measures oxygen saturation using sensors that contain red and infrared (660 and 940 nanometer) light sources, called LEDs. The light energy from each LED is beamed through a sample cell—a pulsating vascular bed, the patient’s finger or toe for example. The remaining light energy not absorbed by the sample cell reaches a light receptor in the sensor, called a photodiode. Oxygen saturated blood absorbs different amounts of light at each wavelength as compared to unsaturated blood. Therefore, the amount of light absorbed by the blood in each pulse can be used to calculate oxygen saturation. The Model 515B/C is calibrated to display “functional” saturation. This differs from the “fractional” saturation value displayed by most co-oximeters. Functional saturation is defined as: HbO2 Functional Saturation = 100 - (COHb + METHb) HbO2 = Fractional Hemoglobin COHb = Carboxyhemoglobin METHb = Methemoglobin This can be considered to represent the amount of oxyhemoglobin as a percentage of the hemoglobin that can be oxygenated. Dysfunctional hemoglobins (COHb and METHb) are not included in the measurement of functional saturation. Pulse Rate is calculated by measuring the time interval between peaks of the infrared light waveform. The inverse of this measurement is displayed as pulse rate. The oxygen saturation and pulse rate values are updated once each second. Presence of a pulse is indicated visibly by a bar graph display, a plethysmogram graphic display (Model 515C only), and audibly by a “beep.” The Model 515B/C must be used in conjunction with SuperBright™ Sensors. See “Accessories” on page 43 for a list of available sensors and accessories. Rev. 02 Model 515B/C User’s Manual 1 1 Description Trademark Acknowledgments Trademark Acknowledgments SuperBright, Y-STRIP and Y-SENSOR are trademarks of Novametrix Medical Systems Inc. 2 Model 515B/C User’s Manual Rev. 02 2 Patient Safety Pulse oximetry is a non-invasive method of monitoring the oxygen saturation of arterial blood. Pulse oximeters display oxygen saturation of functional hemoglobin and therefore the accuracy may be interfered with by carboxyhemoglobin or other dyshemoglobins present in significant concentrations. Oxygen saturation monitoring is intended to be used in a variety of clinical situations, including, but not limited to respiratory therapy, anesthesia, intensive care, and emergency. The Model 515B/C Pulse Oximeter has electrically isolated inputs. Patient leakage current flowing from the instrument to ground is limited to less than 10 µA at 120 V, 60 Hz. Patient isolation is greater than 10 MΩ, 2500 V rms at 60 Hz. For maximum patient and operator safety, the following procedures are recommended; • Failure of Operation: If the monitor fails to respond as described, do not use until the situation has been corrected by qualified personnel. • Keep the monitor and its accessories clean. • Do not operate the monitor when it is wet due to spills or condensation. • Do not operate the monitor if it appears to have been dropped or damaged. • Connect the line cord only to a grounded hospital grade outlet. The Model 515B/C should be connected to the same electrical circuit as other equipment in use on the patient. Outlets on the same circuit can be identified by the hospital’s engineering department. Indications and Usage The Model 515B/C is intended to be used for monitoring functional oxygen saturation and pulse rate in circumstances where it is desirable to monitor patient oxygenation. The monitor is designed to monitor all patients including adult, pediatric, and neonatal. The Model 515B/C is not intended for any other purpose. NOTE: Components of this product and its associated accessories which may have patient contact are free of latex. Rev. 02 Model 515B/C User’s Manual 3 2 Patient Safety Warnings Warnings ! Warning Indicates a potentially harmful condition that can lead to personal injury. • Explosion Hazard: Do NOT use the Model 515B/C in the presence of flammable anesthetics. Use of this instrument in such an environment may present an explosion hazard. • Electrical Shock Hazard: Always turn the oximeter off, and remove the AC power cord before cleaning it. Do NOT use a damaged sensor or one with exposed electrical contacts. Refer servicing to qualified service personnel. • Patient Safety: Extreme care should be exercised with neonates to assure continued circulation distal to the sensor site after application. • Failure of Operation: If the oximeter fails to respond as described, do not use it until the situation has been corrected by qualified personnel. • Data Validity: The Pulse Oximeter should NOT be used as a substitute for an ECG monitor. The oximeter’s Pulse Rate display reflects the pulsatile flow found at the patient extremity connected to the sensor. This rate can be affected by many factors and may occasionally be “frozen.” • Care should be exercised to assure continued peripheral perfusion distal to the SpO2 sensor site after application. • Data Validity: Do NOT attach a sensor distal to a blood pressure cuff. Valid data CANNOT be processed when the cuff is inflated. Attach the sensor to the limb opposite to the site used for the blood pressure cuff. • Data Validity: Inaccurate SpO2 and/or Pulse Rate measurements can be caused by any of the following: • Incorrect application or use of a sensor • Significant levels of dysfunctional hemoglobins such as carboxyhemoglobin or methemoglobin • Significant levels of indocyanine green, methylene blue, or other intravascular dyes • Exposure to excessive illumination such as surgical lamps - especially ones with a xenon light source, or direct sunlight • Excessive patient movement, venous pulsations, electrosurgical interference • Do Not apply Y-Sensor tapes or wraps so tightly that circulation is restricted. Inspect site often for adequate circulation - at least once every four hours. When applying sensors take note of patient’s physiological condition. For example, burn patients may exhibit more sensitivity to heat and pressure and therefore additional consideration such as more frequent site checks may be appropriate. 4 Model 515B/C User’s Manual Rev. 02 Patient Safety Cautions 2 Cautions Caution Indicates a condition that may lead to equipment damage or malfunction. • • • • • • Do not operate the Model 515B/C when it is wet due to spills or condensation. Do not operate the Model 515B/C if it appears to have been dropped or damaged. Never sterilize or immerse the monitor in liquids. Do not sterilize or immerse sensors except as directed in this manual. Excessive tension should not be applied to the sensor cable. Do not store the monitor or sensors at temperatures less than 14 °F (-10 °C) or greater than 131 °F (55 °C). • Do not operate the monitor or sensors at temperatures less than 50 °F (10 °C) or greater than 104 °F (40 °C). • Federal (U.S.A.) law restricts this device to sale, distribution, or use by or on the order of a licensed medical practitioner. • Overstretching the pulse oximeter finger sensor can damage the sensor and potentially affect pulse oximeter readings. Do not stretch the finger sensor open beyond the limit for which it was designed. Overstretching can be prevented: avoid opening the sensor by any means other than squeezing the grips; DO NOT force the sensor onto large objects such as a bedrail. Rev. 02 Model 515B/C User’s Manual 5 2 Patient Safety Cautions [This page intentionally blank.] 6 Model 515B/C User’s Manual Rev. 02 3 Front and Rear Panel Illustrations WAVEFORM DISPLAY ON MODEL 515C ONLY POWER button - Press to turn the monitor on or off. Audio key - Press to toggle two minute silence, and reset alert conditions (when active). Press and hold for audio disable. Pulse Key - Sets pulse rate alert limits when used with the keys. Press and hold to set auto alert limits. SpO2 key - Sets saturation alert limits when used with the keys. Press and hold to set auto alert limits. Increase/decrease keys - Press to set pulse and alert audio level. Sets alert limits when used in conjunction with SpO2 and Pulse keys. Press and hold to control graphics display contrast on Models 515C (Model 515B does not have graphics display option). Saturation and pulse rate displays - Saturation and pulse rate values will appear. Status messages will appear if necessary, see “Troubleshooting” on page 33. Arrows indicate alert status or that alerts are being set. Rev. 02 ALERT BAR SENSOR INPUT AC indicator - Green when the monitor is connected to AC power and rear panel power entry module switch is set to “|” (ON). Also indicates the battery is charging. Battery icon - Green when operating on battery with a charged battery, orange when battery power is diminished, flashes red when battery power is at a critical low. Finger probe icon -Flashes red when no probe is connected or the probe is off the patient. Red for any sensor errors which occur during monitoring. Hand icon - Yellow when monitor is searching for valid signal and data is being held. Audio disabled icon - Flashes yellow when the audio has been disabled. Two minute silence indictor - Illuminates yellow when the audio has been muted for two minutes. Signal bar - Pulses with respect to monitored pulse rate. Amplitude corresponds to signal strength. Model 515B/C User’s Manual 7 3 Front and Rear Panel Illustrations Ground stud - Use to connect monitor’s chassis to earth ground. Rear panel power switch - Set to “|” allows AC mains to power monitor, set to “O” switches AC mains power off. Voltage select/fuse compartment - Sets mains operating voltage and houses mains fuses. Power cord entry - Plug power cord into this receptacle. Use only hospital grade three wire plugs for connection via supplied power cord. Ground stud - Use to connect monitor’s chassis to earth ground. Voltage select/fuse compartment - Sets mains operating voltage and houses mains fuses. Rear panel power switch - Set to “|” allows AC mains to power monitor, set to “O” switches AC mains power off. Power cord entry - Plug power cord into this receptacle. Use only hospital grade three wire plugs for connection via supplied power cord. AC Power cord: The AC power line cord shipped with monitors for North America is a Hospital Grade, SJT style cord with a 120 VAC plug. All power line cords shipped with monitors for Europe are the European style with a 220-240 VAC plug. All other style power line cords, as required by the country of destination, are provided by the distributor of that country. 8 Model 515B/C User’s Manual Rev. 02 4 Preparing For Use Monitor Power Up NOTE: Before using the monitor for the first time, attach the line cord to the rear panel power entry module, then connect to a proper AC mains outlet. Set the rear panel power switch to “|” (ON), check that the front panel icon is illuminated. Allow the battery to charge for 12 hours. See “Long Term Storage” on page 11. 1. Plug the connector end of a SuperBright™ series sensor or extension cable into the front panel connector of the monitor. The sensor will “click” into place when properly seated. SuperBright™ SERIES CONNECTOR NOTE: To disconnect the saturation sensor from the monitor, press the latch release lever on the sensor connector and pull the connector straight back and away from the monitor. DO NOT twist the connector. PRESS DOWN ON LATCH RELEASE THEN PULL OUT 2. If the monitor is to be operated from the AC line, plug the power cord into a properly grounded three wire outlet and set the rear panel power switch to the Rev. 02 Model 515B/C User’s Manual 9 4 Preparing For Use Monitor Power Down ON (|) position. The green AC indicator on the front panel will illuminate to show that AC current is reaching the monitor and charging the battery. REAR PANEL POWER SWITCH AC POWER CORD 3. Press the front panel power key sequence: . The monitor will power up in the following • An audible series of beeps will be produced. • All displays and LEDs will briefly illuminate. • The monitor will perform a self test, then the revision level will appear in the saturation display, the model number “515” will appear in the pulse rate display, and a beep will coincide with a flash of the alert bar.. • The monitor will enter normal operating mode. With the sensor disconnected, or connected but not applied to a patient, the SpO2 and pulse rate windows will display “- - -.” 4. Ensure that the monitor is operating in accordance with the above listed steps before applying the sensor to the patient. Monitor Power Down 1. To turn the Model 515B/C off, press the key. Pressing the front panel power key will turn the monitor on/off. The green AC indicator will stay illuminated signifying that although the monitor is off, AC mains is still connected to the monitor. 2. To disconnect AC mains power, set the rear panel power switch to OFF (O). Check that the front panel icon is not illuminated. NOTE: Removing the AC mains power will not charge the battery. See “Battery Operation” on page 11. 10 Model 515B/C User’s Manual Rev. 02 Preparing For Use Battery Operation 4 Battery Operation The Model 515B/C uses battery power if the line cord is disconnected or the rear panel power switch is OFF (O). The monitor can operate for up to 8 hours while powered from its internal battery (fully charged battery). The battery is charging only when the monitor is connected to AC power, the rear panel power switch is ON (|), and the front panel icon is green. NOTE: Excessive alerting reduces battery life when operating on battery power. When the monitor is operating on battery power, and the battery is sufficiently charged, the battery icon will be green. Should the battery power run low the icon will turn orange. If the AC line is not connected and the monitor continues to run, the battery will become exhausted and the icon will begin flashing red, the monitor will sound an audible alert then shortly turn itself off. NOTE: This alert cannot be silenced by pressing the key. The monitor must be connected to AC power to silence the alert condition and recharge the battery. If the monitor is allowed to continue operation while the battery is in the exhausted state, the displays will blank out and the audible tone will stop. Reconnect the monitor to the AC line to recharge the battery. The battery will be fully recharged in 12 hours. Long Term Storage If the monitor has not been used or powered by AC mains for an extended time1 (3 months or more) allow the battery to charge for 12 hours before use. The monitor may not power up on battery power if the battery is not sufficiently charged. To charge the battery, connect the AC mains and set the rear panel power switch ON (|). Check that the front panel icon is green. Allow the battery to charge for 12 hours to ensure a fully charged battery in the event that battery power is required. 1. The internal battery may slowly discharge over long periods of non use. Rev. 02 Model 515B/C User’s Manual 11 4 Preparing For Use Battery Operation [This page intentionally blank.] 12 Model 515B/C User’s Manual Rev. 02 5 Monitor Operation Once an SpO2 sensor is connected to the monitor and properly applied to the patient, the Model 515B/C displays SpO2, pulse rate, and a signal bar that gives qualitative indication of the strength of the pulsatile signal which the monitor is receiving. In the case of the Model 515C, a plethysmogram (pulsatile waveform) will be displayed on the LCD screen. The SpO2 and pulse rate display also indicate status messages and audio levels. These functions are described in detail in this section. SpO2 and Pulse Rate Displays The measured SpO2 will appear in the display at the upper left of the front panel, the pulse rate in the display at the lower left. The Model 515B/C ensures that only valid pulsatile signals are processed. Bad or invalid data causes alerts to occur and may also cause the displays to show “- - -” and “- - -” in the SpO 2 and pulse rate displays respectively. SpO2 DISPLAY PULSE BAR PULSE RATE DISPLAY The displays are updated once per second as the monitor is acquiring data. If the monitor cannot detect a regular and rhythmic pulsatile signal for periods longer than 45 seconds, the display will blank out (“- - -” will be displayed in the SpO2 and “- - -” in the Pulse rate displays). If the signal should return (regular and rhythmic pulsatile data detected), then the display will update with the new values. Rev. 02 Model 515B/C User’s Manual 13 5 Monitor Operation Pulse Activity Bar When the Model 515B/C detects a pulsatile signal that is too low to be processed after previously receiving an acceptable signal and displaying data, the icon will illuminate. This indicates that the SpO2 and pulse rate data has been held since the last acceptable signal. If an acceptable signal is not detected within 30 seconds, dashes will be displayed, the icon will flash, and the appropriate status code will appear. (See “Troubleshooting” on page 33.) When the monitor is not detecting a valid signal, the display will react in a particular manner relative to the condition that exists. When the monitor is operating normally and no probe is connected, or if a probe is connected but not attached to a patient, the displays will show dashes “- - -” and the icon will also flash. Conditions may occur that require certain status messages to be displayed. In these cases the SpO2 display will show “Err,” indicating that a particular condition exists and requires correction. In addition, the monitor will display a number in the pulse rate display that corresponds to the condition at hand. See “Troubleshooting” on page 33 for more information. The SpO2 and pulse rate displays will also show the alert limits when set manually or when auto limits are enabled. See “Alert Limits” on page 16 for more information on setting alert limits. When the alert or pulse beep volumes are adjusted, the SpO2 display will show “PUL” (if pulse volume was selected), or “ALr” (if alert volume was selected), and the pulse rate display will show the volume level. (See “Pulse Beep Volume Control” on page 19 and “Alert Volume Control” on page 18.) When in the contrast adjust mode, the SpO2 display will show “Con”, see “Contrast Control” on page 19. Pulse Activity Bar The signal bar or pulse activity bar is derived from the pulsatile signal that is measured by the monitor. The height of the bar with each pulse beat is proportional to the strength of the signal for low to medium signals, and is adjusted to fit the graph for large signals. This pulse activity bar represents the patient’s pulse and should show regular rhythmic movement. Erratic or nonrhythmic movement may indicate a poorly positioned or applied sensor, or may be indicative of excessive patient movement at the sensor site. Check the sensor site and if necessary, attempt to reduce patient movement. SIGNAL BAR Plethysmogram Display The Model 515C version includes a display for a plethysmogram (pulsatile waveform). The plethysmogram display is a graphic representation of the pulsatile signal as detected by the sensor. The display is continually updated from left to right. The amplitude of the plethysmogram is proportional to the strength of the pulsatile signal for low to medium signals, and is scaled to fit the window for large signals. 14 Model 515B/C User’s Manual Rev. 02 5 Monitor Operation Alert Limit Violations PLETHYSMOGRAM DISPLAY (MODEL 515C ONLY) Alert Limit Violations When the Model 515B/C detects SpO2 or pulse rate values that exceed either the high or low limits, both an audible alert tone and visual alerts are generated. The audible alert can have its volume adjusted, be muted for two minutes, or be disabled (see “Audible Alert Muting” on page 18). The visual alerts are the red alert bar, the limit arrows (high or low), and the out of range numeric value. The red alert bar will flash indicating an alert condition. A limit arrow, either high or low, will flash in the violated parameter’s window (either SpO2 or pulse rate). The numeric value which is out of range will also flash. If the alert condition no longer exists, the alerts will stop, however the limit arrow will flash until acknowledged (by pressing the alert reset key ). Pressing the key while the alert condition exists will temporarily disable the red alert bar for ten seconds, after which the bar will begin to flash again if an alert condition is still present. NOTE: Pressing the key will also affect the two minute silence or audio disable. HIGH LOW INDICATORS ALERT BAR ALERT RESET/AUDIO KEY For example; if the monitor detects a violation of the lower SpO2 value. An audible alert tone will sound (provided the audio has not been muted or disabled). The red alert bar, the low limit indicator in the SpO2 display window, and the SpO2 numerical value will flash. Assuming the audio has not been disabled or muted, pressing the key will silence the alert tone and temporarily disable the alert bar flashing. If the violation is not corrected, the red alert bar will begin to flash again after ten seconds from the release of the key. If the key is not pressed when the alert occurs, and the violation is corrected, only the low indicator arrow and the numeric value will flash until the key is pressed to acknowledge the alert violation. Rev. 02 Model 515B/C User’s Manual 15 5 Monitor Operation Alert Limits Alert Limits The monitor is shipped from the factory set to the default alert limits (SpO2: high - 100, low 85; Pulse Rate: high - 150, low - 40). If the limits are changed and the monitor is turned off, the changed values will be used when power is reapplied (alert limits are retained in battery backed memory). The alert limits can be reset to the factory defaults at any time when the monitor is powered up, see “Resetting to Factory Defaults” on page 20. The Model 515B/C SpO2 and pulse rate alert limits can be set manually, or the monitor can automatically set these limits based upon the values being detected. When any alert limit is violated, the monitor will indicate an alarm condition. The red alert bar, the arrow that corresponds to the violated alert (upper or lower arrow), and the corresponding numeric value (SpO2 or pulse rate) will flash. An audible alert will also sound, provided it has not been disabled. NOTE: The SpO2 sensor must be connected to the monitor, then attached to a patient, and valid SpO2 data must be acquired before the alert audio will sound or the alert bar will flash to indicate any alert conditions that may exist. Manually Setting Alert Limits Once the monitor has completed its power up sequence and is operating normally, the alert limit values can be changed. The Model 515B/C will not allow a parameter’s upper and lower alert limits to be set to within 5 digits of each other. For example; High Pulse Rate alert limit is at 50, low Pulse Rate alert limit at 40. If the high Pulse Rate limit is lowered to 44, the Pulse Rate low limit will change from 40 to 39 in order to maintain the 5 digit difference between limits. Care should be exercised to ensure that clinically reasonable alert limit settings are selected. Novametrix does not recommend the setting of limit values to such a wide span as to effectively render the alert limit feature useless. Once the limit values are properly set, the user should periodically confirm patient status by alternate means and not rely solely on alerts generated from violated limits. To set the SpO2 alert limits: 1. Press the key once for setting the upper alert limit. To advance to setting the lower alert limit without adjusting the upper limit proceed to step 4. 2. The SpO2 display will show the currently set upper alert limit. The in the SpO2 display area will illuminate red indicating that the upper alert limit can be adjusted. The SpO2 upper alert limit can be adjusted from 100-55. 3. Press the key to increase the alert limit, or to decrease the alert limit. 4. Press the key again for setting the lower alert limit. The in the SpO2 display area will illuminate red indicating that the lower alert limit can be adjusted. The SpO2 low alert limit can be adjusted from 95-50. 5. Press the key to increase the alert limit, or to decrease the alert limit. 6. Press the key again to exit the alert limits mode, or the monitor will automatically return to normal display mode after ten seconds. 16 Model 515B/C User’s Manual Rev. 02 Monitor Operation Alert Limits 5 To set the Pulse Rate alert limits: 1. Press the key once for setting the upper alert limit. To advance to setting the lower alert limit without adjusting the upper limit, proceed to step 4. 2. The pulse rate display will show the currently set upper alert limit. 3. Press the key to increase the alert limit, or to decrease the alert limit. The in the pulse rate display area will illuminate red indicating that the upper alert limit can be adjusted. The Pulse Rate upper alert limit can be adjusted from 250-35. 4. Press the key again for setting the lower alert limit. The in the pulse rate display area will illuminate red indicating that the lower alert limit can be adjusted. The Pulse rate lower alert limit can be adjusted from 245-30. 5. Press the key to increase the alert limit, or to decrease the alert limit. 6. Press the key again to exit the alert limits mode, or the monitor will automatically return to normal display mode after ten seconds. Auto Alert Limits The auto alert limits can be set as soon as valid patient data is displayed. To set SpO2 auto alert limits: 1. Press and hold the key for three seconds, the monitor will beep twice. The monitor will set the upper SpO2 alert limit to 5 more than the value displayed when the key was pressed (maximum setting of 100). The lower SpO2 alert limit will be set to 5 less than the displayed value when the key was pressed (minimum setting of 50). For example; if the SpO2 = 98% and the auto limits are set, the system will set the upper alert limit to 100 (98+5=103, but maximum limit of 100), and the lower limit to 93 (98-5=93). 2. The SpO2 display shows the new upper alert limit for three seconds, then the new lower alert limit for three seconds. The monitor will then return to normal operation. To set the Pulse Rate auto alert limits: 1. Press and hold the key for three seconds, the monitor will beep twice. The pulse rate high limit will be set 25% more than, and the low limit 25% less than, the pulse rate value displayed when the key was pressed. The maximum value that can be set is 249, and the minimum is 30. For example; if the pulse rate was 72 when the key is pressed, the system will set the upper pulse rate limit to 90 (72+25%=90) and the lower alert to 54 (72-25%=54). 2. The Pulse Rate display shows the new upper alert limit for three seconds, then the lower alert limit for three seconds. The monitor will then return to normal operation. Rev. 02 Model 515B/C User’s Manual 17 5 Monitor Operation Audible Alert Muting Audible Alert Muting The Model 515B/C will sound an audible alert when any type of alarm condition is detected. This audible alert can be muted for a two minute duration, or disabled for the monitoring session. The volume level of the audible alert tone can also be adjusted by use of the front panel arrow keys. When the audible alert is disabled, there will be no sample tones when adjusting the alert volume or pulse beep volume. See “Alert Volume Control” on page 18 and “Pulse Beep Volume Control” on page 19. NOTE: Alarm tone for low battery cannot be silenced. To silence this alarm, connect the monitor to AC power and set the rear panel power switch ON (|). Check that the icon on the front panel is green. To mute the audible alert for two minutes: 1. Press the 2. The key. icon flashes yellow and any audible alerts sounding are muted. To cancel two minute mute: 1. Press the 2. The key. icon is off (any alerts that are active will sound an alarm tone). To disable alert audio: 1. Press and hold the seconds). key until the icon illuminates (approximately three To enable alert volume: 1. Press the key, and the icon will turn off. Alert Volume Control The volume level of the monitor’s audible alert is user adjustable (from level one through level seven). The alert volume feature cannot be used to eliminate audible alerts because the alert is still audible at its lowest setting. To silence audible alerts, use the key to select the two minute mute or press and hold for audio disable. See “Audible Alert Muting” above for more information. To adjust the alert volume: 1. Press the key to display the current alert volume level. The SpO2 window will display “ALr” (for alert), and the pulse window will display the alert volume level that is currently selected. 2. Press or level. to increase or to decrease the alert volume level. Each time the key is pressed, a short sample tone will sound at the new volume The sample tones will not occur if the audible alert is disabled ( 18 Model 515B/C User’s Manual illuminated). Rev. 02 Monitor Operation Pulse Beep Volume Control 5 3. The Model 515B/C will return to normal display mode ten seconds after the last or key press, or sooner by pressing the or keys. The new value will remain in effect even after the monitor is turned off. This parameter is stored in battery backed memory and will be reset to its default value if the monitor is reset to factory defaults, see “Resetting to Factory Defaults” on page 20. NOTE: If the and keys are pressed while the monitor is sounding an alert, they will only set the alert volume (pulse volume and contrast cannot be adjusted when the monitor is alerting). Pulse Beep Volume Control The Model 515B/C is equipped with an audible pulse beep feature that allows the user to “hear” changes in the patient’s SpO2 and pulse rate. An audible “beep” occurs with each detected pulse beat. The time between beeps indicates the pulse rate. The pitch of the beep varies with the SpO2 value. While SpO2 is greater than or equal to three digits below the SpO2 high alert limit setting, the highest pitch tone sounds. The beep’s pitch decreases with each one digit drop in SpO2 below that level. If the SpO2 value drops more than 28 percent below the SpO2 high alert limit setting, the beep remains at the lowest pitched level. To adjust the pulse beep volume: 1. Press the key to display the current pulse volume level. The SpO2 window will display “PUL” (for pulse), and the pulse window will display the pulse volume level that is currently selected. 2. Press to increase or to decrease the pulse volume level. Each time the or key is pressed, a short sample tone will sound at the current volume level. The sample tones will not occur if the audible alert is disabled ( illuminated). 3. The Model 515B/C will return to normal display mode ten seconds after the last or key press, or sooner by pressing the or keys. The new value will remain in effect even after the monitor is turned off. This parameter is stored in battery backed memory and will be reset to its default value if the monitor is reset to factory defaults, see “Resetting to Factory Defaults” on page 20. NOTE: If the and keys are pressed while the monitor is sounding an alert, they will only set the alert volume (pulse volume and contrast cannot be adjusted when the monitor is alerting). Contrast Control Contrast adjustment for the graphics display on Model 515C monitors (not available on Model 515B) can be adjusted to the user’s needs. The contrast varies the difference in intensity between the background and graphics in the graphics display window. This allows controlling the clarity of the display in different lighting and temperature conditions. To adjust the contrast level: 1. Press and hold the key for three seconds. The SpO2 window will display “Con” (for contrast) while the monitor is in the contrast adjust mode. Rev. 02 Model 515B/C User’s Manual 19 5 Monitor Operation Resetting to Factory Defaults 2. Press to increase or to decrease the contrast level. View the display with each depression to check if the contrast level is desirable. 3. The Model 515C will return to normal display mode ten seconds after the last or key press, or sooner by pressing the or keys. The new setting will remain in effect even after the monitor is turned off. This parameter is stored in battery backed memory and will be reset to its default value if the monitor is reset to factory defaults, see “Resetting to Factory Defaults” on page 20. Resetting to Factory Defaults The monitor is set to the default values when shipped from the factory. Any changes made to these values are retained even after the unit is shut off. If desired, the monitor can be reset to the default values when power is applied (see below). NOTE: If the battery backed memory is lost (battery disconnected) then the monitor will automatically reset to the factory defaults when power is applied. The default values are: Parameter Default Value High SpO2 Alert Limit: 100 Low SpO2 Alert Limit: 85 High Pulse Rate Alert Limit: 150 Low Pulse Rate Alert Limit: 40 Alert Volume: 3 Pulse Volume: 0 (off) To reset the monitor to the default values: 1. With the monitor off, press and hold the key while momentarily pressing the key to turn the monitor on. Release the key when “515” is displayed in the pulse rate display. • An audible series of beeps will be produced. • The monitor will perform a self test, the revision level will appear in the saturation display, the model number “515” will appear in the pulse rate display, and a beep will coincide with a flash of the alert bar. • The audible series of beeps will occur a second time. All displays and LEDs will briefly illuminate. The revision level will appear in the saturation display, the model number “515” will appear in the pulse rate display. This second occurrence of the power up routine indicates that the monitor is reset to the factory defaults. • The monitor will enter normal operating mode. With the sensor disconnected, or connected but not applied to a patient, the SpO2 and pulse rate windows will display “- - -.” 2. The monitor will be reset to the factory defaults. 20 Model 515B/C User’s Manual Rev. 02 6 SpO2 Sensors This section explains how to select an SpO2 sensor, how to connect the sensor to the monitor, and how to apply the sensor to the patient. CAUTION: Connect only Novametrix saturation sensor extension cables and/or SuperBright™ SpO2 sensors to the Model 515B/C Do not use other SpO2 sensors or accessories with Model 515B/C. Before connecting to the patient or to the monitor, ensure that sensor extension cables and/or sensors are physically intact, with no broken, frayed or damaged components. To attach a SuperBright sensor or sensor extension cable to Model 515B/C: 1. Plug the connector into the front panel SpO2 sensor input. SuperBright™ SERIES CONNECTOR The connector clicks into place when properly seated. Do not twist the connector. Sensors may be connected or removed whether or not the monitor is turned on. 2. To disconnect, press the latch release lever then pull the connector from the monitor. PRESS DOWN ON LATCH RELEASE THEN PULL OUT Do not twist the connector. Rev. 02 Model 515B/C User’s Manual 21 6 SpO2 Sensors OxySnap™ Connectors OxySnap™ Connectors To connect an OxySnap extension cable to an OxySnap SuperBright sensor: 1. Align the arrows on the OxySnap connectors and press the connectors together. FINGER GRIPS OxySnap CONNECTOR 2. To disconnect, grasp the connectors at the finger grips and pull them apart. Finger Sensor The reusable Finger Sensor is intended for adult or appropriate size pediatric fingers and is not designed for neonatal applications. FINGER SENSOR OxySnap EXTENSION CABLE 22 Model 515B/C User’s Manual Rev. 02 SpO2 Sensors Finger Sensor Quick Check 6 To apply the finger sensor to the patient: 1. Gently squeeze the grips at the rear of the sensor (indicated by arrows below). PLACEMENT GUIDE CABLE EXITS ABOVE FINGER 2. Position fingertip against placement guide with fingernail towards the red light. Do not position the finger so as to protrude past the placement guide. 3. Release the finger grips. WARNING: Inspect the site often for adequate circulation—at least once every four hours. When applying sensors take note of patient’s physiological condition. For example, burn patients may exhibit more sensitivity to heat and pressure and therefore additional consideration such as more frequent site checks may be appropriate. 4. To remove sensor, gently squeeze grips and slide the sensor from the finger. CAUTION: Overstretching the pulse oximeter finger sensor can damage the sensor and potentially affect pulse oximeter readings. Do not stretch the finger sensor open beyond the limit for which it was designed. Overstretching can be prevented: avoid opening the sensor by any means other than squeezing the grips; DO NOT force the sensor onto large objects such as a bedrail. Finger Sensor Quick Check 1. Is the flashing when the sensor is connected to the monitor but not applied to the patient? 2. Apply the sensor to your index finger. Are reasonable SpO2 and pulse rate values displayed? 3. A YES to BOTH #1 and #2 indicates that the sensor is OK. Apply the sensor to the patient as instructed above. The quick check also tests the functionality of the extension cable. Rev. 02 Model 515B/C User’s Manual 23 6 SpO2 Sensors Y-Sensor Y-Sensor The reusable Y-Sensor is a flexible sensor designed for use on any patient. Y-SENSOR OxySnap EXTENSION CABLE The Y-Sensor’s Center Strip is not a functional part of the sensor. Its twofold purpose is to aid in the placement of the sensor into the Y-Strip or other securing system and to limit the distance between the sensor heads to no more than 25 mm. The center strip may be removed (carefully cut away) if the distance between the sensor heads needs to be reduced to less than 25 mm. SENSOR HEADS CENTER STRIP STRIP MAY BE REMOVED 24 Model 515B/C User’s Manual Rev. 02 SpO2 Sensors Y-Sensor Application using Y-Strip Tapes, or Foam Wrap 6 Y-Sensor Application using Y-Strip Tapes, or Foam Wrap 1. Select a Y-Strip or foam wrap based on the patient type and intended sensor location. Y-Strips come in two color coded sizes: 25 mm tapes have green liners, and 20 mm tapes have blue liners. The size refers to the distance between the holes in the tape Wrap Style Tape Cat. No. 8829 Cat. No. 8828 25 mm (Green) 20 mm (Blue) Neonatal Foot, Hand Neonatal Foot, Hand Pediatric Toe, Finger Finger Style Tape Cat. No. 8832 Cat. No. 8831 25 mm (Green) 20 mm (Blue) Adult Finger Pediatric Finger Adult Finger 2. Remove the portion of the release liner containing the holes. REMOVE RELEASE LINERS WITH HOLES WRAP STYLE TAPE FINGER STYLE TAPE 3. Skip this step if using the 25 mm Y-Strip tape or foam wrap. If using the 20 mm Y-Strip tape, carefully remove the Y-Sensor’s center strip using a pair of scissors or a sharp blade. STRIP REMOVED The center strip does not effect sensor operation, its purpose is to aid putting the sensor into the 25 mm tape and to limit the distance between the sensor heads to no greater than 25 mm. 4. Press the “button”, on the back of each sensor head, through a hole in the tape or foam wrap. Rev. 02 Model 515B/C User’s Manual 25 6 SpO2 Sensors Y-Sensor Application using Y-Strip Tapes, or Foam Wrap Press in from the sticky side of the tape. The tape will stretch to fit the sensor button. Y-SENSOR PLACED ON Y-STRIP TAPE LINER THIS SIDE (TOP) HEAD BUTTON Y-STRIP TAPE CROSS SECTION Y-SENSOR PLACED ON FOAM WRAP BLUE SIDE FACING UP 5. Remove the remaining release liner(s) and apply the sensor/tape to the patient. Ensure that the sensor heads are directly opposite each other through the tissue. This prevents the sensor from being placed on a site too thick (high arch) for proper operation. Position the sensor so that the tape does not extend over the space between the fingers or toes to insure that there will be no light transmission through this space. 6. To maximize sensor life, secure the cable along the limb with tape as shown in the illustrations. 26 Model 515B/C User’s Manual Rev. 02 SpO2 Sensors Y-Sensor Application using Ear Clip 6 Leave slack in the wires between the tape and the sensor. ADULT/PEDIATRIC FINGER NEONATAL/PEDIATRIC FOOT NEONATAL HAND PEDIATRIC TOE WARNING: Do not wrap the tape around the limb so tightly that circulation is restricted. Inspect the site often for adequate circulation—at least once every four hours. When applying sensors take note of patient’s physiological condition. For example, burn patients may exhibit more sensitivity to heat and pressure and therefore additional consideration such as more frequent site checks may be appropriate. Y-Sensor Application using Ear Clip 1. Remove center strip from the Y-Sensor. SENSOR HEADS CENTER STRIP (REMOVE) STRIP REMOVED Rev. 02 Model 515B/C User’s Manual 27 6 SpO2 Sensors Y-Sensor Application using Ear Clip 2. Slide each Y-Sensor head into the ear clip‘s receptacles, the heads should face each other. SENSOR HEAD EAR CLIP RECEPTACLE SQUEEZE HERE TO APPLY 3. Gently squeeze the end of the ear clip (shown in diagram), and apply the sensor to the patient. If a satisfactory reading cannot be obtained, rub the site and/or use adhesive dots for better response. The adhesive dots (PN: 8700-00) included with the ear clips will also help in preventing the ear clip from falling off (e.g. during exercising). ADULT EAR OPTIONAL PLACEMENTS WARNING: Inspect the site often for adequate circulation—at least once every four hours. When applying sensors take note of patient’s physiological condition. For example, burn patients may exhibit more sensitivity to heat and pressure and therefore additional consideration such as more frequent site checks may be appropriate. 28 Model 515B/C User’s Manual Rev. 02 SpO2 Sensors Y-Sensor Quick Check 6 Y-Sensor Quick Check 1. With the Y-Sensor connected to monitor but not applied to patient, position the sensor heads so that they face each other (the red light shines at the detector). Is the on the front panel flashing? 2. Tape the Y-Sensor to your index finger. Does the monitor show reasonable SpO2 and pulse rate values? 3. A YES to BOTH #1 and #2 indicates that the sensor is OK. Apply the sensor to the patient as instructed above. The quick check also tests the functionality of the extension cable. Single Patient Use SpO2 Sensors The Single Patient Use SpO2 sensors (Catalog Nos. 6480 and 6455) can be used when monitoring adult, pediatric or neonatal patients with Novametrix Pulse Oximeters (SuperBright series). These sensors are used with the DB-9 extension cable. PEDIATRIC/ADULT SENSOR NEONATAL/PEDIATRIC SENSOR WARNING: Use the Single Patient Use sensor and DB9 extension cable only with Novametrix SuperBright compatible pulse oximeters. Use with any other device may result in equipment damage or patient injury. CAUTION: These SpO2 sensors are intended for single patient use. The sensors can be reapplied to various sites on the same patient but should not be used on multiple patients. Do not attempt to clean or disinfect the sensor, as system performance will be compromised. NOTE: The Single Patient Use sensor should be discarded if sensor integrity becomes questionable. Rev. 02 Model 515B/C User’s Manual 29 6 SpO2 Sensors Single Patient Use SpO2 Sensor Application Single Patient Use SpO2 Sensor Application 1. Connect the DB-9 extension cable to the Model 515B/C front panel connector. SuperBright™ SERIES CONNECTOR 2. Press the black connector on the end of the extension cable into the black connector on the end of the Single Patient Use sensor. DB-9 CONNECTOR ON EXTENSION CABLE SENSOR CONNECTOR 3. To disconnect the DB-9 extension cable from the sensor, grasp the connectors and pull them apart. To disconnect the DB-9 connector from the Model 515B/C, press the latch 30 Model 515B/C User’s Manual Rev. 02 SpO2 Sensors Single Patient Use SpO2 Sensor Application 6 release lever on the extension cable connector and pull the connector straight back away from the monitor. DO NOT twist the connector. PRESS DOWN ON LATCH RELEASE THEN PULL OUT 4. Select the appropriate size sensor based on the patient type. PEDIATRIC/ADULT SENSOR ADULT TOE ADULT FINGER NEONATAL/PEDIATRIC SENSOR NEONATAL HAND NEONATAL FOOT PEDIATRIC TOE 5. To apply the sensor, place the blue side of the sensor wrap against the skin, wrap it around the site and secure with Velcro ® tab. The Velcro tab on the Rev. 02 Model 515B/C User’s Manual 31 6 SpO2 Sensors Single Patient Use SpO2 Sensor Quick Check neonatal/pediatric version is removable to allow the foam wrap to be cut before applying to the patient. NEONATAL/PEDIATRIC SENSOR CUT EXCESS OFF VELCRO TAB Ensure that the sensor heads are positioned directly opposite each other through the tissue. The adhesive dots (Catalog No. 8700) which are included with each sensor can be applied to the sensor before patient application for additional adhesion to the site. 6. For additional support, secure the cable along the limb with tape. WARNING: Do not wrap the sensor around the limb so tightly that circulation is restricted. Inspect the site often, at least every four hours, for adequate circulation. When applying sensors take note of patient’s physiological condition. For example, burn patients may exhibit more sensitivity to heat and pressure and therefore additional consideration such as more frequent site checks may be appropriate. Single Patient Use SpO2 Sensor Quick Check 1. With the sensor connected to monitor but not applied to patient, position the sensor heads so that they face each other (the red light shines at the detector). Is the on the front panel flashing? 2. Tape the Y-Sensor to your index finger. Does the monitor show reasonable SpO2 and pulse rate values? 3. A YES to BOTH #1 and #2 indicates that the sensor is OK. Apply the sensor to the patient as instructed above. This quick check also test the functionality of the extension cable. 32 Model 515B/C User’s Manual Rev. 02 7 Troubleshooting Certain conditions may evoke special messages in the saturation and pulse rate displays. These displays and the conditions are listed below. Note that “Err” stands for error, but does not necessarily indicate a malfunction. Also, error conditions one and two are internal only, and are not displayed. Low signal strength. Pulse strength as detected by the sensor is too small for proper monitor operation. This message will disappear once the problem is corrected. Insufficient light. Sensor is placed on a site too thick (or opaque) for adequate light transmission. This message will disappear once the problem is corrected. Pulse out of range. Pulse must be within 30 -250 beats per minute inclusive. This message will disappear once the problem is corrected. Rev. 02 Model 515B/C User’s Manual 33 7 Troubleshooting Light interference. Ambient light source (sunlight, warming lights, etc.) are interfering with sensor operation. Shield sensor from these light sources. This message will disappear once the problem is corrected. Sensor fault. Remove sensor from use and contact qualified service personnel. Monitor fault. Record the error number that appears in the pulse rate display (XX will vary, depending upon the fault). Remove the monitor from use and contact qualified service personnel (report the number that appears in the pulse rate display). Bad Signal. Monitor not receiving valid signals from sensor. May be caused by excessive motion, cardiac arrhythmia or other situations leading to poor signal. Check patient status, reposition sensor. This message will disappear once the problem is corrected. 34 Model 515B/C User’s Manual Rev. 02 8 Maintenance This section contains the Model 515B/C monitor and accessory maintenance information. Cleaning and Sterilization Follow the cleaning and sterilization instructions listed below to clean and/or sterilize the monitor and its accessories. Monitor • • • • Turn the monitor off and unplug the line cord from the AC mains before cleaning. Clean the monitor surface with a damp cloth. Do not immerse the monitor. Do not attempt to sterilize the monitor. Finger Sensor • Clean the Finger Sensor surface with a cloth dampened with an isopropyl alcohol 70% solution or bleach 10% solution or with the cold liquid sterilants Cidex™, or Sporicidin™. After cleaning wipe the sensor down thoroughly with a clean water dampened cloth to rinse. • Ensure that the finger sensor windows are clean and dry before reuse. • Do not immerse the finger sensor. • Do not attempt to sterilize the finger sensor. • After cleaning the Finger Sensor, verify the sensor is physically intact, with no broken/ frayed wires or damaged parts. Ensure the connectors are clean and dry, with no signs of contamination or corrosion. Do not use a broken or damaged sensor or one with wet, contaminated or corroded connectors. • Perform a “Quick Check” to verify the integrity of the sensor. See “Finger Sensor Quick Check” on page 23. Y-Sensor • The Y-Sensor may be immersed—up to, but not including, the connector, in a glutheralhyde solution, 10% bleach solution or Sporicidin™. Refer to manufacturer’s instructions and standard hospital protocols to determine recommended times for disinfection/sterilization. • Rinse thoroughly with water and dry before use (do not rinse the connector). • Do not attempt to sterilize Y-Sensor except as stated above. • Do not immerse connector on the Y-Sensor. • After cleaning/sterilizing the Y-Sensor, verify the sensor is physically intact, with no broken/frayed wires or damaged parts. Ensure the connectors are clean and dry, with no signs of contamination or corrosion. Do not use a broken or damaged sensor or one with wet, contaminated, or corroded connectors. Rev. 02 Model 515B/C User’s Manual 35 8 Maintenance Battery Maintenance • Perform a “Quick Check” to verify the integrity of the sensor. See “Y-Sensor Quick Check” on page 29. Y-Strip Tapes and Single Patient Use SpO2 Sensors • Treat Y-Strip tapes and Single Patient Use sensors in accordance with hospital protocol for single-patient use items. Ear Clip • Clean the ear clip with a cloth dampened with 70% isopropyl alcohol. After cleaning wipe the ear clip down thoroughly with a clean water dampened cloth to rinse. • Do not immerse the ear clip Battery Maintenance If the monitor has not been used or powered by AC mains for an extended time1 (3 months or more) allow the battery to charge for 12 hours before use. The monitor may not power up on battery power if the battery is not sufficiently charged. To charge the battery, connect the AC mains and set the rear panel power switch ON (|). Check that the front panel icon is green. Allow the battery to charge for 12 hours to ensure a fully charged battery in the event that battery power is required. The AC power line cord shipped with monitors for North America is a Hospital Grade, SJT style cord with a 120 VAC plug. All power line cords shipped with monitors for Europe are the European style with a 220-240 VAC plug. All other style power line cords, as required by the country of destination, are provided by the distributor of that country. 1. The internal battery may slowly discharge over long periods of non use. 36 Model 515B/C User’s Manual Rev. 02 8 Maintenance Mains Voltage Configuration Mains Voltage Configuration The rear panel power entry module indicates the mains voltage setting for the monitor. Check that the voltage is correct before attaching the line cord and powering the monitor. The Model 515B/C can be set to operate from 100-120 VAC 50/60Hz or 200-240VAC 50/60Hz. Refer to the following sections for fuse replacement and changing the mains voltage setting. Fuse Replacement ! CAUTION: Replace fuses with same type and rating. Verify proper fuse value for mains voltage setting (see table below). Mains Voltage Fuses (Slo Blo) 100-120 VAC 0.5 A 250V 200-240 VAC 250mA 250V 1. Check that the monitor is OFF. 2. Set the rear panel power entry module switch to OFF (“O”). Remove the line cord from the power entry module (if connected). 3. Using a flat blade screwdriver, pry the fuse access door open to expose the fuse housing. Note the orientation of the fuse housing (this determines the mains operating voltage). POWER ENTRY MODULE FUSE HOUSING FUSE ACCESS DOOR Rev. 02 Model 515B/C User’s Manual 37 8 Maintenance Mains Voltage Configuration 4. Pry the fuse housing out from the power entry module. FUSE HOUSING NOTE: 5mm X 20mm fuses are installed toward the “back” of the fuse housing as shown OR 3AG TYPE 5 X 20mm TYPE 5. Replace the blown fuse(s) with the proper type and rating. 6. Re-install the fuse housing. When positioning the housing into the power entry module ensure that it is oriented correctly. Press the fuse housing back into the power entry module. 7. Close the fuse access door and verify the proper mains operating voltage is displayed. MAINS OPERATING VOLTAGE 115V Changing the Mains Voltage Setting ! CAUTION: Replace fuses with same type and rating. Verify proper fuse value for mains voltage setting (see table below). Mains Voltage Fuses (Slo Blo) 100-120 VAC 0.5 A 250V 200-240 VAC 250mA 250V 1. Check that the monitor is OFF. 2. Set the rear panel power entry module switch to OFF (“O”). Remove the line cord from the power entry module (if connected). 38 Model 515B/C User’s Manual Rev. 02 8 Maintenance Mains Voltage Configuration 3. Using a flat blade screwdriver, pry the fuse access door open to expose the fuse housing. Pry the fuse housing out from the power entry module. FUSE HOUSING FUSE ACCESS DOOR 4. Install the proper type and rating fuse for the mains voltage setting required. 5. Position the housing into the power entry module so that the desired voltage is furthest away from the switch (see below). SET FOR 100-120V OPERATION SET FOR 200-240V OPERATION 6. Close the fuse access door and verify the proper mains operating voltage is displayed. 115V Rev. 02 230V MAINS OPERATING VOLTAGE Model 515B/C User’s Manual 39 8 Maintenance Mains Voltage Configuration [This page intentionally blank.] 40 Model 515B/C User’s Manual Rev. 02 9 Specifications Below are specifications for the Novametrix Model 515B/C Pulse Oximeter. These specifications are listed for informational purposes only, and are subject to change without notice. Pulse Oximeter Principle of Operation • Red/Infrared absorbtion SpO2 (Oxygen Saturation) • Range: 0-100% • Accuracy: (for 1 standard deviation or 68% of sample distribution) ± 2% SpO2 (for 80-100% SpO2) unspecified for 0-79% • Display Resolution: 1% • Averaging: 8 seconds • Audio: Pitch of pulse tone varies with SpO2 value Pulse Rate • • • • Range: 30-250 beats per minute (bpm) Accuracy: (1 standard deviation), ± 1% of full scale Display Resolution, 1 bpm Averaging time: 8 seconds Sensors • Reusable Y-Sensor™ (can be sterilized and used with all patient populations) and reusable adult finger sensor • Neonatal/Pediatric and Pediatric/Adult Single Patient Use SpO2 Sensors Plethysmogram (Model 515C only) • Pulsatile waveform General Specifications Alerts • Limits: Automatic and adjustable limits for SpO2 and Pulse Rate, values are retained in memory when the monitor is turned off, or can be reset to factory defaults when the monitor is turned on Rev. 02 Model 515B/C User’s Manual 41 9 Specifications General Specifications • Audio: Adjustable volume, 2 min. silence or OFF (LED indicators) • Visual: Flashing numerics upon violated limit(s) & red “Alert Bar” with limit (high or low) violation indicator • Messages: Sensor disconnected, sensor off patient, low signal, insufficient light, high ambient light, pulse out of range, sensor faulty, monitor faulty. Display • Numerics: 7-Segment LED’s • Plethysmogram (Model 515C): Liquid crystal graphic module, 2.4”W X 1.3”H Physical • Operating Environment: 10-40 °C (50-104° F) 0-90% relative humidity (non-condensing) • Weight: approximately 6 lbs. (2.72 kg) • Dimensions: Height, 3.3 inches (8.38 cm) Width, 9 inches (22.86 cm) Depth, 8 inches (20.32 cm) Electrical • Power: 100-120/220-240 VAC ± 10%, 50-60 Hz, 30VA • Fuse Rating: U.S. specification: 0.5 A, 250 V, Slo-Blo (x2) European specification: T 250 mA/250 V (x2) • Battery: Sealed lead acid gel cell, 8 hr. life, 12 hr. recharge. Indicators for battery charging, battery operation, low battery, and extremely low battery. 42 Model 515B/C User’s Manual Rev. 02 10 Accessories Model 515B/C Catalog No. Description 6500-00 Model 515B Pulse Oximeter 6550-00 Model 515C Pulse Oximeter with graphic display PULSE OXIMETER SpO2 SENSORS and CABLES 8793 OxySnap Y-Sensor (use with OxySnap extension cable) 8744 OxySnap Finger Sensor (use with OxySnap extension cable) 8853 OxySnap Extension Cable, 8ft. (use with OxySnap sensors) 8898 OxySnap Long Extension Cable, 12 ft. (use with OxySnap sensors) 8894-00 OxySnap Connector Strap (25 per box) 4941 Saturation Sensor Extension Cable, 4 feet (use with non-OxySnap sensors) 4942 Saturation Sensor Extension Cable, 6 feet (use with non-OxySnap sensors) 4943 Saturation Sensor Extension Cable, 10 feet (use with non-OxySnap sensors) 5266 Saturation Sensor Extension Cable, 25 feet (use with non-OxySnap sensors) 8776 SuperBright™ Finger Sensor (10 ft sensor cable) 8791 SuperBright™ Y-Sensor (10 ft sensor cable) 8789 Special use SuperBright™ Finger Sensor (8 inch sensor cable) 5238 Special Use SuperBright™ Finger Sensor & 25 ft. shielded cable Single Patient Use SpO2 Sensors Rev. 02 6455 Pediatric/Adult Single Patient Use SpO2 Sensor 6480 Neonatal/Pediatric Single Patient Use SpO2 Sensor 8933 DB-9 Extension Cable (use with Single Patient Use SpO2 sensors only) 8936 DB-9 to OxySnap Connector Cable (use with Single Patient Use SpO2 sensors only) Model 515B/C User’s Manual 43 10 Accessories Catalog No. Description OxySnap SENSOR MANAGEMENT PLANS Select an OxySnap Finger Sensor or Y-Sensor Management Plan for each SuperBright™ Pulse Oximeter. The plan you select determines the warranty period - 12, 24 or 36 months. How the plans work: Included in each plan are TWO sensors - one for immediate use, the other one for backup. If a sensor becomes inoperative, place the backup sensor into use and return the inoperative sensor in the convenient prepaid mailer. A replacement sensor will be shipped within two business days of receipt of the inoperative sensor. This simple return/replacement method will be used for the entire warranty period, thereby guaranteeing your costs and virtually eliminating sensor tracking hassles. Warranty: The plan warranty (not individual sensors) is 12, 24 or 36 months. Replacement sensors provided under terms of the plan shall carry the remaining plan warranty - replacements do not extend the warranty. 8793-12 Y-12 Plan: The plan warranty is 12 months. Includes 3 boxes of any Y-Strip Taping Systems 8793-24 Y-24 Plan: The plan warranty is 24 months. Includes 6 boxes of any Y-Strip Taping Systems 8793-36 Y-36 Plan: The plan warranty is 36 months. Includes 9 boxes of any Y-Strip Taping Systems 8744-12 Finger-12 Plan: The plan warranty is 12 months. 8744-24 Finger-24 Plan: The plan warranty is 24 months. 8744-36 Finger-36 Plan: The plan warranty is 36 months. Y-SENSOR APPLICATORS (tapes, wraps, earclip) 8828 20mm Wrap Style Y-Strip Taping System (100 per box) Use on neonatal foot and hand, or on pediatric toe or finger, color coded blue. 8829 25mm Wrap Style Y-Strip Taping System (100 per box) Use on neonatal foot and hand, color coded green 8831 20mm Finger Style Y-Strip Taping System (100 per box) Use on pediatric finger or on small adult finger, color coded blue 8832 25mm Finger Style Y-Strip Taping System (100 per box) Use on adult finger, color coded green 8836 Non-Adhesive Foam Wraps (25 per box) 6131-50 Ear Clip (Pkg of 5) Includes 10 adhesive dots 6131-25 Ear Clip (Pkg of 25) Includes 50 adhesive dots 8700-00 Adhesive dots (Pkg of 200) For use with ear clip MOUNTING SYSTEMS 140030 Wall Mount 140031 Wall Mount (less wall channel) 140032 Pivot Block Mount 140033 Transport Mount (without swivel head) 44 Model 515B/C User’s Manual Rev. 02 Accessories Catalog No. Description 140034 Transport Mount (with swivel head) 140035 Countertop Mount (11 inch base) 140036 Countertop Mount (5 inch base) 140037 Portable Instrument Housing 140038 Rollstand 10 MISCELLANEOUS 7106-10 Transport Pouch (for monitor) 7104-10 Side Accessory Pouch 6318-00 Kickstand Kit for Model 515B or 515C monitors 600026 Power cord (included with monitor) REFERENCE CARDS 6342-32 English 6436-32 Spanish 6435-32 French 6365-32 German 280022 13” chain, used to attach reference card to the monitor EXTENDED WARRANTY (Normal warranty on monitor - 1 year) 6500-81 Model 515B warranty extended an additional 1 year 6500-82 Model 515B warranty extended an additional 2 years 6550-81 Model 515C warranty extended an additional 1 year 6550-82 Model 515C warranty extended an additional 2 years BIOMEDICAL SERVICE TRAINING & TEST KITS Rev. 02 5530-00 TB500B SpO2 Test Box 9999-96 “focus” Technical Training Seminars, Pulse Oximetry (1 day course) Model 515B/C User’s Manual 45 10 Accessories [This page intentionally blank.] 46 Model 515B/C User’s Manual Rev. 02