1
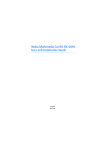
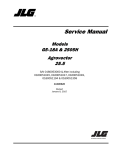
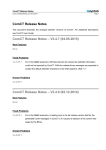
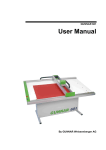
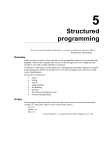
I I
MkII
INSTRUCTION MANUAL
A
M
A.
B.
C.
D.
E.
F.
G.
L
K
J
D
BUTT
SUPER-GLIDE BOLT
SAFETY
RIFLE SCOPE (not included)
BARREL SHROUD
MUZZLE
SILENCER (*not available in some countries)
C
B
H.
I.
J.
K.
L.
M.
MkII
I
E
H
F
FILLER VALVE ROTATING DUST COVER
FORE-END
ACTION BLOCK
TRIGGER GUARD
TRIGGER
STOCK
I I
*G
MkII
INSTRUCTION MANUAL
SERIAL No:...................................
FILL PRESSURE:..........................
CALIBRE:......................................
1
Contents
2
The Logun Standard
3
The Logun Legend Evolves
4
Section 1
The Golden Rules of Safe Shooting
5
Section 2
Getting Started
6
Section 3
Shooting to the Max
14
Section 4
Looking After Your Logun Rifle
18
Section 5
Adjusting the Trigger
20
Section 6
Removal of Barrel
22
Section 7
Do’s and Don’ts / Problems
23
Section 8
Service Record
24
The Logun Standard
A Logun rifle is built like no other airgun - because it’s built to The Logun
Standard. Whilst many modern air rifles offer fine accuracy, efficient
handling and a high standard of workmanship, none displays all of these
qualities with the effortless superiority of a Logun rifle.
Along with technical accomplishments unrivalled within the airgun industry
today, this rifle has class - it’s as simple as that. Each one is not just hand
built but individually crafted, with every component fine-tuned for peak
performance and total reliability.
Although the Logun Standard is uncompromising in its demand for
perfection, every rifle made to that Standard has an identity all of its own.
The unique degree of traditional craftsmanship invested in each Logun
rifle sets them apart from mere production-line units and that same
devotion to detail and customer requirement makes each Logun rifle as
individual as its owner. We believe that the individuality of a Logun rifle is
essential, after all, if you really wanted just another air rifle, there are
plenty from which to choose. By choosing a Logun, we know you want a
rifle that sets itself and its owner apart from the crowd - and that’s
precisely what the Logun Standard delivers.
Your Logun rifle will look, feel, handle and shoot like no other rifle ever
made. Only another Logun rifle will ever match its performance and
quality because, only Logun rifles are made to conform to - The Logun
Standard.
3
The Logun Legend Evolves
In 1998, the airgun world was taken by storm by the newly launched Logun rifle.
Evolving from a prototype designed and built by renowned airgun engineer Jim
Hogan in his Rotherham workshop, it became an air-powered sporting rifle
capable of incredible accuracy at ranges of 50 yards and beyond.
This unrivalled performance was delivered so consistently and so quietly that new
industry standards were established, standards that even today no other
manufacturer can match. The Logun rifle quickly became a best-seller with an
army of satisfied owners all proudly enjoying the benefits of this unique, high
quality rifle.
Logun’s mission statement is “Making the Best or Making the Best Better” and
with this philosophy in mind, the best has been made better with the development
of the Logun MkII. Every component of the original rifle was examined and
improved, elevating Logun to such a peak of precision, quality and performance
that the competition can only look on in envy.
Each component of the Logun MkII is finished and assembled by hand. These
components are then matched and calibrated along with their mating parts to
form an air rifle of unparalleled quality. Having assembled a precision instrument,
it must then be calibrated and tested. This process is one that many other
manufacturers pay little regard to but Logun spend time tuning, calibrating and
testing each rifle. Once it meets the exacting standards demanded of a Logun
product it will be forwarded for the final battery of quality control evaluations. Only
when it has passed every stringent quality test will Logun allow it to leave the
factory, thereby ensuring the rifle you have purchased is worthy of the Logun
name.
Now begins a sporting association between man and machine never before seen
in the airgun industry. Part of that association is formed here, as you study this
manual. By doing so, you will understand and appreciate the high level of
craftmanship and gun making expertise that has been invested in your rifle. You
will appreciate too the need to play your part in the process of sporting excellence
only a Logun can provide.
By choosing a Logun MkII, you have declared your intention to be the best. Now,
make the most positive move possible to further that intention by studying this
manual and putting into practice the lessons it teaches. Your Logun rifle has been
designed and built by the best in the business - now it’s your turn to give it your
best shot. We know what it takes to shoot to the best of your ability, to enjoy this
sport at the highest level and to gain from shooting a level of pleasure and
satisfaction never before experienced with a sporting rifle...this manual will help to
lead you to that level.
4
SECTION 1
THE GOLDEN RULES OF SAFE SHOOTING
What makes a great shooter? Is it the ability to hit distant targets with
machine-like precision? Is it the skill required to perform to the highest
level under any conditions nature can throw at you? Or is it that magical
talent that sets the sporting champion apart from those who merely
compete? Well, great shooters can be all of these things but first and
foremost, they are something far more important than any of these
things. Great shooters are safe. They shoot safely, wisely and are a
credit to themselves and their sport. Safe shooting is a far more vital
attribute than any other in this great sport of ours.
Study the golden rules of safe shooting presented below, learn them,
remember them and more than any skill you strive for, practice them
each and every time you shoot.
1) NEVER, ever point a gun at a human being. This applies every bit
as strongly, whether you think the gun is loaded or not. For the
purposes of range safety, ALL guns should be handled as though
loaded at ALL times.
2) NEVER, ever point a gun at anything that isn’t a safe,legitimate
target. Again, it is irrelevant whether or not the gun is loaded.
3) It is your responsibility to act safely at all times and to ensure
that others do the same. All shooters must act as range safety
officers - because range safety is EVERYONE’S responsibility.
4) Study the instructions supplied with your airgun BEFORE using
it. Learn to operate your airgun safely before attempting to shoot
with it. Don’t be in such a hurry to begin shooting that you ignore
the most important aspect of your sport - SAFETY!
5) Study and practice the rules of range safety, which are:
NEVER ever walk onto any shooting range unless you have made
certain that it is safe to do so.
5
BEFORE you begin shooting, always ensure that your shooting
range is secure and that people, animals and pets cannot stray into
your line of fire.
NEVER leave your airgun loaded or unattended, or store it in such a
way that unauthorised persons can use it.
ALWAYS ensure that every pellet you fire remains within the
boundaries of the land on which you have permission to shoot. This
is a legal, as well as a safety requirement.
NEVER, ever point a gun at any target, at any time and for any
reason unless you are 100% certain that it is safe to do so.
Remember - the above rules are the basics and many more of them
will be in force to cover different shooting situations. It is your
responsibility to learn and practice any and all safety rules that
pertain to your shooting and the legal restrictions on air rifle
shooting in your country.
IGNORANCE IS NO EXCUSE AND NEGLIGENCE IS INEXCUSABLE!
ALWAYS THINK SAFETY!
SECTION 2
GETTING STARTED
With such a high quality rifle at your disposal, you’re bound to want to get
out and start shooting right away. That’s understandable and you can bet
that every new owner was just as excited as you are now when they got
their first Logun rifle. That’s why helping you to experience the thrill of
shooting a Logun in the shortest time possible is what this section of the
manual is all about.
Study the following step-by-step instructions and you’ll be up and running
with your new Logun MkII in a matter of minutes. Once you’ve
familiarised yourself with the function of your new rifle (and you’ve calmed
down a bit, after discovering just how well these rifles shoot!), you can
then study the rest of this manual in detail, using the information it
contains to refine your new-found expertise even further. For now, read
the starter instructions, then go turn yourself on to what real shooting can
do for an airgunner.
6
QUICK-START INSTRUCTIONS
Please note: Your Logun MkII requires the fitting of a telescopic sight or
similar sighting device before use. Logun recommend Simmons, Weaver
and AGS scopes. Always ensure that the mounts used are sufficiently
high enough to lift the objective bell of the scope clear of the rifle’s barrel
and action block.
1) Inspect the contents of the padded gun case supplied with your Logun
MkII. Apart from the rifle and this manual, the gun case should also
contain a Logun silencer (not included in countries where silencers or
moderators are illegal, eg:USA), a quick-fit charging adaptor, a test target,
warranty card and chronograph reading showing the consistency readings
of the gun. If any of these items are missing or damaged in any way,
please contact your dealer or Logun on 01902 722 144.
7
2) Take the supplied probe charging connector and screw it securely to
the air hose of your charging equipment. Note: If you are using a stirrup
pump ensure that a filter is fitted to minimise the risk of foreign particles
and moisture entering the rifles receiver.
3) Rotate filler valve dust cover. Note: This cover is essential to prevent
the ingress of dust and grit.
The cover can be rotated clockwise or anti-clockwise to enable the
cover hole to align with the fill hole of the valve body.
8
4) Push the probe up to the shoulder - this will ensure correct filling.
5) Once the probe is securely fitted, your Logun MkII can be gradually
charged with compressed air to the pressure indicated in the front
inside cover of this manual. Over-charging will result in a loss of power
from the rifle and could damage the internal seals.
Full
Please Note: When full, the needle on the gauge can fall anywhere
within the marked sector shown above.
9
6) When charging is complete, ‘bleed’ the excess air from the hose only
and disconnect the probe from the rifle by pulling back.
7) Rotate the dust cover immediately. Never use or store your Logun
MkII without its filler valve dust cover closed. Dirt and grit can
contaminate the internal valve system of your rifle, so keep the dust
cover closed between fills at all times.
8) If supplied, screw on the Logun silencer. Do not use excessive force to
secure the silencer - a ‘finger tight grip is perfect. In countries where
silencers are illegal, such as US, a silencer is not supplied and must
never be used.
10
9) Before attempting to fill your Logun MkII’s magazine with pellets,
take the rifle to a safe shooting range.
Next, with the rifle un-cocked and the muzzle pointing safely at the
ground, draw back the spring loaded pellet probe and lock it fully back
into its retaining notch. NOTE: Your Logun MkII is set up to use any of
the Crosman Premier and ‘pell range of pellets eg: Accupell, Matchpell,
Verminpell and Powapell. FAC and export model MkII’s are supplied
with two extra slip gauges, Number 2 for Bisley Magnums and Number
3 for JSB sourced pellets such as Air Arms Field and Daystate Field.
Please use the appropriate slip gauge for the pellet selected. If you
wish to use an alternative pellet a custom slip gauge can be
produced - please contact your dealer for further details.
For details of how to change your slip gauge see page 22
11
Load the pellets, nose-first, into the magazine, before lifting the pellet
probe and allowing it to locate to the rear of the last pellet loaded.
IMPORTANT: DO NOT allow the pellet probe to travel freely under the
power of its activating spring inside the magazine either when the
magazine is full or empty. This can seriously damage the probe, pellets
or both, with a subsequent risk of malfunction.
Also Note: There is a Logun method for fast, efficient loading. Simply
cradle the gun in your left arm, pointing downwards and leaning slightly
backwards. The pellets will now drop into the magazine with ease. We
call this “The Logun Load!”
12
10) Your Logun MkII is now ready to use. After checking that it is safe to
shoot, simply lift the cocking/loading bolt, draw it back fully, return it to its
closed position and the rifle can now be fired.
WARNING: Do not cock your Logun twice
as this will cause a jam
Repeat the bolt-action sequence until all the pellets in the Logun MkII’s
magazine have been fired. Repeat steps 9 and 10 to carry on shooting.
NOTE: When the magazine is empty, the pellet pusher engages into the
pellet carriage locking it. Pulling back the pellet pusher and locking it
down releases the carriage, thus allowing the carriage to return back into
the block.
NOTE: Depending on the specification of your Logun MkII - Karbine,
Standard or FAC / Export (High Power) - it will need to be recharged with
air after the amount of shots shown in the table below. Do not shoot the
rifle completely empty of air as pellets can become jammed in the rifle’s
barrel if you shoot your Logun below the recommended shot capacity.
Should this, or any other problem occur with your Logun MkII, please
contact your dealer or call the Logun Service Centre on 01902 738070
Do not attempt repairs yourself - you may do more harm than good!
Once you have become familiar with the operation of your Logun MkII,
it’s time for you to move up to the next phase in your shooting
development
KARBINE (sub 12 ft lbs) - 70 SHOTS
STANDARD (sub 12 ft lbs- 120 SHOTS
FAC / Export (30ft lbs) - 30 SHOTS
13
SECTION 3
SHOOTING TO THE MAX
Your Logun MkII is capable of a standard of accuracy that can only be
exploited by shooters on the top of their form. Quite simply, unless you’re
shooting to the very best of your ability, you now own a gun that will
out-shoot you - and then some. Don’t be offended by this statement
because that’s how it should be. Ideally, your shooting gear should be so
good that you never have to worry about its performance, leaving you to
concentrate on matching the potential of your equipment. Now that you
have become familiar with the basic function of your Logun MkII, the next
stage in your shooting development concerns you, more than the rifle.
The first thing to take to heart is the meaning of a motto that Logun has
always been based on. That motto is: “Only the best is good enough”.
Every part of your Logun MkII has been built in accordance with that
simple statement and it’s up to you to maintain that philosophy right
through your shooting. By choosing a Logun rifle you’ve applied the motto
to your choice of gun, now do the same to everything else involved with
your shooting, from pellet choice, through your maintenance regime, all
the way to the final follow-through technique after the shot is on its way.
Most of all, that motto must become your mantra. It must forge your
attitude to shooting and you must accept that to compromise is to accept
second-best. You chose the best, to help you be the best you can.
PHASE 1. PELLET CHOICE
No matter how expensive a rifle may be, its ultimate effectiveness will
always rest on the head of a pellet that costs a few pence. It’s the pellet
that delivers everything else you’ve put into the shot and without quality
ammo, you can forget high quality results - and by ‘high quality’, we
always mean the best it’s possible to achieve.
14
Most of the top shooters use prepared pellets. They do so because
prepared pellets are more consistent in flight, less likely to jam a
multi-shot magazine and are better for the barrels in which they are used.
It’s easily possible to prepare a whole tin of 500 pellets in less time that it
takes to make a cup of tea, so, all things considered its an exercise well
worth doing.
PHASE 2. PELLET PREPARATION
1) Take a clean jar and half fill it with water, to which a squirt of washing
up liquid has been added. Tip a tinful of pellets into the jar, replace the lid
securely, then ‘swirl’ the pellets around for at least two minutes.
This washing motion will dislodge lead particles and the detergent in the
washing-up liquid will dissolve any grease or oil left on the pellets during
their manufacture. Check out the amount of lead ‘swarf’ you have
removed from your pellets by allowing the pellets to settle in a corner of
the jar. Those shiny flakes you see are tiny pieces of lead that could
otherwise become lodged in the rifling of your barrel.
Remember - Crosman pellets are made to the highest standard in the
industry and lower quality pellets will probably give up 3 to 5 times the
amount of lead swarf than a Crosman. This is one of the many reasons
why Crosman pellets are recommended for these rifles.
2) When the washing process is finished, pour the contents of the jar into
a soft, plastic cooking sieve - available very cheaply from any household
goods store - and flush the pellets thoroughly under running water until all
traces of lead swarf have been removed. Dispose of the swarf carefully
and try not to let any go down the plug hole.
3) With the pellets still in the sieve, use a hair dryer on it’s highest heat
setting to completely dry the pellets. Keep the hair dryer close to the
pellets, deliberately drying and heating the pellets evenly.
15
4) When the whole batch of ammo is dry and still warm, turn out the
sieve onto a large piece of lint-free cloth, into which a quantity of pellet
lubricant such as Logun PL9 has been rubbed.
5) ‘Roll’ the pellets around in the cloth (never apply oil directly to the
pellets or you may fill the skirts with oil and unbalance them) until they’ve
all received a ‘slick’ coating of Logun PL9 lubricant.
6) Your pellets are ready and may now be returned to the tin (clean it out
with a cloth first) - the whole process will have taken but a few minutes
and the results will more than reward your efforts.
IMPORTANT NOTES:
* Throughout the preparation process, look for any deformed or bent
pellets and discard them.
* Don’t use penetrating oil such as WD-40 to lubricate your pellets
because this can ‘creep’ into the internal mechanics of your rifle and
dissolve the high-performance greases used there.
* Always use a padded ammo pouch or tin, or try lining a Crosman pellet
tin with foam. This not only protects your pellets from deformation, it also
stops them rattling noisily too.
* Now that your pellets are lubricated, they will help to protect the barrel
of your rifle from rust.
* Lubricated pellets also ensure that your rifle’s multi-shot magazine
system retains the perfect amount of lubrication for smooth operation.
PHASE 3. CORRECT USE OF THE TRIGGER
When you use the trigger on your Logun MkII, you apply the final
technique to the shot. A poorly used trigger means a poorly placed shot,
so this part of your technique must match Logun’s motto of “Only The
Best Is Good Enough”, or everything that went before has been wasted.
The two-stage, fully adjustable trigger mechanism on your Logun MkII is
a triumph of mechanical engineering. Sensitive, secure and variable to
the needs of every shooter, your trigger will release every shot perfectly.
As ever, it’s up to you to match it’s performance.
16
Before any shooter can use a trigger properly, it needs to be set up to
match his or her preference. That’s no problem for Logun MkII owners.
Simply follow the instructions on page 20 of this manual. With the trigger
adjusted to your requirements, it’s time to practice using it correctly.
Before you do that,mentally replace the phrase “pulling the trigger”, with
the more appropriate phrase, “squeezing the trigger”. In the past, airgun
triggers were, indeed, “pulled”, mainly because some of them were so
crude that they needed a hefty pull to make them work. Modern airguns
are precision instruments, with the Logun MkII the finest among them the Logun trigger needs nothing more than the movement of your fingertip to activate it. A Logun trigger is always squeezed, never pulled please remember that.
THE TRIGGER SEQUENCE IN ACTION
1) With the target in your sights, position your trigger finger on the lower
section of the trigger blade.
2) Smoothly take up the trigger’s first pressure, allowing the trigger to
come to rest at it’s second stage.
3) Finalise your aim, then, without making a conscious effort, increase
finger-pressure on the trigger until the rifle fires...hold on - possibly the
most important part of the sequence has yet to be executed.
4) After the rifle fires, STAY ON AIM UNTIL THE PELLET STRIKES.
This technique is known as “follow-through” and it can often mark the
difference between a good shooter and a great one. Most great
sportsmen such as golfers, cricketers, footballers, tennis players and
especially shooters, have consistent follow-through actions which ensure
that their delivery technique is completed perfectly. As a shooter, your job
isn’t finished until the shot lands, so you must remain on duty until that
moment. Basically, by using follow-through, you ensure that you don’t
adversely affect the quality of the shot after the trigger is squeezed.
*Tip: The best way to develop a consistent follow-through, is to hold the
trigger in the ‘fire’ position until the shot lands, rather than releasing it
immediately. Make sure you stay perfectly on aim until the shot strikes and
your shooting will take another giant step towards it’s full potential.
17
PHASE 4: WORK ON YOUR HANDLING
Your Logun MkII is recoilless and perfectly balanced, therefore it doesn’t
need to be gripped tightly or pulled into your shoulder. This rifle should
be guided and supported with a secure, forgiving hold, making sure that,
whatever shooting stance you favour is well-balanced and stable. Above
all, don’t allow muscle tension to build up in your hands, arms or torso.
Stay relaxed, keep calm and let the rifle take care of business.
Also, experiment with different stances. Many top hunters find that the
lower centre of gravity provided by adopting a kneeling or sitting stance
greatly increases stability and accuracy along with it - especially at longer
range. If you’re not too sure about the correct use of these positions, get
along to a field target club and learn how to use them to your advantage.
Experiment on different target types. One useful source of targets is the
website www.freetargets.com.
SECTION 4
LOOKING AFTER YOUR RIFLE
Each Logun MkII is built to provide a lifetime of high-performance service
and requires very little in the way of user-maintenance, beyond a wipe
over with a synthetic oil, (such as Logun SL7), impregnated cloth, after
every use. In fact, the best way to make certain that your Logun rifle runs
perfectly, is to avoid doing anything to it that may affect it’s built in high
performance.
Your Logun MkII is built almost exclusively from aircraft grade aluminium
and stainless steel, which all but eliminates the problems with rust
suffered by many other airguns. However, wiping over all metal surfaces
after handling is essential to prevent build-up of grease and dirt.
Apart from the occasional removal of the stock, it is vital that you never,
ever dismantle the rifle, or attempt any unauthorised modifications or
adjustments to any part of its mechanism. Such abuse of the rifle will
immediately negate your warranty and could irreparably damage your
gun. Countless hours of dedicated expertise have been devoted to the
development of this rifle - please don’t undo it at all or tinker with it.
The Logun technicians have installed several ‘tell-tale’ devices within
18
the rifle, all of which are designed to immediately reveal evidence of
tampering. Basically, if you break the ‘no tampering’ clause of your
guarantee, then the warranty on your Logun will become invalid.
LUBRICATION
Logun rifles are designed to run virtually maintenance-free between their
2 year factory service intervals. The use of lubricated pellets, as advised
within the Pellet Preparation section contained in Section 3 of this
manual, will ensure that the multi-shot pellet magazine system remains
perfectly lubricated. Should this component become dry of lubrication,
simply apply one drop of Logun GO2 gun oil (not silicone oil) to the
pellet loading chamber, then work the pellet probe back and forth several
times to evenly distribute the oil.
Similarly, if the cocking/loading bolt requires lubrication, use a very light
smear of Logun SG1 grease in the rear section of the bolt shaft. The
correct grease can be bought at your Logun stockist.
It is recommended that the trigger mechanism of your rifle remains as
lubricated by our factory technicians. Should you experience any
problems with this or any other component of your Logun MkII, please
contact your dealer or call the Logun Service Centre on 01902 738070
REMEMBER: Over-lubrication of your rifle can result in the attraction and
accumulation of dust and grit. DO NOT over-lubricate any component of
this rifle.
MAINTAINING YOUR LOGUN MkII’s STOCK
Just rub a few drops of walnut oil, or a similar product, into the stock once
a month or so, avoiding over-use of any treatment to prevent build-up.
Do not store your rifle near any heat source, such as a radiator or storage
heater, which could dry out the timber and cause cracking of the wood.
Also, if your Logun should become wet, do not attempt to dry it rapidly.
Remove the stock from the action (by unscrewing the single stock fixing
bolt positioned on the underside of the rifle’s fore-end, in front of the
trigger guard) mop up excessive moisture, wipe the stock as dry as
possible and allow the rifle to dry completely at room temperature.
19
SECTION 5
ADJUSTING THE TRIGGER
Before it leaves the factory, each Logun MkII will have its trigger adjusted
to a safe and efficient setting. Different shooters prefer different trigger
set-ups and your Logun MkII offers an almost unlimited range of set-up
options. However, you are advised to alter the setting of your rifle’s
trigger only if you really need to. Please familiarise yourself with the rifle
before deciding on your preferred trigger setting because it’s entirely
possible that the factory setting will suit you perfectly.
Should this not be the case and you wish to re-set your rifle’s trigger,
please refer to the photograph below and follow all instructions carefully.
NOTE: FIRST CHECK THAT THE RIFLE IS UNLOADED AND THAT
ITS PELLET MAGAZINE IS EMPTY. Trigger adjustment requires the
removal of the stock. This is done by unscrewing the hex-headed, single
stock fixing bolt (A), located on the underside of the fore-end just ahead
of the trigger guard. There is no need to remove the trigger guard, simply
separate the action from the stock after removal of the stock fixing bolt.
Remember to store the stock fixing bolt carefully
(A)
20
1. Safety Handle
2. Backpart
3. Adjuster Screw
4. Lock Nut
5. Spring
6. Adjuster Screw
7. Adjuster Screw
8. Spring
9. Trigger Block
10. Trigger Housing
11. Trigger
12. Adjuster Screw
13. Adjuster Screw
ADJUSTING THE TRIGGER
To adjust the first trigger stage, adjust screw (7).
To adjust the second trigger stage, the safety must be OFF and the rifle
un-cocked - then adjust screw (13).
NOTE: When you have altered the position of the trigger block, adjust the
screw (3) for the safety function. To do this, release nut (4) and adjust
screw (3) until it gets as close to the trigger block as possible without
touching it. Lock the screw and nut after adjustment.
NOTE: Always ensure the rifle is not loaded before proceeding with any
alterations to the trigger. If the position of the trigger block (9) is changed
with screw (13), ensure a sufficient amount of sear engagement with the
hammer is maintained. After adjustments have been made, please ensure
that the safety mechanism functions normally.
NEVER attempt to remove the trigger mechanism from the rifle!
NOTE: Any trigger screw adjustments will require re-LoctitingTM to prevent
self adjustment. Use a thread locking agent such as Loctite 242TM.
SAFETY
To activate safety, rotate backpart (2) to the
right with safety handle (1). When safety is
on, the trigger block is locked by the backpart
and the trigger housing (10) is locked by
screw (3). This ensures that the rifle doesn’t
fire. To release the safety, rotate the back
part to the left.
FIRE
SAFE
Please note: The safety will only operate correctly when the rifle is
in the cocked and ready to fire position.
21
SECTION 6
REMOVAL OF BARREL
The Logun MkII must be unloaded and double checked to ensure it is
safe.
STEP 1
There are two Allen key headed screws situated on the same side as the
loading system towards the front of the breech. These are the fixing
screws for the barrel, completely remove one of the screws. Undo the
second by 5 full turns.
STEP 2
Go to the front end of the gun, hold the silencer or, if silencer not fitted,
the stainless steel adaptor and pull away the front of the action.
The barrel will slide out from the barrel shroud. Clean the barrel as
necessary using a cleaning kit such as the Logun Airgun Cleaning Kit.
STEP 3
Prior to re-fitting the barrel note that on the breech end of the barrel there
are two dimples situated at 900 to the port hole. These two dimples are to
locate on the fixing screws mentioned in step one, push the barrel back
into the shroud, making sure it is fully engaged within the block.
STEP 4
To locate the dimples, look down the threaded hole from which you
removed the fixing screw, rotate barrel until the dimple is visible, tighten
the screw which was left in the breech, then re-fit the second screw.
Make sure both screws are secure but be careful not to over tighten.
Please Note: You may find the barrel accuracy may be slightly irratic for
a short period. This will improve as the barrel becomes leaded again.
CHANGING A SLIP GAUGE
The Logun MkII must be unloaded and double checked to ensure it is
safe.
STEP 1
Above the slip gauge in the breech block there is an access hole
containing an Allen key headed screw. Put your Allen key into the bolt
and loosen the screw until the slip gauge can be removed.
STEP 2
Slide the required slip gauge into the aperture, dog-leg at the back. Slide
it as far forward as it will go and re-tighten the Allen key headed screw.
22
SECTION 7
Do’s and Don’ts
DO clean your rifle with a synthetic based spray such as Logun SL7 applied to
the rifle by spraying it on a lint free cloth then wipe over rifle.
DON’T spray synthetic based spray Directly onto the rifle, always apply by
spraying it on a lint free cloth.
DON’T use silicone oils or greases.
DO remove the stock from the action before drilling the stock to fit sling swivels.
DON’T leave the filling chamber exposed, always rotate the dust cover.
DO use a synthetic grease, such as Logun SG1, on the filling probe, this will
increase the life of the o-ring seals situated on the probe body.
DON’T rely on the safety catch to provide guaranteed safety.
DO follow the rules of safe shooting on page 5 of this manual.
DON’T overcharge the rifle, this will result in a loss of power and could
damage the internal seals.
DO bleed off excess air from the filling hose prior to pulling the probe out.
DO have your rifle serviced every two years - this is a condition of your
lifetime warranty.
Problems
In the unlikely event of your Logun MkII showing signs of
malfunctioning or of reduced performance, DO NOT attempt to
rectify the problem yourself. Please contact your dealer or call the
Logun Service Line where they will either talk you through any
simple rectification or arrange for the rifle to be returned to the
Service Centre for repair.
Logun Service Line - 01902 738070
23
SECTION 8
SERVICE RECORD
Your rifle must be serviced bi-annually by an
approved Logun Service Centre. Failure to do so will
invalidate the rifle’s lifetime warranty. Contact the
Logun Service Line on 01902 738070
Service Due
24
Date
Serviced
Serviced
By
Service
Centre Stamp
I I
MkII
Sole Distributor Airgunsport Ltd
Universe House,
Key Industrial Park,
Planetary Road,
Willenhall,
West Midlands,
WV13 3YA
England
TEL: 01902 722 144
Fax: 01902 722 880
Service Line Tel: 01902 738070
e - mail: [email protected]
www.logun.com
www.airgunsport.com
www.freetargets.com