1
4-194-692-21(1)
DSC-WX5
GB Digital Still Camera/Instruction Manual
ES Cámara fotografía digital/Manual de instrucciones
© 2010 Sony Corporation
Downloaded From camera-usermanual.com Sony Manuals
GB
ES
English
Owner’s Record
The model and serial numbers are located on the bottom. Record the serial number in the
space provided below. Refer to these numbers whenever you call your Sony dealer
regarding this product.
Model No. DSC-WX5
Serial No. ______________________________
WARNING
To reduce fire or shock hazard, do not expose the unit to rain or
moisture.
If the shape of the plug does not fit the power outlet, use an attachment plug adaptor of the
proper configuration for the power outlet.
CAUTION
[ Battery pack
If the battery pack is mishandled, the battery pack can burst, cause a fire or even chemical
burns. Observe the following cautions.
GB
• Do not disassemble.
• Do not crush and do not expose the battery pack to any shock or force such as
hammering, dropping or stepping on it.
• Do not short circuit and do not allow metal objects to come into contact with the battery
terminals.
2
Downloaded From camera-usermanual.com Sony Manuals
• Do not expose to high temperature above 60°C (140°F) such as in direct sunlight or in a
car parked in the sun.
• Do not incinerate or dispose of in fire.
• Do not handle damaged or leaking lithium ion batteries.
• Be sure to charge the battery pack using a genuine Sony battery charger or a device that
can charge the battery pack.
• Keep the battery pack out of the reach of small children.
• Keep the battery pack dry.
• Replace only with the same or equivalent type recommended by Sony.
• Dispose of used battery packs promptly as described in the instructions.
[ Battery charger
Even if the CHARGE lamp is not lit, the battery charger is not disconnected from the AC
power source (mains) as long as it is connected to the wall outlet (wall socket). If some
trouble occurs while using the battery charger, immediately shut off the power by
disconnecting the plug from the wall outlet (wall socket).
GB
The power cord (mains lead), if supplied, is designed specifically for use with this camera
only, and should not be used with other electrical equipment.
For Customers in the U.S.A. and Canada
[ RECYCLING LITHIUM-ION BATTERIES
Lithium-Ion batteries are recyclable.
You can help preserve our environment by returning your used
rechargeable batteries to the collection and recycling location nearest
you.
For more information regarding recycling of rechargeable batteries,
call toll free
1-800-822-8837, or visit http://www.rbrc.org/
Caution: Do not handle damaged or leaking Lithium-Ion batteries.
[ Battery pack
This device complies with Part 15 of the FCC Rules. Operation is subject to the following
two conditions:
(1) This device may not cause harmful interference, and (2) this device must accept any
interference received, including interference that may cause undesired operation.
This Class B digital apparatus complies with Canadian ICES-003.
GB
3
Downloaded From camera-usermanual.com Sony Manuals
For Customers in the U.S.A.
UL is an internationally recognized safety organization.
The UL Mark on the product means it has been UL Listed.
If you have any questions about this product, you may call:
Sony Customer Information Center
1-800-222-SONY (7669)
The number below is for the FCC related matters only.
[ Regulatory Information
Declaration of Conformity
Trade Name: SONY
Model No.: DSC-WX5
Responsible Party: Sony Electronics Inc.
Address:
16530 Via Esprillo,
San Diego, CA 92127 U.S.A.
Telephone No.: 858-942-2230
This device complies with Part15 of the FCC Rules. Operation is subject to the
following two conditions: (1) This device may not cause harmful interference, and (2)
this device must accept any interference received, including interference that may cause
undesired operation.
[ CAUTION
You are cautioned that any changes or modifications not expressly approved in this manual
could void your authority to operate this equipment.
[ Note:
GB
This equipment has been tested and found to comply with the limits for a Class B digital
device, pursuant to Part 15 of the FCC Rules.
These limits are designed to provide reasonable protection against harmful interference in
a residential installation. This equipment generates, uses, and can radiate radio frequency
energy and, if not installed and used in accordance with the instructions, may cause
harmful interference to radio communications. However, there is no guarantee that
interference will not occur in a particular installation. If this equipment does cause harmful
interference to radio or television reception, which can be determined by turning the
equipment off and on, the user is encouraged to try to correct the interference by one or
more of the following measures:
– Reorient or relocate the receiving antenna.
– Increase the separation between the equipment and receiver.
– Connect the equipment into an outlet on a circuit different from that to which the
receiver is connected.
– Consult the dealer or an experienced radio/TV technician for help.
4
Downloaded From camera-usermanual.com Sony Manuals
The supplied interface cable must be used with the equipment in order to comply with the
limits for a digital device pursuant to Subpart B of Part 15 of FCC Rules.
For Customers in Europe
[ Notice for the customers in the countries applying EU Directives
The manufacturer of this product is Sony Corporation, 1-7-1 Konan Minato-ku Tokyo,
108-0075 Japan. The Authorized Representative for EMC and product safety is Sony
Deutschland GmbH, Hedelfinger Strasse 61, 70327 Stuttgart, Germany. For any service or
guarantee matters please refer to the addresses given in separate service or guarantee
documents.
This product has been tested and found compliant with the limits set out in the EMC
Directive for using connection cables shorter than 3 meters (9.8 feet).
GB
[ Attention
The electromagnetic fields at the specific frequencies may influence the picture and sound
of this unit.
[ Notice
If static electricity or electromagnetism causes data transfer to discontinue midway (fail),
restart the application or disconnect and connect the communication cable (USB, etc.)
again.
[ Disposal of Old Electrical & Electronic Equipment (Applicable in
the European Union and other European countries with separate
collection systems)
This symbol on the product or on its packaging indicates that this product
shall not be treated as household waste. Instead it shall be handed over to
the applicable collection point for the recycling of electrical and electronic
equipment. By ensuring this product is disposed of correctly, you will help
prevent potential negative consequences for the environment and human
health, which could otherwise be caused by inappropriate waste handling
of this product. The recycling of materials will help to conserve natural
resources. For more detailed information about recycling of this product,
please contact your local Civic Office, your household waste disposal service or the shop
where you purchased the product.
GB
5
Downloaded From camera-usermanual.com Sony Manuals
[ Disposal of waste batteries (applicable in the European Union
and other European countries with separate collection systems)
This symbol on the battery or on the packaging indicates that the battery
provided with this product shall not be treated as household waste.
On certain batteries this symbol might be used in combination with a
chemical symbol. The chemical symbols for mercury (Hg) or lead (Pb) are
added if the battery contains more than 0.0005% mercury or 0.004% lead.
By ensuring these batteries are disposed of correctly, you will help prevent
potentially negative consequences for the environment and human health which could
otherwise be caused by inappropriate waste handling of the battery. The recycling of the
materials will help to conserve natural resources.
In case of products that for safety, performance or data integrity reasons require a
permanent connection with an incorporated battery, this battery should be replaced by
qualified service staff only. To ensure that the battery will be treated properly, hand over
the product at end-of-life to the applicable collection point for the recycling of electrical
and electronic equipment.
For all other batteries, please view the section on how to remove the battery from the
product safely.
Hand the battery over to the applicable collection point for the recycling of waste batteries.
For more detailed information about recycling of this product or battery, please contact
your local Civic Office, your household waste disposal service or the shop where you
purchased the product.
Notice for customers in the United Kingdom
A moulded plug complying with BS 1363 is fitted to this equipment for your safety and
convenience.
Should the fuse in the plug supplied need to be replaced, a fuse of the same rating as the
supplied one and approved by ASTA or BSI to BS 1362, (i.e., marked with an
or
mark) must be used.
If the plug supplied with this equipment has a detachable fuse cover, be sure to attach the
fuse cover after you change the fuse. Never use the plug without the fuse cover. If you
should lose the fuse cover, please contact your nearest Sony service station.
GB
6
Downloaded From camera-usermanual.com Sony Manuals
Table of contents
Getting started
Refer to “Cyber-shot Handbook” (PDF) on supplied CDROM ...........................................................................................8
Checking the accessories supplied...........................................8
Notes on using the camera ........................................................8
Identifying parts .......................................................................12
Battery charging and the number of images/time
that can be recorded ...............................................................13
Inserting the battery pack/a memory card (sold separately)...16
Setting the date and time/display color ...................................19 GB
Shooting/viewing images
Shooting still images ................................................................21
Shooting movies.......................................................................22
Viewing images ........................................................................23
“Cyber-shot Handbook” (PDF)
Learning more about the camera (“Cybershot Handbook”) ......................................................................24
Others
List of icons displayed on the screen ......................................25
Number of still images and recordable time of movies ...........27
Precautions ..............................................................................29
Specifications...........................................................................31
GB
7
Downloaded From camera-usermanual.com Sony Manuals
Refer to “Cyber-shot Handbook” (PDF)
on supplied CD-ROM
For details on advanced operations, please read “Cybershot Handbook” (PDF) on the CD-ROM (supplied) using
a computer.
Refer to “Cyber-shot Handbook” for in-depth instructions
on shooting or viewing images and connecting the camera to your
computer, printer or TV (page 24).
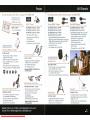
Checking the accessories supplied
•
•
•
•
•
•
Battery charger BC-CSN/BC-CSNB (1)
Power cord (mains lead) (not supplied in the USA and Canada) (1)
Rechargeable battery pack NP-BN1 (1)
USB, A/V cable for multi-use terminal (1)
Wrist strap (1)
CD-ROM (1)
– Cyber-shot application software
– “Cyber-shot Handbook”
• Instruction Manual (this manual) (1)
Notes on using the camera
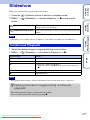
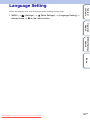
Changing the language setting
The screen language can be changed if necessary.
To change the language setting, press MENU t
Settings) t [Language Setting].
(Settings) t
(Main
Internal memory and memory card back up
Do not turn off the camera, remove the battery pack, or remove the memory
card while the access lamp is lit. Otherwise, the internal memory data or the
memory card may be damaged. Be sure to make a backup copy to protect your
data.
GB
8
Downloaded From camera-usermanual.com Sony Manuals
Functions built into this camera
• This manual describes each of the functions of TransferJet-compatible/
incompatible devices, 1080 60i-compatible devices and 1080 50i-compatible
devices.
To check if your camera supports the TransferJet function, and whether it is
a 1080 60i-compatible device or 1080 50i-compatible device, check for the
following marks on the bottom of the camera.
TransferJet-compatible device:
(TransferJet)
1080 60i-compatible device: 60i
1080 50i-compatible device: 50i
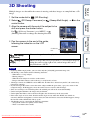
• Do not watch 3D images shot with this camera for extended periods of time
on 3D-compatible monitors.
• When you view 3D images shot with this camera on a 3D-compatible
monitors, you may experience discomfort in the form of eye strain, fatigue, GB
or nausea. To prevent these symptoms, we recommend that you take regular
breaks. However, you need to determine for yourself the length and
frequency of breaks you require, as they vary according to the individual. If
you experience any type of discomfort, stop viewing the 3D images until you
feel better, and consult a physician as necessary. Also refer to the operating
instructions supplied with the device or software you have connected or are
using with this camera. Note that a child’s eyesight is still at the development
stage (particularly children below the age of 6). Consult a pediatrician or
ophthalmologist before letting your child view 3D images, and make sure he/
she observes the above precautions when viewing such images.
On database files
When you insert a memory card without a database file into the camera and
turn on the power, part of the memory card capacity is used to automatically
create a database file. It may take some time until you can perform the next
operation.
Notes on recording/playback
• To ensure stable operations of the memory card, we recommend that you use
this camera to format any memory card being used with this camera for the
first time. Note that formatting will erase all data recorded on the memory
card. This data cannot be restored. Be sure to backup any important data to a
PC or other storage location.
• If you repeatedly record/delete images, fragmentation of data may occur on
the memory card. Movies may not be able to be saved or recorded. In such a
case, save your images to a PC or other storage location, then [Format].
• Before you start recording, make a trial recording to make sure that the
camera is working correctly.
• The camera is neither dust-proof, nor splash-proof, nor water-proof. Read
“Precautions” (page 29) before operating the camera.
Downloaded From camera-usermanual.com Sony Manuals
GB
9
• Avoid exposing the camera to water. If water enters inside the camera, a
malfunction may occur. In some cases, the camera cannot be repaired.
• Do not aim the camera at the sun or other bright light. It may cause the
malfunction of the camera.
• Do not use the camera near a location that generates strong radio waves or
emits radiation. Otherwise, the camera may not properly record or play back
images.
• Using the camera in sandy or dusty locations may cause malfunctions.
• If moisture condensation occurs, remove it before using the camera.
• Do not shake or strike the camera. It may cause a malfunction and you may
not be able to record images. Furthermore, the recording media may become
unusable or image data may be damaged.
• Clean the flash surface before use. The heat of flash emission may cause dirt
on the flash surface to become discolored or to stick to the flash surface,
resulting in insufficient light emission.
Notes on the LCD screen and lens
• The LCD screen is manufactured using extremely high-precision technology
so over 99.99% of the pixels are operational for effective use. However,
some tiny black and/or bright dots (white, red, blue or green) may appear on
the LCD screen. These dots are a normal result of the manufacturing process,
and do not affect the recording.
• When the battery level becomes low, the lens might stop moving. Insert a
charged battery pack and turn on the camera again.
On camera’s temperature
Your camera and battery may get warm due to continuous use, but it is not a
malfunction.
On the overheat protection
Depending on the camera and battery temperature, you may be unable to
record movies or the power may turn off automatically to protect the camera.
A message will be displayed on the LCD screen before the power turns off or
you can no longer record movies.
On image data compatibility
• The camera conforms with DCF (Design rule for Camera File system)
universal standard established by JEITA (Japan Electronics and Information
Technology Industries Association).
• Sony does not guarantee that the camera will play back images recorded or
edited with other equipment, or that other equipment will play back images
recorded with the camera.
GB
10
Downloaded From camera-usermanual.com Sony Manuals
Importing AVCHD movies into a computer
When importing movies recorded in AVCHD format into a computer, for
Windows use the “PMB” software on the CD-ROM (supplied) or for
Macintosh use the “iMovie” software bundled with Macintosh computers.
Notes when playing movies on other devices
This camera uses MPEG-4 AVC/H.264 High Profile for AVCHD format
recording. Movies recorded in AVCHD format with this camera cannot be
played by the following devices.
– Other devices compatible with AVCHD format that does not support High
Profile
– Devices incompatible with the AVCHD format
This camera also uses MPEG-4 AVC/H.264 Main Profile for MP4 format
recording. For this reason, movies recorded in MP4 format with this camera
cannot be played on devices other than those that support MPEG-4 AVC/
H.264.
GB
Discs recorded with HD (high definition) image quality
This camera captures high definition footage in the AVCHD format. DVD
media containing AVCHD footage should not be used with DVD based
players or recorders, as the DVD player/recorder may fail to eject the media
and may erase its contents without warning. DVD media containing AVCHD
footage may be played on a compatible Blu-ray Disc™ player/recorder or
other compatible device.
Warning on copyright
Television programs, films, videotapes, and other materials may be
copyrighted. Unauthorized recording of such materials may be contrary to the
provisions of the copyright laws.
No compensation for damaged content or recording failure
Sony cannot compensate for failure to record or loss or damage of recorded
content due to a malfunction of the camera or recording media, etc.
GB
11
Downloaded From camera-usermanual.com Sony Manuals
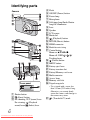
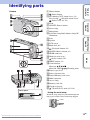
Identifying parts
D
E
F
G
H
Camera
I
J
K
L
M
N
O
P
Q
Cover panel
A Shutter button
B
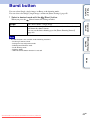
(Burst) button
C For shooting: W/T (zoom) lever
For viewing:
(Playback
zoom) lever/ (Index) lever
GB
12
Downloaded From camera-usermanual.com Sony Manuals
R
S
T
U
V
W
X
Y
Z
Flash
ON/OFF (Power) button
Power lamp
Microphone
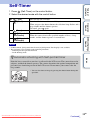
Self-timer lamp/Smile Shutter
lamp/AF illuminator
Lens
Speaker
LCD screen
Mode dial
(Playback) button
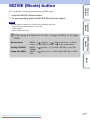
MOVIE (Movie) button
HDMI connector
Hook for wrist strap
Control button
Menu on: v/V/b/B/z
Menu off: DISP/ / / /
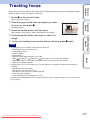
Tracking focus
(Delete) button
MENU button
Battery eject lever
Battery insertion slot
Battery/Memory card cover
Multi connector
Access lamp
Memory card slot
Tripod receptacle
• Use a tripod with a screw less
than 5.5 mm (7/32 inches) long.
Otherwise, you cannot firmly
secure the camera, and damage to
the camera may occur.
wj
(TransferJet™) mark
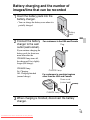
Battery charging and the number of
images/time that can be recorded
the battery pack into the
1 Insert
battery charger.
• You can charge the battery even when it is
partially charged.
Battery
pack
the battery
2 Connect
charger to the wall
GB
For customers in the USA and Canada
Plug
outlet (wall socket).
If you continue charging the
battery pack for about one
more hour after the
CHARGE lamp turns off,
the charge will last slightly
longer (full charge).
CHARGE lamp
Lit: Charging
Off: Charging finished
(normal charge)
CHARGE lamp
For customers in countries/regions
other than the USA and Canada
Power cord
(mains lead)
CHARGE lamp
charging is finished, disconnect the battery
3 When
charger.
GB
13
Downloaded From camera-usermanual.com Sony Manuals
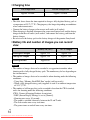
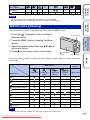
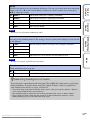
x Charging time
Full charge time
Normal charge time
Approx. 245 min.
Approx. 185 min.
Notes
• The table above shows the time required to charge a fully depleted battery pack at
a temperature of 25°C (77°F). Charging may take longer depending on conditions
of use and circumstances.
• Connect the battery charger to the nearest wall outlet (wall socket).
• When charging is finished, disconnect the power cord (mains lead) and the battery
charger from the wall outlet (wall socket), and remove the battery pack from the
battery charger.
• Be sure to use the battery pack or the battery charger of the genuine Sony brand.
x Battery life and number of images you can record/
view
Battery life (min.)
No. of Images
Shooting still images
Approx. 115
Approx. 230
Viewing still images
Approx. 190
Approx. 3800
Shooting movies
Approx. 60
—
Notes
• The number of images that can be recorded is an approximate number when
shooting with a fully charged battery pack. The number may be less depending on
the circumstances.
• The number of images that can be recorded is when shooting under the following
conditions:
– Using Sony “Memory Stick PRO Duo” media (sold separately).
– When a fully charged battery pack (supplied) is used at an ambient temperature
of 25°C (77°F).
• The number of still images that can be recorded is based on the CIPA standard,
and is for shooting under the following conditions.
(CIPA: Camera & Imaging Products Association)
– DISP (Screen Display Settings) is set to [Normal].
– Shooting once every 30 seconds.
– The zoom is switched alternately between the W and T ends.
– The flash strobes once every two times.
– The power turns on and off once every ten times.
GB
14
Downloaded From camera-usermanual.com Sony Manuals
• The battery life for movies is when shooting under the following conditions:
– Recording mode: AVCHD HQ
– When continuous shooting ends because of set limits (page 28), press the shutter
button down again and continue shooting. Shooting functions such as the zoom
do not operate.
z Using the camera abroad
You can use the camera and the battery charger (supplied) in any country or
region where the power supply is within 100 V to 240 V AC, 50/60 Hz.
An electronic transformer (travel converter) is unnecessary. Do not use an
electronic transformer, as this may cause a malfunction.
GB
GB
15
Downloaded From camera-usermanual.com Sony Manuals
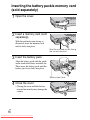
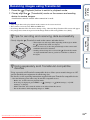
Inserting the battery pack/a memory card
(sold separately)
1 Open the cover.
a memory card (sold
2 Insert
separately).
With the notched corner facing as
illustrated, insert the memory card
until it clicks into place.
Note the notched corner facing
the correct direction.
3 Insert the battery pack.
Align the battery pack with the guide
arrow inside the battery insertion slot.
Then, insert the battery pack until the
battery eject lever locks into place.
Battery eject lever
4 Close the cover.
• Closing the cover with the battery
inserted incorrectly may damage the
camera.
GB
16
Downloaded From camera-usermanual.com Sony Manuals
x Memory card that you can use
The following memory cards are compatible with this camera: “Memory Stick
PRO Duo” media, “Memory Stick PRO-HG Duo” media, “Memory Stick
Duo” media, SD memory card, SDHC memory card and SDXC memory card.
However, all memory cards are not guaranteed to work with this camera.
MultiMediaCard cannot be used.
• In this manual, the term “Memory Stick Duo” media is used to refer to “Memory
Stick PRO Duo” media, “Memory Stick PRO-HG Duo” media and “Memory
Stick Duo” media, and the term “SD card” is used to refer to SD memory card,
SDHC memory card and SDXC memory card.
• When recording movies, it is recommended that you use the following memory
cards:
–
(Mark2) (“Memory Stick PRO Duo” (Mark2) media) GB
–
(“Memory Stick PRO-HG Duo” media)
– SD memory card, SDHC memory card or SDXC memory card (Class 4 or faster)
For details on the number of images/time that can be recorded, see page 27.
Note
• Images recorded on an SDXC memory card cannot be transferred or played back
on computers or AV devices that are not exFAT-compatible, even when the
camera is connected to the computer or AV device using a USB cable. Before
connecting, make sure that the device is exFAT-compatible. If connected to a
device that is not exFAT-compatible, a format drive request may appear. Do not
format the drive, or all data will be lost. (exFAT is the file system used by SDXC
memory cards.)
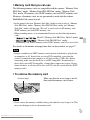
x To remove the memory card
Access lamp
Make sure that the access lamp is not lit,
then push the memory card in once.
Note
• Never remove the memory card/the battery pack when the access lamp is lit. This
may cause damage to data or the memory card.
GB
17
Downloaded From camera-usermanual.com Sony Manuals
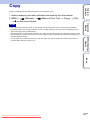
x When there is no memory card inserted
Images are stored in the camera’s internal memory (approximately 32 MB).
To copy images from the internal memory to a memory card, insert a memory
card in the camera, then select MENU t
(Settings) t
(Memory
Card Tool) t [Copy].
x To remove the battery pack
Battery eject lever
Slide the battery eject lever. Be sure not
to drop the battery pack.
x Checking the remaining battery charge
A remaining charge indicator appears on the LCD screen.
High
Low
Notes
• It takes about one minute until the correct remaining charge indicator appears.
• The remaining charge indicator may not be correct under certain circumstances.
• When [Power Save] is set to [Standard] or [Stamina], if you do not operate the
camera for a certain period of time while the power is on, the LCD screen becomes
dark, then the camera turns off automatically (Auto power-off function).
• To keep clean battery pack terminal and prevent short-circuiting, place the battery
pack in a plastic bag, etc. when carrying and storing to isolate it from other metal
objects, etc.
GB
18
Downloaded From camera-usermanual.com Sony Manuals
Setting the date and time/display color
the ON/OFF (Power)
1 Press
button.
ON/OFF (Power) button
The camera is turned on. The power
lamp lights up only when the camera
starts up.
• It may take time for the power to
turn on and allow operation.
a setting item with
2 Select
v/V on the control button,
GB
then press z.
Date & Time Format: Selects the
date and time display format.
Daylight Savings: Selects Daylight
Savings On/Off.
Date & Time: Sets the date and time.
Control button
Set the numeric value and desired settings with v/V/
3 b/B,
then press z.
• Midnight is indicated as 12:00 AM, and noon as 12:00 PM.
4 Select [OK], then press z.
the instructions on the screen. Select your
5 Follow
desired area with b/B on the control button, then
press z.
6 Select [OK], then press z.
7 Select desired display color, then press z.
8 Select [OK], then press z.
GB
19
Downloaded From camera-usermanual.com Sony Manuals
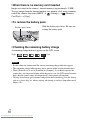
x Superimposing the date on the images
The camera does not have a feature for superimposing dates on images. By
using “PMB” in the CD-ROM (supplied), you can print or save images with
the date. For details, see the “PMB Help”.
x Setting the date and time again
The date and time setup screen appears automatically only when the power is
turned on the first time. To reset the date and time, display the date and time
setup screen by pressing MENU t
(Settings) t
(Clock Settings) t
[Date & Time Setting].
GB
20
Downloaded From camera-usermanual.com Sony Manuals
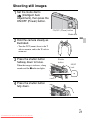
Shooting still images
mode dial to
1 Set the
(Intelligent Auto
Adjustment), then press the
ON/OFF (Power) button.
ON/OFF (Power) button
Mode dial
2
GB
Hold the camera steady as
illustrated.
• Turn the W/T (zoom) lever to the T
side to zoom in, and to the W side to
zoom out.
the shutter button
3 Press
halfway down to focus.
When the image is in focus, a beep
sounds and the z indicator lights.
Shutter
button
AE/AF
lock
the shutter button
4 Press
fully down.
GB
21
Downloaded From camera-usermanual.com Sony Manuals
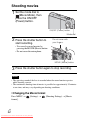
Shooting movies
the mode dial to
1 Set(Movie
Mode), then
press the ON/OFF
(Power) button.
ON/OFF (Power) button
Mode dial
the shutter button to
2 Press
start recording.
Do not cover with
your fingers.
• You can also record movies by
pressing the MOVIE (Movie) button.
• Do not cover the microphone.
MOVIE (Movie) button
3 Press the shutter button again to stop recording.
Notes
• The operating sound of the lens is recorded when the zoom function operates
while shooting a movie.
• The continuous shooting time of movies is possible for approximately 29 minutes
at one time, and may vary depending on shooting conditions.
x Changing the Movie format
Press MENU t
format].
(Settings) t
GB
22
Downloaded From camera-usermanual.com Sony Manuals
(Shooting Settings) t [Movie
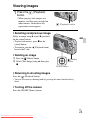
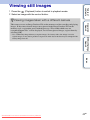
Viewing images
the
1 Press
button.
(Playback)
• When you play back images on a
memory card that were recorded on
other cameras, the database file
registration screen appears.
(Playback) button
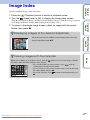
x Selecting next/previous image
Select an image using B (next)/b (previous)
on the control button.
• To play back movies, press z on the
control button.
• To zoom in, turn the
(Playback zoom)
lever to the T side.
GB
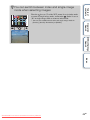
x Deleting an image
1 Press the (Delete) button.
2 Select [This Image] using v, then press
z.
(Delete)
button
Control button
x Returning to shooting images
Press the
(Playback) button.
• You can also return to shooting mode by pressing the shutter button halfway
down.
x Turning off the camera
Press the ON/OFF (Power) button.
GB
23
Downloaded From camera-usermanual.com Sony Manuals
Learning more about the camera
(“Cyber-shot Handbook”)
“Cyber-shot Handbook”, which explains how to use the camera in detail, is
included on the CD-ROM (supplied). Refer to it for in-depth instructions on
the many functions of the camera.
x For Windows users
on your computer, and insert the CD-ROM
1 Turn
(supplied) into the CD-ROM drive.
2 Click [Handbook].
3 Click [Install].
“Cyber-shot Handbook” from the shortcut on
4 Start
the desktop.
x For Macintosh users
on your computer, and insert the CD-ROM
1 Turn
(supplied) into the CD-ROM drive.
the [Handbook] folder and copy
2 Select
“Handbook.pdf” stored in the [GB] folder to your
computer.
copying is complete, double-click
3 After
“Handbook.pdf”.
GB
24
Downloaded From camera-usermanual.com Sony Manuals
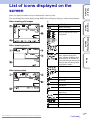
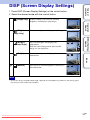
List of icons displayed on the screen
You can change the screen display using DISP (Screen Display Settings) on
the control button.
When shooting still images
Display
Indication
Scene Recognition icon
White Balance
Metering Mode
3D images
Vibration warning
Anti Blink
When shooting movies
GB
Scene Recognition
Overlay icon for
Superior Auto
Adjustment
Defocus Effect
Soft Skin Effect
Burst Shooting Interval
A
Display
Indication
Smile Detection
Sensitivity indicator
Battery remaining
Low battery warning
Image Size/Panorama
image size/Quality
Scene Selection
Shooting mode
(Intelligent Auto
Adjustment/Superior
Auto Adjustment/
Background Defocus/
Program Auto/Scene
Selection/iSweep
Panorama/3D Sweep
Panorama/Sweep Multi
Angle/Movie Mode)
Downloaded From camera-usermanual.com Sony Manuals
Zoom scaling
GB
25
B
D
Display
Indication
z
AE/AF lock
ISO400
ISO number
Display
Indication
Self-timer
C:32:00
Self-diagnosis display
NR slow shutter
Overheating warning
125
Shutter speed
Face Detection
F2.4
Aperture value
+2.0EV
Exposure value
Database file full/
Database file error
warning
Focus
Standby
0:12
Recording a movie/
Standby
AF range finder frame
Recording time (m:s)
Spot metering crosshairs
C
Display
Destination
Indication
Recording folder
96
Number of recordable
images
100Min
Recordable time
Recording/Playback
Media (Memory card,
internal memory)
Eye-Fi Mode display
AF illuminator
Red-eye reduction
Flash mode
Flash charging
GB
26
Downloaded From camera-usermanual.com Sony Manuals
Histogram
•
appears when
histogram display is
disabled.
Number of still images and recordable
time of movies
The number of still images and recordable time may vary depending on the
shooting conditions and the memory card.
x Still images
(Units: Images)
Capacity
Size
Internal
memory
Memory card formatted with this camera
Approx.
32 MB
2 GB
4 GB
8 GB
16 GB
32 GB
GB
12M
6
344
690
1397
2846
5625
8M
8
482
967
1959
3990
7884
5M
10
582
1168
2366
4819
9524
207
11760
23600
47810
16:9(9M)
6
382
766
1552
3160
6246
16:9(2M)
32
1838
3688
7470
15210
30060
VGA
97350 192380
Notes
• When the number of remaining shootable images is greater than 99,999, the
“>99999” indicator appears.
• When an image shot with other cameras is played back on this camera, the image
may not appear in the actual image size.
GB
27
Downloaded From camera-usermanual.com Sony Manuals
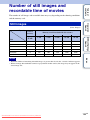
x Movies
The table below shows the approximate maximum recording times. These are
the total times for all movie files. Continuous shooting is possible for
approximately 29 minutes at one time. The maximum size of an MP4-format
movie file is up to approximately 2GB.
(Units: hour : minute : second)
Capacity Internal
memory
Memory card formatted with this camera
Approx.
32 MB
2 GB
4 GB
8 GB
16 GB
32 GB
AVC HD 17M FH
—
0:14:00
0:28:30
0:58:10
1:58:50
3:55:20
AVC HD 9M HQ
—
0:28:00
0:57:00
1:56:20
3:57:50
7:50:40
MP4 12M
—
0:20:40
0:41:40
1:24:40
2:52:30
5:41:00
MP4 6M
—
0:40:40
1:21:50
2:45:50
5:37:50 11:07:50
1:15:10
2:31:10
5:06:20 10:23:50 20:33:00
Quality/Size
MP4 3M
0:01:10
Note
• The recordable time of movies may vary depending on the shooting conditions
(temperature, etc.). The value above applies when DISP (Screen Display Settings)
is set to [Normal].
GB
28
Downloaded From camera-usermanual.com Sony Manuals
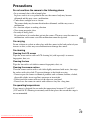
Precautions
Do not use/store the camera in the following places
• In an extremely hot, cold or humid place
In places such as in a car parked in the sun, the camera body may become
deformed and this may cause a malfunction.
• Under direct sunlight or near a heater
The camera body may become discolored or deformed, and this may cause a
malfunction.
• In a location subject to rocking vibration
• Near strong magnetic place
• In sandy or dusty places
Be careful not to let sand or dust get into the camera. This may cause the camera to
malfunction, and in some cases this malfunction cannot be repaired.
GB
On carrying
Do not sit down in a chair or other place with the camera in the back pocket of your
trousers or skirt, as this may cause malfunction or damage the camera.
On cleaning
Cleaning the LCD screen
Wipe the screen surface with an LCD cleaning kit (sold separately) to remove
fingerprints, dust, etc.
Cleaning the lens
Wipe the lens with a soft cloth to remove fingerprints, dust, etc.
Cleaning the camera surface
Clean the camera surface with a soft cloth slightly moistened with water, then wipe
the surface with a dry cloth. To prevent damage to the finish or casing:
– Do not expose the camera to chemical products such as thinner, benzine, alcohol,
disposable cloths, insect repellent, sunscreen or insecticide.
– Do not touch the camera with any of the above on your hand.
– Do not leave the camera in contact with rubber or vinyl for a long time.
On operating temperatures
Your camera is designed for use under the temperatures between 0°C and 40°C
(32°F and 104°F). Shooting in extremely cold or hot places that exceed this range is
not recommended.
GB
29
Downloaded From camera-usermanual.com Sony Manuals
On the internal rechargeable backup battery
This camera has an internal rechargeable battery for maintaining the date and time
and other settings regardless of whether the power is on or off.
This rechargeable battery is continually charged as long as you are using the camera.
However, if you use the camera for only short periods, it discharges gradually, and if
you do not use the camera at all for about one month it becomes completely
discharged. In this case, be sure to charge this rechargeable battery before using the
camera.
However, even if this rechargeable battery is not charged, you can still use the
camera, but the date and time will not be indicated.
Charging method of the internal rechargeable backup battery
Insert charged battery pack in the camera, and then leave the camera for 24 hours or
more with the power off.
Eye-Fi card
As of March 2010, Eye-Fi cards are sold in the U.S.A., Canada, Japan and some
countries in the European Union.
– For more information on the Eye-Fi card, contact the manufacturer or seller of
Eye-Fi card directly.
– Eye-Fi cards are permitted only in the countries and regions in which they were
purchased. You may be held liable due to local restrictions.
GB
30
Downloaded From camera-usermanual.com Sony Manuals
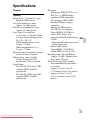
Specifications
Camera
[System]
Image device: 7.81 mm (1/2.3 type)
Exmor R CMOS sensor
Total pixel number of camera:
Approx. 12.8 Megapixels
Effective pixel number of camera:
Approx. 12.2 Megapixels
Lens: Sony G 5× zoom lens
f = 4.25 mm – 21.25 mm (24 mm –
120 mm (35 mm film equivalent)),
F2.4 (W) – F5.9 (T)
While shooting movies (16:9):
28 mm – 140 mm
While shooting movies (4:3):
34 mm – 170 mm
Exposure control: Automatic exposure,
Scene Selection (14 modes)
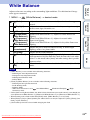
White balance: Auto, Daylight,
Cloudy, Fluorescent 1/2/3,
Incandescent, Flash, One Push
Signal format:
For 1080 50i: PAL color, CCIR
standards HDTV 1080/50i
specification
For 1080 60i: NTSC color, EIA
standards HDTV 1080/60i
specification
File format:
Still images: JPEG (DCF Ver. 2.0,
Exif Ver. 2.3, MPF Baseline)
compliant, DPOF compatible
3D still images: MPO (MPF
Extended (Disparity Image))
compliant
Movies (AVCHD format):
AVCHD Ver. 1.0 compliant
Video: MPEG-4 AVC/H.264
Audio: Dolby Digital 2ch,
equipped with Dolby Digital Stereo
GB
Creator
• Manufactured under license from
Dolby Laboratories.
Movies (MP4 format):
Video: MPEG-4 AVC/H.264
Audio: MPEG-4 AAC-LC 2ch
Recording media: Internal Memory
(Approx. 32 MB), “Memory Stick
Duo” media, SD card
Flash: Flash range (ISO sensitivity
(Recommended Exposure Index)
set to Auto):
Approx. 0.2 m to 5.1 m (W)
(7 7/8 inches to 16 ft 8 3/4 inches)
Approx. 0.9 m to 2.1 m (T)
(2 ft 11 3/8 inches to 6 ft 10 5/8
inches)
GB
31
Downloaded From camera-usermanual.com Sony Manuals
[Input and Output connectors]
HDMI connector: HDMI mini terminal
Multi use terminal: Type3
(AV-out (SD/HD Component)/
HDMI/USB/DC-in):
Video output
Audio output (Stereo)
USB communication
USB communication: Hi-Speed USB
(USB 2.0 compliant)
[LCD screen]
LCD panel: 7.0 cm (2.8 type) TFT
drive
Total number of dots: 460 800 (960 ×
480) dots
[Power, general]
Power: Rechargeable battery pack
NP-BN1, 3.6 V
AC-LS5 AC Adaptor (sold
separately), 4.2 V
Power consumption (during shooting):
1.0 W
Operating temperature: 0°C to 40°C
(32°F to 104°F)
Storage temperature: –20°C to +60°C
(–4°F to +140°F)
Dimensions: 91.7 × 51.9 × 21.5 mm
(3 5/8 × 2 1/8 × 7/8 inches)
(W/H/D, excluding protrusions)
Mass (including NP-BN1 battery pack
and “Memory Stick Duo” media):
Approx. 146 g (5.2 oz)
Microphone: Stereo
Speaker: Monaural
Exif Print: Compatible
PRINT Image Matching III:
Compatible
GB
32
Downloaded From camera-usermanual.com Sony Manuals
BC-CSN/BC-CSNB battery
charger
Power requirements: AC 100 V to
240 V, 50/60 Hz, 2 W
Output voltage: DC 4.2 V, 0.25 A
Operating temperature: 0°C to 40°C
(32°F to 104°F)
Storage temperature: –20°C to +60°C
(–4°F to +140°F)
Dimensions: Approx. 55 × 24 × 83 mm
(2 1/4 × 31/32 × 3 3/8 inches)
(W/H/D)
Mass: Approx. 55 g (1.9 oz)
Rechargeable battery pack
NP-BN1
Used battery: Lithium-ion battery
Maximum voltage: DC 4.2 V
Nominal voltage: DC 3.6 V
Maximum charge voltage: DC 4.2 V
Maximum charge current: 0.9 A
Capacity:
typical: 2.3 Wh (630 mAh)
minimum: 2.2 Wh (600 mAh)
Design and specifications are subject to
change without notice.
Trademarks
• The following marks are trademarks
of Sony Corporation.
, “Cyber-shot,”
“Memory Stick,”
, “Memory
Stick PRO,”
,
“Memory Stick Duo,”
, “Memory
Stick PRO Duo,”
, “Memory
Stick PRO-HG Duo,”
, “Memory
Stick Micro,” “MagicGate,”
, “BRAVIA,”
“PhotoTV HD,” “DVDirect,”
TransferJet and the TransferJet logo
• “Blu-ray Disc” and the logo are
trademarks.
• “AVCHD” and “AVCHD” logotype
are trademarks of Panasonic
Corporation and Sony Corporation.
• Dolby and the double-D symbol are
trademarks of Dolby Laboratories.
• HDMI, the HDMI logo and HighDefinition Multimedia Interface are
trademarks or registered trademarks
of HDMI Licensing LLC.
• Microsoft, Windows, DirectX and
Windows Vista are either registered
trademarks or trademarks of
Microsoft Corporation in the United
States and/or other countries.
• Macintosh, Mac OS and “iMovie”
are trademarks or registered
trademarks of Apple Inc.
• Intel and Pentium are trademarks or
registered trademarks of Intel
Corporation.
• SDXC and SDHC logos are
trademarks of SD-3C, LLC.
• MultiMediaCard is a trademark of the
MultiMediaCard Association.
• “PlayStation” is a registered
trademark of Sony Computer
Entertainment Inc.
• Adobe and Reader are either
trademarks or registered trademarks
of Adobe Systems Incorporated in the
United States and/or other countries.
• The OBEX word mark and logo are
registered trademarks and are owned
by Infrared Data Association
(IrDA®).
• Eye-Fi is a trademark of Eye-Fi, Inc.
• In addition, system and product
names used in this manual are, in
GB
general, trademarks or registered
trademarks of their respective
developers or manufacturers.
However, the ™ or ® marks are not
used in all cases in this manual.
Additional information on this
product and answers to frequently
asked questions can be found at
our Customer Support Website.
Printed on 70% or more recycled paper
using VOC (Volatile Organic
Compound)-free vegetable oil based
ink.
GB
33
Downloaded From camera-usermanual.com Sony Manuals
Printed in China
Downloaded From camera-usermanual.com Sony Manuals
Table of
contents
Operation
Search
MENU/Settings
Search
Index
Cyber-shot Handbook
DSC-WX5/WX5C
© 2010 Sony Corporation
Downloaded From camera-usermanual.com Sony Manuals
4-194-687-11(1)
GB
Table of
contents
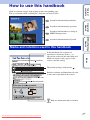
How to use this handbook
Click on a button at upper right to jump to the corresponding page.
This is convenient when searching for a function you want to view.
Operation
Search
Search for information by operation.
MENU/Settings
Search
Search for information in a listing of
MENU/Settings items.
Marks and notations used in this handbook
MENU/Settings
Search
Index
Search for information by keyword.
Operation
Search
Table of
contents
Search for information by function.
The default setting is indicated by
Index
In this handbook, the sequence of
operations is shown by arrows (t).
Operate the camera in the order indicated.
Marks are shown as they appear in the
camera’s default setting.
.
Indicates cautions and limitations relevant
to the correct operation of the camera.
z
Indicates information that is useful to
know.
Downloaded From camera-usermanual.com Sony Manuals
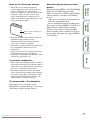
2GB
“Memory Stick
Duo” media
Adaptor
Downloaded From camera-usermanual.com Sony Manuals
Index
When using a “Memory Stick Duo”
media with standard sized “Memory
Stick” media slot
You can use the “Memory Stick Duo” media
by inserting it into the “Memory Stick Duo”
media Adaptor (sold separately).
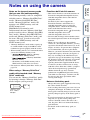
• This manual describes each of the functions of
TransferJet-compatible/incompatible devices,
1080 60i-compatible devices and 1080 50icompatible devices.
To check if your camera supports the
TransferJet function, and whether it is a
1080 60i-compatible device or 1080 50icompatible device, check for the following
marks on the bottom of the camera.
TransferJet-compatible device:
(TransferJet)
1080 60i-compatible device: 60i
1080 50i-compatible device: 50i
• Do not watch 3D images shot with this camera
for extended periods of time on 3D-compatible
monitors.
• When you view 3D images shot with this
camera on a 3D-compatible monitors, you may
experience discomfort in the form of eye strain,
fatigue, or nausea. To prevent these symptoms,
we recommend that you take regular breaks.
However, you need to determine for yourself the
length and frequency of breaks you require, as
they vary according to the individual. If you
experience any type of discomfort, stop viewing
the 3D images until you feel better, and consult
a physician as necessary. Also refer to the
operating instructions supplied with the device
or software you have connected or are using
with this camera. Note that a child’s eyesight is
still at the development stage (particularly
children below the age of 6). Consult a
pediatrician or ophthalmologist before letting
your child view 3D images, and make sure he/
she observes the above precautions when
viewing such images.
MENU/Settings
Search
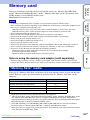
• “Memory Stick Duo” media with a capacity up
to 32 GB and SD card up to 64 GB have been
confirmed to operate properly with the camera.
• When recording movies, it is recommended that
you use the following memory cards:
–
(Mark2) (“Memory
Stick PRO Duo” (Mark2) media)
–
(“Memory Stick PROHG Duo” media)
– SD memory card, SDHC memory card or
SDXC memory card (Class 4 or faster)
• For details on “Memory Stick Duo” media, see
page 158.
Functions built into this camera
Operation
Search
Notes on the types of memory cards
that you can use (sold separately)
The following memory cards are compatible
with this camera: “Memory Stick PRO Duo”
media, “Memory Stick PRO-HG Duo”
media, “Memory Stick Duo” media, SD
memory card, SDHC memory card and
SDXC memory card.
MultiMediaCard cannot be used.
In this manual, the term “Memory Stick Duo”
media is used to refer to “Memory Stick PRO
Duo” media, “Memory Stick PRO-HG Duo”
media and “Memory Stick Duo” media, and
the term “SD card” is used to refer to SD
memory card, SDHC memory card and
SDXC memory card.
Table of
contents
Notes on using the camera
Notes on the battery pack
• Charge the battery pack (supplied) before using
the camera for the first time.
• You can charge the battery pack even if it is not
completely discharged. In addition, even if the
battery pack is not fully charged, you can use the
partially charged capacity of the battery pack as
is.
• If you do not intend to use the battery pack for a
long time, use up the existing charge and
remove it from the camera, then store it in a
cool, dry place. This is to maintain the battery
pack functions.
• For details on the usable battery pack, see
page 160.
3GB
Continued r
Notes on the LCD screen and lens
MENU/Settings
Search
Index
• Exposing the LCD screen or the lens to direct
sunlight for long periods may cause
malfunctions. Be careful when placing the
camera near a window or outdoors.
• Do not press against the LCD screen. The screen
may be discolored and that may cause a
malfunction.
• Images may trail across on the LCD screen in a
cold location. This is not a malfunction.
• Be careful not to bump the movable lens, and be
careful not to apply force to it.
This camera also uses MPEG-4 AVC/H.264
Main Profile for MP4 format recording.
For this reason, movies recorded in MP4
format with this camera cannot be played on
devices other than those that support MPEG4 AVC/H.264.
Operation
Search
Black, white, red, blue or
green dots
– Other devices compatible with AVCHD format
that do not support High Profile
– Devices incompatible with the AVCHD format
Table of
contents
• The LCD screen is manufactured using
extremely high-precision technology so over
99.99% of the pixels are operational for
effective use. However, some tiny black and/or
bright dots (white, red, blue or green) may
appear on the LCD screen. These dots are a
normal result of the manufacturing process and
do not affect the recording.
Note when playing movies on other
devices
This camera uses MPEG-4 AVC/H.264 High
Profile for AVCHD format recording.
Movies recorded in AVCHD format with this
camera cannot be played by the following
devices.
On moisture condensation
• If the camera is brought directly from a cold to a
warm location, moisture may condense inside or
outside the camera. This moisture condensation
may cause a malfunction of the camera.
• If moisture condensation occurs, turn off the
camera and wait about an hour for the moisture
to evaporate. Note that if you attempt to shoot
with moisture remaining inside the lens, you
will be unable to record clear images.
The images used in this Handbook
The images used as examples in this
Handbook are reproduced images, and are not
actual images shot using this camera.
Downloaded From camera-usermanual.com Sony Manuals
4GB
Notes on using the camera
Downloaded From camera-usermanual.com Sony Manuals
Index
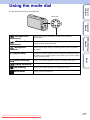
Using the mode dial ············································ 20
Intelligent Auto Adjustment ································· 21
Superior Auto Adjustment ··································· 22
Background Defocus··········································· 24
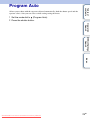
Program Auto ······················································ 25
Scene Selection ·················································· 26
Intelligent Sweep Panorama ······························· 29
Movie Mode························································· 31
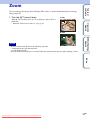
Zoom ··································································· 32
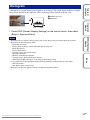
Tracking focus·······················································33
DISP (Screen Display Settings) ····························34
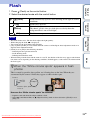
Flash ··································································· 36
Smile Shutter······················································· 37
Self-Timer···························································· 38
Burst button························································· 40
MOVIE (Movie) button········································· 41
MENU/Settings
Search
Shooting
Operation
Search
How to use this handbook····································· 2
Notes on using the camera ··································· 3
Operation Search ·················································· 9
MENU/Settings Search ······································· 12
Identifying parts··················································· 16
List of icons displayed on the screen ·················· 17
Using the internal memory ·································· 19
Table of
contents
Table of contents
5GB
Operation
Search
Viewing still images············································· 42
Playback zoom···················································· 43
Image Index ························································ 44
Delete·································································· 45
Viewing burst images ·········································· 47
Viewing movies ··················································· 49
Table of
contents
Viewing
3D images
MENU/Settings
Search
3D Functions ······················································· 51
3D Shooting ························································ 53
Viewing images shot in Sweep Multi Angle
mode stereoscopically········································· 55
Viewing an image on a 3D TV····························· 56
Index
MENU (Shooting)
MENU items (Shooting) ······································ 12
MENU (Viewing)
MENU items (Viewing) ········································ 13
Settings
Setting items ······················································· 14
Downloaded From camera-usermanual.com Sony Manuals
6GB
Computer
MENU/Settings
Search
Using with your computer·································· 133
Using the software ············································ 134
Connecting the camera to a computer··················136
Uploading images to a media service ···················138
Creating a disc of movies ······································140
Operation
Search
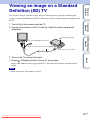
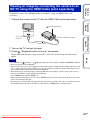
Viewing an image on a Standard Definition
(SD) TV ····························································· 127
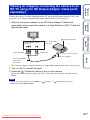
Viewing an image on a High Definition (HD)
TV······································································ 128
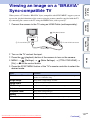
Viewing an image on a “BRAVIA”
Sync-compatible TV ·········································· 131
Table of
contents
TV
Index
Printing
Printing still images ··········································· 143
Troubleshooting
Troubleshooting ················································ 144
Warning indicators and messages ···················· 152
Downloaded From camera-usermanual.com Sony Manuals
7GB
Index ································································· 168
MENU/Settings
Search
Index
Operation
Search
Using the camera abroad·································· 157
Memory card ····················································· 158
Battery pack ······················································ 160
Battery charger·················································· 161
Intelligent Pantilter············································· 162
AVCHD format ·················································· 163
TransferJet standard ········································· 164
Number of still images and recordable time of
movies······························································· 165
Precautions ······················································· 167
Table of
contents
Others
Index
Downloaded From camera-usermanual.com Sony Manuals
8GB
Leaving the settings to Intelligent Auto Adjustment ······························· 21
the camera
Superior Auto Adjustment ································· 22
Shooting 3D images
3D Sweep Panorama ········································· 53
Sweep Multi Angle ·············································· 53
Shooting portraits
Background Defocus ·········································· 24
Soft Skin ································································· 26
Soft Snap ······························································· 26
Anti Motion Blur ···················································· 26
Twilight Portrait ···················································· 26
Smile Shutter ························································ 37
Scene Recognition ·············································· 74
Face Detection ····················································· 78
Anti Blink ································································ 80
Red Eye Reduction ··········································· 100
Shooting panoramic
images
Intelligent Sweep Panorama ···························· 29
Shooting moving
objects
Movie Mode··························································· 31
Tracking focus ······················································ 33
Burst Settings ······················································· 65
Downloaded From camera-usermanual.com Sony Manuals
Index
Movie Mode··························································· 31
MOVIE (Movie) button ······································· 41
Movie format ························································· 95
MENU/Settings
Search
Shooting movies
Operation
Search
Scene Selection ··················································· 26
Scene Recognition ·············································· 74
Table of
contents
Operation Search
9GB
Shooting without blur
Forced Flash ························································· 36
Scene Recognition ·············································· 74
Operation
Search
Shooting with backlight Backlight Correction HDR ································· 26
Table of
contents
Anti Motion Blur ···················································· 26
Hand-held Twilight ·············································· 26
High Sensitivity····················································· 27
2-second delay self-timer ·································· 38
ISO ··········································································· 68
Shooting in dark places Anti Motion Blur ···················································· 26
Tracking focus ······················································ 33
Focus ······································································ 71
Face Detection ····················································· 78
Changing image size/
quality
Image Size/Panorama Image Size/
Quality ····································································· 62
Changing screen
display
DISP (Screen Display Settings) ······················ 34
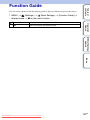
Function Guide ··················································· 104
Deleting images
Delete ································································ 45, 90
Format ·································································· 119
Displaying enlarged
images
Playback zoom ····················································· 43
Trimming (Resize) ··············································· 89
Editing images
Retouch ·································································· 89
Index
Changing focus
position
MENU/Settings
Search
High Sensitivity····················································· 27
Slow Synchro ························································ 36
ISO ··········································································· 68
Playing back a series of Slideshow ······························································ 81
images in order
Downloaded From camera-usermanual.com Sony Manuals
10GB
Changing date and
time settings
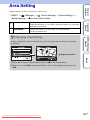
Area Setting ························································ 125
Date & Time Setting·········································· 126
Initializing settings
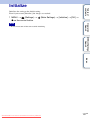
Initialize································································· 107
Printing images
Printing still images ··········································· 143
Viewing on TVs
Viewing an image on a 3D TV ························· 56
Viewing an image on a Standard Definition
(SD) TV································································· 127
Viewing an image on a High Definition
(HD) TV ································································ 128
Creating AVCHD
format movie disc
Creating a disc of movies ································ 140
Information about
optional accessories
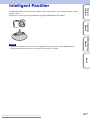
Intelligent Pantilter············································· 162
Downloaded From camera-usermanual.com Sony Manuals
Index
“PMB (Picture Motion Browser)” ·················· 134
MENU/Settings
Search
Printing images with
the date
Operation
Search
Viewing images shot in Sweep Multi Angle
mode stereoscopically ······································· 55
Table of
contents
Viewing 3D images
11GB
Table of
contents
MENU/Settings Search
MENU items (Shooting)
You can select the various shooting functions easily from the MENU button.
1 Press the ON/OFF (Power) button and set the
camera to shooting mode.
ON/OFF (Power) button
Operation
Search
2 Press the MENU button to display the Menu
screen.
3 Select the desired menu item with v/V/b/B on
the control button.
MENU button
Control button
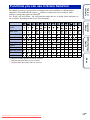
In the table below, indicates settings that can be changed, while – indicates settings that cannot
be changed. A setting may be fixed or restricted depending on the shooting mode. For details,
see the page for each item.
The icons below
indicate the available modes.
Scene Selection
—
Easy Mode
—
—
—
—
—
—
—
—
—
—
—
—
—
—
3D Shooting
—
—
—
—
—
Shooting Direction
—
—
—
—
—
Defocus Effect
—
—
—
—
Index
Mode dial
Menu items
MENU/Settings
Search
4 Press the MENU button to turn off the Menu
screen.
—
—
—
—
—
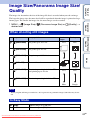
Image Size/Panorama
Image Size/Quality
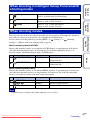
Burst Settings
—
—
—
—
—
Burst Shooting
Interval
—
—
—
—
—
—
—
—
EV
ISO
—
—
—
White Balance
—
—
—
Focus
—
—
—
Metering Mode
—
—
—
—
—
Scene Recognition
Soft Skin Effect
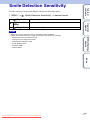
Smile Detection
Sensitivity
—
—
—
—
—
—
—
—
Face Detection
Downloaded From camera-usermanual.com Sony Manuals
—
—
—
—
—
—
—
—
—
—
—
—
—
12GB
Continued r
Anti Blink
—
—
—
—
—
—
—
(Settings)
Table of
contents
Mode dial
Menu items
Notes
• [Quality] is displayed only when [Movie format] is set to [AVCHD].
• Only the items that are available for each mode are displayed on the screen.
Operation
Search
MENU items (Viewing)
You can select the various viewing functions easily from the MENU button.
1 Press the
(Playback) button to switch to
playback mode.
Control button
MENU/Settings
Search
2 Press the MENU button to display the Menu
screen.
3 Select the desired menu item with v/V/b/B on
the control button.
4 Press z on the center of the control button.
indicates settings that can be changed, while – indicates settings that cannot
View Mode
Internal
Memory
Memory card
Folder view
(MP4)
AVCHD
view
—
—
(3D Viewing)
—
—
(Send by TransferJet)
—
—
Menu items
Date View
Folder view
(Still)
(Slideshow)
Index
In the table below,
be changed.
(Playback)
button
MENU button
(View Mode)
Folder View
—
—
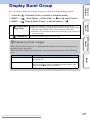
(Display Burst Group)
—
(Retouch)
—
—
—
—
—
—
—
—
—
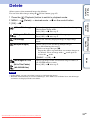
(Delete)
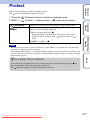
(Protect)
DPOF
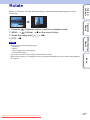
(Rotate)
(Select Folder)
—
—
—
—
(Settings)
Note
• Only the items that are available for each mode are displayed on the screen.
Downloaded From camera-usermanual.com Sony Manuals
13GB
Setting items
(Settings) screen.
1 Press the MENU button to display the Menu
screen.
Control button
Operation
Search
2 Select
(Settings) with V on the control button,
then press z on the center of the control button to
display the setup screen.
Table of
contents
You can change the settings on the
3 Select each item with v/V/b/B, then z.
4 Select the desired setting, then press z.
MENU button
Shooting Settings
MENU/Settings
Search
Categories
Items
Movie format
AF Illuminator
Grid Line
Digital Zoom
Auto Orientation
Red Eye Reduction
Main Settings
Index
Blink Alert
Beep
Language Setting
Function Guide
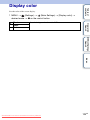
Display color
Demo Mode
Initialize
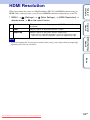
HDMI Resolution
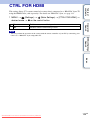
CTRL FOR HDMI
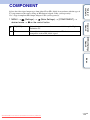
COMPONENT
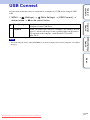
USB Connect
LUN Settings
Download Music
Format Music
Power Save
TransferJet
Eye-Fi*
Downloaded From camera-usermanual.com Sony Manuals
14GB
Continued r
Categories
Format
Create REC.Folder
Change REC.Folder
Delete REC.Folder
Table of
contents
Memory Card Tool
Items
Copy
File Number
Format
File Number
Clock Settings
Area Setting
Date & Time Setting
Operation
Search
Internal Memory Tool
* [Eye-Fi] appears only when an Eye-Fi card (commercially available) is inserted in the camera.
MENU/Settings
Search
Notes
• [Shooting Settings] appears only when settings have been entered from shooting mode.
• [Memory Card Tool] appears only when a memory card is inserted in the camera, while [Internal
Memory Tool] appears only when a memory card is not inserted.
Index
Downloaded From camera-usermanual.com Sony Manuals
15GB
A Shutter button
Camera
B
(Burst) button
Table of
contents
Identifying parts
C For shooting: W/T (zoom) lever (32)
For viewing: (Playback zoom) lever/
(Index) lever (43, 44)
E ON/OFF (Power) button
F Power lamp
G Microphone
Operation
Search
D Flash
H Self-timer lamp/Smile Shutter lamp/AF
illuminator
J Speaker
K LCD screen
L Mode dial (20)
M
(Playback) button (42)
N MOVIE (Movie) button (41)
MENU/Settings
Search
I Lens
O HDMI connector
P Hook for wrist strap*
(Delete) button (45)
R MENU button (12)
Index
Q
S Control button
Menu on: v/V/b/B/z
Menu off: DISP/ / / /Tracking focus
T Battery eject lever
U Battery insertion slot
V Battery/Memory card cover
W Multi connector
X Access lamp
Y Memory card slot
Z Tripod receptacle
wj
(TransferJet™) mark (85, 116)
Cover panel
* Using the wrist strap
Attach the strap and place your hand through the
loop to prevent the camera from being dropped.
Hook
Downloaded From camera-usermanual.com Sony Manuals
16GB
Icons are displayed on the screen to indicate the camera status.
You can change the screen display using DISP (Screen Display Settings) on the control button.
When shooting still images
A
Indication
Battery remaining
Low battery warning
Image Size/Panorama image
size/Quality
Operation
Search
Display
MENU/Settings
Search
When shooting movies
Table of
contents
List of icons displayed on the
screen
Scene Selection
Index
Shooting mode (Intelligent
Auto Adjustment/Superior
Auto Adjustment/Background
Defocus/Program Auto/Scene
Selection/iSweep Panorama/3D
Sweep Panorama/Sweep Multi
Angle/Movie Mode)
Scene Recognition icon
When playing back
White Balance
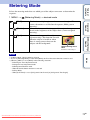
Metering Mode
3D images
Vibration warning
Anti Blink
Scene Recognition
Overlay icon for Superior Auto
Adjustment
Defocus Effect
Soft Skin Effect
Burst Shooting Interval
Burst Images
Main image in the burst group
Downloaded From camera-usermanual.com Sony Manuals
17GB
Continued r
Display
Indication
Display
Red-eye reduction
Metering Mode
Flash mode
Flash charging
Table of
contents
Smile Detection Sensitivity
indicator
Indication
White Balance
Zoom scaling
ISO400
Print order (DPOF)
Database file full/Database file
error warning
Playback zoom
View mode
D
Display
Indication
Self-timer
B
C:32:00
Self-diagnosis display
Display
Indication
Overheating warning
z
AE/AF lock
Face Detection
ISO400
ISO number
Database file full/Database file
error warning
NR slow shutter
Shutter speed
F2.4
Aperture value
+2.0EV
Exposure value
Destination
AF range finder frame
Index
125
Focus
REC
Standby
Recording a movie/Standby
0:12
Recording time (m:s)
101-0012
Folder-file number
2010 1 1
9:30 AM
Recorded date/time of the
playback image
Spot metering cross-hairs
+2.0EV
Exposure value
500
Shutter speed
F2.4
Aperture value
N
Playback
C
Display
MENU/Settings
Search
TransferJet settings
ISO number
Operation
Search
Protect
Playback bar
Indication
Recording folder
Playback folder
96
Number of recordable images
12/12
Image number/Number of
images recorded in date range,
selected folder
100Min
Recordable time
00:00:12
Counter
Histogram
•
appears when histogram
display is disabled.
Volume
Recording/Playback Media
(Memory card, internal memory)
Eye-Fi Mode display
Changing folder
AF Illuminator
Downloaded From camera-usermanual.com Sony Manuals
18GB
The camera has approximately 32 MB of internal memory. This memory is not removable. Even
when there is no memory card inserted in the camera, you can record images using this internal
memory.
B
Internal
memory
• You cannot record movies to the internal memory with the
following movie quality or movie image size:
– [AVC HD 17M FH], [AVC HD 9M HQ]
– [MP4 12M], [MP4 6M]
[Playback]: Images stored in the internal memory are played
back.
[Menu, Settings, etc.]: Various functions can be
performed on images in the internal memory.
Index
On image data stored in the internal memory
MENU/Settings
Search
B
When there is no memory card inserted
[Recording]: Images are recorded using the internal
memory.
Operation
Search
When a memory card is inserted
[Recording]: Images are recorded on the memory card.
[Playback]: Images on the memory card are played back.
[Menu, Settings, etc.]: Various functions can be
performed on images on the memory card.
Table of
contents
Using the internal memory
We recommend that you copy (back up) data using one of the following methods.
To copy (back up) data on a hard disk of your computer
Perform the procedure on page 136 without a memory card inserted in the camera.
To copy (back up) data on a memory card
Prepare a memory card with sufficient free capacity, then perform the procedure explained in
[Copy] (page 123).
Notes
• You cannot import image data on a memory card to the internal memory.
• By making a USB connection between the camera and a computer with a cable, you can import data
stored in the internal memory to a computer. However you cannot export data on a computer to the
internal memory.
Downloaded From camera-usermanual.com Sony Manuals
19GB
Table of
contents
Using the mode dial
Set the mode dial to the desired function.
Mode dial
Operation
Search
Allows you to shoot still images with the setting adjusted
automatically.
(Superior Auto
Adjustment)
Allows you to shoot still images in higher quality than with
Intelligent Auto Adjustment mode.
(Background
Defocus)
Allows you to shoot an image with background defocus and define
the subject.
(Program Auto)
(Scene Selection)
Allows you to shoot with preset settings according to the scene.
(iSweep Panorama)
Allows you to shoot a panoramic image after composing images.
(3D Shooting)
Allows you to shoot 3D images by composing images.
(Movie Mode)
Index
Allows you to shoot with the exposure adjusted automatically (both
the shutter speed and the aperture value). Also you can select various
settings using the menu.
MENU/Settings
Search
(Intelligent Auto
Adjustment)
Allows you to record movies.
Downloaded From camera-usermanual.com Sony Manuals
20GB
Allows you to shoot still images with the setting adjusted automatically.
1 Set the mode dial to
(Intelligent Auto Adjustment).
Table of
contents
Intelligent Auto Adjustment
2 Shoot with the shutter button.
Note
zOn Scene Recognition
Operation
Search
• Flash mode is set to [Auto] or [Off].
Scene Recognition operates in Intelligent Auto Adjustment mode. This function lets the
camera automatically recognize the shooting conditions and shoot the image.
• The camera recognizes (Twilight),
(Twilight Portrait),
(Twilight using a tripod),
(Backlight),
(Backlight Portrait),
(Landscape),
(Macro) or
(Portrait), and displays
the corresponding icon and guide on the screen when the scene is recognized.
For details, see page 74.
Index
zIf you shoot a still image of a subject that is difficult
MENU/Settings
Search
Scene Recognition icon and guide
to focus on
• The shortest shooting distance is approximately 5 cm (2 inches) (W), 90 cm (2 ft 11 3/8 inches) (T)
(from the lens).
• When the camera cannot focus on the subject automatically, the AE/AF lock indicator changes to
flash slowly and the beep does not sound. Either recompose the shot or change the focus setting
(page 71).
• Focusing may be difficult in the following situations:
– It is dark and the subject is distant.
– The contrast between the subject and the background is poor.
– The subject is seen through glass.
– The subject is moving quickly.
– There is reflective light or shiny surfaces.
– The subject is backlit or there is a flashing light.
Downloaded From camera-usermanual.com Sony Manuals
21GB
The camera combines Scene Recognition and high-quality image technology to automatically
shoot the images with the optimal settings.
1 Set the mode dial to
Table of
contents
Superior Auto Adjustment
(Superior Auto Adjustment).
2 Press the shutter button.
Notes
MENU/Settings
Search
• [Flash] is fixed to [Auto] or [Off]. In low light conditions such as night scenes, set [Flash] to [Off] to
achieve the optimal effect of the overlaid images.
• The effect of reduced subject blur and noises is less effective in the following situations:
– Subjects are moving
– Subjects are too close to the camera
– Images with little contrast, such as sky, sandy beach or lawn
– Images with constant changes, such as waves or waterfalls
Operation
Search
The camera shoots burst images when needed and overlays the multiple images. By
overlaying the images, the camera records an image with less subject blur and noises.
Index
Downloaded From camera-usermanual.com Sony Manuals
22GB
Continued r
Adjustment mode and Intelligent Auto Adjustment
mode?
Backlight Correction HDR
Twilight
Prevents over and under
exposure.
Operation
Search
In [Superior Auto Adjustment] mode, the camera shoots burst images based on the
recognized scene.
After shooting, the camera creates a composite of the burst images to produce a higherquality image. However, it may take longer to record images than in Intelligent Auto
Adjustment mode.
Table of
contents
zWhat is the difference between Superior Auto
Twilight Portrait
Backlight
Overlaying shooting
Backlight Portrait
Reduces noises.
MENU/Settings
Search
Twilight using a
tripod
Landscape
Index
Macro
Portrait
Shooting an image
The camera selects the optimal overlay mode based on the recognized scene.
• In Backlight Correction HDR or overlaying shooting mode,
LCD screen.
Downloaded From camera-usermanual.com Sony Manuals
(the overlay icon) appears on the
23GB
The camera focuses only on the subject, leaving the background out of focus, so that the subject
stands out.
1 Set the mode dial to
Table of
contents
Background Defocus
(Background Defocus).
2 Press the shutter button.
• Shoot from the recommended shooting distance indicated on the LCD screen.
• Before shooting, select MENU t [Defocus Effect] t [High], [Mid] or [Low] to change
the intensity of the background defocus effect.
Downloaded From camera-usermanual.com Sony Manuals
Index
zTips for defocusing the background
MENU/Settings
Search
• When shooting, hold the camera still to reduce camera shake.
• The background may not be defocused in the following situations:
– The scene is too bright or too dark.
– The subject is moving.
– The subject is too far from the camera. (The recommended shooting distance has been exceeded.)
– The subject is too close to the background.
• The Background Defocus effect may not work effectively in the following situations:
– The subjects are too small.
– The subject is the same color as the background.
– You moved the camera after setting the AE/AF lock.
• If you are unable to defocus effectively, try the following steps:
– Turn the W/T (zoom) lever to the T side.
– Approach the subject until you are within the recommended shooting distance.
– Separate the subject and the background.
– Shoot after focusing on the subject.
Operation
Search
Notes
24GB
Allows you to shoot with the exposure adjusted automatically (both the shutter speed and the
aperture value). Also you can select various settings using the menu.
1 Set the mode dial to
Table of
contents
Program Auto
(Program Auto).
2 Press the shutter button.
Operation
Search
MENU/Settings
Search
Index
Downloaded From camera-usermanual.com Sony Manuals
25GB
Table of
contents
Scene Selection
Allows you to shoot with preset settings according to the scene.
1 Set the mode dial to
(Scene Selection).
2 Select the desired mode t z on the control button.
If you want to switch to another scene, press the MENU button.
(Soft Snap)
Allows you to shoot images with a softer atmosphere for
portraits and flowers, etc.
(Anti Motion
Blur)
(Landscape)
Allows you to shoot indoor shots without using the flash
to reduce subject blur.
Allows easy shooting of distant scenes by focusing in
the distance. Shoots the clear sky and trees and flowers
in vivid colors.
Index
(Backlight
Correction HDR)
MENU/Settings
Search
Allows you to shoot faces for smoothness.
Operation
Search
(Soft Skin)
Allows you to shoot two images having different
exposures to create a single image with a greater range
of gradation. The camera combines the dark parts of an
image taken with a bright exposure setting and the bright
parts of an image taken with a dark exposure setting.
(Twilight Portrait) Allows you to shoot sharp images of people with the
night view in the background without compromising the
atmosphere.
(Twilight)
Allows you to shoot night scenes at far distance without
losing the dark atmosphere of the surroundings.
(Hand-held
Twilight)
Allows you to shoot night scenes with less noise without
using a tripod.
Downloaded From camera-usermanual.com Sony Manuals
26GB
Continued r
(High Sensitivity) Allows you to shoot images without a
(Gourmet)
(Beach)
(Fireworks)
Allows you to shoot images with the proper settings for
seaside or lakeside scenes.
Allows you to record clear images preventing sunken
colors in snowy scenes or other places where the whole
screen appears white.
Allows you to record fireworks in all their splendor.
Index
Note
MENU/Settings
Search
(Snow)
Allows you to shoot images of your pet with the best
settings.
Operation
Search
(Pet)
Allows you to shoot food arrangements in delicious and
bright colors using Macro mode.
Table of
contents
flash under low light conditions,
reducing blur.
• When you shoot images using
(Twilight Portrait), (Twilight) or
(Fireworks) mode, the shutter
speed is slower and the images tend to blur. To prevent blurring, the use of a tripod is recommended.
Downloaded From camera-usermanual.com Sony Manuals
27GB
Functions you can use in Scene Selection
Operation
Search
Flash
Self-Timer
—
Burst Settings
—
—
—
—
EV
—
—
—
—
—
—
—
—
—
—
—
—
—
—
—
—
—
—
—
White Balance
—
—
Focus
—
—
Metering Mode
—
—
Soft Skin Effect
*2
Face Detection
*3
*1
—
*3
—
—
—
—
—
—
—
—
—
—
*1
—
—
*1
Downloaded From camera-usermanual.com Sony Manuals
—
—
—
—
—
—
—
—
—
—
—
—
—
—
—
—
—
—
—
—
—
—
—
—
—
—
—
—
—
Index
*1 [Flash] for [White Balance] cannot be selected.
*2 [Off] for [Soft Skin Effect] is not available.
*3 [Off] for [Face Detection] cannot be selected.
—
—
—
—
—
—
MENU/Settings
Search
Smile Shutter
Anti Blink
Table of
contents
For shooting an image appropriately according to the scene condition, a combination of
functions is determined by the camera. indicates settings that can be changed, while –
indicates settings that cannot be changed.
For “Flash” and “Self-Timer,” the icons indicate modes that are available. Some functions are
not available, depending on the Scene Selection mode.
28GB
Allows you to create a panoramic image from composite images. The camera also automatically
detects people’s faces or moving subjects.
Operation
Search
1 Set the mode dial to
Table of
contents
Intelligent Sweep Panorama
(iSweep Panorama).
2 Align the camera with the end of the subject to be
shot and press the shutter button.
3 Pan the camera to the end of the guide,
following the indication on the LCD screen.
Index
Guidance
bar
MENU/Settings
Search
This part will not be taken
Notes
• If you cannot pan the camera across the entire subject within the given time, a gray area occurs in the
composite image. If this happens, move the camera faster to record a full panoramic image.
• Since several images are stitched together, the stitched part will not be recorded smoothly.
• Under low light conditions, panoramic images may be blurred or the shooting may not be successful.
• Under lights that flicker, such as fluorescent lights, the brightness or color of the combined image will
not always be the same.
• When the whole angle of panoramic shooting and the AE/AF locked angle are very different in
brightness, color and focus, the shooting will not be successful. If this happens, change AE/AF locked
angle and shoot again.
• Intelligent Sweep Panorama is not suitable for the following situations:
– Subjects are too close to the camera
– Images with little contrast, such as sky, sandy beach or lawn
– Images with constant changes, such as waves or waterfalls
• You cannot create panoramic images in the following situations:
– You pan the camera too quickly or too slowly.
– There is too much camera shake.
Downloaded From camera-usermanual.com Sony Manuals
29GB
Continued r
panoramic image
MENU t [Shooting Direction] t select [Right], [Left], [Up]
and [Down] t z
Panorama Image Size: MENU t [Panorama Image Size] t select [Standard] or
[Wide] t z
Shooting Direction:
Pan the camera in an arc at a constant velocity in the direction indicated on the LCD screen.
Subjects at rest are more suited for panorama shots than moving subjects.
Operation
Search
zTips for shooting a panoramic image
Table of
contents
zChanging the shooting direction or image size of a
MENU/Settings
Search
Vertical direction
Radius as short
as possible
Horizontal direction
Index
• First, press the shutter button halfway so that you can lock the focus, exposure and white balance.
Then, press the shutter button fully down and pan or tilt the camera.
• If a section with greatly varied shapes or scenery is concentrated along a screen edge, the image
composition may fail. In such case, adjust the frame composition so that the section is in the center
of the image, then shoot again.
zScrolling the panoramic images for display
You can scroll panoramic images by pressing z on the control button while panoramic
images are being displayed. Turn the W (zoom) lever to display the whole image again.
Shows the displayed area of
the whole panoramic image
Control button/lever
Action
z on the control button
Scrolling playback/pauses
scrolling images
v/V/b/B on the control
button
Scrolls images
W (zoom) lever
Displays the whole image
• Panoramic images can also be played back using the supplied software “PMB” (page 134).
• Panoramic images recorded using another camera may not scroll correctly when played.
Downloaded From camera-usermanual.com Sony Manuals
30GB
Allows you to record movies.
1 Set the mode dial to
(Movie Mode).
Table of
contents
Movie Mode
2 Press the shutter button.
3 To stop recording, press the shutter button again.
Size
Movie format:
Image Size (MP4):
zTo shoot a movie quickly
MOVIE (Movie) button
To end movie recording, press the MOVIE (Movie) button
again.
The menu and setting items used for recording are those enabled
when you set the mode dial to
(Movie Mode).
Downloaded From camera-usermanual.com Sony Manuals
Index
In other than Easy Mode, you can start movie recording simply by pressing the MOVIE
(Movie) button.
MENU/Settings
Search
Quality (AVCHD):
MENU t
(Settings) t
(Shooting Settings) t [Movie
format] t [AVCHD] or [MP4] t z on the control button
MENU t
(Quality) t [AVC HD 17M FH] or [AVC HD 9M
HQ]
MENU t
(Image Size) t [MP4 12M], [MP4 6M] or [MP4
3M]
Operation
Search
zChanging the Movie Format, Image Quality or Image
31GB
You can enlarge the image when shooting. The camera’s optical zoom function can enlarge
images up to 5×.
1 Turn the W/T (zoom) lever.
Table of
contents
Zoom
T side
Turn the W/T (zoom) lever to (T) to zoom in, and to (W) to
zoom out.
W side
MENU/Settings
Search
Notes
• Zoom is locked to the W side in the following situations:
– In Intelligent Sweep Panorama mode
– In 3D shooting mode
• The operating sound of the lens is recorded when the zoom function operates while shooting a movie.
Operation
Search
• When the zoom scale exceeds 5×, see page 98.
Index
Downloaded From camera-usermanual.com Sony Manuals
32GB
The camera tracks the subject and adjusts focus automatically until you press the shutter button
halfway down, even if the subject is moving.
Table of
contents
Tracking focus
1 Press z on the control button.
The target frame appears.
Operation
Search
2 Place the target frame over the subject you want
to focus on, and press z.
Tracking begins.
3 Press the shutter button half way down.
The position of the subject, focus and exposure are locked.
Target frame
5 To stop the tracking focus function before shooting, press z again.
Notes
Downloaded From camera-usermanual.com Sony Manuals
Index
• Tracking focus is not available in the following situations:
– In Intelligent Sweep Panorama mode
– In 3D shooting mode
– In Movie Mode
– In Easy Mode
– When the Smile Shutter function is activated
– When
(Landscape), (Twilight) or (Fireworks) is selected in Scene Selection
– When [Self-Timer] is set to [Self-portrait One Person] or [Self-portrait Two People]
– When you use [Digital Zoom]
• Tracking focus may fail to lock the focus, lose the subject or track different subject in the following
situations:
– The subject moves too quickly.
– The subject is too small or too large.
– The subject is the same color as the background.
– Under low light conditions.
– Under conditions where the brightness varies.
• Tracking focus will automatically be canceled when the subject disappears from the screen or has failed
to be tracked.
MENU/Settings
Search
4 Press the shutter button fully down to shoot the
image.
33GB
1 Press DISP (Screen Display Settings) on the control button.
2 Select the desired mode with the control button.
Table of
contents
DISP (Screen Display Settings)
(Image Only) In Movie Mode, sets screen to standard
brightness and displays only images.
(Bright +
Exposure Data)
Sets screen brighter and displays the
information.
Exif data and a histogram for the recorded
image are also displayed.
Sets screen brighter and displays the
information.
(Normal)
Sets screen to standard brightness and displays
the information.
Index
(Bright)
MENU/Settings
Search
Sets screen brighter and displays only images.
Operation
Search
(Bright +
Image Only)
Note
• If you view images in bright outside light, adjust the screen brightness up. However, the battery power
may decrease faster under such condition.
Downloaded From camera-usermanual.com Sony Manuals
34GB
Histogram
Table of
contents
A histogram is a graph showing the brightness of an image. The graph display indicates a bright
image when skewed to the right side, and a dark image when skewed to the left side.
A Number of pixels
B Brightness
A
Bright
1 Press DISP (Screen Display Settings) on the control button, then select
[Bright + Exposure Data].
Index
Downloaded From camera-usermanual.com Sony Manuals
MENU/Settings
Search
Notes
• The histogram also appears when playing back a single image, but you cannot adjust the exposure.
• The histogram does not appear when:
– Recording 3D images
– Playing back 3D images shot in other than [16:9] image size
– Recording movies
– Playing back movies
– Viewing vertical orientation images
– Rotating still images
– Shooting with iSweep Panorama
– Viewing images shot with iSweep Panorama
– When [Display Burst Group] is set to [Display Main Image Only]
• A large difference in the histogram displayed during shooting and playback may occur when:
– The flash strobes.
– The shutter speed is slow or fast.
• The histogram may not appear for images recorded using other cameras.
Operation
Search
B
Dark
35GB
1 Press
(Flash) on the control button.
2 Select the desired mode with the control button.
(Auto)
(Slow
Synchro)
(Off)
Flash automatically operates when shooting in low light or backlit
conditions.
Flash always operates.
Flash always operates.
The shutter speed is slow in a dark place to clearly shoot the
background that is out of flash light.
Operation
Search
(On)
Table of
contents
Flash
Flash does not operate.
•
•
•
•
Index
The flash strobes twice. The first flash adjusts the light quantity.
While charging the flash,
is displayed.
You cannot use the flash during burst shooting.
[On] or [Slow Synchro] is not available when the camera is in Intelligent Auto Adjustment mode or in
Superior Auto Adjustment mode.
• [Flash] is set to [Off] in the following situations:
– In Intelligent Sweep Panorama mode
– In 3D shooting mode
– In Background Defocus mode
• When shooting with the flash and the zoom is set to W, the shadow of the lens may appear at the bottom
left of the screen, depending on the shooting conditions. If this happens, set the zoom to T and shoot with
the flash again.
MENU/Settings
Search
Notes
zWhen the “White circular spots” appears in flash
photos
This is caused by particles (dust, pollen, etc.) floating close to the lens. When they are
accentuated by the camera’s flash, they appear as white circular spots.
Camera
Subject
Particles (dust, pollen, etc.)
in the air
How can the “White circular spots” be reduced?
• Light the room and shoot the subject without a flash.
• Select
(Anti Motion Blur) or
(High Sensitivity) mode in Scene Selection. ([Flash] is set to
[Off].)
Downloaded From camera-usermanual.com Sony Manuals
36GB
Table of
contents
Smile Shutter
When the camera detects a smile, the shutter is released automatically.
1 Press
(Smile) on the control button.
2 Wait for a smile to be detected.
3 To stop shooting, press
(Smile) again.
Face Detection frame
Notes
Index
• Shooting using the Smile Shutter ends automatically when either the memory card or internal memory
becomes full.
• Smiles may not be detected correctly depending on the conditions.
• You cannot use the digital zoom function.
• The Smile Shutter function is not available in the following situations:
– In Intelligent Sweep Panorama mode
– In Superior Auto Adjustment mode
– In Background Defocus mode
– In 3D shooting mode
– In Movie Mode
MENU/Settings
Search
Smile Detection Sensitivity
indicator
Operation
Search
When the smile level exceeds the b point on the indicator, the
camera records images automatically.
If you press the shutter button during Smile Shutter, the camera
shoots the image, and then returns to Smile Shutter mode.
zHints for better capturing of smiles
Do not cover the eyes with the bangs.
Do not obscure the face by hat, masks, sunglasses, etc.
2 Try to orient the face in front of the camera and be as
level as possible. Keep the eyes narrowed.
3 Give a clear smile with an open mouth. The smile is
easier to detect when the teeth are shown.
1
• The shutter operates when any person whose face is being detected smiles.
• You can select or register the priority subject for face detection with [Face Detection]. When the
selected face is registered in the camera memory, Smile Detection is performed only for that face
(page 78).
• If the camera cannot detect a smile, set the Smile Detection Sensitivity to [Slight Smile].
Downloaded From camera-usermanual.com Sony Manuals
37GB
1 Press
Table of
contents
Self-Timer
(Self-Timer) on the control button.
2 Select the desired mode with the control button.
(Off)
Does not use the self-timer.
Sets the self-timer to a 10-second delay.
When you press the shutter button, the self-timer lamp flashes and a
beep sounds until the shutter operates.
To cancel, press again.
(2sec)
Sets the self-timer to a 2-second delay.
(Self-portrait
One Person)
Notes
• In Movie Mode, [Self-portrait One Person] or [Self-portrait Two People] is not available.
• The self-timer is not available in the following situations:
– In Intelligent Sweep Panorama mode
– In 3D shooting mode
Point the lens at yourself so your face is reflected in the LCD screen. The camera detects the
subjects, and then the shutter operates. The camera determines the optimal composition and
prevents faces from being cut out of the LCD screen. Do not move your camera after the
beep sounds.
Index
zAutomatic shooting with Self-portrait timer
MENU/Settings
Search
(Self-portrait
Two People)
Sets the self-timer to Self-portrait timer.
When the camera detects the specified number of faces, a beep
sounds, and the shutter operates 2 seconds later.
Operation
Search
(10sec)
• You can also shoot an image by pressing the shutter button during this
operation.
Downloaded From camera-usermanual.com Sony Manuals
38GB
Continued r
If your hands or body moves while holding the camera and pressing the shutter button,
“Camera shake” occurs. Camera shake occurs frequently under low-light or slow shutter
speed conditions, such as those encountered in
(Twilight Portrait) or (Twilight) mode.
In such a case, shoot with the below tips in mind.
Operation
Search
• Shoot with a 2-second delay self-timer and stabilize
the camera by holding your arms firmly at your side
after pressing the shutter button.
• Use a tripod or place the camera on a flat surface to
hold the camera steady.
Table of
contents
zHints for preventing blur
MENU/Settings
Search
Index
Downloaded From camera-usermanual.com Sony Manuals
39GB
You can select Single (single-image) or Burst as the shooting mode.
You can also select Single (single-image) or Burst in [Burst Settings] (page 65).
1 Select a desired mode with the
When you press the
Table of
contents
Burst button
(Burst) button.
(Burst) button, the setting switches.
The camera shoots a single image.
Burst
The camera shoots up to 10 continuous frames in one burst when you
hold down the shutter button.
You can set the burst shooting speed in [Burst Shooting Interval]
(page 66).
• The Burst button is not available in the following situations:
– In iSweep Panorama mode
– In Superior Auto Adjustment mode
– In Background Defocus mode
– In 3D shooting mode
– In Movie Mode
– When the Smile Shutter function is activated
MENU/Settings
Search
Note
Operation
Search
Single
Index
Downloaded From camera-usermanual.com Sony Manuals
40GB
You can quickly start shooting movies from all REC modes.
1 Press the MOVIE (Movie) button.
Table of
contents
MOVIE (Movie) button
2 To stop recording, press the MOVIE (Movie) button again.
Note
Operation
Search
• MOVIE (Movie) button is not available in the following situations:
– When the Smile Shutter function is activated
– In Easy Mode
– When using [Self-Timer]
zChanging the Movie Format, Image Quality or Image
Movie format:
Quality (AVCHD):
Image Size (MP4):
MENU t
(Settings) t
(Shooting Settings) t [Movie
format] t [AVCHD] or [MP4] t z on the control button
MENU t
(Quality) t [AVC HD 17M FH] or [AVC HD
9M HQ]
MENU t
(Image Size) t [MP4 12M], [MP4 6M] or [MP4
3M]
MENU/Settings
Search
Size
Index
Downloaded From camera-usermanual.com Sony Manuals
41GB
1 Press the
(Playback) button to switch to playback mode.
2 Select an image with the control button.
Table of
contents
Viewing still images
zViewing images taken with a different camera
MENU/Settings
Search
• Use a sufficiently charged battery to register images. If a battery with a low charge is used to
register images, it may not be possible to register all of the data or the data may be corrupted if the
battery charge runs out.
Operation
Search
This camera creates an Image Database File on the memory card for recording and playing
images. If the camera detects images not registered in the Image Database File on the
memory card, a registration screen with the message “Files found which were not
recognized Import files” will be displayed. To view unregistered images, register them by
selecting [OK].
Index
Downloaded From camera-usermanual.com Sony Manuals
42GB
Table of
contents
Playback zoom
Plays back the enlarged image.
1 Turn the
(Playback zoom) lever to (T) during still
image playback.
2 Adjust the position with the control button.
3 Change the zoom scale with the
lever.
(Playback zoom)
Turn the lever to (T) to zoom in, to (W) to zoom out.
Press z to cancel playback zoom.
You can save an enlarged image by using the trimming function.
Press MENU t [Retouch] t [Trimming (Resize)].
MENU/Settings
Search
zTo save enlarged images
Shows the displayed
area of the whole
image
Operation
Search
The image is enlarged to twice the previous size, at the center of the
image.
Index
Downloaded From camera-usermanual.com Sony Manuals
43GB
Displays multiple images at the same time.
1 Press the
2 Turn the
(Playback) button to switch to playback mode.
Table of
contents
Image Index
(Index) lever to (W) to display the image index screen.
3 To return to the single-image screen, select an image with the control
button, then press z.
Operation
Search
Turn the lever again to display an index screen with more images. Turn the lever yet again to
view images with the Calendar while playing back in [Date View].
zDisplaying images of the desired date/folder
When [View Mode] is set to [Date View], turn the
Calendar, while the index displays more images.
(Index) lever to view images with the
Index
zViewing images with the Calendar
MENU/Settings
Search
Select the left side bar with the control button, then select the
desired date/folder with v/V.
• To select the month you want to display, select / with the
control button, then the desired month.
• To view images in selected date in index mode, select the date with
the control button and press z.
• To exit the Calendar, select
with the control button, then press
z.
Downloaded From camera-usermanual.com Sony Manuals
44GB
Allows you to select unwanted images for deletion. You can also delete images from the MENU
button (page 90).
1 Press the
2
Table of
contents
Delete
(Playback) button to switch to playback mode.
(Delete) button t desired mode t z on the control button
All in This Folder
All AVCHD files
Multiple Images
Deletes all images in the selected date range or folder, or all
AVCHD movies at once.
Press [OK] t z after step 2.
Allows you to select and delete multiple images.
Do as the following after step 2.
2MENU t [OK] t z
Deletes the currently displayed image in single-image mode.
All Imgs in This Burst
Group
Deletes all images in the selected burst group at once.
Press [OK] t z after step 2.
All but This Image
Deletes burst group images other than the selected image in
Display Burst Group mode.
Press [OK] t z after step 2.
Cancel
Cancels the deletion.
Index
This Image
MENU/Settings
Search
1Select an image then press z.
Repeat the above step until there are no more images to be
deleted. Select an image with a
mark again to release the
mark.
Operation
Search
All Images on This Date
Notes
• In Easy Mode, you can select from [1 image] or [All] to delete images.
• When the internal memory is used to record images, View Mode is set to Folder View and still images
and movies are displayed in the same folder.
Downloaded From camera-usermanual.com Sony Manuals
45GB
Continued r
mode when selecting images
Turn the lever to (T) of the W/T (zoom) lever in index mode
to return to single-image mode, and turn the
(Index) lever to
(W) in single-image mode to return to index mode.
Table of
contents
zYou can switch between index and single-image
• You can also switch between index and single-image modes in
[Protect], [Send by TransferJet] or [DPOF].
Operation
Search
MENU/Settings
Search
Index
Downloaded From camera-usermanual.com Sony Manuals
46GB
Table of
contents
Viewing burst images
Plays back burst images.
1 Press the
(Playback) button to switch to playback mode.
2 Select burst images using b/B on the control button.
Operation
Search
3 Press the desired button according to the playback
mode.
Action
Press V on the control button.
Displays the burst images in index mode.
The display switches between single image display and thumbnail
image display each time you press z on the control button.
Press z on the control button.
You can view the burst images as a movie by tilting the camera to
the right or left.
Note
• You can view the burst images as a movie only when you set [View Mode] to [Date View] and [Display
Burst Group] to [Display Main Image Only].
MENU/Settings
Search
Operation method
zDisplaying grouped burst images side by side
Main image
Thumbnail image
display
Index
Only the main image is displayed if [Display Main Image Only] has been set. You can
display images in the index by following the procedure below.
Single image display
The image being displayed
above
Display the main image in playback mode, then press V on the control button.
The images are displayed in the index.
2 Press b/B to display each image in a burst group.
3 The display switches between single image display and thumbnail image display each time you
press z.
4 To cancel the display, press V.
1
Downloaded From camera-usermanual.com Sony Manuals
47GB
Continued r
camera to the right or left
To view the burst images smoothly as a movie, press z on the control button, then tilt the
camera to the right or left, as illustrated.
Table of
contents
zViewing the burst images as a movie by tilting the
Operation
Search
MENU/Settings
Search
Tilt the camera to the right or left, with the
center of the camera as the axis.
Index
Downloaded From camera-usermanual.com Sony Manuals
48GB
1 Press the
Table of
contents
Viewing movies
(Playback) button to switch to playback mode.
2 Select a movie with the control button.
3 Press z.
Movie playback starts.
Action
z
Stop
B
Fast forward
b
Fast rewind
V
Displays the control panel
Operation
Search
Control button
• You may not be able to play back some images shot using other cameras.
zTo display only movies on the index screen
You can view only movie thumbnails on the index screen by pressing MENU t
Mode) t
(Folder view (MP4)) or
(AVCHD view).
(View
Displays MP4-format movie thumbnails on the index screen.
(AVCHD view)
Displays AVCHD-format movie thumbnails on the index screen.
• When a movie file is played back to the end, the camera automatically starts playing back the next
movie file.
Index
(Folder view (MP4))
MENU/Settings
Search
Note
Displaying the control panel
Display the control panel, you can control slow movie playback and adjust the volume.
1 Press V on the control button.
The control panel appears.
2 Select a desired button with b/B, and press z.
Button
Action
Fast rewind
Playback/Stop
Fast forward
Slow playback
Volume control
Close the control panel
Downloaded From camera-usermanual.com Sony Manuals
49GB
Continued r
Select the image you want to display using b/B on the control button, and press z.
The Playback bar appears, you can check a playback position of a movie.
Table of
contents
zOn the movie viewing screen
,
,
,
or
appears on the movie viewing
screen.
The icon displayed may vary depending on image size and quality.
Operation
Search
Playback bar
MENU/Settings
Search
Index
Downloaded From camera-usermanual.com Sony Manuals
50GB
MENU/Settings
Search
Shooting
To shoot 3D images, sweep the
camera as illustrated.
Playing back
images on the
camera
Images shot in [Sweep Multi Angle]
mode
Index
Images shot in [3D Sweep
Panorama] mode
Operation
Search
This camera is compatible with 3D functions. The 3D functions installed on this camera are [3D
Sweep Panorama] and [Sweep Multi Angle]. 3D images shot in [3D Sweep Panorama] mode can
be played back only on a 3D TV, while the images shot in [Sweep Multi Angle] mode can be
played back both on this camera and on a 3D TV.
This section describes the difference between [3D Sweep Panorama] mode and [Sweep Multi
Angle] mode.
For more details, see the following pages:
– 3D Shooting (page 53)
– Viewing images shot in Sweep Multi Angle mode stereoscopically (page 55)
– Viewing an image on a 3D TV (page 56)
Table of
contents
3D Functions
The recorded images are played
back as normal still images. You
cannot view 3D images.
You can view stereoscopic images
shot in [Sweep Multi Angle] mode by
tilting the camera to the right or left.
For details, see page 55.
Playing back
images on a
3D TV
3D images shot in
(Standard) and
(Wide) image size can be played
and scrolled on a 3D TV. For details,
see page 56.
Downloaded From camera-usermanual.com Sony Manuals
For details, see page 56.
51GB
Continued r
A 3D image consists of both JPEG and MPO files.
If you import images shot in [3D Sweep Panorama] and [Sweep Multi Angle] modes into a
computer, the image data is stored on the computer as follows.
Usage
DSC0ffff.JPG
DSC0ffff.MPO
For playing back the 3D images on
a 3D TV
Sweep Multi Angle
DSC0aaaa.JPG
DSC0aaaa.MPO
For playing back the 3D images on
a 3D TV
DSC0ssss.JPG
DSC0ssss.MPO
For playing back the 3D images on
the camera
MENU/Settings
Search
• If you shoot 3D images in [Sweep Multi Angle] mode, the following files are stored on the
computer.
– JPEG files and MPO files (for playing back on the camera)
– JPEG files and MPO files (for playing back on a 3D TV)
• If you delete either the JPEG file or the MPO file comprising a 3D image, that 3D image may not be
played back successfully.
Operation
Search
File name on the computer
3D Sweep Panorama
Table of
contents
zFile name of the 3D image
Index
Downloaded From camera-usermanual.com Sony Manuals
52GB
Multiple images are shot while the camera is moving, and these images are compiled into a 3D
image.
1 Set the mode dial to
Table of
contents
3D Shooting
(3D Shooting).
(Sweep Multi Angle) t z on the
Operation
Search
2 Select
(3D Sweep Panorama) or
control button.
3 Align the camera with the end of the subject to be
shot and press the shutter button.
For
(3D Sweep Panorama), press MENU t
(Shooting Direction) to change the shooting direction.
4 Pan the camera to the end of the guide,
following the indication on the LCD
screen.
Guidance
bar
Shoots an image that can be played back on a 3D TV.
(Sweep Multi
Angle)
Shoots an image that can be played back as a stereoscopic image by
tilting the camera to the right or left, and an image that can be
played back on a 3D TV.
Index
(3D Sweep
Panorama)
MENU/Settings
Search
This part will not be taken
Notes
• In [Sweep Multi Angle] mode, you can select only the [16:9(2M)] panoramic image size.
• 3D shooting is not suitable for the following situations:
– When there is a large subject
– Moving subjects
– When the main subject is too close to the camera
– Images with little contrast, such as the sky, a sandy beach, or lawn
• 3D images consist of a JPEG file and an MPO file. If either file is deleted on your PC, the camera may
not operate correctly.
• If you cannot pan the camera across the entire subject within the given time, a gray area occurs in the
composite image. If this happens, move the camera faster to record a full 3D image.
• Since several images are stitched together, the stitched part will not be recorded smoothly.
• Under low light conditions, the images may be blurred.
• Under lights that flicker, such as fluorescent lights, the 3D shot may not be successful.
• If the entire angle of view of the 3D shot and the angle of view when the AE/AF was locked are
extremely different in brightness, color or focus, the shot will not be successful. If this happens, change
the location of the AE/AF lock and try again.
• 3D shooting may be canceled in the following situations:
– You pan the camera too quickly or too slowly.
– There is too much camera shake.
Downloaded From camera-usermanual.com Sony Manuals
53GB
Continued r
Pan the camera in an arc at a constant velocity in the
direction indicated on the LCD screen.
Subjects at rest are best suited for 3D shots.
Sweep the camera approximately 45 degrees to the left and right of the subject you want to
focus on.
Downloaded From camera-usermanual.com Sony Manuals
Index
Image
MENU/Settings
Search
zShootable range in Sweep Multi Angle mode
Operation
Search
• Determine the scene and press the shutter button halfway, so that you can lock the focus, exposure
and white balance. Then, press the shutter button fully down and pan the camera.
Table of
contents
zTips for shooting a 3D image
54GB
1 Press the
(Playback) button to switch to playback mode.
2 Select an image shot in
control button.
(Sweep Multi Angle) mode using b/B on the
Operation
Search
You can view the stereoscopic images shot in [Sweep Multi Angle] mode by tilting the camera
to the right or left.
Table of
contents
Viewing images shot in Sweep
Multi Angle mode
stereoscopically
3 Press z.
5 Press z again to end playback.
Note
• 3D images shot in [3D Sweep Panorama] mode cannot be played back in 3D on the camera.
MENU/Settings
Search
4 Tilt the camera to the right or left.
zTilting the camera to the right or left
Downloaded From camera-usermanual.com Sony Manuals
Index
To view images shot in [Sweep Multi Angle] mode
stereoscopically, tilt the camera to the right or left as
illustrated.
55GB
You can view 3D images recorded on the camera in 3D format by connecting the camera to a 3D
TV using an HDMI Cable (sold separately).
Refer also to the operating instructions supplied with the TV.
Table of
contents
Viewing an image on a 3D TV
1 Connect the camera to the TV using an HDMI Cable (sold separately).
Operation
Search
(Playback) button
HDMI jack
2 To the HDMI connector
HDMI Cable
2 Turn on the TV and set the input.
3 Press the
4 MENU t
(Playback) button to turn on the camera.
MENU/Settings
Search
1 To the HDMI jack
(3D Viewing) t z on the control button
Images shot with the camera appear on the TV.
Control button
Action
z
Scroll Playback
• Plays back scrolling images shot in 3D Sweep Panorama mode.
• Press b/B to move the direction of scrolling.
• When playing back a 3D image shot in [16:9] image size, [Scroll Playback] is
not available.
v
Continuous Playback
• Continuously plays back only 3D images.
b
B
V
Displays the previous image.
Index
5 Press b/B on the control button to select images and set the desired
mode.
Displays the next image.
Ends 3D playback.
Downloaded From camera-usermanual.com Sony Manuals
56GB
Continued r
Notes
Table of
contents
Operation
Search
• When you select
(3D Viewing) mode, only 3D images are displayed.
• If you play back an image shot in [3D Sweep Panorama] mode with [Shooting Direction] set to [Up] or
[Down], the image is played back horizontally on the TV.
• Press MENU t
(Settings) t (Main Settings) to select [Auto] or [1080i] for [HDMI Resolution].
• The beep sound is fixed to [Shutter].
• Do not connect the camera and equipment to be connected using output terminals. When the camera and
TV are connected using output terminals, no video and sound are produced. Such a connection can also
cause trouble of the camera and/or connected equipment.
• This function may not work properly with some TVs. For example, you may not be able to view a video
on your TV, output in 3D mode or hear sound from the TV.
• Use an HDMI Cable with the HDMI logo.
• When connecting the camera to a TV, use an HDMI Cable that can be connected to the mini jack on the
camera end and to the TV jack.
• Recording may automatically stop to protect the camera after a period of time when you shoot movies in
the condition where the camera and TV are connected by an HDMI Cable (sold separately).
MENU/Settings
Search
Index
Downloaded From camera-usermanual.com Sony Manuals
57GB
Table of
contents
Easy Mode
Allows you to shoot still images using the minimum necessary functions.
The text size increases and indicators become easier to see.
1 Set the mode dial to
2 MENU t
(Intelligent Auto Adjustment).
(Easy Mode) t z on the control button.
Operation
Search
3 [OK] t z
4 Shoot with the shutter button.
Note
• The battery power may decrease faster because the screen brightness increases automatically.
Image Size:
MENU t [Image Size] t z on the control button t desired
mode t z
Select between [Large] or [Small] size.
Self-Timer:
on the control button t desired mode
Select between [10sec] or [Off] mode.
Flash:
on the control button t desired mode
Select between [Auto] or [Off] mode.
on the control button
Index
Smile Shutter:
MENU/Settings
Search
zFunctions available in Easy Mode (Shooting)
zOn Scene Recognition
Scene Recognition operates in Easy Mode. This function lets the camera automatically
recognize the shooting conditions and shoot the image.
Scene Recognition icon
• The camera recognizes (Twilight),
(Twilight Portrait),
(Twilight using a tripod),
(Backlight),
(Backlight Portrait),
(Landscape),
(Macro) or
(Portrait), and displays
an icon on the LCD screen when the scene is recognized.
For details, see page 74.
Downloaded From camera-usermanual.com Sony Manuals
58GB
Continued r
When you press the
(Playback) button in Easy Mode, the playback screen text becomes
larger and easier to see. In addition, only the deletion function becomes available.
Delete:
(Delete) button t [OK] t z on the control button
You can delete the currently displayed image.
• When a memory card is inserted in the camera, [View Mode] is set to [Date View].
Operation
Search
MENU t [Delete] t z on the control button t desired mode t z
Select between [1 image] or [All].
You can delete the currently displayed image with [1 image] and delete all
images in the selected date range or internal memory (if selected) with [All].
Table of
contents
zViewing in Easy Mode
MENU/Settings
Search
Index
Downloaded From camera-usermanual.com Sony Manuals
59GB
Set the direction in which the camera will be panned when shooting in Intelligent Sweep
Panorama or 3D Sweep Panorama modes.
1 MENU t
Table of
contents
Shooting Direction
(Shooting Direction) t desired direction
Pan from left to right.
(Left)
Pan from right to left.
(Up)
Pan from down to up.
(Down)
Pan from up to down.
Operation
Search
(Right)
Notes
MENU/Settings
Search
• You cannot select [Up] and [Down] when you have selected [16:9] in [3D Sweep Panorama] mode.
• You can select only the right direction in [Sweep Multi Angle] mode.
Index
Downloaded From camera-usermanual.com Sony Manuals
60GB
Sets the level of background defocus effect when shooting in Background Defocus mode.
1 Set the mode dial to
2 MENU t
(Mid)
(High)
(Defocus Effect) t desired mode
Adds a slight Background Defocus effect.
Adds an average Background Defocus effect.
Adds a strong Background Defocus effect.
Operation
Search
(Low)
(Background Defocus).
Table of
contents
Defocus Effect
MENU/Settings
Search
Index
Downloaded From camera-usermanual.com Sony Manuals
61GB
The image size determines the size of the image file that is recorded when you take an image.
The larger the image size, the more detail will be reproduced when the image is printed on largeformat paper. The smaller the image size, the more images can be recorded.
(Panorama Image Size) or
(Quality) t
When shooting still images
Usage guidelines
For prints up to A3+ size
(3264×2448)
For prints up to A3 size
(2592×1944)
For prints up to L/2L/A4 size
(640×480)
For e-mail attachments
(4000×2248)
For viewing on a high-definition TV
and printing up to A4 size
(1920×1080)
For viewing on a high-definition TV
Printing
Less
Fine
More
Rough
Less
Fine
More
Rough
Index
(4000×3000)
No. of
images
MENU/Settings
Search
Image size
Operation
Search
1 MENU t (Image Size),
desired size
Table of
contents
Image Size/Panorama Image Size/
Quality
Note
• When you print still images recorded at a 16:9 aspect ratio or panoramic images, both sides may be cut
off.
In Easy Mode
Large
Shoots images in [12M] size.
Small
Shoots images in [5M] size.
Downloaded From camera-usermanual.com Sony Manuals
62GB
Shoots at 1920 × 1080 (Horizontal).
[16:9] is available only for 3D shooting.
(Standard)
Shoots at 4912 × 1080 (Horizontal).
Shoots at 3424 × 1920 (Vertical).
(Wide)
Shoots at 7152 × 1080 (Horizontal).
Shoots at 4912 × 1920 (Vertical).
Operation
Search
(16:9)
When shooting movies
Movie recording format (AVCHD)
Movies shot with this camera are recorded in AVCHD format, at approximately 60 fields/sec
(for 1080 60i-compatible devices) or 50 fields/sec (for 1080 50i-compatible devices), in
interlaced mode, with Dolby Digital audio, AVCHD format.
Description
17 Mbps
Shoots at a maximum picture quality of
1920×1080 size
AVC HD 9M HQ
9 Mbps
Shoots at a high picture quality of
1440×1080 size
Index
Average bit-rate
AVC HD 17M FH
MENU/Settings
Search
The larger the size of the movie image, the higher the image quality. The higher the amount of
data used per second (average bit-rate), the smoother the playback image.
Select a movie recording format by pressing MENU t
(Settings) t
(Shooting
Settings) t [Movie format] in shooting mode (page 95).
Movie quality
Table of
contents
When shooting in Intelligent Sweep Panorama/3D
shooting modes
Movie recording format (MP4)
Movies shot with this camera are recorded in MPEG-4 format, at approximately 30 frames/sec
(for 1080 60i-compatible devices) or approximately 25 frames/sec (for 1080 50i-compatible
devices), in progressive mode, with AAC audio, mp4 format.
Movie image size
Average bit-rate
Description
MP4 12M
12 Mbps
Shoots at 1440×1080 size
MP4 6M
6 Mbps
Shoots at 1280×720 size
MP4 3M
3 Mbps
Shoots at VGA size
Note
• A telephoto image is produced when [MP4 3M] image size is selected.
Downloaded From camera-usermanual.com Sony Manuals
63GB
Continued r
A digital image is made up of a collection of small dots called pixels.
If it contains a large number of pixels, the image becomes large, it takes up more memory,
and the image is displayed in fine detail. “Image size” is shown by the number of pixels.
Although you cannot see the differences on the screen of the camera, the fine detail and data
processing time differ when the image is printed or displayed on a computer screen.
Image size: 12M
4000 pixels × 3000 pixels = 12,000,000 pixels
2 Image size: VGA
640 pixels × 480 pixels = 307,200 pixels
1
Pixels
Many pixels
(Fine image quality and large file size)
Few pixels
(Rough image quality but small file size)
MENU/Settings
Search
Pixel
Operation
Search
Description of the pixels and the image size
Table of
contents
zOn “image quality” and “image size”
Index
Downloaded From camera-usermanual.com Sony Manuals
64GB
You can select Single (single-image) or Burst as the shooting mode.
1 MENU t
(Single)
The camera shoots a single image.
The camera shoots up to 10 continuous frames in one burst when
you hold down the shutter button.
MENU/Settings
Search
Notes
Index
• [Burst Settings] is not available in the following situations:
– In Intelligent Sweep Panorama mode
– In Superior Auto Adjustment mode
– In Background Defocus mode
– In 3D shooting mode
– In Movie Mode
– When the Smile Shutter function is activated
– In Easy Mode
• [Flash] is set to [Off].
• When recording with the self-timer, a series of up to 10 images is recorded.
• The recording interval becomes longer, depending on the setting for the image size.
• [Focus], [White Balance], and [EV] are adjusted for the first image, and these settings are also used for
the other images.
• [VGA] image size will be set while recording on internal memory.
• When the battery level is low, or when the internal memory or a memory card is full, the burst stops.
• In slow shutter speed conditions, the burst of shots per second may be decreased.
Operation
Search
(Burst)
(Burst Settings) t desired mode
Table of
contents
Burst Settings
zAbout the recording of burst shooting images
After shooting burst images, the shot images are displayed in frames on the LCD screen.
When all the images are fitted in the frames, recording is completed.
You can stop the recording by pressing z on the control button.
When stopped, the image displayed in index and images in the image processing are
recorded.
Downloaded From camera-usermanual.com Sony Manuals
65GB
Selects the number of images taken per second for Burst shooting.
1 MENU t
(Burst Shooting Interval) t desired mode
Shoots up to 10 images per second in succession.
(Mid)
Shoots up to 5 images per second in succession.
(Low)
Shoots up to 2 images per second in succession.
Operation
Search
(High)
Table of
contents
Burst Shooting Interval
MENU/Settings
Search
Index
Downloaded From camera-usermanual.com Sony Manuals
66GB
You can adjust the exposure manually in 1/3 EV steps in a range of –2.0 EV to +2.0 EV.
1 MENU t
(EV) t desired EV setting
Table of
contents
EV
Note
zAdjusting the exposure for better looking images
Operation
Search
• If you shoot a subject in extremely bright or dark conditions, or when you use the flash, the exposure
adjustment may not be effective.
Overexposure = too much light
Whitish image
Correct exposure
MENU/Settings
Search
Lower EV setting –
Higher EV setting +
Downloaded From camera-usermanual.com Sony Manuals
Index
Underexposure = too little light
Darker image
67GB
Sets the luminous sensitivity when the camera is in Program Auto mode.
1 MENU t
(ISO) t desired mode
(Auto)
/
/
/
Sets the ISO sensitivity automatically.
You can reduce image blurring in dark locations or with moving
subjects by increasing the ISO sensitivity (select a larger number).
Note
• You can select only from [ISO AUTO], [ISO 125] to [ISO 800] when the shooting mode is set to burst
mode.
Index)
ISO sensitivity is a speed rating for recording media that incorporates an image sensor that
receives light. Even when the exposure is the same, images differ depending on the ISO
sensitivity.
Index
High ISO sensitivity
Records a bright image even in dark locations while increasing
shutter speed to reduce blur.
However, the image tends to become noisy.
MENU/Settings
Search
zAdjusting ISO Sensitivity (Recommended Exposure
Operation
Search
/
/
Table of
contents
ISO
Low ISO sensitivity
Records a smoother image.
However, when the exposure is insufficient, the image may become
darker.
zHints for preventing blur
Even though the camera is steady, the subject moves during the exposure and is captured
blurred when the shutter button is pressed. Camera shake is reduced automatically,
however, the function does not effectively reduce subject blur.
Subject blur occurs frequently under low-light or slow shutter speed conditions.
In such a case, shoot with the below tips in mind.
• Select a higher ISO sensitivity so that the shutter
speed is faster.
• Select
(High Sensitivity) mode in Scene
Selection.
Downloaded From camera-usermanual.com Sony Manuals
68GB
Adjusts color tones according to the surrounding light conditions. Use this function if image
color appears unnatural.
1 MENU t
Table of
contents
White Balance
(White Balance) t desired mode
(Auto)
(Daylight)
Adjusts for outdoors conditions on a fine day, evening views, night
scenes, neon signs, fireworks, etc.
(Cloudy)
Adjusts for a cloudy sky or a shady location.
[Fluorescent White Balance 1]: Adjusts for white fluorescent
lighting.
[Fluorescent White Balance 2]: Adjusts for natural white
fluorescent lighting.
[Fluorescent White Balance 3]: Adjusts for day white fluorescent
lighting.
n
(Incandescent)
Adjusts for places under incandescent lamp, or under bright
lighting, such as in a photo studio.
Adjusts for the flash conditions.
(One Push)
Adjusts the white balance depending on the light source. The white
color memorized in [One Push Set] mode becomes the basic white
color. Use this mode when [Auto] and other settings don’t provide
accurate colors.
(One Push
Set)
Memorizes the basic white color which will be used in [One Push]
mode.
Index
(Flash)
MENU/Settings
Search
(Fluorescent
White Balance 1)
(Fluorescent
White Balance 2)
(Fluorescent
White Balance 3)
Operation
Search
Adjusts the white balance automatically so that the colors appear
natural.
Notes
• [White Balance] is not available in the following situations:
– In Intelligent Auto Adjustment mode
– In Superior Auto Adjustment mode
– In Background Defocus mode
– In Easy Mode
• [Flash] in [White Balance] is not available in the following situations:
– In Intelligent Sweep Panorama mode
– In 3D shooting mode
– In Movie Mode
– When Scene Selection is set to
(Anti Motion Blur),
(Hand-held Twilight),
(High
Sensitivity) mode
• Under fluorescent lights that flicker, the white balance function may not work correctly even though you
select [Fluorescent White Balance 1], [Fluorescent White Balance 2], or [Fluorescent White Balance 3].
• When shooting with a flash in other than [Flash] mode, [White Balance] is set to [Auto].
• When [Flash] is [On] or [Slow Synchro], the white balance can only be adjusted to [Auto], [Flash], [One
Push], or [One Push Set].
• [One Push Set] cannot be selected while charging the flash.
Downloaded From camera-usermanual.com Sony Manuals
69GB
1 Frame a white object such as a piece of paper filling the screen under the
same lighting conditions as you will shoot the subject.
2 MENU t
button
Table of
contents
To capture the basic white color in [One Push
Set] mode
(White Balance) t [One Push Set] t z on the control
Notes
zEffects of lighting conditions
The apparent color of the subject is affected by the lighting conditions.
The color tones are adjusted automatically, but you can adjust color tones manually using
the White Balance function.
Daylight
Cloudy
Fluorescent
Incandescent
Characteristics of
light
White (standard)
Bluish
Green-tinged
Reddish
Downloaded From camera-usermanual.com Sony Manuals
Index
Weather/lighting
MENU/Settings
Search
• If the
indicator flashes while shooting, the white balance is either not set or cannot be set. Use
automatic white balance.
• Do not shake or strike the camera while [One Push Set] is in progress.
• When flash mode is set to [On] or [Slow Synchro], the white balance is adjusted to the condition with the
flash emitting.
Operation
Search
The screen momentarily turns black, and when the white balance has been adjusted and stored
in the memory, the recording screen is displayed again.
70GB
You can change the focus method. Use the menu when it is difficult to get the proper focus in
auto focus mode.
AF stands for “Auto Focus,” a function that adjusts the focus automatically.
1 MENU t
Table of
contents
Focus
(Focus) t desired mode
Focuses on a subject in all ranges of the
finder frame automatically.
When you press the shutter button halfway
down in still image shooting mode, a green
frame is displayed around the area that is in
focus.
Operation
Search
(Multi AF)
AF range finder frame
(Center AF)
MENU/Settings
Search
• When the Face Detection function is active, AF
operates with priority on faces.
Focuses on a subject in the center of the
finder frame automatically. Using the AF
lock function together, you can compose the
image the way you want.
AF range finder frame
(Spot AF)
Index
Focuses on an extremely small subject or a
narrow area automatically. Using the AF
lock function together, you can compose the
image the way you want. Hold the camera
steady so as not to misalign the subject and
the AF range finder frame.
AF range finder frame
Notes
• When you use [Digital Zoom] or [AF Illuminator], the AF range finder frame setting is disabled and AF
range finder frame is displayed as a dotted line instead. In this case, the camera works to focus on the
subjects at the center of the screen.
• When the focus mode is set to other than [Multi AF], you cannot use the Face Detection function.
• [Focus] is set to [Multi AF] in the following situations:
– In Intelligent Auto Adjustment mode
– In Superior Auto Adjustment mode
– In Background Defocus mode
– In Movie Mode
– When the Smile Shutter function is activated
– In Easy Mode
– When [Self-Timer] is set to [Self-portrait One Person] or [Self-portrait Two People]
• If Tracking focus is activated, the camera focuses with priority on the subject to be tracked.
Downloaded From camera-usermanual.com Sony Manuals
71GB
Continued r
If the subject is out of focus, do as follows:
AF range finder
frame
2When the AE/AF lock indicator stops flashing and
remains on, return to the fully composed shot, and
press the shutter button fully down.
• As long as you do not press the shutter button fully
down, you can retry the procedure as many times as
necessary.
Operation
Search
AE/AF lock
indicator
1Recompose the shot so that the subject is centered
in the AF range finder, and press the shutter
button halfway to focus on the subject (AF lock).
Table of
contents
zFocusing on subjects near the edge of the screen
MENU/Settings
Search
Index
Downloaded From camera-usermanual.com Sony Manuals
72GB
Selects the metering mode that sets which part of the subject to measure to determine the
exposure.
1 MENU t
Table of
contents
Metering Mode
(Metering Mode) t desired mode
(Center)
Measures the center of the image, and determines the exposure
based on the brightness of the subject there (Center-weighted
metering).
(Spot)
Measures only a part of the subject
(Spot metering). This function is useful
when the subject is backlit or when
there is strong contrast between the
subject and the background.
Spot metering crosshairs
Positions on the subject
MENU/Settings
Search
Divides into multiple regions and measures each region. The
camera determines a well-balanced exposure (Multi-pattern
metering).
Operation
Search
(Multi)
Notes
Downloaded From camera-usermanual.com Sony Manuals
Index
• In Movie Mode, [Spot] cannot be selected.
• If you set [Metering Mode] to other than [Multi], the Face Detection function cannot be used.
• [Metering Mode] is set to [Multi] in the following situations:
– In Intelligent Auto Adjustment mode
– In Superior Auto Adjustment mode
– In Background Defocus mode
– When the Smile Shutter function is activated
– In Easy Mode
– When [Self-Timer] is set to [Self-portrait One Person] or [Self-portrait Two People]
73GB
The camera automatically detects shooting conditions, and then takes the shot. When a motion is
detected, the ISO sensitivity is increased according to the movement to reduce subject blur
(Motion Detection).
Table of
contents
Scene Recognition
Example of an image when
(Backlight) is activated.
Scene Recognition icon and guide
(Twilight),
(Twilight Portrait),
(Twilight
using a tripod),
(Backlight),
(Backlight
Portrait),
(Landscape),
(Macro),
(Portrait)
2 MENU t
(Auto)
(Advanced)
(Intelligent Auto Adjustment).
(Scene Recognition) t desired mode
When the camera recognizes the scene, it switches to the optimal
settings and shoots the image.
• When you shoot two images consecutively, the + mark on the
icon
will turn green.
• When two frames are shot, the two images are displayed side by side
immediately after shooting.
• When [Anti Blink] is displayed, 2 images are taken automatically and
the image with the eyes open is selected automatically. For details on the
Anti Blink function, see “What is the Anti Blink function?”.
Index
When the camera recognizes the scene, it switches to the optimal
settings. When the camera recognizes (Twilight), (Twilight
Portrait),
(Twilight using a tripod), (Backlight) or
(Backlight Portrait), it automatically changes the setting and
shoots another image.
MENU/Settings
Search
1 Set the mode dial to
Operation
Search
The camera recognizes the following types of scenes.
When the camera determines the optimal scene, it
displays the corresponding icon and guide.
Notes
• The Scene Recognition function does not operate when you shoot images using digital zoom.
• [Scene Recognition] is set to [Auto] in the following situations:
– In Superior Auto Adjustment mode
– In Easy Mode
– When the Smile Shutter function is activated
– When [Self-Timer] is set to [Self-portrait One Person] or [Self-portrait Two People]
– During burst shooting
• In Tracking focus mode,
(Portrait),
(Twilight Portrait) or
(Backlight Portrait) are not
recognized.
• The available flash settings are [Auto] and [Off].
•
(Twilight using a tripod) scenes sometimes cannot be recognized in an environment where vibrations
are transferred to the camera even though it is fixed on a tripod.
• Sometimes a slow shutter results when a scene is recognized as a
(Twilight using a tripod). Keep the
camera still during shooting.
• These scenes may not be recognized depending on the situation.
Downloaded From camera-usermanual.com Sony Manuals
74GB
Continued r
selecting the one you like (Advanced mode)
In [Advanced] mode, the camera shoots two images consecutively with the settings
differing as follows when it recognizes (Twilight), (Twilight Portrait),
(Twilight
using a tripod), (Backlight) or (Backlight Portrait) scenes, which tends to blur.
You can select the desired image from the two images shot.
Shoots in Slow Synchro
Shoots with sensitivity increased and shake
reduced
Shoots in Slow Synchro with the face
which the flash strobes on as guide
Shoots with sensitivity increased with the face as
guide and shake reduced
Shoots in Slow Synchro
Shoots with even slower shutter speed without
increasing sensitivity
Shoots with the flash
Shoots with the brightness and contrast of the
background adjusted
Shoots with the face which the flash
strobes on as guide
Shoots with the brightness and contrast of the
face and the background adjusted
* When [Flash] is set to [Auto].
MENU/Settings
Search
Second Image
Operation
Search
First Image*
Table of
contents
z Shooting two images with different settings and
zWhat is the Anti Blink function?
Index
When set to [Advanced], the camera automatically shoots two images consecutively* when
it recognizes
(Portrait). The camera will select, display, and record the image which the
eyes are not blinked automatically. If the eyes are closed in both images, the message
“Blinked eye detected” is displayed.
* except when the flash strobes/when the shutter speed is slow
Downloaded From camera-usermanual.com Sony Manuals
75GB
When the Face Detection function is activated, sets whether to use the Soft Skin effect, and the
effect level.
1 MENU t
(Soft Skin Effect) t desired mode
Does not use the Soft Skin Effect.
(Low)
Adds light Soft Skin Effect.
(High)
Adds moderate Soft Skin Effect.
Adds strong Soft Skin Effect.
Operation
Search
(Off)
(Mid)
Table of
contents
Soft Skin Effect
Notes
MENU/Settings
Search
• [Off] is not available when Scene Selection is set to
(Soft Skin) mode.
• The [Soft Skin Effect] may not be visible depending on the subject.
Index
Downloaded From camera-usermanual.com Sony Manuals
76GB
Sets the sensitivity of the Smile Shutter function for detecting smiles.
1 MENU t
(Smile Detection Sensitivity) t desired mode
(Big Smile)
Detects a big smile.
Detects a normal smile.
(Slight Smile) Detects even a slight smile.
Notes
MENU/Settings
Search
• Smiles may not be detected correctly depending on the conditions.
• [Smile Detection Sensitivity] cannot be adjusted in the following situations:
– In Intelligent Sweep Panorama mode
– In Superior Auto Adjustment mode
– In Background Defocus mode
– In 3D shooting mode
– In Movie Mode
– In Easy Mode
Operation
Search
(Normal
Smile)
Table of
contents
Smile Detection Sensitivity
Index
Downloaded From camera-usermanual.com Sony Manuals
77GB
Detects the faces of your subjects and adjusts the focus, flash, exposure, white balance and redeye reduction settings automatically.
Face Detection frame (White)
1 MENU t
(Auto)
Cannot use Face Detection.
Selects the face the camera is to automatically focus on.
(Child
Priority)
Detects and shoots with priority on child’s face.
(Adult
Priority)
Detects and shoots with priority on adult’s face.
MENU/Settings
Search
(Off)
(Face Detection) t desired mode
Operation
Search
Face Detection frame (Orange)
When the camera detects more than one subject, the camera will judge
which is the main subject and set focus by priority. The Face Detection
. The frame
frame for the main subject will change to an orange-colored
for which the focus is set will turn green when the shutter button is pressed
halfway down.
Table of
contents
Face Detection
Notes
Downloaded From camera-usermanual.com Sony Manuals
Index
• [Face Detection] is not available in the following situations:
– In Intelligent Sweep Panorama mode
– In 3D shooting mode
– In Movie Mode
– In Easy Mode
• [Off] is not available when [Self-Timer] is set to [Self-portrait One Person] or [Self-portrait Two People].
• You can select [Face Detection] only when the focus mode is set to [Multi AF] or the metering mode is
set to [Multi].
• The Face Detection function does not work when using the digital zoom.
• Up to 8 faces of your subjects can be detected.
• Adults and children may not be recognized correctly depending on the conditions.
• During Smile Shutter shooting, [Face Detection] is automatically set to [Auto] even if it is set to [Off].
78GB
Continued r
Normally the camera automatically selects the face to focus on according to the [Face
Detection] setting, but you can also select and register a face to be given priority.
1Press z on the control button during Face Detection.
The target frame appears.
3To cancel face registration, press z again.
MENU/Settings
Search
• When you remove the battery from the camera or leave the power turned off for a few days, the face
registration is reset.
• If Tracking focus is activated, Face Registration settings are reset.
• When the registered face disappears from the LCD screen, the camera returns to the setting selected
by [Face Detection]. When the registered face is shown on the LCD screen again, the camera
focuses on the registered face.
• It may not be possible to detect the registered face correctly depending on the surrounding
brightness, the subject’s hairstyle, etc.
• When the Smile Shutter function is used with the Face Detection frame registered, Smile Detection
is performed only on the registered face.
• In Easy Mode or when [Self-Timer] is set to [Self-portrait One Person] or [Self-portrait Two
People], the priority face cannot be registered.
Operation
Search
2Place the target frame over the detected face, and press z.
The selected face is registered as the priority face, and the frame
changes to an orange-colored
.
Table of
contents
zRegistering the priority face (Selected-face Memory)
Index
Downloaded From camera-usermanual.com Sony Manuals
79GB
When Scene Selection is set to
(Soft Skin) or
(Soft Snap) while you are shooting an
image, the camera automatically shoots two images consecutively. The camera will select,
display and record the image which the eyes are not blinked automatically.
1 Set the mode dial to
(Soft Skin) or
3 MENU t
(Scene Selection).
(Soft Snap).
(Anti Blink) t desired mode
(Auto)
When Face Detection is active, the Anti Blink function operates so
that images with the subject’s eyes open are recorded.
(Off)
Does not use the Anti Blink function.
• Anti Blink does not function in the following situations:
– When using the flash
– During burst shooting
– When the Face Detection function does not work
– When the Smile Shutter function is activated
• Sometimes the Anti Blink function does not work depending on the situation.
• When the Anti Blink function is set to [Auto] but only images with the subject’s eyes closed are
recorded, the message “Blinked eye detected” is displayed on the LCD screen. Shoot again as necessary.
MENU/Settings
Search
Notes
Operation
Search
2 Select
Table of
contents
Anti Blink
Index
Downloaded From camera-usermanual.com Sony Manuals
80GB
Images are automatically played back in succession.
1 Press the
(Playback) button to switch to playback mode.
2 MENU t
button
(Slideshow) t desired slideshow t z on the control
Plays back all the images in succession from the displayed
image to the very last image.
(Slideshow with music)
Plays back still images in succession along with effects and
music.
• [Slideshow] is not available when [View Mode] is set to [Folder view (MP4)] or [AVCHD view].
Continuous Playback
1 Select the desired image for playing with the control button.
2 MENU t
MENU/Settings
Search
Note
Operation
Search
(Continuous Playback)
Table of
contents
Slideshow
(Slideshow) t [Continuous Playback] t z
Action
z
Stop
v
Sets the display settings.
V
Displays the volume control screen.
• Adjust the volume with v/V on the control button, then press
z.
b
Rewinds image.
B
Forwards image.
Index
Control button
Note
• When [Display Burst Group] is [Display Main Image Only], only the main image is displayed.
zViewing panoramic images during continuous
playback
The whole panoramic image is displayed for 3 seconds.
You can scroll a panoramic image by pressing z.
Downloaded From camera-usermanual.com Sony Manuals
81GB
Slideshow with music
(Slideshow) t [Slideshow with music] t z on the control
Displays the setting screen.
Table of
contents
1 MENU t
button
2 Select a desired setting.
3 [Start] t z
Operation
Search
4 Press z to end the slideshow.
Note
• [Slideshow with music] is not available for the following images:
– Panoramic images
– 3D images recorded in [Standard] or [Wide]
All
Plays a slideshow of all the images in order.
This Date
Plays a slideshow of images with the currently selected date range
when View Mode is [Date View].
Folder
Plays a slideshow of images in the currently selected folder in
Folder View.
Simple
A simple slideshow switching images at a preset interval.
The playback interval is adjustable in [Interval] and you can
thoroughly enjoy your images.
Nostalgic
A moody slideshow reproducing the atmosphere of a movie scene.
Stylish
A stylish slideshow proceeding at a middle tempo.
Active
A high-tempo slideshow suitable for active scenes.
Index
Effects
Selects the playback speed and mood for slideshows. If the playback time of a movie is long,
an image is taken from it and displayed.
MENU/Settings
Search
Image
Selects the group of images to be shown. This setting is fixed to [Folder] when the internal
memory is used to record images.
Note
• When [Display Burst Group] is set to [Display Main Image Only], the burst images are displayed as
follows.
– When [Effects] is set to [Simple], only the main image is displayed.
– When [Effects] is set to other than [Simple] and there are two or fewer burst images, only the main
image is displayed.
– When [Effects] is set to other than [Simple] and there are three or more burst images, three images
including the main image are displayed.
Downloaded From camera-usermanual.com Sony Manuals
82GB
Continued r
The default setting for a [Simple] slideshow.
Music2
The default setting for a [Nostalgic] slideshow.
Music3
The default setting for a [Stylish] slideshow.
Music4
The default setting for an [Active] slideshow.
Mute
Does not use BGM.
Note
• The movies are played back without their audio.
1 sec
Sets the display interval of images for a [Simple] slideshow.
3 sec
5 sec
MENU/Settings
Search
Interval
Sets the screen switching interval. The setting is fixed to [Auto] when [Simple] is not selected
as the [Effects].
Operation
Search
Music1
Table of
contents
Music
Specifies the music to be played during slideshows. You can select more than one background
music track. Press V on the control button to display the volume control screen, then press
v/V to adjust the volume.
10 sec
Auto
The interval is set to suit the selected [Effects] item.
• The interval setting is invalid for movie playback.
Index
Note
Repeat
Turns slideshow repeat on or off.
On
Plays back images in a continuous loop.
Off
After all the images have been played back, the slideshow ends.
zSelecting background music
You can transfer a desired music file from your CDs or MP3 files to the camera to play back
during slideshow. To transfer music, install the “Music Transfer” software (supplied) to
your computer. For details, see pages 134 and 135.
• You can record up to four pieces of music on the camera. (The 4 preset pieces (Music1 – Music4)
can be replaced with the ones you transferred.)
• The maximum length of each music file for music playback of the camera is about 5 minutes.
• If you cannot play back a music file due to damage or other malfunctions of the file, execute
[Format Music] (page 114) and transfer the music again.
Downloaded From camera-usermanual.com Sony Manuals
83GB
Select [3D Viewing] when you want to play back images shot in 3D mode on the 3D TV.
Connect the camera and the 3D TV using an HDMI Cable (sold separately) (page 56).
1 Press the
2 MENU t
Table of
contents
3D Viewing
(Playback) button to switch to playback mode.
(3D Viewing) t z on the control button
Operation
Search
MENU/Settings
Search
Index
Downloaded From camera-usermanual.com Sony Manuals
84GB
1 Insert a Memory Stick with TransferJet into the camera, and press the
(Playback) button.
(Send by TransferJet) t desired mode t z on the control
3 Transfer images by closely aligning the
camera and other device.
(TransferJet) marks on the
A notification sound is emitted when connection is made.
(This Image)
(Multiple
Images)
Sends the currently displayed image in single-image mode.
MENU/Settings
Search
2 MENU t
button
Operation
Search
TransferJet is a close-up, wireless transfer technology that allows data to be transferred by
closely aligning two products that you want to communicate with each other.
To find out whether your camera is equipped with the TransferJet function, check for the
(TransferJet) mark on the bottom of the camera.
Using a Memory Stick with TransferJet (sold separately) allows images to be transferred
between TransferJet-compatible devices.
For more details on TransferJet, see the operating instructions supplied with Memory Stick with
TransferJet.
Table of
contents
Send by TransferJet
You can select and send multiple images.
After step 2, perform the following.
Index
1Select an image then press z.
Repeat the above step until there are no more images to be sent.
Select an image with a
mark to release the
mark.
2MENU t [OK] t z
Notes
• Only still images can be transferred.
• Up to 10 images can be transferred at once. However, for 3D images, both the MPO file and the JPEG
file are transferred. Depending on the receiving device, up to 20 images are received.
• Set [TransferJet] to [On] in
(Settings) (page 116).
• On an airplane, set [TransferJet] to [Off] in
(Settings) (page 116). In addition, follow the rules of the
place where you use.
• The connection is cut if transfer cannot be made within about 30 seconds. If this happens, select [Yes]
and realign the two
(TransferJet) marks on the camera and another device.
• Memory Stick with TransferJet and camera models with TransferJet are not sold in some countries and
regions due to local laws and regulations.
• Set the [TransferJet] function to [Off] in countries and regions other than where you purchased your
camera. Depending on the country or region, if you use the TransferJet function, you may be liable due to
local restrictions on transmission of electromagnetic waves.
Downloaded From camera-usermanual.com Sony Manuals
85GB
Receiving images using TransferJet
(Playback) button to switch to playback mode.
2 Closely align the
(TransferJet) marks on the camera and sending
device to receive images.
Table of
contents
1 Press the
A notification sound is emitted when connection is made.
Notes
Only images that can be played back on the camera can be sent or received.
This camera can receive only JPEG and MPO files.
If an Image Database File error occurs during saving, a Recover Image Database File screen will appear.
Play images that cannot be registered in the Image Database File using [Folder view (Still)].
Closely align the
(TransferJet) mark on the camera and other device.
• The transfer rate and range differ depending on the angle at which
the
(TransferJet) marks are aligned.
• It may be necessary to alter the position/angle of the camera until
communication can be obtained.
• Sending and receiving data is easier if the
(TransferJet) marks
are aligned with both cameras parallel to each other as shown in
the figure.
MENU/Settings
Search
z Tips for sending and receiving data successfully
Operation
Search
•
•
•
•
Index
z Using separately sold TransferJet-compatible
devices
Using separately sold TransferJet-compatible devices allows you to transfer images to a PC
and can broaden your enjoyment of transferring data.
For details, see the operating instructions supplied with your TransferJet-compatible device.
• Note the following points when using TransferJet-compatible devices.
– Before use, set the camera to playback mode.
– If no image is displayed, press MENU t
(Settings) t (Main Settings) t [LUN
Settings] t [Single].
– While connected, data cannot be written to or deleted from the camera.
– Do not disconnect while importing images to “PMB”.
Downloaded From camera-usermanual.com Sony Manuals
86GB
Allows you to select the display format for images.
1 Press the
(Playback) button to switch to playback mode.
2 MENU t
(View Mode) t desired mode t z on the control button
Displays images by date.
(Folder view
(Still))
Displays still images.
(Folder
view (MP4))
Displays MP4-format movies.
(AVCHD
Displays AVCHD-format movies.
Note
• When the internal memory is used to record images, View Mode is set to Folder View and still images
and movies are displayed in the same folder.
Displaying the Calendar
MENU/Settings
Search
view)
(View Mode) t [Date View] t z on the control button
(Index) lever repeatedly until the Calendar is displayed.
Use the control button to select / , then select the month you want to display. Select the
date and press z to view images of the selected date in index mode.
Index
2 Turn the
Operation
Search
(Date View)
1 MENU t
Table of
contents
View Mode
zViewing images taken with a different camera
This camera creates an Image Database File on the memory card for recording and playing
images. If the camera detects images not registered in the Image Database File on the
memory card, a registration screen with the message “Files found which were not
recognized Import files” will be displayed. To view unregistered images, register them by
selecting [OK].
• Use a sufficiently charged battery to register images. If a battery with a low charge is used to
register images, it may not be possible to transfer all of the data or the data may be corrupted if the
battery charge runs out.
Downloaded From camera-usermanual.com Sony Manuals
87GB
You can select to display burst images in groups or display all images during playback.
1 Press the
(Playback) button to switch to playback mode.
2 MENU t
3 MENU t
Table of
contents
Display Burst Group
(View Mode) t [Date View] t z on the control button
(Display Burst Group) t desired setting t z
• When Face Detection is performed in burst mode, the camera determines
and displays the optimum image as the main image. When Face
Detection is not performed, the first image in the burst group is displayed
as the main image.
Plays back all burst images one at a time.
zDisplaying burst images
When [Display Burst Group] is set to [Display Main Image Only], only the main image of
the burst group is displayed.
When the camera displays the main image, you can play back the images in the following
ways.
Operation method
MENU/Settings
Search
(Display All)
Groups burst images, then plays back the main image only.
Operation
Search
(Display Main
Image Only)
Action
Press V on the control button. The burst images are displayed in the index. The display switches
between single image display and thumbnail image display each
time you press z on the control button.
Downloaded From camera-usermanual.com Sony Manuals
Index
Press z on the control button. The burst images are displayed as a movie by tilting the camera to
the right or left.
88GB
Retouches a recorded image and records it as a new file. The original image is retained.
1 Press the
2 MENU t
(Playback) button to switch to playback mode.
Table of
contents
Retouch
(Retouch) t desired mode t z on the control button
3 Perform retouching according to the operation method in each mode.
Records the zoomed playback
image.
(Red Eye
Correction)
Corrects the red-eye phenomenon
caused by flash.
Select [OK] with the control
button t z.
• You may not be able to correct the
red-eye phenomenon depending on the image.
1
Sharpens the image within a
chosen frame.
Select the area (frame) of the
desired image to retouch with the
control button t MENU.
2 [OK] t z
• Depending on the image, sufficient
correction may not be applied and
the image quality may deteriorate.
1
Index
(Unsharp
masking)
MENU/Settings
Search
Turn the lever to (T) to zoom in
and turn to (W) to zoom out.
2 Set the zoom point with the control
button.
3 MENU t select an image size to save t z
4 [OK] t z
• The quality of trimmed images may deteriorate.
• The image size that you can trim may vary depending on the image.
1
Operation
Search
(Trimming
(Resize))
Note
• You cannot retouch the following images:
– Panoramic images
– 3D images
– Movies
– Images displayed in a burst group
Downloaded From camera-usermanual.com Sony Manuals
89GB
Allows you to select unwanted images for deletion.
You can also delete images using the (Delete) button (page 45).
1 Press the
2 MENU t
Table of
contents
Delete
(Playback) button to switch to playback mode.
(Delete) t desired mode t z on the control button
(All but This Image)
Deletes all images in the selected burst group at once.
Press [OK] t z after step 2.
(This Image)
Deletes the currently displayed image in single-image
mode.
(Multiple Images)
Allows you to select and delete multiple images.
Do as the following after step 2.
1Select an image then press z.
Repeat the above step until there are no more images to
be deleted. Select an image with a
mark again to
release the
mark.
(All Images on This
Date)
(All in This Folder)
Deletes all images in the selected date range or folder, or
all AVCHD movies at once.
Press [OK] t z after step 2.
Index
2MENU t [OK] t z
MENU/Settings
Search
(All Imgs in This Burst
Group)
Deletes burst group images other than the selected image in
Display Burst Group mode.
Press [OK] t z after step 2.
Operation
Search
3 [OK] t z
(All AVCHD files)
Notes
• In Easy Mode, you can select from [1 image] or [All] to delete images.
• When the internal memory is used to record images, View Mode is set to Folder View and still images
and movies are displayed in the same folder.
Downloaded From camera-usermanual.com Sony Manuals
90GB
Protects recorded images against accidental erasure.
The
mark is displayed for registered images.
1 Press the
(Playback) button to switch to playback mode.
2 MENU t
(Protect) t desired mode t z on the control button
(Multiple
Images)
Protects the currently displayed image in single-image mode.
You can select and protect multiple images.
After step 2, perform the following.
2MENU t [OK] t z
Notes
• When the internal memory is used to record images, View Mode is set to Folder View and still images
and movies are displayed in the same folder.
• When [Display Burst Group] is set to [Display Main Image Only], only the main image in the burst group
is protected. If you want to protect all images, set [Display Burst Group] to [Display All] first, then apply
the protection (page 88).
Index
zTo cancel the protection
MENU/Settings
Search
1Select an image then press z.
Repeat the above step until there are no more images to be
protected. Select an image with a
mark to release the
mark.
Operation
Search
(This Image)
Table of
contents
Protect
Select the image for which you want to cancel protection, and unlock it by pressing z on
the control button as the same procedure to protect it.
The
indicator disappears, and the protection is released.
Downloaded From camera-usermanual.com Sony Manuals
91GB
DPOF (Digital Print Order Format) is a function that allows you to specify the images of the
memory card that you want to print out later.
The
(Print order) mark is displayed for registered images.
(Playback) button to switch to playback mode.
2 MENU t
t desired mode t z on the control button
(This Image)
(Multiple
Images)
Orders printing the currently displayed image in single-image
mode.
You can select and order printing multiple images.
After step 2, perform the following.
2MENU t [OK] t z
Notes
• The
(Print order) mark cannot be added to the following images:
– Movies
– Images in the internal memory
• You can add a
(Print order) mark to a maximum 999 images.
Index
zClearing the DPOF mark
MENU/Settings
Search
1Select an image then press z.
Repeat the above step until there are no more images to be
printed. Select an image with a
mark to release the
mark.
Operation
Search
1 Press the
Table of
contents
DPOF
Select the image to clear the DPOF registration, then press z on the control button in the
same procedure as when making a
mark.
The
mark disappears and the DPOF registration is cleared.
Downloaded From camera-usermanual.com Sony Manuals
92GB
Rotates a still image. Use this function to display a horizontal orientation image in vertical
orientation.
2 MENU t
(Playback) button to switch to playback mode.
(Rotate) t z on the control button
Operation
Search
1 Press the
Table of
contents
Rotate
3 Rotate the image with [ / ] t b/B.
Notes
Downloaded From camera-usermanual.com Sony Manuals
Index
• You cannot rotate the following images:
– 3D images
– Movies
– Images displayed in a burst group
– Protected still images
• You may not be able to rotate images shot with other cameras.
• When viewing images on a computer, the image rotation information may not be reflected depending on
the software.
MENU/Settings
Search
4 [OK] t z
93GB
When multiple folders are created in a memory card, this function selects the folder containing
the image you want to play back.
1 Press the
(Playback) button to switch to playback mode.
(Select Folder) t z
4 Select the folder with b/B.
5 [OK] t z
zViewing images across multiple folders
When multiple folders are created and the first or last image in the folder is displayed, the
following indicators appear.
: Moves to the previous folder
: Moves to the next folder
: Moves to either the previous or next folders
MENU/Settings
Search
Note
• This item is not displayed when the internal memory is used to record images.
Operation
Search
2 MENU t
(View Mode) t [Folder view (Still)] or [Folder view (MP4)]
t z on the control button
3 MENU t
Table of
contents
Select Folder
Index
Downloaded From camera-usermanual.com Sony Manuals
94GB
You can set the recording method used to record movies.
1 Set the camera to shooting mode.
Table of
contents
Movie format
2 MENU t
(Settings) t
(Shooting Settings) t [Movie format] t
desired mode t z on the control button
MP4
Sets the recording method to MP4, which is suitable for WEB
uploads and e-mail attachments.
MP4 (AVC) movies are recorded.
MENU/Settings
Search
Sets the recording method to AVCHD, which is suitable for
viewing smooth video images on a high-definition television.
AVCHD movies are recorded.
Operation
Search
AVCHD
Index
Downloaded From camera-usermanual.com Sony Manuals
95GB
The AF illuminator supplies fill light to focus more easily on a subject in dark surroundings.
The AF illuminator emits red light allowing the camera to focus easily when the shutter button is
pressed halfway, until the focus is locked. The
indicator appears at this time.
Table of
contents
AF Illuminator
1 Set the camera to shooting mode.
Auto
Uses the AF illuminator.
Off
Does not use the AF illuminator.
Downloaded From camera-usermanual.com Sony Manuals
Index
• Focus is achieved as long as the AF illuminator light reaches the subject, regardless of whether light fails
to reach the center of the subject.
• You cannot use the AF illuminator in the following situations:
– In Intelligent Sweep Panorama mode
– In 3D shooting mode
– When
(Landscape), (Twilight),
(Pet) or (Fireworks) mode is selected in Scene Selection.
– When [Self-Timer] is set to [Self-portrait One Person] or [Self-portrait Two People].
• When you use the AF illuminator, the normal AF range finder frame is disabled and a new AF range
finder frame is displayed by a dotted line. AF operates with priority on subjects located near the center of
the frame.
• The AF illuminator emits very bright light. Although there is no health hazard, do not look directly into
the AF illuminator emitter at close range.
MENU/Settings
Search
Notes
Operation
Search
2 MENU t
(Settings) t
(Shooting Settings) t [AF Illuminator] t
desired mode t z on the control button
96GB
With reference to the grid lines, you can easily set a subject in a horizontal/vertical position.
1 Set the camera to shooting mode.
Table of
contents
Grid Line
2 MENU t
(Settings) t
(Shooting Settings) t [Grid Line] t
desired mode t z on the control button
Displays the grid lines. The grid lines are not recorded.
Off
Does not display the grid lines.
Operation
Search
On
MENU/Settings
Search
Index
Downloaded From camera-usermanual.com Sony Manuals
97GB
Selects the Digital Zoom mode. The camera enlarges the image using optical zoom (up to 5×).
When the zoom scale is exceeded, the camera uses either smart or precision Digital Zoom.
Table of
contents
Digital Zoom
1 Set the camera to shooting mode.
Smart (
)
Precision (
)
Enlarges all image sizes by the total zoom scale of approximately
10×, including the optical zoom 5×. However, note that the image
quality deteriorates when the optical zoom scale is exceeded.
(Precision digital zoom)
Does not use the Digital Zoom.
Notes
Index
• The Digital Zoom function does not operate in the following situations:
– In Intelligent Sweep Panorama mode
– In Superior Auto Adjustment mode
– In Background Defocus mode
– In 3D shooting mode
– In Movie Mode
– When
(Backlight Correction HDR) mode is selected in Scene Selection.
– When the Smile Shutter function is activated.
– When [Self-Timer] is set to [Self-portrait One Person] or [Self-portrait Two People].
• The smart zoom is not available when the image size is set to [12M] or [16:9(9M)].
• The Face Detection function does not work when using the Digital Zoom.
MENU/Settings
Search
Off
Enlarges the image digitally within the range where the image will
not be distorted, according to the image size. (Smart zoom)
Operation
Search
2 MENU t
(Settings) t
(Shooting Settings) t [Digital Zoom] t
desired mode t z on the control button
Total zoom scale when using Smart zoom
(including optical zoom 5×)
The supported zoom ratio differs depending on the image size.
Size
Total zoom scale
8M
Approx. 6.1×
5M
Approx. 7.7×
VGA
Approx. 31×
16:9(2M)
Approx. 10×
Downloaded From camera-usermanual.com Sony Manuals
98GB
When the camera is rotated to shoot a portrait (vertical) image, the camera records its position
change and displays the image in the portrait position.
Table of
contents
Auto Orientation
1 Set the camera to shooting mode.
On
Records the image with the correct orientation.
Off
Does not use Auto Orientation.
Operation
Search
2 MENU t
(Settings) t
(Shooting Settings) t [Auto Orientation]
t desired mode t z on the control button
Notes
zRotating images after recording
Downloaded From camera-usermanual.com Sony Manuals
Index
If the orientation of an image is incorrect, you can use the [Rotate] on the Menu screen to
display the image in portrait position.
MENU/Settings
Search
• Black is displayed to the left and right of vertical orientation images.
• Depending on the shooting angle of the camera, the orientation of the image may not be recorded
correctly.
• You cannot use [Auto Orientation] in the following situations:
– In 3D shooting mode
– In Movie Mode
99GB
The flash strobes two or more times before shooting to reduce the red-eye phenomenon when
using the flash.
Table of
contents
Red Eye Reduction
1 Set the camera to shooting mode.
Auto
When the Face Detection function is activated, the flash strobes
automatically to reduce the red-eye phenomenon.
On
The flash always strobes to reduce the red-eye phenomenon.
Off
Does not use Red Eye Reduction.
Index
• To avoid blurring of images, hold the camera firmly until the shutter is released. It usually takes a second
until the shutter is released, and also be sure not to allow the subject to move during this period.
• Red Eye Reduction may not produce the desired effects. It depends on individual differences and
conditions, such as distance to the subject, or if the subject looked away from the pre-strobe.
• If you do not use the Face Detection function, Red Eye Reduction does not work, even when you select
[Auto].
• [Red Eye Reduction] is set to [Off] in the following situations:
– In Background Defocus mode
– In 3D shooting mode
– When
(Anti Motion Blur),
(Hand-held Twilight) or
(High Sensitivity) mode is selected in
Scene Selection.
– When the Smile Shutter function is activated.
MENU/Settings
Search
Notes
Operation
Search
2 MENU t
(Settings) t
(Shooting Settings) t [Red Eye
Reduction] t desired mode t z on the control button
zWhat causes the red-eye phenomenon?
Pupils become dilated in dark environments. Flash light is reflected off the blood vessels at
the back of the eye (retina), causing the “red-eye” phenomenon.
Camera
Eye
Retina
Other ways to reduce red-eye
• Select
(High Sensitivity) mode in Scene Selection. (The flash is set to [Off] automatically.)
• When the eyes of the subject turn out red, correct the image with [Retouch] t [Red Eye
Correction] on the viewing menu or with the supplied software “PMB”.
Downloaded From camera-usermanual.com Sony Manuals
100GB
When an image with the subject’s eyes closed is recorded while Face Detection is activated, the
message “Blinked eye detected” is displayed.
Table of
contents
Blink Alert
1 Set the camera to shooting mode.
Auto
Displays the “Blinked eye detected” message.
Off
Does not display the message.
Operation
Search
2 MENU t
(Settings) t
(Shooting Settings) t [Blink Alert] t
desired mode t z on the control button
MENU/Settings
Search
Index
Downloaded From camera-usermanual.com Sony Manuals
101GB
Changes the settings of the sound produced when you operate the camera.
1 MENU t
(Settings) t
(Main Settings) t [Beep] t desired
mode t z on the control button
Turns on the shutter sound when you press the shutter button.
High
Low
Turns on the beep/shutter sound when you press the control/shutter
button.
If you want to lower the beep volume, select [Low].
Off
Turns off the beep/shutter sound.
Operation
Search
Shutter
Table of
contents
Beep
MENU/Settings
Search
Index
Downloaded From camera-usermanual.com Sony Manuals
102GB
Selects the language to be used in the menu items, warnings and messages.
1 MENU t
(Settings) t
(Main Settings) t [Language Setting] t
desired mode t z on the control button
Table of
contents
Language Setting
Operation
Search
MENU/Settings
Search
Index
Downloaded From camera-usermanual.com Sony Manuals
103GB
You can select whether or not the function guide is displayed when you operate the camera.
1 MENU t
(Settings) t
(Main Settings) t [Function Guide] t
desired mode t z on the control button
Displays the function guide.
Off
Does not display the function guide.
Operation
Search
On
Table of
contents
Function Guide
MENU/Settings
Search
Index
Downloaded From camera-usermanual.com Sony Manuals
104GB
Sets the color of the screen display.
1 MENU t
(Settings) t
(Main Settings) t [Display color] t
desired mode t z on the control button
Black
White
Pink
Operation
Search
Sets the background color of the LCD screen.
Table of
contents
Display color
MENU/Settings
Search
Index
Downloaded From camera-usermanual.com Sony Manuals
105GB
You can set whether to use a demonstration of Smile Shutter or AVCHD movie playback. When
there is no need to view a demonstration, set to [Off].
Table of
contents
Demo Mode
1 MENU t
(Settings) t
(Main Settings) t [Demo Mode] t
desired mode t z on the control button
Demo Mode2
Automatically starts the Smile Shutter demonstration when no
operation is performed for 15 seconds.
Demo Mode3
If no operation is performed for a set period of time while the
camera is connected to an HD TV, a demonstration of AVCHD
movie playback will automatically be performed.
Off
Does not perform a demonstration.
Notes
• Pressing the shutter button during the Smile Shutter demonstration operates the shutter, but no image is
recorded.
• During a demonstration, if the number of images saved in the internal memory increases, the camera may
automatically delete the images.
MENU/Settings
Search
A demonstration of the shooting functions will be performed.
Operation
Search
Demo Mode1
Index
Downloaded From camera-usermanual.com Sony Manuals
106GB
Initializes the setting to the default setting.
Even if you execute [Initialize], the images are retained.
1 MENU t
(Settings) t
z on the control button
Table of
contents
Initialize
(Main Settings) t [Initialize] t [OK] t
Operation
Search
Note
• Be sure not to turn off the camera while initializing.
MENU/Settings
Search
Index
Downloaded From camera-usermanual.com Sony Manuals
107GB
When you connect the camera to a High Definition (HD) TV with HDMI terminals using an
HDMI Cable (sold separately), you can select HDMI Resolution to output images to the TV.
Table of
contents
HDMI Resolution
1 MENU t
(Settings) t
(Main Settings) t [HDMI Resolution] t
desired mode t z on the control button
The camera automatically recognizes an HD TV and sets the output
resolution.
1080i
Outputs signals in HD picture quality (1080i).
480p/576p
Outputs signals in SD picture quality (480p/576p).
Operation
Search
Auto
• If the camera is 1080 60i-compatible, signals are output using 480p,
whereas if it is 1080 50i-compatible, signals are output using 576p.
• If you cannot display the screen properly with the [Auto] setting, select either [1080i] or [480p/576p]
depending on the TV to be connected.
MENU/Settings
Search
Note
Index
Downloaded From camera-usermanual.com Sony Manuals
108GB
This setting allows (TV) remote control of a camera that is connected to a “BRAVIA” Sync TV
using the HDMI Cable (sold separately). For details on “BRAVIA” Sync, see page 131.
Table of
contents
CTRL FOR HDMI
1 MENU t
(Settings) t
(Main Settings) t [CTRL FOR HDMI] t
desired mode t z on the control button
Enables remote-controlled operation.
Off
Disables remote-controlled operation.
Note
Operation
Search
On
• You can perform the operation of the camera with the remote controller of your TV by connecting your
camera to a “BRAVIA” Sync-compatible TV.
MENU/Settings
Search
Index
Downloaded From camera-usermanual.com Sony Manuals
109GB
Selects the video signal output type from either SD or HD (1080i) in accordance with the type of
TV you connect to the camera using an HD Output Adaptor Cable (sold separately).
Use a Type3-compliant HD Output Adaptor Cable (sold separately).
Table of
contents
COMPONENT
1 MENU t
(Settings) t
(Main Settings) t [COMPONENT] t
desired mode t z on the control button
Select this item to connect the camera to a 1080i-capable High
Definition TV.
SD
Select this item to connect the camera to a TV that is not
compatible with an HD(1080i) signal.
Operation
Search
HD(1080i)
MENU/Settings
Search
Index
Downloaded From camera-usermanual.com Sony Manuals
110GB
Sets the mode when the camera is connected to a computer or a USB device using the USB
cable.
Table of
contents
USB Connect
1 MENU t
(Settings) t
(Main Settings) t [USB Connect] t
desired mode t z on the control button
Establishes a Mass Storage connection between the camera and a
computer or other USB device.
PTP/MTP
When you connect the camera to a computer, the AutoPlay Wizard
appears, and the still images in the recording folder on the camera
are imported to the computer. (with Windows 7/Vista/XP,
Mac OS X)
MENU/Settings
Search
Note
• You cannot import movies when [PTP/MTP] is selected. To import movies to the computer, select [Mass
Storage].
Operation
Search
Mass Storage
Index
Downloaded From camera-usermanual.com Sony Manuals
111GB
Sets the display method for the recording media displayed on a computer screen or other monitor
when the camera is connected with a computer or AV component using a USB connection.
Table of
contents
LUN Settings
1 MENU t
(Settings) t
(Main Settings) t [LUN Settings] t
desired mode t z on the control button
Single
When the memory card is inserted into the camera, the images on
the memory card are displayed; when it is not inserted, the images
in the internal memory are displayed. Select this setting in cases
where the images of both the memory card and the internal memory
are not displayed when the camera is connected to a device other
than a computer.
Note
• Set [LUN Settings] to [Multi] when uploading images to a media service using “PMB Portable”.
MENU/Settings
Search
The images both on the memory card and in the internal memory
are displayed. Select this setting when you connect the camera to a
computer.
Operation
Search
Multi
Index
Downloaded From camera-usermanual.com Sony Manuals
112GB
You can use “Music Transfer” in the CD-ROM (supplied) to change background music tracks.
1 MENU t
(Settings) t
z on the control button
(Main Settings) t [Download Music] t
Table of
contents
Download Music
The message “Connect to PC” is displayed.
3 Follow the instructions on the screen to change music files.
Operation
Search
2 Make a USB connection between the camera and a computer, then start
“Music Transfer”.
MENU/Settings
Search
Index
Downloaded From camera-usermanual.com Sony Manuals
113GB
You can delete all the background music files stored in the camera. It can be used in cases such
as when the background music files are damaged and cannot be played.
1 MENU t
(Settings) t
t z on the control button
Table of
contents
Format Music
(Main Settings) t [Format Music] t [OK]
camera
You can use “Music Transfer” in the CD-ROM (supplied) to reset music files to the preset
ones.
2Start “Music Transfer”, then restore the default music.
• For details on using “Music Transfer”, see the help in “Music Transfer”.
MENU/Settings
Search
1Execute [Download Music], then make a USB connection between the camera and a
computer.
Operation
Search
zRestoring the music preset at the factory to the
Index
Downloaded From camera-usermanual.com Sony Manuals
114GB
Sets the length of time until the LCD screen goes dark and the time until the camera turns off. If
you do not operate the camera for a certain period of time while the power is on using the battery
pack, the screen goes dark and the camera later turns off automatically to prevent wearing down
the battery pack (Auto power-off function).
Proactively saves the battery power.
If the camera is not operated for a certain period of time, the power
turns off automatically. In shooting mode, the LCD screen
automatically goes dark before the power turns off.
Standard
If the camera is not operated for a certain period of time, the power
turns off automatically. In shooting mode, the LCD screen
automatically goes dark before the power turns off.
It takes longer before the power turns off than when set to
[Stamina].
Off
Does not use the Auto power-off function.
MENU/Settings
Search
Stamina
Operation
Search
1 MENU t
(Settings) t
(Main Settings) t [Power Save] t
desired mode t z on the control button
Table of
contents
Power Save
Note
Downloaded From camera-usermanual.com Sony Manuals
Index
• The camera does not turn off automatically in the following situations:
– During slideshow
– When viewing images shot in [Sweep Multi Angle] mode by tilting the camera
– When viewing burst images by tilting the camera
– When playing back movies
– During HDMI outputting
– During Eye-Fi connection
115GB
1 MENU t
(Settings) t
(Main Settings) t [TransferJet] t
desired mode t z on the control button
Communicates using TransferJet.
Off
Does not communicate using TransferJet.
Notes
Index
• In Easy Mode, [TransferJet] is fixed to [Off].
• While aboard an airplane, set [TransferJet] to [Off]. In addition, always follow all regulations governing
the location in which the camera is being used.
• The connection is cut if transfer cannot be made within about 30 seconds. If this happens, select [Yes]
and again align two
(TransferJet) marks on the camera and another device.
• Memory Stick with TransferJet and camera models with TransferJet are not sold in some countries and
regions due to local laws and regulations.
• Set the [TransferJet] function to [Off] in countries and regions other than where you purchased your
camera. Depending on the country or region, if you use the TransferJet function, you may be liable due to
local restrictions on transmission of electromagnetic waves.
MENU/Settings
Search
On
Operation
Search
You can select TransferJet communication settings. TransferJet is a close-up, wireless transfer
technology that allows data to be transferred by closely aligning two products that you want to
communicate with each other. To find out whether your camera is equipped with the TransferJet
function, check for the
(TransferJet) mark on the bottom of the camera.
Using a Memory Stick with TransferJet (sold separately) allows images to be transferred
between TransferJet-compatible devices.
For more details on TransferJet, see the Operating Instructions supplied with Memory Stick with
TransferJet.
Table of
contents
TransferJet
zWhat is TransferJet?
TransferJet allows you to share images by sending and
receiving image data. Insert a Memory Stick with
TransferJet in your camera and align two
(TransferJet)
marks of the camera and another device that supports this
function.
For details on image transfer, see page 85.
Downloaded From camera-usermanual.com Sony Manuals
116GB
Sets whether to use the upload function of an Eye-Fi card (commercially available), when you
use the Eye-Fi card with this camera. [Eye-Fi] is displayed only when the Eye-Fi card is inserted
in the camera.
Table of
contents
Eye-Fi
1 MENU t
(Settings) t
(Main Settings) t [Eye-Fi] t
desired mode t z on the control button
Off
Does not use the upload function.
Notes
Index
• As of March 2010, Eye-Fi cards are sold in the U.S.A., Canada, Japan and some countries in the
European Union.
• For more information on the Eye-Fi card, contact the manufacturer or seller of Eye-Fi cards directly.
• Eye-Fi cards are permitted only in the countries and regions in which they were purchased. You may be
held liable due to local restrictions.
• The Eye-Fi card has a wireless LAN function. Do not insert the Eye-Fi card where wireless LAN is
prohibited, such as while aboard an airplane. If the Eye-Fi card is inserted, set [Eye-Fi] to [Off]. When
the uploading function of the Eye-Fi card is set to [Off],
is displayed on the LCD screen.
MENU/Settings
Search
Uses the upload function.
The Eye-Fi mode display icon on the LCD screen will change
depending on the communication mode of the Eye-Fi card.
Eye-Fi card is in standby mode. There is no image to be sent.
Eye-Fi card is in upload standby mode.
Eye-Fi card is in connecting mode.
Eye-Fi card is uploading images.
An error has occurred.
Operation
Search
On
Transferring image data using the Eye-Fi card
1 Set the wireless LAN access point settings or the transferring direction
settings of the Eye-Fi card.
For details, refer to the operating instructions supplied with the Eye-Fi card.
2 After the settings are finished, insert the Eye-Fi card into the camera, and
shoot the images.
The recorded images are automatically transferred via the wireless LAN to the PC, etc.
Downloaded From camera-usermanual.com Sony Manuals
117GB
Continued r
Notes
Table of
contents
Operation
Search
MENU/Settings
Search
• When you use a new Eye-Fi card for the first time, copy the install file of the PC application written in
the Eye-Fi card first, then format the card.
• Before using the Eye-Fi card, upgrade the firmware of the Eye-Fi card to the latest version. For details on
version upgrades, refer to the operating instructions supplied with the Eye-Fi card.
• When uploading image data, [Power Save] is not available.
• If the
(error) icon is displayed, eject and re-insert the Eye-Fi card, or turn the power of the camera
off and on again. If the
(error) icon is still displayed, the Eye-Fi card may be corrupted. For details,
contact Eye-Fi, Inc.
• Wireless LAN communication may be interrupted by the other communication devices. If data reception
is insufficient, move the camera closer to the access point.
• For details on content that can be uploaded, refer to the operating instructions supplied with the Eye-Fi
card.
• Some Eye-Fi cards have an “Endless Memory Mode.” This product does not support “Endless Memory
Mode.” Make sure that Eye-Fi cards that you insert into this product have “Endless Memory Mode”
turned off. For details on setting “Endless Memory Mode”, refer to the operating instructions supplied
with the Eye-Fi card.
Index
Downloaded From camera-usermanual.com Sony Manuals
118GB
Formats the memory card or the internal memory. To ensure stable operations of the memory
card, we recommend that you use this camera to format any memory card being used with this
camera for the first time. Note that formatting will erase all data recorded on the memory card.
This data cannot be restored. Be sure to backup any important data to a PC or other storage
location.
Note
• Note that formatting permanently erases all data including even protected images.
Operation
Search
1 MENU t
(Settings) t
(Memory Card Tool) or
(Internal
Memory Tool) t [Format] t [OK] t z on the control button
Table of
contents
Format
MENU/Settings
Search
Index
Downloaded From camera-usermanual.com Sony Manuals
119GB
Creates a folder in a memory card to store recorded images.
Images are recorded in the newly created folder until you create another folder or select another
recording folder.
Table of
contents
Create REC.Folder
1 MENU t
(Settings) t
(Memory Card Tool) t [Create
REC.Folder] t [OK] t z on the control button
After a new folder is created, you can change the storage destination folder (page 121) and
select the folder for viewing images (page 94).
MENU/Settings
Search
zOn the folders
Operation
Search
Notes
• This item is not displayed when the internal memory is used to record images.
• When you insert a memory card that was used with other equipment into the camera and shoot images, a
new folder may be automatically created.
• Up to 4,000 images can be stored in one folder. When the folder capacity is exceeded, a new folder is
automatically created.
Index
Downloaded From camera-usermanual.com Sony Manuals
120GB
Changes the folder in the memory card that is currently used to store recorded images.
1 MENU t
(Settings) t
REC.Folder]
(Memory Card Tool) t [Change
Table of
contents
Change REC.Folder
2 Select a folder with b/B on the control button.
Notes
MENU/Settings
Search
• This item is not displayed when the internal memory is used to record images.
• You cannot select the following folder as a recording folder.
– “100” folder
– A folder with a number that has either “sssMSDCF” or “sssANV01” only
• You cannot move recorded images to another folder.
Operation
Search
3 [OK] t z
Index
Downloaded From camera-usermanual.com Sony Manuals
121GB
Deletes the folder in a memory card that is used to store recorded images.
1 MENU t
(Settings) t
REC.Folder]
(Memory Card Tool) t [Delete
Table of
contents
Delete REC.Folder
2 Select a folder with b/B on the control button.
Notes
MENU/Settings
Search
• This item is not displayed when the internal memory is used to record images.
• If you delete the folder set as the recording folder using [Delete REC.Folder], the folder that has the
largest folder number is selected as the next recording folder.
• You can delete only empty folders. If a folder contains images, or even files that cannot be played back
by the camera, first delete these images and files with a computer, and then delete the folder.
Operation
Search
3 [OK] t z
Index
Downloaded From camera-usermanual.com Sony Manuals
122GB
Copies all images in the internal memory to a memory card.
1 Insert a memory card with sufficient free capacity into the camera.
2 MENU t
(Settings) t
t z on the control button
Table of
contents
Copy
(Memory Card Tool) t [Copy] t [OK]
MENU/Settings
Search
• Use a fully charged battery pack. If you attempt to copy image files using a battery pack with little
remaining charge, the battery pack may run out, causing copying to fail or possibly corrupting the data.
• You cannot copy images individually.
• The original images in the internal memory are retained even after copying. To delete the contents of the
internal memory, remove the memory card after copying, then format the internal memory ([Format] in
[Internal Memory Tool]).
• A new folder is created on the memory card and all the data will be copied to it. You cannot choose a
specific folder and copy images to it.
Operation
Search
Notes
Index
Downloaded From camera-usermanual.com Sony Manuals
123GB
Selects the method used to assign file numbers to images.
1 MENU t
(Settings) t
(Memory Card Tool) or
(Internal
Memory Tool) t [File Number] t desired mode t z on the control
button
Reset
Starts from 0001 each time the folder is changed. (When the
recording folder contains a file, a number one higher than the
largest number is assigned.)
MENU/Settings
Search
Assigns numbers to files in sequence even if the recording folder or
the memory card is changed. (When the replaced memory card
contains a file with a number higher than the last assigned number,
a number one higher than the largest number is assigned.)
Operation
Search
Series
Table of
contents
File Number
Index
Downloaded From camera-usermanual.com Sony Manuals
124GB
Adjusts the time to the local time of a selected area.
1 MENU t
(Settings) t
(Clock Settings) t [Area Setting] t
desired setting t z on the control button
You use the camera in your area.
When the currently set area differs from your home area, you must
make the Area Setting.
Destination
You use the camera set to the time at your destination.
Set the destination area.
Setting a frequently visited destination lets you easily adjust the time when you visit that
destination.
MENU/Settings
Search
zChanging Area Setting
Operation
Search
Home
Table of
contents
Area Setting
Daylight Savings icon
Index
1Select the area part for [Destination], then press z on the control button.
2Select an area with b/B on the control button, and select Daylight Savings time with
v/V.
Downloaded From camera-usermanual.com Sony Manuals
125GB
Sets the date and time again.
1 MENU t
(Settings) t
(Clock Settings) t [Date & Time Setting]
t desired setting t z on the control button
Table of
contents
Date & Time Setting
2 Set the numeric value and desired settings with v/V/b/B.
Date & Time Format
You can select the date and time display format.
Daylight Savings
You can select Daylight Savings [On]/[Off].
Date & Time
You can set the date and time.
MENU/Settings
Search
Note
• The camera does not have a feature for superimposing dates on images. By using “PMB” in the CDROM (supplied), you can print or save images with the date.
Operation
Search
3 [OK] t z
Index
Downloaded From camera-usermanual.com Sony Manuals
126GB
You can view images recorded on the camera in standard picture quality by connecting the
camera to a Standard Definition (SD) TV. Refer also to the operating instructions supplied with
the TV.
2 Connect the camera to the TV with the Cable for multi-use terminal
(supplied).
1 To audio/video input jacks
Cable for multi-use terminal (supplied)
2 To the multi connector
4 Press
(Playback) button to turn on the camera.
Images shot with the camera appear on the TV. Select the desired image with the control
button.
Index
3 Turn on the TV and set the input.
MENU/Settings
Search
(Playback) button
Operation
Search
1 Turn off both the camera and the TV.
Table of
contents
Viewing an image on a Standard
Definition (SD) TV
Note
• During output to TV, [Easy Mode] is invalid.
Downloaded From camera-usermanual.com Sony Manuals
127GB
You can view images recorded on the camera in high picture quality by connecting the camera to
a High Definition (HD) TV using the HDMI Cable (sold separately) or HD Output Adaptor
Cable (sold separately). Use a Type3-compliant HD Output Adaptor Cable. Refer also to the
operating instructions supplied with the TV.
2 Connect the camera to the TV using the HDMI Cable (sold separately) or
HD Output Adaptor Cable (sold separately).
Operation
Search
1 Turn off both the camera and the HD TV.
Table of
contents
Viewing an image on a High
Definition (HD) TV
Notes
When you play back a single image, no icons are displayed on the TV.
You cannot play back images in Easy Mode during TV output.
Images shot in [VGA] image size cannot be played back in the HD format.
When you shoot movies while the camera and a TV are connected using an HDMI Cable (sold
separately) or HD Output Adaptor Cable (sold separately), the image being shot is not displayed on the
TV.
MENU/Settings
Search
•
•
•
•
z“PhotoTV HD”
Index
This camera is compatible with the “PhotoTV HD” standard.
By connecting a Sony TV compatible with “PhotoTV HD” using an HDMI Cable (sold
separately) or HD Output Adaptor Cable (sold separately), a whole new world of photos can
be comfortably enjoyed in breathtaking Full HD quality.
• “PhotoTV HD” allows for a highly-detailed, photo-like expression of subtle textures and colors.
• When the camera is connected to a Sony TV compatible with Video A mode using an HDMI Cable,
your TV is automatically set to the picture quality suitable for still images. When the setting of the
TV is set to Video, the picture quality is set to that suitable for movies.
• When playing back an AVCHD movie, it is recommended that you set [View Mode] to [AVCHD
view].
• For details, see the operating instructions of the TV.
Downloaded From camera-usermanual.com Sony Manuals
128GB
Connect the camera to the HDMI terminal of an HD TV using the HDMI Cable (sold
separately).
Table of
contents
Viewing an image by connecting the camera to an
HD TV using the HDMI Cable (sold separately)
1 Connect the camera to the TV with the HDMI Cable (sold separately).
HDMI terminal
2 To the HDMI connector
HDMI Cable
2 Turn on the TV and set the input.
3 Press
MENU/Settings
Search
1 To the HDMI
terminal
Operation
Search
(Playback) button
(Playback) button to turn on the camera.
Images shot with the camera appear on the TV. Select the desired image with the control
button.
• Press MENU t
(Settings) t (Main Settings) to select [Auto] or [1080i] for [HDMI Resolution].
• The beep sound is fixed to [Shutter].
• Do not connect the camera and equipment to be connected using output terminals. When the camera and
TV are connected using output terminals, no video and sound are produced. Such a connection can also
cause trouble of the camera and/or connected equipment.
• This function may not work properly with some HD TVs. For example, you may not be able to view a
video on your HD TV or hear sound from the HD TV.
• Use an HDMI Cable with the HDMI logo.
• When connecting the camera to a TV, use an HDMI Cable that can be connected to the mini jack on the
camera end and to the TV jack.
• Recording may automatically stop to protect the camera after a period of time when you shoot movies in
the condition where the camera and TV are connected by an HDMI Cable (sold separately).
Downloaded From camera-usermanual.com Sony Manuals
Index
Notes
129GB
Table of
contents
Viewing an image by connecting the camera to an
HD TV using the HD Output Adaptor Cable (sold
separately)
Connect the camera to an HD (High Definition) TV using the HD Output Adaptor Cable (sold
separately). Use a Type3-compliant HD Output Adaptor Cable (sold separately).
1 To audio/video
input jacks
COMPONENT AUDIO
VIDEO IN
Green/Blue/Red
White/Red
MENU/Settings
Search
(Playback) button
Operation
Search
1 Attach a conversion adaptor to an HD Output Adaptor Cable (sold
separately) and connect the camera to a High Definition (HD) TV with the
appropriate cable.
2 To the multi connector
Index
Conversion adaptor*
HD Output Adaptor
Cable (sold
separately)
* The conversion adaptor is supplied with a Type3-compliant HD Output Adaptor Cable (sold separately).
2 Turn on the TV and set the input.
3 Press the
(Playback) button to turn on the camera.
Images shot with the camera appear on the TV. Select the desired image with the control
button.
Note
• Before you use this function, select MENU t
[HD(1080i)] for [COMPONENT].
Downloaded From camera-usermanual.com Sony Manuals
(Settings) t
(Main Settings) to select
130GB
When you use a TV that has “BRAVIA” Sync (compatible with SYNC MENU) support, you can
operate the playback functions of the camera using the remote controller supplied with the TV
by connecting the camera to the TV using the HDMI Cable (sold separately).
(Playback) button
1 To the HDMI jack
2 To the HDMI connector
HDMI Cable
MENU/Settings
Search
HDMI jack
Operation
Search
1 Connect the camera to the TV using an HDMI Cable (sold separately).
Table of
contents
Viewing an image on a “BRAVIA”
Sync-compatible TV
2 Turn on the TV and set the input.
(playback) button of the camera to turn on the camera.
4 MENU t
(Settings) t
(Main Settings) t [CTRL FOR HDMI] t
[On] t z on the control button
Index
3 Press the
5 Press the SYNC MENU button of the TV’s remote controller to select the
desired mode.
Menu
Function
Slideshow with music
Automatically plays back images with sound effects or background
music in a continuous loop.
Single Image
Plays back a single image at a time.
Image Index
Displays multiple images at the same time.
3D Viewing
Plays back 3D images recorded in 3D shooting mode.
Delete
Deletes recorded images.
Playback Zoom
Plays back enlarged images.
Rotate
Rotates a still image.
View Mode
Selects the display format for viewing multiple images.
Downloaded From camera-usermanual.com Sony Manuals
131GB
Continued r
Notes
Table of
contents
• When the camera is connected to a TV set using an HDMI Cable, the functions that you can operate are
limited.
• You can perform the operation of the camera with the remote controller of your TV by connecting your
camera to a “BRAVIA” Sync-compatible TV. For details, see the operating instructions of the TV.
• If the camera functions in an undesired manner when you are controlling it using the TV’s remote
controller, such as when connected via HDMI to another manufacturer’s TV, press MENU t
(Settings) t (Main Settings) t [CTRL FOR HDMI] t [Off].
Operation
Search
MENU/Settings
Search
Index
Downloaded From camera-usermanual.com Sony Manuals
132GB
“PMB” and other applications are contained on the CD-ROM (supplied) to allow more versatile
use of images shot with your Cyber-shot camera.
Table of
contents
Using with your computer
Recommended computer environment (Windows)
Microsoft Windows XP*1 SP3/Windows Vista*2 SP2/
Windows 7
Others
CPU: Intel Pentium III 800 MHz or faster (For playing/
editing the High Definition movies: Intel Core Duo
1.66 GHz or faster/ Intel Core 2 Duo 1.66 GHz or faster)
Memory: 512 MB or more (For playing/ editing the High
Definition movies: 1 GB or more)
Hard Disk: Disk space required for installation—
approximately 500 MB
Display: Screen resolution: 1,024 × 768 dots or more
*1 64-bit editions and Starter (Edition) are not supported.
Recommended computer environment
(Macintosh)
Index
Windows Image Mastering API (IMAPI) Ver.2.0 or later is required to use the function for creating
discs.
*2 Starter (Edition) is not supported.
MENU/Settings
Search
OS (pre-installed)
Operation
Search
The following computer environment is recommended when using the supplied software
“PMB”, “Music Transfer” and “PMB Portable” or importing images via a USB connection.
The following computer environment is recommended when using the supplied software “Music
Transfer” and “PMB Portable” or importing images via a USB connection.
OS (pre-installed)
USB Connection: Mac OS X (v10.3 to v10.6)
Music Transfer/PMB Portable: Mac OS X (v10.4 to
v10.6)
Notes
• Operation is not assured in an environment based on an upgrade of the operating systems described
above or in a multi-boot environment.
• If you connect two or more USB devices to a single computer at the same time, some devices, including
the camera, may not operate, depending on the types of USB devices you are using.
• Connecting the camera using a USB interface that is compatible with Hi-Speed USB (USB 2.0
compliant) allows advanced transfer (high speed transfer), as the camera is compatible with Hi-Speed
USB (USB 2.0 compliant).
• When your computer resumes activity from suspend or sleep mode, communication between the camera
and your computer may not recover at the same time.
Downloaded From camera-usermanual.com Sony Manuals
133GB
Installing “PMB (Picture Motion Browser)” and
“Music Transfer” (Windows)
The installation menu screen appears.
• If it does not appear, double-click [Computer] (in Windows XP, [My Computer]) t
(SONYPMB).
• If the AutoPlay screen appears, select “Run Install.exe” and follow the instructions that appear on the
screen to proceed with the installation.
Operation
Search
1 Turn on your computer and insert the CD-ROM (supplied) into the CDROM drive.
Table of
contents
Using the software
2 Click [Install].
3 Select the desired language, then proceed to the following screen.
The “License Agreement” screen appears.
4 Carefully read the agreement, click the radio button (
the terms of the agreement, and then click [Next].
t
) to accept
5 Follow the instructions on the screen to complete the installation.
6 Remove the CD-ROM after the installation is complete.
Index
• For the installation, connect the camera to the computer during the procedure (page 136).
• When the restarting confirmation message appears, restart the computer following the instructions on
the screen.
• DirectX may be installed depending on the system environment of your computer.
MENU/Settings
Search
The “Choose Setup Language” screen appears.
7 Start up the software.
• To start up “PMB,” click
(PMB) on the desktop.
For the detailed operation method, see the following PMB support page (English only):
http://www.sony.co.jp/pmb-se/
or click
(PMB Help).
• To start up “PMB” from the Start menu, select [Start] t [All Programs] t
(PMB).
• If “PMB” was installed on your computer and if you re-install “PMB” using the supplied CD-ROM,
you can start up all the applications from “PMB Launcher.” To start up “PMB Launcher,” doubleclick
(PMB Launcher) on the desktop.
Notes
• Log on as Administrator.
• When “PMB” is started up for the first time, the confirmation message of the Information tool appears on
the screen. Select [Start].
• If “PMB” has been already installed on your computer and that “PMB” version number is lower than that
of the supplied CD-ROM, re-install “PMB” using the supplied CD-ROM.
• If the version number is higher than that of the supplied CD-ROM, you do not need to re-install “PMB”.
When you connect the camera and the computer via USB cable, the available “PMB” function is
activated.
• If “PMB” has already been installed on your computer and that “PMB” version number is lower than 5.0,
some functions may become invalid after you install “PMB” using the supplied CD-ROM. Also, you can
start up “PMB” or other various software from “PMB Launcher” installed at the same time. To start up
“PMB Launcher,” double-click
(PMB Launcher) on the desktop.
Downloaded From camera-usermanual.com Sony Manuals
134GB
Installing “Music Transfer” (Macintosh)
2 Double-click
(SONYPMB).
Table of
contents
1 Turn on your Macintosh computer, and insert the CD-ROM (supplied) into
the CD-ROM drive.
3 Double-click the [MusicTransfer.pkg] file in the [Mac] folder.
The installation of the software starts.
Operation
Search
Notes
• “PMB” is not compatible with Macintosh computers.
• Shut down all other application software before you install “Music Transfer”.
• For installation, you need to log on as Administrator.
Index
• “PMB” allows you to import images shot with the camera to a computer for display. Make a USB
connection between the camera and your computer, and click [Import].
• Images on a computer can be exported to a memory card, and displayed on the camera. Make a USB
connection between the camera and your computer, click [Export] t [Easy Export (PC Sync)] in
the [Manipulate] menu, and click [Export].
• You can save and print images with the date.
• You can display images stored on a computer by shooting date in a calendar display.
• You can correct (Red Eye Reduction, etc.) still images, and change the shooting date and time.
• You can create discs with CD or DVD disc-writing drive.
• Blu-ray discs, AVCHD discs and DVD-Video discs can be created from AVCHD movies imported
to a PC. (An environment that provides Internet connectivity is required when creating a Blu-ray
disc or DVD-Video disc for the first time.)
• You can upload images to a network service. (An internet connection environment is required.)
• For other details, see
(PMB Help).
MENU/Settings
Search
zIntroduction to “PMB”
zIntroduction to “Music Transfer”
“Music Transfer” allows you to replace the Music files provided in the camera at the factory
with your favorite tracks, and to delete and add Music files.
You can also restore the tracks stored at the factory to your camera.
• The following track types can be imported using “Music Transfer”.
– MP3 files stored on the hard disk of your computer
– Music CD tracks
– Preset-music saved on the camera
• Before starting up “Music Transfer,” perform MENU t
(Settings) t
[Download Music], and connect the camera to the computer.
(Main Settings) t
For other details, see the help in “Music Transfer”.
Downloaded From camera-usermanual.com Sony Manuals
135GB
• Use a Type3-compliant USB/AV/DC IN Cable (sold separately).
2 Turn on the computer, then press
(Playback) button.
3 Connect the camera to your computer.
Operation
Search
1 Insert a sufficiently charged battery pack into the camera, or connect the
camera to a wall outlet (wall socket) using the AC-LS5 AC Adaptor (sold
separately) and the USB/AV/DC IN Cable for multi-use terminal (sold
separately).
Table of
contents
Connecting the camera to a
computer
• When a USB connection is established for the first time, your computer automatically runs a program
to recognize the camera. Wait for a while.
MENU/Settings
Search
1 To a USB jack of the computer
Index
2 To the multi connector
Cable for multi-use terminal (supplied)
Importing images to a computer (Windows)
“PMB” allows you to easily import images.
For details on “PMB” functions, see the “PMB Help”.
Importing images to a computer without using “PMB”
When the AutoPlay Wizard appears after making a USB connection between the camera and a
computer, click [Open folder to view files] t [OK] t [DCIM] or [MP_ROOT] t copy the
desired images to the computer.
Notes
• Use “PMB” for operations such as when importing AVCHD movies to a computer.
• If operations are performed on an AVCHD movie file or folder on the camera from a PC while the
camera is connected to a PC, it may destroy the image file or playback may become impossible. Do not
delete or copy AVCHD movies on the camera’s memory card from a PC. Sony bears no responsibility
for the result of operations of this type.
• The camera creates a 3D image by combining a JPEG file with an MPO file. If you delete either file on a
PC, you cannot playback the 3D image.
Downloaded From camera-usermanual.com Sony Manuals
136GB
Importing images to a computer (Macintosh)
Table of
contents
1 Connect the camera to your Macintosh computer first. Double-click the
newly recognized icon on the desktop t the folder where the images you
want to import are stored.
2 Drag and drop the image files to the hard disk icon.
The image files are copied to the hard disk.
The image is displayed.
Operation
Search
3 Double-click the hard disk icon t the desired image file in the folder
containing the copied files.
Deleting the USB connection
•
•
•
•
Disconnecting the cable for multi-use terminal.
Removing a memory card.
Inserting a memory card into the camera after copying images from the internal memory.
Turning off the camera.
1 Double-click the disconnect icon on the
tasktray.
2 Click
Windows Vista
MENU/Settings
Search
Perform the procedures from step 1 to 3 below before:
(USB Mass Storage Device) t [Stop].
Notes
Index
Windows XP
3 Confirm the device on the confirmation
window, then click [OK].
Disconnect icon
• Drag and drop the icon of the memory card or the drive icon to the “Trash” icon beforehand when you
use a Macintosh computer, and the camera is disconnected from the computer.
• When performing operations such as importing AVCHD movies, use the “iMovie” software bundled
with Macintosh computers.
Downloaded From camera-usermanual.com Sony Manuals
137GB
This camera has a built-in application “PMB Portable”.
You can use this application to do the following:
For details on “PMB Portable”, see the “PMB Portable” help.
Starting up “PMB Portable” (Windows)
1 Make a USB connection between the camera and a computer.
When you connect the camera and your computer, AutoPlay Wizard appears.
Click [×] to close the AutoPlay Wizard for any unnecessary drives.
MENU/Settings
Search
When using “PMB Portable” for the first time, you must select the language. Follow the
procedure below to make the selection. Once the language selection has been made, steps 3 to 5
are unnecessary the next time you use “PMB Portable”.
Operation
Search
• You can easily upload images to a blog or other media service.
• You can upload images from a computer connected to the Internet even when you are away from home or
the office.
• You can easily register the media services (such as blogs) you use frequently.
Table of
contents
Uploading images to a media
service
• If the desired AutoPlay Wizard does not appear, click [Computer] (in Windows XP, [My Computer])
t [PMBPORTABLE], then double-click [PMBP_Win.exe].
• If [PMB Portable] is not displayed within the AutoPlay Wizard, click [Computer] t
[PMBPORTABLE], then double-click [PMBP_Win.exe].
Index
2 Click [PMB Portable].
(in Windows XP, click [PMB Portable] t [OK])
The Language Selection screen appears.
3 Select the desired language, then click [OK].
The Region Selection screen appears.
4 Select the appropriate [Region] and [Country/Area], and then click [OK].
The User Agreement screen appears.
5 Read the agreement carefully. If you accept the terms of the agreement,
click [I Agree].
“PMB Portable” starts up.
Downloaded From camera-usermanual.com Sony Manuals
138GB
Starting up “PMB Portable” (Macintosh)
When you connect the camera and your computer, [PMBPORTABLE] appears on the
desktop.
Click [×] for any unnecessary drives.
Table of
contents
1 Make a USB connection between the camera and a computer.
2 Click [PMBP_Mac] in the [PMBPORTABLE] folder.
3 Select the appropriate [Region] and [Country/Area], and then click [OK].
The User Agreement screen appears.
4 Read the agreement carefully. If you accept the terms of the agreement,
click [I Agree].
Operation
Search
The Region Selection screen appears.
“PMB Portable” starts up.
•
•
•
•
“PMB Portable” is not supported for AVCHD movies.
Set [LUN Settings] in [Main Settings] to [Multi].
Always connect to a network when using “PMB Portable”.
When uploading images over the Internet, the cache may remain in the computer being used depending
on the service provider. This is also true when this camera is used for this purpose.
• When a bug occurs in “PMB Portable” or you delete “PMB Portable” by mistake, you can repair “PMB
Portable” by downloading the PMB Portable installer from the web site.
“PMB Portable” makes it possible to download the URLs of a number of websites from the
server administered by Sony (the “Sony server”).
In order to use “PMB Portable” to enjoy the benefits of the image uploading service or other
services (the “services”) provided by these and other websites, you must consent to the
following.
Index
Notes on “PMB Portable”
MENU/Settings
Search
Notes
• Some websites require registration procedures and/or fees to use their services. In using such services,
you must comply with the terms and conditions established by the websites concerned.
• Services may be terminated or changed in accordance with the convenience of the website operators.
Sony will not be held responsible for any trouble occurring between the users and third parties or any
inconvenience caused to users relating to the utilization of the services inclusive of the termination of or
changes to such services.
• To view a website, you will be redirected to it by the Sony server. There may be times when you cannot
access the website because of server maintenance or for other reasons.
• If the operation of the Sony server is to be terminated, you will be notified of the termination ahead of
time on Sony website, etc.
• The URLs to which you are redirected by the Sony server and other information may be recorded for the
purposes of improving Sony future products and services. However, no personal data will be recorded on
such occasions.
Downloaded From camera-usermanual.com Sony Manuals
139GB
You can create a disc from AVCHD movies that have been recorded with this camera.
Table of
contents
Creating a disc of movies
Selecting the method for creating a disc of
movies
Creation method
Blu-ray disc playback devices
(Blu-ray disc player,
PlayStation®3, etc.)
Importing movies to a computer using
“PMB” and creating a Blu-ray disc
AVCHD format playback
devices
(Sony Blu-ray disc player,
PlayStation®3, etc.)
Importing movies to a computer using
“PMB” and creating an AVCHD
format disc
Ordinary DVD playback
devices
(DVD player, computer that can
play DVDs, etc.)
Importing movies to a computer using
“PMB” and creating a standard
definition image quality (STD) disc
Disc type
MENU/Settings
Search
Player
Operation
Search
Select the method that suits your disc player.
For details on the method for creating a disc using “PMB”, see “PMB Help.”
To import movies into a PC, see page 136.
Creating an AVCHD format disc using
a DVD Writer/Recorder other than
DVDirect Express
Index
Notes
• If you create a disc using Sony DVDirect (DVD Writer), use the memory card slot of the DVD Writer or
connect the DVD Writer via USB connection to transfer the data.
• If you use Sony DVDirect (DVD Writer), check that the firmware is updated to the newest version.
For details, see the following URL:
http://sony.storagesupport.com/
zCharacteristics of each type of disc
Using a Blu-ray disc enables you to record high-definition image quality (HD) movies of
a longer duration than DVD discs.
High-definition image quality (HD) movies can be recorded on DVD media, such as
DVD-R discs, and a high-definition image quality (HD) disc is created.
• You can play a high-definition image quality (HD) disc on AVCHD format playback
devices, such as a Sony Blu-ray disc player and a PlayStation®3. You cannot play the
disc on ordinary DVD players.
Standard definition image quality (STD) movies converted from high-definition image
quality (HD) movies can be recorded on DVD media, such as DVD-R discs, and a
standard definition image quality (STD) disc is created.
Downloaded From camera-usermanual.com Sony Manuals
140GB
Continued r
The following 12-cm discs can be used with “PMB”. For information on Blu-ray discs, see
page 141.
Disc type
Characteristics
DVD-R / DVD+R / DVD+R DL
Cannot be re-written.
DVD-RW / DVD+RW
Can be re-written and used again.
Operation
Search
• Always maintain your PlayStation®3 to use the latest version of the PlayStation®3 system software.
• The PlayStation®3 may not be available in some countries/regions.
Table of
contents
zTypes of discs that can be used with “PMB”
Creating AVCHD discs
1 Turn on the power of the PC and insert an unused disc in the DVD drive.
2 Start “PMB”.
3 Select the AVCHD movie to be written to the disc.
4 Click
(HD)].
MENU/Settings
Search
An AVCHD disc with HD picture quality can be created from AVCHD movies imported to a PC
using supplied “PMB” software.
(Create Discs), then select [Create AVCHD Format Discs
Notes
Index
5 Create the disc by following the on-screen instructions.
• Be sure that “PMB” has already been installed (page 134).
• Still images and MP4 movies cannot be recorded on an AVCHD disc.
• Disc creation may take time.
zPlaying an AVCHD disc on a PC
AVCHD discs can be played on a PC using “Player for AVCHD” installed along with
“PMB”. To start the software, click on [Start] t [All Programs] t [PMB] t [PMB
Launcher] t [View] t [Player for AVCHD].
For detailed operations, see the Help for “Player for AVCHD”.
• Images may not play back smoothly depending on the PC environment.
Creating Blu-ray discs
You can create Blu-ray discs from AVCHD movies imported to a PC.
The PC in question must be capable of creating Blu-ray discs. BD-R (not re-writable) or BD-RE
(re-writable) discs can be used. Multi-session recordings cannot be made.
To create Blu-ray discs, be sure to install [BD add-on software] on the “PMB” installation
screen. To install, your PC must be connected to the Internet.
For detailed operations, see “PMB Help”.
Downloaded From camera-usermanual.com Sony Manuals
141GB
DVD discs with standard definition image quality (STD) can be created using supplied “PMB”
software and selecting an AVCHD movie imported to the PC.
Table of
contents
Creating standard definition image quality (STD)
discs
1 Turn on the power of the PC and insert an unused disc in the DVD drive.
• If software other than “PMB” starts automatically, exit that software.
3 Select the AVCHD movie to be written to the disc.
4 Click
(STD)].
(Create Discs), then select [Create DVD-Video Format Discs
Notes
• Be sure that “PMB” has already been installed (page 134).
• Discs cannot be created for MP4 movies.
• Disc creation may take time due to converting the AVCHD movie to standard definition image quality
(STD).
• The PC must be connected to the Internet the first time a DVD-Video disc is created.
MENU/Settings
Search
5 Create the disc by following the on-screen instructions.
Operation
Search
2 Start “PMB”.
Index
Downloaded From camera-usermanual.com Sony Manuals
142GB
Notes
• When you print still images shot in 16:9 mode, both edges may be cut off.
• You cannot print panoramic images depending on the printer.
You can take a memory card containing images shot with the camera to a photo printing service
shop. As long as the shop supports photo printing services conforming to DPOF, you can make a
(Print order) mark on images in advance on the viewing menu so that you do not have to
reselect them when you print them out at the shop.
MENU/Settings
Search
Printing at a shop
Operation
Search
You can print still images using the following methods.
• Printing directly using a memory card-compliant printer
For details, see the operating instructions supplied with the printer.
• Printing using a computer
You can import images to a computer using the supplied “PMB” software and print the
images. You can insert the date on the image and print it.
For details, see the “PMB Help”.
• Printing at a shop
Table of
contents
Printing still images
Notes
Downloaded From camera-usermanual.com Sony Manuals
Index
• You cannot print images stored in the internal memory at a print shop directly from the camera. Copy the
images to a memory card (page 123), then take the memory card to the print shop.
• Consult your photo printing service shop as to what types of memory card they can process.
• A memory card adaptor (sold separately) may be necessary. Consult your photo printing service shop.
• Before you take image data to a shop, always copy (back up) your data to a disk.
• You cannot set the number of prints.
• If you want to superimpose dates on images, consult your photo printing service shop.
143GB
If you experience trouble with the camera, try the following solutions.
1 Check the items on pages 144 to 151.
Table of
contents
Troubleshooting
If a code such as “C/E:ss:ss” appears on the screen, see
page 152.
4 Consult your Sony dealer or local authorized Sony service
facility.
Be aware that by sending the camera for repair, you give consent that the contents of the internal
memory, music files may be checked.
Index
Additional information on this product and answers to frequently asked questions can
be found at our Customer Support Website.
http://www.sony.net/
MENU/Settings
Search
3 Initialize the settings (page 107).
Operation
Search
2 Remove the battery pack, wait for about one minute, re-insert
the battery pack, then turn on the power.
Battery pack and power
Cannot insert the battery pack.
• Make sure the direction of the battery is correct, and insert it until the battery eject lever is locked.
Cannot turn on the camera.
• After inserting the battery pack into the camera, it may take a few moments for the camera to power
up.
• Insert the battery pack correctly.
• The battery pack is discharged. Insert a charged battery pack.
• The battery pack terminals are dirty. Gently wipe away any dirt with a soft cloth.
• Use a recommended battery pack.
The power turns off suddenly.
• Depending on the camera and battery temperature, the power may turn off automatically to protect
the camera. In this case, a message is displayed on the LCD screen before the power turns off.
• If you do not operate the camera for a certain period of time while the power is on and [Power Save]
is set to [Standard] or [Stamina], the camera turns off automatically to prevent wearing down the
battery pack. Turn on the camera again.
Downloaded From camera-usermanual.com Sony Manuals
144GB
The remaining charge indicator is incorrect.
• You cannot charge the battery pack using the AC Adaptor (sold separately). Use the battery charger
to charge the battery.
The CHARGE lamp flashes while charging the battery.
MENU/Settings
Search
Index
• Check that the battery pack type is NP-BN1.
• The CHARGE lamp flashes infrequently when you use a battery pack that has not been used for a
long time.
• The CHARGE lamp (on the supplied battery charger) has two flash patterns, fast flash (approx. 0.15second intervals) and slow flash (approx. 1.5-second intervals). If the lamp flashes quickly, remove
the battery pack being charged, and then insert the same battery pack into the battery charger again
(until it clicks). If the lamp flashes quickly again, this may indicate a battery pack problem.
If the lamp flashes slowly, the charger is in standby mode and charging has temporarily stopped.
Charging stops temporarily and standby mode results when the temperature is outside the range
suitable for charging. Charging resumes and the CHARGE lamp lights when the temperature returns
to the range suitable for charging.
It is recommended to charge the battery pack within the proper charging temperature range between
10°C to 30°C (50°F to 86°F).
• For details, see page 161.
Operation
Search
Cannot charge the battery pack.
Table of
contents
• This is caused when you use the camera in an extremely hot or cold location.
• A discrepancy arose between the remaining charge indicator and the actual remaining battery charge.
Fully discharge the battery pack once, then charge it to correct the indication. Depending on
conditions of use, the display may remain incorrect.
• Battery capacity decreases over time and through repeated use. If decreased usage time between
charges becomes significant, it is probably time to replace it with a new one.
Shooting still images/movies
Cannot record images.
• When images cannot be recorded into a memory card but are recorded into the internal memory, even
though a memory card has been inserted into the camera, make sure that the memory card has been
fully inserted.
• Check the free capacity of the internal memory or memory card. If it is full, do one of the following:
– Delete unnecessary images (pages 45, 90).
– Change the memory card.
• You cannot record images while charging the flash.
• For recording movies, it is recommended that you use the following memory cards:
– “Memory Stick PRO Duo” (Mark2) media, “Memory Stick PRO-HG Duo” media
– SD memory card, SDHC memory card or SDXC memory card (Class 4 or faster)
• Set [Demo Mode] to [Off] (page 106).
Smile Shutter function does not work.
• No image is shot if a smiling face is not detected.
• Set [Demo Mode] to [Off] (page 106).
Anti-blur function does not work.
• The anti-blur function may not work properly when shooting night scenes.
• Shoot after pressing the shutter button halfway down.
Downloaded From camera-usermanual.com Sony Manuals
145GB
Recording takes a long time.
Table of
contents
• When the shutter speed becomes slower than a certain speed, for example, when you shoot images in
dark locations, the camera automatically reduces the image noise. This function is called NR (noise
reduction) slow shutter and the shooting time takes longer.
The image is out of focus.
Zoom does not work.
• You can select Face Detection only when the focus mode is set to [Multi AF] and the Metering Mode
is set to [Multi].
Index
Cannot select the Face Detection function.
MENU/Settings
Search
• You cannot use the zoom in the following situations:
– In Intelligent Sweep Panorama mode
– In 3D shooting mode
• You cannot use the Smart zoom depending on the image size (page 98).
• You cannot use the Digital Zoom in the following situations:
– In Superior Auto Adjustment mode
– In Background Defocus mode
– In Movie Mode
– When
(Backlight Correction HDR) mode is selected in Scene Selection.
– When the Smile Shutter function is activated.
Operation
Search
• The subject is too close. When shooting, make sure to position the lens farther away from the subject
than the minimum shooting distances (approximately 5 cm (2 inches) (W)/90 cm (2 ft 11 3/8 inches)
(T) from the lens).
• (Twilight),
(Landscape) or (Fireworks) mode is selected in Scene Selection when shooting
still images.
The flash does not work.
• You cannot use the flash in the following situations:
– In Background Defocus mode
– When shooting burst images
– When
(Anti Motion Blur) mode, (Twilight) mode,
(Hand-held Twilight) mode, (High
Sensitivity) mode or (Fireworks) mode is selected in Scene Selection.
– In Intelligent Sweep Panorama mode
– In 3D shooting mode
– In Movie Mode
• Set the flash to [On] (page 36) when the Scene Selection mode is set to (Landscape), (Gourmet),
(Pet),
(Beach) or (Snow) mode.
Fuzzy white circular spots appear in images shot using the flash.
• Particles (dust, pollen, etc.) in the air reflected the flash light and appeared in the image. This is not a
malfunction.
The close-up shoot function (Macro) does not work.
• The camera automatically adjusts the focus. Press and hold the shutter button halfway down. Focus
adjustment may take some time when shooting a close subject.
•
(Landscape) mode, (Twilight) mode or (Fireworks) mode is selected in the Scene Selection.
Downloaded From camera-usermanual.com Sony Manuals
146GB
The date and time are not displayed on the LCD screen.
Cannot insert dates on images.
• This camera does not have a feature for superimposing dates on images. By using “PMB”, you can
print or save images with the date (page 134).
• The exposure is incorrect. Correct the exposure (page 67).
The image colors are not correct.
Operation
Search
The F value and shutter speed flash when you press and hold the shutter button
halfway down.
Table of
contents
• While shooting, the date and time are not displayed. They are displayed only during playback.
• Adjust the White Balance (page 69).
• The camera is attempting to increase the visibility of the screen by temporarily brightening the image
under conditions of low illumination. There is no effect on the recorded image.
You can see a dark shadow on the image.
• Depending on the brightness of the subject, you may see a dark shadow when you change the
aperture. This is not a malfunction.
MENU/Settings
Search
Noise appears in the image when you view the screen in a dark place.
The eyes of the subject come out red.
Index
• Set [Red Eye Reduction] to [Auto] or [On] (page 100).
• Shoot the subject at a distance closer than the flash range using the flash.
• Light the room and shoot the subject.
• Retouch the image using [Retouch] t [Red Eye Correction] in viewing menu, or correct using
“PMB”.
Dots appear and remain on the screen.
• This is not a malfunction. These dots are not recorded.
Cannot shoot images in succession.
• The internal memory or memory card is full. Delete unnecessary images (pages 45, 90).
• The battery level is low. Insert charged battery pack.
The same image is shot several times.
• Set [Burst Settings] to [Single] (page 65).
• [Scene Recognition] is set to [Advanced] (page 74).
Downloaded From camera-usermanual.com Sony Manuals
147GB
Viewing images
Cannot play back stereoscopic images on the camera.
The date and time are not displayed.
• The screen display is set to display images only. Press the DISP (Screen Display Settings) button to
display information (page 34).
Left and right sides of the screen are shown in black.
MENU/Settings
Search
• Stereoscopic images can be played back on this camera only when that image has been recorded
using [Sweep Multi Angle] mode.
• 3D images consist of a JPEG file and an MPO file. If either file is deleted on the PC, the camera may
not operate correctly.
Operation
Search
• Make sure that the memory card is fully inserted into the camera.
• The folder/file name has been changed on your computer.
• No guarantees are made for playing back, on this camera, files containing images which were
processed on a computer or images which were shot using other cameras.
• The camera is in USB mode. Delete the USB connection (page 137).
• Use “PMB” to play images stored on a PC with this camera.
Table of
contents
Cannot play back images.
• [Auto Orientation] is set to [On] (page 99).
• Transfer music files to the camera with “Music Transfer” (pages 134, 135).
• Confirm that the volume setting and slideshow setting are correct (page 82).
• Slideshow is played back with [Continuous Playback]. Select [Slideshow with music] and play back.
Index
Cannot hear music during slideshow.
The image does not appear on the TV.
• The camera and television must use the same color television system (page 157).
• Check whether the connection is correct (pages 127, 128).
• If the USB connector of the cable for multi-use terminal is connected to another device, disconnect it
(page 137).
The 3D images do not appear on the TV even though the camera is in [3D
Viewing] mode.
• Check that the TV is set to display the 3D images.
Deleting
Cannot delete an image.
• Cancel the protection (page 91).
Downloaded From camera-usermanual.com Sony Manuals
148GB
Computers
Your computer does not recognize the camera.
Cannot import images.
After making a USB connection, “PMB” does not start automatically.
Index
• Connect the camera and your computer correctly making a USB connection (page 136).
• When you shoot images with a memory card formatted by a computer, you may not be able to import
the images to a computer. Shoot using a memory card formatted by the camera (page 119).
MENU/Settings
Search
• When the battery level is low, insert the charged battery pack or use the AC Adaptor (sold
separately).
• Set [USB Connect] to [Mass Storage] (page 111).
• Use the cable for multi-use terminal (supplied).
• Disconnect the cable for multi-use terminal from both the computer and the camera, and connect it
again firmly.
• Disconnect all equipment other than the camera, the keyboard and the mouse from the USB
connectors of your computer.
• Connect the camera directly to your computer without passing through a USB hub or other device.
Operation
Search
• Check that the computer and the “Memory Stick” media Reader/Writer support a “Memory Stick
PRO Duo” media. Users of computers and the “Memory Stick” media Readers/Writers made by
manufacturers other than Sony should contact those manufacturers.
• If a “Memory Stick PRO Duo” media is not supported, connect the camera to the computer
(page 136). The computer recognizes the “Memory Stick PRO Duo” media.
Table of
contents
A “Memory Stick PRO Duo” media is not recognized by a computer with a
“Memory Stick” media slot.
• Make the USB connection after the computer is turned on.
After making a USB connection, “PMB Portable” does not start.
• Set [LUN Settings] to [Multi].
• Set [USB Connect] to [Mass Storage].
• Connect the computer to the network.
Cannot play back images on your computer.
• If you are using “PMB”, refer to “PMB Help” (page 134).
• Consult the computer or software manufacturer.
The image and sound are interrupted by noise when you view a movie on a
computer.
• You are playing back the movie directly from the internal memory or the memory card. Use “PMB”
and import the movie to your computer, then play back the movie (page 134).
Images once exported to a computer cannot be viewed on the camera.
• Use “PMB” to play images stored on a PC with this camera.
• Register the image in the Image Database File and play in [Date View] (page 87).
• Event View is not available on this camera.
Downloaded From camera-usermanual.com Sony Manuals
149GB
Memory card
• Insert it in the correct direction.
Table of
contents
Cannot insert a memory card.
You have formatted a memory card by mistake.
• All the data on the memory card is deleted by formatting. You cannot restore it.
• Check that the memory card has been securely inserted as far as it will go.
Operation
Search
Data is being recorded to internal memory even though you inserted a memory
card.
Internal memory
• There is a memory card inserted in the camera. Remove it.
Cannot copy the data stored in the internal memory to a memory card.
• The memory card is full. Copy to a memory card with sufficient capacity.
MENU/Settings
Search
Cannot play back or record images using the internal memory.
Cannot copy the data on the memory card or the computer to the internal
memory.
Printing
Index
• This feature is not available.
Cannot print an image.
• Refer to the operation manual of the printer.
Images are printed with both edges cut off.
• Depending on your printer, all the edges of the image may be cut off. Especially when you print an
image shot with the image size set to [16:9], the lateral end of the image may be cut off.
• When printing images using your printer, cancel the trimming or borderless settings. Consult the
printer manufacturer as to whether the printer provides these functions or not.
• When having images printed at a digital print shop, ask the shop whether they can print the images
without cutting off both edges.
Cannot print images with the date.
• Using “PMB”, you can print images with date (page 134).
• The camera does not have a feature for superimposing dates on images. However, because the images
shot with the camera include information on the recording date, you can print images with the date
superimposed if the printer or the software can recognize Exif information. For compatibility with
Exif information, consult the manufacturer of the printer or the software.
• If you use a photo printing service, ask them to superimpose the dates on images.
Cannot print the 3D images as they are displayed on the camera’s LCD screen.
• The 3D images displayed on the camera are MPO files, but the images to be printed are JPEG files, so
in some cases, the images to be printed out are not the same as the ones displayed on the LCD screen.
Downloaded From camera-usermanual.com Sony Manuals
150GB
Others
• Moisture condensation has occurred. Turn off the camera and leave it for about an hour before using
it.
Table of
contents
The lens gets fogged.
The camera turns off with the lens portion extended.
The camera becomes warm when you use it for a long time.
• This is not a malfunction.
Operation
Search
• The battery pack is discharged. Replace it with a charged battery pack, then turn the camera on again.
• Do not attempt to force the lens that has stopped moving.
The Clock Set screen appears when you turn on the camera.
The date or time is incorrect.
• The Area Setting is set to a different location than your current location. Change the setting by
MENU t
(Settings) t [Clock Settings] t [Area Setting].
MENU/Settings
Search
• Set the date and time again (page 126).
• The internal rechargeable backup battery has discharged. Insert a charged battery, and set aside for
24 hours or more with the power left off.
Index
Downloaded From camera-usermanual.com Sony Manuals
151GB
Table of
contents
Warning indicators and
messages
Self-diagnosis display
Operation
Search
If a code starting with a letter of the alphabet appears, the self-diagnosis function on the camera
is working. The last two digits (indicated by ss) will differ depending on the state of the
camera.
If you cannot solve the problem even after trying the following corrective actions a few times,
the camera may need repair. Contact your Sony dealer or local authorized Sony service facility.
C:32:ss
C:13:ss
• The camera cannot read or write data on the memory card. Try turning off and on the camera again, or
taking out and inserting the memory card several times.
• The internal memory has experienced a format error, or an unformatted memory card is inserted.
Format the internal memory or the memory card (page 119).
• The inserted memory card cannot be used with the camera, or the data is damaged. Insert a new
memory card.
E:62:ss
Index
E:61:ss
MENU/Settings
Search
• There is trouble with the camera’s hardware. Turn the power off and on again.
E:91:ss
• A camera malfunction has occurred. Initialize the camera (page 107), then turn the power on again.
E:94:ss
• There is a malfunction when writing or deleting data. Repair is required. Contact your Sony dealer or
local authorized Sony service facility. Be prepared to give all numbers in the error code beginning
from the E.
Messages
If the following messages appear, follow the instructions.
• The battery level is low. Charge the battery pack immediately. Depending on the conditions of use or
the type of battery pack, the indicator may flash even though there are still 5 to 10 minutes of
remaining battery time left.
For use with compatible battery only
• The battery inserted is not an NP-BN1 (supplied) battery pack.
Downloaded From camera-usermanual.com Sony Manuals
152GB
System error
Camera overheating
Allow it to cool
Table of
contents
• Turn the power off and then on again.
• The camera temperature has risen. The power may turn off automatically, or you may be unable to
record movies. Leave the camera in a cool location until the temperature goes down.
• Turn the power off and then on again.
Reinsert the memory card
Memory card type error
• The inserted memory card cannot be used in the camera (page 3).
This memory card may not record or play
MENU/Settings
Search
• The inserted memory card cannot be used in the camera (page 3).
• The terminal section of the memory card is dirty.
• The memory card is damaged.
Operation
Search
Internal memory error
• The inserted memory card cannot be used in the camera (page 3).
• Format the media again (page 119).
Index
Error formatting internal memory
Error formatting memory card
Buffer overflow
• If you use a memory card that has been recorded and erased repeatedly, or that was formatted on a
different camera, the data writing speed may be too slow. First back up any data on the card to a
computer, and then reformat the card before using it (page 119).
• The writing speed of the memory card you are using is not sufficient for movie recordings. Use a
“Memory Stick PRO-HG Duo” media, “Memory Stick PRO Duo” (Mark2) media, or an SD card
(Class 4 or faster).
Memory card locked
• You are using the memory card with the write-protect switch, and the switch is set to the LOCK
position. Set the switch to the recording position.
Read only memory card
• The camera cannot record or delete images on this memory card.
Writing to the memory card was not completed correctly
Recover data
• Reinsert the memory card, and follow the instructions on the screen.
No images
• No images that can be played back have been recorded in the internal memory.
• No images that can be played back have been recorded in the memory card.
Downloaded From camera-usermanual.com Sony Manuals
153GB
No still images
File found which was not recognized
Table of
contents
• There are no 3D images that can be played back in [3D Viewing] mode.
• The selected folder or date does not contain a file that can be played back in a slideshow.
• You tried to delete a folder containing a file that cannot be played on this camera. Delete the file on a
computer and then delete the folder.
• A folder with the same first three digit number already exists on the memory card (for example:
123MSDCF and 123ABCDE). Select another folder, or create a new folder (pages 120, 121).
Operation
Search
Folder error
Cannot create more folders
Empty folder contents
• You tried to delete a folder containing one or more files. Delete all of the files and then delete the
folder.
Folder protected
MENU/Settings
Search
• The folder with a name beginning with “999” exists on the memory card. You cannot create any
folders if this is the case.
• You tried to delete a folder that is protected as read only on a computer.
• An error occurred while the image was playing back.
No guarantees are made for playing back, on this camera, files containing images which were
processed on a computer or images which were shot using other cameras.
Index
Cannot display file
Read only folder
• You have selected a folder that cannot be set as a recording folder on the camera. Select another
folder (page 121).
File protected
• Release the protection (page 91).
Image size over limit
• You are playing back an image with size that cannot be played back on the camera.
Unable to detect face for retouch
• You may not be able to retouch the image depending on the image.
(Vibration warning indicator)
• Camera shake may occur due to insufficient light. Use the flash, or mount the camera on a tripod to
secure the camera.
Downloaded From camera-usermanual.com Sony Manuals
154GB
• For recording movies, it is recommended that you use a “Memory Stick PRO Duo” (Mark2) media, a
“Memory Stick PRO-HG Duo” media or an SD memory card (Class 4 or faster).
Table of
contents
MP4 12M is not supported with this memory card
MP4 6M is not supported with this memory card
Recording is unavailable in this movie format
• Set [Movie format] to [MP4] (page 95).
• The lens malfunction.
Maximum number of
images already selected
Error Playing Music
• Delete the Music file, or replace it with a normal Music file.
• Execute [Format Music], then download a new Music file.
MENU/Settings
Search
• Up to 10 files can be selected when using [TransferJet].
• Up to 100 files can be selected when using [Multiple Images].
• You can add
(Print order) marks to up to 999 files.
Operation
Search
Turn the power off and on again
Error Formatting Music
• Execute [Format Music].
Index
Operation cannot be executed
in unsupported files
• Processing and other editing functions of the camera cannot be performed on image files that have
been processed using a computer or images that were recorded with other cameras.
Preparing Image Database File Please wait
• The camera restores the date information, etc., in cases where images have been deleted on a PC, etc.
• The necessary Image Database File is created after the memory card is formatted.
• The number of images exceeds that for which date management in a database file by the camera is
possible. To register additional images in the Image Database File, delete images in [Date View].
Inconsistencies found in Image Database File. Recover data
• AVCHD movies cannot be recorded or played because the Image Database File is corrupt. Follow the
on-screen instructions to recover the Image Database File.
• It is not possible to record to the camera’s Image Database File or play back using [Date View]. Use
“PMB” to back up all images to a PC and use it to restore a memory card or internal memory.
Downloaded From camera-usermanual.com Sony Manuals
155GB
• Import all of the images to the computer with “PMB”, and format the memory card or the internal
memory (page 119).
To view the images again with the camera, export the imported images to the camera with “PMB”.
Table of
contents
Image Database File error
Cannot recover
Recording function unavailable
due to high internal temperature
Recording has stopped due to
increased camera temperature
• Recording has stopped due to a rise in temperature while recording a movie. Please wait until the
temperature goes down.
Connection failed
• Check the TransferJet reception port and transfer data correctly (page 16).
• Either communication was cut off during image transfer, or transfer was cut off because device
memory is full. Check the available memory capacity and try transferring data using TransferJet
again.
• You may not be able to receive the image depending on the image.
Downloaded From camera-usermanual.com Sony Manuals
Index
Some files were not sent
Some files were not received
MENU/Settings
Search
• When you record movies for a long time, the camera temperature rises. In this case, stop recording
movies.
Operation
Search
• The camera temperature has risen. You cannot record images until the temperature has gone down.
156GB
You can use the battery charger (supplied), and the AC-LS5 AC Adaptor (sold separately) in any
country or region where the power supply is within 100 V to 240 V AC, 50/60 Hz.
Table of
contents
Using the camera abroad
Note
• Do not use an electronic transformer (travel converter), as this may cause a malfunction.
To view movies shot using this camera on a television, the camera and television must use the
same color television system. Check the color TV system for the country or region where you are
using the camera.
PAL system (1080 50i)
Australia, Austria, Belgium, China, Croatia, Czech Republic, Denmark, Finland, Germany,
Holland, Hong Kong, Hungary, Indonesia, Italy, Kuwait, Malaysia, New Zealand, Norway,
Poland, Portugal, Rumania, Singapore, Slovak Republic, Spain, Sweden, Switzerland, Thailand,
Turkey, United Kingdom, Viet Nam, etc.
Index
PAL-M system (1080 50i)
Brazil
MENU/Settings
Search
NTSC system (1080 60i)
Bahama Islands, Bolivia, Canada, Central America, Chile, Colombia, Ecuador, Jamaica, Japan,
Korea, Mexico, Peru, Surinam, Taiwan, the Philippines, the U.S.A., Venezuela, etc.
Operation
Search
On TV color systems
PAL-N system (1080 50i)
Argentina, Paraguay, Uruguay
SECAM system (1080 50i)
Bulgaria, France, Greece, Guiana, Iran, Iraq, Monaco, Russia, Ukraine, etc.
Downloaded From camera-usermanual.com Sony Manuals
157GB
The types of memory cards that can be used with the camera are “Memory Stick PRO Duo”
media, “Memory Stick PRO-HG Duo” media, “Memory Stick Duo” media, SD memory card,
SDHC memory card and SDXC memory card.
MultiMediaCard cannot be used.
Table of
contents
Memory card
Notes
Index
• When inserting a memory card into a memory card adaptor, make sure the memory card is inserted
facing in the correct direction, then insert it all the way in. Incorrect insertion may result in a malfunction.
MENU/Settings
Search
Note on using the memory card adaptor (sold separately)
Operation
Search
• A memory card formatted with a computer is not guaranteed to operate with the camera.
• Data read/write speeds differ depending on the combination of the memory card and the equipment used.
• Data may be corrupted in the following cases:
– When the memory card is removed or the camera is turned off during a read or write operation
– When the memory card is used in locations subject to static electricity or electrical noise
• We recommend backing up important data.
• Do not attach a label on the memory card itself nor on a memory card adaptor.
• Do not touch the terminal section of the memory card with your hand or a metal object.
• Do not strike, bend or drop the memory card.
• Do not disassemble or modify the memory card.
• Do not expose the memory card to water.
• Do not leave the memory card within the reach of small children. They might accidentally swallow it.
• Insert a memory card that fits the memory card slot size. Otherwise, it will cause a malfunction.
• Do not use or store the memory card under the following conditions:
– High temperature locations such as the hot interior of a car parked in direct sunlight
– Locations exposed to direct sunlight
– Humid locations or locations with corrosive substances present
“Memory Stick” media
The types of “Memory Stick Duo” media that can be used with the camera are listed in the table
below. However, proper operation cannot be guaranteed for all “Memory Stick Duo” media
functions.
“Memory Stick” media type
Recording/Playback
Memory Stick Duo (without MagicGate)
Memory Stick Duo (with MagicGate)
a*1
a*2
MagicGate Memory Stick Duo
Memory Stick PRO Duo
a*1*2
a*2*3
Memory Stick PRO-HG Duo
a*2*3*4
*1 High-speed data transfer using a parallel interface is not supported.
*2 “Memory Stick Duo” media, “MagicGate Memory Stick Duo” media, “Memory Stick PRO Duo” media
and “Memory Stick PRO-HG Duo” media are equipped with MagicGate functions. MagicGate is
copyright protection technology that uses encryption technology. Data recording/playback that requires
MagicGate functions cannot be performed with the camera.
*3 [AVC HD 17M FH], [AVC HD 9M HQ], [MP4 12M] or [MP4 6M] movies cannot be recorded to
internal memory or a Memory Stick other than a “Memory Stick PRO Duo” media.
*4 This camera does not support 8-bit parallel data transfer. It performs the same 4-bit parallel data transfer
as the “Memory Stick PRO Duo” media.
Downloaded From camera-usermanual.com Sony Manuals
158GB
Continued r
Operation
Search
• This product is compatible with “Memory Stick Micro” media (“M2”). “M2” is an abbreviation for
“Memory Stick Micro” media.
• To use a “Memory Stick Micro” media with the camera, be sure to insert the “Memory Stick Micro”
media into an “M2” Adaptor as large as of Duo size. If you insert a “Memory Stick Micro” media into the
camera without an “M2” Adaptor as large as of Duo size, you might not be able to remove it from the
camera.
• Do not leave the “Memory Stick Micro” media within the reach of small children. They might
accidentally swallow it.
Table of
contents
Notes on using a “Memory Stick Micro” media (sold
separately)
MENU/Settings
Search
Index
Downloaded From camera-usermanual.com Sony Manuals
159GB
On charging the battery pack
• We recommend charging the battery pack in an ambient temperature of between 10°C to 30°C (50°F to
86°F). The battery pack may not be fully charged in temperatures outside this range.
Table of
contents
Battery pack
Effective use of the battery pack
Index
• Fully discharge the battery pack before storing and store it in a cool, dry place. To maintain the battery
pack’s function, fully charge the battery pack and then fully discharge it on the camera at least once a
year while storing.
• To use the battery pack up, leave the camera in slideshow (page 81) playback mode until the power goes
off.
• To keep clean battery pack terminal and prevent short-circuiting, place the battery pack in a plastic bag,
etc. when carrying and storing to isolate it from other metal objects, etc.
MENU/Settings
Search
How to store the battery pack
Operation
Search
• Battery performance decreases in low temperature surroundings. So in cold places, the operational time
of the battery pack is shorter. We recommend the following to ensure longer battery pack use:
– Put the battery pack in a pocket close to your body to warm it up, and insert it in the camera
immediately before you start shooting.
• The battery pack will run out quickly if you use the flash or zoom frequently.
• We recommend having spare battery packs handy for two or three times the expected shooting time, and
making trial shots before taking the actual shots.
• Do not expose the battery pack to water. The battery pack is not water-resistant.
• Do not leave the battery pack in extremely hot places, such as in a car or under direct sunlight.
• When the battery pack terminals become dirty, the camera may not turn on, the battery pack may not
charge, or other symptoms may occur. In these cases, gently wipe away any dirt with a soft cloth.
On battery life
• The battery life is limited. Battery capacity decreases over time and through repeated use. If decreased
usage time between charges becomes significant, it is probably time to replace it with a new one.
• The battery life varies according to how it is stored and the operating conditions and environment in
which each battery pack is used.
Compatible battery pack
• The NP-BN1 battery pack (supplied) can be used only in N type compatible Cyber-shot models.
Downloaded From camera-usermanual.com Sony Manuals
160GB
Operation
Search
MENU/Settings
Search
• Only NP-BN1 type battery packs (and no others) can be charged in the battery charger (supplied).
Batteries other than the specified kind may leak, overheat, or explode if you attempt to charge them,
posing a risk of injury from electrocution and burns.
• Remove the charged battery pack from the battery charger. If you leave the charged battery pack in the
charger, battery life may be shortened.
• The CHARGE lamp of the supplied battery charger flashes in either way:
– Fast flashing: Turns the light on and off repeatedly at the interval of 0.15 seconds.
– Slow flashing: Turns the light on and off repeatedly at the interval of 1.5 seconds.
• When the CHARGE lamp flashes fast, remove the battery pack being charged, and then insert the same
battery pack into the battery charger securely again. When the CHARGE lamp flashes fast again, this
may indicate a battery error or that a battery pack other than the specified type has been inserted. Check
that the battery pack is the specified type. If the battery pack is the specified type, remove the battery
pack, replace it with a new one or another one and check if the battery charger operates correctly. If the
battery charger operates correctly, a battery error may have occurred.
• When the CHARGE lamp flashes slowly, it indicates that the battery charger stops charging temporarily
on standby. The battery charger stops charging and enters the standby status automatically when the
temperature is outside of the recommended operating temperature. When the temperature gets back
within the appropriate range, the battery charger resumes charging and the CHARGE lamp lights up
again. We recommend charging the battery pack in an ambient temperature of between 10 °C to 30 °C
(50 °F to 86 °F).
Table of
contents
Battery charger
Index
Downloaded From camera-usermanual.com Sony Manuals
161GB
Intelligent Pantilter (sold separately) allows you to take pictures, by having the camera detect
people’s faces.
For details, see the operating instructions supplied with Intelligent Pantilter.
Table of
contents
Intelligent Pantilter
Operation
Search
MENU/Settings
Search
Notes
• DSC-WX5C digital still camera does not support the Intelligent Pantilter (IPT-DS1/IPT-DS1C).
• The Intelligent Pantilter may not be available in all countries or regions.
Index
Downloaded From camera-usermanual.com Sony Manuals
162GB
Recording and playback on the camera
Based on the AVCHD format, your camera records with the high definition image quality (HD) mentioned
below.
1080 60i-compatible device
MPEG-4 AVC/H.264 1920×1080/60i, 1440×1080/60i
1080 50i-compatible device
MPEG-4 AVC/H.264 1920×1080/50i, 1440×1080/50i
Audio signal:
Dolby Digital 2ch
Recording media: Memory card
*1 1080i specification
A high definition specification which utilizes 1,080 effective scanning lines and the interlace system.
MENU/Settings
Search
Video signal*3:
Operation
Search
The AVCHD format has been developed for high-definition digital video cameras when recording an HD
(High-Definition) signal at the 1080i*1 or 720p*2 specification using high-efficiency compression coding
technology. The MPEG-4 AVC/H.264 format is adopted to compress video data, and the Dolby Digital or
Linear PCM system is used to compress audio data.
The MPEG-4 AVC/H.264 format is capable of compressing images at higher efficiency than that of the
conventional image compressing format. The MPEG-4 AVC/H.264 format enables a high definition video
signal shot on a digital video camera recorder to be recorded on 8 cm DVD discs, hard disk drive, flash
memory, memory card, etc.
Table of
contents
AVCHD format
*2 720p specification
A high definition specification which utilizes 720 effective scanning lines and the progressive system.
*3 Data recorded in AVCHD format other than the above mentioned cannot be played on your camera.
Index
Downloaded From camera-usermanual.com Sony Manuals
163GB
TransferJet communications conform to the standard given below.
TransferJet standard:
Conforms to PCL Spec. Rev. 1.0
• Use the “SCSI” communication protocol above when connecting to a TransferJet-compatible device
(sold separately). Or, use the “OBEX” communication protocol when sharing data between cameras.
Operation
Search
Protocol Class Name (communication type):
SCSI Block Device Target
OBEX Push Server
OBEX Push Client
Table of
contents
TransferJet standard
MENU/Settings
Search
Index
Downloaded From camera-usermanual.com Sony Manuals
164GB
The number of still images and recordable time may vary depending on the shooting conditions
and the memory card.
(Units: Images)
Capacity
Internal
memory
Memory card formatted with this camera
4 GB
8 GB
16 GB
32 GB
12M
6
344
690
1397
2846
5625
8M
8
482
967
1959
3990
7884
5M
10
582
1168
2366
4819
9524
VGA
207
11760
23600
47810
97350
192380
16:9(9M)
6
382
766
1552
3160
6246
16:9(2M)
32
1838
3688
7470
15210
30060
Downloaded From camera-usermanual.com Sony Manuals
Index
Notes
• When the number of remaining shootable images is greater than 99,999, the “>99999” indicator appears.
• When an image shot with other cameras is played back on this camera, the image may not appear in the
actual image size.
MENU/Settings
Search
Approx.
32 MB
2 GB
Size
Operation
Search
Still images
Table of
contents
Number of still images and
recordable time of movies
165GB
Movies
Table of
contents
The table below shows the approximate maximum recording times. These are the total times for
all movie files. Continuous shooting is possible for approximately 29 minutes at one time. The
maximum size of an MP4-format movie file is up to approximately 2GB.
(Units: hour : minute : second)
Capacity
Internal
memory
Memory card formatted with this camera
4 GB
8 GB
16 GB
32 GB
AVC HD 17M FH
—
0:14:00
0:28:30
0:58:10
1:58:50
3:55:20
AVC HD 9M HQ
—
0:28:00
0:57:00
1:56:20
3:57:50
7:50:40
MP4 12M
—
0:20:40
0:41:40
1:24:40
2:52:30
5:41:00
MP4 6M
—
0:40:40
1:21:50
2:45:50
5:37:50
11:07:50
MP4 3M
0:01:10
1:15:10
2:31:10
5:06:20
10:23:50
20:33:00
Note
• The recordable time of movies may vary depending on the shooting conditions (temperature, etc.). The
value above applies when DISP (Screen Display Settings) is set to [Normal].
MENU/Settings
Search
2 GB
Quality/Size
Operation
Search
Approx.
32 MB
Index
Downloaded From camera-usermanual.com Sony Manuals
166GB
Do not use/store the camera in the following places
Operation
Search
• In an extremely hot, cold or humid place
In places such as in a car parked in the sun, the camera body may become deformed and this may cause a
malfunction.
• Under direct sunlight or near a heater
The camera body may become discolored or deformed, and this may cause a malfunction.
• In a location subject to rocking vibration
• Near strong magnetic place
• In sandy or dusty places
Be careful not to let sand or dust get into the camera. This may cause the camera to malfunction, and in
some cases this malfunction cannot be repaired.
Table of
contents
Precautions
On carrying
On cleaning
Cleaning the LCD screen
Wipe the screen surface with an LCD cleaning kit (sold separately) to remove fingerprints, dust, etc.
Cleaning the lens
Wipe the lens with a soft cloth to remove fingerprints, dust, etc.
Index
Cleaning the camera surface
Clean the camera surface with a soft cloth slightly moistened with water, then wipe the surface with a dry
cloth. To prevent damage to the finish or casing:
– Do not expose the camera to chemical products such as thinner, benzine, alcohol, disposable cloths,
insect repellent, sunscreen or insecticide.
– Do not touch the camera with any of the above on your hand.
– Do not leave the camera in contact with rubber or vinyl for a long time.
MENU/Settings
Search
Do not sit down in a chair or other place with the camera in the back pocket of your trousers or skirt, as this
may cause malfunction or damage the camera.
On operating temperatures
Your camera is designed for use under the temperatures between 0°C and 40°C (32°F and 104°F). Shooting
in extremely cold or hot places that exceed this range is not recommended.
On the internal rechargeable backup battery
This camera has an internal rechargeable battery for maintaining the date and time and other settings
regardless of whether the power is on or off.
This rechargeable battery is continually charged as long as you are using the camera. However, if you use
the camera for only short periods, it discharges gradually, and if you do not use the camera at all for about
one month it becomes completely discharged. In this case, be sure to charge this rechargeable battery before
using the camera.
However, even if this rechargeable battery is not charged, you can still use the camera, but the date and time
will not be indicated.
Charging method of the internal rechargeable backup battery
Insert charged battery pack in the camera, and then leave the camera for 24 hours or more with the power
off.
Downloaded From camera-usermanual.com Sony Manuals
167GB
Numerics
Continuous Playback ......................................................81
3D Functions ......................................................................51
Control button ....................................................................16
3D Shooting ........................................................................53
Copy .....................................................................................123
3D Sweep Panorama .......................................................53
Create REC.Folder .........................................................120
3D Viewing .........................................................................84
Creating a disc .................................................................140
A
AF Illuminator ...................................................................96
D
Date & Time Setting .....................................................126
Anti Blink ............................................................................80
Defocus Effect ...................................................................61
Anti Motion Blur ..............................................................26
Delete ...............................................................................45, 90
Area Setting ......................................................................125
Delete REC.Folder .........................................................122
Auto Orientation ...............................................................99
Demo Mode ......................................................................106
AVCHD format ...............................................................163
Digital Zoom ......................................................................98
DISP .......................................................................................34
B
Display Burst Group .......................................................88
Background Defocus .......................................................24
Display color ....................................................................105
Backlight Correction HDR ...........................................26
Download Music .............................................................113
Battery charger ................................................................161
DPOF .....................................................................................92
Beach .....................................................................................27
Beep ......................................................................................102
E
Easy Mode
Index
Battery pack ......................................................................160
MENU/Settings
Search
AF range finder frame ....................................................71
Operation
Search
CTRL FOR HDMI .........................................................109
Table of
contents
Index
Shooting ........................................................................58
Blink Alert .........................................................................101
Burst button .........................................................................40
Viewing .........................................................................59
Burst Settings .....................................................................65
EV ...........................................................................................67
Burst Shooting Interval ..................................................66
Exposure ...............................................................................67
Eye-Fi ..................................................................................117
C
Calendar ................................................................................87
F
Center AF .............................................................................71
Face Detection ...................................................................78
Center-weighted metering ............................................73
File Number ......................................................................124
Change REC.Folder.......................................................121
Fireworks .............................................................................27
Clock Settings ..................................................................126
Flash .......................................................................................36
COMPONENT ................................................................110
Focus ......................................................................................71
Computer
Folder
Importing images.............................................136, 137
Changing .....................................................................121
Macintosh ...................................................................133
Creating .......................................................................120
Recommended computer environment ..........133
Deleting .......................................................................122
Windows .....................................................................133
Connecting
Selecting ........................................................................94
Format .................................................................................119
Computer ....................................................................136
Format Music ...................................................................114
TV ..................................................................................127
Function Guide ................................................................104
Downloaded From camera-usermanual.com Sony Manuals
168GB
N
Gourmet ................................................................................27
Number of still images .................................................165
Grid Line ..............................................................................97
O
H
Optical zoom ................................................................32, 98
Hand-held Twilight..........................................................26
OS ..........................................................................................133
Table of
contents
G
HD(1080i) ..........................................................................110
P
HDMI Resolution ...........................................................108
Panorama ..............................................................................29
High Sensitivity .................................................................27
Panorama Image Size .....................................................62
PC ..........................................................................................133
Pet ............................................................................................27
Identifying parts ................................................................16
Pixel ........................................................................................64
Image Index ........................................................................44
Playback
Image Size ...........................................................................62
3D images .....................................................................55
Initialize ..............................................................................107
Movies............................................................................49
Intelligent Auto Adjustment ........................................21
Still images...................................................................42
Intelligent Pantilter ........................................................162
Playback zoom ...................................................................43
Intelligent Sweep Panorama ........................................29
PMB .....................................................................................134
Internal memory ................................................................19
PMB Portable ...................................................................138
ISO ..........................................................................................68
Power Save ........................................................................115
MENU/Settings
Search
I
Operation
Search
HDMI connector ...............................................56, 129, 131
Precision digital zoom ....................................................98
Print ................................................................................92, 143
Landscape ............................................................................26
Print order mark ........................................................92, 143
Language Setting ............................................................103
Program Auto .....................................................................25
LUN Settings ....................................................................112
Protect ....................................................................................91
Index
L
PTP .......................................................................................111
M
Macintosh computer ......................................................133
Q
Mass Storage ....................................................................111
Quality ...................................................................................62
Memory card ................................................................3, 158
MENU ...................................................................................12
R
Metering Mode ..................................................................73
Red Eye Correction .........................................................89
Mode dial .............................................................................20
Red Eye Reduction ........................................................100
MOVIE (Movie) button .................................................41
Retouch .................................................................................89
Movie format ......................................................................95
Rotate .....................................................................................93
Movie Mode
Shooting ........................................................................31
S
Viewing .........................................................................49
Scene Recognition............................................................74
MTP ......................................................................................111
Scene Selection..................................................................26
Multi AF ...............................................................................71
Screen Display Settings .................................................34
Multi connector ...............................................127, 130, 136
SD ..........................................................................................110
Multi-pattern metering ...................................................73
Select Folder .......................................................................94
Music Transfer .........................................................134, 135
Selected-face Memory....................................................79
Downloaded From camera-usermanual.com Sony Manuals
169GB
W
Self-portrait .........................................................................38
Warning indicators and messages ...........................152
Self-Timer ............................................................................38
White Balance ....................................................................69
Send by TransferJet .........................................................85
Windows computer ........................................................133
Settings ..................................................................................14
Shooting
3D images .....................................................................53
Table of
contents
Self-diagnosis display ...................................................152
Z
Zoom ......................................................................................32
Movie..............................................................................31
Shooting Direction ...........................................................60
Slideshow .............................................................................81
Slideshow with music .....................................................82
Operation
Search
Still Image ....................................................................21
Slow Synchro .....................................................................36
Smart zoom .........................................................................98
Smile Shutter ......................................................................37
Snow.......................................................................................27
Soft Skin ...............................................................................26
Soft Skin Effect .................................................................76
Soft Snap ..............................................................................26
MENU/Settings
Search
Smile Detection Sensitivity ..........................................77
Software ..............................................................................134
Spot AF .................................................................................71
Superior Auto Adjustment ............................................22
Sweep Multi Angle ..........................................................53
Index
Spot metering .....................................................................73
T
Tracking focus ...................................................................33
TransferJet .........................................................................116
TransferJet standard ......................................................164
Trimming (Resize) ...........................................................89
Troubleshooting ..............................................................144
TV ...........................................................................56, 127, 128
Twilight.................................................................................26
Twilight Portrait ................................................................26
U
Unsharp masking ..............................................................89
USB Connect ....................................................................111
Using the camera abroad .............................................157
V
VGA .......................................................................................62
View Mode ..........................................................................87
Viewing burst images .....................................................47
Downloaded From camera-usermanual.com Sony Manuals
170GB
Notes on the License
Index
The software that is eligible for the following GNU General Public License (hereinafter referred
to as “GPL”) or GNU Lesser General Public License (hereinafter referred to as “LGPL”) are
included in the camera.
This informs you that you have a right to have access to, modify, and redistribute source code for
these software programs under the conditions of the supplied GPL/LGPL.
Source code is provided on the web. Use the following URL to download it.
http://www.sony.net/Products/Linux/
We would prefer you do not contact us about the contents of source code.
MENU/Settings
Search
On GNU GPL/LGPL applied software
Operation
Search
THIS PRODUCT IS LICENSED UNDER THE AVC PATENT PORTFOLIO LICENSE FOR
THE PERSONAL AND NON-COMMERCIAL USE OF A CONSUMER TO
(i) ENCODE VIDEO IN COMPLIANCE WITH THE AVC STANDARD (“AVC VIDEO”)
AND/OR
(ii) DECODE AVC VIDEO THAT WAS ENCODED BY A CONSUMER ENGAGED IN A
PERSONAL AND NON-COMMERCIAL ACTIVITY AND/OR WAS OBTAINED FROM A
VIDEO PROVIDER LICENSED TO PROVIDE AVC VIDEO.
NO LICENSE IS GRANTED OR SHALL BE IMPLIED FOR ANY OTHER USE.
ADDITIONAL INFORMATION MAY BE OBTAINED FROM MPEG LA, L.L.C. SEE
HTTP://WWW.MPEGLA.COM
Table of
contents
“C Library”, “Expat”, “zlib”, “dtoa”, “pcre” and “libjpeg” software are provided in the camera.
We provide this software based on license agreements with their owners of copyright. Based on
requests by the owners of copyright of these software applications, we have an obligation to
inform you of the following. Please read the following sections.
Read “license1.pdf” in the “License” folder on the CD-ROM. You will find licenses (in English)
of “C Library”, “Expat”, “zlib”, “dtoa”, “pcre” and “libjpeg” software.
Read “license2.pdf” in the “License” folder on the CD-ROM. You will find licenses (in English)
of “GPL”, and “LGPL” software.
To view the PDF, Adobe Reader is needed. If it is not installed on your computer, you can
download it from the Adobe Systems web page:
http://www.adobe.com/
On the license of “Music Transfer” in the CD-ROM (supplied)
MPEG Layer-3 audio coding technology and patents licensed from Fraunhofer IIS and
Thomson.
Downloaded From camera-usermanual.com Sony Manuals
171GB
Español
Notas
A
B
A
Consejos para tomar imágenes 3D
Para tomar imágenes 3D, haga un barrido con la cámara como se muestra en la
ilustración.
Para tomar imágenes 3D correctamente, haga un barrido con la cámara lentamente.
(Intente abarcar un semicírculo en 5 s (segundo).)
Si hace el barrido muy rápida o lentamente, se visualizará un mensaje en la pantalla
LCD.
C
B
Consejos para desenfocar el fondo
Cuando el modo de toma está ajustado a [Desenfoque del fondo], la cámara deja
desenfocado el fondo para destacar el motivo.
Si toma una imagen con el motivo y el fondo distanciados como se muestra en la
ilustración, puede desenfocar el fondo.
C
Utilización del “PMB (Picture Motion Browser)”
El “PMB” está incluido en el CD-ROM suministrado. Instálelo en su ordenador para
que la gestión y utilización de las imágenes le resulten más placenteras.
Si ya hay instalada una versión más antigua del “PMB” en su ordenador,
será sobrescrita cuando sea instalada la versión más reciente del CD-ROM
suministrado.
Para más detalles sobre cómo utilizar el “PMB”, consulte la “Ayuda de PMB”
después de realizar la instalación.
Puede ver películas AVCHD en el ordenador utilizando el “PMB”.
Para más detalles sobre la opeoración, consulte el Manual de instrucciones o la
“Guía práctica de Cyber-shot” incluida en el CD-ROM suministrado.
English
Français
Notes
Remarques
A
A
Tips for shooting 3D images
Conseils pour la prise d’images 3D
To shoot 3D images, sweep the camera as shown in the illustration.
To take 3D images correctly, sweep the camera slowly. (Aim for a 5-second
semicircle.)
If you are sweeping too quickly or too slowly, a message will be displayed on the
LCD screen.
Pour prendre des images 3D, déplacez l’appareil en balayant comme représenté sur
l’illustration.
Pour prendre correctement des images 3D, déplacez lentement l’appareil en
balayant. (Essayez d’effectuer un demi-cercle en 5 secondes.)
Si vous déplacez l’appareil trop rapidement ou trop lentement, un message s’affiche
sur l’écran LCD.
B
Tips for defocusing the background
When the shooting mode is set to [Background Defocus], the camera leaves the
background out of focus so that the subject stands out.
If you shoot an image with the subject and background far apart as shown in the
illustration, the background can be defocused.
C
Using “PMB (Picture Motion Browser)”
“PMB” is included on the supplied CD-ROM. Install it on your computer to make
managing and using your images more enjoyable.
If there is an older version of “PMB” installed on your computer, it will be
overwritten when the newer version on the supplied CD-ROM is installed.
For details on using “PMB”, refer to “PMB Help” after installation.
You can view AVCHD movies on a computer using “PMB”.
For details on operation, refer to the Instruction Manual or to the “Cyber-shot
Handbook” included on the supplied CD-ROM.
B
Conseils pour obtenir le flou de profondeur
Lorsque le mode de prise de vue est placé sur [Flou de profondeur], l’appareil laisse
l’arrière-plan flou de sorte que le sujet se détache.
Si vous prenez une image alors que le sujet et l’arrière-plan sont très éloignés,
comme représenté sur l’illustration, vous pouvez obtenir un arrière-plan flou.
C
Utilisation de « PMB (Picture Motion Browser) »
Le logiciel « PMB » se trouve sur le CD-ROM fourni. Installez-le sur votre
ordinateur pour rendre plus agréable la gestion et l’utilisation de vos images.
Si une version antérieure du logiciel « PMB » est installée sur votre ordinateur,
elle sera écrasée lorsque la version plus récente du CD-ROM fourni est installée.
Pour plus d’informations sur l’utilisation du logiciel « PMB », consultez l’« Aide
PMB » après l’installation.
Vous pouvez visualiser des films AVCHD sur un ordinateur à l’aide de « PMB ».
Pour plus d’informations sur l’utilisation, consultez le Mode d’emploi ou le « Guide
pratique de Cyber-shot » se trouvant sur le CD-ROM fourni.
Downloaded From camera-usermanual.com Sony Manuals
Português
Українська
Notas
Примітки
A
A
Sugestões para fotografar imagens 3D
Поради для зйомки 3D-фотографій
Para fotografar imagens 3D, mova a câmara como mostrado na ilustração.
Para captar correctamente imagens 3D, mova a câmara lentamente. (Tenha por
objectivo um semicírculo de 5 segundos).
Se estiver a mover muito rapidamente ou muito lentamente, visualizar-se-á uma
mensagem no ecrã LCD.
Щоб зробити 3D-фото, проведіть фотоапаратом, як показано на малюнку.
Для кращого запису 3D-зображення ведіть фотоапарат плавно (розраховуйте
виконати повну дугу за 5 секунд).
Якщо вести фотоапарат надто швидко або надто повільно, на РК дисплеї
з’явиться відповідне повідомлення.
B
B
Sugestões para desfocar o fundo
Поради для зйомки фотографій із розмитим тлом
Quando o modo de fotografia estiver regulado para [Desfocagem do Fundo], a
câmara deixa o fundo desfocado para que o motivo sobressaia.
Se fotografar uma imagem com o motivo e fundo muito distantes como mostrado
na ilustração, o fundo pode ser desfocado.
Коли вибрано режим зйомки [Расфокусиров. фона], тло на фотографії буде
трохи розмитим, щоб підкреслити об’єкт зйомки.
Цей прийом можна застосовувати, коли об’єкт зйомки знаходиться на
достатній віддалі від предметів тла, як показано на малюнку.
C
C
Utilização do “PMB (Picture Motion Browser)”
Використання програми «PMB (Picture Motion Browser)»
O “PMB” vem incluído no CD-ROM fornecido. Instale-o no seu computador para
que a gestão e utilização das suas imagens seja mais agradável.
Se o seu computador tiver instalada uma versão mais antiga do “PMB”, ela será
substituída quando for instalada a versão mais recente do CD-ROM fornecido.
Para mais detalhes sobre a utilização do “PMB”, consulte a “Ajuda do PMB” após
a instalação.
Pode visualizar filmes AVCHD num computador utilizando o “PMB”.
Програма «PMB» постачається на компакт-диску разом із фотоапаратом.
Встановивши її на комп’ютері, можна спростити перегляд і операції з
фотографіями.
Якщо на комп’ютері встановлено ранішу версію «PMB», у ході встановлення
її буде замінено на нову версію з компакт-диска.
Докладніше про користування програмою «PMB» можна дізнатися з
екранної довідки, відкривши пункт «PMB Help» після встановлення
програми.
За допомогою «PMB» можна також переглядати на комп’ютері відео у
форматі AVCHD.
Para mais detalhes sobre a operação, consulte o Manual de instruções ou o “Manual
da Cyber-shot” incluído no CD-ROM fornecido.
Докладніше про користування фотоапаратом можна дізнатися з Посібника
з експлуатації або «Посібника з Cyber-shot» на компакт-диску, що входить у
комплект.
Русский
Примечания
A
Рекомендации по съемке 3D-изображений
Для съемки 3D-изображений поворачивайте фотоаппарат, как показано на
рисунке.
Для правильной съемки 3D-изображений поворачивайте фотоаппарат
медленно. (Выполните движение полукругом в течение 5 секунд.)
При повороте слишком быстро или слишком медленно на экране ЖКД будет
отображаться сообщение.
B
Рекомендации по расфокусировке фона
Если режим съемки установлен в положение [Расфокусиров. фона],
фотоаппарат оставляет фон расфокусированным, выделяя таким образом
объект.
При выполнении съемки изображения с объектом и фоном, находящимися на
большом расстоянии друг от друга, как показано на рисунке, фон может быть
расфокусированным.
C
Использование программного обеспечения “PMB (Picture Motion
Browser)”
“PMB” содержится на прилагаемом диске CD-ROM. Установите его на свой
компьютер, чтобы сделать процесс управления и использования изображений
более приятным.
Если на компьютере установлена более старая версия “PMB”, поверх нее
будет записана более новая версия при установке с прилагаемого CD-ROM.
Что касается подробных сведений по использованию “PMB”, см. “Справка
PMB” после установки.
Вы можете просматривать видеозаписи записи AVCHD на компьютере с
помощью “PMB”.
Что касается подробных сведений по эксплуатации, см. Инструкцию по
эксплуатации или “Руководство по Cyber-shot”, находящееся на прилагаемом
диске CD-ROM.
Downloaded From camera-usermanual.com Sony Manuals
Downloaded From camera-usermanual.com Sony Manuals
Downloaded From camera-usermanual.com Sony Manuals
Downloaded From camera-usermanual.com Sony Manuals
EXAMPLE of SAVINGS:
With 15% discount, the more you buy, the more you sove!
Register your new Cyber-shof8 camera online today
and save 15% on eligible accessories
!hook you lor pu"C/'IO$lrlg 0 DogIIoI h'ogong P\'odI.Ic! !tom Sor"tf RegIslei' yovt Son(' 0IgI1oI
Imogoog P\'odI.IcI wI1tw'l 30 d<r(I 01 pvrchoM Recerw on elac1JOOoC coupon good lor 0 15~
dGcount on !he pudlose 01 ......." Son( 00............. 01 !he 0t*W Sor"tf SI'yI8" _ . OU'
OUIOmOlOC regGrto!oon pIOCe$S below rTICIkes ~ OO$V to "9S1ef 'fOUl Sory 0igft0I1rr\ogf'Ig PIoducI
METHOO I: Aulomolic: USB Regis'totlon
F<:>r Wind<>ws' PC
1) Tum on 'fOUl PC
2) Ploce lt18 CI>OOM "fIJPI'8d ""'lh 'fOUl
producl Inlo 'fOUl PC", CD df1>'9
3) When !he In$IoIohOn menu oppeon.dock
PIoducI Regl$lrOloon
4) ConIiml!he
"'1/'0'1 OOd OOUIllry/oreo
O"I/oImollOll. ClIck 'ConI......·.
5) FoIow lt18 ln$!JUCI'JOnS to cornecr yovt
proWcllO yovt PC ond f9Q1Slef
0.. METHOD 2: Reg;./tH onIirNI
"" Moo
1) fum on yovt Moe
2) Ploce Ih& CD-ROM SlIJ)pIied wIIh yout
poduct onto 'fOUl Moe'l CD ct/Ye
3) ~ onSONYPC1UTl'
4) 5elect me Moe IoIdeI ond <:Iout>I&d<:k
lleQIst'cmot'f.
5) Confirm the regron ond OOlXlIfy/oreo
~ iIom'ocItIcW 1. Chck ·Conl.........·
b) Follow me W'l$lrucloonl to
po:Xluct to yovt Moe cod reg<slef
connecI,.,....
0' /lffp$://(1<OdvcI1flgif-I10ti0n,J()(Iy.ccm
..ust '"'" this 19Q1S1lOtUl1lle ond III out Ihe Iorm to gelyovt diIcot.rl! e<:oupon
OIlO£R BV TtllPHONE ANO STIll IlECENE A 15'J:. Dl!>COUNf ON EUGlBl£ ACCESSORIES
• you re unobIIt to OCC8SIlhe Sen( Style "*> SIle, you con coli our solei repre:sento1Mn
(n'fhme ot 1.JJn-u&-1~ You con pIOC:e 'fOUl o:det 24 ho...-s 0 dOy. 1 dOyI 0 weal< by
Contents:
Power/Kit/Tripods
Coses
Party-Shot" personal photographer
Woter Housing/DVDirecte Recorder
GPS Unit/Memory Slick't Media/TransferJer
pIlOtle Ot on Ihe "*> usrog mm! me)Ol' credit oortl!l
.see USB r&gl';1'otlOn Ilyet '" ,hos box lor deIo•• ~ kl~ ond st\IppIog opply, Fot II'1e tvllloon5 ClOd oond~1Om.
VIS'! hrtps IlpIOductreglSlrOl<JO "!Of'Ycorn/
Downloaded From camera-usermanual.com Sony Manuals
04 - 05
06-09
10 - 11
12 - 13
14 - 15
Power
To order by phone with 15% oN &-Coupon: 1-877-865-7669
Kit /Tripods
To order by phone wilh 15% off &-Coupon: 1-877·865-7669
UTHIUM Ion N Type
..... 1
•(
10
Rechorgeable Battery
NP.lINl $49.99
HOMI Cobles
•
0le-HE3OHf {9.M/3m} $1>4.99
OlCHE2CH' (6.4f1l2m) $44.99
0lC+<E10Hf (3.2tlllm) S34.99
. 'w. 2.3 WIl (630 mAIl)
~/CWqI
•
• High-$peed HDMI ~
, SUpportIng up 10 l~ "fIJI
HO" IllKlUWJn
· GoId-pIoled pIugi
BCTllN S59.99
• Appfo>c. twice os toSI os chorger
supplied wim oomero
• IlotIe<Y chi::>Ioa< 10< N 1ypa 00IIety
• Also oomp:lfibIa wim G. n t ond R
type botte<oes
· Great !of ,......... th ",tlDC!ing N:; plug
• l.\"lIYenol \OI'Ioge N; 11»24(1\1 (50160 Hl)
•
AC
Powe,
!
AdoPl1d
Ae-l.S5' S39.99
mlllsua
....
......" -
•
• $upplie> po..oe< ""-' IronsJemng
itnOQ9$ 10 rour compolible PC
· N::. lC1O-24OV (SO/60 Hz)
• No chorgmg tuncrion
' _ VMC-MOJ .. VMC-MOJ
( ...... ,,~ olWtj).
HD Output Adoptor Coble '""
._VMCMHC3 $59.99
• Connects j'OI..W Cybar~ com<l'fO
10 oompohble HD I9I8Iiisions
• VIOW vour phoIoo in hogh deIinit>oo
•
· IncUde1 \'Ideo, oudio ood USB OIJt•
~ p::owe<.....wy COtV"oGCIor
• Appro<.4 911 (1,5m) Ieng1I'l
" Compot;bIIit'I
1IMCMD2; OSC-TX9
VMCMOO OSC-fX5. T99. WX5
.. _
• Awro<.4 9ft (1,5m) Ieoglh
~
AC-UI1ot _
...........
"POlO,"',).
Register online now 01 https I/producfreglsfrotlon sony com/
to save 15% on Ihese eligible Ilems 01 SonyStyte com
Downloaded From camera-usermanual.com Sony Manuals
•
DLCHESOP (l6ll/5m) $99.99
DLC-HE3OP (9.6II/3m) $59.99
DLC-HE2OP (6.4l1l2m) S39.99
ClI.CHE1OP(3.2tI/lm) $29.99
• High Speed HOM Coble WI1h E _
· Meets 01 CUO'IeI't HDMI .too ido":!>. WJ)POf1'ing
1080p, 30/41(, hldio Return ChoIY>e! (ARC).
«Wl-!1ll!Illm
, SrnoI corryng
cose
Mini HOMI Cobles
,
•
OLe-HEMJO ('l.6tlfJrn) $59.99
DLCliEM15 (4.8If/Um) $39.99
• Hlgh-{)efinltio diglloI W:1eo and IYI,jIj.
<:hCltvlUl digIIaI audio daIO rrooslef
· ~ cobIo/""""""'" lor HOM
equipped AN components
• CompoIibI& wim JOTV ond
30 BIu-roy Disc f'Iov&r1
• SuppofIs HOMI output with HOMl
Type C (minl)
• Compcmble orVf wim DSCWX5
e :t1< •
ACCGT6N S59.99
•
with spore botIery
ood ~ 1 rrinltrIpod
• Mlnllripod .l<K>diBs rour C<lffillIt:I
on 0 toble or 1\01 surtoee
· Cose IncUde1 >ide pocke1 to sIore Ihe tripod
'~
VMCM02IVMCM03" $39.99
Cobles
Acce$sory Kit
e_
MultkJse TSlminol Coble
HDM1~
HDMI Elhemel CllUnneI (HEC)
• GoId-pIoled pI<.v>
• CompoTitJle onIV wIlh OSC-TX9
• CorTvItitJle onIV Wllh DSC·TX9
Compact IlotlefY Charger
Round
•
Trovel Kit
Trovel Tripocl
VCHll00 S34.99
• UghIweighI"'I8t..turdy t~ trlpo:j
· E><Ier'id. up 10 ... generous 39 3/8'
· Fold. d<;Jwn too compocl 14"
•
•
$19.99
· CCwnpocT deSign 10< IKlsy porlObijIy
• Ex1<:H odobllI O>gs oIow 10< 0 m<:IOnum
heigtlr 01 7 1/6"
· eome. wlth its own C<lffVW>g pouc:tl
on<.! <:lo.><>'*'g doth
VC1~
~
To order bV phone with 15% off &coupon: 1-877-865-7669
lcs.csw.;a (bIocI;)
LC$.C$\I8/1 (tlIac:O)
Soft Corrylng Cose
•
lCS<:SVA/B.11l. $39.99
• Ch;lcMlyIe bog
• CoNrrvcled ol r.gh-gtode Ieother
• AYOIlot>le in t....o COlO..
• hcludes moTchIng srrop
Soft Corrying Case
lCS-CSVB/B 529.99
• Comes with 0 wrisT STrop
• Mode ol poIvu9mone
Flootil1Q SIrap
•
•
STl4SA $29.99
• Aooling shOp lor 'I"JU' DSC·l)(5
~-~
• Keeps yc:Nl comero oftooT when
dropped in The v.oIe<
lcs.csvc/I (tlI<>ci;)
Lcs.csvc/l (DIue)
l.CS-THQfW
lcs.csvcIP (l>ri.)
leather Carrying Case
lCS-CSVO/B (b&Ir loop) S39.99
lCS-CSV£l1l (wrist s!fop) S39.99
• Texfued ~ Ieothef cow
• MagneT", cb!ure
LCS<:SYC/B./LIP.IY $1'1.99
•
• OppobllJ po...w::h s!Vle
• Mode ol polyuIeThone
• Aoe>IIobllt in lou" cok>rs
•
lCS-THQ/W $24.99
• F...., and cosuol COIryw>g <:0.... lor
The DSC-TXS. T99.oncl WX5 comeIOS
, water repellenr mol&riol wiII1 smoI
holes to twp I:oop Insode dry
, CoIObine< lO OTlOCt1lO belliooP,
pune, '" bog
•
,
Register online now at hHps //producrreglsrrol,on sony com/
to sO\le 15% on these eligible IIems oT SonySlyle com
• lIoIh models lei '/O'J ~ yc:Nl
comero in slyle
,
Downloaded From camera-usermanual.com Sony Manuals
Waler Repellent Case
I.CS-CSVCN <_)
Soff Carrying Case
c_)
...::.:..
Cases
To order by phone with 15% off EM::oupon: 1-877-865-7669
To order by phone with 151. off &-Coupon: 1-877-865-7669
leother Cover
1
J
Soft Carrying Case
•
LCs.c5U/B.IL 1ft IS 519.99
• TI'oee comportmenlllo< 8>lIlO slOlOge
• Four oorryfng opIlons. bell loop. hip bog.
$I'o::lI.lldeI strop. one! WIOP 0t1 (I $!lOP
· Pocke!. b Memory Stick" meolo ond
LCHIlE/S (bkJC:t)
•
Soft Conying Case
"
lCSCSJ 519.99
· Cosuol one! spotty ~ case
• InnlI< pod<et con hold Memory Slic
.-"""'"
•
meolo ond llllllJ baOOry
• ShouIdet ,!fOP ond belI100p Incllxled
• A""lilobIe In ""'" <::olo<$
tes<:sVFfl (bU)
l.C$CSVFIN (gold)
SoH Colf'(ing Case
lcs-csvF/8. Ift/L IN 529.99
• Jusllll case to help l.I'UgIy
PIOI8Ct you- camero
• AvolIablll In lour coIo<s
Register onhne now at hHps I jproducfreglsfroflon sony com/
to sove 15% on these eligible Items at SonyStyle com
Downloaded From camera-usermanual.com Sony Manuals
lC$CSWIB (l;>kx;t:.) LCS-CSW/R ($J)
•
•
lCJ.THE/B $39.99
• Gerune ieoIIlef corneoo COo'8t
• FIip<.ip design allows QUid< IOuCh-pcnej <>e<:GSS
· Includes .~, pen wiIl1 'Io<ago sbl
• Compolible <:Jt:V.i with QSC.lXS ond T99
LCS-CSW/l (bk>e)
._Soft Carrying Case
•
LCS-CSl $14.99
• Storoge lOr Memory Slid< media end
"""'"
• Co3...o1 ond
Iigh~l wIIh
belI100p
LCS-CSW/S ( - . ,
Sott Corrying Cose
LC5-CSWIB./Il./L/S $14.99
• SIeel< slyle
• DeIocIloble bell hook
• Compact wim ifv>e< pockets lor . Avoiloblo in lour coIo<s
mamo<V =roo. cosh. 10, etc:
•
~
•
Il'T-OSl $149.99
• Srops pictures 01 an """"t-oulom<Jlic:o1y
• 10 ,1eIogeo Itt,' pons and IiltlIO IoIow $o.bjech; oro::IloIm phoIos
• AuIOn"OIleOIIy deleClS Ioc:es ond odjUSIS the oompo$ilion
of pic!.......
• Auto I00!I00I'r' copIure " .... WIlh smile srutIer'" Iecho lOIogv
• Vo<x ,:<J/T'le,CfS is-.eep Pono<omo Mode coprures sturnng
ponoromic: irn<>goos
· ~rible 0tVf Wtlh DSC-TX9 and DSC-WX5
•
/'
Relax and join In the party with Sony's Porty-sho'" personal photographer.
This smart device works together with your DSC-TX9 and WX5 Cyber-shore
camero's Foce Delec!lon and Smile Shutter"" technologies 10 automatically
loke photos for you. 11 pons. tills, and zooms all by itsel1-seorchlng fOf and
capturing" smile to compose candid. onc&-in-o-lifellme photos, Irs never
been this easy to toke such nolurol-looking. unposed pictures.
Downloaded From camera-usermanual.com Sony Manuals
P'!!!Y-shot.
Register online now 01 https / jproductr9g!slrotlon sony earn/
to save 15% on Ihese eligible Items 01 SonyStyle com
~
To order bV phone with 15% oft &<:oupon: 1-877-865-7669
oQ
•
ACCMP101 $19.99
· £xha O<ings <>"Id sealing grease tor
MIll(·lHJ SoNt" Morine Pod<
• HePs 'ltI$!.lI9 Manna Pock teI\"OltI$ IOOIerlighl
DVDlrect Muill-lunclion DVD Recorder'
vro-MC/l 5199,99
• IlONler SO home video from W1ucJDIr 0r"JV source 10 OVD
~o"'
• Tronsler HD home video !rom Sony AVOiD HondYcom
•
<>"Id AVCHD comporible C'f'I)eo'-$I\01 come<os
(DSC-WX5. 00. TX7 ClOd I«5V 0tlIy) 10 0vt>"
COIl OCOidei$
• Aocepl$ "'li,JOlly ony memory cord (""cepl
Compoctflo$h" medici) 10 l<on$ler )'QUO" d1gilOl
pI\OIO$ 10 DVD 0$ 0 slicIe$FIOw 0< for prooto slO<oge
• 2,1· color _lCD ~for phoIo/vid90 pmWIw
MorIne pockl WOfkng with your
Cybef"$hO~ come";'-' Underwote< Mode
to enhonce color .eproducfk)n 000
18toln Imoge·s notullJllones.
Manne Pock
•
MPK·lHJ $249.99
• WoIerprool houslng for
· orroo pIOIeCl'Qn up 10 132 loot (4trn) deep
· set rour CybeH.hol COtTl8IlJ 10 ~
Modo to anhonc8 color "'PfOdu<:l'Qn ond
I9Ioin moge"l N;I!<.lIOIIi::lr>m
• Toke beovtifuj UI oe. nolei ~ with
""""" modlI ond l80listic pI\OIO$ with !tie
---
• Cool iPOlibie wiIh DSCTX9. TX5. end T'99
3_-.._.. . . . .
1
C'f'I)eo'~ comol«:I
-~
Downloaded From camera-usermanual.com Sony Manuals
...
_-
""""'"'I....,...,..
[M) modo<> ..... 1" .'VAVCKl!<>ol<JgO ""Of be.,.,.,.... .... 0 OOI''''''btW _
0000PC
""" . . . - _
'" PlAVSWlON"J -.c.s ow modo<> ..... b .... Avc>'f:)!<>ol<JgO"""" no< be ....
,., _lMl-"I*>\4B.OI_lMl """"'"' ....... l<JII
modio and ....... _
os..,.....",
~
2Iho
~
""
"'00_ 001""_ ow ........
"'.,oct_
<looc$
Register online now at hHps / /producfreglstrollon sony com/
to save 15% on these eligible Items at SonyStyle com
.2!-
GPS Unit
Memory Stick" Media{TransferJet'"
To order by phone with 15
off &Coupon: 1-877-865-7669
•
MemOlV Slick media WIth
TronsferJel technology'
GPS U,
CEI:Imm
•
GPS-CS3KA 5149.99
• AuIOmOticoIt,' record 1tle location r:J
"""'V sI>oI 'PJ IOke
• DIspIoy your plctunH os pop-ups on
Google Mops~ mapplng seMoe"'
• llui/I-in Merrlory Stick Duo~ ond so eord
sIol oIkJrs eosv dolo-motctwlg proc<I$!
(PhoIo dol<> and GPS log dolo)
• Hign sensltMIy (.l59dBm 01 leSS)
• ll\-"'S on 008 M boTlery ($Old separaTely)
br oppmI<, 1Stws
• LCD display stIows posrtiOn Inlo. DoIIetV
mom_ ""'Ooof'" in!o, dOle " !me. ond
c_
0""_""" _._
_10_" __.
<>nd1o~1o""""""''''''_'_
.
- ..... and _ _
_
......
---
_1""""_
•
Ms.-JXaG $99.99
Memory stlCk PRO-HG Duo "HX" Media
•
32 G8' (30.0 G8 awiI)
SDHC/SD MemOfY Cord'
32 GB' (30.0 GB owiI.)
•
SJ-J2N4 $159.99
16 GB' (1"-8 GB owiI.)
SF-16N4 $79.99
MSliX32A $199.9\1
1IlGB" (t4.9G6aw11.)
MSl-lX1M 5109.99
· 8GB" (7.35 G8 ovoiI.l Memoty StIck
wiIl1lranslerJel teehnolc>gv
• Enoblos ....... prolO moolog tly
olIgn TransIer.Jel loQos ~
come<os equipped lranslerJot
"""'"""
8 GB" 0.35 GB ovoiIJ
MSl-lX8A $5'/,99
• 30MB/second reod speed
,,,,,,,,te<s'
to< high-$peed
• EI"oCIbIM.....veIess phok> viewing
and SI\Ori'Ig with !he US.. ,
($Old sep<llO!elv)
• TronsIe<JeI tunction .. oompolible
"""" wtth (lSC.lX9. TW. and
=""
. ldeollo< HO recording
B G8' (7.3 G8 0>0II.)
SNlN4 $44.99
" G8' (3.6 G8 cnooU,)
SF-<lN4 $29.99
2 GB' (I.B GB oYOII.)
Sf.2Nl 514.99
, fa use If'l wide voriery ol oppIco11Of'1S
, Closs 4 sp<MKi is ~ ""
AVCHO ,eco4F;liI'O
• ~ 0180 00 the 00Id lor wriIlen nole5
, If'lcluda5 .-Plcl Story poclufe shorlf'lg
~,',-Plcl $loIy lor MemooyCord'
CIOOIeS diSlO'\CliYe pholo presentolioo
,.#h unique b\OJI'S synced Io-.:ls
and music, Yoo.x pllO/OS and m..oslc ol
memones wiI be ormr.ged ....10 0
moYing photo olb<.m
• IncIOOe5 File Rescue So/twot9: "l'()ClYIlI
oOOOOnlol'/ .-ted images. MP£G
and Ml'4 \/ideo
°
f?eglster online now 01 https/lproductreglslrolronsonycom/
10 save 15% on thesa ehglble Ilems 01 SonySlyle com
Downloaded From camera-usermanual.com Sony Manuals
Trons\efJel Stollon
.
" " ' _ .. _
..-w_............ 01
,1"""'_
... _
e ,..
1.--,.-..I'lIO_·_c..,.._
•• .........,...
_--.
....
J.
_ . _ _ ....... 01
~ b < r _
_
_ _ IpKIIc-.. ...
- -....,
2. ....... ~ ~
_ _.... _
__ '_....
s.e
_
,.-,-"<,
__
" ..n......
--,.-.._
'gO
_ _ .. --,.
_. I V ..
P "".,
_
_
_ • • • •,
TJS.l $149.99
• Set your compoIible comero on
!he lroMtefJet slahon 10 IronsIeI
pholOS and rro::Mes'
• EOS'/ V .... and 'SlOr9" solvI'oons
• EO$ily w.w content on 0 PC 01 TV
• So.oe conrent 10 0 PC 01 other
compatible pnxlucI connected
~
"".....
_---.-
--~
.......
•
.loI_
_
~ee.......I0_"
~
Downloaded From camera-usermanual.com Sony Manuals
I Digital Camera
LIMITED WARRANTY (US Only)
Sony Electronics Inc. ("Sony") warrants this product against defects in material or workmanship for the time periods
and as set forth below when purchased directly from Sony or a Sony Retailer. Pursuant to this Limited Warranty,
Sony will, at its option, (i) repair the product using new or refurbished parts or (ii) replace the product with a new or
refurbished product. For purposes ofthis Limited Warranty, " refurbished" means a product or part that has been
returned to its original specifications. In the event of a defect. these are your exclusive remedies.
Term: For a period of one (1) year from the original date of purchase of the product, Sony will, at its option, repair or
replace with new or refurbished product or parts, any product or parts determined to be defective.
This Limited Warranty covers only the hardware components packaged with the Product. It does not cover technical
assistance for hardware or software usage and it does not cover any software products whether or not contained in
the Product; any such software is provided II AS IS" unless expressly provided for in any enclosed software Limited
Warranty. Please refer to the End User License Agreements included with the Product for your rights and obligations
with respect to the software.
Instructions: To obtain warranty service, you must deliver the product, freight prepaid, in either its original packaging
or packaging affording an equal degree of protection to the Sony authorized service facility specified. It is your
responsibility to backup any data, software or other materials you may have stored or preserved on your unit. It is
likely that such data, software, or other materials will be lost or reformatted during service and Sony will not be
responsible for any such damage or loss. A dated purchase receipt from Sony or a Sony Retailer is required. For
specific instructions on how to obtain warranty service for your product,
Visit Sony's Web Site:
www.sony.com/support
Or call the Sony Customer Information Service Center
1-8DO-222-S0NY (7669)
For an accessory or part not available from your authorized dealer, call:
1-800-488-S0NY (7669)
Repair I Replacement Warranty: This Limited Warranty shall apply to any repair, replacement part or replacement
product for the remainder of the original Limited Warranty period or for ninety (90) days, whichever is longer. Any
parts or product replaced under this Limited Warranty will become the property of Sony.
This Limited Warranty only covers product issues caused by defects in material or workmanship during ordinary
use; it does not cover product issues caused by any other reason, including but not limited to product issues due to
acts of God, misuse, limitations of technology, or modification of or to any part of the Sony product or product
purchased from other than Sony or a Sony Retailer. To determine if a retailer is part of the Sony Retailer Network,
please contact Sony's Customer Service Call Center or go to www.sony.com/support.This Limited Warranty does
not cover Sony products sold AS IS or WITH ALL FAULTS or consumables (such as fuses or batteries). This Limited
Warranty is invalid if the factory-applied serial number has been altered or removed from the product. This Limited
Warranty is valid only in the United States.
UMITATlON ON DAMAGES: SONY SHALL NOT BE LIABLE FOR ANY INCIDENTAL OR CONSEQUENTIAL DAMAGES
FOR BREACH OF ANY EXPRESS OR IMPLIED WARRANTY ON THIS PRODUCT.
DURATION OF IMPUED WARRANTlES: EXCEPT TO THE EXTENT PROHIBITED BY APPLICABLE LAW, ANY IMPLIED
WARRANTY OF MERCHANTABILITY OR FITNESS FOR A PARTICULAR PURPOSE ON THIS PRODUCT IS LIMITED IN
DURATION TO THE DURATION OF THIS WARRANTY.
Some states do not allow the exclusion or limitation of incidental or consequential damages, or allow limitations on
how long an implied warranty lasts, so the above limitations or exclusions may not apply to you. This Limited
Warranty gives you specific legal rights and you may have other rights which vary from state to state.
2-148-635-13
1111111111111111111111 1111111
Downloaded From camera-usermanual.com Sony Manuals
Printed in China