1
neoVI PLASMA Help 12May13
Overview ........................................................................................................................................................................................................................................................................................................................ 1
Device Layout & Features ............................................................................................................................................................................................................................................................................... 3
Touch Screen ..................................................................................................................................................................................................................................................................................................... 7
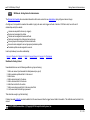
Status Bar Icons ..................................................................................................................................................................................................................................................................................... 9
Buttons ............................................................................................................................................................................................................................................................................................................... 11
LEDs ................................................................................................................................................................................................................................................................................................................... 14
Internal Features ............................................................................................................................................................................................................................................................................................ 18
VNETs ................................................................................................................................................................................................................................................................................................................. 19
FIRE VNET ........................................................................................................................................................................................................................................................................................... 21
AnalogIN VNET .................................................................................................................................................................................................................................................................................... 23
Wireless Mode ....................................................................................................................................................................................................................................................................................................... 25
Configure neoVI PLASMA ......................................................................................................................................................................................................................................................................... 26
Make a VS3ZIP Script ................................................................................................................................................................................................................................................................................. 30
Setup Databases ................................................................................................................................................................................................................................................................................. 31
Select Channels to Log ...................................................................................................................................................................................................................................................................... 34
Setup Standalone Logging ................................................................................................................................................................................................................................................................ 39
Collections and Methods ............................................................................................................................................................................................................................................................. 41
Messages Method ............................................................................................................................................................................................................................................................ 43
Message Collection Options ..................................................................................................................................................................................................................................... 44
Collection Start Options ........................................................................................................................................................................................................................................... 46
Collection Configuration ........................................................................................................................................................................................................................................... 48
............................................................................................................................................................................................................................. 49
............................................................................................................................................................................................................................................ 51
.............................................................................................................................................................................................................................................. 53
Restart Options ..................................................................................................................................................................................................................................................... 55
neoVI PLASMA Collection Upload .............................................................................................................................................................................................................................. 57
Histogram Method ............................................................................................................................................................................................................................................................ 59
Bus Query Method ........................................................................................................................................................................................................................................................... 63
Reporting Options ....................................................................................................................................................................................................................................................................... 65
Power Management .................................................................................................................................................................................................................................................................... 67
Generate ..................................................................................................................................................................................................................................................................................... 70
Power Modes ................................................................................................................................................................................................................................................................................................... 74
Finish After Messages or Expression
Pre/Post Collection
One Shot Report
77
User Accounts ...................................................................................................................................................................................................................................................................................... 79
View ............................................................................................................................................................................................................................................................................................ 81
Fleets ............................................................................................................................................................................................................................................................................. 83
Vehicles .......................................................................................................................................................................................................................................................................... 85
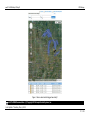
neoVI PLASMAs Across the Globe ............................................................................................................................................................................................................................. 87
Dashboard ........................................................................................................................................................................................................................................................... 88
............................................................................................................................................................................................................................................ 89
........................................................................................................................................................................................................................................ 92
....................................................................................................................................................................................................................................... 100
....................................................................................................................................................................................................................................... 109
.................................................................................................................................................................................................................................. 113
Scripts ......................................................................................................................................................................................................................................................................... 124
Manage My Account ................................................................................................................................................................................................................................................................ 126
Administrator Accounts .................................................................................................................................................................................................................................................................. 128
Getting Started for Administrators ............................................................................................................................................................................................................................................ 131
View ............................................................................................................................................................................................................................................................................................ 81
Fleets ............................................................................................................................................................................................................................................................................. 83
Vehicles .......................................................................................................................................................................................................................................................................... 85
Scripts ......................................................................................................................................................................................................................................................................... 124
Manage .................................................................................................................................................................................................................................................................................... 133
Vehicles ....................................................................................................................................................................................................................................................................... 136
Add/Edit Vehicles ............................................................................................................................................................................................................................................... 138
Fleets .......................................................................................................................................................................................................................................................................... 140
Add/Edit Fleets .................................................................................................................................................................................................................................................. 142
Devices ....................................................................................................................................................................................................................................................................... 144
Add/Edit Devices ................................................................................................................................................................................................................................................ 146
Accounts ...................................................................................................................................................................................................................................................................... 148
Accounts .......................................................................................................................................................................................................................................................... 150
......................................................................................................................................................................................................................................... 152
Account Groups ................................................................................................................................................................................................................................................. 155
................................................................................................................................................................................................................................... 157
Permissions ...................................................................................................................................................................................................................................................... 159
....................................................................................................................................................................................................................................... 161
Roles .............................................................................................................................................................................................................................................................. 163
My Account ....................................................................................................................................................................................................................................................... 126
Wireless NeoVI Website ............................................................................................................................................................................................................................................................................
Logger Commands
CoreMini
Data
GPS
Miscellaneous
Add/Edit Accounts
Add/Edit Account Groups
Add/Edit Permissions
.............................................................................................................................................................................................................................................. 165
Notifications ...................................................................................................................................................................................................................................................... 166
Add/Edit Notifications ....................................................................................................................................................................................................................................... 168
Site ............................................................................................................................................................................................................................................................................. 170
Component Versions ........................................................................................................................................................................................................................................... 172
Disk Space ....................................................................................................................................................................................................................................................... 173
Logs ............................................................................................................................................................................................................................................................... 174
License ............................................................................................................................................................................................................................................................ 175
Wireless Link Speed and Data Usage .............................................................................................................................................................................................................................................. 177
WirelessNeoVI Application (WN APK) .............................................................................................................................................................................................................................................. 178
WN App Menu: Quit ........................................................................................................................................................................................................................................................................ 181
WN App Menu: SW/HW Info ......................................................................................................................................................................................................................................................... 182
WN App Menu: About ...................................................................................................................................................................................................................................................................... 184
Realtime Activity Log ....................................................................................................................................................................................................................................................................... 185
Schedule Auto-Send ................................................................................................................................................................................................................................................................ 187
Change Password
CoreMini Actions ...................................................................................................................................................................................................................................................................... 188
Secure Connection Manager ......................................................................................................................................................................................................................................................... 189
190
SD Card Stats ......................................................................................................................................................................................................................................................................... 191
View CoreMini Info ........................................................................................................................................................................................................................................................ 195
Upload Event Stats .................................................................................................................................................................................................................................................................. 197
WirelessNeoVI Settings .................................................................................................................................................................................................................................................................. 199
Server Connection ................................................................................................................................................................................................................................................................... 200
Data Upload and GPS ............................................................................................................................................................................................................................................................. 201
Message Filter ......................................................................................................................................................................................................................................................................... 203
Miscellaneous Settings ............................................................................................................................................................................................................................................................ 205
Disable WirelessNeoVI ................................................................................................................................................................................................................................................................... 208
PC Mode with Vehicle Spy ........................................................................................................................................................................................................................................................................ 210
For More Help ..................................................................................................................................................................................................................................................................................................... 212
SD Card and Data Statistics .........................................................................................................................................................................................................................................................
neoVI PLASMA Help 12May13
Overview
Overview of neoVI PLASMA
Intrepid Control Systems has brought mobile technology into the world of vehicle testing with neoVI PLASMA!
What Is It?
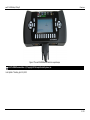
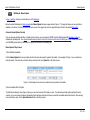
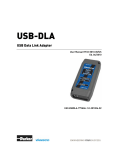
neoVI PLASMA (Figure 1) is a wireless capable device for testing vehicle data bus networks. This device layout link can help you locate some of its main
features.
neoVI PLASMA has WIFI and 3G wireless technologies; plus GPS tracking too.
Up to 3 VNET modules interact with all types of vehicle networks including CAN, LIN, K-Line, MOST, and FlexRay, among others. A FIRE VNET, based upon
Intrepid's proven neoVI FIRE hardware, is included to start with.
A touch screen interface with an Android operating system lets you quickly see and control operations. Many buttons and LEDs are also included.
As you can see, the neoVI PLASMA has a LOT going on, but this documentation will try to help you get the most from it. A more detailed product overview can
be downloaded by clicking here (pdf).
How Do I Use It?
The answer to that really depends upon what your needs are at the time. neoVI PLASMA has the flexibility to be used in a couple of ways:
Wireless Mode (PC from afar)
A computer using the Wireless NeoVI website can find and connect to neoVI PLASMAs that are in remote locations.
PC Mode with Vehicle Spy (PC direct connect)
A computer running Vehicle Spy software can connect directly to a neoVI PLASMA.
1 / 212
neoVI PLASMA Help 12May13
Overview
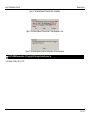
Figure 1: The neoVI PLASMA can be used in a couple of ways.
neoVI PLASMA Documentation - (C) Copyright 2015 Intrepid Control Systems, Inc.
Last Update: Thursday, April 18, 2013
2 / 212
neoVI PLASMA Help 12May13
Device Layout & Features
Device Layout & Features
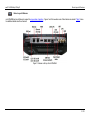
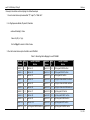
neoVI PLASMA has tons of features to support its unique modes of operation. Figures 1 and 2 show where some of these features are located. Table 1 below
has additional details about these features.
Figure 1: Features on the top of neoVI PLASMA.
3 / 212
neoVI PLASMA Help 12May13
Device Layout & Features
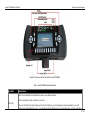
Figure 2: Features on the front and bottom of neoVI PLASMA.
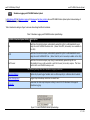
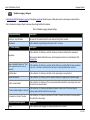
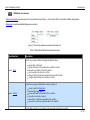
Table 1: neoVI PLASMA Feature Descriptions
Top Side
Description
Slot for a small card that identifies the device on a cellular network.
Avoid touching the metal contacts on the card.
SIM Card
To insert the SIM card (while looking at the front of Plasma), point its diagonal notch downwards to your left
with its gold contacts facing at you. You should feel slight resistance from a spring then hear or feel a small click
4 / 212
neoVI PLASMA Help 12May13
Device Layout & Features
if done properly.
Two standard size slots for SD cards that can be up to 128 GB each for logging data.
Avoid touching the metal contacts on the card.
SD Cards
To insert an SD card (while looking at the front of Plasma), point its diagonal notch downwards to your left and
its gold contacts facing away from you. You should feel slight resistance from a spring then hear or feel a small
click if done properly.
SD Card LEDs
Two LEDs that indicate the current status of each SD card.
Ethernet
Outboard port can connect to an Ethernet network or an external 3G modem.
Ethernet
(ICS mfg)
Inboard port is for ICS manufacturing and debugging purposes.
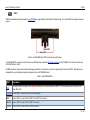
HDMI
Connection for an external display, like a monitor or projector.
USB Host
Two USB host ports (standard A plug) for external controls, like a mouse or keyboard.
USB to PC
USB port (standard B plug) for connecting to a computer USB port.
USB
(ICS MFG)
Smallest USB port (micro B plug) is for ICS manufacturing and debugging purposes.
Audio Input
Connector jack input for an amplified microphone.
Audio Output
Connector jack output for a small speaker or headphones.
WIFI
WIFI antenna connection for the small mast antenna provided.
GPS
GPS antenna connection for the wire labeled "GPS" on the 2 wire puck antenna provided.
GSM
3G cellular antenna connection for the wire labeled "GSM" on the 2 wire puck antenna provided.
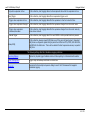
Front Side
Description
D-Pad
Backlit 5 button control pad with up, down, left, right, and select buttons. D-Pads on the left and right sides do
the same thing.
Android Buttons
Backlit standard Android buttons for Home, Menu, and Back. Button groups on the left and right sides do the
same thing.
5 / 212
neoVI PLASMA Help 12May13
LEDs
Device Layout & Features
Lights indicate the status of various features.
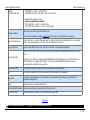
Senses how bright or dark the local area is.
Light Sensor
Read analog value in Vehicle Spy Expression Builder:
Physical IO/General neoVI Hardware/Light Sensor
Bright = 0 and Dark = 255
Touch Screen
A touch sensitive screen for viewing and controlling information.
Buttons 1-10
Backlit buttons that can be customized for various use.
Bottom Side
Description
Master VNET
This connects to DC power and vehicle data bus networks. The master VNET is required to be the FIRE VNET
that ships with neoVI PLASMA.
Slave VNETs
Two slave VNETs can be additional FIRE VNETs or other VNETs like AnalogIN, MOST, MOST50, or FlexRay.
Inside
Description
Internal Features A programmable beeper and a temperature sensor.
Top of Table Top of Page
neoVI PLASMA Documentation - (C) Copyright 2015 Intrepid Control Systems, Inc.
Last Update: Friday, April 19, 2013
6 / 212
neoVI PLASMA Help 12May13
Touch Screen
Touch Screen
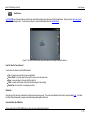
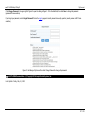
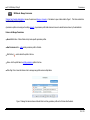
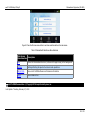
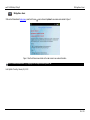
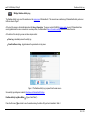
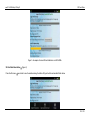
neoVI PLASMA has a touch sensitive screen that uses an Android operating system like many of today's smartphones. Along the top are status bar icons to
show new and ongoing events. The home screen (Figure 1) shows onboard applications like WirelessNeoVI.
Figure 1: The neoVI PLASMA home screen with status bar indicating a successful start up.
How Do I Use the Touch Screen?
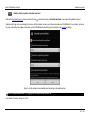
Use these touch motions to perform different tasks:
Tap - to make a menu selection or open an application
Press & Hold - to grab an object that you want to move or open its option menu
Drag - to move an object or to slowly scroll through a list
Flick - to quickly scroll through a list (touch the screen again to stop scrolling)
Double Tap - to zoom in/out on a web page or picture
Status Bar
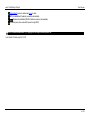
Along the top of the screen is a status bar that shows new and ongoing events. The events are indicated with short text or small animated icons. The status
bar can be flicked downwards to expose more details and upwards again to hide them.
Successful Start Up of Wireless
A few moments after neoVI PLASMA boots up, the touch screen status bar should show:
7 / 212
neoVI PLASMA Help 12May13
Touch Screen
WirelessNeoVI service is enabled and server is online.
GPS lock established (if enabled, connected, and available)
Wireless link established (WIFI/3G if enabled, connected, and available)
Full battery level (due to external DC power through VNET)
neoVI PLASMA Documentation - (C) Copyright 2015 Intrepid Control Systems, Inc.
Last Update: Monday, April 22, 2013
8 / 212
neoVI PLASMA Help 12May13
Status Bar Icons
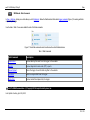
Status Bar Icons
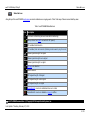
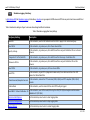
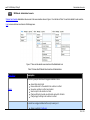
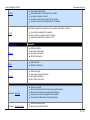
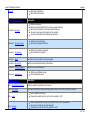
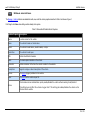
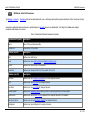
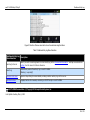
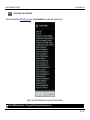
Along the top of the neoVI PLASMA touch screen are icons to indicate new or ongoing events. Table 1 lists many of these icons and what they mean.
Table 1: neoVI PLASMA Status Bar Icons
Icon Description
3G network: alternating arrows means data transferring
Battery status: full (VNET connected to DC power)
GPS: enabled and locked in
GPS: enabled, but not locked in (blinking circle means trying to lock in)
Cellular signal strength: full signal
Cellular signal strength: some signal
Cellular signal strength: no signal
SIM card not detected
Sound is muted
WIFI signal strength: full signal
WIFI signal strength: some signal
WIFI signal strength: no signal
WirelessNeoVI: service is enabled and server is online
WirelessNeoVI: service is disabled or server is offline
neoVI PLASMA Documentation - (C) Copyright 2015 Intrepid Control Systems, Inc.
Last Update: Thursday, February 07, 2013
9 / 212
neoVI PLASMA Help 12May13
Status Bar Icons
10 / 212
neoVI PLASMA Help 12May13
Buttons
Buttons
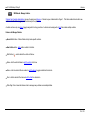
neoVI PLASMA has many buttons located across the device that are explained here further.
There is NOT a power on/off button. neoVI PLASMA is designed to be "always on" until the VNET power connection is removed. Power management features
are available to minimize power consumption. neoVI PLASMA entering sleep mode can be identified by all the front facing LEDs turning yellow. Once sleep
mode is entered, the LEDs will turn off.
D-Pad Buttons
D-Pads are the round control areas on the left and right sides with 5 backlit buttons for up, down, left, right, and select. Both sides perform the same actions.
The buttons can be used along with the touch screen to highlight items and make selections.
Home | Menu | Back Buttons
These 3 backlit buttons on the left and right sides work the same as those found on many of today's Android smartphones:
Home - jumps to the main home screen from anywhere
Menu - shows the menu options available
Back - returns to the previous screen or menu
Custom Buttons 1-10
The custom buttons can be scripted to do different tasks like capture a buffer, transmit a message, or start a function block.
Button Monitoring in Vehicle Spy (for advanced users)
All buttons can be monitored using a Vehicle Spy CoreMini script.
11 / 212
neoVI PLASMA Help 12May13
Buttons
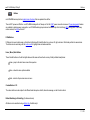
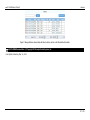
One way to let a button control script logic is to follow these steps:
1. Use a function block script command like "If", "Jump If", or "Wait Until".
2. In VSpy Expression Builder, Physical IO, Switches:
neo0-sw#-0-index(0) = Value
Value is 0 (off) or 1 (on).
# is the VSpy # to monitor in Table 1 below.
3. Run the function block script as CoreMini in neoVI PLASMA.
Table 1: Vehicle Spy Button Mapping for neoVI PLASMA
Builder VSpy
neoVI PLASMA
Name
#
Button
Switch 1
0 Button #1
Switch 2
1 Button #2
Switch 3
2 Button #3
Switch 4
3 Button #4
Switch 5
4 Button #5
Switch 6
5 Button #6
Builder VSpy
neoVI PLASMA
Name
#
Button
Switch 13 12 Left Keypad DOWN button
Switch 14 13 Left Keypad RIGHT button
Switch 15 14 Left Keypad UP button
Switch 16 15 Left/Right Android BACK buttons
Switch 17 16 Left/Right Android MENU buttons
Switch 18 17 Left/Right Android HOME buttons
Switch 7
Switch 8
Switch 9
Switch 10
Switch 11
Switch 19
Switch 20
Switch 21
Switch 22
Switch 23
6
7
8
9
10
Button #7
Button #8
Button #9
Button #10
Left Keypad CENTER button
18
19
20
21
22
Right Keypad UP button
Right Keypad RIGHT button
Right Keypad DOWN button
Right Keypad LEFT button
Right Keypad CENTER button
12 / 212
neoVI PLASMA Help 12May13
Switch 12
Buttons
11
Left Keypad LEFT button
-
-
-
neoVI PLASMA Documentation - (C) Copyright 2015 Intrepid Control Systems, Inc.
Last Update: Sunday, April 21, 2013
13 / 212
neoVI PLASMA Help 12May13
LEDs
LEDs
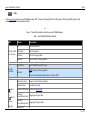
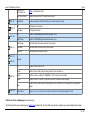
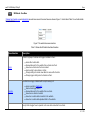
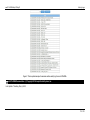
As the device layout shows, the neoVI PLASMA has many LEDs. There are 2 top facing LEDs for the SD cards and 10 front facing LEDs (Figure 1) that
indicate device conditions as described in Table 1.
Figure 1: These LEDs indicate the status of some neoVI PLASMA features.
Table 1: neoVI PLASMA LED Pattern Defaults
LED
Pattern
Description
Off
SD card removed.
SD Card LEDs Solid Green
(on top side) Solid Red
All LEDs
Together
LED #1
(red)
+
LED #2
(green)
Together
SD card inserted.
SD card is logging data.
Blink Red
Core firmware is being updated.
Solid Yellow
neoVI PLASMA is going to sleep.
Solid Red
VNET firmware is being updated.
OR
Internal communication fault between HID and VNET.
Blink Green alone
Powered, but not doing anything.
Blink Red alone
CoreMini is running.
Alternate Red/Green Online with Vehicle Spy.
Blink Red
Green Blinks Slowly
Logging pre-trigger data.
Blink Red
Logging post-trigger data.
Green Blinks Quickly
Blink Red 1x
14 / 212
neoVI PLASMA Help 12May13
LED #3
LED #4
LED #5
LED #6
LEDs
Blink Red 1x
Blink Green 3x
VNET in bootloader mode.
Both Solid Yellow
Waiting to sleep after PC USB is disconnected.
Blink White
Data uploading to Wireless NeoVI server before going to sleep.
Off
GPS signal not locked in.
Solid Blue
GPS signal locked in.
Off
Modem's PWRMON signal indicates modem is off.
Solid Green
Modem's PWRMON signal indicates modem is on.
Solid Green
Wireless NeoVI license is valid and not expired.
Solid Blue
Wireless NeoVI license is valid, but expired.
Solid Red
Wireless NeoVI license is invalid.
LED #7
Unused
LED #8
LED #9
LED #10
Off
Modem driver is idle or off.
Green
Modem driver onoff signal is being pulsed to turn modem on.
Yellow
Modem driver is waiting for PWRMON or CTS to reach correct state.
Purple
Modem driver 10 s delay. (required by modem's software user manual)
Blue
Modem driver onoff signal is being pulsed to turn modem off or is sending AT commands for
sleep.
Solid Yellow
Stays on 5 s every time Linux sends an internal communication update to HID.
LED Control, Colors, and Mapping (for advanced users)
All front facing LEDs can be controlled using a Vehicle Spy CoreMini script. All of the LEDs are multicolor, including those used for backlighting the buttons.
15 / 212
neoVI PLASMA Help 12May13
LEDs
One way to control a neoVI PLASMA LED in Vehicle Spy is to follow these steps:
1. Use 2 function block script "Set Value" commands to control the LED color and value.
2. In VSpy Expression Builder, Physical IO, LEDs:
neo0-ld#-1-index(0) = Color ...where Color is 0 to 7...see below*
neo0-ld#-0-index(0) = Value ...where Value is 0 (off) or 1 (on)
[# is the VSpy # number to change in Table 2 below]
3. Run the function block script as CoreMini in neoVI PLASMA.
* LED colors can be any of these values:
0 black | 1 red | 2 green | 3 yellow | 4 blue | 5 magenta | 6 cyan | 7 white
Table 2: Vehicle Spy LED Mapping for neoVI PLASMA
Builder VSpy
neoVI PLASMA
Name
#
LED
1
0 Top row LED #1
2
1 Top row LED #2
3
2 Top row LED #3
4
3 Top row LED #4
5
4 Top row LED #5
6
5 Top row LED #6
7
6 Top row LED #7
8
7 Top row LED #8
Builder VSpy
neoVI PLASMA
Name
#
LED
n/a
18 Bottom button 5
n/a
19 Bottom button 4
n/a
20 Bottom button 3
n/a
21 Bottom button 2
n/a
22 Bottom button 1
n/a
23 Left Android Back button
n/a
24 Left Android Menu button
n/a
25 Left Android Home button
16 / 212
neoVI PLASMA Help 12May13
LEDs
9
10
n/a
n/a
n/a
n/a
n/a
8
9
10
11
12
13
14
Top row LED #9
Top row LED #10
Right Android Back button
Right Android Menu button
Right Android Home button
Bottom button 0
Bottom button 9
n/a
n/a
n/a
n/a
n/a
n/a
n/a
26
27
28
29
30
31
32
Right keypad UP button
Right keypad RIGHT button
Right keypad DOWN button
Right keypad LEFT button
Right keypad CENTER button
Left keypad UP button
Left keypad RIGHT button
n/a
n/a
n/a
15
16
17
Bottom button 8
Bottom button 7
Bottom button 6
n/a
n/a
n/a
33
34
35
Left keypad DOWN button
Left keypad LEFT button
Left keypad CENTER button
Top of Page
neoVI PLASMA Documentation - (C) Copyright 2015 Intrepid Control Systems, Inc.
Last Update: Saturday, April 20, 2013
17 / 212
neoVI PLASMA Help 12May13
Internal Features
Internal Features
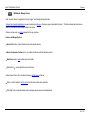
neoVI PLASMA has some internal features that can be accessed using a Vehicle Spy CoreMini script.
Beeper
A programmable beeper can be accessed at this location in the Vehicle Spy Expression Builder:
Physical IO, PWM Outputs, PWM Output 1, PWM Frequency (Hz)
Audible sound from the beeper ranges between 1 Hz to 4111 Hz. For example, to sound a simple beep, use a function block script with the following steps:
1.
2.
3.
4.
Set Value of PWM Output 1 Frequency = 500
Wait For = 0.25 s
Set Value of PWM Output 1 Frequency = 0
Stop
Temperature Sensor
The internal temperature can be accessed at this location in the Vehicle Spy Expression Builder:
Physical IO, General neoVI Hardware, Temperature Deg C, Value
For example, an application signal can be set to that value and then the temperature can be tracked using the Wireless NeoVI website Live Data command.
neoVI PLASMA Documentation - (C) Copyright 2012 Intrepid Control Systems, Inc.
Last Update: Sunday, April 21, 2013
18 / 212
neoVI PLASMA Help 12May13
VNETs
VNETs
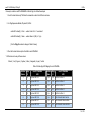
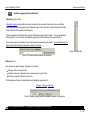
VNETs are hardware modules developed for neoVI PLASMA that support different functionality for different needs. Up to three VNETs are possible as shown in
Figure 1.
Figure 1: neoVI PLASMA has 3 VNET connections along the bottom.
A central FIRE VNET is required to control the outer two VNETs and also provides the DC power connection to neoVI PLASMA. The outer slots can have any
of the VNETs listed in Table 1.
All VNETs are able to run their own scripts for data logging, simulation, or test execution. Scripts run independently of other active VNETs. Although they are
independent, they record data with a single time stamp onto the neoVI PLASMA SD cards.
Table 1: neoVI PLASMA VNETs
VNET
Description
FIRE
The master VNET that gives neoVI FIRE functionality and controls both slave VNETs. This can also be used in either or both
slave VNET slots.
AnalogIN A slave VNET to measure and record analog inputs.
MOST
A slave VNET to work with the MOST 25 or MOST 50 networks.
MOST50
A slave VNET to work with the MOST 50 network.
FlexRay
A slave VNET to work with the FlexRay network.
19 / 212
neoVI PLASMA Help 12May13
VNETs
neoVI PLASMA Documentation - (C) Copyright 2015 Intrepid Control Systems, Inc.
Last Update: Thursday, February 07, 2013
20 / 212
neoVI PLASMA Help 12May13
FIRE VNET
FIRE VNET
One FIRE VNET is included with every neoVI PLASMA to connect to a number of different vehicle networks and control any slave VNETs. The FIRE VNET is
based upon Intrepid's proven neoVI FIRE hardware. neoVI PLASMA can support 3 VNETs at the same time.
A detailed product overview of the FIRE VNET can be downloaded by clicking here (pdf).
Pinout Diagram
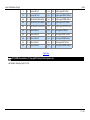
FIRE VNET has a 26 pin male connector with the pinout in Table 1 and layout in Table 2. Note that the FIRE VNET pinout is NOT the same as the neoVI FIRE
25 pin connector.
Table 1: FIRE VNET Pinout
(26 pin connector with 3 rows of pins)
Pin Name
Pin Name
Pin Name
1
2
3
MISC1
MISC3
TSYNC L
10 GND
11 MISC2
12 MISC4
19 VBATT
20 MISC5
21 L-LINE
4
5
6
7
8
HSCAN L
MSCAN L
HSCAN2 L
HSCAN3 L
LSFTCAN L
13
14
15
16
17
22
23
24
25
26
9
J1850 VPW 18 LSFTCAN H
TSYNC H
HSCAN H
MSCAN H
HSCAN2 H
HSCAN3 H
LIN1
LIN2
LIN3
LIN4
SWCAN
Table 2: FIRE VNET Pin Layout
(MALE 26 pin connector with 3 rows of pins)
21 / 212
neoVI PLASMA Help 12May13
FIRE VNET
1
10
2
11
19
3
12
20
4
13
21
5
14
22
6
15
23
7
16
24
8
17
25
9
18
26
neoVI PLASMA Documentation - (C) Copyright 2015 Intrepid Control Systems, Inc.
Last Update: Monday, January 28, 2013
22 / 212
neoVI PLASMA Help 12May13
AnalogIN VNET
AnalogIN VNET
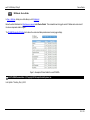
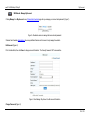
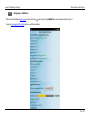
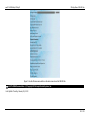
The AnalogIN slave VNET measures and records analog inputs. This VNET must be installed in slot 1 for neoVI PLASMA. This VNET must be enabled using
the "Slave VNET A" settings in 3G Explorer shown in Figure 1.
Figure 1: The AnalogIN VNET must be enabled using these 3G Explorer "Slave VNET A" settings.
Pinout Diagram
AnalogIn VNET has a 26 pin male connector with the pinout in Table 1 and layout in Table 2.
Table 1: AnalogIn VNET Pinout
(26 pin connector with 3 rows of pins)
Pin Name
Pin Name
Pin Name
23 / 212
neoVI PLASMA Help 12May13
AnalogIN VNET
1
ADC_IN 1 +
10
GND
19
VBATT
2
ADC_IN 2 +
11
ADC_IN 1 -
20
ADC_IN 3 +
3
ADC_IN 3 -
12
ADC_IN 2 -
21
ADC_IN 4 -
4
ADC_IN 10 CHA
13
ADC_IN 4 +
22
NA
5
NA
14
ADC_IN 10 CHB
23
NA
6
NA
15
NA
24
NA
7
NA
16
NA
25
ADC_IN 5 -
8
ADC_IN 6 +
17
ADC_IN 5 +
26
ADC_IN 7 -
9
ADC_IN 7 +
18
ADC_IN 6 -
Table 2: AnalogIn VNET Pin Layout
(MALE 26 pin connector with 3 rows of pins)
1
10
2
11
19
3
12
20
4
13
21
5
14
22
6
15
23
7
16
24
8
17
25
9
18
26
neoVI PLASMA Documentation - (C) Copyright 2015 Intrepid Control Systems, Inc.
Last Update: Wednesday, December 04, 2013
24 / 212
neoVI PLASMA Help 12May13
Wireless Mode
Wireless Mode
One of the exciting ways to use neoVI PLASMA is in wireless mode* where it can be monitored and controlled remotely by a PC with the Wireless NeoVI
website.
How To Get neoVI PLASMA Into Wireless Mode
First, connect a PC to neoVI PLASMA through USB:
1. Configure the firmware, RTC time, and network baud rates with neoVI 3G Explorer.
Next, on neoVI PLASMA by itself:
2. Verify the antennas, SIM card, and SD Card #1 are installed.
3. Connect the FIRE VNET to DC power and vehicle data bus networks.
4. Verify the touch screen shows a successful start up of wireless.
Finally, on a PC by itself:
5.
6.
7.
8.
9.
Use Vehicle Spy to generate a VS3ZIP script file with desired power management.
Use the Wireless NeoVI website Vehicle List to verify neoVI PLASMA is online.
Use the website to send the VS3ZIP script from the PC to neoVI PLASMA.
Use the website to control and monitor the neoVI PLASMA.
Use the website to transfer archived data collected by neoVI PLASMA to the PC.
*Wireless mode has major advantages, but link speed and data usage should be considered too.
neoVI PLASMA Documentation - (C) Copyright 2015 Intrepid Control Systems, Inc.
Last Update: Monday, April 22, 2013
25 / 212
neoVI PLASMA Help 12May13
Configure neoVI PLASMA
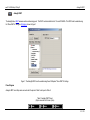
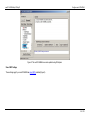
neoVI 3G Explorer
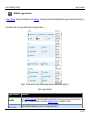
neoVI 3G Explorer configures essential parameters in neoVI PLASMA to ensure that it works correctly during any mode of operation. Parameters include its
firmware, real time clock (RTC), and vehicle network baud rates, among others. neoVI 3G Explorer MUST run on a PC connected to the neoVI PLASMA via the
USB to PC port.
Open neoVI 3G Explorer on a PC
One way to open neoVI 3G Explorer directly is to click on it in this folder:
Windows Start menu \ IntrepidCS \ Vehicle Spy 3 \ neoVI 3G Explorer
The other ways to open neoVI 3G Explorer are by opening Vehicle Spy first, then clicking the
Hardware Setup button at any of these locations:
Setup \ Hardware
Spy Networks \ Networks
Setup Hardware button to the right of the blue play/stop button
Logon view, Configure Hardware button in lower right corner
Measurement \ VehicleScape DAQ, Database/Hardware Setup tab, Edit hardware and network settings button
Tools \ Utilities \ CoreMini Console, neoVI (USB) tab
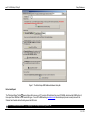
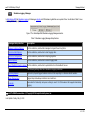
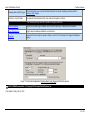
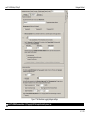
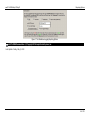
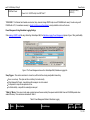
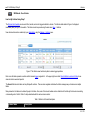
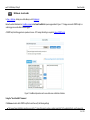
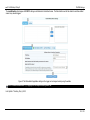
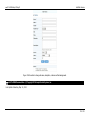
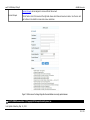
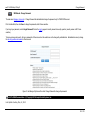
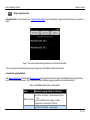
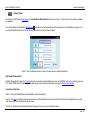
Use neoVI 3G Explorer to Configure neoVI PLASMA
Firmware
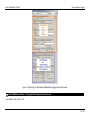
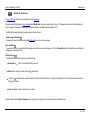
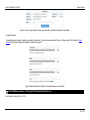
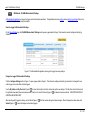
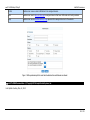
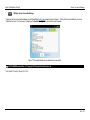
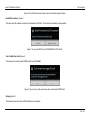
After 3G Explorer is open the VNET will show up in the tree on the left (Figure 1: ). Clicking the Connect button (Figure 1: ) will connect to the device and
read its current settings which will be displayed in the area on the right. The status window (Figure 1: ) will indicate any issues while connected to the VNET.
The firmware versions are displayed on the right (Figure 1: ) and appear as black text if up-to-date and red text if out of date. If needed, the Manual Reflash
button will update the firmware.
Network Settings
To adjust a network setting, like baud rate, click on the proper network in the tree and the area on the right will refresh to show the related settings that can be
adjusted. Make sure to click the Write Settings button (Figure 1: ) after making changes to push those new settings into neoVI PLASMA. If you make a
mistake while changing settings you can click the Load Defaults button (Figure 1: ) to reset ALL 3G Explorer settings in neoVI PLASMA back to their
defaults.
RTC Time
26 / 212
neoVI PLASMA Help 12May13
Configure neoVI PLASMA
Click Read RTC (Figure 1: ) to see the current time of the neoVI PLASMA Real Time Clock. Click Synchronize RTC re-sync the neoVI PLASMA RTC time
to the current PC clock time.
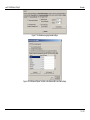
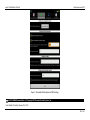
Figure 1: Use neoVI 3G Explorer with PC USB to configure essential parameters in neoVI PLASMA.
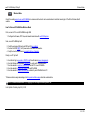
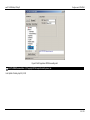
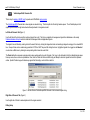
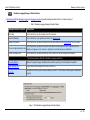
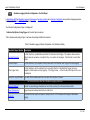
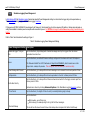
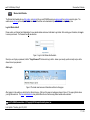
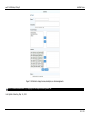
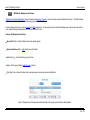
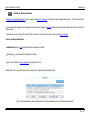
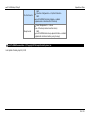
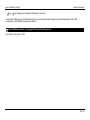
Android
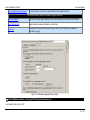
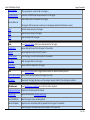
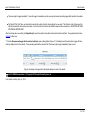
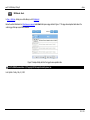
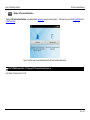
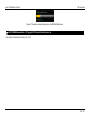
If necessary, the neoVI PLASMA's Linux operating system can be updated using 3G Explorer. To flash the device, the USB to PC and USB ICS mfg ports must
BOTH be connected at the same time between neoVI PLASMA and the PC for this update to work. After everything is setup, open 3G Explorer on the PC, go to
the Android branch, and click the Update to... button (Figure 2) to start the update.
The Send Message Events to Android checkbox (Figure 2) should remain disabled. This option is for future applications for the neoVI PLASMA.
27 / 212
neoVI PLASMA Help 12May13
Configure neoVI PLASMA
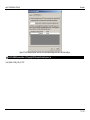
Figure 2: The neoVI PLASMA Linux can be updated using 3G Explorer.
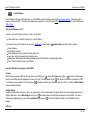
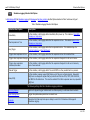
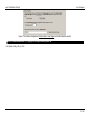
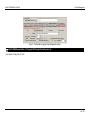
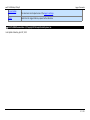
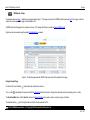
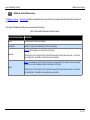
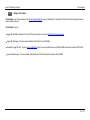
Slave VNET Settings
These settings apply if your neoVI PLASMA has slave VNETs installed (Figure 3).
28 / 212
neoVI PLASMA Help 12May13
Configure neoVI PLASMA
Figure 3: Don't forget slave VNETs have settings too!
neoVI PLASMA Documentation - (C) Copyright 2015 Intrepid Control Systems, Inc.
Last Update: Monday, April 22, 2013
29 / 212
neoVI PLASMA Help 12May13
Make a VS3ZIP Script
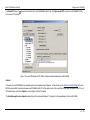
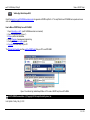
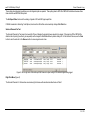
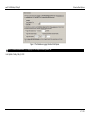
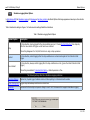
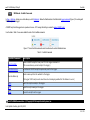
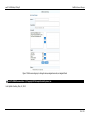
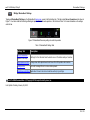
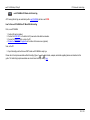
Vehicle Spy VehicleScape DAQ
One of the steps to run neoVI PLASMA in wireless mode is to generate a VS3ZIP script file for it. The script file tells neoVI PLASMA how to operate on its own
while connected to a vehicle.
How to Make a VS3ZIP Script for neoVI PLASMA
1.
2.
3.
4.
5.
6.
Open Vehicle Spy on a PC. (neoVI PLASMA connection is not needed)
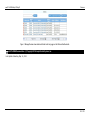
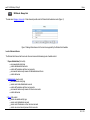
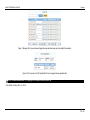
Open VehicleScape DAQ. (Figure 1)
Setup a platform with databases.
Select Channels of messages and signals to log.
Configure Standalone Logging options.
Generate the VS3ZIP script on your PC.
The Wireless NeoVI website can then send the VS3ZIP script from your PC to neoVI PLASMA.
Figure 1: Use Vehicle Spy VehicleScape DAQ on a PC to make a VS3ZIP script for neoVI PLASMA.
neoVI PLASMA Documentation - (C) Copyright 2015 Intrepid Control Systems, Inc.
Last Update: Friday, May 3, 2013
30 / 212
neoVI PLASMA Help 12May13
Setup Databases
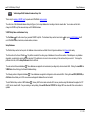
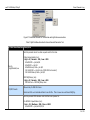
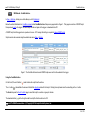
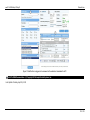
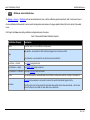
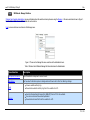
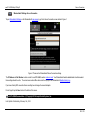
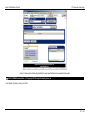
VehicleScape DAQ: Database/Hardware Setup Tab
This is step 3 in making a VS3ZIP script to operate neoVI PLASMA in wireless mode.
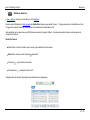
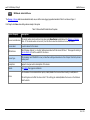
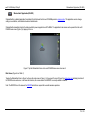
The critical role of the Database/Hardware Setup tab (Figure 1) is to setup databases for decoding all vehicle network data. You can also use this tab to
change the VS3ZIP script file name and setup neoVI PLASMA hardware.
VS3ZIP Script Name and Hardware Setup
The Test Name will be the name of your generated VS3ZIP script file. The Hardware Setup section has a button
neoVI PLASMA firmware, baud rates, network enables, and more.
that opens neoVI 3G Explorer to edit
Setup Databases
The Platform Setup section has four parts. All database choices made here will affect the list of signals available on the Channels tab nearby.
The first section is the Current Platform . The platform consists of the entire group of databases in the next three sections. VehicleScape is very database
dependent, so selecting the correct platform is important! If the platform is not correct or does not exist yet, this section will let you correct it. To change the
platforms in the list, click the Setup Platforms button to edit them.
The next section is Network databases . These databases are applied to all normal mode (non-diagnostic) vehicle network traffic. Clicking the Load DBC or
VSDB files button will bring up the Network Databases dialog.
The following section is Diagnostic databases . These databases are applied to all diagnostic vehicle network traffic. Clicking the Load ODX, MDX/GDX, or
A2L files button will take you to ECUs view where new diagnostic database files can be loaded.
The last Platform Setup section is MEP databases . Memory Edit Protocol reads and writes ECU memory locations using A2L database files applied to CCP
or XCP vehicle network traffic. If any are missing or need updating, the Load A2L files for CCP/XCP will display MEP view where A2L Files can be added or
updated.
31 / 212
neoVI PLASMA Help 12May13
Setup Databases
Figure 1: The VehicleScape DAQ Database/Hardware Setup tab.
Extract and Export
The "Extract and Export" button opens a feature that can use your PC to read an SD card taken from a neoVI PLASMA, extract raw data VSB files from it,
then export those VSB files to other decoded file types. For neoVI PLASMA working in wireless mode this extract/export process is usually done with the
Wireless NeoVI website without fumbling around with SD cards.
neoVI PLASMA Documentation - (C) Copyright 2015 Intrepid Control Systems, Inc.
32 / 212
neoVI PLASMA Help 12May13
Setup Databases
Last Update: Friday, May 3, 2013
33 / 212
neoVI PLASMA Help 12May13
Select Channels to Log
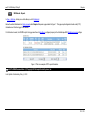
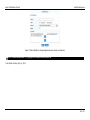
VehicleScape DAQ: Channels Tab
This is step 4 in making a VS3ZIP script to operate neoVI PLASMA in wireless mode.
The VehicleScape DAQ Channels tab is where signals are selected to log. This tab is split into left and right window panes. The left side displays a list of
signals to pick from and the right side allows further adjustments to the signals selected.
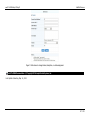
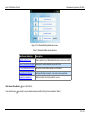
Left Side of Channels Tab (Figure 1)
Use the left side of the tab to search for and select signals from a list. The list is a compilation of messages and signals from databases on the nearby
Database/Hardware Setup tab and other data like the Messages Editor and Application Signals.
The signal list can be filtered by entering text into the search field or by clicking the diagnostics button and selecting a diagnostic category in the network/ECU
tree. Groups of items can be created using press/hold of CTRL or SHIFT keys and left clicking the items. Highlighted signals to be logged can be Selected
one at a time or All at once by clicking the corresponding button below the search field.
The Paste List button can speed up signal selection when working with a huge list of signals. First, copy to the clipboard a list of line delimited signal names
from any source, like a column in a spreadsheet. Next, click the Paste List button and Vehicle Spy will attempt to select all signals that match the clipboard
entries. Specific Problem Logs will indicate any signals that Vehicle Spy could not find a match for.
Figure 1: Use the left side of VehicleScape DAQ Channels to find and select signals to log.
Right Side of Channels Tab (Figure 2)
Use the right side of the tab to make adjustments to the signals selected.
Polling Setup
34 / 212
neoVI PLASMA Help 12May13
Select Channels to Log
These polling rates determine how fast any one shot diagnostic jobs are repeated. These polling rates do NOT affect MEP A2L file data items because those
items use their own MEP DAQ Delay times.
The Set Export Order button sets the ordering of signals in CSV and MAT signal export files.
If GMLAN is enabled in Vehicle Spy Tools/Options, then items from GM cal files can be loaded by clicking a CAL File button.
Selected Channels For Test
The Selected Channels for Test area in the lower half of Figure 2 displays the signals that were selected to be logged. If the signal is a PID or MEP A2L file
data item then its priority (how often it gets requested) can be changed to Fast/Medium/Slow by double clicking on it. At the bottom of this area, use the Clear
button to clear the entire list or the Remove button to remove signals one at a time.
Figure 2: Use the right side of VehicleScape DAQ Channels to adjust settings of the selected signals being logged.
Right Click Menu (Figure 3)
The Selected Channels For Test area has an extensive right click menu with selections described below in Table 1.
35 / 212
neoVI PLASMA Help 12May13
Select Channels to Log
Figure 3: The Selected Channels For Test area has useful right click menu selections.
Table 1: Right Click Menu Selections for Items in Selected Channels for Test
Rt Click Menu Selection Description
Sets the periodic rate of one shot requests sent for this item.
Priority
High/Normal/Low
Polling Setup defaults (ms):
High = 0 / Normal = 150 / Low = 500
GMLAN DPID = job $AA/01
GMLAN PID = job $22
GMLAN Memory Data = job $23
ISO 14229 DID = job $22 (only if ISO15765 not needed)
ISO 14229 Memory Data = job $23
MEP DAQ Delays (ms):
High = 0 / Normal = 150 / Low = 600
MEP A2L item = MEP DAQ Delay rates
Allowed only for MEP A2L items.
CCP/XCP Events
Selects an ECU event schedule defined in an A2L file. This is known as event based DAQ'ing.
Sets the periodic DPID schedule rate that this item is packed in.
Per GMW3110 specification (ms):
Fast = 25 / Medium = 200 / Slow = 1000
GMLAN DPID = job $AA 04/03/02
36 / 212
neoVI PLASMA Help 12May13
Periodic
Fast/Medium/Slow
Select Channels to Log
GMLAN PID = job $2C + $AA 04/03/02
GMLAN Memory Data = job $2D + $2C + $AA 04/03/02
Per ISO 14229 specification (ms):
"vehicle-manufacturer-specific"
ISO 14229 DID = job $2C + $2A 03/02/01
ISO 14229 Memory Data = job $2C + $2A 03/02/01
Allowed only for ISO 14229 and GMLAN items.
Change condition
Selects which Standalone Logging collections must be active for this signal to be requested.
Pack at half precision
If an item Priority = Periodic this packs only the signal's top half most significant bytes into a dynamic
DPID. This allows packing more items, but with a sacrifice of precision.
Copy DID to ECU
Copies a DID definition from one "real" ECU to another in the diagnostic database.
Allowed only for ISO 14229 DIDs with its source being a base/virtual/GMRDB ECU with USDT request
ID = 0.
Move DID to ECU
Use this to copy DIDs from a base/virtual/GMRDB ECU with DID definitions to "real" ECUs that need
DID definitions in the diagnostic database. The base/virtual/GMRDB ECU DID list will remain
unchanged after using this menu selection.
Remove selected
Cuts selected signals from the list without copying them to the clipboard.
Cut
Cuts selected signals from the list and copies their information to the clipboard.
Copy data
Copies all signal information to the clipboard in a tab delimited format that can be pasted into a
spreadsheet application.
Paste
Pastes previously cut signals into the list.
Show diagnostic tweaker
Shows a viewing area on the right side of the Online tab.
Set Export Order
Sets the ordering of signals in CSV and MAT signal export files.
Top of Page
neoVI PLASMA Documentation - (C) Copyright 2015 Intrepid Control Systems, Inc.
37 / 212
neoVI PLASMA Help 12May13
Select Channels to Log
Last Update: Monday, April 22, 2013
38 / 212
neoVI PLASMA Help 12May13
Setup Standalone Logging
VehicleScape DAQ: Standalone Logging Tab
This is step 5 in making a VS3ZIP script to operate neoVI PLASMA in wireless mode.
Additional help can be found in the VehicleScape DAQ Standalone Logging application note within the Vehicle Spy help files.
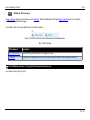
The Standalone Logging tab generates a script that lets ICS hardware collect data on its own while disconnected from a computer.
Standalone Logging Page Layout
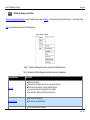
The Standalone Logging page has 2 major areas shown in Figure 1 and described in Table 1.
The upper area has Collection setups that change appearance depending upon which method is being used in that collection.
The bottom area contains important sections that do not change appearance because these settings affect ALL collections above.
Table 1: Standalone Logging Setup Areas
Standalone Logging Area Description
Collections and Methods
Collections define log file creation and they can use different methods to gather data.
The following settings affect ALL Standalone Logging collections
Reporting Options
Options for physical logger feedback and Live Data reporting to a Wireless NeoVI website.
Power Management
Logger sleep and wakeup selections are made here.
Generate
Generates the final script and opens a dialog to send it to ICS hardware that supports standalone
logging.
39 / 212
neoVI PLASMA Help 12May13
Setup Standalone Logging
Figure 1: In Vehicle Spy, the VehicleScape DAQ Standalone Logging tab has 2 major areas.
neoVI PLASMA Documentation - (C) Copyright 2015 Intrepid Control Systems, Inc.
Last Update: Friday, May 3, 2013
40 / 212
neoVI PLASMA Help 12May13
Collections and Methods
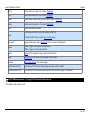
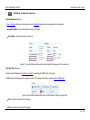
Standalone Logging Collections and Methods
Collections (Figures 1 and 2)
A Standalone Logging collection defines how, when, and what log files are created. Each collection can use a different
method with its own start/stop trigger logic and configuration settings. Each collection can log many files and all of the files
from that collection will be created in the same manner.
Collections appear as vertical tabs along the right side of Standalone Logging similar to Figure 1. They can be added and
deleted using the +/- buttons nearby. One standalone logger script can have a maximum of 16 unique collections.
The collection name can be changed at the top of each method setup area as shown in Figure 2. Every data file saved by the
logger script will have the same root name as the collection it came from.
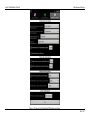
Figure 1: Collection tabs.
Figure 2: This collection name is shown on the vertical tabs.
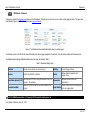
Methods (Figure 3)
Each collection can gather messages, a histogram, or a bus query.
Messages - data over a period of time.
Histogram - frequency of data points across a value range over a period of time.
Bus Query - snapshot of data at one point in time.
The following links will take you to detailed help for each Standalone Logging method:
Messages Histogram Bus Query
Figure 3: Standalone Logging can gather messages, histograms, and bus queries.
neoVI PLASMA Documentation - (C) Copyright 2015 Intrepid Control Systems, Inc.
41 / 212
neoVI PLASMA Help 12May13
Collections and Methods
Last Update: Monday, May 13, 2013
42 / 212
neoVI PLASMA Help 12May13
Messages Method
Standalone Logging - Messages
In VehicleScape DAQ the Standalone Logging of a Messages collection lets ICS hardware log data files over a period of time. Use the links in Table 1 to see
more help for the setup options.
Figure 1: The VehicleScape DAQ Standalone Logging Messages selection.
Table 1: Standalone Logging Messages Setup Sections
Messages Setup Section
Description
Message Collection Options
For this collection, select which messages to log and how to log them.
Collection Start Options
For this collection, select when to start logging data.
Collection Configuration
For this collection, select when to stop logging data.
Restart Options
For this collection, select when to restart logging data.
neoVI PLASMA Collection Upload For this collection, select when to upload data to a WirelessNeoVI server.
The following settings affect ALL Standalone Logging collections
Reporting Options
Options for physical logger feedback and Live Data reporting to a Wireless NeoVI website.
Power Management
Logger sleep and wakeup selections are made here.
Generate
Generates the final script and opens a dialog to send it to ICS hardware that supports standalone
logging.
neoVI PLASMA Documentation - (C) Copyright 2015 Intrepid Control Systems, Inc.
Last Update: Friday, May 3, 2013
43 / 212
neoVI PLASMA Help 12May13
Message Collection Options
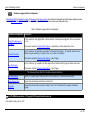
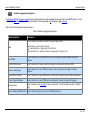
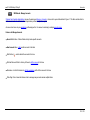
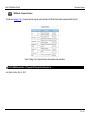
Standalone Logging Message Collection Options
In VehicleScape DAQ the Standalone Logging of a Messages collection has specific settings described in Table 1 and shown in Figure 1.
Table 1: Standalone Logging Message Collection Options
Message Collection Option
Description
Entire Bus
In this collection, log all messages from all networks.
Selected Messages
In this collection, only log data selected on the Channels tab.
Enable decimation
In this collection, log selected data at periodic rates defined in the Channels tab Priority column.
this collection, log selected normal mode data at a chosen periodic rate, regardless of how
Force a single decimation rate In
fast/slow it appears on the network. Diagnostic mode data rates are unaffected.
Store on change only
In this collection, log selected data only if any data in its carrier message has changed.
The following settings affect ALL Standalone Logging collections
Reporting Options
Options for physical logger feedback and Live Data reporting to a Wireless NeoVI website.
Power Management
Logger sleep and wakeup selections are made here.
Generate
Generates the final script and opens a dialog to send it to ICS hardware that supports standalone
logging.
Figure 1: The Standalone Logging Message Collection Options.
44 / 212
neoVI PLASMA Help 12May13
Message Collection Options
neoVI PLASMA Documentation - (C) Copyright 2015 Intrepid Control Systems, Inc.
Last Update: Friday, May 3, 2013
45 / 212
neoVI PLASMA Help 12May13
Collection Start Options
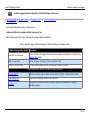
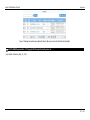
Standalone Logging Collection Start Options
In VehicleScape DAQ the Standalone Logging of a Messages or Bus Query collection has Start Options described in Table 1 and shown in Figure 1.
Table 1: Standalone Logging Collection Start Options
Collection Start Option
Description
Immediately
In this collection, start logging data immediately after power up. This enables a Finish After
Messages or Expression.
When Expression is True
In this collection, start logging data after the expression is true. This enables a Finish After
Messages or Expression.
Using Trigger
In this collection, start logging data after an expression action. This enables setup of a
Pre/Post Collection or One Shot Report.
Trigger when expression is true
In this collection, start logging data after the expression is true for a selected time.
Trigger when expression changes In this collection, start logging data after the expression changes from its current value.
Trigger when expression
increases/decreases
In this collection, start logging data after the expression changes from its current value by
some chosen amount.
Manual Trigger
In this collection, start logging data if the neoVI MOTE or other pendant button is pressed.
Always DAQ
In this collection, always request DAQ items even if they are not being logged. Requested
DAQ items are diagnostic signals that get polled from ECUs like DTCs, PIDs, ISO 14229 IDs,
and MEP A2L file data items. This must be enabled if the Start expression uses any requested
DAQ item.
The following settings affect ALL Standalone Logging collections
Reporting Options
Options for physical logger feedback and Live Data reporting to a Wireless NeoVI website.
Power Management
Logger sleep and wakeup selections are made here.
Generate
Generates the final script and opens a dialog to send it to ICS hardware that supports
standalone logging.
46 / 212
neoVI PLASMA Help 12May13
Collection Start Options
Figure 1: The Standalone Logging Collection Start Options.
neoVI PLASMA Documentation - (C) Copyright 2015 Intrepid Control Systems, Inc.
Last Update: Friday, May 3, 2013
47 / 212
neoVI PLASMA Help 12May13
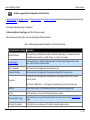
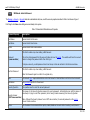
Collection Configuration
Standalone Logging Collection Configuration
In VehicleScape DAQ the Standalone Logging of a Messages or Bus Query collection has a Collection Configuration setup that changes appearance based
upon what Collection Start Option is selected. Use the links described in Table 1 to see more help for each configuration setup.
Table 1: Standalone Logging Collection Configurations
Collection Configuration Description
Finish After Messages or
Expression
For this collection, stop logging after a chosen number of messages are logged or after an expression
is true.
This setup is enabled if Collection Start Option = Immediately or When Expression is True.
Pre/Post Collection
For this collection, log data before and after the Collection Start trigger. The capture window can be
defined using an expression, a length of time, or a number of messages.
This setup is enabled if Collection Start Option = Using Trigger.
For this collection, log a snapshot of data values after a Collection Start triggered chosen delay time.
One Shot Report
This setup is enabled if Collection Start Option = Using Trigger.
The following settings affect ALL Standalone Logging collections
Reporting Options
Options for physical logger feedback and Live Data reporting to a Wireless NeoVI website.
Power Management
Logger sleep and wakeup selections are made here.
Generate
Generates the final script and opens a dialog to send it to ICS hardware that supports standalone
logging.
neoVI PLASMA Documentation - (C) Copyright 2015 Intrepid Control Systems, Inc.
Last Update: Friday, May 3, 2013
48 / 212
neoVI PLASMA Help 12May13
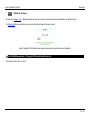
Finish After Messages or Expression
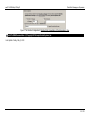
Standalone Logging Collection Configuration - Finish After Messages or Expression
In VehicleScape DAQ the Standalone Logging of a Messages collection has a Collection Configuration setup area that changes appearance based upon what
Collection Start Option is selected.
The Collection Configuration in Figure 1 is displayed only if:
Collection Start Option = Immediately or When Expression is True
Table 1 describes each setting in Figure 1 and some other settings that affect all collections.
Table 1: Standalone Logging Collection Configuration - Finish After Messages or Expression Options
Collection Configuration Setting Description
Finish After # of Messages
For this collection, stop logging data when a chosen number of messages are logged after the
Collection Start trigger.
Finish on Expression
For this collection, stop logging after an expression is true.
Collection / Log File Name
The name of this collection and the root name of all log files it creates.
The following settings affect ALL Standalone Logging collections
Reporting Options
Options for physical logger feedback and Live Data reporting to a Wireless NeoVI website.
Power Management
Logger sleep and wakeup selections are made here.
Generate
Generates the final script and opens a dialog to send it to ICS hardware that supports
standalone logging.
49 / 212
neoVI PLASMA Help 12May13
Finish After Messages or Expression
Figure 1: The Collection Configuration if Collection Start = Immediately or When Expression is True.
neoVI PLASMA Documentation - (C) Copyright 2015 Intrepid Control Systems, Inc.
Last Update: Friday, May 3, 2013
50 / 212
neoVI PLASMA Help 12May13
Pre/Post Collection
Standalone Logging Collection Configuration - Pre/Post Collection
In VehicleScape DAQ the Standalone Logging of a Messages collection has a Collection Configuration setup area that changes appearance based upon what
Collection Start Option is selected.
The Collection Configuration in Figure 1 is displayed if:
Collection Start Option = Using Trigger and Pre/Post Collection is selected.
Table 1 describes each setting in Figure 1 and some other settings that affect all collections.
Table 1: Standalone Logging Collection Configuration - Pre/Post Collection Options
Pre/Post Collection Setting Description
Pre/Post Collection
For this collection, log data before and after the Collection Start trigger. The capture window can
be defined using an expression, a length of time, or a number of messages.
One-shot Report
For this collection, log a snapshot of data values after a Collection Start triggered chosen delay
time. Click the link to see further details.
Stop on expression
For this collection, stop logging when the expression is true.
"changing" checkbox
For this collection, stop logging when the expression changes from its current value.
Timeout sec
For this collection, stop logging when the expression is true/changes value OR after a timeout
period in seconds.
This timeout is disabled if set = 0 and logging will stop based only upon the expression logic.
Card Size
SD card memory size in the ICS hardware that will run the Standalone Logging script.
By time
For this collection, use time to define the pre/post capture window.
Time Before/After Trigger
For this collection, save a log file that starts/stops at the chosen times around the Collection Start
trigger.
By number of messages
For this collection, use message count to define the pre/post capture window.
51 / 212
neoVI PLASMA Help 12May13
Pre/Post Collection
Messages Before/After Trigger For this collection, save a log file that starts/stops at the chosen message counts around the
Collection Start trigger.
Collection / Log File Name
The name of this collection and the root name of all log files it creates.
The following settings affect ALL Standalone Logging collections
Reporting Options
Options for physical logger feedback and Live Data reporting to a Wireless NeoVI website.
Power Management
Logger sleep and wakeup selections are made here.
Generate
Generates the final script and opens a dialog to send it to ICS hardware that supports standalone
logging.
Figure 1: The Collection Configuration if Collection Start = Using Trigger and Pre/Post is selected.
neoVI PLASMA Documentation - (C) Copyright 2015 Intrepid Control Systems, Inc.
Last Update: Friday, May 3, 2013
52 / 212
neoVI PLASMA Help 12May13
One Shot Report
Standalone Logging Collection Configuration - One Shot Report
In VehicleScape DAQ the Standalone Logging of a Messages or Bus Query collection has a Collection Configuration setup area that changes appearance
based upon what Collection Start Option is selected.
The Collection Configuration in Figure 1 is displayed if:
Collection Start Option = Using Trigger and One-shot Report is selected.
Table 1 describes each setting in Figure 1 and some other settings that affect all collections.
Table 1: Standalone Logging Collection Configuration - One Shot Report Setting
One Shot Report Option Description
Pre/Post Collection
For this collection, log data before and after the Collection Start trigger. The capture window can be
defined using an expression, a length of time, or a number of messages. Click the link to see further
details.
One-shot Report
For this collection, log a snapshot of data values after the Collection Start trigger then stop logging.
After trigger delay
For this collection, wait for a delay time (in seconds) after the Collection Start trigger then log a
snapshot of data values and stop logging. If the trigger delay = 0 then the One Shot Report will occur
immediately.
Collection / Log File Name The name of this collection and the root name of all log files it creates.
The following settings affect ALL Standalone Logging collections
Reporting Options
Options for physical logger feedback and Live Data reporting to a Wireless NeoVI website.
Power Management
Logger sleep and wakeup selections are made here.
Generate
Generates the final script and opens a dialog to send it to ICS hardware that supports standalone
logging.
53 / 212
neoVI PLASMA Help 12May13
One Shot Report
Figure 1: The Collection Configuration if Collection Start = Using Trigger and One Shot Report is selected.
neoVI PLASMA Documentation - (C) Copyright 2015 Intrepid Control Systems, Inc.
Last Update: Friday, May 3, 2013
54 / 212
neoVI PLASMA Help 12May13
Restart Options
Standalone Logging Restart Options
In VehicleScape DAQ the Standalone Logging of a Messages or Bus Query collection has Restart Options that change appearance based upon other collection
settings.
Table 1 describes the settings in Figures 1 to 3 and some other settings that affect all collections.
Table 1: Standalone Logging Restart Options
Restart Option
Stop
Description
In this collection, stop logging after the stop conditions are met. If using Pre/Post Collection then stop only
after the max number of trigger events have been collected.
This setting disappears if a Pre/Post Collection is using a stop expression.
Restart
Force Restart
In this collection, restart logging after the stop conditions are met and wait again for the Collection Start
trigger.
In this collection, always restart logging after the stop conditions are met. (ignore the initial Collection Start
trigger)
This setting is available if Collection Start Option = When Expression is True.
The following settings affect ALL Standalone Logging collections
Reporting Options
Options for physical logger feedback and Live Data reporting to a Wireless NeoVI website.
Power Management Logger sleep and wakeup selections are made here.
Generate
Generates the final script and opens a dialog to send it to ICS hardware that supports standalone logging.
55 / 212
neoVI PLASMA Help 12May13
Restart Options
Figure 1: The Restart Options if Collection Start = Immediately.
Figure 2: The Restart Options if Collection Start = When Expression is True.
Figure 3: The Restart Options if Collection Configuration = Stop on Expression.
neoVI PLASMA Documentation - (C) Copyright 2015 Intrepid Control Systems, Inc.
Last Update: Friday, May 3, 2013
56 / 212
neoVI PLASMA Help 12May13
neoVI PLASMA Collection Upload
Standalone Logging neoVI PLASMA Collection Upload
In VehicleScape DAQ the Standalone Logging of a Messages or Bus Query collection has neoVI PLASMA Collection Upload options to take advantage of
PLASMA's wireless capabilities.
Table 1 describes the settings in Figure 1 and some other settings that affect all collections.
Table 1: Standalone Logging neoVI PLASMA Collection Upload Settings
PLASMA Collection Upload Setting Description
3G
Each time this collection stops, automatically upload its log file to a WirelessNeoVI server
using the neoVI PLASMA 3G wireless link. (slower than WIFI, but usually more available in
the USA)
WIFI
Each time this collection stops, automatically upload its log file to a WirelessNeoVI server
using the neoVI PLASMA WIFI link. (faster than 3G, but not as widely available in the USA)
Fail Timeout
Each time this collection stops, keep trying to automatically upload its log file to a
WirelessNeoVI server until successful or until the timeout (in minutes) expires. This timer
restarts after each PLASMA wakeup event.
The following settings affect ALL Standalone Logging collections
Reporting Options
Options for physical logger feedback and Live Data reporting to a Wireless NeoVI website.
Power Management
Logger sleep and wakeup selections are made here.
Generate
Generates the final script and opens a dialog to send it to ICS hardware that supports
standalone logging.
Figure 1: The neoVI PLASMA Collection Upload settings.
57 / 212
neoVI PLASMA Help 12May13
neoVI PLASMA Collection Upload
neoVI PLASMA Documentation - (C) Copyright 2015 Intrepid Control Systems, Inc.
Last Update: Friday, May 3, 2013
58 / 212
neoVI PLASMA Help 12May13
Histogram Method
Standalone Logging - Histogram
In VehicleScape DAQ the Standalone Logging of a Histogram collection will log the frequency of data points across a value range over a period of time.
Table 1 describes the settings in Figure 1 and some other settings that affect all collections.
Table 1: Standalone Logging Histogram Settings
Histogram Setting
Description
Collection / Log File Name
The name of this collection and the root name of all log files it creates.
Dimensions
In this collection, log a histogram that uses from 1 to 3 axes.
X Y Z Axis Setting
Description
In this collection, for this axis, count the frequency of values created by this expression.
Expression
The Expression Builder DAQ data source will list signals selected on the VehicleScape DAQ
Channels tab.
Value is calculated based on "Time"
In this collection, for this axis, count the length of time (in seconds) that the axis expression
while expression is non-zero (in
is non-zero. Use this to count how often an event of varying duration has occurred.
seconds)
Min/Max Value
In this collection, for this axis, set limits on the value range to keep track of.
Number of Buckets
In this collection, for this axis, set the number of buckets to apply across the value range.
Add to closest bucket
In this collection, for this axis, if the axis expression falls outside the value range then count
that value in the closest bucket.
this collection, for this axis, add spillover buckets at each end of the value range for
Create dedicated spillover buckets In
counting values that fall outside the value range.
Increment an "invalid" counter
In this collection, for this axis, increment an "invalid" counter each time the axis expression
falls outside the value range.
Histogram Sample Options
Description
Every
In this collection, start logging at a chosen periodic rate in seconds.
59 / 212
neoVI PLASMA Help 12May13
Histogram Method
Only when expression is true
In this collection, start logging data at a chosen periodic rate while the expression is true.
Using Trigger
In this collection, start logging data after an expression trigger event.
Trigger when expression is true
In this collection, start logging data after the expression is true for a selected time.
Trigger when expression changes
In this collection, start logging data after the expression changes from its current value.
Trigger when expression
increases/decreases
In this collection, start logging data after the expression changes from its current value by
some chosen amount.
Manual Trigger
In this collection, start logging data if the neoVI MOTE or other pendant button is pressed.
Always DAQ
In this collection, always request DAQ items even if they are not being logged. Requested
DAQ items are diagnostic signals that get polled from ECUs like DTCs, PIDs, ISO 14229 IDs,
and MEP A2L file data items. This must be enabled if a start expression uses any requested
DAQ item.
The following settings affect ALL Standalone Logging collections
Reporting Options
Options for physical logger feedback and Live Data reporting to a Wireless NeoVI website.
Power Management
Logger sleep and wakeup selections are made here.
Generate
Generates the final script and opens a dialog to send it to ICS hardware that supports
standalone logging.
60 / 212
neoVI PLASMA Help 12May13
Histogram Method
Figure 1: The Standalone Logging Histogram settings.
neoVI PLASMA Documentation - (C) Copyright 2015 Intrepid Control Systems, Inc.
61 / 212
neoVI PLASMA Help 12May13
Histogram Method
Last Update: Friday, May 3, 2013
62 / 212
neoVI PLASMA Help 12May13
Bus Query Method
Standalone Logging - Bus Query
In VehicleScape DAQ the Standalone Logging of a Bus Query collection can log a snapshot of DID values and DTCs at one point in time from several ECUs at
once.
Table 1 describes the settings in Figure 1 and some other settings that affect all collections.
Table 1: Standalone Logging Bus Query Settings
Bus Query Setting
Description
Base ECU
In this collection, use the DID definitions in this ECU to apply to the entire Bus Query.
Select ECUs
In this collection, log a bus query from these chosen ECUs.
Specify a Range
In this collection, log a bus query from all ECUs within a range of arbitration IDs on a chosen
network.
Diagnostic ID of first/last ECU
In this collection, log a bus query from all ECUs within this range of arbitration IDs.
Network of ECUs
In this collection, log a bus query from all ECUs within a range of arbitration IDs on this
network.
Select DIDs
In this collection, log a bus query of these chosen DIDs.
Read DTCs
In this collection, log all DTCs (diagnostic trouble codes) from all chosen ECUs if the DTC
passes the Status Mask filter.
this collection, include the DTC extended (ISO $19/06) and DTC snapshot (ISO $19/04)
Read Extended/Snapshot Records In
records.
Status Mask
In this collection, use this mask to filter which DTCs will get logged.
In this collection, use J1979 mode $09 to log the VIN (PID $02) and engine control module
Read OBD II VIN and Calibration ID calibration ID (PID $04).
Collection Start Options
For this collection, select when to start logging data.
Collection Configuration
For this collection, select when to stop logging data.
Restart Options
For this collection, select when to restart logging data.
63 / 212
neoVI PLASMA Help 12May13
neoVI PLASMA Collection Upload
Bus Query Method
For this collection, select when to upload data to a WirelessNeoVI server.
The following settings affect ALL Standalone Logging collections
Reporting Options
Options for physical logger feedback and Live Data reporting to a Wireless NeoVI website.
Power Management
Logger sleep and wakeup selections are made here.
Generate
Generates the final script and opens a dialog to send it to ICS hardware that supports
standalone logging.
Figure 1: The Standalone Logging Bus Query settings.
neoVI PLASMA Documentation - (C) Copyright 2015 Intrepid Control Systems, Inc.
Last Update: Friday, May 3, 2013
64 / 212
neoVI PLASMA Help 12May13
Reporting Options
Standalone Logging Reporting Options
In VehicleScape DAQ the Standalone Logging feature has Reporting Options for physical feedback from the logger itself or neoVI MOTE hardware. It is also
possible to have Live Data reporting to a Wireless NeoVI website. These settings apply to all Standalone Logging collections.
Refer to Table 1 which describes the settings in Figure 1.
Table 1: Standalone Logging Reporting Options
Reporting Option
Description
For all collections, use LEDs to indicate the current logger status.
LEDs
neoVI MOTE
Red blink = logger script is running
Green blink slow = logging data to the SD card
Green blink fast = pre/post collection is logging after a trigger event
For all collections, use a neoVI MOTE connected to the logger for basic feedback and control
features.
neoVI MOTE Network
For all collections, the network used by the logger to communicate with neoVI MOTE.
Buzz on Start/Trigger
For all collections, the neoVI MOTE will make a chosen sound when the logger is started or
triggered.
Expressions to Display
For all collections, the neoVI MOTE will use scrolling text to display values of chosen expressions.
Show Triggered Message
For all collections, the neoVI MOTE will use scrolling text to show the logger has triggered.
Wireless NeoVI
For all collections, send Live Data of chosen expressions to the WirelessNeoVI website. (PLASMA
only)
Beep on Wakeup (PLASMA only) For all collections, beep every time neoVI PLASMA wakes up.
65 / 212
neoVI PLASMA Help 12May13
Reporting Options
Figure 1: The Standalone Logging Reporting Options.
neoVI PLASMA Documentation - (C) Copyright 2015 Intrepid Control Systems, Inc.
Last Update: Friday, May 3, 2013
66 / 212
neoVI PLASMA Help 12May13
Power Management
Standalone Logging Power Management
In VehicleScape DAQ the Standalone Logging feature has important Power Management settings to control when the logger will go to sleep and wake up.
These power mode settings apply to all Standalone Logging collections.
ICS loggers (neoVI FIRE, PLASMA, ION) are designed to be "always on", which means they do not have power on/off switches. Various sleep and wake up
settings are available to minimize power consumption while connected to power. It is CRITICAL to change the default Never sleep setting to avoid killing a car
battery!
Refer to Table 1 which describes the settings in Figure 1.
Table 1: Standalone Logging Power Management Settings
Power Management Setting Description
Disable all logger Tx'ing on
this
For all collections, stop all diagnostic transmit messages sent by the logger after the chosen
expression becomes true.
For all collections, use default firmware settings configured in hardware with neoVI 3G Explorer.
Never
The firmware default for all ICS hardware is Sleep Mode DISABLED, which means never enter
sleep mode...always stay awake. This setting can kill a car battery if used incorrectly.
When Message Not Present
For all collections, go to sleep after a chosen message is not received for a chosen period of time.
On Expression
For all collections, go to sleep after a chosen expression is true for a chosen period of time.
On No Bus Activity
For all collections, go to sleep after all chosen networks connected to the logger remain quiet for a
chosen period of time.
Networks are chosen by clicking Advanced Options in the Standalone Logging Generate section.
Time Period
For all collections, the length of time to wait (in seconds) before going to sleep.
For all collections:
When awake, everything runs.
When asleep, the wakeup might not log the first few messages.
Normal Wakeup
This mode has the lowest current draw while asleep when compared to Instant and Drowsy
67 / 212
neoVI PLASMA Help 12May13
Power Management
modes.
Any activity on any network connected to the logger will trigger a wakeup and keep it awake until
sleep conditions are met again.
For all collections:
When awake, everything runs.
When asleep, a wakeup from HS or MSCAN can log the first message that woke it up.
Instant (HS/MS) Wakeup
This mode has higher current draw while asleep when compared to Normal mode.
Any activity on any network connected to the logger will trigger a wakeup and keep it awake until
sleep conditions are met again.
For all collections: (intended for neoVI PLASMA)
When awake, the touch screen remains off, but the script and SD card still run.
When asleep, a wakeup from HS or MSCAN can log the first message that woke it up.
Drowsy Wakeup
For neoVI PLASMA, this mode has the lowest current draw while AWAKE when compared to
Normal and Instant modes.
Any activity on any network connected to the logger will trigger a wakeup and keep it awake until
sleep conditions are met again.
Start a new file when waking For all collections, start a new log file after each wakeup instead of appending data to a previous
up
log file.
neoVI PLASMA remote
wakeup
For all collections, allow a sleeping PLASMA to be woken up with an SMS text message.
3G
Use the PLASMA 3G wireless link to upload all log files to a WirelessNeoVI server before going to
sleep. (slower than WIFI, but usually more available in the USA)
WIFI
Use the PLASMA WIFI wireless link to upload all log files to a WirelessNeoVI server before going to
sleep. (faster than 3G, but not as widely available in the USA)
Fail Timeout
For all collections, PLASMA will automatically upload all log files to a WirelessNeoVI server before
going to sleep until it is successful or until this timeout (in minutes) expires. This timer is reset
after each PLASMA wakeup.
68 / 212
neoVI PLASMA Help 12May13
Power Management
Figure 1: The Standalone Logging Power Management settings.
neoVI PLASMA Documentation - (C) Copyright 2015 Intrepid Control Systems, Inc.
Last Update: Friday, May 3, 2013
69 / 212
neoVI PLASMA Help 12May13
Generate
Standalone Logging Generate
This is the final step 6 for making a VS3ZIP script to operate neoVI PLASMA in wireless mode.
In VehicleScape DAQ the Standalone Logging feature has options for generating the logger script. Refer to Table 1 which describes the settings in Figures 1 to
3 below.
Table 1: Standalone Logging Generate Settings
Generate Setting
Description
Generate decoding
database
Include a decoding database with the script file based upon databases shown on the Database/Hardware
Setup tab.
Transfer to SD card
Save the decoding database on the logger SD card.
Save to local file
system
Save the decoding database on the PC.
Save the current setup in VS3ZIP format to copy all databases and the VS3 file into one file.
Save setup as VS3ZIP
This format is required for use with the WirelessNeoVI website.
Save in existing
setup
Save the setup in the currently open VS3ZIP file.
Save in data
directory
Save the setup in a new VS3ZIP file in the user's Vehicle Spy Data Directory.
Select CoreMini if the script will be used in ICS logger hardware.
Generate for
Select Vehicle Spy if the script will be used for desktop debugging purposes.
Hardware
Select the ICS logger hardware that will be running this Standalone Logging script.
Click Generate to build the Standalone Logging script.
Generate button
This process converts all settings into Function Blocks, Application Signals, and Messages and names them
all with a "_VSSAL" suffix. This also opens CoreMini Console which compiles the information and saves it
on the PC.
70 / 212
neoVI PLASMA Help 12May13
Generate
Advanced Generator Options
Advanced Tab
Advanced Options
button
Click Advanced Options shown in Figure 1 to access the dialogs shown in Figures 2 and 3.
Force use of partitions For all collections, forces the use of partitions; not just on the pre/post collections.
Use
For all collections, when using ISO 14229, use diagnostic job $10/03 to initiate diagnostics with ECUs.
EnterExtendedSession
Enable MISC I/O to
control external...
For all collections, use the {MISC IO 1 (Value) :neo0-mi0-0-index(0)} output on the ICS logger to control
external devices across logger sleep/wake cycles.
0 = off (asleep), 1 = on (awake).
Networks to ignore in For all collections, use this table to select Networks for the Power Management sleep setting = "On No Bus
sleep expression
Activity".
Auto Disable Diagnostics Tab
Auto stop diag
requests to ECUs...
For all collections, automatically stop diagnostic requests to ECUs when a separate tool makes a request.
If no diag commands
exist from other
tool...
For all collections, if no diagnostic commands exist from a separate tool then restart diagnostic commands
after timeout (in seconds).
Auto Disable
Diagnostics table
For all collections, if a message appears on the chosen network with the chosen arbitration ID then the
logger will stop transmitting all diagnostic messages.
71 / 212
neoVI PLASMA Help 12May13
Generate
Figure 1: The Standalone Logging Generate settings.
Figure 2: Click "Advanced Options" and click on the Advanced tab to see these settings.
72 / 212
neoVI PLASMA Help 12May13
Generate
Figure 3: Click "Advanced Options" and click on the Auto Disable Diagnostics tab to see these settings.
neoVI PLASMA Documentation - (C) Copyright 2015 Intrepid Control Systems, Inc.
Last Update: Friday, May 3, 2013
73 / 212
neoVI PLASMA Help 12May13
Power Modes
Power Modes
Always On
neoVI PLASMA is designed to be "always on" until its VNET power connection is removed. Various sleep and wake up settings are available to minimize power
consumption.
Is My neoVI PLASMA Going to Sleep?
If you see ALL buttons and front facing LEDs suddenly turn yellow, then yes, it is going to sleep shortly.
Touch Screen Display Timeout
The Android operating system includes a screen timeout feature that can help save power. To change the timeout use:
Home /
Menu / Settings / Display / Screen Timeout
When the screen timeout occurs the touch screen will go black, but it does NOT shutdown other parts of neoVI PLASMA or put it into any sleep mode. The
LEDs will keep working to indicate it is still fully awake. To get the touch screen to appear again, you can tap on it or press any of the off-screen buttons.
Power Up Sequence (Table 1)
Connecting power first to neoVI PLASMA always starts its VS3ZIP script (if present). Connecting USB to PC first will prevent the VS3ZIP script from starting on
its own.
Table 1: Results of neoVI PLASMA Power Up Sequence
Power Up Sequence Result
LED Blink Pattern
(neoVI PLASMA)
Power Only
Blink Red Only
(LED #1)
VS3ZIP script starts* (if present)
Power 1st - VS3ZIP script starts* (if present)
Power then USB
Alternate Red / Green
USB 2nd - neoVI PLASMA can be used with the PC, even after the script has started (LED #1 / #2)
USB 1st - neoVI PLASMA can be used with the PC
Blink Green Only
74 / 212
neoVI PLASMA Help 12May13
Power Modes
USB then Power
Power 2nd - VS3ZIP script does NOT start*
Blink Green Only
(LED #2)
*REMEMBER: The Wireless NeoVI website can also start, stop, clear and change VS3ZIP scripts in neoVI PLASMA from far away! So when using neoVI
PLASMA with a PC, it is sometimes necessary to disable the Wireless neoVI application to clearly establish control over the device.
Power Management Using Standalone Logging Settings
When making a VS3ZIP script file using Vehicle Spy VehicleScape DAQ, the Standalone Logging Power Management options in Figure 1 offer great flexibility.
Figure 1: The Power Management area on the VehicleScape DAQ, Standalone Logging tab.
Sleep Triggers - There are four selections to choose from, with the last three having an adjustable timer setting.
Never - never sleep. This option can kill a car battery if not used correctly.
When Message Not Present - sleep after specific message is not on the network
On Expression - sleep after an expression is true
On No Bus Activity - sleep after the network(s) remain quiet
"Wake Up" Modes - These are not really wake up modes because these are actually three power modes that affect how neoVI PLASMA operates when
awake OR asleep. These modes are summarized in Table 2.
Table 2: Power Management Modes in Standalone Logging
# Mode
When Awake
When Asleep
Awake
Asleep
mA @ 12V mA @ 12V
75 / 212
neoVI PLASMA Help 12May13
0 Normal
Power Modes
Everything runs.
Wakeup might miss first few messages.
~ 700
~ 10
2 Instant Everything runs.
(HS/MS)
Wakeup from HS or MSCAN will log first
message.
~ 700
~ 44
Wakeup from HS or MSCAN will log first
message.
~ 180
~ 44
7 Drowsy
Screen remains off, but script and SD card
runs.
The # column in Table 2 is the value of the "Power Management Mode" signal found in the Vehicle Spy Expression Builder under the Physical IO, Power
Management category.
neoVI PLASMA Documentation - (C) Copyright 2015 Intrepid Control Systems, Inc.
Last Update: Sunday, May 5, 2013
76 / 212
neoVI PLASMA Help 12May13
Wireless NeoVI Website
Wireless NeoVI Website
The Wireless NeoVI website lets you find, monitor, and control all of your neoVI PLASMAs running in wireless mode from vehicles across the globe. The
website server archives log files captured from the vehicles and these files can be downloaded to your PC for further analysis at any time.
Log In to Wireless NeoVI
Please contact your Wireless NeoVI administrator for your website address and account information to get started. After entering your information, click Log In
to access your account. The Password here IS case sensitive.
Figure 1: Log In to the Wireless NeoVI website.
Should you ever forget your password, click the "Forgot Password?" link below the Log In button. Answer your security question correctly and you will be
allowed to reset your password.
After Log In
Figure 2: The header area has account information and links to other pages.
After logging in to the website you will start on the Vehicle List page. At the top of the page is a header area shown in Figure 2. The upper right side shows
your login name and role. The User and Administrator roles provide different levels of access using different website menu selections.
neoVI PLASMA Documentation - (C) Copyright 2015 Intrepid Control Systems, Inc.
Last Update: Thursday, April 25, 2013
77 / 212
neoVI PLASMA Help 12May13
Wireless NeoVI Website
78 / 212
neoVI PLASMA Help 12May13
User Accounts
WN Website: User Accounts
Wireless NeoVI website users have access to the menu selections shown in Figure 1. Use the links in Table 1 to see further details for each selection.
Administrator accounts have additional Manage menu selections.
Figure 1: These are the website menu selections at the User level.
Table 1: Wireless NeoVI Website Menu Selections for Users
Menu Selection
Description
A fleet is a group of vehicles with loggers installed in them.
View > Fleets
Access fleet vehicle lists.
Review data sent to the website from vehicles in a fleet.
See where vehicles in a fleet are located.
Send a script to all vehicles in a fleet.
Change settings to decode raw data into various file formats.
Change logger settings in all vehicles in a fleet.
A vehicle has a logger installed with a script running in it.
View > Vehicles
Access a vehicle's Dashboard.
Read vehicle logger alerts.
Review data sent to the website from a vehicle.
See where a vehicle is located.
See when a vehicle last connected to the website.
See when a vehicle last uploaded data to the website.
A script tells a logger how to operate on its own while connected to a vehicle.
79 / 212
neoVI PLASMA Help 12May13
User Accounts
See all scripts uploaded to the website by the current account.
Send a script to a vehicle or fleet of vehicles.
Download scripts from the website to a PC.
View > Scripts
Manage > My Account
Update the website account and password information.
Log Out
Exit from the website.
neoVI PLASMA Documentation - (C) Copyright 2015 Intrepid Control Systems, Inc.
Last Update: Thursday, April 25, 2013
80 / 212
neoVI PLASMA Help 12May13
View
WN Website: View Menu
Wireless NeoVI website user and administrator accounts have access to the same View menu shown in Figure 1. Use the links in Table 1 to see further details
for each selection.
Figure 1: The website View menu selections.
Table 1: Wireless NeoVI Website View Menu Selections
Menu Selection
Description
A fleet is a group of vehicles with loggers installed in them.
Fleets
Access fleet vehicle lists.
Review data sent to the website from vehicles in a fleet.
See where vehicles in a fleet are located.
Send a script to all vehicles in a fleet.
Change settings to decode raw data into various file formats.
Change logger settings in all vehicles in a fleet.
A vehicle has a logger installed with a script running in it.
Vehicles
Access a vehicle's Dashboard.
Read vehicle logger alerts.
Review data sent to the website from a vehicle.
See where a vehicle is located.
See when a vehicle last connected to the website.
See when a vehicle last uploaded data to the website.
A script tells a logger how to operate on its own while connected to a vehicle.
81 / 212
neoVI PLASMA Help 12May13
Scripts
View
See all scripts uploaded to the website by the current account.
Send a script to a vehicle or fleet of vehicles.
Download scripts from the website to a PC.
neoVI PLASMA Documentation - (C) Copyright 2015 Intrepid Control Systems, Inc.
Last Update: Friday, April 26, 2013
82 / 212
neoVI PLASMA Help 12May13
Fleets
WN Website: View Fleets
The Wireless NeoVI website can be used to find, monitor, and control loggers in an entire fleet of vehicles. Use the main menu View -> Fleets to open a table
similar to Figure 1.
New fleets of vehicles can be created only by an administrator using the Manage -> Fleets menu.
Figure 1: The Fleets view has links to perform various operations across a fleet of vehicles.
Each row in the table represents a fleet of vehicles and the operations that can be done across all vehicles within that fleet. The Search field above the table
can help find a specific fleet. There are also navigation aids below the table to manage many fleets across multiple tables.
Elements in the table can be clicked to jump to that item. Also, the Name column header can be clicked to sort it by ascending or descending order. Refer to
Table 1 for more information about the various columns.
Table 1: Fleets Column Descriptions
Column Name
Description
Name
Fleet name and a link to the vehicles within that fleet.
Vehicles Count
Total number of vehicles assigned to that fleet.
Data
Data Archive of all data log files sent to the website from all vehicles within that fleet.
Location
Last reported GPS location of all vehicles within that fleet.
83 / 212
neoVI PLASMA Help 12May13
Fleets
Send CoreMini
Send a script to all loggers installed on vehicles within that fleet.
Data Export Settings
Select which file formats to export whenever data is received from vehicles within that fleet.
PLASMA Settings
Change logger settings for all vehicles in that fleet.
neoVI PLASMA Documentation - (C) Copyright 2015 Intrepid Control Systems, Inc.
Last Update: Friday, April 26, 2013
84 / 212
neoVI PLASMA Help 12May13
Vehicles
WN Website: View Vehicles
How Are My Vehicles Doing Today?
The Wireless NeoVI website can be used to find, monitor, and control loggers installed in vehicles. The Vehicles table similar to Figure 1 is displayed
immediately after you log in to the website. The table can also be opened using the main menu View -> Vehicles.
New vehicle entries can be created only by an administrator using the Manage -> Vehicles menu.
Figure 1: The Vehicles view has links to perform various logger operations.
Each row in the table represents a vehicle and the licensed logger assigned to it. In the upper right corner click Show All Vehicle Locations On Map to see
where all vehicles were last reported.
The Search field above the table can help find specific vehicles. There are also navigation aids below the table to manage many vehicles across multiple
tables.
Many elements in the table can be clicked to jump to that item. Also, some of the column headers can be clicked to sort the table by that column in ascending
or descending order. Refer to Table 1 to help understand what the various columns are for.
Table 1: Vehicle List Column Descriptions
Column Name
Description
85 / 212
neoVI PLASMA Help 12May13
Vehicles
Name
Vehicle name and a link to the vehicle's Dashboard.
Year
Vehicle year and a link to the vehicle's Dashboard.
Make
Vehicle make or brand name and a link to the vehicle's Dashboard.
Model
Vehicle model and a link to the vehicle's Dashboard.
VIN
Vehicle Identification Number.
Fleet name and a link* to see other vehicles in that fleet.
Fleet
(*this link is NOT the same as the View -> Fleets page)
Device SN
Logger serial number and a Dashboard link to the vehicle it is assigned to.
Status
Online - logger is running ok in wireless mode.
Offline - logger is not currently detected.
Alerts
Alerts from the logger that may require further attention.
Data
Data Archive of log files sent by the logger to the website.
Location
GPS location history of the vehicle logger.
Last Connected (UTC)
Last date and UTC time the vehicle logger was online with the website.
Last Data Upload (UTC)
Last date and UTC time a data log file was sent from the vehicle logger to the website.
neoVI PLASMA Documentation - (C) Copyright 2015 Intrepid Control Systems, Inc.
Last Update: Friday, April 26, 2013
86 / 212
neoVI PLASMA Help 12May13
neoVI PLASMAs Across the Globe
neoVI PLASMAs Across the Globe
Figure 1 shows the global reach of the Wireless NeoVI website and its Vehicles view.
Figure 1: Map from the Wireless NeoVI website showing neoVI PLASMAs online around the world.
neoVI PLASMA Documentation - (C) Copyright 2015 Intrepid Control Systems, Inc.
Last Update: Friday, April 26, 2013
87 / 212
neoVI PLASMA Help 12May13
Dashboard
WN Website: Dashboard
Clicking on a vehicle in the Vehicles view takes you to the Dashboard. This page lets you focus on just one vehicle (and its logger) at a time. The upper area
looks similar to Figure 1 and the lower area has many logger commands.
Figure 1: The Dashboard shows detailed information about one vehicle logger.
The Vehicles column on the left lists the online/offline state of all vehicle loggers assigned to the account. It also has links to quickly switch between them.
The Dashboard area displays detailed information about the logger as outlined in Table 1.
Table 1: Dashboard Display Fields
Vehicle
Shows which vehicle you are looking at.
Activity
Current logger activity.
Device
Vehicle Identification Number.
Status
Status updates indicated with
pulsing color.
date and UTC time a log file was sent from the Connection
Last Data Upload (UTC) Last
logger to the website.
Loaded CoreMini
Name of VS3ZIP script file currently loaded in the
logger.
Wireless link and GPS lock
information.
if script is/is not running and
Script Status Shows
is/is not logging data.
neoVI PLASMA Documentation - (C) Copyright 2015 Intrepid Control Systems, Inc.
Last Update: Saturday, April 27, 2013
88 / 212
neoVI PLASMA Help 12May13
Logger Commands
WN Website: Logger Commands
In View -> Vehicles, clicking on a vehicle takes you to its Dashboard. The lower area of the vehicle Dashboard has many logger commands and an Activity Log
similar to Figure 1.
Use the links in Table 1 to see more details for each of the logger commands.
Figure 1: The lower part of the vehicle Dashboard page has many commands and an Activity Log.
Table 1: Logger Commands
Logger Command
Description
CoreMini
These CoreMini commands relate to the logger's script that tells it how to run on its own when connected to
the vehicle. A CoreMini compiler in Vehicle Spy generates scripts in a VS3ZIP file format.
Send CoreMini
Sends a VS3ZIP script file from your PC to the logger and starts it.
89 / 212
neoVI PLASMA Help 12May13
Send CoreMini
CoreMini Archive
Logger Commands
(This overwrites any current script in the logger.)
An archive of VS3ZIP script files previously sent to the logger.
Sends a wake up from the website to the logger.
Remote Wake Up
(The logger's SIM card provider must have text messaging enabled for this feature to work.)
Start
Starts the script currently in the logger.
Stop
Stops the script running in the logger.
Clear
Clears the script from the logger.
Data
These Data commands relate to any data captured by the logger.
Data Archive
Review data log files sent from the logger to the website.
Reports
Review diagnostic trouble code (DTC) reports.
Manual Upload
Forces the logger to send its data log files to the website.
Live Data
Watch live signal data from the logger.
Media Files
Review media files captured by the logger.
GPS
These GPS commands relate to logger locations within the Global Positioning System.
Current GPS Location Shows the last reported location of the logger on a map.
GPS History
Shows where the logger has been over time using a map and a table of time stamped coordinates.
Miscellaneous
These Miscellaneous commands do not fit in the other categories.
Data Export Settings Selections for the data export file format.
Activity Logs
Review Wireless NeoVI realtime activity logs.
Reset PLASMA OS
Resets the logger's Linux operating system.
Cancel All Uploads
Stops all current and pending data log uploads from the logger to the website.
Shows the logger's IP address and version numbers of its components.
90 / 212
neoVI PLASMA Help 12May13
Logger Commands
Device Details
This also has a link to adjust some of the logger's settings.
Alerts
Alerts from the logger that may require further attention.
neoVI PLASMA Documentation - (C) Copyright 2015 Intrepid Control Systems, Inc.
Last Update: Saturday, April 27, 2013
91 / 212
neoVI PLASMA Help 12May13
CoreMini
WN Website: CoreMini Commands
In View -> Vehicles, clicking on a vehicle takes you to its Dashboard. Below the Dashboard are CoreMini related logger commands (Figure 1) for working with
VS3ZIP scripts in the logger.
A VS3ZIP script tells the logger how to operate on its own. A PC running Vehicle Spy is needed to make a VS3ZIP script.
Use the links in Table 1 to see more details for each of the CoreMini commands.
Figure 1: These CoreMini commands can be found below the vehicle Dashboard area.
Table 1: CoreMini Commands
CoreMini Command
Description
Send CoreMini
Sends a VS3ZIP script file from your PC to the logger and starts it.
(This overwrites any current script in the logger.)
CoreMini Archive
An archive of VS3ZIP script files previously sent to the logger.
Sends a wake up from the website to the logger.
Remote Wake Up
(The logger's SIM card provider must have text messaging enabled for this feature to work.)
Start
Starts the script currently in the logger.
Stop
Stops the script running in the logger.
Clear
Clears the script from the logger.
neoVI PLASMA Documentation - (C) Copyright 2015 Intrepid Control Systems, Inc.
Last Update: Sunday, April 28, 2013
92 / 212
neoVI PLASMA Help 12May13
CoreMini
93 / 212
neoVI PLASMA Help 12May13
Send CoreMini
WN Website: Send CoreMini
In View -> Vehicles, clicking on a vehicle takes you to its Dashboard.
Below the vehicle Dashboard is a CoreMini command called Send CoreMini that opens a page similar to Figure 1. This page can send a VS3ZIP script to a
vehicle logger or an entire fleet of vehicle loggers.
A VS3ZIP script tells the logger how to operate on its own. A PC running Vehicle Spy is required to make a VS3ZIP script.
Figure 1: CoreMini scripts can be sent to one vehicle or an entire fleet of vehicles.
Using the "Send CoreMini" Command
Click Browse to select which VS3ZIP script file to send then verify the following settings:
"Get queued logger data before sending new script to it" - forces the logger to send any pending logged data* to the website before it uses the new script.
94 / 212
neoVI PLASMA Help 12May13
Send CoreMini
"Send new script to logger immediately" - forces the logger to immediately use the new script and cancel all pending logged data* uploads to the website.
"By Vehicle" & "By Fleet" tabs - use these tabs to select which vehicle or fleet of vehicles will get the new script. The left side is a list of choices and the
right side shows which choices have been made. Use the >>> and <<< buttons in the middle to make and remove selections. USE EXTRA CAUTION IF
UPDATING AN ENTIRE FLEET.
After the settings above are verified, click Upload Script to send the script from the website to all selected vehicles and fleets. Every uploaded script is also
archived for future use.
* The link to Show queued logger data for selected vehicle(s) opens a dialog similar to Figure 2. This dialog shows if selected vehicle loggers still have
data logs waiting to send to the website. These pending uploads will be canceled if the "Send new script to logger immediately" option is used.
Figure 2: An example of a logger with a data log file waiting to be sent to the website.
neoVI PLASMA Documentation - (C) Copyright 2015 Intrepid Control Systems, Inc.
Last Update: Sunday, May 12, 2013
95 / 212
neoVI PLASMA Help 12May13
CoreMini Archive
WN Website: CoreMini Archive
In View -> Vehicles, clicking on a vehicle takes you to its Dashboard.
Below the vehicle Dashboard is a CoreMini command called CoreMini Archive that opens a page similar to Figure 1. This page is an archive of VS3ZIP script
files previously sent to the logger. Archived scripts can be sent again to the logger or downloaded to a PC.
A VS3ZIP script tells the logger how to operate on its own. A PC running Vehicle Spy is required to make a VS3ZIP script.
Scripts can also be accessed using the website main menu View -> Scripts.
Figure 1: The CoreMini Archive shows all VS3ZIP scripts ever sent from the website to the logger.
Using the CoreMini Archive
On the far left, the red X button (
The +/- button (
) asks to delete the script from the archive.
) shows/hides the names of all data file collections related to that script. Clicking the script name does the same thing as the +/- button.
The Send link opens the Send CoreMini page to send that script to a vehicle or group of vehicles.
The download button (
) at the far right sends the script file from the archive to a PC.
neoVI PLASMA Documentation - (C) Copyright 2015 Intrepid Control Systems, Inc.
96 / 212
neoVI PLASMA Help 12May13
CoreMini Archive
Last Update: Sunday, April 28, 2013
97 / 212
neoVI PLASMA Help 12May13
CoreMini Start, Stop, & Clear
WN Website: CoreMini Start, Stop, Clear
Read the Dashboard (Figure 1)
In View -> Vehicles, clicking on a vehicle takes you to its Dashboard that shows these two important bits of information:
Loaded CoreMini - shows which script is currently in the logger.
Script Status - shows if the script is running or not.
Figure 1: The vehicle Dashboard shows which script is loaded in the logger and if it is running or not.
Start, Stop, Clear (Figure 2)
Below the vehicle Dashboard are CoreMini commands for controlling the VS3ZIP script in the logger.
A VS3ZIP script tells the logger how to operate on its own. A PC running Vehicle Spy is needed to make a VS3ZIP script.
Figure 2: The CoreMini Commands Start, Stop, and Clear directly control the logger's script.
Start - starts the script currently in the logger.
Stop - stops the script currently in the logger.
98 / 212
neoVI PLASMA Help 12May13
CoreMini Start, Stop, & Clear
Clear - clears the script currently in the logger.
neoVI PLASMA Documentation - (C) Copyright 2015 Intrepid Control Systems, Inc.
Last Update: Monday, April 29, 2013
99 / 212
neoVI PLASMA Help 12May13
Data
WN Website: Data Commands
In View -> Vehicles, clicking on a vehicle takes you to its Dashboard. Below the Dashboard are Data related logger commands (Figure 1) for working with data
captured by the logger.
Use the links in Table 1 to see more details for each of the Data commands.
Figure 1: These Data commands can be found below the vehicle Dashboard area.
Table 1: Data Commands
Data Command
Description
Data Archive
Review data log files sent from the logger to the website.
Reports
Review diagnostic trouble code (DTC) reports.
Manual Upload
Forces the logger to send its data log files to the website.
Live Data
Watch live signal data from the logger.
Media Files
Review media files captured by the logger.
neoVI PLASMA Documentation - (C) Copyright 2015 Intrepid Control Systems, Inc.
Last Update: Sunday, April 28, 2013
100 / 212
neoVI PLASMA Help 12May13
Data Archive
WN Website: Data Archive
In View -> Vehicles, clicking on a vehicle takes you to its Dashboard.
Below the vehicle Dashboard is a Data command called Data Archive that opens a page similar to Figure 1. This page is an archive of all data log files sent
from the logger to the website. Data file contents can be reviewed on the website or downloaded to a PC.
The Data Archive page has these three major areas as shown in Figure 1:
Vehicle Logger Information
The upper right area is the same as the vehicle Dashboard seen at the top of many pages.
Files and Filters
The area on the left lets you select data files and apply various filters to narrow them down a bit. Click the Show Data button at the bottom to see a filtered file
list appear in the lower right area.
Filtered File List
The filtered file list in the lower right lets you do these things:
Download and (
) buttons - downloads that file to your PC.
Delete button - asks if you want to delete the
marked files.
+/- button ( ) - shows/hides the names of all data files in that collection for that script. Clicking the "Uploaded On (UTC)" collection date does the same
thing as the +/- button.
View - displays the contents of that file on the website.
Below the filtered file list, Archive Storage shows how much server memory is used up and how much is available for use.
101 / 212
neoVI PLASMA Help 12May13
Data Archive
Figure 1: Data files from a logger can be reviewed on the website or downloaded to a PC.
neoVI PLASMA Documentation - (C) Copyright 2015 Intrepid Control Systems, Inc.
Last Update: Monday, April 29, 2013
102 / 212
neoVI PLASMA Help 12May13
Reports
WN Website: Reports
In View -> Vehicles, clicking on a vehicle takes you to its Dashboard.
Below the vehicle Dashboard is a Data command called Reports that opens a page similar to Figure 1. This page reports diagnostic trouble code (DTC)
information sent from the logger to the website.
For this feature to work, the VS3ZIP script in the logger must have its Bus Query configured properly in the VehicleScape DAQ Standalone Logging settings.
Figure 1: This is an example of DTC report information.
neoVI PLASMA Documentation - (C) Copyright 2015 Intrepid Control Systems, Inc.
Last Update: Wednesday, May 1, 2013
103 / 212
neoVI PLASMA Help 12May13
Manual Upload
WN Website: Manual Upload
In View -> Vehicles, clicking on a vehicle takes you to its Dashboard.
Below the vehicle Dashboard is a Data command called Manual Upload that opens a page similar to Figure 1. This page first shows you how much data is
available on the device, then lets you decide how much you want, then triggers the device to upload that amount of data to the website Data Archive.
Automatic Upload Options Can Help
If you are manually uploading data often or forgetting to do it entirely, you can change the VS3ZIP script with VehicleScape DAQ Standalone Logging to
automate the upload process. Your options include automatic upload at the end of a collection or before neoVI PLASMA goes to sleep. Either choice means
neoVI PLASMA pushes data to the archive by itself giving you more time to do something else.
Manual Upload 3 Step Process
1) See What Data Is Available
Click the Manual Upload button to see all data collections the device has ready for upload to the website. In the example of Figure 1, only one collection is
ready for upload. If the device has a collection that you want then click on its Upload link in the Action column.
Figure 1: In this example, the device has one collection ready to upload to the website.
2) Select How Much Data To Upload
The Data Session dialog is shown (Figure 2) where you can select how much of the data you want. The initial end point slider settings will grab the entire
collection, but you can reduce that amount by adjusting them to whatever start and end times you want that are available within that collection. After selecting
how much data you want, click the Upload Selection button to finish the process.
104 / 212
neoVI PLASMA Help 12May13
Manual Upload
Figure 2: Use the end point sliders to control how much data to upload from the device to the website.
3) Upload The Data
The website triggers the device to upload your selection to the archive. You should see a result similar to Figure 3 if all goes well. When finished, the Data
Archive will let you view the data on the website or download it to your PC.
Figure 3: Manual upload from the device to the website archive was successful!
neoVI PLASMA Documentation - (C) Copyright 2015 Intrepid Control Systems, Inc.
Last Update: Sunday, May 12, 2013
105 / 212
neoVI PLASMA Help 12May13
Live Data
WN Website: Live Data
In View -> Vehicles, clicking on a vehicle takes you to its Dashboard.
Below the vehicle Dashboard is a Data command called Live Data that opens a page similar to Figure 1. This page shows results of custom expressions in
"real time" from the vehicle logger. Note that time delays in this data are affected by wireless communication network speed, dropouts, etc.
For this feature to work, the VS3ZIP script in the logger must have its "Wireless NeoVI" Reporting Option enabled and configured properly in the VehicleScape
DAQ Standalone Logging settings.
Use the Start and Stop buttons to control the live data display.
Figure 1: This example shows a neoVI PLASMA reporting its red LED just turned on.
neoVI PLASMA Documentation - (C) Copyright 2015 Intrepid Control Systems, Inc.
Last Update: Thursday, May 9, 2013
106 / 212
neoVI PLASMA Help 12May13
Media Files
WN Website: Media Files
In View -> Vehicles, clicking on a vehicle takes you to its Dashboard.
Below the vehicle Dashboard is a Data command called Media Files that opens a page similar to Figure 1. This page is an archive of all media files sent from
the logger to the website. Media files can be reviewed on the website itself or downloaded to a PC.
Audio media files can be captured using neoVI MIC hardware connected to a logger's USB port. Capturing video media is a feature under development at
Intrepid Control Systems.
Media Files Features
Media Toolbar - click on the toolbar to control volume, jump forward/back, start, and pause.
Delete button - asks if you want to delete the
Play button (
marked files.
) - plays that file on the website.
Download button (
) - downloads that file to a PC.
Navigation aids below the table help manage many media files across multiple pages.
107 / 212
neoVI PLASMA Help 12May13
Media Files
Figure 1: Media files from a logger can be reviewed on the website or downloaded to a PC.
neoVI PLASMA Documentation - (C) Copyright 2015 Intrepid Control Systems, Inc.
Last Update: Thursday, May 9, 2013
108 / 212
neoVI PLASMA Help 12May13
GPS
WN Website: GPS Commands
In View -> Vehicles, clicking on a vehicle takes you to its Dashboard. Below the Dashboard are GPS related logger commands (Figure 1) to view Global
Positioning System locations of the logger.
Use the links in Table 1 to see more details for each of the GPS commands.
Figure 1: These GPS commands can be found below the vehicle Dashboard area.
Table 1: GPS Commands
GPS Command
Description
Current GPS Location
Shows the last reported location of the logger on a map.
GPS History
Shows where the logger has been over time using a map and a table of time stamped coordinates.
neoVI PLASMA Documentation - (C) Copyright 2015 Intrepid Control Systems, Inc.
Last Update: Sunday, April 28, 2013
109 / 212
neoVI PLASMA Help 12May13
GPS History
WN Website: GPS Commands
In View -> Vehicles, clicking on a vehicle takes you to its Dashboard.
Below the vehicle Dashboard are GPS commands that open pages similar to Figure 1. These pages use Google Maps™ and the Global Positioning System to
indicate logger locations around the world.
Current GPS Location shows on a scalable map where the logger last reported itself to be.
GPS History shows where the logger has been over time using a scalable map and a table of time stamped coordinates. The following features can be found
along the top of the GPS History area:
Search - show logger locations for a selected period of time.
Clear GPS History - asks if you want to delete all GPS history data points.
Show selected points - shows the selected
GPS history data points.
110 / 212
neoVI PLASMA Help 12May13
GPS History
Figure 1: Hmm...where has that logger been lately?
neoVI PLASMA Documentation - (C) Copyright 2015 Intrepid Control Systems, Inc.
Last Update: Thursday, May 9, 2013
111 / 212
neoVI PLASMA Help 12May13
GPS History
112 / 212
neoVI PLASMA Help 12May13
Miscellaneous
WN Website: Miscellaneous Commands
In View -> Vehicles, clicking on a vehicle takes you to its Dashboard. Below the Dashboard are Miscellaneous logger commands (Figure 1) that do not fit in the
other logger command categories.
Use the links in Table 1 to see more details for each of the Miscellaneous commands.
Figure 1: These Miscellaneous commands can be found below the vehicle Dashboard area.
Table 1: Miscellaneous Commands
Miscellaneous Command Description
Data Export Settings
Selections for the data export file format.
Activity Logs
Review Wireless NeoVI realtime activity logs.
Reset PLASMA OS
Resets the logger's Linux operating system.
Cancel All Uploads
Stops all current and pending data log uploads from the logger to the website.
Shows the logger's IP address and version numbers of its components.
Device Details
This also has a link to adjust some of the logger's settings.
Alerts from the logger that may require further attention.
Alerts
Any unread alerts are indicated with a red box around the icon and the number of alerts currently
unread.
neoVI PLASMA Documentation - (C) Copyright 2015 Intrepid Control Systems, Inc.
113 / 212
neoVI PLASMA Help 12May13
Miscellaneous
Last Update: Sunday, April 28, 2013
114 / 212
neoVI PLASMA Help 12May13
Data Export Settings
WN Website: Data Export Settings
In View -> Vehicles, clicking on a vehicle takes you to its Dashboard.
Below the vehicle Dashboard is a Miscellaneous command called Data Export Settings that opens a page similar to Figure 1. Enabling other Data Export
Formats creates those file types in the Data Archive, assuming correct databases are included within the VS3ZIP script running on the logger.
Figure 1: Click "Data Export Settings" to select data export formats.
Table 1: Data Export Formats
Data Export Format Description
BLF
Raw message data in Vector™ binary log file format.
CANSNIFF
Decoded message data in Vector™ CANSniff format.
CSV Log File
Decoded signal data versus time.
CSV Capture
Decoded message and signal data in CSV format.
IMG
Decoded message and signal data for a MOST network.
115 / 212
neoVI PLASMA Help 12May13
Data Export Settings
MDF
Decoded signal data in MDF format.
VECTOR
Raw message data in Vector™ ASCII format.
How Does a Logger Use the Wireless NeoVI Website Data Export Settings?
There is a hidden process involved when a logger sends its data log files to the website. This process is detailed a bit further here to help advanced users
understand how the website Data Export Settings are put to use.
1. Extract [always occurs]
In neoVI PLASMA, its SD card #1 named "LOGGER" has Vehicle Spy Archive (VSA) files on it. The VSA files contain the VS3ZIP script and network data
captured from the vehicle. When the script triggers neoVI PLASMA to upload data logs to the website, an extraction occurs which pulls the following files from
the VSA file on the SD card:
VSB (Vehicle Spy Binary) - raw data message files.
VSDB (Vehicle Spy Database) - the combination of all databases built into the VS3ZIP script from the Standalone Logging Database Setup tab.
Notes.txt - detailed log of the extraction process.
These files are first compressed on neoVI PLASMA to decrease the upload time. The files are then uploaded to the Wireless NeoVI website using the wireless
link. The website then decompresses the files into collections in the Data Archive.
2. Export [optional]
Additional files are exported from the extracted data only if one or more of the Data Export Settings have been selected.
If a selected export format is a raw message data format then a direct export of the VSB file occurs to that format.
If a selected export format requires decoded message or signal data then the VSDB file is applied to the VSB file before export occurs.
neoVI PLASMA Documentation - (C) Copyright 2015 Intrepid Control Systems, Inc.
116 / 212
neoVI PLASMA Help 12May13
Data Export Settings
Last Update: Thursday, May 9, 2013
117 / 212
neoVI PLASMA Help 12May13
Activity Logs
WN Website: Activity Logs
In View -> Vehicles, clicking on a vehicle takes you to its Dashboard.
Below the vehicle Dashboard is a Miscellaneous command called Activity Logs that opens a page similar to Figure 1. This page lets you review and retrieve
realtime activity logs from the WirelessNeoVI application that runs on the logger. The activity logs can help troubleshoot wireless communication issues.
The latest logger activity is also shown below the Dashboard in an area to the right of the logger commands.
Activity Log Features
Delete - asks if you want to delete the
marked files.
Retrieve APK Log - forces the logger to send its current activity log to the website.
View - opens the activity log file and allows it be sent to a PC.
Figure 1: In this example, the logger has two activity logs to look at.
When viewing a log file you should see something similar to Figure 2. You can Search the log for clues or Download it to a PC for further detective work.
118 / 212
neoVI PLASMA Help 12May13
Activity Logs
Figure 2: This is a partial example of a wireless real-time activity log from neoVI PLASMA.
neoVI PLASMA Documentation - (C) Copyright 2015 Intrepid Control Systems, Inc.
Last Update: Thursday, May 9, 2013
119 / 212
neoVI PLASMA Help 12May13
Device Details
WN Website: Device Details
In View -> Vehicles, clicking on a vehicle takes you to its Dashboard.
Below the vehicle Dashboard is a Miscellaneous command called Device Details. This command shows the logger's current IP address and version level of
its various components similar to Figure 1.
The PLASMA WirelessNeoVI Settings button above the version level table provides access to many logger settings.
Figure 1: An example of Device Details for a neoVI PLASMA.
neoVI PLASMA Documentation - (C) Copyright 2015 Intrepid Control Systems, Inc.
Last Update: Thursday, May 9, 2013
120 / 212
neoVI PLASMA Help 12May13
PLASMA Settings
WN Website: PLASMA WirelessNeoVI Settings
A WirelessNeoVI application running on the logger controls all wireless operations. This application has many settings and an activity log scheduler that can be
viewed and changed remotely using the website.
View the Logger's WirelessNeoVI Settings
On the Device Details page, the PLASMA WirelessNeoVI Settings button opens a page similar to Figure 1 that shows the current settings and activity log
schedule.
Figure 1: The WirelessNeoVI application running on the logger has many settings.
Change the Logger's WirelessNeoVI Settings
Click the Configure Settings button in Figure 1 to open a page similar to Figure 2. This allows the settings and activity log schedule to be changed for one
vehicle logger or an entire fleet of vehicle loggers.
Use the By Vehicle and By Fleet tabs (Figure 2: ) to select which vehicle or fleet of vehicles will get the new settings. The left side is a list of choices and
the right side shows which choices have been made. Use the >>> and <<< buttons (Figure 2: ) to make and remove selections. USE EXTRA CAUTION IF
UPDATING AN ENTIRE FLEET.
After selecting which loggers to change, use the tabs at Figure 2:
Submit (Figure 2: ) to send all changes to all selected loggers.
to find the various settings and make changes. After all changes have been made click
121 / 212
neoVI PLASMA Help 12May13
PLASMA Settings
The Load Defaults button changes all WEBSITE settings on all tabs back to their default values. The Submit button must still be clicked to send those default
values to any selected loggers.
Figure 2: The WirelessNeoVI application settings on the logger can be changed remotely using the website.
neoVI PLASMA Documentation - (C) Copyright 2015 Intrepid Control Systems, Inc.
Last Update: Thursday, May 9, 2013
122 / 212
neoVI PLASMA Help 12May13
Alerts
WN Website: Alerts
In View -> Vehicles, clicking on a vehicle takes you to its Dashboard.
Below the vehicle Dashboard is a Miscellaneous command called Alerts that opens a page similar to Figure 1. This page shows important alerts about the
vehicle logger that may require further attention.
Figure 1: Example of daily alerts for the logger license expiration date.
neoVI PLASMA Documentation - (C) Copyright 2015 Intrepid Control Systems, Inc.
Last Update: Friday, May 10, 2013
123 / 212
neoVI PLASMA Help 12May13
Scripts
WN Website: Scripts
The website main menu View -> Scripts opens a page similar to Figure 1. This page is an archive of VS3ZIP script files previously sent to the logger. Archived
scripts can be sent again to the logger or downloaded to a PC.
A VS3ZIP script tells the logger how to operate on its own. A PC running Vehicle Spy is required to make a VS3ZIP script.
Scripts can also be accessed using the website CoreMini Archive command.
Figure 1: The Scripts page shows all VS3ZIP scripts ever sent from the website to the logger.
Using the Scripts Page
On the far left, the red X button (
The +/- button (
) asks to delete the script from the archive.
) shows/hides the names of all data file collections related to that script. Clicking the script name does the same thing as the +/- button.
The Send CoreMini button and the Send link will open the Send CoreMini page to send a script to a vehicle or group of vehicles.
The download button (
) at the far right sends the script file from the website to a PC.
neoVI PLASMA Documentation - (C) Copyright 2015 Intrepid Control Systems, Inc.
124 / 212
neoVI PLASMA Help 12May13
Scripts
Last Update: Friday, May 10, 2013
125 / 212
neoVI PLASMA Help 12May13
My Account
WN Website: Manage My Account
Clicking Manage then My Account on any Wireless NeoVI website page lets you manage your account and password. (Figure 1)
Figure 1: All website users can manage their account and password.
Wireless NeoVI website administrators have many additional features on this menu to help manage the website.
Edit Account (Figure 2)
Fill in the data fields, then click Save to change account information. The Security Answer is NOT case sensitive.
Figure 2: Use Manage / My Account to edit account information.
Change Password (Figure 3)
126 / 212
neoVI PLASMA Help 12May13
My Account
Click Change Password in the upper right of Figure 2 to open the dialog in Figure 3. Fill in the data fields, then click Save to change the password.
(password IS case sensitive)
If you forget your password, use the Forgot Password? link on the Log In page and correctly answer the security question. (security answer is NOT case
sensitive)
Figure 3: Use Manage / My Account then click Change Password to change the password.
neoVI PLASMA Documentation - (C) Copyright 2015 Intrepid Control Systems, Inc.
Last Update: Friday, May 10, 2013
127 / 212
neoVI PLASMA Help 12May13
Administrator Accounts
WN Website: Administrator Accounts
Wireless NeoVI website administrators have access to the menu selections shown in Figure 1. Use the links in Table 1 to see further details for each selection.
User level accounts have less choices in the Manage menu.
Figure 1: These are the website menu selections at the Administrator level.
Table 1: Wireless NeoVI Website Menu Selections for Administrators
View Menu
Description
A fleet is a group of vehicles with loggers installed in them.
Fleets
Access fleet vehicle lists.
Review data sent to the website from vehicles in a fleet.
See where vehicles in a fleet are located.
Send a script to all vehicles in a fleet.
Change settings to decode raw data into various file formats.
Change logger settings in all vehicles in a fleet.
A vehicle has a logger installed with a script running in it.
Access a vehicle's Dashboard.
128 / 212
neoVI PLASMA Help 12May13
Vehicles
Administrator Accounts
Read vehicle logger alerts.
Review data sent to the website from a vehicle.
See where a vehicle is located.
See when a vehicle last connected to the website.
See when a vehicle last uploaded data to the website.
A script tells a logger how to operate on its own while connected to a vehicle.
Scripts
Manage Menu
See all scripts uploaded to the website.
Send a script to a vehicle or fleet of vehicles.
Download scripts from the website to a PC.
Description
Vehicles
Add a new vehicle.
Edit vehicle information.
Edit logger information.
Edit fleet information.
Fleets
Add a new fleet.
Edit fleet information.
Devices
Add a new logger.
View logger version information.
Edit logger information.
Edit vehicle information.
Accounts > Accounts
Add a new account.
Edit account information like the security question/answer.
Edit account permissions to access website features.
See when an account last logged into the website.
See account IP address used during its last log in.
Accounts > Account Groups
Add a new account group.
Edit account group information.
129 / 212
neoVI PLASMA Help 12May13
Accounts > Permissions
Administrator Accounts
Add a new permission template.
Edit a permission template.
Accounts > Roles
See which roles the website currently supports.
Accounts > My Account
Update your account and security information.
Accounts > Change Password
Update your account password.
Accounts > Notifications
Add a new notification setup.
Edit a notification setup.
Site > Component Versions
View the website component version levels.
Site > Disk Space
See how much disk drive space is being used and how much is free for data log storage.
Site > Logs
View a website activity log.
Download a website activity log from the website to a PC.
Site > License
Send a Wireless NeoVI license file (WNLZIP) from a PC to the website.
See when a license file was last uploaded.
Download a license file from the website to a PC.
Logout
Exit from the website.
Top of Page
neoVI PLASMA Documentation - (C) Copyright 2015 Intrepid Control Systems, Inc.
Last Update: Thursday, April 25, 2013
130 / 212
neoVI PLASMA Help 12May13
Getting Started for Administrators
WN Website: Getting Started for Administrators
The Wireless NeoVI website has some internal interactions that can be unclear for new administrators trying to figure out where to begin.
At a high level, it is important to remember the website is trying to let users control loggers on fleets of vehicles. With that in mind, here is the set of
relationships used by the website:
Licenses are required for devices (i.e. loggers)
Devices can be assigned to vehicles.
Vehicles can be assigned to devices and fleets.
Fleets can be assigned to vehicles and account groups.
Account groups can be assigned to fleets and accounts.
Accounts can be assigned to account groups and permission profiles.
Permission profiles can be assigned to accounts.
Here's a pictorial way to see those relationships:
License => Device <=> Vehicle <=> Fleet <=> Account Group <=> Account <=> Permissions
Workflow For Getting Started
New administrators can use the following workflow to get up and running:
1.
2.
3.
4.
5.
6.
7.
8.
Add a user account (and remember the initial password you give it)
Add a permission profile and link it to the account
Add a device
Add a wireless license for the device
Add a vehicle and link it to the device
Add a fleet and link it to the vehicle
Add an account group and link it to the account and fleet
Let the user know their initial log in password.
That should be enough to get the ball rolling!
If desired, an email notification can also be added to let the user know each time the logger has sent data to the website. The notification must be linked to the
account.
neoVI PLASMA Documentation - (C) Copyright 2015 Intrepid Control Systems, Inc.
131 / 212
neoVI PLASMA Help 12May13
Getting Started for Administrators
Last Update: Sunday, May 12, 2013
132 / 212
neoVI PLASMA Help 12May13
Manage
WN Website: Manage Menu
Wireless NeoVI website administrators have access to all of the Manage menu selections shown in Figure 1. Use the links in Table 1 to see further details for
each selection.
User level accounts have less choices in the Manage menu.
Figure 1: These are the Manage menu selections at the Administrator level.
Table 1: Wireless NeoVI Website Menu Selections for Administrators
Manage Menu Selection
Description
Vehicles
Add a new vehicle.
Edit vehicle information.
Edit logger information.
Edit fleet information.
Fleets
Add a new fleet.
Edit fleet information.
Add a new logger.
View logger version information.
Devices
133 / 212
neoVI PLASMA Help 12May13
Devices
Manage Accounts Menu
Manage
Edit logger information.
Edit vehicle information.
Description
Accounts > Accounts
Add a new account.
Edit account information like the security question/answer.
Edit account permissions to access website features.
See when an account last logged into the website.
See account IP address used during its last log in.
Accounts > Account Groups
Add a new account group.
Edit account group information.
Accounts > Permissions
Add a new permission template.
Edit a permission template.
Accounts > Roles
See which roles the website currently supports.
Accounts > My Account
Update your account and security information.
Accounts > Change Password
Update your account password.
Accounts > Notifications
Add a new notification setup.
Edit a notification setup.
Manage Site Menu
Description
Site > Component Versions
View the website component version levels.
Site > Disk Space
See how much disk drive space is being used and how much is free for data log storage.
Site > Logs
View a website activity log.
Download a website activity log from the website to a PC.
Site > License
Send a Wireless NeoVI license file (WNLZIP) from a PC to the website.
See when a license file was last uploaded.
Download a license file from the website to a PC.
134 / 212
neoVI PLASMA Help 12May13
Manage
Top of Page
neoVI PLASMA Documentation - (C) Copyright 2015 Intrepid Control Systems, Inc.
Last Update: Friday, May 10, 2013
135 / 212
neoVI PLASMA Help 12May13
Vehicles
WN Website: Manage Vehicles
Wireless NeoVI website administrators can use the main menu Manage -> Vehicles to open a table similar to Figure 1. This table contains links to add a new
vehicle or to edit vehicles, loggers, and fleets already in the system.
A vehicle can have only one device (logger) assigned to it at any given time. A vehicle can be assigned to a fleet that contains multiple vehicles.
Features for Manage Vehicles
Search field & button - filters all tables to help locate specific vehicles.
New Vehicle button - adds another vehicle to the table.
Red X button ( ) - asks to delete the vehicle in that row.
Name - click the vehicle's Name to edit the vehicle in that row.
Device - click the vehicle's Device number to edit the device (logger) installed on that vehicle.
Fleet - click the vehicle's Fleet name to edit the fleet the vehicle is in.
Table Page Tools - below the table are tools to manage many vehicles across multiple tables.
136 / 212
neoVI PLASMA Help 12May13
Vehicles
Figure 1: Manage Vehicles shows a table with links to edit any vehicle on the Wireless NeoVI website.
neoVI PLASMA Documentation - (C) Copyright 2015 Intrepid Control Systems, Inc.
Last Update: Saturday, May 11, 2013
137 / 212
neoVI PLASMA Help 12May13
Add/Edit Vehicles
WN Website: Add or Edit Vehicle
The Manage -> Vehicles table lets an administrator add, view, or edit the vehicle properties described in Table 1 and shown in Figure 1.
Don't forget to click Save when editing a vehicle already in the system.
Table 1: Wireless NeoVI Website Vehicle Properties
Vehicle Property Description
Name
A custom name for the vehicle.
Make
The vehicle's maker or brand name.
Model
The vehicle's model name, model number, or style.
Model Year
The vehicle's model year.
VIN
Vehicle Identification Number.
Plate
The license plate installed on the vehicle.
Odometer
Vehicle odometer at the time the vehicle is added to the website.
Description
Supports a longer custom description of the vehicle.
Device
The device (logger) installed on the vehicle.
Fleet
The fleet that this vehicle is part of.
This checkbox lets an administrator quickly enable/disable the vehicle without needing to add/delete it.
Active
This setting does not affect the vehicle or logger itself. This setting just enables/disables the vehicle on the
Wireless NeoVI website.
138 / 212
neoVI PLASMA Help 12May13
Add/Edit Vehicles
Figure 1: Edit a vehicle to change its name, description, or device and fleet assignments.
neoVI PLASMA Documentation - (C) Copyright 2015 Intrepid Control Systems, Inc.
Last Update: Saturday, May 11, 2013
139 / 212
neoVI PLASMA Help 12May13
Fleets
WN Website: Manage Fleets
Wireless NeoVI website administrators can use the main menu Manage -> Fleets to open a table similar to Figure 1. This table contains links to add a new fleet
or to edit fleets already in the system.
A fleet can have one or more vehicles and account groups assigned to it. A fleet can be useful for applying some website features across many vehicles and
loggers at the same time such as GPS tracking, changing logger scripts, or modifying logger settings.
Features for Manage Fleets
Search field & button - filters all tables to help locate specific fleets.
New Fleet button - adds another fleet to the table.
Red X button ( ) - asks to delete the fleet in that row.
Name - click the fleet's Name to edit the fleet in that row.
Table Page Tools - below the table are tools to manage many fleets across multiple tables.
140 / 212
neoVI PLASMA Help 12May13
Fleets
Figure 1: Manage Fleets shows a table with links to edit any fleet on the Wireless NeoVI website.
neoVI PLASMA Documentation - (C) Copyright 2015 Intrepid Control Systems, Inc.
Last Update: Saturday, May 11, 2013
141 / 212
neoVI PLASMA Help 12May13
Add/Edit Fleets
WN Website: Add or Edit Fleet
The Manage -> Fleets table lets an administrator add, view, or edit the fleet properties described in Table 1 and shown in Figure 1.
Don't forget to click Save when editing a fleet already in the system.
Table 1: Wireless NeoVI Website Fleet Properties
Fleet Property Description
Name
A custom name for the fleet.
Description
Supports a longer custom description of the fleet.
Account Groups can be assigned or removed from the fleet. This can save time versus changing assignments on
one account or one vehicle at a time.
Account Groups
The left side is a list of choices and the right side shows which choices have been made. Use the >>> and <<<
buttons in the middle to make and remove selections.
Vehicles can be assigned or removed from the fleet. A fleet of vehicles can be useful for applying some website
features across many loggers at the same time.
Vehicles
The left side is a list of choices and the right side shows which choices have been made. Use the >>> and <<<
buttons in the middle to make and remove selections.
142 / 212
neoVI PLASMA Help 12May13
Add/Edit Fleets
Figure 1: Edit a fleet to change its name, description, or vehicle assignments.
neoVI PLASMA Documentation - (C) Copyright 2015 Intrepid Control Systems, Inc.
Last Update: Saturday, May 11, 2013
143 / 212
neoVI PLASMA Help 12May13
Devices
WN Website: Manage Devices
Note: The term "device" is equivalent to the term "logger" used throughout these help files.
Wireless NeoVI website administrators can use the main menu Manage -> Devices to open a table similar to Figure 1. This table contains links to add a new
device or to edit devices and vehicles already in the system.
A device can have only one vehicle assigned to it at any given time.
Features for Manage Devices
Search field & button - filters all tables to help locate specific devices.
Device Components Version button - see a table of all devices and their software versions.
New Device button - adds another device to the table.
Red X button ( ) - asks to delete the device in that row.
Device Label / Device SN - click either of these to edit the device in that row.
Vehicle - click the Vehicle to edit the vehicle that the device in that row is installed in.
Table Page Tools - below the table are tools to manage many devices across multiple tables.
144 / 212
neoVI PLASMA Help 12May13
Devices
Figure 1: Manage Devices shows a table with links to edit any logger on the Wireless NeoVI website.
neoVI PLASMA Documentation - (C) Copyright 2015 Intrepid Control Systems, Inc.
Last Update: Saturday, May 11, 2013
145 / 212
neoVI PLASMA Help 12May13
Add/Edit Devices
WN Website: Add or Edit Device
The Manage -> Devices table lets an administrator add, view, or edit the device (logger) properties described in Table 1 and shown in Figure 1.
Don't forget to click Save when editing a device already in the system.
Table 1: Wireless NeoVI Website Device Properties
Device Property
Description
serial number can be entered only when using New Device located above the Manage -> Devices
Device Serial Number This
table. If this serial number is incorrect, then this device must be deleted and a new one added.
Device Label
A custom name for the device.
SMS Address
Short Message System (i.e. texting) address associated with the device SIM card. This supports sending a
Remote Wake Up from the website to the device.
Device Type
This is always neoVI PLASMA for now, but another exciting wireless device from Intrepid Control Systems is
coming soon!
Description
Supports a longer custom description of the device.
Vehicle
The vehicle this logger is installed in.
This checkbox lets an administrator quickly enable/disable the device without needing to add/delete it.
Active
This setting does not affect the device itself. This setting just enables/disables the device on the Wireless
NeoVI website.
146 / 212
neoVI PLASMA Help 12May13
Add/Edit Devices
Figure 1: Edit a device to change its label, description, or vehicle assignment.
neoVI PLASMA Documentation - (C) Copyright 2015 Intrepid Control Systems, Inc.
Last Update: Saturday, May 11, 2013
147 / 212
neoVI PLASMA Help 12May13
Accounts
WN Website: Manage Accounts Menu
Wireless NeoVI website administrators can control website accounts using the Manage -> Accounts menu selections shown in Figure 1. Use the links in Table
1 to see further details for each selection.
User level accounts have less choices in the Manage menu.
Figure 1: These are the Manage Accounts menu selections at the Administrator level.
Table 1: Wireless NeoVI Website Manage Accounts Menu Selections for Administrators
Menu Selection
Description
Accounts
Add a new account.
Edit account information like the security question/answer.
Edit account permissions to access website features.
See when an account last logged into the website.
See account IP address used during its last log in.
Account Groups
Add a new account group.
Edit account group information.
Add a new permission template.
Permissions
148 / 212
neoVI PLASMA Help 12May13
Accounts
Permissions
Edit a permission template.
Roles
See which roles the website currently supports.
My Account
Update your account and security information.
Change Password
Update your account password.
Notifications
Add a new notification setup.
Edit a notification setup.
neoVI PLASMA Documentation - (C) Copyright 2015 Intrepid Control Systems, Inc.
Last Update: Friday, May 10, 2013
149 / 212
neoVI PLASMA Help 12May13
Accounts
WN Website: Manage Accounts
Wireless NeoVI website administrators can use the main menu Manage -> Accounts -> Accounts to open a table similar to Figure 1. This table contains links to
add a new account or to edit accounts and permission profiles already in the system.
An account can have only one permission profile assigned to it. An account can belong to multiple account groups.
Features for Manage Accounts
Search field & button - filters all tables to help locate specific accounts.
New Account button - adds another account to the table.
Red X button ( ) - asks to delete the account in that row.
First/Last Name or E-Mail - click any of these to edit the account in that row.
Permission - click the Permission to edit the permissions profile for the account in that row.
Table Page Tools - below the table are tools to manage many accounts across multiple tables.
150 / 212
neoVI PLASMA Help 12May13
Accounts
Figure 1: Manage Accounts shows a table with links to edit any account on the Wireless NeoVI website.
neoVI PLASMA Documentation - (C) Copyright 2015 Intrepid Control Systems, Inc.
Last Update: Saturday, May 11, 2013
151 / 212
neoVI PLASMA Help 12May13
Add/Edit Accounts
WN Website: Add or Edit Account
The Manage -> Accounts -> Accounts table lets an administrator add, view, or edit the account properties described in Table 1 and shown in Figure 1.
Don't forget to click Save when editing an account already in the system.
Table 1: Wireless NeoVI Website Account Properties
Account Property
Description
First Name
Account holder's first name.
Last Name
Account holder's last name.
E-Mail
Account holder's full email address.
This field is visible only when adding a NEW account.
Password
(case sensitive)
This is the initial password that the account holder will need to Log In. The website will force the account
holder to change this password after their first log in.
To improve security, a valid password must meet many criteria as outlined in the Notes area below.
This field is visible only when adding a NEW account.
Confirm Password
Enter the Password again to confirm the original entry.
Role
The account role. Super administrators control all accounts. Administrators control User level accounts.
Permission
The permission profile for the account.
Security Question
The question used to reset the account password.
The answer to the Security Question required to reset a password. Administrators can edit this answer if
somebody is trying to reset their password, but is having trouble answering their Security Question.
Security Answer
(NOT case sensitive) Note: Although the Security Answer here is NOT case sensitive, the account password on the Log In
screen IS case sensitive.
Active
This checkbox lets an administrator quickly enable/disable an account without needing to add/delete it.
152 / 212
neoVI PLASMA Help 12May13
Add/Edit Accounts
Account Groups can be assigned or removed from the account.
Account Groups
The left side is a list of choices and the right side shows which choices have been made. Use the >> and
<< buttons in the middle to make and remove selections.
Figure 1: Edit an account to change things like the email address or security question/answer.
neoVI PLASMA Documentation - (C) Copyright 2015 Intrepid Control Systems, Inc.
Last Update: Saturday, May 11, 2013
153 / 212
neoVI PLASMA Help 12May13
Add/Edit Accounts
154 / 212
neoVI PLASMA Help 12May13
Account Groups
WN Website: Manage Account Groups
Wireless NeoVI website administrators can use the main menu Manage -> Accounts -> Account Groups to open a table similar to Figure 1. This table contains
links to add a new account group or to edit account groups already in the system.
An account group can have one or more accounts and fleets assigned to it. An account group can be useful for assigning many vehicles to many accounts at
once, instead of doing the assignments one vehicle and account at a time.
Features for Manage Account Groups
Search field & button - filters all tables to help locate specific groups.
New Account Group button - adds another group to the table.
Red X button ( ) - asks to delete the group in that row.
Name - click the group's Name to edit the group in that row.
Table Page Tools - below the table are tools to manage many account groups across multiple tables.
Figure 1: Manage Account Groups shows a table with links to edit any group on the Wireless NeoVI website.
155 / 212
neoVI PLASMA Help 12May13
Account Groups
neoVI PLASMA Documentation - (C) Copyright 2015 Intrepid Control Systems, Inc.
Last Update: Sunday, May 12, 2013
156 / 212
neoVI PLASMA Help 12May13
Add/Edit Account Groups
WN Website: Add or Edit Account Group
The Manage -> Accounts -> Account Groups table lets an administrator add, view, or edit the account group properties described in Table 1 and shown in
Figure 1.
Don't forget to click Save when editing an account group already in the system.
Table 1: Wireless NeoVI Website Account Group Properties
Account Group Property Description
Name
A custom name for the account group.
Description
Supports a longer custom description of the account group.
Accounts can be assigned or removed from the group.
Accounts
The left side is a list of choices and the right side shows which choices have been made. Use the >>
and << buttons in the middle to make and remove selections.
Fleets can be assigned or removed from the group. Assigning a fleet of vehicles to an account group
can save time versus assigning vehicles to accounts one at a time.
Fleets
The left side is a list of choices and the right side shows which choices have been made. Use the >>
and << buttons in the middle to make and remove selections.
157 / 212
neoVI PLASMA Help 12May13
Add/Edit Account Groups
Figure 1: Edit an account group to change its name, assigned accounts, or assigned fleets.
neoVI PLASMA Documentation - (C) Copyright 2015 Intrepid Control Systems, Inc.
Last Update: Sunday, May 12, 2013
158 / 212
neoVI PLASMA Help 12May13
Permissions
WN Website: Manage Permissions
Wireless NeoVI website administrators can use the main menu Manage -> Accounts -> Permissions to open a table similar to Figure 1. This table contains links
to add and edit permission profiles.
A permissions profile can be assigned to multiple accounts. A permissions profile limits actions and access to website features chosen by the administrator.
Features for Manage Permissions
Search field & button - filters all tables to help locate specific permission profiles.
New Permission button - adds another permission profile to the table.
Red X button ( ) - asks to delete the profile in that row.
Name - click the profile Name to edit the permissions profile in that row.
Table Page Tools - below the table are tools to manage many profiles across multiple tables.
Figure 1: Manage Permissions shows a table with links to edit any permission profile on the Wireless NeoVI website.
159 / 212
neoVI PLASMA Help 12May13
Permissions
neoVI PLASMA Documentation - (C) Copyright 2015 Intrepid Control Systems, Inc.
Last Update: Sunday, May 12, 2013
160 / 212
neoVI PLASMA Help 12May13
Add/Edit Permissions
WN Website: Add or Edit Permissions
The Manage -> Accounts -> Permissions table lets an administrator add, view, or edit the permission profile properties described in Table 1 and shown in Figure
1.
A permissions profile limits actions and access to website features for accounts chosen by the administrator. Don't forget to click Save when editing a
permission profile already in the system.
Table 1: Wireless NeoVI Website Permissions Properties
Permissions Property
Description
Name
Name of the permissions profile.
Description
A description of the profile.
Actions (on/off)
Description
Add
Members can add things.
View
Members can view data log files and Realtime Activity Logs.
Delete
Members can delete files on the website.
Download
Members can download files from the website to their PC.
Modules (on/off)
Description
CoreMini
Members can use CoreMini commands to control assigned devices.
GPS
Members can see GPS data for assigned devices.
Live Data
Members can see Live Data for assigned devices.
Manual Upload
Members can manually upload data log files from an assigned device to the website.
Data Archive
Members can access data log files uploaded from assigned devices to the website.
Bus Query Report
Members can access Bus Query Reports for assigned devices.
Histograms
Members can see Histograms for assigned devices.
161 / 212
neoVI PLASMA Help 12May13
Add/Edit Permissions
E-Mail
Members can receive email notifications from assigned devices.
SMS
Members can send a Remote Wake Up to assigned devices that have SIM cards with texting enabled.
Logs
Members can access Realtime Activity Logs uploaded from assigned devices to the website.
Figure 1: Edit a permissions profile to select which website actions and features are allowed.
neoVI PLASMA Documentation - (C) Copyright 2015 Intrepid Control Systems, Inc.
Last Update: Sunday, May 12, 2013
162 / 212
neoVI PLASMA Help 12May13
Roles
WN Website: Manage Role
The main menu Manage -> Accounts -> Roles shows all possible roles for Wireless NeoVI website accounts (Figure 1).
Figure 1: Manage Roles shows a list of current roles supported by the Wireless NeoVI website.
Levels of Account Access
The Wireless NeoVI server has three levels of account access with decreasing levels of website control:
1. Super Administrator (full control)
can view website activity logs
controls all Administrator accounts
controls all Permissions and User level accounts
can view and reset security answer of all Administrators and Users
controls all devices
2. Administrator (much control)
can view website activity logs
cannot control other Administrator accounts
controls all Permissions and User level accounts
can view and reset security answer of all User level accounts
controls all devices
3. User (little control)
cannot view website activity logs
cannot control Administrator accounts
cannot control Permissions or other User level accounts
cannot view or reset security answer of other accounts
163 / 212
neoVI PLASMA Help 12May13
Roles
cannot view or control devices assigned to other accounts
neoVI PLASMA Documentation - (C) Copyright 2015 Intrepid Control Systems, Inc.
Last Update: Sunday, May 12, 2013
164 / 212
neoVI PLASMA Help 12May13
Change Password
WN Website: Change Password
The main menu Manage -> Accounts -> Change Password lets administrators change the password only for THEIR OWN account.
Fill in the data fields, then click Save to change the password, which IS case sensitive.
If you forget your password, use the Forgot Password? link on the Log In page and correctly answer the security question. (security answer is NOT case
sensitive)
To improve privacy and security, the log in passwords of other accounts on the website can not be changed by administrators. Administrators can only change
the security question and answer in other accounts.
Figure 3: Use Manage / My Account then click Change Password to change the password.
neoVI PLASMA Documentation - (C) Copyright 2015 Intrepid Control Systems, Inc.
Last Update: Sunday, May 12, 2013
165 / 212
neoVI PLASMA Help 12May13
Notifications
WN Website: Manage Notifications
Wireless NeoVI website administrators can use the main menu Manage -> Accounts -> Notifications to open a table similar to Figure 1. This table contains links
to add and edit notification configurations.
An active notification configuration tells the website to send an email to all assigned accounts whenever the logger uploads a data log file from the vehicle to the
website server.
The emails can be setup to trigger "By Vehicle" for ANY collection or to trigger "By Collection" for only a specific script collection.
Features for Manage Notifications
Add Notification button - adds another notification configuration to the table.
Red X button ( ) - asks to delete the configuration in that row.
Name - click the Name to edit the notification configuration in that row.
Table Page Tools - below the table are tools to manage many configurations across multiple tables.
Figure 1: Manage Notifications shows a table with links to edit any notification setup on the Wireless NeoVI website.
166 / 212
neoVI PLASMA Help 12May13
Notifications
neoVI PLASMA Documentation - (C) Copyright 2015 Intrepid Control Systems, Inc.
Last Update: Sunday, May 12, 2013
167 / 212
neoVI PLASMA Help 12May13
Add/Edit Notifications
WN Website: Add or Edit Notifications
The Manage -> Accounts -> Notifications table lets an administrator add, view, or edit the notification properties described in Table 1 and shown in Figure 1.
An active notification tells the website to send an email to all assigned accounts whenever the logger uploads a data log file from the vehicle to the website
server.
Don't forget to click Save when editing a notification configuration already in the system.
Table 1: Wireless NeoVI Website Notification Properties
Notification Property
Description
Name
A custom name for the notification configuration.
By Vehicle - send emails for ANY collections triggered on the chosen vehicle
Type
By Collection - send emails for only the chosen script collection
By Vehicle -> Vehicle
The vehicle being monitored.
By Collection -> Script
The VS3ZIP script being monitored.
By Collection -> Collection The script collection being monitored.
Active
This checkbox quickly enables/disables the notification configuration without needing to add/delete it.
Accounts can be assigned or removed to receive the email notices about logger activity.
Accounts
The left side is a list of choices and the right side shows which choices have been made. Use the >>
and << buttons in the middle to make and remove selections.
168 / 212
neoVI PLASMA Help 12May13
Add/Edit Notifications
Figure 1: Edit a notification to change assigned accounts, vehicles, or collections.
neoVI PLASMA Documentation - (C) Copyright 2015 Intrepid Control Systems, Inc.
Last Update: Sunday, May 12, 2013
169 / 212
neoVI PLASMA Help 12May13
Site
WN Website: Manage Site Menu
Wireless NeoVI website administrators can see information about the website and setup licenses using the Manage -> Site menu selections shown in Figure 1.
Use the links in Table 1 to see further details for each selection.
User level accounts have less choices in the Manage menu.
Figure 1: These are the Manage Site menu selections at the Administrator level.
Table 1: Wireless NeoVI Website Manage Site Menu Selections for Administrators
Menu Selection
Description
Component Versions
View the website component version levels.
Disk Space
See how much disk drive space is being used and how much is free for data log storage.
Logs
View a website activity log.
Download a website activity log from the website to a PC.
License
Send a Wireless NeoVI license file (WNLZIP) from a PC to the website.
See when a license file was last uploaded.
Download a license file from the website to a PC.
170 / 212
neoVI PLASMA Help 12May13
Site
neoVI PLASMA Documentation - (C) Copyright 2015 Intrepid Control Systems, Inc.
Last Update: Friday, May 10, 2013
171 / 212
neoVI PLASMA Help 12May13
Component Versions
WN Website: Component Versions
The main menu Manage -> Site -> Component Versions shows the version information of all Wireless NeoVI website components similar to Figure 1.
Figure 1: Manage / Site / Component Versions shows website version information.
neoVI PLASMA Documentation - (C) Copyright 2015 Intrepid Control Systems, Inc.
Last Update: Sunday, May 12, 2013
172 / 212
neoVI PLASMA Help 12May13
Disk Space
WN Website: Disk Space
The main menu Manage -> Site -> Disk Space shows how much server memory is used up and how much is available for use, similar to Figure 1.
The Data Archive files can eat up this space very quickly if the files are large and the space is small.
Figure 1: Manage / Site / Disk Space shows how much server memory is used and how much is available.
neoVI PLASMA Documentation - (C) Copyright 2015 Intrepid Control Systems, Inc.
Last Update: Sunday, May 12, 2013
173 / 212
neoVI PLASMA Help 12May13
Logs
WN Website: Site Logs
Wireless NeoVI website administrators can use the main menu Manage -> Site -> Logs to see a page similar to Figure 1. This page shows logs of website
activity that can be downloaded to a PC.
To view a log, select the File in the pull down list in the upper left corner and click View.
Click the Download link to download that activity log from the website to a PC.
Figure 1: Manage / Site / Logs provides logs of all Wireless NeoVI website activity.
On a related note, all administrators have an Active Users link at the very bottom of all website pages. The link shows how many accounts are currently
logged in and clicking it shows which specific accounts they are.
neoVI PLASMA Documentation - (C) Copyright 2015 Intrepid Control Systems, Inc.
Last Update: Sunday, May 12, 2013
174 / 212
neoVI PLASMA Help 12May13
License
WN Website: Site Licenses
Wireless NeoVI website administrators can use the main menu Manage -> Site -> License to see a page similar to Figure 1. This page shows all registered
logger licenses and allows new licenses to be added.
Each logger requires a WNLZIP license file from Intrepid Control Systems to allow operation on the Wireless NeoVI website.
Features for Site License List
Search field & button - filters all tables to help locate specific licenses.
Upload button - sends a WNLZIP license file from a PC to the website.
Red X button ( ) - asks to delete the license in that row.
Upload Status - shows the Wireless NeoVI license expiration date for the logger in that row, similar to Figure 2.
Download button (
) - sends the WNLZIP license file from the website to a PC.
Table Page Tools - below the table are tools to manage many licenses across multiple tables.
175 / 212
neoVI PLASMA Help 12May13
License
Figure 1: Manage / Site / License shows all logger licenses and allows new ones to be added to the website.
Figure 2: In the License List, click "Upload Status" to see a logger's license expiration date.
neoVI PLASMA Documentation - (C) Copyright 2015 Intrepid Control Systems, Inc.
Last Update: Sunday, May 12, 2013
176 / 212
neoVI PLASMA Help 12May13
Wireless Link Speed and Data Usage
Wireless Link Speed and Data Usage
Although neoVI PLASMA in wireless mode is quite amazing, wireless link speed (and possibly your bandwidth usage cost) needs to be considered. Data
processing time and usage costs can increase quickly when trying to apply multiple large databases to huge buffers of data coming from multiple, fast networks
blasting messages periodically at all times.
Relative Speeds
The fastest connections on neoVI PLASMA for moving large amounts of data around are its "hardwired" ethernet and USB ports.
The fastest wireless link supported by neoVI PLASMA is currently WIFI.
The next fastest wireless link is 3G cellular (GSM). neoVI PLASMA does not support faster 4G cellular technology yet, but it will at some point.
It Can Pay to Think Small
While there is certainly a need at times to "grab everything" there can be a price to pay for doing it that way all the time. On the other hand, there is also a risk
of thinking TOO small or being too crafty and missing the data you needed to collect to solve a problem. So do not go overboard with these considerations.
When circumstances allow, try to reduce the amount of data you use in order to save you time and possibly money. Here are a few thought starters to help:
Databases - skip using databases entirely if raw data is good enough. If decoded data is needed maybe keep the databases on your PC and not include
them with the VS3ZIP scripts. If decoded data is needed on the website, then try to only include databases in the VS3ZIP scripts that will apply to that data
set and not other databases.
Filters - use filters to collect only the data you need. For example, if you only care about one ECU that communicates on one vehicle network, you might
consider filtering only for that ECU/network combination. Even using just a network filter alone can be a HUGE data reducer on today's multiple network
vehicles.
Triggers - use trigger logic to start and stop data collection around the point of interest.
neoVI PLASMA Documentation - (C) Copyright 2015 Intrepid Control Systems, Inc.
Last Update: Tuesday, January 29, 2013
177 / 212
neoVI PLASMA Help 12May13
WirelessNeoVI Application (WN APK)
WirelessNeoVI Application (WN APK)
WirelessNeoVI is an Android application from Intrepid Control Systems that lets neoVI PLASMA operate in wireless mode. This application can also change
settings, view statistics, and troubleshoot wireless related issues.
WirelessNeoVI automatically starts in the background after power is applied to neoVI PLASMA. The application's main screen can be opened from the neoVI
PLASMA home screen (Figure 1) by tapping on its icon.
Figure 1: Tap the WirelessNeoVI icon on the neoVI PLASMA home screen to access it.
Main Screen (Figure 2 and Table 1)
Tapping the WirelessNeoVI icon in Figure 1 will open the main screen in Figure 2. In the upper left corner of Figure 2 is a status bar icon indicating the status of
the WN APK service and server. Just below the status bar, the screen shows if the SERVICE is currently enabled or disabled.
Note: The SERVICE is not the same as the SERVER and both are required for successful wireless operations.
178 / 212
neoVI PLASMA Help 12May13
WirelessNeoVI Application (WN APK)
Figure 2: The WirelessNeoVI application main screen.
Table 1: WirelessNeoVI Main Screen Selections
Main Screen Selection
Description
Realtime Activity Log
View a realtime log of WirelessNeoVI activity and server traffic.
Secure Connection Manager Keep server communications secure with this.
SD Card and Data Statistics Shows SD card and data upload event statistics.
WirelessNeoVI Settings
Settings affecting all aspects of wireless mode operations.
Disable WirelessNeoVI
Disables/enables the WirelessNeoVI service.
Main Screen Menu Button
Press the off-screen
(Figure 3 and Table 2)
menu button to see the selections along the bottom of Figure 3 and described in Table 2.
179 / 212
neoVI PLASMA Help 12May13
WirelessNeoVI Application (WN APK)
Figure 3: Press the off-screen menu button to see these selections while on the main screen.
Table 2: WirelessNeoVI Main Screen Menu Selections
Main Screen
Description
Menu Selection
Quit
Closes the WirelessNeoVI screen, but leaves the app running in the background.
Settings
Settings affecting all aspects of wireless mode operations.
SW/HW Info
View neoVI PLASMA software and hardware information.
About
View release notes.
neoVI PLASMA Documentation - (C) Copyright 2015 Intrepid Control Systems, Inc.
Last Update: Thursday, February 07, 2013
180 / 212
neoVI PLASMA Help 12May13
WN App Menu: Quit
WN App Menu: Quit
While on the WirelessNeoVI main screen, press the off-screen
menu button and tap Quit to close the main screen.
"Quit" does NOT stop the WirelessNeoVI application from running!
After quitting, you will see the WirelessNeoVI status bar icon
is still there which means the application is still running.
To disable WirelessNeoVI you must open it and tap on the Disable WirelessNeoVI button at the bottom of the main screen.
neoVI PLASMA Documentation - (C) Copyright 2015 Intrepid Control Systems, Inc.
Last Update: Wednesday, January 16, 2013
181 / 212
neoVI PLASMA Help 12May13
WN App Menu: SW/HW Info
WN App Menu: SW/HW Info
While on the WirelessNeoVI main screen, press the off-screen
menu button and tap SW/HW Info to see information similar to Figure 1.
Tap on the View Logger SD Card Info button to see SD card statistics.
182 / 212
neoVI PLASMA Help 12May13
WN App Menu: SW/HW Info
Figure 1: Use the off-screen menu button on the main screen to see this SW/HW Info.
neoVI PLASMA Documentation - (C) Copyright 2015 Intrepid Control Systems, Inc.
Last Update: Tuesday, January 29, 2013
183 / 212
neoVI PLASMA Help 12May13
WN App Menu: About
WN App Menu: About
While on the WirelessNeoVI main screen, press the off-screen
menu button and tap About to see release notes similar to Figure 1.
Figure 1: Use the off-screen menu button on the main screen to see version information.
neoVI PLASMA Documentation - (C) Copyright 2015 Intrepid Control Systems, Inc.
Last Update: Tuesday, January 29, 2013
184 / 212
neoVI PLASMA Help 12May13
Realtime Activity Log
WN App: Realtime Activity Log
The Realtime Activity Log is one of the selections on the main screen of WirelessNeoVI. This screen shows a realtime log of WirelessNeoVI activity and server
traffic as shown in Figure 1.
At the top of the screen is critical information about the Server Connection. The server must be ONLINE for wireless mode to work. If WirelessNeoVI was
recently updated and the server connection is now always offline, the WirelessNeoVI Server Connection settings should be checked for errors.
At the bottom of the activity log screen are these simple controls:
Clear Log - immediately erases the activity log.
View Error/General Log - toggles between the general and error log views.
Figure 1: The Realtime Activity Log is opened from the main screen.
Some activity log settings are located in Miscellaneous WirelessNeoVI Settings.
Realtime Activity Log Menu Button
Press the off-screen
(Figure 2 and Table 1)
menu button to see the selections along the bottom of Figure 2 and described in Table 1.
185 / 212
neoVI PLASMA Help 12May13
Realtime Activity Log
Figure 2: Press the off-screen menu button to see the selections along the bottom.
Table 1: Realtime Activity Log Menu Selections
Realtime Activity Log
Description
Menu Selection
Send Log to Server
Asks if you wish to send a general or error activity log to the Wireless NeoVI website. Just tap on a selection to
archive it on the server for future reference.
Reset Log
Immediately erases the activity log in neoVI PLASMA.
(Warning: no prompt!)
Schedule Auto-Send
Opens a setup dialog for automatically sending realtime activity logs to the server.
CoreMini Actions
Displays buttons for manually controlling a VS3ZIP script in neoVI PLASMA.
neoVI PLASMA Documentation - (C) Copyright 2015 Intrepid Control Systems, Inc.
Last Update: Sunday, May 5, 2013
186 / 212
neoVI PLASMA Help 12May13
Schedule Auto-Send
Realtime Activity Log Menu: Schedule Auto-Send
While on the Realtime Activity Log screen, press the off-screen
menu button and tap on Schedule Auto-Send to see a setup dialog similar to Figure 1.
Realtime activity logs can be sent manually to the server, but this scheduler can save you the hassle by making neoVI PLASMA do it for you instead. Just setup
the rules on the dialog, tap on Save at the bottom, and neoVI PLASMA will send activity logs to the website server archive accordingly.
Figure 1: Use this scheduler to automatically send activity logs to the website archive.
neoVI PLASMA Documentation - (C) Copyright 2015 Intrepid Control Systems, Inc.
Last Update: Tuesday, January 29, 2013
187 / 212
neoVI PLASMA Help 12May13
CoreMini Actions
Realtime Activity Log: CoreMini Actions
While on the Realtime Activity Log screen, press the off-screen
described in Table 1.
menu button and tap on CoreMini Actions to see the controls shown in Figure 1 and
Figure 1: Use CoreMini Actions to directly control VS3ZIP scripts in neoVI PLASMA.
"CoreMini" is the program inside neoVI PLASMA that runs VS3ZIP script files. These CoreMini Action buttons let you manually control that program.
The controls are similar to the Wireless NeoVI website CoreMini Commands.
Table 1: Realtime Activity Log: CoreMini Actions
Command
Description
Start CoreMini
Starts the script currently in the device.
Stop CoreMini
Stops the script running in the device.
Clear CoreMini
Clears the script from the device.
Cancel Upload
Cancels the upload of any data log file to the website server currently in progress.
Clear PLASMA
Stops and clears the script in the device, cancels all data log file uploads, and resets the server connection.
neoVI PLASMA Documentation - (C) Copyright 2015 Intrepid Control Systems, Inc.
Last Update: Tuesday, January 29, 2013
188 / 212
neoVI PLASMA Help 12May13
Secure Connection Manager
WN App: Secure Connection Manager
Tapping on the Secure Connection Manager on the WirelessNeoVI main screen opens the screen in Figure 1. The top of the screen indicates if your server
connection is secure. If it is not secure, try tapping on the Update Security button at the bottom to get an update.
Figure 1: This example shows a secure wireless server connection.
neoVI PLASMA Documentation - (C) Copyright 2015 Intrepid Control Systems, Inc.
Last Update: Tuesday, January 29, 2013
189 / 212
neoVI PLASMA Help 12May13
SD Card and Data Statistics
WN App: SD Card and Data Statistics
Tapping on SD Card and Data Statistics on the WirelessNeoVI main screen opens the screen in Figure 1. This screen lets you see the SD Card Stats and the
Upload Event Stats.
Figure 1: Use this screen to see information about the SD card and data upload events.
neoVI PLASMA Documentation - (C) Copyright 2015 Intrepid Control Systems, Inc.
Last Update: Monday, April 22, 2013
190 / 212
neoVI PLASMA Help 12May13
SD Card Stats
WN App: SD Card Stats
SD Card Stats is one of the selections on the SD Card and Data Statistics screen in WirelessNeoVI. Opening SD Card Stats shows the following main screen
sections similar to Figure 1:
SD Card Stats (Figure 1)
Logger SD Card State - Indicates if the "top slot" SD card is inserted or not, which is SD Card #1 in the device layout.
Logger SD Card Usage - This area shows information for SD card #1 in neoVI PLASMA.
CoreMini in Logger SD Card - Tap on the View CoreMini Info button to see many statistics about the CoreMini VS3ZIP script currently loaded on SD Card #1.
Local File System Usage - This area contains information about a third SD card which is internal to neoVI PLASMA.
191 / 212
neoVI PLASMA Help 12May13
SD Card Stats
Figure 1: An example of various SD card statistics in neoVI PLASMA.
SD Card Stats Menu Button
Press the off-screen
(Figure 2)
menu button to see the selections along the bottom of Figure 2 which are described further below.
192 / 212
neoVI PLASMA Help 12May13
SD Card Stats
Figure 2: Press the off-screen menu button to see these selections along the bottom.
Reset API Connections (Figure 3)
This option resets the software connections to the hardware and SD Card. This should not be needed for normal operation.
Figure 3: You can reset API for the neoVI PLASMA VNET or SD Card #1.
Clear CoreMini From Card (Figure 4)
This will erase the currently loaded VS3ZIP script file in neoVI PLASMA.
Figure 4: Tap on yes if you really want to erase the currently loaded VS3ZIP script.
Settings (Figure 5)
This slider determines how often the SD Card Stats screen is updated.
193 / 212
neoVI PLASMA Help 12May13
SD Card Stats
Figure 5: This slider is a menu button option on the SD Card Stats screen.
neoVI PLASMA Documentation - (C) Copyright 2015 Intrepid Control Systems, Inc.
Last Update: Wednesday, February 06, 2013
194 / 212
neoVI PLASMA Help 12May13
View CoreMini Info
SD Card Stats: View CoreMini Info
While on the WirelessNeoVI SD Card Stats screen tap on View CoreMini Info to see information similar to Figure 1.
Figure 1: Use the SD Card Stats screen to get to all of this CoreMini Info.
neoVI PLASMA Documentation - (C) Copyright 2015 Intrepid Control Systems, Inc.
195 / 212
neoVI PLASMA Help 12May13
View CoreMini Info
Last Update: Tuesday, January 29, 2013
196 / 212
neoVI PLASMA Help 12May13
Upload Event Stats
WN App: Upload Event Stats
Upload Event Stats is one of the selections on the SD Card and Data Statistics screen in WirelessNeoVI. Tapping on that selection shows a screen similar to
Figure 1.
Figure 1: This screen has stats for data log upload events to the Wireless NeoVI website.
This screen keeps track of all automatic data upload events triggered by neoVI PLASMA to the Wireless NeoVI website.
Automatic Data Log Upload Methods
When making a VS3ZIP script, the VehicleScape Standalone Logging options support three methods to make neoVI PLASMA automatically upload its data log
files to the Wireless NeoVI website server. Table 1 shows which settings in Standalone Logging are required for each method being tracked.
Table 1: neoVI PLASMA Automatic Data Log Upload Methods
Event
Standalone Logging Settings in Vehicle Spy
Collection Start Option = When Expression is True
AND
While True Events neoVI
PLASMA Collection Upload = enabled
(uploads each collection after it finishes)
Collection Start Option = Using Trigger
197 / 212
neoVI PLASMA Help 12May13
Upload Event Stats
Pre Post Events
AND
Collection Configuration = Pre/Post Collection
AND
neoVI PLASMA Collection Upload = enabled
(uploads each collection after it finishes)
Sleep Events
Power Management < > Never
(one of the sleep modes must be active)
AND
neoVI PLASMA before sleep upload all data = enabled
(uploads all collections before going to sleep)
neoVI PLASMA Documentation - (C) Copyright 2015 Intrepid Control Systems, Inc.
Last Update: Monday, April 22, 2013
198 / 212
neoVI PLASMA Help 12May13
WirelessNeoVI Settings
WN App: WirelessNeoVI Settings
Tapping on WirelessNeoVI Settings on the WirelessNeoVI main screen, opens to the first settings tab. This tab is called Server Connection and is shown in
Figure 1. Four tabs in total hold the settings affecting all aspects of wireless mode operations. Use the links in Table 1 to for more information on the settings
each tab has.
Figure 1: WirelessNeoVI has many settings to control its operation.
Table 1: WirelessNeoVI Settings Tabs
Settings Tab
Description
Server Connection
(opens to this tab)
Settings for the Wireless NeoVI website server IP address and port number.
Data Upload and GPS
Change how data uploads work and how often GPS updates information.
Message Filter
Pre-built message filters to reduce data uploads.
Miscellaneous Settings Application thread controls and realtime activity log settings.
neoVI PLASMA Documentation - (C) Copyright 2015 Intrepid Control Systems, Inc.
Last Update: Monday, January 28, 2013
199 / 212
neoVI PLASMA Help 12May13
Server Connection
WirelessNeoVI Settings: Server Connection
Tap on WirelessNeoVI Settings on the WirelessNeoVI main screen to get to the Server Connection screen similar to Figure 1.
Figure 1: These are the WirelessNeoVI Server Connection settings.
The IP Address and Port Number must be correct for neoVI PLASMA to work in wireless mode. Your WirelessNeoVI website administrator should know what
these settings should be set to. The current server online/offline status is at the very top of the WirelessNeoVI Realtime Activity Log.
If you have a finicky WIFI connection there is a setting here to change the connect attempts.
Do not forget to tap the Save button at the bottom of the screen.
neoVI PLASMA Documentation - (C) Copyright 2015 Intrepid Control Systems, Inc.
Last Update: Wednesday, February 06, 2013
200 / 212
neoVI PLASMA Help 12May13
Data Upload and GPS
WirelessNeoVI Settings: Data Upload and GPS
Tap on WirelessNeoVI Settings on the WirelessNeoVI main screen then tap on the Data Upload and GPS tab to get to the screen similar to Figure 1.
Do not forget to tap the Save button after making any changes here! It is at the very bottom of the screen and can be easy to miss if you do not scroll down to
find it.
Configure Data Upload Parameters
This area in Figure 1 gives the option to track data. Clicking Show Upload Events keeps track of all automatic data upload events triggered by neoVI PLASMA
to the Wireless NeoVI website. (Data log uploads can be manual using the website or automatic using the VS3ZIP script.)
Configure GPS Post Parameters
This area in Figure 1 controls how often neoVI PLASMA will send GPS position updates to the website server.
Configure Live Data
This area controls how long neoVI PLASMA will send Live Data to the Wireless NeoVI website.
Configure Audio Recording (Pendant)
This area at the bottom of Figure 1 controls audio recordings from a pendant.
201 / 212
neoVI PLASMA Help 12May13
Data Upload and GPS
Figure 1: WirelessNeoVI Data Upload and GPS settings.
neoVI PLASMA Documentation - (C) Copyright 2015 Intrepid Control Systems, Inc.
Last Update: Tuesday, January 29, 2013
202 / 212
neoVI PLASMA Help 12May13
Message Filter
WirelessNeoVI Settings: Message Filter
Tap on WirelessNeoVI Settings on the WirelessNeoVI main screen to get to the Message Filter screen similar to Figure 1.
Figure 1: These are the WirelessNeoVI Message Filter settings.
Most settings here are disabled for now, but there are some pre-built filters for specific customers of Intrepid Control Systems.
Farmlink
When uploading, exclude any upload that only contains neoVI network msgs (GPS-only file).
VM-NA (VM Motori North America)
203 / 212
neoVI PLASMA Help 12May13
Message Filter
When uploading, periodically filter CCP traffic on MSCAN to reduce the amount of data to be uploaded before sleep.
1. No HSCAN1/2 messages on manual or automatic uploads before sleep.
2. Only upload MSCAN ArbIDs $360, $389, and $3A0 with full cycle sampled every 200 ms.
neoVI PLASMA Documentation - (C) Copyright 2015 Intrepid Control Systems, Inc.
Last Update: Tuesday, January 29, 2013
204 / 212
neoVI PLASMA Help 12May13
Miscellaneous Settings
WN App: Miscellaneous Settings
Tap on WirelessNeoVI Settings on the WirelessNeoVI main screen then tap on the Miscellaneous Settings tab to get to the screen similar to Figure 1.
Do not forget to tap the Save button after making any changes here! It is at the very bottom of the screen and can be easy to miss if you do not scroll down to
find it.
Configure Main Service Settings
Controls for WirelessNeoVI threads and notification of job results. It is HIGHLY recommended to not change these settings.
Configure Main Activity Settings
Changes how WirelessNeoVI indicates activities.
Configure Activity Log Settings
These settings affect how the Realtime Activity Log operates.
205 / 212
neoVI PLASMA Help 12May13
Miscellaneous Settings
Figure 1: These are the WirelessNeoVI Miscellaneous settings.
206 / 212
neoVI PLASMA Help 12May13
Miscellaneous Settings
neoVI PLASMA Documentation - (C) Copyright 2015 Intrepid Control Systems, Inc.
Last Update: Wednesday, February 06, 2013
207 / 212
neoVI PLASMA Help 12May13
Disable WirelessNeoVI
WN App: Disable
The bottom of the WirelessNeoVI main screen has a Disable/Enable WirelessNeoVI button shown in Figure 1. That button is the only quick way to disable
the application.
Even when disabled, the WirelessNeoVI status bar icon
will continue to show the application is still running because it is only disabled, not stopped.* The
top of the WirelessNeoVI main screen has text showing if the service is currently enabled or disabled.
Figure 1: Tap on the disable button at the bottom of the main screen to disable WirelessNeoVI.
Why Disable WirelessNeoVI?
Disabling WirelessNeoVI is optional for PC mode, but can be a good idea to clearly establish control over neoVI PLASMA. It can be very confusing to use your
PC to send a VS3ZIP script to the hardware and moments later see it was cleared by somebody far away using the Wireless NeoVI website!
Some Related Side Notes
Note #1 - Cycling neoVI PLASMA power will restart AND re-enable WirelessNeoVI.
Note #2 - Using Quit by pressing the off-screen menu button on the WirelessNeoVI main screen does NOT stop the WirelessNeoVI application from running!
That selection only closes the WirelessNeoVI main screen.
*Note #3 - To completely stop WirelessNeoVI (during this power cycle only) you must use this Android setting:
208 / 212
neoVI PLASMA Help 12May13
Home /
Disable WirelessNeoVI
Menu / Manage Apps / Downloaded / WirelessNeoVI / Force Stop
Cycling neoVI PLASMA power will restart WirelessNeoVI unless you use that same Android settings area to Uninstall WirelessNeoVI, which is NOT
recommended! (neoVI PLASMA is a wireless device after all)
neoVI PLASMA Documentation - (C) Copyright 2015 Intrepid Control Systems, Inc.
Last Update: Sunday, May 5, 2013
209 / 212
neoVI PLASMA Help 12May13
PC Mode with Vehicle Spy
neoVI PLASMA in PC Mode with Vehicle Spy
A PC running Vehicle Spy can work directly with a neoVI PLASMA, just like a neoVI FIRE.
How To Get neoVI PLASMA Into PC Mode With Vehicle Spy
First, on neoVI PLASMA:
1.
2.
3.
4.
Verify an SD card is installed.
Connect the FIRE VNET on the bottom to DC power and vehicle data bus networks.
Connect the USB to PC port on top to the PC.
Disable the WirelessNeoVI application at the bottom of its main screen. (optional)
Next, on the PC:
5. Open Vehicle Spy and it will show a VNET inside neoVI PLASMA is ready to go.
Please refer to the help documentation within Vehicle Spy (Figure 1: and ) for tutorials, examples, and details regarding features not described in this
guide. The Vehicle Spy help documentation can also be found online by clicking here.
210 / 212
neoVI PLASMA Help 12May13
PC Mode with Vehicle Spy
Figure 1: Please see the Vehicle Spy help files for many important features not presented in this guide.
neoVI PLASMA Documentation - (C) Copyright 2015 Intrepid Control Systems, Inc.
Last Update: Monday, January 28, 2013
211 / 212
neoVI PLASMA Help 12May13
For More Help
For More Help
Intrepid Control Systems, Inc.
31601 Research Park Dr.
Madison Heights, Michigan 48071 USA
(ph) 586.731.7950
(fax) 586.731.2274
(email)
(ICS website) www.intrepidcs.com
neoVI PLASMA hardware
http://intrepidcs.com/neoviplasma/index.html
Wireless NeoVI website
http://www.wirelessneovi.com/
Vehicle Spy software
http://intrepidcs.com/VehicleSpy/index.html
neoVI PLASMA Documentation - (C) Copyright 2015 Intrepid Control Systems, Inc.
Last Update: Thursday, April 18, 2013
212 / 212