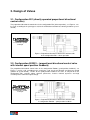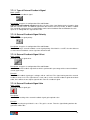
1
Proportional Directional Control Valve PRM7
User Manual
ARGO-HYTOS s.r.o., Vrchlabí
Fluid & Moition Control
Table of Contents
TABLE OF CONTENTS...................................................................................................................................... 1
1. GENERAL INFORMATION .......................................................................................................................... 3
1.1. INTRODUCTION ............................................................................................................................................. 3
1.2. VALVES USAGE ............................................................................................................................................. 3
1.3. LIMITED WARRANTY .................................................................................................................................... 3
1.4. USED SYMBOLS ............................................................................................................................................. 4
1.5. CAUTION ....................................................................................................................................................... 4
1.6. SERVICE, MAINTENANCE, REPAIRS ............................................................................................................... 5
1.7. BASIC SETTING ............................................................................................................................................. 5
2. TECHNICAL DESCRIPTION........................................................................................................................ 5
2.1. BASIC PARTS ................................................................................................................................................. 5
2.2. TECHNICAL PARAMETERS ............................................................................................................................. 6
3. DESIGN OF VALVES...................................................................................................................................... 7
3.1. CONFIGURATION E01 (DIRECTLY OPERATED PROPORTIONAL DIRECTIONAL CONTROL VALVE) ..................... 7
3.2. CONFIGURATION E02S01 – (PROPORTIONAL DIRECTIONAL CONTROL VALVE WITH INTERNAL SPOOL
POSITION FEEDBACK) ........................................................................................................................................... 7
3.3. CONFIGURATION E03 – (PROPORTIONAL DIRECTIONAL CONTROL VALVE WITH EXTERNAL FEEDBACK) ........ 8
3.4. CONFIGURATION E04S01 – (PROPORTIONAL DIRECTIONAL CONTROL VALVE WITH INTERNAL SPOOL
POSITION FEEDBACK AND EXTERNAL FEEDBACK) ................................................................................................ 8
4. VALVE ASSEMBLY........................................................................................................................................ 8
5. ELECTRICAL CONNECTION ...................................................................................................................... 9
5.1. CONNECTION OF POWER SUPPLY AND COMMAND SIGNAL TO THE VALVE ELECTRONICS............................. 9
5.2. CONNECTION OF A CABLE FOR ELECTRONICS PARAMETERS SETTING ........................................................ 10
5.3. CONNECTION OF THE EXTERNAL FEEDBACK CABLE ................................................................................... 10
5.4. PUTTING INTO OPERATION .......................................................................................................................... 11
6. DIGITAL INTEGRATED ELECTRONICS................................................................................................ 12
6.1. ELECTRONICS BLOCK DIAGRAM ................................................................................................................. 12
6.2. SETTING OF THE ELECTRONICS PARAMETERS ............................................................................................. 12
7. CONFIGURATION PROGRAM PRM7CONF........................................................................................... 13
7.1. BASIC DESCRIPTION .................................................................................................................................... 13
7.2. INSTALLATION ............................................................................................................................................ 13
7.3. USER INTERFACE......................................................................................................................................... 13
7.3.1. Main Menu .......................................................................................................................................... 14
7.3.2. Toolbar................................................................................................................................................ 15
7.3.3. Status Line........................................................................................................................................... 16
7.3.4. Desktop................................................................................................................................................ 17
7.4. COMMUNICATION WITH THE VALVE ELECTRONICS..................................................................................... 17
7.4.1. Communication Setting ....................................................................................................................... 17
7.4.2. Communication Establishment............................................................................................................ 18
7.4.3. Uploading Data from the Valve Electronics ....................................................................................... 19
7.4.4. Downloading Data to the Valve Electronics ....................................................................................... 19
7.4.5. Status of the Valve Electronics............................................................................................................ 19
7.4.6. Reset of the Valve Electronics ............................................................................................................. 20
7.5. POSSIBILITIES OF SETTING THE VALVE ELECTRONICS PARAMETERS .......................................................... 20
7.5.1. Parameters table ................................................................................................................................. 20
7.5.2. Block Diagram .................................................................................................................................... 21
7.5.3. Setting According to the Ordering Code ............................................................................................. 21
7.5.3. Setting from a Prepared Configuration File ....................................................................................... 23
7.6. BLOCK DIAGRAMS AND TABLES OF PARAMETERS OF BASIC CONFIGURATIONS ........................................ 24
1
7.6.1. Configuration E01............................................................................................................................... 24
7.6.2. Configuration E02S01......................................................................................................................... 26
7.6.3. Configuration E03............................................................................................................................... 28
7.6.4. Configuration E04S01......................................................................................................................... 30
7.7. BASIC CONFIGURATION BLOCKS DETAILED DESCRIPTION.......................................................................... 33
7.7.1. Directional Valve Configuration......................................................................................................... 33
7.7.2. Command Signal Type Selection......................................................................................................... 33
7.7.3. Command Signal Polarity ................................................................................................................... 34
7.7.4. Threshold ............................................................................................................................................ 34
7.7.5. Ramp Functions .................................................................................................................................. 34
7.7.6. Command Signal Gain ........................................................................................................................ 35
7.7.7. Dead Band Compensation................................................................................................................... 36
7.7.8. Current Limiting.................................................................................................................................. 36
7.7.9. Dither .................................................................................................................................................. 37
7.7.10. Internal and External Feedback Controllers .................................................................................... 37
7.7.11. Type of External Feedback Signal..................................................................................................... 39
7.7.12. External Feedback Signal Polarity ................................................................................................... 39
7.7.13. External Feedback Signal Offset....................................................................................................... 39
7.7.14. External Feedback Signal Gain ........................................................................................................ 39
7.7.15. Linearization Function...................................................................................................................... 41
7.8. MEASUREMENT ........................................................................................................................................... 42
2
1. General Information
1.1. Introduction
The proportional directional control valve PRM7 consists of a cast iron body, a special cylindrical
spool, two centering springs with supporting washers, one or two proportional solenoids, a position
sensor, eventually a box with digital electronics. The position sensor measuring system consists of a
differential transformer with a core and the evaluation electronics in the hybrid design. The
proportional directional control valve PRM7 is produced in three basic sizes - Ng4, Ng6, Ng10.
In design with integrated electronics, the proportional directional control valve is equipped with an
electronics box which is fixed to any solenoid together with the position sensor the outlet of which is
directly connected to it by a cable. In design with two solenoids, the opposite solenoid is connected
with the electronics box by means of a cable terminated with connector EN 175301-803-A. Coils can
be rotated round the longitudinal axis by +-90°, including the electronics box. Connecting of power
supply voltage, command signal, spool position sensor control outlet (if it is there) and +10V DC output
voltage is accomplished through a seven-poles connector M23. Connecting of external feedback is
accomplished with the help of a five-poles connector M12x1 where there is, except of external
feedback input, also the power supply voltage +24V for the external sensor.
The output current to solenoid coils is controlled by means of PWM. Electronics is equipped with
internal current feedback; the output current can be modulated by a dither signal. Individual function
parameters are set by software with the help of a computer connected to the proportional directional
control valve through the serial interface RS 232.
Factory configuration of the proportional directional control valve depends on its type of construction.
The configuration with the external feedback has to be consulted with the producer.
1.2. Valves Usage
Proportional directional control valves with digital integrated electronics are available in following
configurations (see catalogue for more details):
•
•
•
•
E01 – directly operated proportional directional control valve (without a feedback)
E02S01 - proportional directional control valve with internal spool position feedback
E03 - proportional directional control valve with external feedback
E04S01 - proportional directional control valve with internal spool position feedback and
external feedback
In configurations E01 and E02S01 the proportional directional control valves can be used for the
direction and flow rate control (position or speed control). In configurations E03 and E04S01 they can
be used, according to the kind of the scanned physical quantity, for the direction and flow rate control
(position or motion speed), eventually for pressure control (force or torque).
1.3. Limited Warranty
The proportional directional control valves operation at any device must be performed in accordance
with recommendations of the producer ARGO-HYTOS s.r.o. and safety or other regulations given by
the particular country legislature. The producer takes no responsibility for health or property damages
caused by operating the hydraulic or other systems equipped with the proportional directional control
valve made by ARGO-HYTOS s.r.o. In case of not observing the rules, wrong manipulation, false
interpretation or misunderstanding, the responsibility and liability remains on the user.
3
1.4. Used Symbols
!
This symbol warns that there is a danger for persons, machines, material or living
environment.
This symbol calls attention to advice and information.
1.5. Caution
The directional control valve can be installed and put into operation only by a trained and authorized
person.
!
The parts of the valve may be warm during the operation.
When using the control valves in applications with high safety requirements it is necessary to take a
measure for the case of a failure which disconnects the power supply voltage, eventually the valve
command signal. The directional control valve then returns back to the central position automatically.
!
After switching on the electronics power supply, the command signal will be active after a short
interval (1 – 2 s). It is necessary to care that command signal does not cause any undesirable
valve function.
When installing a directional control valve, it is necessary to comply with schedule and fulfillment of the
individual works. Before putting into operation it is necessary to test all electrical and hydraulic
connections once more. To prevent collisions, before putting into operation all the safety equipment
must be functional. It is necessary to observe all the safety rules.
4
1.6. Service, Maintenance, Repairs
Do not try to repair the proportional directional control valve on your own. After a repair, particular
settings must be made which can be accomplished only by a qualified person. Send the directional
control valves which has to be repaired to the producer’s address or to the trade representation
address.
In case of a claim it is necessary to deliver the type number and the serial number. These data will
push the claim forward and ensure the fast and reliable repair.
In case of detecting a defect or a failure, your seller will be happy to give you a phone or a written
advice. We offer experienced and skilled experts for repairs and the maintenance.
1.7. Basic Setting
Proportional directional control valves are ready for instant use from the producer. The directional
control valve digital electronics basic setting is made by the producer. In configurations E01 and
E02S01 the directional control valve is fully functional and there is no need for any interference into
the electronics setting. In configurations E03 and E04S01 it is necessary to set the electronics
parameters which ensure the correct function of the directional control valve in the external feedback.
2. Technical Description
2.1. Basic Parts
Figure 1 shows the proportional directional control valve PRM7 and its basic parts.
The directional control valve consists of:
• the body with the inserted spool (1),
• proportional solenoids (2),
• the spool position sensor (3),
• the control digital electronics (4).
4
1
3
2
Figure 1. Basic parts of the proportional directional control valve (lay-out of configuration E04S01)
Basic parts are the same for all configurations offered by the producer but their application differs
according to the respective configuration.
5
2.2. Technical Parameters
Basic parameters
Range, marking
General
-20°C ... +50°C
Environment temperature
IP65
Electric overlap grade
Oscillations, sine-wave according to IEC 68-2-6
Vibrations
Shocks according to IEC 68-2-27
Conduit impact according to EN 61000-4-4
Disturbance resistance
HF exposure according to EN 61000-4-3
HF conduit supply according to EN 61000-4-6
Emission related to conduit according to EN 55011
Interference emission
Radiated emission according to EN 55011
Basic directional control valve
parameters
NG04
Nominal size
NG06
NG10
DIN 24 340 and ISO 4401
Installation dimensions
320 bar
Maximum working pressure in outlets P, A, B
Maximum working pressure in outlet T
100 bar
160 bar
220 bar
Mineral oil (HM, HV) according to DIN51524
Pressure liquid
-30°C ... +80°C / -20°C ... +80°C
Fluid working temperature range (NBR/Viton)
20 mm²/s ... 400 mm²/s
Working viscosity range
Specified fluid cleanliness level
3
-1
Nominal flow rate [dm min ] at ∆p = 10 bar
Grade 21/15 according to ISO 4406: 1987, recommended
filter’s filtering capability β10 ≥ 75.
4, 8, 12
15, 30
30, 60
Basic electronics parameters
Power supply voltage with protection against
reversing of polarity
Input: command signal
Input: spool position
Input: external feedback
Resolution of A/D transducers
PWM frequency
Output: solenoid coils
Cycle period of the controllers
Setting of parameters
CAN serial interface
11,2…28 V DC (residual ripple < 10%)
+/-10V, 0...10V, +/-10mA, 4...20mA, 0...20mA, 12 +/- 8 mA
0…5V
0...10V, 4...20mA, 0...20mA
12 bit
18 kHz
Two final stages with pulse width modulation max. 3.5 A
170µs
With the help of PC (RS232) and user’s software PRM7Conf
On inquiry
6
3. Design of Valves
3.1. Configuration E01 (directly operated proportional directional
control valve)
The proportional directional control valve in the configuration E01 (direct operation), see Figure 2, can
be used, according to the spool type used, for the oil direction and flow rate control (position or speed
control).
A schematic symbol
example
Figure 2. Proportional directional control valve with two coils
In the configuration E01 – direct operation
3.2. Configuration E02S01 – (proportional directional control valve
with internal spool position feedback)
The proportional directional control valve in the configuration E02S01 (spool position feedback), see
Figure 3, can be used, according to the spool type used, for the oil direction and flow rate control
(position or speed control). Thanks to the spool position feedback, the valve, in comparison to the
configuration E01, provides higher dynamic parameters, features minimal hysteresis and high
sensitivity to the command signal change.
A schematic symbol
example
Figure 3. Proportional directional control valve with two coils
in configuration E02S01 - spool position feedback
7
3.3. Configuration E03 – (proportional directional control valve with
external feedback)
The proportional directional control valve in the configuration E03 (external feedback), see Figure 4,
can be used, according to the measured physical quantity, for the oil flow direction and flow rate
control (position or speed rate control), eventually pressure control (force or torque control).
A schematic symbol
example
Figure 4. Proportional directional control valve in configuration E03 –
external feedback
3.4. Configuration E04S01 – (proportional directional control valve
with internal spool position feedback and external feedback)
The proportional directional control valve in the configuration E04S01 (spool position feedback and
external feedback), see Figure 5, can be used, according to the measured physical quantity, for the oil
flow direction and flow rate control (position or speed control), eventually pressure control (force or
torque control). The presence of the internal feedback enables, to a certain extent, to influence the
dynamic behavior of the proportional directional control valve with regard to requirements of the actual
application.
A schematic symbol
example
Figure 5. Proportional directional control valve with two coils
in configuration E04S01 - spool position feedback and external feedback
4. Valve Assembly
Valves are designed for installation according to DIN 24 340 and ISO 4401. Make the assembly
according to the producer’s instructions written in the documentation that is a part of each valve
package.
8
5. Electrical Connection
The digital integrated electronics is located in a plastic box situated directly on the proportional
directional control valve solenoid. The electronics is connected to this solenoid with the help of
connectors which are placed inside the box. The second solenoid is connected to the electronics by a
cable and a connector DIN 43650. Connections of the control system, power supply, spool position
feedback and external feedback, PC and solenoids power supply are shown in Figure 6.
Control, Power
Supply
Connection with
PC
External Feedback
Solenoid Power Supply
Spool Position Feedback
Figure 6. Proportional directional control valve PRM7 electronics box
5.1. Connection of Power Supply and Command Signal to the Valve Electronics
The connection of the power supply and the command signal to the valve electronics will be made by
means of a seven-poles connector M23 shown in Figure 7. M23 connector is not a part of supply and it
is necessary to order it separately according to the producer’s catalogue. The significance of individual
contacts is in the Figure 8 showing the connector situated on the electronics box.
Figure 7. Connecting connector M23
M23
Pin 1:
Power supply 11,2…28V DC
Pin 2:
GND (power)
Pin 3:
Command
Pin 4:
GND (signal)
Pin 5:
Reference voltage +10 V DC
Pin 6:
Spool position sensor signal - copy
Pin 7:
Protective earth conductor (PE)
Figure 8. Connecting connector M23 positioned on the electronics box
!
Do not connect under the voltage.
The command signal input resistance:
• Voltage signals ≅ 200 kΩ (+/- 10V, 0 ... 10V)
• Current signals ≅ 255 Ω (+/-10mA, 4...20mA, 0...20mA, 12 +/- 8 mA)
9
5.2. Connection of a Cable for Electronics Parameters Setting
Connecting of the computer to the valve electronics is performed by means of a special cable (see
Figure 9). The cable is equipped with a four-pole connector M12 for the connection to the valve and a
nine-pin connector CANNON 9 for the connection to the computer RS232 serial port. The cable is not
a part of supply and is to be ordered separately according to the producer’s catalogue. The
significance of individual contacts is in the Figure 10 showing the connector situated on the electronics
box.
Figure 9. The cable designed for the connection of the proportional directional
control valve PRM7 to PC
M12
Pin 1:
Programming – TxD line of serial interface RS232
Pin 2:
Programming – RxD line of serial interface RS232
Pin 3:
Programming – earth
Pin 4:
Not used
Figure 10. Connector M12, designed for the connection to PC, positioned on the electronics box
5.3. Connection of the External Feedback Cable
Connection of the external feedback (for configurations E03 and E04S01 only) will be performed with
the help of a five-pin connector M12 which is in Figure 11. Except of connecting the signal from the
external feedback, the connector enables a connection of supply voltage for an external sensor as
well. M23 connector is not a part of supply and it is to be ordered separately according to the
producer’s catalogue. The significance of individual contacts is in the Figure 12 showing the connector
situated on the electronics box.
Figure 11. External feedback cable connecting connector M12
Socket 1:
M12
Power supply of the external feedback sensor 11,2…28
V DC
Socket 2: External feedback signal sensor output.
Socket 3: Earth
Socket 4: Not used
Socket 5: Not used
Figure 12. External feedback cable connecting connector M12
10
!
After the connection, the unexpected hydraulic equipment reaction can occur. It is necessary to
carry out the necessary safety measures.
External feedback signal sensor output.
• Voltage signals ≅ 200 kΩ (0 ... 10V)
• Current signals ≅ 255 Ω (4 ... 20mA, 0 ... 20mA)
5.4. Putting into Operation
On the upper part of the electronics box (see Figure 13) are situated the green and red LEDs.
After connecting the supply voltage, the green LED which signals the electric voltage presence, lights
up.
The flashing red LED signals an electronics error state. The error state reasons can be following:
•
Disconnected connection of the electronics output with the solenoid coil,
•
The current command signal is out of the specified range (if there is a set command signal
4-20 mA or 12 +/-8 mA)
•
The current external feedback signal is out of the specified range (if there is a set command
signal 4-20 mA)
The permanent red LED light signals an internal software problem.
After the error eliminating the electronics can be activated again via disconnecting the supply voltage
for a short moment or via electronics reset from the program PRM7Conf (see the chapter 7).
Green LED
Red LED
Figure 13. Operation state signaling
!
At the proportional directional control valve commissioning the necessary safety guidelines must
be observed precisely. To avoid uncontrolled equipment behavior, it is necessary to check all the
electrical and hydraulic circuits before the supply voltage connecting. Particular measures for
possible emergency cutoff must be taken.
11
6. Digital Integrated Electronics
6.1. Electronics Block Diagram
Figure 14. Valve PRM7 digital electronics block diagram
The digital integrated electronics (see figure 14) is controlled by an internal program (firmware) which
is stored in a Flash memory. This program provides basic electronics functions so that the valve can
fulfill the user’s requirements. The producer does not exclude a possibility of a continuous firmware
update with the view of the directional control valves PRM7 functional properties optimization.
The valve electronics is connected to the PC with the help of serial interface RS232. Two lines are
used for the connection from this interface; RxD enabling the data acceptance from the electronics
and TxD enabling data entry to the electronics. Basic baud parameters are: baud rate 19,200 bps,
8 data bits, no parity, 1 stop bit.
6.2. Setting of the Electronics Parameters
Digital integrated electronics operation parameters are set from the production so that they provide the
optimal valve function in terms of its operational configuration and its static and dynamic properties. In
case that this operational parameters setting will not comply with a particular valve application, it is
possible to change the setting with the help of a PC which is connected with the proportional
directional control valve by means of a special cable through the connection port RS232. After the
agreement with the producer, the hardware and software needed is supplied together with the valve.
12
7. Configuration Program PRM7Conf
7.1. Basic Description
The program PRM7Conf is designed only for the proportional directional control valves PRM7 digital
electronics operational parameters modification. Its basic features are:
• Minimum requirements for hardware are: Processor: Pentium 433 MHz, Memory RAM: 32 MB,
Free HD space: 20MB, Minimal screen resolution: 800x600dpi, Operating system: Windows 98,
ME, 2000, XP.
• It enables electronics setting by means of the graphic interface in the form of tables or block
diagrams.
• It enables to save the operational parameters setting to *.PRM file.
• It enables to carry out the electronics operational parameters setting with the help of ordering code
that is listed in the producer’s catalogue.
• It enables two operational modes: on-line and off-line.
• It enables signal measuring behind the chosen blocks which set the electronics parameters.
7.2. Installation
For installation start the setup.exe file from the enclosed CD. This will activate the installer that will
lead you through all the installation process. Installer will download all the necessary program files to
locations defined during the installation. After completing the installation, start the program by
PRM7Conf.exe file, which is located in a directory selected by you, or start the program by
PRM7Conf shortcut located in menu Start -> Programs of the operating system Windows.
7.3. User Interface
User interface of the program PRM7Conf is shown in Figure 15. Its main parts are:
• Main Menu
• Toolbar
• Status Line
• Desktop
Through these parts the program communication can be established easily.
Additionally, it is possible to carry out the valve electronics setting or to read the status of the valve
electronics.
Figure 15. Program PRM7Conf work user interface
13
7.3.1. Main Menu
The main menu is located right in the top of the graphical user interface. Its detail is shown in
Figure 16. The often-used items are placed in the toolbar.
Figure 16. Main menu of the program PRM7Conf
File
This menu enables to work mainly with configuration files (*.PRM files). These files are used for
storing the valve electronics setting data. The stored files could be used for easy setting of the
directional control valve electronics or re-writing incorrect data back to initial if the new ones are not
satisfactory. The items of the menu File are:
• Open: The item enables to open *.PRM file.
• Save: The item enables to save *.PRM file.
• Save as: The item enables to save *.PRM file under a different name.
• Print: The item enables to print the electronics parameters out which are set for the
chosen configuration.
• Exit: The item enables to quit working with the program PRM7Conf.
Edit
This menu enables easy text transfer between the table cells or edit boxes of the dialog windows. The
items of the menu Edit are:
• Cut: The item enables to cut text from a table cell or from an edit box.
• Copy: The item enables to copy text from a table cell.
• Paste: The item enables to insert cut text or copied text into the cell.
Display
This menu enables a suitable choice of the environment (display of the desktop) for editing the valve
electronics parameters. The program provides two ways of electronics settings: through a block
diagram or through a parameters table. The block diagram is a graphical representation of various
functions (blocks) of the valve electronics. The parameters table displays all the parameters en bloc
and, eventually, it enables their modification. The items of the menu Display are:
• Block diagram: The item enables to display the block diagram of the chosen
configuration.
• Parameters table: The item enables to display parameters table of a chosen
configuration.
• Measurement: The item enables to measure signals in the specific nod points of the
valve electronics given by its structure.
Directional valve
This menu contains program functions which enable data exchange between the program PRM7Conf
and the electronics. Additionally, the menu enables the valve configuration change. The items of
menu Valve are:
• Upload data: The item enables to upload data from the valve electronics to the program.
• Download data: The item enables to download data to the valve electronics.
• Configuration change: The item enables to change the valve electronics configuration
according to the ordering code. The program offers 12 basic configurations in total.
Communication
This menu contains functions which enable program communication with the valve electronics. The
individual items of the menu Communication are:
• Setting: The item enables a communication port setting of the RS232 serial interface.
Furthermore, the item enables setting the mode (on-line, off-line) after the program start.
14
•
•
•
Status: The item enables to read information in relation with setting of the program
communication with the electronics, error state and the electronics firmware version.
Reset: The item enables reset of the electronics.
On-line: The item enables the program connecting to the valve electronics or program
disconnecting from the valve electronics.
Help
This menu opens the Help and provides important information about the program PRM7Conf. The
items of the menu Help are:
• Content: The item shows the help content.
• About… : The item provides information about the program and about its producer.
7.3.2. Toolbar
The toolbar is located right in the top of the program user interface below the main menu and it
gathers the often-used menu items. Its detail is shown in Figure 17.
Figure 17. Toolbar
Read data from file
This button enables to read data from a configuration file (*.PRM file). This function of the button is the
same as the function of the menu item File->Open.
Save data to file
This button enables to save data to file (*.PRM file). This function of the button is the same as the
function of the menu item File->Save.
Print
This button enables to print the table of the set parameters out which occur in the chosen
configuration. This function of the button is the same as the function of the menu item File->Print.
Copy
This button enables to copy a chosen text from a table cell selected for edit. This function of the button
is the same as the function of the menu item Edit->Copy.
Paste
This button enables to insert the cut text or copied text into the cell for edit. The function of the button
is the same as the function of the menu item Edit->Paste.
Cut
This button enables to cut the text from a cell selected for edit. The function of the button is the same
as the function of the menu item Edit->Cut.
15
Upload data from valve
This button enables to upload data from the valve electronics. The function of the button is the same
as the function of the menu item Valve->Upload data.
Download data to valve
This button enables to download data to the valve electronics. The function of the button is the same
as the function of the menu item Valve->Download data.
Configuration change
This button enables to change the valve electronics configuration. The function of the button is the
same as the function of the menu item Valve->Configuration change.
Block diagram
This button enables to switch the program desktop to the mode of directional control valve electronics
setting via the block diagram. The function of the button is the same as the function of the menu item
Valve->Block diagram.
Parameters table
This button enables to switch the program desktop to the mode of directional control valve electronics
setting via the block diagram. The function of the button is the same as the function of the menu item
Display->Parameters table.
Measurement
This button enables to switch the program desktop to the mode of measurement. The function of the
button is the same as the function of the menu item Display->Measurement.
Reset
This button enables the reset of the valve electronics. The function of the button is the same as the
function of the menu item Communication->Reset.
On-line
This button enables to switch over the program modes between on-line and off-line. The function of
the button is the same as the function of the menu item Communication->Online.
7.3.3. Status Line
The status line is located right in the bottom of the graphical user interface. The sense of the status
line is to provide important information about the actual program status. Its detail is shown in Figure
18.
Figure 18. Status Line
The status line shows:
• The actual mode of the program: on-line and off-line.
• The information about the firmware version.
16
•
•
The current directional control valve configuration. During data uploading from the valve
electronics or data downloading to the valve electronics, the actual status of uploading or
downloading is displayed here.
The name of the file (*.PRM) that is in operation.
The actual mode of the program and firmware version can to be found in the Status dialog box which
is activated by the menu item Communication->Status.
7.3.4. Desktop
The desktop occupies the biggest part of the graphical interface of the program PRM7Conf.
Displayed on the desktop are, according to the chosen option, the following items:
• Block diagram and individual dialog boxes that are activated by the block diagram
• Parameters table
• Measurement dialog box
• Communication setting dialog box
• Configuration change dialog box
7.4. Communication with the Valve Electronics
7.4.1. Communication Setting
The program PRM7Conf communicates with the valve electronics via the computer RS232 serial
interface. The basic baud parameters are:
• Baud rate 19200 bps
• 8 data bits
• No parity
• 1 stop bit
The port communication setting is provided via menu item Communication->Setting. In the shown
dialog box Communication setting (see Figure 19) it is possible to assign a communication port.
Figure 19. Communication Setting
17
7.4.2. Communication Establishment
The program PRM7Conf offers two modes of work:
• on-line: Connection to the valve electronics is established and parameters changes will be
applied immediately.
• off-line: Connection to the valve electronics is not established. All the changes made will come
out at the moment of the connection to the proportional directional control valve.
Connection to the valve electronics (turnover of the program PRM7Conf to the on-line mode) is
possible to be established:
• by menu item Communication->On-line,
• or by toolbar button On-line.
By the same options, it is possible to break down the connection to the valve electronics (turnover of
the program PRM7Conf to the off-line mode).
If the connection with the valve electronics is not established, the main reasons of the failure could be:
• disconnected or damaged communication cable of the PC RS232 serial interface,
• switched off or damaged power supply (the status of electronics power supply is
signalized by green LED),
• damaged proportional directional control valve electronics
If there is a requirement to establish connection to the valve electronics (to turnover into on-line mode)
immediately after the start of the program, it is necessary to make a particular setting in the
Communication Setting dialog box (see Figure 20). The Communication Setting dialog box is
displayed when the menu item Communication->Setting is selected. The setting is done by option
on-line in the Mode at start group. The change will be active after re-start of the program.
Figure 20. Mode at start setting
18
7.4.3. Uploading Data from the Valve Electronics
Uploading data from the valve electronics to the program PRM7Conf is possible to be realized
• by menu item Valve->Upload data
• or by toolbar button Upload data from valve
The program also enables to upload data from the valve electronics automatically at the start of the
program. This function is activated in case the mode at start is set to on-line (automatic connection
after the start up). The setting is possible from dialog box activated by menu item Communication>Setting.
The process of data uploading from the valve electronics is visible in the status line.
7.4.4. Downloading Data to the Valve Electronics
Downloading data to the valve electronics from the program PRM7Conf is possible to be realized
• by menu item Valve->Download data
• or by toolbar button Download to directional valve
The process of data downloading to the valve electronics is visible in the status line.
!
Downloading the data to the valve electronics can cause undesired behavior of the proportional
directional control valve. If you decide to download the data to the valve electronics, assure
yourself that your hydraulic circuit is secured against damage or eventual personal threat or injury.
7.4.5. Status of the Valve Electronics
The proportional valve electronics can detect the basic errors signalized by fleshing the red LED. In
this case the valve electronics does not react to status parameters changes though the connection in
the on-line mode is established.
The error state of the valve electronics, including further information (selected communication port,
mode of the program, firmware version and the electronics serial number), is possible to be found out
in the Status dialog box. Status dialog box (see Figure 8) appears after selection of the menu item
Communication->Status.
19
For re-activation of the electronics (after solving the error detected by fleshing red LED) it
is necessary to reset the valve electronics.
Figure 21. Status of the valve electronics.
7.4.6. Reset of the Valve Electronics
The reset of the valve electronics from program PRM7Conf interface can be carried out
• by menu item Communication->Reset,
• or by toolbar button Reset.
While the reset command is executing, all program functions are disabled.
!
The reset of the valve electronics can cause undesired behavior of the proportional directional
control valve. If you decide to reset the valve electronics, assure yourself that your hydraulic circuit
is secured against damage or eventual personal threat or injury.
7.5. Possibilities of Setting the Valve Electronics Parameters
7.5.1. Parameters table
A parameters table, in which all the set parameters are listed, belongs to each configuration.
An example of the parameters table of one of the possible configurations is shown in Figure 22.
The parameters table is displayed
• by menu item Display->Parameters table,
• or by toolbar button Parameters table.
20
7.5.2. Block Diagram
Each configuration is represented by a block diagram in which specific blocks correspond to particular
functions (parameters) of the electronics. After a click of the left mouse button on the selected block,
a dialog box appears which enables to make required changes. An example of the block diagram of
one of the possible configurations is shown in Figure 10.
The block diagram is displayed
• by menu item Display->Block diagram
• or by toolbar button Block diagram
The block diagram enables to monitor the signal flow through the individual blocks continually and to
measure currents of the valve exciting coil. The measurement nods are marked with red squares and
are placed between the blocks enabling the change of parameters (see Figure 23).
Figure 22. An example of a parameters table in
configuration E02S01
Figure 23. An example of a block diagram in
configuration E02S01
7.5.3. Setting According to the Ordering Code
If it is necessary to change the valve configuration or if it is necessary to put the valve in service
quickly (in case of original configuration data loss), the data predefined by the producer can be loaded
into the valve electronics. These predefined data can be established via specification of the valve
according to the ordering code. For this purpose, the dialog box Valve configuration according to
the ordering code is used. Explanations of the ordering code individual markings are in the sale
catalogue.
The dialog box Valve configuration according to the ordering code (see Figure 23) is displayed
• by menu item Valve->Configuration change,
• or by toolbar button Configuration change.
By selection of the items offered by the dialog box it is possible to assemble a marking according to
the ordering code to which the new valve setting relates.
21
!
•
•
•
This setting is not quite optimal because it does not cover individual corrections that are
necessary for perfect operation of each proportional directional control valve. Therefore,
some improvements in valve setting should follow (through the parameters table or the
block diagram).
Save the producer’s valve setting to file before loading a new setting to the valve
electronics.
In case of loss of original configuration data, it is possible to receive these data back from
the producer if you send the type number and the serial number of the valve. The type
number and the serial number are placed on the valve nameplate (see Figure 24).
Figure 23. Setting according to the ordering code
Figure 24. An example of a name plate of a proportional directional control valve
22
7.5.3. Setting from a Prepared Configuration File
Configuration files (*.PRM files) are used for storing the valve electronics settings. The stored files can
be used later for easy setting of other directional control valve electronics or for re-writing incorrect
data back to the initial setting.
The configuration file with the required setting of the valve electronics can be loaded to the program
PRM7Conf
• by menu item File->Open,
• or by toolbar button Read data from file
In the shown dialog box (see Figure 25) it is possible to choose a required *.PRM file.
In on-line mode the data from the configuration file can be directly written into the valve electronics.
The setting of the valve electronics can be saved from the program PRM7Conf to a configuration file
(*.PRM file).
• by menu item File->Save,
• or by toolbar button Save data to file
In the shown dialog box (see Figure 26) the user can name or re-name the configuration file.
Figure 25. File opening
Figure 26. File saving
23
7.6. Block Diagrams and Tables of Parameters of Basic
Configurations
7.6.1. Configuration E01
Configuration E01 – (directly operated proportional directional control valve without feedback) is
available in 3 modifications. Solenoid coil located on side A and B of the valve, solenoid coil located
on side A only, solenoid coil on side B only. The valve block diagram with solenoid coils on side A and
B is shown in Figure 27. For this configuration modifications with one solenoid coil the block diagram is
similar.
Figure 27. Configuration E01 block diagram with solenoid coils on side A and B.
Here is the list of parameters of the valve electronics which are set for this configuration.
Name in the
parameters table
Block
symbol
Brief description of the function
Command signal
This parameter sets the type of the command signal. The
command signal can be voltage or current, unipolar or bipolar.
Command signal
polarity
This parameter changes the command signal polarity.
Threshold
Ramp up – coil A
This parameter defines the threshold of the command signal
below which the command signal is ignored. The main
purpose is to suppress a signal noise around command signal
zero.
This parameter sets the time within the signal behind the ramp
function increase from 0% to 100% at 100% step increase of
the entering signal. The current to the coil A is directly
proportional to the signal increase behind this ramp.
Ramp up – coil B
This parameter sets the time within the signal behind the ramp
function increase from 0% to 100% at 100% step increase of
the entering signal. The current to the coil B is directly
proportional to the signal increase behind this ramp.
Ramp down – coil A
This parameter sets the time within the signal behind the ramp
function decrease from 100% to 0% at 100% step decrease of
the entering signal. The current to the coil A is directly
proportional to the signal decrease behind this ramp.
24
Ramp down – coil B
This parameter sets the time within the signal behind the ramp
function decrease from 100% to 0% at 100% step decrease of
the entering signal. The current to the coil B is directly
proportional to the signal decrease behind this ramp.
Command signal gain coil A
This parameter defines the transfer relation between the
command signal and the current to the coil A.
Command signal gain coil B
This parameter defines the transfer relation between the
command signal and the current to the coil B.
Dead band
compensation - coil A
This parameter defines the step change of the current to the
coil A to compensate the positive overlap of the valve spool.
Dead band
compensation - coil B
This parameter defines the step change of the current to the
coil B to compensate the positive overlap of the valve spool.
Current limiting - coil A
This parameter limits the maximum output current to the coil
A.
Current limiting - coil B
This parameter limits the maximum output current to the coil
B.
Dither amplitude
This parameter sets the amplitude range of the coil excitation
current superposed on its DC component. This has a
significant influence on hysteresis and sensitivity of the
proportional valve. The setting is done experimentally.
Dither frequency
This parameter sets the frequency range of the coil excitation
current superposed on its DC component. This has a
significant influence on hysteresis and sensitivity of the
proportional valve. The setting is done experimentally.
Directional valve
configuration
This parameter enables to change the configuration of the
valve electronics. The block symbol is used only for
configuration with coils on side A and B.
Directional valve
configuration
This parameter enables to change the configuration of the
valve electronics. The block symbol is used only for
configuration with one coil on side A, resp. side B.
Measurement point
25
7.6.2. Configuration E02S01
Configuration E02S01 (proportional directional control valve with internal spool position feedback) is
available in 3 modifications. Solenoid coils located on side A and B of the valve, solenoid coil located
on side A only, solenoid coil on side B only. The valve block diagram with solenoid coils on side A and
B is shown in Figure 28. For this configuration modifications with one solenoid coil the block diagram is
similar.
Figure 28. Configuration E02S01 block diagram with solenoid coils on side A and B.
Here is the list of parameters of the valve electronics which are set for this configuration.
Name in the
parameters table
Block
symbol
Brief description of the function
Command signal
This parameter sets the type of the command signal. The
command signal can be voltage or current, unipolar or bipolar.
Command signal
polarity
This parameter changes the command signal polarity.
Threshold
This parameter defines the threshold of the command signal
below which the command signal is ignored. Its main purpose
is to suppress a signal noise around command signal zero.
Ramp up – coil A
This parameter sets the time within the signal behind the ramp
function increase from 0% to 100% at 100% step increase of
the entering signal. The current to the coil A is directly
proportional to the signal increase behind this ramp.
Ramp up – coil B
This parameter sets the time within the signal behind the ramp
function increase from 0% to 100% at 100% step increase of
the entering signal. The current to the coil B is directly
proportional to the signal increase behind this ramp.
Ramp down – coil A
This parameter sets the time within the signal behind the ramp
function decrease from 100% to 0% at 100% step decrease of
the entering signal. The current to the coil A is directly
proportional to the signal decrease behind this ramp.
Ramp down – coil B
This parameter sets the time within the signal behind the ramp
function decrease from 100% to 0% at 100% step decrease of
the entering signal. The current to the coil B is directly
proportional to the signal decrease behind this ramp.
Command signal gain coil A
This parameter defines the transfer relation between the
command signal and the spool position signal required. This
influences the current to coil A.
26
Command signal gain coil B
This parameter defines the transfer relation between the
command signal and the spool position signal required. This
influences the current to coil B.
Dead band
compensation - coil A
This parameter defines the step change of the current to the
coil A to compensate the positive overlap of the valve spool.
Dead band
compensation - coil B
This parameter defines the step change of the current to the
coil B to compensate the positive overlap of the valve spool.
Current limiting - coil A
This parameter limits the maximum output current to the
coil A.
Current limiting - coil B
This parameter limits the maximum output current to the
coil B.
Dither amplitude
This parameter sets the amplitude range of the coil excitation
current superposed on its DC component. This has a
significant influence on hysteresis and sensitivity of the
proportional valve. The setting is done experimentally.
Dither frequency
This parameter sets the frequency range of the coil excitation
current superposed on its DC component. This has a
significant influence on hysteresis and sensitivity of the
proportional valve. The setting is done experimentally.
P parameter of internal
feedback controller
This parameter sets the P component of the internal feedback
controller.
I parameter of internal
feedback controller
This parameter sets the I component of the internal feedback
controller.
D parameter of internal
feedback controller
T parameter of internal
feedback controller
D parameter: the parameter sets the derivative component of
the internal feedback controller.
T parameter: the parameter modifies dynamic behavior of the
internal feedback controller (causes delay)
Activation of internal
feedback linearization
This parameter activates the internal feedback linearization.
The linearization function is used for modification of the
natural status of the valve flow rate characteristics.
Linearization point Xn
of internal feedback
Linearization point Yn
of internal feedback
This parameter allows defining 9 linearization points. The
linearization function is used for modification of the natural
status of the valve flow rate characteristics.
Directional valve
configuration
This parameter enables to change the configuration of the
valve electronics. The block symbol is used only for
configuration with coils on side A and B.
Directional valve
configuration
This parameter enables to change the configuration of the
valve electronics. The block symbol is used only for
configuration with one coil on side A, resp. side B.
Measurement point
27
7.6.3. Configuration E03
Configuration E03 (proportional directional control valve with external feedback) is available in 3
modifications. Solenoid coils located on side A and B of the valve, solenoid coil located on side A only,
solenoid coil on side B only. The valve block diagram with solenoid coils on side A and B is shown in
Figure 29. For this configuration modifications with one solenoid coil the block diagram is similar.
Figure 29. Configuration E03 block diagram with solenoid coils on side A and B.
Here is the list of parameters of the valve electronics which are set for this configuration.
Name in the
parameters table
Block
symbol
Brief description of the function
Command signal
This parameter sets the type of the command signal. The
command signal can be voltage or current, unipolar or bipolar.
Command signal
polarity
This parameter changes the command signal polarity.
Threshold
This parameter defines the threshold of the command signal
below which the command signal is ignored. The main purpose
is to suppress a signal noise around command signal zero.
Ramp up
This parameter sets the time within the signal behind the ramp
function increase from 0% to 100% at 100% step increase of
the entering signal.
Ramp down
This parameter sets the time within the signal behind the ramp
function decrease from 100% to 0% at 100% step decrease of
the entering signal.
Current limiting - coil A
This parameter limits the maximum output current to the coil A.
Current limiting - coil B
This parameter limits the maximum output current to the coil B.
28
Dither amplitude
This parameter sets the amplitude range of the coil excitation
current superposed on its DC component. This has a significant
influence on hysteresis and sensitivity of the proportional valve.
The setting is done experimentally.
Dither frequency
This parameter sets the frequency range of the coil excitation
current superposed on its DC component. This has a significant
influence on hysteresis and sensitivity of the proportional valve.
The setting is done experimentally.
P parameter of external
feedback controller
This parameter sets the P component of external feedback
controller.
I parameter of external
feedback controller
This parameter sets the I component of external feedback
controller.
D parameter of external
feedback controller
T parameter of external
feedback controller
D parameter: the parameter sets the derivative component of
the external feedback controller.
T parameter: the parameter modifies dynamic behavior of the
external feedback controller (causes delay)
Type of external
feedback signal
This parameter sets the type of the external feedback signal.
The external feedback signal can be voltage or current.
External feedback
signal polarity
This parameter changes external feedback signal polarity.
External feedback
signal offset
This parameter sets the external feedback signal offset.
External feedback
signal gain
This parameter sets the external feedback signal gain.
Activation of external
feedback linearization
This parameter activates the external feedback linearization.
The linearization function is used for definition of the required
functional relation between its input and output of the external
signal feedback.
Linearization point Xn
of external feedback
Linearization point Yn
of external feedback
This parameter allows defining 9 linearization points. The
linearization function is used for definition of the required
functional relation between its input and output of the external
signal feedback.
Directional valve
configuration
This parameter enables to change the configuration of the valve
electronics. The block symbol is used only for configuration with
coils on side A and B.
Directional valve
configuration
This parameter enables to change the configuration of the valve
electronics. The block symbol is used only for configuration with
one coil on side A, resp. side B.
Measurement point
29
7.6.4. Configuration E04S01
Configuration E04S01 (proportional directional control valve with internal spool position feedback and
external feedback) is available in 3 modifications. Solenoid coils located on side A and B of the valve,
solenoid coil located on side A only, solenoid coil on side B only. The valve block diagram with
solenoid coils on side A and B is shown in Figure 30. For this configuration modifications with one
solenoid coil the block diagram is similar.
Figure 30. Configuration E04S01 block diagram with solenoid coils on side A and B.
Here is the list of parameters of the valve electronics which are set for this configuration.
Name in the
parameters table
Block
symbol
Brief description of the function
Command signal
This parameter sets the type of the command signal. The
command signal can be voltage or current, unipolar or bipolar.
Command signal
polarity
This parameter changes the command signal polarity.
Threshold
This parameter defines the threshold of the command signal
below which the command signal is ignored. Its main purpose
is to suppress a signal noise around command signal zero.
Ramp up
This parameter sets the time within the signal behind the ramp
function increase from 0% to 100% at 100% step increase of
the entering signal.
Ramp down
This parameter sets the time within the signal behind the ramp
function decrease from 100% to 0% at 100% step decrease of
the entering signal.
Current limiting - coil A
This parameter limits the maximum output current to the
coil A.
Current limiting - coil B
This parameter limits the maximum output current to the
coil B.
Dither amplitude
This parameter sets the amplitude range of the coil excitation
current superposed on its DC component. This has a
significant influence on hysteresis and sensitivity of the
proportional valve. The setting is done experimentally.
30
Dither frequency
This parameter sets the frequency range of the coil excitation
current superposed on its DC component. This has a
significant influence on hysteresis and sensitivity of the
proportional valve. The setting is done experimentally.
P parameter of internal
feedback controller
This parameter sets the P component of the internal feedback
controller.
I parameter of internal
feedback controller
This parameter sets the I component of the internal feedback
controller.
D parameter of internal
feedback controller
T parameter of internal
feedback controller
D parameter: the parameter sets the derivative component of
internal feedback controller.
T parameter: the parameter modifies dynamic behavior of the
internal feedback controller (causes delay)
P parameter of external
feedback controller
This parameter sets the P component of the external feedback
controller.
I parameter of external
feedback controller
This parameter sets the I component of the external feedback
controller.
D parameter of external
feedback controller
T parameter of external
feedback controller
D parameter: the parameter sets the derivative component of
the external feedback controller.
T parameter: the parameter modifies dynamic behavior of the
external feedback controller (causes delay)
Type of external
feedback signal
This parameter sets the type of the external feedback signal.
The external feedback signal can be voltage or current.
External feedback
signal polarity
This parameter changes the external feedback signal polarity.
External feedback
signal offset
This parameter sets the external feedback signal offset.
External feedback
signal gain
This parameter sets the external feedback signal gain.
Activation of internal
feedback linearization
This parameter activates the internal feedback linearization.
The linearization function is used for modification of the
natural status of the valve flow rate characteristics.
Linearization point Xn
of internal feedback
Linearization point Yn
of internal feedback
This parameter allows defining 9 linearization points. The
linearization function is used for modification of the natural
status of the valve flow rate characteristics.
Activation of external
feedback linearization
This parameter activates the external feedback linearization.
The linearization function is used for definition of the required
functional relation between its input and output of external
signal feedback.
Linearization point Xn
of external feedback
Linearization point Yn
of external feedback
This parameter allows defining of 9 linearization points. The
linearization function is used for definition of the required
functional relation between its input and output of external
signal feedback.
31
Directional valve
configuration
This parameter enables to change the configuration of the
valve electronics. The block symbol is used only for
configuration with coils on side A and B.
Directional valve
configuration
This parameter enables to change the configuration of the
valve electronics. The block symbol is used only for
configuration with one coil on side A, resp. side B.
Measurement point
32
7.7. Basic Configuration Blocks Detailed Description
In this part the basic blocks, which the individual block diagrams enabling the valve electronics setting
consist of, are described. Each block matches the equivalent item in the parameters table.
7.7.1. Directional Valve Configuration
Block symbol:
Description: It appears in all configurations.
The block is used for setting the valve into the required configuration. The valve is possible to be set
into the configuration E01, E02S01, E03, E04S01. Each configuration is in modification with two
solenoids or in modification with one solenoid on A side, respectively on B side. The configuration
identification in the parameters table is shown in Table 1.
Directional Valve
Configuration
With one coil on A side
With one coil on B side
With two coils
E01
E02S01
E03
E04S01
Open loop
Internal
feedback
External
feedback
Internal and
external
feedback
OL_A
OL_B
OL_A&B
CL_int_A
CL_int_B
CL_int_A&B
CL_ext_A
CL_ext_B
CL_ext_AB
CL_int&ext_A
CL_int&ext_B
CL_int&ext_A&B
Table 1 The identification of the valve configuration in the parameters table.
7.7.2. Command Signal Type Selection
Block symbol:
Description: It appears in all configurations.
The block determines the valve command signal type that is connected to the electronics input. All
signal types which can be used for the valve operation are tabulated in Table 2.
Valve configuration
Command
Signals
E01
E02S01
E03
Open loop
Internal feedback
External feedback
1 coil
+/-10V
2 coils
1 coil
X
E04S01
Internal and external
feedback
2 coils
1 coil
2 coils
1 coil
2 coils
X
X
X
X
X
0…10V
X
X
X
X
X
X
0..20mA
X
X
X
X
X
X
4…20mA
X
X
X
X
X
X
+/-10mA
X
X
X
X
X
X
12 +/- 8 mA
X
X
X
X
X
X
Table 2 Allowed command signals for possible configurations
33
7.7.3. Command Signal Polarity
Block symbol:
Description: It appears in all configurations.
The block changes the command signal polarity. Allowed command signal polarities for possible
configurations are shown in Table 3. If the block is set OFF, the valve behaves as if the command
signal was disconnected.
Valve configuration
E02S01
E03
E01
Allowed
polarities
E04S01
Internal and external
Open loop
Internal feedback
External feedback
feedback
Coils
Coils
Coils
Coils
Coil A Coil B
Coil A Coil B
Coil A Coil B
Coil A Coil B
AB
AB
AB
AB
-1
OFF
X
1
X
X
X
X
X
X
X
X
X
X
X
X
X
X
X
X
X
X
X
X
X
X
X
X
X
X
X
X
X
X
X
Table 3. Allowed command signals for given configurations
7.7.4. Threshold
Block symbol:
Description: It appears in all configurations.
The threshold sets the valve non-sensitivity around the command signal zero value. The threshold
extent is expressed in percents of one polarity command signal maximum. After the setting, the valve
does not react to command signal changes which are less than the set threshold limit. For command
signal values higher than the set threshold limit, the signal correspondent to input is output.
The function can be used in all valve configurations for attenuation of the command signal unwanted
ripple around zero value so that the valve ignores it to the command signal set level.
Example:
The command signal +/- 10V, the threshold setting 10%. If there is a signal in the range -1V…+1V in
the command input, the valve does not respond to this signal.
7.7.5. Ramp Functions
Blocks symbols:
Description of function in configuration E01, E2S01
Ramp up – coil A, respectively ramp up – coil B sets the command signal gradual increase.
According to polarity of the signal entering to ramp functions, the setting takes effect in the gradual
increase of the current for the solenoid coil A, respectively for the solenoid coil B. The ramp up – coil A
is active for positive polarity, the ramp up – coil B is active for negative polarity. The setting expresses
the time within the signal behind the ramp function increases from 0% to 100% at a 100% step
increase of the entering signal.
34
Ramp down - coil A, respectively Ramp down – coil B sets the command signal gradual decrease.
According to polarity of the signal entering to ramp functions, the setting takes effect in the gradual
decrease of the current for the solenoid coil A, respectively for the solenoid coil B. The setting
expresses the time within the signal behind the ramp function decreases from 100% to 0% at a 100%
step decrease of the entering signal.
Example: The block setting Ramp up – coil A for 5s. The entering signal change from 0 to 50% shows
itself by linear increase of the output signal from 0 to 50% for 2.5s.
Description of function in configuration E03, E04S01:
Ramp up sets the time within the signal behind the ramp function (the controlled parameter) increases
from 0% to 100% at a 100% step increase of the entering signal.
Ramp down sets the time within the signal behind the ramp function (the controlled parameter)
decreases from 100% to 0% at 100% step increase of the entering signal.
Example: The block setting Ramp up for 5s.
• The entering signal step change from 0% to 50% shows itself by linear increase of the
output signal from 0 to 50% for 2.5s.
• The entering signal step change from -50% to 50% shows itself by linear increase of the
output signal from -50% to 50% for 5s.
7.7.6. Command Signal Gain
Blocks symbols:
Command signal gain - coil A
Command signal gain - coil B
Description: It appears in configurations E01 and E02S01.
Command signal gain – coil A, respectively Command signal gain – coil B performs command
signal gain setting. According to the polarity of the signal entering the particular gain block, the setting
will influence the current flowing to the solenoid coil A or B. The block of Command signal gain – coil A
is active for positive polarity, the block of Command signal gain – coil B is active for negative polarity.
Example of setting in configuration E01:
Command signal gain in configuration E01 is expressed in mA/% which enables an easy
recomputation of the command signal to the solenoid excitation coil current. For example, if there is an
input signal +10% and the Command signal gain – coil A is set to 20mA/% value, the output
excitation current to coil A will gain 200mA value.
Example of setting in configuration E02S01:
The Command signal gain in configuration E02S01 is expressed in a non-dimensional form. If an entry
signal is set to +10% and the Command signal gain – coil A is set to 2, the output signal from the block
will be +20%.
35
7.7.7. Dead Band Compensation
Block symbols:
Dead band compensation - coil A
Dead band compensation - coil B
Description: It appears in configurations E01 and E02S01.
Dead band compensation - coil A, respectively Dead band compensation - coil B enables to
compensate the proportional directional control valve spool positive overlap.
The aim of the dead band compensation is to minimize the proportional directional control valve
neutral zone around the command signal zero value. The spool positive overlap enables to ensure a
full flow closure of the valve in the centre position by technologically advantageous production
tolerances.
In the immediate vicinity of the zero value of the signal entering the particular compensation block, the
compensation setting comes out according to the signal polarity by the current step flowing to the
solenoid coil A or B. The Dead band compensation–coil A is active for the positive polarity, the
Dead band compensation– coil B is active for the negative polarity.
Example of setting in configuration E01:
The Dead band compensation in configuration E01 is expressed in mA. If the signal entering to the
block gains positive value, the Threshold is set to 0%, the Dead band compensation – coil A is set
to 100mA, then in the command signal immediate vicinity the solenoid coil will be excited by 100mA
current.
Example of setting in configuration E02S01:
The Dead band compensation in configuration E02S01 is expressed in percentage of the command
signal maximum. If the signal entering to the block is positive, the Threshold is set to 0%, the Dead
band compensation – coil A is set to +10%, then in the command signal immediate vicinity the
output signal value from the block will be offset by +10%.
7.7.8. Current Limiting
Blocks symbols:
Current limiting - coil A
Current limiting - coil B
Description: It appears in all configurations.
The Current limiting – coil A, respectively Current limiting – coil B blocks are used for limiting the
maximum output current which is supplied from the electronics to the solenoid coil A, respectively the
solenoid coil B. The current limiting is set in mA. The current limiting value depends on the coil type
connected.
Example:
If the current limiting is set to 3500mA, at the 100% signal entering the current limiting block, the
maximum current of 3500mA will excite the solenoid coil. The set current limiting values can be
reached only in case of fulfilling the conditions resulting from the Ohm’s law.
36
7.7.9. Dither
Blocks symbols:
Dither amplitude
Dither frequency
Description of the function: It appears in all configurations.
Dither – amplitude, Dither – frequency blocks enable to define dither parameters.
Dither is a signal superposition with a defined curve for the direct-current component of the output
current from the electronics supplying the solenoid coils. Its aim is to keep the valve spool moving
constantly (oscillation with a small amplitude) by which a substantially smaller friction between the
proportional directional control valve moving parts is reached. With a help of dither, the proportional
directional control valve functional properties can be improved dramatically in the sense of hysteresis
decreasing and increasing of sensitivity to command signal changes. This function finds the biggest
use especially in configuration E01 (directly operated valve).
Dither setting:
A wrong dither setting can result in a substantially undesirable valve spool vibrating and by this the
whole hydraulic circuit. Its optimal setting differs on a case-by-case basis. Commonly, the setting is
made in a frequency range from 60 Hz to 160 Hz for the parameter amplitude range 10 to 30. Dither
parameters are optimized so that the required hysteresis value is reached and the setting does not
cause any undesired oscillations in the hydraulic circuit at the same time.
7.7.10. Internal and External Feedback Controllers
Blocks symbols:
P parameter of internal
feedback controller
P parameter of external
feedback controller
I parameter of internal
feedback controller
I parameter of external
feedback controller
D parameter of internal
feedback controller
D parameter of external
feedback controller
Description:
The blocks are used for definition of parameters of PID controllers. There are two control circuits built
in the control electronics. Controllers are in configurations E02S01, E03, E04S01. One PID controller
is used in configuration E02S01 and E03. Two cascade ranged PID controllers are used in
configuration E04S01.
General mathematical description of controllers:
General mathematical description of controllers of the internal and external feedback results from the
equation
t
du (t )
de(t )
T
+ u (t ) = P e(t ) + I ∫ e(t )dt + D
,
dt
dt
0
in which e(t) [%] is the lag error, u(t) [%] is the controller output signal and t [s] is time.
-1
Parameters P [-], I [s ], D [s], T [s] represent the controller individual adjustable parameters.
37
The controller individual components significance:
•
The proportional component
the permanent lag error.
•
The integral component
P e(t ) . It amplifies the lag error. When used separately, it works with
t
I ∫ e(t )dt . It integrates the lag error. In closed control circuit it works with
0
a transient lag error (the control process gets settled if the lag error is zero). If it is used
separately, it does not satisfy the stability conditions for the astatic systems (e.g. hydraulic motor
position control).
•
The derivative component
D
de(t )
. It derives the lag error. It cannot operate separately in a
dt
closed control loop because it allows a stable control deviation of any size. In combination with P
and I controller components it improves the control loop stability.
•
The delaying component
T
du (t )
. It changes the controller dynamic properties.
dt
Setting of controllers
There are several setting methods of the controllers. Some of them result from physics
experiments (e.g. Ziegler’s and Nichols’s methods), some result from the mathematical formulae (e.g.
various methods based on integral criteria). These methods can be learned from any technical
literature on control systems.
Here the controller setting method which can be applied in operation conditions is introduced.
The criterion of this method is reaching of the maximum proportional integration constants at the
fastest transient performance and retaining the pre-set control circuit closed loop transient
characteristic curve (e.g. maximum limited sustained value overshoot).
• Zero constant of integration I, zero derivative constant D and zero time constant of the derivative
component T is set on the controller first. The proportional constant P is set to some small value.
• After the controlled system stabilization a small control step is set and the feedback is monitored
at the same time. The controller should have a tendency to decrease the initial control deviation. If
a decreasing does not occur, there is a possibility of a wrong feedback setting (polarity or signal
ranges).
• If the negative feedback is set, it is necessary to repeat the reference input steps at the permanent
increasing of the proportional constant P so that a visible overshoot occurs. At this moment it is
necessary to return the proportional constant P to the value at which the overshoot does not occur
too much.
• Now the increasing of the integration constant should proceed in a similar way. The overshoot of
the transient response should be a little higher than supposed.
• The derivative constant D, which should decrease the higher overshoot to the specified value
again, starts to increase last.
• If the control time is maintained or even decreased due to increasing the derivative constant D, the
constants P and I can go still higher.
• If the control time is prolonged at the system stabilization by means of the derivative component, it
is necessary to decrease constants of all components, especially D constant.
• Prolonging of acting of derivative component is possible to carry out by T constant.
38
7.7.11. Type of External Feedback Signal
Block symbol:
Type of external feedback signal
Description: It appears in configurations E03 and E04S01.
Type of external feedback signal block defines the type of the signal flowing to the electronics input
from the external sensor. The allowed signals from the external sensor are 0..10V, 0..20mA, 4..20mA.
The standardly supplied valves in configurations with external feedback E03 and E04S01 have this
input set as voltage with the signal level 0..10V.
7.7.12. External Feedback Signal Polarity
Block symbol:
External feedback signal polarity
Description: It appears in configurations E03 and E04S01.
The block changes external feedback sensor signal polarity. If the block is set OFF, the valve behaves
as if the external feedback sensor signal was disconnected.
7.7.13. External Feedback Signal Offset
Block symbol:
External feedback signal offset
Description: It appears in configurations E03 and E04S01.
It sets the external feedback signal offset which is performed in percentage of the external feedback
sensor signal range.
Example:
The external feedback signal type is voltage, with 0…10V level. The signal coming out of the external
feedback sensor is 2V. The signal offset is set to (-20%). On the external feedback signal offset block
outlet, there will be the 0% output signal for this value of a feedback signal.
7.7.14. External Feedback Signal Gain
Block symbol:
External feedback signal gain
Description:
It is used for reaching of the external feedback signal gain required value.
Example:
The signal entering the gain block is 10 %. The gain is set to 2. Then the signal flowing out from the
gain block will be 20%.
39
The external feedback setting in configuration E03 a E04S01
Setting functions External feedback signal polarity, External feedback signal offset, External
feedback signal gain are gathered into one dialog box in the block diagram for the external feedback.
The diagram which is shown after activating by means of one of the blocks described (see Figure 31)
shows the signal transformation from the external feedback sensor after its passing through these
blocks.
If the feedback linearization function is non-active, the signal output behind blocks of External
feedback signal polarity, External feedback signal offset, External feedback signal gain
represents the input into the controller differential component.
Signals of the same polarity must enter the controller’s differential component!
An example of the external feedback setting.
It is required that the input signal to the differential component is 80% for the 0% signal coming out of
the external feedback sensor. At the same time it is required that the input signal to the differential
component is 0% for 100% signal coming out of the external feedback sensor. The assumption is that
the external feedback linearization function is non-active.
The graphical presentation gathering the set parameters serves fulfilling the above-mentioned
requirements. The resulting setting is as follows (see Figure 31): Offset 99.99%; Gain 0.8; Polarity:
negative.
Figure 31. External feedback dialog box – gain, polarity, offset
(an example of an external feedback setting)
40
7.7.15. Linearization Function
Blocks symbols:
Internal feedback signal linearization -activation External feedback signal linearization - definition
External feedback signal linearization -activation External feedback signal linearization - definition
Description: It appears in configurations E02S01, E03 and E04S01.
Linearization activation of internal or external feedback causes that the signal from the position
sensor, eventually external sensor is processed with a help of linearization functions. The linearization
function enables to define 9 node points. The coordinates of the node points are entered in
percentage (see Figure 32).
The linearization functions usage can be advantageous in cases when it is necessary to change a
natural form of the functional dependence between the command signal and the output quantity (flow
rate, position, pressure, force, speed, etc.) In configuration E02S01 the linearization function can be
used for a compensation of naturally non-linear proportional directional control valve flow rate
characteristics. In configurations E03 and E04S01 the linearization function enables to solve tasks
when it is necessary to compensate non-linearities of kinematic systems given by construction, when
using asymmetric cylinders etc. In specific cases the linearization function can be used also for dead
band compensation in systems with internal and external feedback (configuration E04S01).
Example:
External feedback signal processing by means of a linearization function. (Xn,Yn) define the
linearization function point.
Signal before linearization block
Linearization point
Xn
-98%
-90%
-65%
-30%
0%
20%
40%
60%
80%
45%
80%
60%
80%
Signal behind linearization block (linearization function activated)
Linearization point
Yn
-60%
-35%
-15%
-5%
0%
5%
20%
Signal behind linearization block (linearization function non-activated)
-100%
-90%
-65%
-30%
0%
20%
40%
Figure 32. External feedback linearization function dialog box.
41
7.8. Measurement
The valve electronics enables, in so-called measurement points, to measure actual signals values and
excitation currents to valve coils.
To measure via measurement points a block diagram of the actual configuration must be displayed.
The measurement points are marked with red squares (see Figure 33) and they are placed between
blocks enabling the parameters change. The requested measurement point is activated by a single
click left mouse button on the measurement point mark.
A further possibility to measure the signals represents the use of the dialog box with predefined
selection of signals. The measurement dialog box differs according to the chosen configuration.
Regardless of the chosen configuration, the measurement of the command signal and currents to the
valve coils is always performed. If a configuration with the feedback is chosen, the signals that help
with the feedback setting are shown as well.
The measurement dialog box (see Figure 34) is accessible from any point of the program. The dialog
box can be activated
• by menu item Display->Measurement,
• or by toolbar button Measurement.
Figure 33. Block diagram in configuration E02S01 – a measurement point example.
Figure 34. An example of a measurement dialog box in configuration E02S01.
42