1
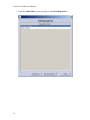
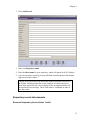
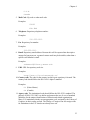
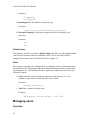
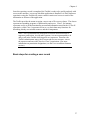
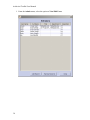
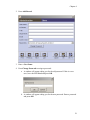
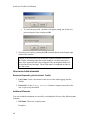
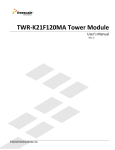
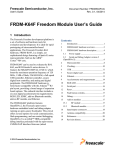
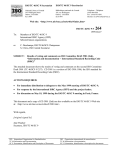
Chapter 4
Managing the Archivists' Toolkit
Overview
The Archivists' Toolkit has an administrative menu with options for configuring the
connection to the database, creating a repository record, establishing users and assigning
permissions, generating reports, importing data, and customizing the application
interface. Some tasks, such as configuring the connection, creating a repository record,
and establishing users, should be done before entering other data into the Toolkit. Others,
such as customizing the application interface, may be done after becoming with familiar
with the application, or not at all. (See Chapter 16 for details on customizing the
application interface.)
Note: Once you have completed the process of establishing your
repository record and any necessary user accounts, you may wish to enter
location records for your repository. Creating location records at once
before they are assigned may result in more consistency among the
records, and the Toolkit provides a Batch Add feature for efficient
creation of multiple location records. For details on creating and assigning
location records, see Chapter 13.
Creating the repository record
Overview
Once you have installed the Archivists' Toolkit, you must create a repository record
before the application can be used. The repository record serves two basic purposes. It
stores information, such as your repository’s contact information and identifying codes,
so that it can be output in administrative and descriptive reports. For example, this
information serves as the source for content in the headers for EAD and METS.
Recording and storing it in one place, at the repository level of description, alleviates the
need for repetitive data entry at the resource level and makes revision easier.
The repository record has a second purpose in a multi-repository implementation of the
AT. It serves to distinguish one repository’s records, data rules, and project definitions
from those of another repository using the same AT implementation.
Basic steps for creating the repository record
31
Archivists' Toolkit User Manual
1. From the Admin Menu, select the option to View/Edit Repositories.
32
Chapter 4
2. Press Add Record.
3. Enter your Repository name.
4. Enter the Short name for your repository, which will appear in all AT displays.
5. Save the repository record by pressing the Save command button at the bottom
right corner of the window.
Caution: If the record does not include the required elements listed above,
the Toolkit will indicate that the record cannot be saved because one or
more of the required fields is not completed. The uncompleted fields will
be listed in the error message. These fields must be completed in order to
save the record.
Repository record data elements
Elements Required by the Archivists’ Toolkit
33
Archivists' Toolkit User Manual
1. Repository name. Enter the name of your repository as you would like it to
appear on administrative reports and descriptive outputs.
Examples:
University of Massachusetts Amherst Special
Collections and University Archives
Scripps Institute of Oceanography Archives
2. Short name. Enter an abbreviated version of your repository name, as you would
like it to be displayed in the AT interface.
Examples:
UMass SCUA
SIO Archives
Additional Elements
You can extend the minimum repository record by recording data for any of the
following data elements. None of these data elements are required to create the repository
record, but many of them may be desirable. For example, your institution will likely want
to include contact information that can be exported with any descriptive outputs that will
be shared with researchers.
1. Address. The Toolkit offers three address lines for the repository's address. All
three need not be used.
Examples:
W.E.B. Du Bois Library
154 Hicks Way
2. City. The town or city in which the repository is located.
Examples:
Amherst
New York
3. Region. The repository's state, province, or other region.
Examples:
MA
Ontario
4. Country. Enter the country in which your repository is located.
Examples:
34
Chapter 4
U.S.A.
Canada
5. Mail Code. Zip code or other mail code.
Examples:
01003
K1A 0N4
6. Telephone. Repository telephone number.
Examples:
212-555-1212
7. Fax. Repository fax number.
Examples:
212-555-1213
8. Email. Repository email address. Because this will be exported into descriptive
outputs for long term use, a general contact email may be desirable, rather than a
specific staff member's email.
Examples:
[email protected]
9. URL. URL for repository web site.
Examples:
http://www.collectionscanada.ca/
10. Country code. The code for the country in which your repository is located. The
country code should follow the ISO 3166-1-alpha-2 standard.
Examples:
US (United States)
CA (Canada)
11. Agency code. The institutional code should follow the ISO 15511 standard. The
purpose of ISO 15511:2003 is to define and promote the use of a set of standard
identifiers for the unique identification of libraries and related organizations.
Many U.S. institutions already use an appropriate code, assigned by the Library of
Congress, in their catalog records. The Library of Congress can also assign codes
for institutions in the U.S. that do not already have one.
35
Archivists' Toolkit User Manual
Examples:
US-MaNoSCA
US-CaLjSIOA
12. Branding device. The URI for a repository logo.
Examples:
http://www.collectionscanada.ca/seal.gif
13. Descriptive language. The primary language used for description by the
repository.
Examples:
eng
fre
Default Values
The repository record also contains a Default Values tab where you can establish default
values for data elements and notes within the Toolkit. This is one of the Toolkit's
customization features, and is described in detail in Chapter 16.
Notes
The repository record also has a Notes tab for recording any narrative information about
the repository itself. This might include the collection development policy, details about
operating hours, etc. This information will be output in the repository record, but not in
descriptive outputs.
1. Label. A header or brief explanatory statement of what the note is. A few
examples are provided in a lookup list that can be edited.
Examples:
Reading Room Hours
2. Note Text. Content of the note itself.
Examples:
Open Monday through Friday, 9:00-5:00
Managing users
Overview
36
Chapter 4
Once the repository record is completed, the Toolkit is ready to be used by anybody with
access to the machine / servers on which the application is installed. It is likely that most
repositories using the Toolkit will want to control certain users' access to some of the
information or features of the application.
The Toolkit provides the means to assign a user to one of five access classes. The classes
represent an expanding sequence of functionality and access. Class 5, for instance,
represents access to all the functionality present and information stored in the AT for all
repositories, while Class 1 represents access to very basic data entry functions for
describing already accessioned resources and their components.
Note: Class 5 permissions are analogous to what are often referred to as
superuser permissions. As with other systems, it is not recommended to do
daily work in the Toolkit while logged in as a superuser. Therefore, the
Toolkit's administrator may wish to create and use two accounts - one as
the superuser and one with Class 4 or Class 3 permissions. (For more
information on permission designations, see the User record data elements
section.)
Basic steps for creating a user record
37
Archivists' Toolkit User Manual
1. From the Admin menu, select the option to View/Edit Users.
38
Chapter 4
2. Press Add Record.
3. Enter a User Name.
4. Press Change Password to assign a password.
a. A window will appear asking you for the old password. If this is a new
user, leave the field blank and press OK.
b. A window will appear asking you for the new password. Enter a password
and press OK.
39
Archivists' Toolkit User Manual
c. To verify the password, a window will appear asking you for the new
password again. Enter it and press OK.
5. Save the user record by pressing the OK command button at the bottom right
corner of the window.
Caution: If the record does not include the required elements listed above,
the Toolkit will indicate that the record cannot be saved because one or
more of the required fields is not completed. The uncompleted fields will
be listed in the error message. These fields must be completed in order to
save the record.
User record data elements
Elements Required by the Archivists’ Toolkit
1. User Name. Create a user name for the user to enter when logging into the
Toolkit.
4. Password. Use the Change Password button to assign a password for the
user, as previously described.
Additional Elements
You can extend the minimum user record by recording data for any of the following data
elements.
1. Full Name. The user's complete name.
Examples:
40
Chapter 4
John Depp
Marie Smith
2. Title. The user's position title.
Examples:
Head, Archives and Special Collections
Project archivist
3. Department. If your repository is organized into departments, you may wish to
record the user's department here.
Examples:
Technical services
Public services
4. Email. User's email address.
5. Access class. The access classes, ranging from zero to five, correspond to the
following permissions:
5 - All read/write and functional permissions for all repositories sharing the
installation. (Superuser)
4 - All read/write and functional permissions for a single repository. (Application
manager)
3 - Read only permissions on repository and user records, all other read/write and
functional permissions for a single repository. (Project manager)
2 - No application or project management customization permissions. Unable to
read or write name contact information. (Advanced data entry staff)
1 - No application or project management customization permissions. Unable to
read or write name contact information. Read only access to accession, digital
object, name, subject, and location records. Read/write permissions on resource
and component description records. (Beginning data entry staff)
0 - May search accession and description records. May not enter any data.
(Reference staff)
6. Repository. Use the drop down box to assign the user to the appropriate
repository.
41