1
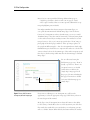
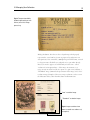
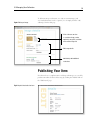
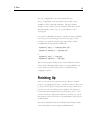
VERSION 2.1 USER MANUAL Streetprint Engine 2.1 User Manual by Matthew Ogle cc 2004 Streetprint.org Some rights reserved. This work is licensed under the Creative Commons Attribution-NonCommercial-ShareAlike License. To view a copy of this license, visit http://creativecommons.org/licenses/by-nc-sa/2.0/ or send a letter to Creative Commons, 559 Nathan Abbott Way, Stanford, California 94305, USA. The events and characters portrayed in this user manual’s case study are fictitious. Any resemblance to persons, living or dead, is purely concidental. This manual was designed and set into type by Hannah Wensel. Illustrations by Chris Govias. Printed and published in Edmonton, Alberta at the CRC Humanities Computing Studio (University of Alberta) ˚ ˇ ˇ for Linotype in The text face is Fairfield Light, designed by Rudolph Ruzicka 1939, digitized by Alex Kazcun in 1991. The captions are set in Univers Condensed, designed by Adrian Frutiger in 1957 for Deberny & Piegnot, digitized by Linotype in 1997. Contents 5 I. Introduction 6 Preface 7 Old Man Grinnel and the Milk River Archive 9 II. Installation 10 PHP and MySQL 10 Download 11 Install 13 III. Site Configuration 14 The Administrative Interface 15 Getting Started 17 Users 18 About Your Site 21 Type Management 27 Search/Browse Options 28 Community Tools 30 Course/Syllabus Tools 31 IV. Managing Your Collection 32 Overview 33 Garbage In, Garbage Out 35 Image Capture 36 Image Processing 42 Adding a Text Record 48 Adding Images 52 Publishing Your Item 54 Editing Your Collection 55 Deleting From Your Collection 56 That’s All, Folks 57 V. Skins 58 Comfortable In Your Skin 59 The Graphics Directory 60 Roll Your Own 61 Finishing Up 63 Welcome Aboard CHAPTER I INTRODUCTION I. Introduction 6 Preface The Streetprint Engine began with a simple idea. A collection of British street literature needed an online home, a place where students and researchers could interact with these fragile texts as though they were sitting down with the original artifacts. The technological complexity of this task soon became a problem; specialists in centuries-old popular print are rarely internet wizards. In search of an ideal solution, our team in the CRC Studio (www.crcstudio.arts.ualberta.ca) developed the Streetprint Engine, free software that gives researchers and collectors (like you) easy-to-use tools to create powerful digital archives and share them on the web. Team Streetprint broadened its focus along the way, creating a system which can now showcase much more than “street print.” We like to think, however, that the ideals which underlie our first collection— finding value in the popular and the importance of public circulation, among others—remain at the core of the Streetprint Engine’s mission. Fig 1. Robinson Crusoe, from The next few pages of this manual will introduce you to “Old Man Streetprint: “Revolution and Grinnel” and lead you through the process of creating a Streetprint site Romanticism” which showcases his eccentric (and imaginary) collection. Along the way, you may be surprised when we point out our software’s rough edges in addition to the tasks it handles with ease. Our intention with this manual’s case study is to push the boundaries of our current Streetprint Engine version, illuminating its flexibility but also its current restrictions. Why do this? Since the Streetprint Engine is “open source” software, any programmer in the world can view our code and make improvements which will then benefit all Streetprint users. Even if you’re not a programmer, you can join the team by reporting bugs or letting us know what improvements you would like to see in the next version of the Streetprint Engine. By highlighting some of our current shortcomings, we hope that we can spur development and turn any existing weaknesses into future areas of strength We hope you enjoy this manual. See you online! – Team Streetprint (www.streetprint.org) I. Introduction 7 Old Man Grinnel and the Milk River Archive “ Scattered among these masquerades were people of a different type...they loitered on the corners or stood with their backs to the store windows and stared at everyone who passed...Tod knew very little about them except that they had come to California to die. —Nathanael West, The Day of the Locust ” Kasper von Grinnel left Milk River much the same way he came; quietly, mysteriously, unceremoniously. After nearly forty years on an old homestead near this southern Alberta town, the strange recluse from California was a fixture in Milk River lore. Old Man Grinnel had faked his own death back in the 1950s, the locals swore, fled north from Hollywood during the communist scare. Neighbours claimed he hadn’t left his house in years; children dared each other to throw rocks through his farmhouse windows on Halloween night. And then one day he was gone. It took a while for Milk River to notice. Grinnel’s farm gradually went to seed, the grocer wondered why the phone failed to ring with the usual weekly order. When the local RCMP detachment entered the house and found no body, no trace of a struggle, new rumors swirled about town: Grinnel was on the run again; he’d gone back to California; he’d been stealthily abducted. But as time passed, it became clear that the old eccentric was gone for good, and his farmhouse was put up for auction. It was around that time that an RCMP officer came knocking at your door. Barely into your fourth week as Milk River’s first official civic archivist, you were surprised to hear the officer had something to show you. No corpse had been found in Grinnel’s farmhouse, but something else had: the old man’s sprawling collection of Hollywood memorabilia. The cops had filled an entire stockroom with the stuff: film reels and movie posters, signed photographs, letters from directors and starlets, even a bizarre assortment of old props from horror and science fiction movies. The RCMP didn’t feel like storing it for much longer, the officer explained. “Do you want this stuff?” I. Introduction 8 And so your first big project has begun. The material in Grinnel’s collection is compelling, providing a powerful textual and visual history of Hollywood’s seedier side, and even hinting at what brought Grinnel into your own community so many years ago. But how to catalogue this collection and share your research? A digital archive would be ideal, since it would both preserve the material and allow you to share it with the greater public, but you’re not a computer expert and the town’s archival budget is meagre at best. You occupy an office along with the mayor’s secretary, and your equipment consists of a single computer, a digital camera, a scanner Look out! It’s the Doom Machines! Fig 2. Poster for The ‘Doom with some image-editing software, and an internet connection. What can be done? Machines’ from Kasper von Enter the Streetprint Engine. This manual will guide you, step-by-step, Grinnel’s collection on how to use our free software to create a website which showcases and preserves Kasper von Grinnel’s eccentric legacy. Let’s get started... CHAPTER II INSTALLATION II. Installation 10 PHP and MySQL Geek Alert! Before getting started with the Streetprint Engine, you need access to a This chapter of the Streetprint web server which can host your Streetprint site and give it a home on the Engine manual is by far the Internet. Streetprint requires a web server with the following software geekiest of the lot. If you need installed: any help with this section, we – PHP 4.1 or higher* recommend you consult your – MySQL 3.23 or higher** nearest internet wizard or technical support staff member. This configuration is a common one; nearly all web hosting companies should be able to provide this setup for only a small monthly fee. Alternatively, you can run the Streetprint Engine from your own computer running Mac OS X , Linux, or Windows provided that you are able to install and configure web server software with PHP and MySQL. * PHP support can be found at www.php.net ** MySQL support at www.mysql.com Download Once the server is ready—lucky us, we were able to get www.oldmangrinnel.com for only $8/month!—it’s time to download the Streetprint Engine. It can be found online at: www.streetprint.org/engine_downloads.php Fig 3. The download page at Streetprint.org. Linux/UNIX users should grab the .tar.gz file, and Mac/Windows users should use the .zip file. II. Installation 11 Install When your download is complete, easy installation instructions can be found in the included ReadMe.html file. Follow the on-screen directions and your Streetprint site will be up and running in a matter of minutes! (There are unfortunately so many different server configurations that it is impossible to illustrate them all here. If you have any problems with this part of the installation, we recommend contacting your web hosting company, your server administrator, or a local internet geek—they have the information you will need to complete the installation process.) Fig 4. Uploading files with FTP. Fig 5. Setting up the database. II. Installation 12 Fig 6. All done! Success! Our new Streetprint site is now online at: www.oldmangrinnel.com/ streetprint/ For Power Users: Streetprint’s Directory structure explained Wondering what all those files and folders in your Streetprint directory do? Here’s a quick guide to some of the important ones: admin/ Streetprint’s administrative tools live in this directory. console.inc Streetprint’s navigation console, appears at the top of every page. courses/ and coursefiles/ Course syllabi and their associated files are placed in these directories. gfx/ This folder contains all the graphics which make up your Streetprint site’s “skin.” If you want to customize the design of your Streetprint site, this is the place to start. imagelibrary/ Once images have been added to your Streetprint database, they are renamed and placed here. medialibrary/ See above, but this time with media files. sp_config.php This is your Streetprint site’s primary configuration file. You can edit it to change database information, the names of your graphics files, your site’s character set, and more. sp_style.css Your Streetprint site’s style sheet. Although future versions of Streetprint will rely more heavily on CSS-based designs, you can still make a lot of tweaks to the look of your site here. uploadfolder/ This is where you will place images that are ready to be added to your Streetprint database. CHAPTER III SITE CONFIGURATION III. Site Configuration 14 The Administrative Interface Streetprint’s administrative interface provides the tools you need to configure and maintain your Streetprint website in a friendly, easy-to-use manner. Since this manual will focus primarily on what to do with your Streetprint site (and not how to do it), here are a few quick tips for getting around: Breadcrumb Trail: Located at the top of every page, the “breadcrumb trail” works just like it does in Hansel and Gretel; it shows your current location and the path you took to get there. Every underlined word is a link, which can be clicked to return to a previously-visited screen. Fig 7. An example of the breadcrumb trail Big Bold Links: It’s hard to miss primary links in the Streetprint administrative interface: they’re big, they’re bold, and they display dotted underlines when you move your mouse over them. Clicking them will take you to a new screen. Fig 8. Want to edit your collection? Click this Colour Coding: Many screens in the administrative interface use colour coding: green for an action which will add something, yellow for editing, and red for deletion. Click those Buttons: Changes you make on screens in Streetprint’s administrative interface will not be saved until you click a button. The name of the button will remind you of the Fig 9. A friendly neighbourhood action it will perform, and you will always button see a status message (in the appropriate colour) confirming your action. Have Fun: You don’t need to be afraid of Streetprint’s administrative interface—we made it pretty difficult to break stuff. Try new things, play around, and let us know how we can continue to improve the interface in future versions of the Streetprint Engine. III. Site Configuration 15 Getting Started Now that our Streetprint site is up and running, it’s time to configure it specifically for Old Man Grinnel’s collection. The administrative tools for any Streetprint site can be found by adding “admin” to the website address. In our case, we would log in by going to: www.oldmangrinnel/streetprint/admin/ The first time you log in, use admin as the user name and leave the password blank. The Streetprint Engine will then prompt you to change your password and enter some personal information for your administrative account. Once logged in, you will see the two main areas of Streetprint’s administrative interface: Site Configuration and My Collection. The Site Configuration section of the Streetprint Engine is composed of six sections: About Your Site, Users, Type Management, Search/Browse Options, Community Tools, and Course/Syllabus Tools. This chapter of the manual will guide you through each of these sections. Fig 10. The link to the Site Configuration section III. Site Configuration Fig 11. Inside the Site Configuration section. 16 III. Site Configuration 17 Users Fig 12. Editing the admin user The Users section will be your first encounter with Streetprint’s administrative interface. The first time you log in, you’ll be prompted to change your password and enter some other information: If you have more than one person working on your Streetprint site, you can add user accounts for them very easily. Fig 13. The Users screen Not all accounts are created equal, however. Editors are users who have the same privileges as your admin user: they can configure the site and add/edit/delete items to your collection. Data entry users can only add collection items and edit records which they added themselves. This helps you maintain editorial control over your new Streetprint site if you so choose. Streetprint Tip: Later on, we’ll show you how the information you enter for your user User Information accounts can be displayed automatically on your Streetprint site’s “About” page. III. Site Configuration 18 About Your Site The About Your Site section lets you configure most of the things visitors will first notice when visiting your online Streetprint archive. Artifact Name: The Artifact Name screen allows you to change the word used to describe items in your collection. “Texts” is the default setting. Many pieces in Old Man Grinnel’s eccentric collection—outside academic circles, at least—wouldn’t normally be considered “texts.” Borrowing the nomenclature we’ve been using in this manual, let’s change the artifact name from “texts” to “items:” Front & About Pages: This section lets us change the text blurbs which appear in various places around our website, as well as the name of our site Fig 14. That’s one hot item! itself. The page is divided into three sections, each with its own button for submitting changes. The first section lets us set our page title and site name. Fig 15. Editing the front page and site names In our case, we’ve opted to have “Old Man Grinnel and the Milk River Archive” appear at the top of our website’s browser window (the page title), and use the shorter “Milk River Archive” as the site name. III. Site Configuration 19 The rest of this section allows you to specify the text which appears on the website’s home page, on the site’s “About” page, and in the fine print at the bottom of every page. It also provides a field for describing the equipment and methodology used for digitizing the items in your site, and even a checkbox for displaying information about your website’s contributors on the site’s “About” page. When checked, the “About” page will display the name, email address, and biography of every user that has been set up in Fig 16. When you type this... the Users section, listing them under the heading “Project Staff.” Fig 17. ...your eager web-surfing audience sees it here. III. Site Configuration For Power Users: Digitization Procedures 20 Your “Digitization Procedures” text field is the perfect place to enter precise technical information on your archival process once it has been established. As an example, here’s the Digitization Procedures text from Streetprint’s flagship collection, Revolution and Romanticism: All images on “Streetprint: Revolution and Romanticism” were catalogued between July 2002 and March 2003 by Chris Govias. Images were scanned as 300 dpi TIFF files using an Epson Perfection 1250 flatbed scanner. Detailed images (such as woodcuts) were captured at 600 dpi using the same equipment. Oversized images were captured with a Nikon CoolPix 995 3.34 megapixel digital camera. These raw images were then resized, color-corrected, and optimized for the web using Adobe Photoshop 7. A series of Photoshop actions automated this procedure. The images were then added to the site using the Streetprint Engine’s image management system (Version 1.0). Featured Text: Every Streetprint site has a featured text, an artifact or item which is displayed on the front page of your website. This is a great way to draw visitors into your collection, provide some dynamic content, or just show off your favourite image—you can change the featured item as often as you like. Once your featured item is selected, you can optionally select an image other than the default image to display; this could be useful for highlighting an unusual feature inside a text instead of displaying the cover, for example. Since we don’t have any items in our collection yet, we’ll come back here later... Metadata: The Metadata screen currently allows you to do one simple Fig 18. How to enable Metadata thing: turn your Streetprint’s site’s metadata on and off. (It is on by default.) III. Site Configuration 21 What is metadata? Simply put, metadata is “data about data.” While Old Man Grinnel’s collection is definitely unique, it is useful to provide ways for other organizations and databases to be able to “read” our item information in a common format. Streetprint’s current implementation of this feature provides basic metadata using the Dublin Core Metadata Initiative’s metadata terms. If the “Enable DCMI Metadata” box is checked, DCMI -compliant metadata tags will be added to the source code of your Streetprint site’s item/text pages. While this change will not be visible to most browsers, any software which is “metadata aware” can use this additional information. The metadata tags added to your Streetprint site’s text/item pages will look Fig 19. Metadata tags something like this: <meta name=”DC.Title” content=”Letter from Ed Nagy”> <link rel=”SCHEMA.dc” href=”http://purl.org/metadata/dublin_core_elements#title”> <meta name=”DC.Creator” content=”Edward Nagy”> <link rel=”SCHEMA.dc” href=”http://purl.org/metadata/dublin_core_elements#creator”> (etc.) Team Streetprint welcomes feedback on our metadata implementation from experts in this field. The Streetprint Engine’s architecture permits the addition of multiple metadata formats and XML export options in the future, should this become desirable. * For more information on Dublin Core Metadata, visit www.dublincore.org. Type Management Every collection is different, and so the Streetprint Engine’s Type Management section lets you organize your collection in a useful way, creating a research taxonomy which will be unique to your site. As we’ll see later, this will also shape the ways in which users will be able to search and browse your Streetprint site. The four different “types” which this section lets you manage are document types, categories, image types, and media types. We’ll examine them in order. Document Type: Every text, item, or artifact in your Streetprint site has a single document type. In Streetprint lingo, a document type is simply the III. Site Configuration 22 name for the kind of physical object in question; it’s the answer to the question “so what is this thing?”. Every item in your collection must have one (and only one) document type. When you click on “document types” from the Type Management screen, you will see an interface which is shared with all the types in this section, a single screen from which you can edit current types, add new types, or delete existing types. Many of the items in Old Man Grinnel’s collection are movie posters, so let’s make “Poster” our first document type. You’ll notice that we already have a single document type, named Fig 20. Managing document types “Default.” Instead of creating a whole new document type, let’s edit this Default type (by clicking the ‘edit’ link next to its name) and rename it to “Poster.” Fig 21. Defaults? We don’t need no stinkin’ defaults! Streetprint Tip: Description Fields The “description” field (for all types in the ’type management‘ section) is optional, and can be left blank. It might be useful, however, to use this field to document any notes you have III. Site Configuration 23 about the type you are setting up, especially if you are working on your site with other collaborators. Future versions of the Streetprint Engine may also use the information in these fields in an expanded version of the “About” section. What other document types do we need? After sifting through all the boxes in Old Man Grinnel’s collection, we’ve discovered the following kinds of items: – Photograph – Letter – Concept Art – Telegram – Movie Prop We can use the document types screen to add these types. One detail to note is the “Default Image Type” pull-down menu, which will be set to “Front” by default. We can safely ignore it for now; this menu’s function will be explained later in this section when Image Types are discussed. Fig 22. Adding more document types For Power Users: Wait a second, what happens if I have 30 “books” in my collection Deleting Types and then I delete the document type “book”? Don’t worry, Streetprint won’t let you do this. You’ll get a warning message, and you’ll have to delete (or pick new document types for) all the individual books in your collection before you can get rid of the document type. This probably won’t occur very often, however; most of the time, you’ll simply want to rename your document types (or categories) instead of deleting them. IV. Managing Your Collection Fig 37. The second half of Streetprint’s “Edit Details” page. 24 III. Site Configuration 25 Categories: Categories are similar to Document Types, but with one key difference: items in your Streetprint collection can belong to multiple categories, whereas each item can only have one document type. Because of this, the uses for the Categories type are nearly endless; you can use them to set up thematic categories, use them as keywords, or set up any other sort of distinctions you like. One thing the document types we’ve just set up for Old Man Grinnel’s collection don’t tell us is what kind of subject matter the artifacts address. Categories can help us address this problem, and we can always add more as we need them. For now, we’ve come up with the following categories for our archive: – Science Fiction – Directors – Horror – Los Angeles – Thriller – Milk River – Comedy – Thinly Veiled Communist Allegories – Actors – (Etc.) Image Types: Image types are like document types, but for images. Every image you add to your Streetprint site must have one (and only one) image type. By default, Streetprint comes with three image types that clearly have books in mind: Front (for front covers), Back (for back covers), and Inside (for inside pages). Since Old Man Grinnel’s collection consists mainly of artifacts such as posters and photographs, “Front” still makes sense as an image type, and we could perhaps keep “Back” in there as well, in case there is some writing (or lipstick) on the back of a document and we would like to include it in the site. “Inside” doesn’t really apply to our collection, however, so let’ delete it. Fig 23. Deleting an image type III. Site Configuration 26 Instead, we’ve come up with the following additional image types: – Single Page (for letters, which we will scan one page at a time) – Close-up (for artifacts where we want to provide additional close-up images highlighting certain details) You might remember that when creating new Document Types, we saw a pull-down menu named “Default Image Type.” One of the nice features of a Streetprint site is that, when browsing, a user sees a small “thumbnail image” above the name of items in the collection, letting them see the artifact instead of just reading its name. If an artifact has several images, however—let’s say it’s a movie prop and it has a “Front” image (a photograph of the whole prop) and three “Close-up” images (photos of the prop from different angles)—how does Streetprint know which single thumbnail image it should choose to represent the artifact as a whole? The answer is that it looks at the document type of the artifact in question, and then chooses the first image which matches the document type’s “Default Image Type.” For our collection, having the default image type set to “Front” is usually a good choice. There’s one exception, however: we decided earlier that we would use the “Single Page” image type for all the pages of a letter, including the first page. This means we should set Letter’s default image type to “Single Page”: Fig 24. Please, Mr. Postman: Every time we add images to our Streetprint site, we’ll have the change my default image type opportunity to select the appropriate image type. We’ll show you how in the next chapter of this manual. Media Types: One of Streetprint’s more advanced features is the ability to add a variety of media files to the record of any item in your collection. If an artifact has media files associated with it, a user browsing your site will see a “Media” button. When clicked, this button will list the artifact’s III. Site Configuration 27 media and provide download links. As you’ve probably guessed, Media types are a lot like Document or Image types. Streetprint knows about two media types by default: MP3 audio files and Quicktime Movies. Adding media types is extremely easy; all you need is a name, a description, and the file “extension” belonging to files of this kind. (“Extension” simply refers to the letters or numbers which occur after the “.” in the filename—mp3, doc, mpg, etc.) For Power Users: Media types are a great way to associate any kind of file with items in Uses for Media Types your collection. Simply by adding the appropriate media type, you can incorporate everything from PDFs and Powerpoint files to Flash movies into your Streetprint site. A current shortcoming, however, is that Streetprint simply provides download links in this format, regardless of media type: – testmovie.mov (Quicktime Movie, 1.2 MB) This movie is a test movie. There currently is no default way to have some content (movies or sound files) play “inline.” Important note: By default, most PHP servers limit uploaded file sizes to 2MB or smaller. If you plan to add media files which are larger than 2MB, you may need to contact your server administrator and have them change this setting first. Now that we’ve set up all of our site’s types, we’re nearly ready to add items to our collection, the topic of the next chapter. But rather than cut right to the chase like a bad Hollywood B-movie, let’s develop our plot a bit more and take a look at the rest of the ‘Site Configuration’ section... Search / Browse Options This section consists of a single, easy-to-use screen. Because every artifact in our Streetprint site will have a title, a document type, and many other optional fields of information, we need to let the Streetprint Engine know III. Site Configuration 28 which of these are important for users browsing and searching our site. For the Milk River Archive, we likely won’t be using the “publisher” field very often, we don’t have any “first lines” (a field mostly useful for poetry), and fields such as “Location” and “City” aren’t of primary importance. We’ve decided to chose the following search and browse options: We’ll examine most of these fields at greater length in the next chapter. Fig 25. Editing search and browse options. Community Tools Team Streetprint plans to gradually build more and more “community tools” into the Streetprint Engine. The Community Tools section is new in version 2.1, and is currently used for managing user comments. By default, every Streetprint site features the ability for site visitors to add their own comments to the texts/items in your digital archive. Visitors to your site will see comments displayed like this: Fig 26. Everybody’s talkin at me... A ‘comments’ entry when viewing a collection item with two comments. III. Site Configuration 29 Fig 27. Clicking on a “view” or “add” comment link displays a popup window like this one. Fig 28. Small symbols indicate the presence of comments while browsing. Clicking them will bring up the appropriate pop-up window. III. Site Configuration 30 If you would prefer not to feature user comments on your Streetprint site, you can turn this feature off with a single click on the “Community Tools” page. It can also be re-enabled at a later date if you so choose. Fig 29. Click here to disable user comments The Streetprint Engine makes it easy to keep an eye on your user comments and delete inappropriate comments as necessary. Clicking on “Delete Comments” from the main Community Tools page will take you to a screen listing all your site’s comments in reversechronological order. Comments which are new will appear in blue. To delete a comment, simply check Fig 30. Deleting Comments. the box next to it and click the “Delete Comments” button. Use this tool sparingly; once comments have been deleted, they cannot be recovered. Course / Syllabus Tools This section of Streetprints administrative interface is aimed at instructors using Streetprint as an instructional aid. It will be documented in a later version of this user manual. If you want to use Streetprint in your teaching, however, give it a try! CHAPTER IV MANAGING YOUR COLLECTION IV. Managing Your Collection 32 Fig 31. “Situation Even Worse,” Telegram to Kasper von Grinnel from Charles Burrell, 1951 Overview Now that our Streetprint site for the Milk River archive has been installed and configured with a site name, document types, categories, and more, it’s time to begin adding items to our collection! The process of adding a collection item to your Streetprint site has five steps, and generally proceeds in this order: Adding to Your Collection – Steps: 1. Image capture (scanning or taking a digital photograph of the item) p 35 2. Image processing: enhancing the image if neccessary and re-sizing it for the web. p 36 3. Adding a Streetprint collection record for the item. p 42 IV. Managing Your Collection 33 4. Adding images to the collection record p 48 5. Optionally adding media files, fulltext, etc. to the collection record p 47 These steps don’t need to proceed sequentially for every individual collection item, however. If it is more convenient, for example, you could complete the first two steps (image capture and processing) for every item in your collection before adding any collection records to your Streetprint site (step three). Likewise, each step can happen at a different time, or be performed by a different person if you so choose. About Images: It becomes apparent from the list of steps above that images are extremely important to a Streetprint site. This stems from our roots in the study of street literature, and our belief that with most artifacts—textual or otherwise—recreating the experience of sitting down with the physical item itself is of utmost importance. This focus on image-based representation (over fulltext, tagging, or other kinds of presentation methods) is perhaps Streetprint’s defining feature. This focus does have a downside, however: the scanning and processing of artifact images is by far the most labour-intensive aspect of creating a Streetprint collection, and these activites remain (for now) external to Streetprint. This means that the current version of the Streetprint Engine cannot do scan-ning and image editing for you. Instead, we recommend using thirdparty applications such as Adobe® Photoshop®*, The Gimp**, and/or the software that came with your digital camera or scanner. This chapter will focus primarily on the collection management steps which directly involve the Streetprint Engine. We will also provide a brief overview of how we manage images for our own Streetprint sites in the CRC Studio. * See www.adobe.com/products/photoshop/ for more information. ** See www.gimp.org for more information. Garbage In, Garbage Out “Garbage in, garbage out” is a frequently-used expression in the computer world, and one you should keep in mind as you begin adding items to your Streetprint collection. The phrase conveys an unfortunate truth about computer software and databases: they’re only as good as the information you put into them. The best database in the world will be useless if the IV. Managing Your Collection 34 data in it is inconsistent; imagine trying to search a library card catalogue that contained twelve different spellings of “Shakespeare,” for example. Software developers sometimes solve the “garbage in, garbage out” problem by making programs that are extremely rigid and inflexible, alerting the user to every possible error in input. This is possible (and even desireable) in some specialized cases, but what about a system like the Streetprint Engine which is designed to be as flexible as possible? Though many aspects of the current Streetprint Engine betray our literary roots, we hope that it will be increasingly used for a wide array of archives and collections about which we have little specific knowledge. For this reason, we can’t make the Streetprint’s error-checking too stringent for fear of limiting the flexibility and usefulness of the software. Instead, our design philosophy presumes an intelligent site editor. We don’t think this is an unreasonable decision...after all, it’s your collection! What does this mean for you? Avoiding the “garbage in, garbage out” problem is easy if you set standards and procedures for your Streetprint site when you begin adding to your collection. If you are working with other collaborators—or even if you’re not—write down the decisions you’re making as you scan your first few im-ages and add your first few text records, and to use these as a basis for formalized procedures. Are authors listed in “firstname lastname” format, or “lastname, firstname?” Should artifacts be scanned at 300 or 600 dpi? What kind of information should go in the “location” field, and how should it be formatted? While the rest of this chapter will make suggestions and provide the background you need to make decisions such as these, it’s ultimately your call. The most important thing is that once choices like this are made—even if they’re relatively arbitrary—all subsequent additions to your Streetprint site should be consistent and adhere as closely as possible to your standards. If this basic principle is followed, your Streetprint site can avoid “garbage in, garbage out” syndrome and continue to be a useful resource well into the future! So how do we add collection items to a Streetprint site, anyway? Let’s start at the very beginning... IV. Managing Your Collection 35 Image Capture One of the first steps when adding to your Streetprint collection is “image capture,” the process of creating digital images of the items in your archive. There are as many ways to create digital images as there are kinds of artifacts, and it is impossible to describe them all here. For the purposes of this manual and our Milk River archive, we’re going to assume that our equipment consists of a consumer-grade flatbed scanner (readily available for under $200) and a high-end consumer-level digital camera. Streetprint Tip: Digitization If you work or study at a university, it is worth investigating the digitization resources which may be offered by various groups on your campus. Often places such as technical services, an art and design department, or science laboratories will have the equipment and/or facilities neccessary to digitize items which (by virtue of their size or shape) are difficult to capture with more modest resources. For small and flat collection items, such as books or paper, capturing images with a flatbad scanner usually provide the best combination of ease-of-use and image quality. Here is a sample telegram from Old Man Grinnel’s collection, captured using a flatbed scanner: Fig 32. Telegram from Molly Heatherington to Kasper von Grinnel, 3 Jan 1949 IV. Managing Your Collection 36 This telegram is a ideal example of an item well-suited to flatbed scanning; even the shadows cast beneath the page’s folded edge contribute to a relatively accurate representation of the object. This telegram was scanned at 300 DPI (dots per inch), an image resolution which permits both online distribution (such as through your Streetprint site) and print distribution. While this resolution is likely higher than neccessary for Streetprint purposes alone, the ability to later produce a print version (or a higherresolution web version) without having to re-scan the original artifact is a definite asset. If you anticipate any future need for extremely highresolution versions of your collection items, or intend to use your scans as definitive archival copies, scan at resolutions higher than 300 DPI. For books whose spines cannot be broken, oversize items (such as Old Man Grinnel’s movie posters), or more three-dimensional objects, digital photography may be a better option than flatbed scanning. Photography is an art unto itself, but a few tips can greatly improve your capture results: use your camera’s highest-resolution setting, ensure a white or neutral background with uniform lighting, use a tripod, and consult a friend/ colleague/student with photographic training if at all possible. With proper digital photography and a bit of image editing, digital photos are often indistinguishable from flatbed scans when viewed at web resolutions. Image Processing As we mentioned in the introduction to this chapter, image processing can be accomplished with a variety of different software programs. Since the Streetprint Engine is not directly involved in this process, this section will simply mention a few tips and tricks, as well as describe ideal image sizes and resolutions for use with your Streetprint site. Correcting Image Capture Problems: The scan we made of Kasper von Grinnel’s telegram was good, but it had a few minor problems: the telegram is slightly crooked, it looks a bit more faded than the original, and there is too much white space around the edges of the artifact. Using Adobe® Photoshop®, we can correct these problems using the Rotate function, the Brightest/Contrast controls, and the crop tool, respectively. We can then save the resulting file as a TIFF image and add something like ‘Fixed Scan’ to the end of its name. The resulting image looks like this: IV. Managing Your Collection 37 Fig 33. Telegram from Molly Heatherington to Kasper von Grinnel, after initial image processing Making Resolutions: Now that we have a digital image which properly represents the actual artifact, it’s time to prepare it for inclusion in our Streetprint site. Our current file, a 300 dpi image in TIFF format, is much too large (in terms of both file size and pixel size) to put online directly. Instead, we need to prepare a few differently-sized versions—called “resolutions” in Streetprint lingo—of the image. At minimum, every image you wish to include on your Streetprint site requires two resolutions, a “Thumbnail” image (miniturized representation of the image) and a “Low” resolution image. Examples of these two image resolutions can be seen in the illustration below, taken from Revolution and Romanticism: “Low” resolution image “Thumbnail” resolution images Fig 34. Image resolutions from www.crcstudio.arts.ualberta.ca/ streetprint/ IV. Managing Your Collection 38 Oftentimes the “Low” resolution image won’t show enough detail, and so the Streetprint Engine can optionally accomodate two additional resolutions, “Medium” and “High.” By providing 3 (or even 4) different resolutions for each image on your Streetprint site, you can offer your visitors maximum flexibility and legibility, allowing those with fast connections to browse very large images and visitors with dial-up connections to view smaller (but faster-loading) versions of the same image. (The plus signs visible underneath the thumbnails in the previous illustration allow visitors to select which resolution they would like to use.) So Many Sizes: So, how do you know exactly how big (or small) to make your images? In theory, Streetprint will handle any size of image for any resolution, but the layout of a Streetprint site won’t work too well if, say, your thumbnail images are 600 pixels wide. Here are the guidelines that Team Streetprint uses when preparing images for our own sites; we recommend you stay fairly close to these parameters for the best results with your Streetprint site. Fig 35. Streetprint Image Resolution Guidelines *recommendation only, it may not always be possible to achieve these sizes Once you have used image editing software to scale your original scan down to one of the sizes listed above, you should finish by saving the new file with your software’s “Save for Web” function, if available. The Streetprint Engine currently expects that all images will be in JPEG format, although its architecture supports additional image formats should new standards emerge. (This is another good reason to always keep a copy of your original TIFF scans; since the format is uncompressed, you can return to these files in future years to produce versions of them in new image formats.) IV. Managing Your Collection 39 Streetprint Tip: Image Does all this talk of multiple sizes, resolutions and files make your Organization head spin? In the CRC Studio, Team Streetprint has come up with a good method of keeping our image files organized, making it a snap when we later upload the images to our Streetprint site. Let’s say we’re scanning a two-page letter from Old Man Grinnel’s archive. We would arrange our computer’s files and folders like this: Images folder for ‘Nagy Letter 1945’ Original scans Web-ready images Fig 36. Image Organization IV. Managing Your Collection 40 Fig 37. Letter from Edward Nagy to Kasper von Grinnel, 18 May 1954 IV. Managing Your Collection For Power Users : Streetprint Actions for Adobe® Photoshop® 41 One of the many useful features of Adobe® Photoshop® image editing software is the ability to create “actions,” a series of prerecorded steps which can then be executed with a single click. The process of creating multiple Streetprint resolutions from each and every scan is admittedly repetitive and laborious; actions can help reduce the tedium and speed up the process considerably. While we encourage you to create your own set of actions—consult your Adobe® Photoshop® manual to find out how—Team Streetprint has also made its own actions available for you to download and use. They can be found online at: www.streetprint.org/engine_downloads.php Double-clicking the StreetprintActions.atn file will load six Streetprint actions into your Photoshop “Actions” tab. They provide automatic resizing and sharpening for two kinds of document orientation—Portrait (tall) and Landscape (wide) —and three Streetprint resolutions (thumbnail, low, and medium). Once an action Fig 38. Before applying the has been applied to a source TIFF image, you can “Save for Web...” “Landscape – Low” action and your image is ready to go! Fig 39. After applying the “Landscape – Low” action IV. Managing Your Collection 42 Adding a Text Record Now that we have prepared some images, it is finally time to return to our Streetprint site’s administrative interface and add some text records. Streetprint’s interface for managing your collection can be found by clicking the “My Collection” link on the administrative home page: Fig 34. Streetprint’s collection management page To add a collection record, click on “Add to Collection.” You will see a page with a series of blank fields to fill in. The table below explains these fields in more detail. (Items in bold are suggestions from Team Streetprint.) Fig. 35 Description of field names IV. Managing Your Collection 43 IV. Managing Your Collection 44 While every single item in your Streetprint collection will have these same input fields, a collection item’s optional fields will not be displayed to visitors to your website unless they contain information. This gives you some flexibility when cataloguing many different kinds of items and documents: we would be able to use the “Pagination” field when adding a record for a multiple-page letter, for example, but could leave the same field blank when adding a collection record for a movie poster. The field names in your Streetprint site can also be changed to better suit your collection, as the next page explains. For the purposes of this manual, however, we will continue using the “default” fields names which we have described above. For Power Users: Perhaps more than any other aspect of the site, Streetprint’s “field Customizing Streetprint’s Field names” betray our roots in the study of street literature—author, Names pagination, publisher, and so on. For the Milk River Archive, these fields are not always ideal but can still be used to describe the many different kinds of items in Old Man Grinnel’s collection. What if someone wanted to use the Streetprint Engine to create a digital archive of paintings, however? In such a scenario, the “Author” field should really be an “Artist” field, a field which would behave exactly like the “Author” field but with a more appropriate name. Streetprint provides a facility for renaming fields through the sp_ fieldnames.inc file, found inside your Streetprint directory. This file can be opened with any text editor (such as “TextEdit” on Macs or “Notepad” on Windows), and contains many lines which look like this: $spFields[‘author’] = “Author”; By changing the words in double quotation marks, you can effectively re-label the “Author” field with any name you like. For our Streetprint painting site example, you would change the line to the following, and then save your changes to the sp_fieldnames.inc file: $spFields[‘author’] = “Artist”; It is important to remember that renaming a field does not change a field’s function and behaviour—number fields remain number fields, optional fields remain optional, etc. Future versions of the Streetprint IV. Managing Your Collection 45 Engine will gradually introduce more and more field customization options. Let’s add some items to our Streetprint site! We’ll begin with the telegram from Molly Heatherington which we prepared earlier in the “Image Fig 36. ‘Add to Collection’ Processing” section: IV. Managing Your Collection 46 Clicking the “Add” button will add the collection record to your Streetprint site. You will then be taken to the “Edit Details” page for your new item. Fig 37. The first half of From this page, you can view and edit all of this item’s details, add and Streetprint’s “Edit Details” page. manage images, media files, and more. IV. Managing Your Collection 47 Publish/Unpublish: Every item in your Streetprint collection is either published or unpublished. When you initially add an item to your collection, it is not published. While you can view and edit it through your site’s administrative interface (as we are now doing with “Drinks at Formosa”), a visitor to www.oldmangrinnel.com would not be able to view this item or even be aware that it exists. Once we have added images and our editorial judgement confirms that the item record is “ready to go,” this item can be put online for the world to see by clicking the “Publish” link. Should a record need revision at any time, you can likewise “Unpublish” any currently-published collection item. Item Details: All of the information we entered in the fields on the “Add to Collection” screen appear here. This information can be edited at any time by clicking the “Edit This Information” link. Record History: Every time the information in the “Item Details” section is modified, a record is kept here. This is particularly useful if you are collaborating with others on your Streetprint site. Image Management: Since images are central to any Streetprint collection, the image management section consists of several important screens. The next section of this chapter will cover them in detail. Fulltext: If your collection item is of a textual nature—such as our telegram—you can optionally add the “full text” of the item to your collection record by clicking the “Add Fulltext” link. Users of your Streetprint site will then be able to search for this text and browse it alongside this item’s images. The fulltext input box also accepts some basic XHTML markup tags if you want to add features such as bold, italics, or hyperlinks to your fulltext record. Fig 38. Adding a fulltext record for the “Drinks at Formosa” telegram. IV. Managing Your Collection 48 Media Management: In the media management section, you can add media files—such as movie clips, audio files, Flash movies, and more—to your collection record. To add a media file, simply click the “Choose File” button and select the media file from your computer’s hard drive. Then choose the appropriate media type from the provided pull-down menu and optionally enter a textual description of the media file. Clicking “Add Media File” will then upload the file to your Streetprint site. Visitors to this collection item will see a “Media” icon which, when clicked, displays a popup window linking to all the media files associated with this item. For more information on Streetprint’s media file functionality, see the “Media Types” manual section on Page 26. First lines: This feature of Streetprint was aimed at our founding collections of street ballads and other popular literature. Since these ballads often had no titles, or have titles which varied from printing to printing, it was customary to record the first lines of their texts as a method for cataloguing them. While we won’t need this feature for the Milk River Archive, using it is easy: type the line of text into the provided input box, and click the “Add First Line” button. Adding Images To add images to this collection record, click the “Add Images” link on this item’s “Edit Details” page. You will then be prompted to move your webready images into Streetprint’s upload folder: Fig 39. Adding images, step 1: move them into your site’s upload folder IV. Managing Your Collection 49 The second part of the screen lists all of the images in the upload folder. In our current example, our folder only contains three files, all of which are different resolutions of the “single” image for our telegram. Let’s enter the information for our telegram’s image: Details of our first image The files which “belong” to our first image Fig 40. Specifying details and Since we only have one image for this item, we check all three of our selecting files checkboxes—representing our three resolutions—and set the “Resolution” menus to indicate which file is which. (If you want to make sure you have the correct image, you can click the image name to see it in a new window.) When you have more than one image in your upload folder, Streetprint “learns” from your resolution menu settings and applies them to the remaining files, so you don’t have to set the resolution menus every time. Once we’ve specified our image details and resolutions, we’re ready to click the upload button: Fig 42. A successful upload IV. Managing Your Collection 50 This means you need to connect to your Streetprint web server—via a LAN connection (such as Appletalk) or via protocols such as FTP or scp—and copy the JPG files we prepared earlier for this item into the directory named uploadfolder, which is located inside your main Streetprint directory. (If an internet geek or a support staff member helped you install your Streetprint site, you may wish to consult with them again to help you through this process.) Since you will be moving images into Fig 43. Placing images in the your upload folder fairly often, it’s a good idea to place a shortcut to this upload folder using an FTP client location on your computer. Once your images have been uploaded, click the “Proceed to Step 2” button to proceed to the next screen: This screen consists of two parts. The first allows you to specify the details of current image you are adding: the image type, the first page number which appears on the image (if any), the total number of pages represented in the image (if any), and a caption for this image. Only the image type menu is mandatory. Fig 44. Adding images Step 2: specifying details and selecting IV. Managing Your Collection 51 Streetprint Tip: Making the Our image for “Drinks at Formosa” has been successfully uploaded, Most of Image Details our upload folder is now empty, and we can safely click the “I’m done adding images” link. If we were adding images for a collection item with multi-ple pages of images, however, we would simply continue specifying image details (and selecting the appropriate file checkboxes) until the upload folder is emptied. Althrough three of the “image details” input fields are optional— “First Page # on Image,” “# of Pages,” and “Caption”—you can use them to your advantage if you know a bit more about how the Streetprint Engine works. If you enter text into the “Caption” field, your caption will always be displayed to website visitors beneath your image. If this field is left empty, Streetprint looks instead to the page-related fields and uses that information—if it exists—to create captions such as “Page 1” or “Pages 32-33.” If all these fields are blank, Streetprint uses the image type as the caption. Streetprint also uses the “First Page # on Image” field for something else: the order in which it displays a collection item’s images. If you type in a caption for an image, the value of the “First Page #” field will never be seen by your visitors, since the caption will always be displayed instead. This allows you to use the page number field as an “ordering” field if you so choose. The field can even accept negative numbers; if you’re entering a book which has a cover and a prefatory page before “Page 1,” you can assign them page numbers of -1 and 0, respectively. These numbers will not be seen as long as captions (such as “Cover” and “Preface”) are provided. Once you reach the Page 1 image, however, you can leave the caption field blank and Fig 45. The “Edit Details” screen Streetprint will automatically create the “Page X” captions for you. after adding an image Clicking “I’m Done Adding Images” will return us to our collection item’s “Edit Details” screen. IV. Managing Your Collection 52 To add more images to this item, or to edit our current images (and associated information, such as captions), we can simply click the “edit/ Fig 46. Editing an Image add images” link on this page. Click a filename to view a resolution image, and to optionally swap this resolution with another image file Edit image details Individually add additional resolutions Publishing Your Item Now that we have a complete item record along with images, we can safely put this item online for the world to enjoy by clicking the “Publish” link on the “Edit Details” page: Fig 47. A published collection item IV. Managing Your Collection 53 Since this item is currently the only item in our new collection, we may as well make it the “Featured Item” on our website! Fig 48. Setting our featured item A visitor to www.oldmangrinnel.com would now see this: Fig 49. Front page of the Milk River Archive Streetprint site IV. Managing Your Collection 54 Here is how the record for “Drinks at Formosa” appears to a website visitor: Fig 50. Viewing “Drinks at Formosa” online Editing Your Collection Editing your collection items is easy: simply click on “View/Edit Collection” from Streetprint’s collection management page. You will be presented with a list of your collection items, colour-coded by publishing status. You can also click on any column title to sort the list: If you are an “Editor” user, you can click on any title to access that item’s text details screen. “Data Entry” users will be able to click on the titles of items which they personally have added to the collection. Fig 51. Collection listing sorted by Title IV. Managing Your Collection 55 Deleting From Your Collection Only delete items from your collection which you are sure you do not want; in most cases, unpublishing a collection item is a better option. To delete items, select “Delete from Collection” from Streetprint’s collection management page. Check boxes indicating the items you wish to delete, and click the “Delete Items” button. You will be prompted to confirm your choices before the items are deleted. Remember to use this feature with caution: deleted collection items (and their associated images, media files, etc.) cannot be recovered. Fig 53. Deleting collection items Fig 52. Are you really really sure? IV. Managing Your Collection 56 That’s All, Folks We’ve now learnt everything we need to know to add more items to the Milk River archive! If you’re curious to see more items from Old Man Grinnel’s collection, you can view the website we’ve been building during this manual online at: www.streetprint.org/oldmangrinnel/ The collection contains items with media files, multiple images, fulltext records, and more. Our Streetprint site is missing just one thing: a graphical “skin” which gives the site a unique look and identity suited to the collection. Skins are the topic of the next chapter, so read on... Fig 54. Autograph from Charles M. Jones 1948 CHAPTER V SKINS V. Skins 58 Comfortable In Your Skin Every Streetprint collection is unique. The various websites at Streetprint.org currently showcase everything from 18th-century chapbooks (Revolution & Romanticism) to rave posters (Urban Record) to clothing and cultural artifacts (Eritrean Print and Oral Culture). Since each collection is unique, Team Streetprint realized that every Streetprint site should also look unique. The team accomplished this by making it very easy to change the graphics which make up your site’s visual look and theme, or “skin.” The Streetprint Engine comes with a default skin which we have been using thus far for Old Man Grinnel’s collection. But we hardly want the public to visit the Milk River Archive’s website and only see the generic “Streetprint Site” logo in the corner. It’s time to customize this skin to suit our collection; this chapter will show you how. For Power Users: In the two years since the Streetprint Engine was first developed, Streetprint Skins and Web the web has seen a tremendous grassroots push for the increased Standards adoption of standards, with a particular emphasis on encapsulating a site’s layout and overall design in its CSS (Cascading Style Sheet) file(s). This approach has clear benefits; with proper XHTML and CSS markup, an entire website can receive a visual makeover simply by tweaking its stylesheet. The current version of the Streetprint Engine still uses images for its primary navigation (the graphics for ‘Home,’ ‘Browse,’ etc.) and its stylesheet (sp_style.css) provides only rudimentary control over the look of a Streetprint site. The next major revision of the Engine, due in late 2004, will drastically change this. We plan to move to a nearly all-CSS layout, which means that “skinning” a Streetprint site will become much easier (and more standards compliant). We will also provide backwards compatibility for existing sites, and for users who prefer using images for their navigation menu. V. Skins 59 The Graphics Directory All of the graphics which make up a site’s skin are located in a directory called gfx/ located inside our main Streetprint directory. This directory contains an image file for every “interface element” in a Streetprint site. Have a look at the image names and the graphics themselves; in most cases, it’s easy to guess what an image is for. Fig 55. logotype.gif Fig 56. search.gif Fig 57. resolution_low.gif, resolution_med.gif, resolution_high.gif The graphics which make up a Streetprint site’s navigation bar are slightly more complicated. Every element in the navigational bar—such as Home or Browse—can have up to three “states,” each represented by a slightly different image. In addition to the default state (or “nostate”), a navigation graphic may have a “roll state” (the image shown when a user rolls their mouse over the graphic) and an “on state” (the image shown when a user is currently within that particular section of the site). Some site editors prefer to only have two states, making the “on” and “roll” states one and the same, whereas others prefer to use all three. Streetprint permits both configurations. Fig 58. browse_nostate.gif Fig 59. browse_rollstate.gif Fig 60. browse_onstate.gif The default state The “roll over” state The “on” state, we’re now in the ‘browse’ section V. Skins 60 Roll Your Own Now that we’ve found all the necessary graphics, it’s time to replace them with our own! The default skin provides a good set of guidelines for the size of our images, but we are free to make any image slightly larger or smaller than the file it will replace. As well, Streetprint allows us to use JPEGs instead of GIFs if we so choose. For Old Man Grinnel’s collection, we decided to make some simple changes, incorporating a new background colour, typeface, and a slight Hollywood aesthetic. (You can make your own graphics files in Adobe® Photoshop® or any other program which allows you to edit and save GIFs or JPEGs.) Here’s a look at some of the graphics in our new skin: Fig 61. Old and new graphics Should we need to change any of our image file names—if we are using JPEGs instead of GIFs, for example, or if we want to use all three navigation states instead of two—the necessary adjustments can be made V. Skins 61 in the sp_config.php file in our main Streetprint directory. The sp_config.php file can be opened with any text editor, such as TextEdit on a Mac or Notepad on Windows. This file’s “Graphics Variables” section contains a series of statements which map a specific Streetprint graphic, such as “logo,” to a specific filename, such as “logotype.gif.” Let’s say that we didn’t like Streetprint’s convention of using two different sizes of logo (one for the main page and one for other pages), and we wanted to use a single file named “logo.jpg” instead. This could be accomplished by changing the lines which read $graphics[ʻlogoʼ] = “logotype_small.gif”; $graphics[ʻlogobigʼ] = “logotype.gif”; to: $graphics[ʻlogoʼ] = “logo.jpg”; $graphics[ʻlogobigʼ] = “logo.jpg”; The rest of the graphics variables section can be modified in a similar fashion. For the Old Man Grinnel website, we are using GIF files and haven’t changed any of their names, and so no modification of sp_ config.php is required. Finishing Up Once we’ve moved our new graphics into the gfx/ directory and made tweaks to sp_config.php (if neccessary) , our skin is ready to go! If we want to change our site’s typeface, background colour or image, or link colour, however, we can do so by editing our site’s stylesheet. The stylesheet is located in the main Streetprint directory and named sp_style.css. Once you learn a few basics, editing CSS stylesheets is extremely easy. A good introduction to CSS is on the web at: www.yourhtmlsource.com/stylesheets/ introduction.html Here’s how our final skin looks on the Old Man Grinnel website, which can be found online at www.streetprint.org/oldmangrinnel: V. Skins 62 Fig 61. The old site Fig 62. Our new site! Fig 63. The old man would be proud! V. Skins 63 Welcome Aboard That’s it! Our new Streetprint site is now ready for the world. Every Streetprint collection is unique, and so adding your own skin and tweaking your style sheet might sometimes be difficult. You may have questions to ask about the skinning process, or about other aspects of your Streetprint site. Even if everything has gone smoothly, you might simply want to let everyone know about your cool new website. Either way, there’s a perfect place to start: the Streetprint.org forums! Visit them online at: www.streetprint.org/forums/ Team Streetprint regularly checks in, and we’d love to help you set up your site. By powering your digital collection with the Streetprint Engine, you’re joining a cutting-edge, evolving community of open archives. We’re excited to have you aboard. Don’t be afraid to stop in and say hello!