1
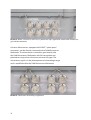
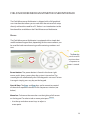
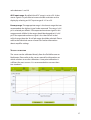
FIELD MICROSENSOR MULTIMETER USER MANUAL
Field Microsensor Multimeter User Manual
Copyright © 2015 · Unisense A/S
Version December 2015
FIELD MICROSENSOR MULTIMETER
USER MANUAL
UNISENSE A/S
TABLE OF CONTENTS
WARRANTY AND LIABILITY . . . . . . . . . . . . . . . . . . . . . . . . . . . . . . . . . . . . . . . . . . . . . . . . . . . . . . . . . . . . 5
CONGRATULATIONS WITH YOUR NEW PRODUCT . . . . . . . . . . . . . . . . . . . . . . . . . . . . . . . . . . . . . . 7
Support, ordering, and contact information
7
OVERVIEW . . . . . . . . . . . . . . . . . . . . . . . . . . . . . . . . . . . . . . . . . . . . . . . . . . . . . . . . . . . . . . . . . . . . . . . . . . . . . 8
Operating and setup conditions
9
SYSTEM FEATURES . . . . . . . . . . . . . . . . . . . . . . . . . . . . . . . . . . . . . . . . . . . . . . . . . . . . . . . . . . . . . . . . . . 10
Field Microsensor Multimeter
Equipment to use with the Field Microsensor Multimeter
Software for the Field Microsensor Multimeter
10
11
12
GENERAL FEATURES . . . . . . . . . . . . . . . . . . . . . . . . . . . . . . . . . . . . . . . . . . . . . . . . . . . . . . . . . . . . . . . . . 13
GETTING STARTED . . . . . . . . . . . . . . . . . . . . . . . . . . . . . . . . . . . . . . . . . . . . . . . . . . . . . . . . . . . . . . . . . . 17
Internal Battery and Connections
Sensors
Autonomous Deployment
Deployments in the laboratory using the PC
17
19
20
20
FIELD MICROSENSOR MULTIMETER USER INTERFACE . . . . . . . . . . . . . . . . . . . . . . . . . . . . . . . . 23
Keypad
23
SENSORS . . . . . . . . . . . . . . . . . . . . . . . . . . . . . . . . . . . . . . . . . . . . . . . . . . . . . . . . . . . . . . . . . . . . . . . . . . . . 25
Edit sensor parameters
Sensor calibration
Export of calibration data
26
27
28
MOTORS . . . . . . . . . . . . . . . . . . . . . . . . . . . . . . . . . . . . . . . . . . . . . . . . . . . . . . . . . . . . . . . . . . . . . . . . . . . . 29
SIGNAL PLOT . . . . . . . . . . . . . . . . . . . . . . . . . . . . . . . . . . . . . . . . . . . . . . . . . . . . . . . . . . . . . . . . . . . . . . . . 32
SEQUENCES . . . . . . . . . . . . . . . . . . . . . . . . . . . . . . . . . . . . . . . . . . . . . . . . . . . . . . . . . . . . . . . . . . . . . . . . . 35
1D Motorized profiling
2D Motorized profiling
DEPLOYMENTS . . . . . . . . . . . . . . . . . . . . . . . . . . . . . . . . . . . . . . . . . . . . . . . . . . . . . . . . . . . . . . . . . . . . . .
STATUS . . . . . . . . . . . . . . . . . . . . . . . . . . . . . . . . . . . . . . . . . . . . . . . . . . . . . . . . . . . . . . . . . . . . . . . . . . . . . .
SETTINGS . . . . . . . . . . . . . . . . . . . . . . . . . . . . . . . . . . . . . . . . . . . . . . . . . . . . . . . . . . . . . . . . . . . . . . . . . . .
BATTERY AND EXTERNAL POWER . . . . . . . . . . . . . . . . . . . . . . . . . . . . . . . . . . . . . . . . . . . . . . . . . . . .
Battery charging and maintenance
External power supply
38
42
46
48
50
52
52
53
FIRMWARE UPDATE . . . . . . . . . . . . . . . . . . . . . . . . . . . . . . . . . . . . . . . . . . . . . . . . . . . . . . . . . . . . . . . . . 54
TROUBLESHOOTING . . . . . . . . . . . . . . . . . . . . . . . . . . . . . . . . . . . . . . . . . . . . . . . . . . . . . . . . . . . . . . . . 57
APPENDIX . . . . . . . . . . . . . . . . . . . . . . . . . . . . . . . . . . . . . . . . . . . . . . . . . . . . . . . . . . . . . . . . . . . . . . . . . . . 58
Field Microsensor Multimeter specifications
Oxygen solubility table
58
59
WARRANTY AND LIABILITY
This product is for research use only. Not for use in human diagnostic or
therapeutic procedures.
Warning
Microsensors have very pointed tips and must be handled with care, to
avoid personal injury, and only by trained personnel.
Unisense A/S recommends users to attend instruction courses to ensure
proper use of the products.
Warranty and Liability
The Field Microsensor Multimeter is covered by a one year limited
warranty.
The warranty does not include repair or replacement necessitated by
accident, neglect, misuse, unauthorized repair, or modification of the
product. In no event will Unisense A/S be liable for any direct, indirect,
consequential or incidental damages, including lost profits, or for any
claim by any third party, arising out of the use, the results of use, or the
inability to use this product.
Repair or Adjustment
Equipment that is not covered by the warranty will, if possible, be
repaired by Unisense A/S with appropriate charges paid by the
customer. In case of return of equipment please contact us for return
authorization.
For further information please see the documents General Terms
of Sale and Delivery of Unisense A/S, and Warranty and Shipping
Information as well as the manuals for the respective products.
SensorTrace Suite software
Unisense SensorTrace Suite software is checked and validated for
the Windows platform as given in the specification. The Customer
must ensure PC is fully updated and no conflicting third party
software is installed. Unisense do not warrant compliance with any
5
other operating systems, language settings or third party software.
For instrumentation and sensors, please refer to our warranty
conditions as given in the document “General Terms of Sale and
Delivery of Unisense A/S” found on www.unisense.com
License agreement
The following terms shall apply to the software provided by Unisense
A/S (“Unisense”) in connection with the simultaneous sale to you
(“Customer”) of a Unisense SensorTrace Suite Software.
All rights, title and interest in the software belong to Unisense.
Unisense grants to the Customer a royalty-free, non-exclusive and
non-transferable license to use the software solely in connection
with the Unisense Product purchased from Unisense simultaneously with the purchase of the software. The Customer undertakes
not to copy, modify, reverse engineer, disassemble or de-compile
all or any part of the software or rent, lease, distribute or sell the
software. The Customer shall, however, be entitled to make one
copy of the software for backup and recovery purposes for use
solely in connection with the Unisense Products supplied by
Unisense together with the software.
Nothing in this License Agreement or any other agreement
between Unisense and the Customer shall be construed as an
obligation for Unisense to provide to the Customer updates of the
software. This License Agreement shall automatically terminate if
the Customer violates the terms of the license. In case of termination of the license the Customer shall immediately destroy the
software and any copy thereof.
6
CONGRATULATIONS WITH YOUR NEW PRODUCT
Support, ordering, and contact information
The Field Microsensor Multimeter uses Unisense microsensors
which are miniturized Clark-type sensors that facilitate reliable
and fast measurements with a high spatial resolution designed for
research applications.
If you wish to order additional products or if you encounter any
problems and need scientific/technical assistance, please do not
hesitate to contact our sales and support team. We will respond to
your inquiry within one working day.
E-mail: [email protected]
Unisense A/S
Tueager 1
DK-8200 Aarhus N, Denmark
Tel: +45 8944 9500
Fax: +45 8944 9549
Further documentation and support is available at our website
www.unisense.com
Note: If you find errors in this manual or have suggestions to
improvements, do not hesitate to contact us at
[email protected]
7
OVERVIEW
The Field Microsensor Multimeter is a digital microsensor amplifier
with automatic sensor detection. It includes built-in datalogger,
motor control, a long battery life, and a robust design. The user
interface consists of a keypad and a graphical 7” LED display with
high color contrast, allowing the user to view and adjust signals
directly on the instrument in the field. The Field Microsensor
Multimeter can be used as a stand-alone instrument, PC controlled
or with autonomous operation.
In this manual we will in detail describe how to use the Field
Microsensor Multimeter.
Information on how to use the Field Microsensor Multimeter as
a part of the Field MicroProfiling System is described in the Field
MicroProfiling System manual. Information on the SensorTrace
Profiling software is found in the SensorTrace Suite manual and
information on how to make advanced sequences for the Field
Microsensor Multimeter using the Programming Tool software is
found in the Programming Tool manual.
8
Operating and setup conditions
The Field Microsensor Multimeter is built for outdoor use. When
closed it is protected against water, dust and salt. The Field
Microsensor Multimeter is splash proof, also when the lid is open.
All channels must be closed with the protective caps when not in
use. Avoid water, salt, and dust getting into the connectors as this
can damage the instrument.
Temperature
-10 °C to 50 °C;
charge temp. 0 °C to 45 °C
Calibration
The Field Microsensor Multimeter is offset calibrated on the eight sensor
channels. Both motor channels come with a factory calibration.
Power
Batteries, internal: Li Ion 78 Ah
External voltage: 9 V (6-28 V)
Charge voltage: 12 VDC, 4 A
Charger supply: 100 to 240 VAC, 50/60 Hz
When an external power supply is disconnected, internal battery supply will continue operating.
Unisense serial number is placed inside the lid.
9
SYSTEM FEATURES
Field and in situ instruments are excellent tools for long-term
studies with continuous and automated measurements in the
field. The Field Microsensor Multimeter is designed for outdoor
measurements right where the action takes place.
The Field Microsensor Multimeter comes with 8 channels for
multi analyte studies and/or replicate measurements. It can be
controlled either directly or online, via cables from a PC, or run
autonomously by a program until retrieved.
The Field Microsensor Multimeter is delivered with easy sensor
connection and automatic sensor polarization for our most
common sensors, and as a water resistant meter ready for outdoor
use. The Field Microsensor Multimeter can design sequences for
1D or 2D profiling with a spatial resolution down to 10 μm using a
Field Motor.
Field Microsensor Multimeter
• Outdoor and water resistant amplifier 8 channels with plug and play sensor connectors:
–– 5 x pA, 2 x mV and 1 x temperature channel
• Field Motor control
• Three serial communication connectors and
one digital input/output connector
• Built-in fully programmable datalogger
• Direct manual, PC controlled or autonomous
operation
• Export of data into SensorTrace Suite for data
analysis.
10
Equipment to use with the Field Microsensor Multimeter
Included with the Field Microsensor Multimeter:
• External charger with cable (FMM-CHG001)
• PC communication cable 5 m (FMM-COM001)
• SenssorTrace Logger software for system
check, setup, calibration, and data retrieval
• Programming Tool software for advanced
programming of the Field Microsensor
Multimeter
Not included (to be ordered separately):
• Unisense Field Microsensors: O2, H2, N2O, NO,
NOx, Temperature, pH, H2S, Redox with 5 m
cable and LEMO splash proof connection
–– Can be custom made with up to 10 m
cable
• External units, e.g. other sensors, optodes,
light sensors etc.
• Unisense Field Motor
• Motor cable 5 m (FMM-MOT001)
–– Can be custom made up to 10 m
• PC communication cable (FMM-COM001)
–– Can be custom made up to 70 m
• LAN communication cable (FMM-COM003)
• External power supply:
–– Unisense External Battery and cable (FMMBAT001)
–– Third party power supply cable (FMMPOW001). Specify cable termination e.g.
banana plug
11
• SensorTrace Profiling software
• Any PC with web browser for software
update
Software for the Field Microsensor Multimeter
SensorTrace Suite
The Field Microsensor Multimeter is compatible with SensorTrace
Logger, Profiling, Rate and Photo. SensorTrace Logger (included)
and SensorTrace Profiling are the two most used programs in
combination with the Field Microsensor Multimeter. SensorTrace
Profiling offers time series data logging along a path. It can
visualize these measurements and calculate activity rates.
Files stored on the Field Microsensor Multimeter can be saved into
SensorTrace Suite compatible files and subsequently be used for
further data analysis.
Programming Tool (included)
The Programming Tool software is used for an advanced use of the
Field Microsensor Multimeter. In Programming Tool it is possible to
build advanced sequences and load them onto the Field Microsensor Multimeter.
12
GENERAL FEATURES
The Field Microsensor Multimeter logs the analogue signals from
the microsensors, position data from the field motors, and all
digital signals from external equipment. For the synchronization
of these signals the Field Microsensor Multimeter uses high speed
background data sampling, and data is therefore available with
your defined sampling speed (e.g. 10 times per second).
The Field Microsensor Multimeter has 8 GB data capacity, corresponding to more than 120 days of data acquisition at 10 Hz. The
Field Microsensor Multimeter has internal batteries that will allow
the system to run up to approximately 20 hours at 25 °C.
The Graphical 7” LED display has 800 x 480 pixels and 18 bit color
with high contrast allowing a good field reading.
Microsensors: The Field Microsensor Multimeter has input
for up to 8 microsensors at the same time. Channel 1 to 5 are
amperiometric sensor channels (Red box), channel 6 and 7 are
potentiometric channels (Blue box) and finally channel 8 is a
temperature channel (Green box).
Photo 1: The sensor channels of the Field Microsensor Multimeter
13
Photo 2: When a channel is not in use, a protective cap is applied to avoid water and dust to
get into the connector.
Unisense Microsensors, equipped with LEMO™ splash proof
connectors, can be directly connected to the Field Microsensor
Multimeter. The microsensors connection goes directly into
the Field Microsensor Multimeter with full recognition and
polarization setup of most Unisense microsensor types. The
microsensor signal is in the picoampere and microvoltage range
and is amplified within the Field Microsensor Multimeter.
Photo 3: Connectors for auxiliary equipment
14
Motor
The Field Microsensor Multimeter can control a high precision
profiling motor in a linear stage system. It controls the high
precision movement of multiple sensors mainly in the vertical
direction into the sample of interest (1D).The Field Microsensor
Multimeter is designed to function with 1 or 2 motors (optional 2D
system) with full positional feedback. Encoder signals from Motor
1 and Motor 2 are used to calculate the precise position of the
linear stage and thus the sensors. The Field Motors are connected
to the Motor1 and/or Motor2 connector of the Field Microsensor
Multimeter.
Charging
The Field Microsensor Multimeter battery is charged when
connecting a power cable to the Power connector.
For long-term deployments an external power supply unit is
necessary. When using an external power source, like an external
battery, the system will be powered from this power source and
not draw power from the internal batteries.
Computer output/input
The PC communication cable is connected to the COM connector
allowing a communication between the Field Microsensor Multimeter and computer. Sequences made in the Programming Tool
software can be added to the Field Microsensor Multimeter, and
data logged on the Field Microsensor Multimeter can be downloaded onto the computer using the SensorTrace Suite software.
External units
The Field Microsensor Multimeter can be expanded to interface
with other external units. Three serial communications connectors
and one digital input/output connector, 3.3 V, I/O, are available
depending on the hardware and software configuration.
15
For instance, an optical oxygen sensor connected to the Unisense
Field Optode Meter, can be useful to make an independent check
of the ambient oxygen concentration.
The Field Microsensor Multimeter is also prepared to activate
external units, e.g. a light source, water sampler etc.
The architecture of the Field Microsensor Multimeter is flexible
and it is possible to interface to other units, e.g. a reference oxygen
sensor, CTDs and MicroOptodes.
Cables and connectors
The cables used for the Field Microsensor Multimeter are all fitted
with LEMO™ splash proof connectors. The motor and sensor cables
are as a standard 5 m.
16
GETTING STARTED
In the following, a short description will help you get started with
the Field Microsensor Multimeter. A more detailed description of
the Field Microsensor Multimeter interface is found later in this
manual.
Internal Battery and Connections
1. Make sure the Field Microsensor Multimeter
battery (internal or external) is charged (see
the Battery and External Power section)
NOTE:
Sensors, motors,
computer connection,
power supply and all
external equipment
can safely be plugged
in and out at any time
during instrument
operation
2. If available connect the Field Motor/Motors
to the Field Microsensor Multimeter into
Motor 1 and Motor 2 channel
3. Turn on the Field Microsensor Multimeter. It
will take a few seconds to boot
4. The first window shown is the Sensors
window
17
In the lower right corner you can see the current status of the Field
Microsensor Multimeter from the LED signal:
• Green blinking: The Field Microsensor Multimeter is ON but inactive
• Green blinking (Slow): The Field Microsensor
Multimeter is ON and a delay timer is active.
The system is therefore waiting to execute a
programmed sequence
• Red blinking: The controller is ON, running a
sequence and actively logging data
• Constant Red: The controller is in an error
state, e.g. if a motor is disconnected or a
sequence is set up incorrectly
5. The screen light will automatically dim if
the keypad is not used. To turn it on again
simply press any key on the keypad
6. To turn off the Field Microsensor Multimeter
press the Power button and acknowledge
the power down selection
18
Sensors
1. Prepare one or more microsensors and
preferably a spare. Ensure that the sensors
are ready for use – for further details refer
to the respective sensor manual for prepolarization etc.
2. Connect the microsensors to the Field
Microsensor Multimeter using one of the
analogue channels 1 – 8
Photo 4: Channel 1 to 5 are amperiometric sensor channels (Red box), channel 6 and 7 are
potentiometric (Blue box) and finally channel 8 is a temperature channel (Green box).
Calibration
1. Enter the calibration menu for each active
sensor on the Field Microsensor Multimeter
2. Prepare calibration solutions and calibrate
the microsensors. Make sure the sensor
reacts as described in the sensor manual
3. Once all sensors are calibrated, carefully
remove the sensors protective tube
19
Autonomous Deployment
1. Make a 1D or 2D profiling sequence in the
Sequences window
2. Place the instrument at the study site
3. You may need to move the motors to position the sensor before starting the autonomous sequence
4. The sequence can be started directly from
the Sequences window by selecting Run or
Run without delay, or by marking it ready for
activation the next time the Start button is
pressed
5. When the measurement time has elapsed,
retrieve the instrument
Deployments in the laboratory using the PC
1. Connect the Field Microsensor Multimeter
to the PC
2. Start SensorTrace Suite
a. Use SensorTrace Logger or SensorTrace Profiling for calibration of
the sensor and for controlling the
motor. For more information please
read the SensorTrace Suite manual
b. The Field Microsensor Multimeter
can also be controlled from the PC
by using Programming Tool. Please
read the Programming Tool manual
for further information
20
Data export and processing
For the data to be accessible you have to download them from the
Field Microsensor Multimeter to the PC.
Using SensorTrace Suite
1. The Field Microsensor Multimeter should
be set on Direct in network mode in the
Settings window. In Status the IP address
of the Field Microsensor Multimeter should
be visible
2. Start either SensorTrace Logger or SensorTrace Profiling. Select File and e.g. Download logger experiment from device
3. Select the deployment/s you want to download from the Field Microsensor Multimeter.
Logger experiments will be saved as x.ulog
files and profiling experiments as x.upro
files
4. Make your post data analysis in SensorTrace
Logger or Sensor Trace Profiling
Using Programming Tool
1. The Field Microsensor Multimeter should be
set on Direct in network mode in the Status
window and the IP address of the Field
Microsensor Multimeter should be visible
2. Select Connect in Programming Tool to
connect the Field Microsensor Multimeter
to the PC
–– You can see the list of download files under
Target/Service/Development data service
–– In the Deployment data service you can
download a complete deployment file
21
package or multiple deployment files by
highlighting several deployment(s) and
pressing Download selected. Likewise
single or multiple deployments can be
deleted
–– The Programming Tool will prompt for a
download directory or automatically place
the files in the Windows Download folder
Each sequence file will download several files e.g:
a. ddmmyyyy_hhmmss_data.txt
b. ddmmyyyy_hhmmss_calibration.txt
c. ddmmyyyy_hhmmss_optode1.txt
d. ddmmyyyy_hhmmss_log.txt
Data downloaded from the Field Microsensor Multimeter are in
a readable text format which can be imported into e.g. Excel for
further data analysis.
For futher information please see the Programming Tool manual.
22
FIELD MICROSENSOR MULTIMETER USER INTERFACE
The Field Microsensor Multimeter is shipped with a full graphical
user interface that allows you to work with the microsensor setup
directly without the need for a PC. Below is an introduction to the
functionalities available on the Field Microsensor Multimeter.
Keypad
The Field Microsensor Multimeter is equipped with a simple but
multifunctional keypad that, depending on the menu context, can
be used for both menu browsing and for entering numbers and
text.
NOTE:
The Stop key
can be used at
any time when
a sequence or
motor is started.
Power button: The power button is found in the lower right
corner and is always green when the system is turned on. The
screenlight will automatically dim if the keypad is not used. To turn
it on again simply press any key on the keypad.
Start & Stop: The Start and Stop keys are for execution control
of the active sequence selected in the Sequences window (see
below).
Menu bar: To browse the menu bar use the right and left arrows
on the keypad. To select a tab or menu point press Select.
• Use the up and down arrow keys to adjust a
menu point
23
• To exit a menu point press the left arrow key
In cases where a user input is needed, browse to and highlight the
input box and then press Select on the keypad. This will result in
an input ribbon popping up. Use the arrow keys to navigate right
and left in the input ribbon and use the Select button to enter the
highlighted character or number.
24
SENSORS
When the system powers up the Sensors window is the first
window shown. Microsensors will be recognized as they are
plugged in, and for most sensors the polarization and amplifier
ranges are automatically set.
All sensor signals and standard derivations (std. dev.) are updated
twice every second and the standard derivation is continuously
calculated from the last 20 signal points. If a sensor has been
calibrated then the calibrated value is also shown.
In the submenu of each sensor channel you can enter the
Calibrate menu and Edit sensor parameters. You can navigate
between the channels with the arrow keys on the keypad.
25
Edit sensor parameters
You may need to adjust the pre-amplification range of the sensor
if it is not recognized as a standard sensor. This is done by selecting
the Edit Sensor Parameters. Following window will pop up:
Calibrated unit: Here you can select different units. Choose the
most appropriate unit for your measurements. Data used for activation calculations in SensorTrace Profiling have to be in µmol/L.
Polarization voltage: Add the polarization voltage (in mV) for the
sensor if the sensor is not recognized. For the correct polarization
voltage value see the sensor manual.
Offset: When the sensor signal is out of range you can use the
offset to move the signal by ±2.5V.
Gain: Here you can increase the signal amplification by choosing a
26
value between 1 and 10.
ADC input range: By default the ADC range is set to ±5V. At low
sensor signals it is possible to increase the bit resolution on the
display by selecting an ADC input range of ±1V or ±2V.
Preamp range: The appropriate range is the lowest range that can
accommodate the highest signal to be measured. The range 1 mV/
pA is selected per default. If the expected maximum signal in this
range exceeds 4500 mV, the range should be changed to 0.1 mV/
pA. If the expected maximum signal is less than 50 mV in the 1
mV/pA range, then the 10 mV/pA range should be selected. Please
refer to the individual sensor manuals for further information
about amplifier settings.
Sensor calibration
The sensor can be calibrated directly from the Field Microsensor
Multimeter. Please refer to the sensor manual for information on
which solutions to use for calibration. A two point calibration is
sufficient for most sensors. It is recommended to use more than
two standards.
27
Calibration procedure
1. Prepare the calibration standards
2. Select the sensor channel of the sensor you
wish to calibrate. Select Calibrate in the
Channel window
3. Place the sensor in the first standard. Add
the concentration of your standard 1 in Calibrated Value. When the raw signal is stable
select Add point. You can add several points
for each standard and a middle value will
be used. Any point can be discarded during
the procedure: Select the point and delete
4. Repeat procedure 3 for one or more standards
5. When the values of all the standards have
been placed select Apply and the calibration
is calculated and stored immediately
6. A calibration can be deleted by selecting
Discard
7. Calibrated values can now be shown in the
Signal plot window as well as in the sensor
signal display
Export of calibration data
The calibration values can also be downloaded through the
SensorTrace Suite or Programming Tool software where both the
raw mV signals and the calibrated values are shown - for further
information see the Data Export and Processing section.
28
MOTORS
In the Motors window the current status and position of the linear
motor stage can be followed. Motors are by default named Motor
1 and Motor 2. In a 2D system the Motor 1 channel is used for
profiling in the z-axis direction and the Motor 2 channel for the
x-axis direction. The precision of the motor is down to 10 μm when
moving in the forward direction.
The moving distances of the motor is given in mm.
In the Motors window a motor control menu is shown.
29
Start forward: Start Forward moves the motor downwards and
away from the motor head.
Start backwards: Start Backwards moves the motor upwards and
towards the motor head.
Stop: Stop will stop the motor. The motor will also stop when
pressing the red Stop button on top of the Field Microsensor
Multimeter.
Step forward/backwards: Step forward or Step backwards moves
the motor forward or backwards the distance set in Move distance
in Advanced control. By default the distance is 1 mm.
Reset position: Selecting Reset position will set the current motor
position to the depth given in Advanced control. When the Reset
Position is set to 0 mm the Field Microsensor Multimeter will use
the current motor position as 0 mm depth.
Advanced control
Move distance: Here you can add the distance (in mm) the motor
should move in step forward and step backwards in the Motors
window.
Move to position: Adding a depth position moves the sensor to
the defined position relative to the depth given in Reset position.
30
Reset position: Here you define your zero depth. If you e.g. have
moved the motor so the microsensor tip is placed at the water
sample interface and you want to define this depth as your zero
depth, add 0 and select Reset position.
Start forward/backwards: Start forward activates the motor
downwards and away from the motor head. Start backwards will
move the motor upwards and towards the motor head.
Stop: The Stop button stops the motor. The motor will also stop
when pressing the red Stop button on top of the Field Microsensor
Multimeter.
Speed: Here you can control the motor speed ranging from 0
to 100 percent. If you add 100 percent the motor will run with a
speed of about 1 mm per second.
Step size: The Field motor comes with a factory calibration. The
step size listed here indicates the minimum steps in mm the Field
Motor can move.
NOTE: When adding a value in Move distance that is lower than
the value added in Step size, the motor will not move.
31
SIGNAL PLOT
In the Signal plot window the real time data collection from the
microsensors and motors are plotted and displayed. All graphs
update automatically twice every second.
NOTE: Live data are not stored on the Field Microsensor Multimeter. Only data recorded by a sequence can be downloaded on
the computer for further processing.
Plot option
In the plot option you can select the motor movements and sensor
signals you wish to see on the display.
32
General: You can choose to see the sensor signal and/or the motor
movements on a white background or a reader friendly grid plot.
Series: Here you can highlight which sensors and motors you
want to see signals from. Select all displays signals from all the
sensors and motors connected to the Field Microsensor Multimeter. Select none will not show any signals on the display.
Signal/motor axis: In the signal and motor axis you can adjust
the scale of the axis. Tagging the auto-adjust scale, the axis will
automatically adjust the scale of the graph based on the highest
and lowest signal. Alternatively you can manually add a minimum
and maximum range for the axis. In the time axis span, you can
choose between numbers of time ranges for the x-axis ranging
from 1 minute to 1 hour.
Motor control
The motor control button in the Signal Plot window allows you
to control the motor while you look at the motor and sensor plot.
This can be an advantage e.g. when moving the sensor towards
the sediment surface. Select Motor and it will be marked red.
33
Use the right and left arrows to switch between Motor 1 and
Motor 2. Continually pressing Arrow down will move the motor
down and away from the motor head. Continually pressing Arrow
up will move the sensors up and towards the motor head.
34
SEQUENCES
The Sequences window lists all the available, autonomously
preprogrammed sequences on the instrument.
Simple 1D- and 2D-profiling sequences can be made directly on
the Field Microsensor Multimeter. Advanced sequences are made
in the Programming Tool software and subsequently uploaded to
the Field Microsensor Multimeter. Please consult the Programming
Tool manual for further information.
The sequences can be executed directly from the Field Microsensor Multimeter. Select the sequence you wish to run. The
MeasureSamples window will give you different opportunities to
start a sequence. When you start a sequence the data are saved
in a file given by the Field Microsensor Multimeter where the file
name contains the date and time. On the screen the trigger type
and estimated duration is shown together with the creation date.
35
Data storage:
Data are stored as soon as the sequence is started in the following
way:
1. Activate the sequence
2. Press Start on the Field Microsensor Multimeter or start the sequence by selecting
Run
3. When the sequence is finished, the same
sequence can be activated again and stored
in two different ways:
a. In one file including many sequences: Press the Start button on top of
the Field Microsensor Multimeter
and the active sequence will run
again and store the data in the
same file as the previous run. When
importing the data into SensorTrace Profiling the profiles will be
listed separately in the Experiment
window
b. As separate files for each sequence:
Select Run in the MeasureSamples
window and the active sequence
will be stored as a separate file
You can stop a running sequence at any time by pressing the Stop
button.
36
MeasureSamples
NOTE:
All measured
data in an
interrupted
sequence will
be stored
Run: Selecting Run will start the sequences.
Run without trigger: Selecting Run without trigger starts the
sequence without a trigger or delay even though it has been
programmed so in the squence.
Mark as active: A sequence that is marked as active can subsequently be started by pressing the Start button or by selecting
Run.
Add sequence: Here it is possible to make 1D- and 2D profiles.
Delete: Here you can delete a sequence.
Add sequence
37
1D Motorized profiling
In Add sequence it is possible to make a simple 1D or 2D profiling
sequence. For making a 1D profile the Field Motor (z-axis) should
be connected to ‘Motor 1’ on the Field Microsensor Multimeter. For
2D profiling the x-axis Field Motor is connected to the ‘Motor 2’
channel.
In the first window you add following information:
1. Name: Here you name the Profiling
sequence. The name of the sequence will
show in the Sequence window.
2. Duration estimate (mins): Here you can
add the estimated time in minutes of the
profile. If you don’t know the duration of
the profile you just add 0.
To continue select Next.
3. In window two you define the profile.
Example: Profiling from a surface 0 mm and 12 mm into the
sample in 50 µm steps. After each step the program waits 5
seconds to stabilize the signal before it measures in 3 seconds and
notes the average value. Only one replicate is made at each step
and after the profile is finished the sensor is placed 5 mm above
the surface. Only one profile should be made.
38
The sequence will look like this:
Number of cycles: Set the desired number of cycles here. In a 1D
setting one profile is identical to one cycle.
Safe (mm): The Safe position is the position where the motor will
rest between cycles. The safe position is to ensure that the sensor
is resting outside the tissue or sediment between replica profiles.
Start (mm): The depth position relative to the Home depth from
where the profile is started. Negative values are above the surface
and thus normally the start position should be negative or 0.
End (mm): The depth position relative to the Home depth where
the profile is stopped.
Step size (mm): The vertical step depths by which the sensor is
moved from start to end position. The step size should not be
smaller than the size of the sensor tip e.g. if the sensor has a tip
size of 50 µm the step sizes should not be smaller than 50 µm.
Replicates: Enter the number of measurements that should be
performed at each depth.
Wait before measure (s): When a new position in a profile is
reached, the system will wait for a period of seconds before it
starts measuring. This is to ensure that the sensor signal is stable
before the measurements starts. The time varies depending on the
sensor. When profiling with multiple sensors the response time of
39
the slowest sensor should be added.
Measure period (s): Sets the duration of the measurement in each
position. Each measurement will be an average value over this
period of time. When making profiles in an unstable environment,
it can be helpful to average over a longer period i.e. increase the
measure period. The setting should be set to match the measuring
condition.
Delay Between (s): Used when starting a profile and during
repeated profiles. Each time a cycle is started, the sensor is placed
in the Safe position and the profile is started after a delay period
given here.
Press Next to continue.
4. In window three in the sequence configuration you define whether the sequence
should have a delay or not and if so, how
ling (in seconds) the delay should be.
5. Select Done when the sequence is ready.
6. Before starting the sequence, place the
Field Motor at your start position. Reset the
position to 0 mm under the Motor window
in the Advanced control menu
7. Select the Profiling sequence in the Se-
40
quence list and press Run. This will start
your profile. All profiles of a 2D profiling
cycle are stored in one file. You can repeat
the 2D profiling sequence by selecting
Run again. Each 2D profiling series will
be stored in a separate file. Alternatively,
activate your sequence by selecting Mark
as
Active and subsequently Start on top of
the Field Microsensor Multimeter. When the
2D profiling sequence is finished you can
start a new series on Start. All files will be
stored in one file. When importing the file
into SensorTrace Profiling all profiles will be
listed in the Experiment window
8. 2D profiling data made on the Field Microsensor Multimeter can be imported to the
SensorTrace Profiling software for activation
calculations. You download the data in the
following way: Connect the Field Microsensor Multimeter to the computer and make
sure that the Network mode in the Settings
window is set to Direct. Start SensorTrace
Profiling, select Download Profiling experiment from device in the File tab and mark the
experiments you want to download. The
downloaded files are stored as x.upro. The
data are now imported into the SensorTrace
Profiling software and further data handling
can be made
41
2D Motorized profiling
Here you define the 2D motorized profiling sequence along a
depth and side gradient. For 2D profiling the z-axis Field Motor
should be connected to the Motor1 connector and the x-axis Field
Motor to Motor2. As an example we make a sequence profiling
into a sample with a step size of 100 µm 20 mm into the sample.
Hereafter Motor 2 will move the sensor 1 cm and start a new
profile into the sample. This is repeated 10 times. After the 2D
profiling is finished Motor 1 and Motor 2 are placed at starting
point 0 mm. The 2D profiling sequence is made in the following
way:
1. Go to the Sequence window on the Field
Microsensor Multimeter, place the green
selecting bar on any sequence and press
Select
2. Select Add sequence and Profiling 2D
3. Name your profiling sequence and add (optional) an estimated time (in minutes) for
the profiling sequence. The saved sequence
will be listed in the Sequences window
42
4. Add the different parameters in the motorized 2D profiling program – see example
below. The detailed description of the
different parameters is found under the 1D
profiling sequence section
5. In the Sequence configuration you define
if the sequence should have a delay or not
and if so add how long (in seconds) the
delay should be. Select Done when the 2D
profiling sequence is ready
43
6. Place Motor 1 and Motor 2 at your start
position. Reset both motors to 0 mm under
Motor and Advanced control
7. Select the Profiling sequence in the Sequence list and press Run. This will start
your profile. All profiles of a 2D profiling
cycle are stored in one file. You can repeat
the 2D profiling sequence by selecting
Run again. Each 2D profiling series will
be stored in a separate file. Alternatively,
activate your sequence by selecting Mark
as
Active and subsequently Start on top of
the Field Microsensor Multimeter. When the
2D profiling sequence is finished you can
start a new series on Start. All files will be
stored in one file. When importing the file
into SensorTrace Profiling all profiles will be
listed in the Experiment window
8. 2D profiling data made on the Field Microsensor Multimeter can be imported to the
SensorTrace Profiling software for activation
calculations. You download the data in the
following way: Connect the Field Microsensor Multimeter to the computer and make
sure that the Network mode in the Settings
44
window is set to Direct. Start SensorTrace
Profiling, select Download Profiling experiment from device in the File tab and mark the
experiments you want to download. The
downloaded files are stored as x.upro. The
data are now imported into the SensorTrace
Profiling software and further data handling
can be made
45
DEPLOYMENTS
The Deployments window shows an updated list of already run
sequences. The result file name, specific sequence name, and
running dates are listed along with the result of the run.
Name: All files automatically receive the name of the sequence
and a number. All files are listed by the time of creation.
Active sequence data tell you that the file receives data from
multiple runs from the same sequence.
Result: Here you can see the status of a completed or running
sequence. A completed sequence is one sequence that has run to
the end. If the sequence has been interrupted before it has ended
the result will show as ‘interrupted’.
• ‘N/A’ indicates that the file is currently
receiving data from the Field Microsensor
Multimeter
• ‘Stalled’ and ‘crashed’ mean that the sequence has been interrupted unexpectedly
46
Sequence: The used sequence is listed here. Deleted means that
the sequence has been deleted in the Sequence window and is no
longer available on the Field Microsensor Multimeter.
Data size: The size of the data file is shown here.
Created: Here you find the date and time of when the file has
been created. You can always find a file by its date and time.
A sequence can be deleted by selecting it and subsequently
choosing delete in the pop up window.
47
STATUS
The Status window allows you to get a quick overview over the
Field Microsensor Multimeter and what is running.
Sequencer panel: Shows the status of the autonomous operation
of the Field Microsensors Multimeter i.e.whether it is idle or
actively running a sequence.
The elapsed time and current step of the executing sequence is
continuously updated. When the status line shows ‘armed’ the
Field Microsensor Multimeter is waiting for a trigger (external
switch or a programmed delay). A trigger can be activated before
time by selecting the Trig button.
48
Log messages Holds a list of information on the last running
autonomous sequence, status messages etc. This log file can be
downloaded using the Programming Tool software. See more
information in the Programming Tool manual.
Last deployment: Holds information on the last completed
autonomous sequence and whether it has completed successfully. This information is needed if you return to the system after a
longer unattended deployment.
System panel: Contains real-time updated information on the
connections, power source, battery status, and finally storage
capacity left for further deployments. The power supply will show
when an external battery is connected. The Field Microsensor
Multimeter will use the power of the external power supply before
using the internal battery. Battery capacity shows the remaining
capacity of the internal battery. Should the free storage capacity
be limited, then some of the storage data from previous deployments should be deleted. In general, it is not recommended to use
the Field Microsensor Multimeter for long-term data backup.
49
SETTINGS
In the Settings window the current date and time can be adjusted.
Here you can also get firmware updates and product information.
Current date and time: Here you can set up and verify that the
real-time clock is set. This is particularly important if you use
delayed deployments, as the real-time clock is used to activate the
start and stop time for a scheduled data logging.
Network mode: The default Direct link between the Field
Microsensor Multimeter and the PC is where the Field Microsensor
Multimeter is given a fixed IP address to the PC. In the Network
mode the Field Microsensor Multimeter accepts any IP address and
network setup from an external DHCP server/ router. The given
IP address is then shown on the screen of the Field Microsensor
Multimeter in the Network ID box.
Network ID: As default the Network ID is xx.1 (see Status window).
If more than two instruments are connected to the computer each
instrument should have its own Network ID (1, 2, 3, 4).
50
Firmware update: You can update the Field Microsensor Multimeter firmware when connected to a PC. Selecting the Firmware
update button will give you the web browser address you should
navigate to e.g: http://10.254.239.1/SoftwareUpdate.html. For
further description see the software update section.
Product information: Shows the basic information about the
instrument. Software version and contact details are found here as
well.
51
BATTERY AND EXTERNAL POWER
Battery charging and maintenance
The Field Microsensor Multimeter contains an internal
rechargeable battery that powers the whole system. The nominal
capacity is 13 Ah @ 25 °C. There is an undercharge protection
circuit which in practice leaves an operation time of approx. 20
hours. The battery is a Lithium-ion type (Li Ion). It has a very low
self-discharge rate and will remain charged for at least one year
when not used.
Charging the battery
If the batteries run low recharge the Field Microsensor Multimeter
by plugging the charger cable FMM-CHG001 into the Power
channel of the Field Microsensor Multimeter. In the Status window
on the instrument the charging process can be followed via the
current battery level indicator. Charging takes approximately 4
hours.
Charging temperature
We recommend charging the battery at a temperature between 5
°C and 35 °C. Although the system runs perfectly on the charger,
e.g. in a laboratory setting, the self heating of the system during
use can be close to 40 °C. There is an intelligent charging circuit
that lowers the charging effect or even stops charging as the
system temperature approaches 40 °C. This results in prolonged
charging time. In an environment with high temperatures it is
recommended to turn off the Field Microsensor Multimeter during
charging.
Also note that the Field Microsensor Multimeter is gray and if
left charging in direct sunlight, e.g. in the open field, the internal
temperature will quickly increase above 40 °C. Protect against
sunlight and cover the case with a wet towel for cooling.
52
NOTE:
Air transport of
Li Ion batteries is
regulated due to
potential hazard.
When travelling,
keep the battery
Material Safety Data
Sheet with the Field
Microsensor Multimeter to verify that
the battery load is
not prohibitive. The
Material Safety Data
Sheet is provided
with the system.
External power supply
The purpose of an external power supply, like the Unisense
External Battery, a car battery or a generator, is to increase
operation time of the system. It is possible to daisy chain several
external power supplies to increase the capacity further. If you
wish to use a Unisense External Battery contact sales@unisense.
com for further information.
The Unisense External Battery is connected to the Field Microsensor Multimeter using the FMM-BAT001 cable whereas your own
external power supply is connected using a FMM-POW001 cable.
During ordering of the FMM-POW001 cable please specify the
output connection of the cable so it can connect to your power
supply.
Use the following procedure when connecting an external power
supply to the Field Microsensor Multimeter:
1. Connect the FMM-BAT001 to the Unisense
External Battery or FMM-POW001 cable to
your external power supply
2. Remove the protective cap from the Field
Microsensor Multimeter Power connector
and insert the LEMO connector from the
NOTE:
Do not unplug the
external battery from
the Field Microsensor
Multimeter when it is in
use, as this will shut down
the Field Microsensor
Multimeter.
FMM-BAT001/FMM-POW001 cable to this
3. Start up the Field Microsensor Multimeter
by pressing the Power button
Recharging a Unisense
External Battery takes
about 4 hours.
4. If you wish to use additional external batteries, connect a second cable between the
connectors of the two external batteries
53
FIRMWARE UPDATE
If the Field Microsensor Multimeter firmware needs updating, this
can be done after receiving firmware update information from
Unisense. Hereafter you start the software update in the Settings
window
The procedure is as follows:
1. Make sure the Field Microsensor Multimeter
battery (internal) is charged (see the Battery
and external power chapter for details)
2. Turn the Field Microsensor Multimeter on
3. Connect the Field Microsensor Multimeter
to an Ethernet (LAN port on the PC) with
the FMM-COM001 cable
4. Make sure that the Field Microsensor
Multimeter is inactive (the status LED in the
lower right corner blinks green)
54
5. Download the firmware update file from
www.unisense.com where you can always
find the newest version of the software
6. Navigate to the Settings window and select
Firmware update
7. Enter the HTTP address listed in the popup
window in any standard web browser e.g.:
http://10.254.239.1/SoftwareUpdate.html
8. Browse to the firmware update file and
upload the new firmware
NOTE: PRESS ONLY ONCE!
Should the upload fail the following page is shown:
9. When the upload has finished select Apply
update
NOTE: PRESS ONLY ONCE!
55
Leave the system to unpack and install the software update file.
It can take several minutes. The system will automatically reboot
when the update has completed.
Once the Field Microsensor Multimeter is restarted it is ready for
use again
All user data and persistent settings will be retained across a
software update.
56
TROUBLESHOOTING
Problem
Possible cause
Solution
Problem
Possible cause
Solution
Problem
Solution
Problem
Possible cause
Solution
After a sequence is done the motor moves to an undefined depth.
The motor has not been reset to e.g. 0 mm before running the
sequence.
Add the correct reset position into the Motor window under
advanced control and reset the motor.
Two or more windows on top of each other.
A double motor action e.g. a motorized sequence is running while
the same motor is controlled manually from the Field Microsensor
Multimeter.
Reset the Field Microsensor Multimeter by holding the OFF button
down for approximate 20-30 seconds.
The Field Microsensor Multimeter will not turn OFF and a green
screen is shown.
Reset the Field Microsensor Multimeter by holding the OFF
buttom down for approximate 20-30 seconds.
Data logger file is missing
The active sequence has an “unbroken error” which is displayed in
the log file.
Test the sequence in the Programming Tool software and change
the settings so it gives a correct sequence. How to test a sequence
is described on page Test a Sequence section.
If you encounter other problems and need scientific/technical assistance, please contact
[email protected] for online support (we will answer you within one workday)
57
APPENDIX
Field Microsensor Multimeter specifications
Field Microsensor MultiMeter
input connector
Sensor
Lemo - Splash Proof (IP68)
Reference (for mV channels)
Subcon plug on the cable of the measuring electrode
aMpliFier
Types
Picoampere
pH/mV
Temperature
Number
5
2
1
Polarization
Digitally adjustable
N/A
N/A
Polarization range
± 2 .5 V
N/A
N/A
Input range
± 4500 pA, ± 45 nA, ±
450 nA, ± 4 .5 µA
± 4500 mV
-10 - +100°C
Input impedance (mV channels)
N/A
> 1013 Ohm
response and control
Response time (90%)
Signal gain factor adjustment
Signal offset adjustment
Control
<35 msec .
1-10
±2 .5 V
Motors - up to 2 (z and x axis)
Field MicroOptode Meter
3-serial RS-232/UART
I/O 4x digital 3 .3V
power
Power supply
Battery operation time @ 25°C
Batteries - internal LiON 78 Ah
External voltage 9V (5-28V)
Normal usage approx . 60 h
Power Save w screen off approx . 75 h
a/d-conVerter
Resolution
16 bit
Sampling frequency
10 kHz
interFace
Interface
On-device control/Remote programming tool
Communication
Ethernet
Analog output
Optional
data acquisition soFtware
Field Multimeter Programming Tool
SensorTrace Suite
Other Unisense software
Data rate
Software data output
Included
Optional - Logging only
Optional - SensorTrace Profiling
Up to 10 samples/sec .
CSV file
display
Display
Graphical 7’’ LED display
18 bit color / high contrast
800x480 pixel
physical
Dimensions
Weight
350x 300 x 148 mm (W x D x H)
Approx . 8,5 kg (19 lbs)
enVironMental
Temperature range
58
Operating conditions 10°C to 50°C
Oxygen solubility table
The table below shows equilibrium concentrations of oxygen
(µmol O2/litre) at ambient partial pressure of 0.21 atm. in water
as a function of temperature and salinity. More detailed tables
available at www.unisense.com
‰ /˚C
0.0
5.0
10.0
15.0
20.0
25.0
30.0
35.0
40.0
0.0
456.6
398.9
352.6
314.9
283.9
257.9
235.9
217.0
200.4
2.0
450.4
393.6
348.1
311.1
280.6
255.0
233.3
214.7
198.3
4.0
444.2
388.5
343.7
307.3
277.3
252.1
230.8
212.4
196.3
6.0
438.1
383.3
339.4
303.6
274.0
249.3
228.3
210.2
194.3
8.0
432.1
378.3
335.1
299.9
270.8
246.5
225.8
207.9
192.3
10.0
426.1
373.3
330.8
296.2
267.6
243.7
223.3
205.7
190.3
12.0
420.3
368.4
326.7
292.6
264.5
240.9
220.9
203.6
188.4
14.0
414.5
363.5
322.5
289.1
261.4
238.2
218.5
201.4
186.5
16.0
408.8
358.7
318.4
285.5
258.3
235.5
216.1
199.3
184.6
18.0
403.2
354.0
314.4
282.1
255.3
232.8
213.7
197.2
182.7
20.0
397.7
349.3
310.4
278.6
252.3
230.2
211.4
195.1
180.8
22.0
392.2
344.7
306.5
275.2
249.3
227.6
209.1
193.0
179.0
24.0
386.8
340.2
302.6
271.9
246.4
225.0
206.8
191.0
177.1
26.0
381.5
335.7
298.7
268.5
243.5
222.5
204.5
189.0
175.3
28.0
376.2
331.2
294.9
265.3
240.6
219.9
202.3
187.0
173.5
30.0
371.0
326.9
291.2
262.0
237.8
217.4
200.1
185.0
171.7
32.0
365.9
322.5
287.5
258.8
235.0
215.0
197.9
183.0
170.0
34.0
3609
3183
2839
2557
2322
2125
1957
1811
1682
36.0
355.9
314.1
280.3
252.5
229.5
210.1
193.6
179.2
166.5
38.0
351.0
309.9
276.7
249.5
226.8
207.7
191.4
177.3
164.8
40.0
346.2
305.8
273.2
246.4
224.1
205.4
189.3
175.4
163.1
42.0
341.4
301.8
269.4
243.4
221.5
203.1
187.3
173.6
161.5
Sources: Garcia, H.E. and Gordon, L.I. 1992. Limnol. Oceanogr. 37:1307-1312
Millero, F.J. and Poisson A. 1981. Deep Sea Res. 28A:625-629)
59
UNISENSE, DENMARK
www.unisense.com · [email protected]