1
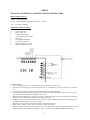
LC SERIES
CONTROL CARDS
USER MANUAL
AE
AYBEY ELEKTRONiK
1
LCR,LCM and LCI BOARDS AND FUNCTIONS
LCM Main Card
LCM, is the main board in the system. It read all inputs by itself and via LCR and LCI. It then outputs necessary
data to activate motor, doors and signals. The lift parameters are also stored in LCM. They can be easily changed
by program buttons. It displays the current floor and target floor by using digital displays. When an error occurs,
it displays error code.
LCR Relay Card
According to the commands by LCM, it produces the outputs which perform all relevant processes with respect
to car motion, security circuit and door. By means of the leds on the card, it can be observed that what process
the lift is performing and the state of the security circuit.
LCI Input / Output Card
It transmits the call data to LCM and turns on the registration lamps. In order to be able to identified by LCM,
it is necessary to connect the jumper whose number is the sequence number of LCI card according to the LCM.
Terminal Signal Ends
•
Main power ( R,S,T,Mp)
•
Motor (U1,V1,W1,U2,V2,W2)
•
Security Circuit (101,120,130,140)
•
Call / Registration lamps (10,11,12.....)
•
Magnetic Switches (M0, ........ , M4)
•
Level Stopper(MK) / In Hydraulic Systems MK1-MK2 (F7-F8)
•
Digital Display (a,.....g,1,-)
•
Revision Signals(500,501,869)
•
Brake(840,2000)
•
Retiring Cam / Door Close (810,2001)
•
Load Contacts (802,804,805)
•
Direction Arrows (31,32)
•
Busy controlled output (190)
•
Busy(12)
•
Cabin Lamp(2)
•
Limit Switches(817,818)
•
PTC Motor thermistor (T1,T2)
•
Door Buttons (K20,DTS)
•
Fire (FIRE)
•
Common of display and signal lamps, +24V DC (100)
•
Common of Register and Bistable GND(1000)
2
PANEL VOLTAGE INFORMATION
Panel Input Voltage
3 Phase 380v-MP
Contactor Supply Voltage
220v AC or 48v DC
Phase Protect Cut off Voltage
+/- 20 %
Brake Supply Voltage
180v DC / 48v DC
PTC Cut Off Resistance
> 500 ohm
Security Circuit Voltage
48v DC
1000
Ground
100
24v DC
101
48v DC
Display Common Voltage
24v DC
IMPORTANT POINTS WHILE ASSEMBLING ELECTRONIC CARDS
Supply Voltage of Electronic Cards: Electronic cards needs a supply voltage, to perform their functions, beside
input signals. This voltage is stated as AC or DC in the inputs. The most important point here is to give true type
of voltage (AC or DC , which is necessary). Another important point is value of the voltage
For example : When we need 12v AC supply and use a 220v/12v transformer. If the voltage has excessive ripples
or voltage level is lower, then this causes some tides and locks to occur on cards. On the contrary, if the voltage
level is higher, then this causes the voltage level on the circuit components to get higher and make them broken.
In such cases , the best thing to be done is to choose the right transformer ,which holds the supply voltage in an
optimum range, by contacting with producer.
Input / Output Terminals: If the cards are not connected according to the manufacturer’s drawing serious
problems may occur. The most important point is to connect the right terminal to the right point. The best method
for this is to mark the cables first and control the voltage level by a voltmeter before connecting. Outputs of
electronics card differs in respect of used components. This can be summarised as ;
•
Opto Coupler Input / Output Circuits
•
Transistorised Output Circuits
•
Relayed Output Circuits
3
OUTPUT TERMINALS AND THE MEANINGS OF THE ABBREVATIONS
1, A,....,G
Digital Display Outputs
C0,....C7
2
Cabin lamp
8AC/12AC
12v AC
RH
High Speed Contactor
12
Busy Signal
RF
Low Speed Contactor
31
Down Arrow Signal
RU1
Down Direction Contactor
32
Up Arrow Signal
RU2
Up Direction Contactor
35
Over Load Signal
R, S, T
Phases
39
Out of Service Lamp(Inspection)
FKR
Phase failure detector
40AC
40v AC
SFP
Brake and Cam Fuse
100
+24v DC
M0,....M4
Magnetic Switches for Gray Code
101
Security Circuit Supply (48v DC)
SKL
Cabin Lamp Fuse
120
Stop Circuit Return
KA
Open Door Signal Output (Transistor 011)
130
Door Contacts Return
K20
Open Door Button
140
Door Locks Return
KK
Close Door Signal Output (Transistor 011)
190
Hall call common for Simple Push Button
DTS
Close Door Button
500
Inspection Up Button
VK
Contactor Supply Voltage
501
Inspection Down Button
SK-S55
Contactor Fuse
802
Minimum Load Contact
LCM
LC Series main card
804
Over Load Contact
LCI
LC Series I/O card
805
Full Load Contact
LCR
LC Series Relay Card
2001
Positive terminal of Cam
Mp
Neutral (Main power)
810
Negative terminal of Cam
SXX
Fuses
810A
Open Door Signal (automatic door)
MK
Stop Switch
817
Lower Limit (End of high speed way)
TMS
Thermic Magnetic Circuit Breaker
818
Upper Limit (End of high speed way)
TR
Thermic Relay
840
Positive terminal of Brake
T1-T2
PTC Motor thermistor terminals
2000
Negative t erminal of Brake
FIRE
Fire Contact
869
Inspection control input
MK1-MK2
Stop switch-Magnetic Switch for Hydraulic
1000
Signal and Security Circuit Ground
Register button inputs
Register lamp outputs
System (up and down)
4
PLACING OF MAGNETIC SWITCHES
Install the system by the following order:
1.
Place bi-stable magnetic switches onto the car in such a way that the front of the switches face to the inner
side of guide rail. If there is no rail between the switches, fix them at least 10 cm away from each other.
2.
Connect the one terminal of M0,M1,M2 and MK switches to 1000(M+) common and the other terminals to
M0,M1,M2 and MK inputs.
3.
After connecting the switches to the card take a magnet in your hand, face it to any switch and then invert it.
In this case the led of the relevant magnetic switches between on and off states. By this way you can check
the cable from the top of the car to the panel.
4.
After checking the switches as told above, take the car to the first floor in inspection mode and place the
magnets according to the magnet location diagram. When you reach to the next floor and locate the magnet,
you will see the new floor number at all displays or “At Floor” light at one upper floor. If there is a mistake,
then take a magnet and move it in front of the switches till you find the last current floor number then search
for your mistake. Don’t leave that floor until you solve the problem.
5.
After completing this job, move the car from bottom floor to the top floor and during this travel observe the
display. If you can see all floor numbers correctly then placing magnet has been done successfully.
6.
If your system is two speed, locate the magnets in the way of MK. If you locate these correctly, when the
car reaches to the exact floor level , the MK led of that floor, on the LCM card, will be off and will remain on
at other locations
7.
At last, take the car to the first floor locate the KSR1 magnets to the same level with the magnet on the M0
path and take to the last floor to place KSR2 on the same level of the magnet of M0,M1,M2,M3 and MK.
After locating these, follow above test procedure:
•
Stop the car any level lower than KSR1 magnet. Take a magnet and change the floor number by facing it
to the opposite of the switches. If you call the car to the bottom floor by using control panel, then the car
must not move but if you call it to any upper floor than floor display it must go.
•
Stop the car any level upper than KSR2 magnet. Take a magnet and change the floor number to any
number less than the top floor by facing it to the opposite of the switches. If you call the car to the top
floor by using control panel, the car must not move but if you call it to an lower floor than floor display it
must go.
8.
After completing above processes successfully, take the lift to the normal control and leave for usage.
5
PROGRAMMING LC SERIES
System parameters of LC Series lift controllers can be observed and modified easily by using three mini buttons
located on the main board, LCM. These buttons are named as follows:
PROG
INC
DEC
A) MODIFYING PARAMETERS
In order to enter programming mode inspection switch must be on. When the lift is in inspection mode you have
to hold your finger pressed onto the (PROG) button until you see the following display on LCM board
(PROG)............(PROG)
n 00
Now the system is in programming mode. This display structure (letter ‘n’ in first display) shows the program
number (‘00’ in this example, left two displays). The programs with the numbers 00..19 are used for hall and cabin
display patterns. Other programs are used as system parameters in controller.
In order to see or modify the data stored in a program number, first you have to find it. When you entered the
programming mode first you see a display exactly as above. You can increment program number by pressing
(INC) button or decrement it by pressing (DEC) button (shortly). But when you have reached lower and upper
limits then the program number cycles to the opposite limit.
For example let us assume the display shows program 24 as follows:
n 2 3
(INC)
n 2 4
(DEC)
n 2 3
(DEC)
n 2 2
(DEC)
n 2 1
6
In order to see the data stored in a program cell you have to press (PROG) button shortly.
n 2 1
(PROG)
0 0 8
Now the display shows the data stored in program number 21. As an information program number 21 stores the
number of stops (floors) in the system. So this controller works with 8 stops.
In order to increment or decrement the data (the number of stops in the system) you can use (INC) and (DEC)
buttons exactly as in program finding procedure
(DEC)
0 0 7
(DEC)
0 0 6
After you corrected the data (found the number in display which corresponds to the number of stops in the
controller) you have to press (PROG) button once to return to the previous level (program selection level).
(PROG)
n 2 1
You can observe and / or modify as many programs as you want in one programming session. Be aware that no
data you have modified until now is written to the EEPROM. The modified data is still in RAM. But when you exit
when you are in program selection level by pressing (PROG) button long until the system leaves the programming
mode, then last configuration you prepared is stored into EEPROM and the control uses these new parameters in
operation. After this point any power breakdown does not influence the parameter memory.
When you exit from programming mode by holding (PROG) button down until the display shows the floor where
the car stays, then system is ready to function as a controller again.
(PROG)..............(PROG)
3
Where 3 stands for floor number 3.
B) FUNCTIONS OF PROGRAMS
The corresponding functions of program numbers:
0..19 : Digital display codes for floors 0..19
20
: Programming codes
21
: Number of stops
22
: Lift traffic model
23
: Lift door type
24
: Definition of parking floor
25
: Parking floor
7
26
27
28
29
30
31
32
33
34
: Maximum lock waiting time
: Number of I/O boards in the system (LCI)
: Busy time
: Automatic door open waiting time
: Waiting time in floor before departure for the next floor (only in collective models)
: Parking floor in fire
: Maximum floor transition period
: Definition of floor level stopper
: Definition of error reporting mechanism
PROGRAM 0..19 : These programs store the digital display codes for the corresponding floors. Program 0 holds
the code for the floor 0 and program 6 the code for the floor 6. These codes control hall and cabin displays but
not the dis play on LCM board. You can enter any code between 0-255. There is table below which shows the
codes for some characters. The characters are not limited with this table. If you need any character other than the
ones in table then please call any AYBEY technical service.
0
1
2
3
4
5
6
7
8
9
219
9
179
59
105
122
250
25
251
123
10
11
12
13
14
15
16
17
18
19
223
13
183
63
109
126
254
29
255
127
A
B
L
r
P
C
E
F
249
234
194
160
241
210
242
240
PROGRAM 20 : This program does not store any data for any controller function. Program 20 is used to
shortcut for some popular digital display configurations.
Here are allowed commands for program 20 and their jobs:
11
: This command fills the program memories 0 to 19 with the digital codes for numbers 0..19. So resulting
digital codes are 0,1,2,3,4,...
12
: This command fills the program cells 0..19 exactly as in command ’11’. In addition to this it also fills the
other program cells (system parameters starting from program 21) with the factory defaults.
8
: This command shift all programs between 0..19 one step down. After executing this command program
1 is shifted to 0, program 2 is shifted to 1 and so on. For example a system like 0,1,2,3,4,... is 1,2,3,4,5,... after
execution.
21
: This command organises digital display numbers as -1,0,1,2,3,...
22
: This command organises digital display numbers as -2,-1,0,1,2,...
23
: This command organises digital display numbers as -3,-2,-1,0,1,...
1
: This command shift all programs between 0..19 one step up. After executing this command program 0 is
shifted to 1, program 1 is shifted to 2 and so on. For example a system like 0,1,2,3,4,... is 0,0,1,2,3,... after execution.
2
: This command shift all programs between 0..19 two step up. After executing this command program 0 is
shifted to 2, program 1 is shifted to 3 and so on. For example a system like 0,1,2,3,4,... is 0,0,0,1,2,3,... after
execution.
3
: This command shift all programs between 0..19 three step up. After executing this command program 0
is shifted to 3, program 1 is shifted to 4 and so on. For example a system like 0,1,2,3,4,... is 0,0,0,0,1,2,3,... after
execution.
PROGRAM 21 : This program holds the number of stops in lift system. You can enter any number between 2
and 24.
PROGRAM 22 : This program stores the parameter which decides the traffic system of the lift as follows:
0
: Simple push button
1
: Simple collective in both directions (not selective)
2
: One call button down collective
8
3
: Two call buttons full collective
Note: if program 27 is 0 then program 22 is automatically 0 (simple push button)
PROGRAM 23 : This program stores the parameter for lift door as follows:
0
: Semi-automatic landing door, no cabin door
1
: Semi-automatic landing door, with cabin door
2
: Full automatic cabin and landing doors.
PROGRAM 24 : This program defines the parking facility of the lift as follows:
0
: No parking floor
1
: Parking floor is defined. The car waits at the parking floor with closed doors.
2
: Parking floor is defined. The car waits at the parking floor with open doors.
If this parameter is 1 or 2 then the car moves to the parking floor, which is specified in program 25, when no call is
present for at least 80 seconds after last lift motion.
PROGRAM 25 : This program stores the parking floor if program 24 is 1 or 2. This number must be less than the
one stored in program 21.
PROGRAM 26 : This program stores maximum time period to wait door lock closed after a door close signal is
sent. It accepts a number between 6-200. So you can adjust this time from 2 sec. to 50 sec..
PROGRAM 27 : This program stores the number of I/O cards connected to the system. It accepts values
between 0 to 8. If program 27 is 0 then program 22 is forced to 0 and the system can function only in simple push
button.
PROGRAM 28 : This program stores busy period. It can be adjusted between 40 and 200. Each number
represents about 12 sec.
PROGRAM 29 : This program stores the time period to wait doors open before reclosing them when the doors
are full automatic It can be adjusted between 30 and 200. Each number represents about 12 sec.
PROGRAM 30 : This program is used only in collective systems. It stores the parameter for the time period
where the car waits before departure for the next call. The parameter can be adjusted between 3 and 45. Each
number represents about 3.5 sec.
PROGRAM 31 : This program stores the floor, where the car moves when a fire signal is detected. The car, after
reaching fire-floor, waits there with open doors. If you enter here a number greater than the one in program 21 an
error with the number 226 is reported by the system.
PROGRAM 32 : This program stores a parameter which stands for the maximum time allowed the car to move
from one floor to the next one. If this time is exceeded then the car is stopped by the system and an error is
reported (249). The parameter can be adjusted between 2 and 15. Each number represents about 2.5 sec. This
function is inhibited when program 34 contains 1 as parameter.
This program is very crucial. In case of any mechanical problem which prevents the motion of the car or any fault
in floor detector system may cause some new big problems if the motor is not switched off immediately. It is
strongly recommended to adjust this function properly when the lift is in service.
PROGRAM 33 : This program organises MK detector, which stops the car at exact floor level. The functions of
the allowed parameters are as follows:
0
: There is only one floor level stopper present in the system. MK input on the LCM board is used as
stopper in up as well as in down direction.
1
: There are two floor level stoppers used in the system. F7 input on the LCM board is used in up
direction as MK1. F8 input on the LCM board is used in down direction as MK2. In this case MK input on LCM
no function.
PROGRAM 34 : This program is used to control error reporting mechanism. The allowed numbers and their
functions are as follows:
0
: System reports all errors and stops the car in all errors.
1
: Only errors which are related to the security circuit are reported. Also the car is stopped only in security
loop errors. Secondary errors like 249, 250, 252, 253,.. are not processed.
9
ERROR CODES
LC system reports some faults by flashing displays. The meanings, possible causes and recommendations for
error codes are as follows:
222
: This code is reported when the traffic system or number of stops specified in program requires more
I/O boards than connected in system.
123
: This code is reported when the inputs can not be read safe enough. It is mainly caused from
electromagnetic interference or bad cable or terminal connection.
225
: This code is reported when the parking floor (program 25) is greater than maximum number of stops
(program 21).
226
: This code is reported when the fire- floor (program 31) is greater than maximum number of stops
(program 21).
130
: This code is reported when the door contact circuit is broken during motion.
140
: This code is reported when door lock circuit is broken during motion or door lock cannot be sensed as
closed after cam or door close signal is applied.
241
: This code is reported when KSR1 and KSR2 are open at the same time. This error is also reported when
stop circuit is open.
249
: This code is reported when no change in floor number is detected in the time interval defined in
program 32 when the car is in motion. This error may be caused by any mechanical or electrical fault which
inhibits motion as well as any fault in floor detecting system. Be aware that any number in program 32 which is
small can also cause this error.
250
: This code is reported when floor detecting system sends any information as floor number to the
controller above highest floor (defined in program21).
252
: This code is reported when the car moves in up direction and the next floor number returns from floor
detecting system other than the expected one.
253
: This code is reported when the car moves in down direction and the next floor number returns from
floor
10
FREQUENTLY ASKED QUESTIONS
1. In push-buttons, there is nothing on displays at stops 0 and 1.
•
Enter 11 to the program 20. If it repeats contact to the main service.
2. In push-buttons displays always show the same floor or meaningless things.
•
The IC ULN2803 may be burnt out because of over current. Check your connections if you are sure that
connections are correct than change the IC with a new one. The IC is under the display output socket on the
LCM card.
3. Displays on push buttons show nothing.
•
Common terminal of the display may be connected false. Check whether it is connected to 100 or not.
•
Change the IC ULN2803.
4. Display shows wrong floor or never changes.
•
The magnet locations may be mistaken. Check them according to the location schematics.
•
There may be a broken magnetic switch.
•
The common terminal of magnetic switches may be not connected or wrong connected. Check whether it is
connected to 1000 or not
•
Magnetic tubes may be too near or too far to the magnets. Check the distance between them through the well.
5. Push button displays and car displays show different things.
•
Dip switch settings of KDS card in inspection box may be fault. Look at the FIGURE 25 and check the settings.
•
Installation of KDS card may be wrong. Look at the FIGURE 25 and check the connections.
6. The lift does not get any registration.
•
The jumpers on output card (LCI) may be placed false. Starting from left card, the jumper of 1st. LCI-08 card
must connect 1st pin, the jumper of 2nd LCI-08 card must connect 2nd pin and so on... According to the
number of output cards, this connection logic goes on. Check this connections (FIGURE 1).
•
The number of output cards(LCI 08) may be entered more, than your system has, to the program 27. For
example, if there are 2 output cards in your system and you entered a greater number than 2, then this cause a
fault. Therefore check the program content. Beside this, check the floor number in program 21 and traffic
system in program 22.
7. Automatic door does not open.
•
System may suppose itself between the floors. If so it does not start to open door. Check whether the MK led,
on the LCM card (the main card at center ), is off or not. This led must be off when the car is at any floor.
8. Automatic door does not close.
•
120 may be shunted through contact switch circuits. After starting to open door, the system must detect that
the door is opened. The system check this by looking whether 130 and 140 circuits are cut or not. By this way
the system understands that the door is opened and after a while it closes the door. If contact switch circuits
are shunted, remove the shunts.
•
Check whether there is a mechanical obstruction or not.
9. Lift moves only one direction.
•
One of the compulsory 2nd speed switches may be open. Therefore the system may suppose itself at upper or
lower limit levels. Check whether 817 and 818 leds, on relay card, are on or not. At normal operation both must
be on. If the car do not exceed the well limit levels and one of the leds is off ;
11
a) Check whether KSR magnetic switches run or not.
b) Check KSR magnetic installation.
c) Check the locations of the magnets located to the limit levels ,which codes the KSR tubes.
d) ULN 2803 IC may be burnt out because of over current. Change this with a new one. The IC is under
the security circuit led group on the relay card.
e) If the directions relays, on the relay card, close (you can observe the leds) , then check the unclosed
contactor connections which comes to the coil ends.
10. Although everything looks normal, lift does not move.
•
Motor protection relay( FKK) may be in off position. Then it prevents the energy to reach the contactors and
the lift can not move. If phase protection is not active, contactors are not energised. AYBEY FKK is phase
order sensitive and if the phases are not on specified order, phase protection disables the system. You can
check whether the motor protection is active or not, by looking the red led on it. If this led is off;
a) Any phase may be absent. Check all phases.
b) Voltage level may be too low. Check it.
c) Phases may be not on specified order. Change the place of any two phase from R-S-T. For example:
Connect the cable at R terminal to the S terminal and connect the cable at S terminal to R terminal.
d) LCR card or card connections may be faulty.
e) Check the contactor fuse(SK).
11. Lift does not open the door when it comes to floor.
•
System may still suppose itself between the floors. You can check this by MK led ,on the LCM card. MK must
be off at floors and must be on between the floors. If the MK is still off when the car is at floor, the car may
see the next magnet by sliding after stopping. In order to prevent this, in automatic door systems, locate the
black magnets, which are under and over the floor level of MK, in the automatic door opening range.
( It is
about a hand span up and down.)
12. The lift always goes the floor (X).
•
If the lift gets a registration itself at 1 minutes after stopping, a park stop has been defined.(Prog24)
•
If the lift gets a registration to X number floor as soon as arriving any floor, change the ULN2803 IC on the
output card( LCI-08).
12
EIK10
EIK 10 LIFT INSPECTION AND HELP SYSTEM WITH BATTERY
EIK 10 CARD OUTPUTS:
AB-AB : Cabin Help Button
AL-AL : Cabin Emergency Lighting Lamp 12v DC / 5 Watt
12 V +- :12v DC Power Supply
TERMINAL GROUP OUTPUTS:
10-11 : Cabin Ceiling Lamp
5
: Neutral (220v AC)
6
: Phase (220v AC)
0
: Control (Stop Output)
1
: Normal (Door Contact Input)
2
: Inspection
3
: Down Inspection Button
4
: Up Inspection Button
8
: Inspection Signal (12v DC)
9
: Inspection Signal (12v DC)
EXPLANATIONS:
1. After assembling the system, connect the free pole of the battery to the system.
2. The system is designed to give 12v DC output at any case, whether there is supply voltage(19v AC 50hz) or
not.
3. Even if there is no supply voltage, alarm and ding dong perform their functions.
4. Connect the terminals of cabin ceiling lamp parallel to the 220v cabin lighting lamp. By this way, the system
automatically detects whether the cabin is in use or not.
5. When the cabin ceiling lamp is turned on ( lift in use), emergency light becomes on. When the cabin ceiling
lamp is turned off, after 5 seconds emergency light becomes off.
6. If supply voltage is cut off when the lift in use, emergency light is on during 12 minutes. After turning off, if
one pushes the help button, it becomes on again.
7. The battery of the system can feed the emergency lamp during 3 hours.
8. When there is supply voltage, the system always charges the battery.
9. When the control switch is at inspection position, it uses the battery as power supply and turns the OUT OF
SERVISE light on. Even if the power supply of panel is cut off, OUT OF SERVISE light still remains on.
13
KDS03
KDS CAR TOP DISPLAY DRIVER
If you use KDS card ,at Aybey Elektronik REV004 model inspection box , you must connect bi-stable magnetic
switches to the KDS card instead of the panel. As explained below, outputs of this card are connected to the
panel.
KDS02 CARD OUTPUTS:
B+
: Common terminal of car top bi-stable magnetic switches and display
B0...,B: Car top bi-stable magnetic switch terminals
M0
M1
M2
M3
M+
: Connect to M0 terminal of the panel
: Connect to M1 terminal of the panel
: Connect to M2 terminal of the panel
: Connect to M3 terminal of the panel
: For different brands and models connect this terminal as shown at below table.
a.....g : Connect number 1 display segment
1, : Connect number 2 display segment
Dip Switch
LC / Mikel Series
KAK Series
0
-1
-2
-3
1
On
Off
*
*
*
*
Panel System
Aybey Card System
Aybey LC Series
Mikel Elektronik
2
*
*
Off
Off
On
On
3
*
*
Off
On
Off
On
4
*
*
Off
Off
Off
Off
M. Common
M+
1000
100
NOTE : In KAK Series Panels, if the M3
magnet is not used, the B3 output of the
card must be shunted to B+ terminal.
FOR FIGURE LOOK AT TURKISH MANUAL page 35
14
LC SERIES ONE SPEED LIFT SYSTEM
1.
In LC series one speed systems all the schematic diagrams, used for two speed systems, can be used by
taking below changes into consideration.
The differences are ;
1.
As in the Figure, RH and RF contactors are short-circuited and directly connected to the coil of a common
contactor RU3 instead of energising two different contactors through their closed contacts.
2.
The magnetic switches, informing floor number ( like M0,M1,M2 .... ), are moved to a brake distance away
from floor level.(It is about 5 cm up and down from exact floor level)
3.
No changes are required in programmes.
4.
No magnetic switch is connected to the MK input of the LCM card except full automatic door lift systems.
Neither magnet nor magnetic switch is placed to the MK path and this path is not used.
5.
In full automatic door systems, MK path may be used to prevent the door from opening between floors.
However, in this case the magnets of MK path must be further to the floor level than the M0,M1,M2....
magnetic switches.
6.
Motor and power connections are as in the Turkish manual page 14.
15