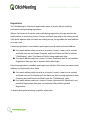
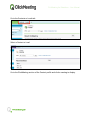
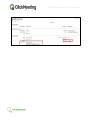
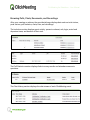
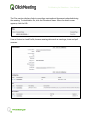
1
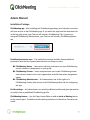
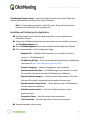
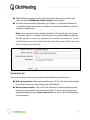
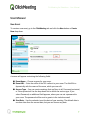
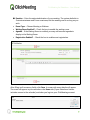
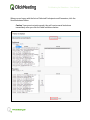
ClickMeeting for Salesforce
User Manual
ClickMeeting for Salesforce - User Manual
Table of Contents
Introduction ......................................................................................................................... 2
Admin Manual ..................................................................................................................... 3
Installation Package ........................................................................................................ 3
Installing and Configuring the Application ..................................................................... 4
Syncing Events ................................................................................................................ 5
Access to Historical Data ................................................................................................ 6
User Manual ........................................................................................................................ 7
New Event ........................................................................................................................ 7
Inviting Attendees ........................................................................................................... 9
Editing Events ................................................................................................................ 12
Joining an Event ............................................................................................................ 14
Browsing Historical Events ........................................................................................... 14
Registration.................................................................................................................... 15
Browsing Polls, Chats, Documents, and Recordings ................................................... 19
Getting Help ...................................................................................................................... 21
www.clickmeeting.com
1
ClickMeeting for Salesforce - User Manual
Introduction
ClickMeeting for Salesforce is an application that enables you to use Salesforce to
schedule, import, and manage ClickMeeting events. It is available at the Salesforce
AppExchange.
With ClickMeeting for Salesforce, you can:
•
Import ClickMeeting events, documents and recordings, and view related data
using Salesforce.
•
Use your Salesforce account to schedule and start ClickMeeting events and
browse event-related data and files such as attendance, polls statistics,
documents, and recordings.
•
Invite Salesforce Leads and Contacts to ClickMeeting events.
www.clickmeeting.com
2
ClickMeeting for Salesforce - User Manual
Admin Manual
Installation Package
ClickMeeting app - After installing the ClickMeeting package, your Salesforce account
will have access to the ClickMeeting app. If you select the app from the drop-down list
at the top right corner, your Tab bar will include a ClickMeeting Tab. If you are an
assigned ClickMeeting Administrator, your Tab bar will include a ClickMeetingAdmin
tab.
Predefined permission sets – The installation package includes three predefined
permission sets that the System Administrator can assign to users:
● ClickMeeting Viewer – Users with read-only permission can view ClickMeeting
events created in a department or work group.
● ClickMeeting Creator – Hosts and presenters can create ClickMeeting events,
view events created in his or her organization, and edit them when assigned as
owner.
● ClickMeeting Administrator – An Administrator has all the rights of a
ClickMeeting Creator plus access to the ClickMeetingAdmin tab for configuring
the app.
Profile settings – An Administrator can install predefined profiles and grant permission
to profiles from a predefined ClickMeeting profile.
ClickMeeting buttons - Use the Page Layout Editor to add an Invite to Meeting button
to the preview pane. The button sends meeting invitations to Salesforce Contacts and
Leads.
www.clickmeeting.com
3
ClickMeeting for Salesforce - User Manual
ClickMeeting Sample Layouts - Layouts for Contacts and Leads include fields that
display data related to the user’s Chat and Poll Answers.
Note: To customize page layouts, click Edit Layout. Drag and drop lists and
buttons from the palette to the preview pane.
Installing and Configuring the Application
● Download app from the AppExchange and install it in your organization's
Salesforce account.
● Assign the ClickMeeting Administrator permission set to yourself for access to
the ClickMeetingAdmin tab.
● Go to ClickMeetingAdmin tab to view and download the Application Manual
● Fill in requested data on the Configuration Page:
o Endpoint URL – Define the URL where service is available. Default is
version 1 of ClickMeeting API.
o ClickMeeting API Key – Enter unique identifier generated by ClickMeeting.
Learn more at http://dev.clickmeeting.com/api-doc/
o Invitation Language – Choose a language for your invitations.
o Synchronization Start Date – All ClickMeeting events created on or after
the start date will synchronize with ClickMeeting for Salesforce.
o Synchronization Frequency – Choose the estimated number of API calls
this app will use daily, depending on the number of rooms used.
o Synchronization Content Owner – Define default owner of ClickMeeting
records created in Salesforce.
o Schedule synchronization – Click the Create jobs button to start
synchronization.
o Connection Status – View the status of your connection.
o Test Connection – Use the Ping button to test your connection.
● Assign permission sets to users.
www.clickmeeting.com
4
ClickMeeting for Salesforce - User Manual
● Add ClickMeeting buttons and related lists to page layouts for Contacts and
Leads or assign ClickMeeting Sample Layouts to user profiles.
● To ensure accurate layout appearance, go to Setup >> Translation Workbench
>>Translation Settings and click to enable the Translation Workbench, currently
available in English only.
Note: If your connection fails, check the Endpoint URL and API Key. Go to Setup
>> Security Controls >> Remote Site Settings to verify that ClickMeeting Remote
Site URL appears as a site your organization can invoke from Salesforce. To add
a ClickMeeting remote site, click New Remote Site, fill in required fields, mark the
Active checkbox, and click Save.
Syncing Events
There are two ways to sync meetings between ClickMeeting and Salesforce:
● Bulk synchronization - Runs automatically every 15, 30 or 60 minutes, depending
on the Sync Frequency chosen by System Administrator.
● Manual synchronization - Due to API calls limitations, an automatically synced
meeting can be synced for the second time after 12 hours. Sync any particular
meeting manually using the Import data now button at the top of the detail page
of each meeting.
www.clickmeeting.com
5
ClickMeeting for Salesforce - User Manual
Meetings scheduled and edited in Salesforce sync with ClickMeeting automatically on a
regular basis.
Access to Historical Data
To get access to past ClickMeeting webinars and meetings, users can schedule
download jobs to synchronize data between Salesforce and ClickMeeting. Go to the
ClickMeetingAdmin tab and choose a Synchronization Start Date.
Users with Creator or Viewer permission can see all downloaded records but can't edit
them. To edit an active record, a user must be the record owner. A user with
ClickMeetingCreator permission can click the Assign to me button to change a record’s
ownership.
www.clickmeeting.com
6
ClickMeeting for Salesforce - User Manual
User Manual
New Event
To create a new event, go to the ClickMeeting tab and click the New button or Create
New drop-down.
A screen will appear containing the following fields:
● Room Name – Choose a name for your room.
● Room URL – Enter the suffix of the URL redirect to your room. The field fills in
dynamically with the name of the room, which you can edit.
● Access Type – You can create meetings that are Open to all, Password protected,
or Token protected. Use the drop-down list to define the access type. If you
select Password, an additional field appears, where you can set a password to
your room. The password will be sent to guests in the invitation email.
● Start Date – Use the calendar to set the date of your meeting. The default date is
one hour later than the current date, but you can choose any date.
www.clickmeeting.com
7
ClickMeeting for Salesforce - User Manual
● Duration – Enter the estimated duration of your meeting. The system defaults to
5-minute minimum and 3-hour maximum, but the meeting can be as long as you
wish.
•
Room Type – Choose Meeting or Webinar
•
Waiting Room Enabled? – Check the box to enable the waiting room.
•
Agenda – If the Waiting Room is enabled, you may add an event agenda to
display in the Waiting Room.
•
Registration Enabled? – Check the box to enable event registration.
After filling in all necessary fields, click Save. A screen with event details will appear.
The event will appear in your calendar on the Home tab (if your Salesforce license
includes access to the calendar) and when you log into your ClickMeeting account.
www.clickmeeting.com
8
ClickMeeting for Salesforce - User Manual
Inviting Attendees
To invite attendees, go to the Invitations section on the event detail page.
•
Click the Invite People button to view two multi-picklists, one for Participants and
one for Presenters. By default, all Contacts and Leads appear in the Available
section of both picklists.
•
In the Participants section, select Leads and Contacts you want to invite as
participants.
•
To view contacts assigned to a specific account, set the drop-down to Account.
Then type the account name (or a snippet) and click the Search button.
•
Optionally, use the Search field to find specific first names, last names, or email
addresses.
•
Use the Add button to move contacts to the Selected side. Use the Available
button to move Selected names back to the Available side.
To select Presenters, go to the Presenters area and use the same procedure as above.
www.clickmeeting.com
9
ClickMeeting for Salesforce - User Manual
When you are happy with the lists of Selected Participants and Presenters, click the
Send Invitations button.
Caution: You cannot un-invite people; they will receive email invitations
immediately after you click the Send Invitations button.
www.clickmeeting.com
10
ClickMeeting for Salesforce - User Manual
After you click Send Invitations, your guests will appear on the detail page of your event
in the Invitations section.
You can also add attendees directly from their Lead or Contact page. Go to the Contact
or Lead tab, choose the Contact or Lead you want to invite, and click the Invite to
ClickMeeting button.
On the next screen, select the role and event for your attendee and click Create
Invitation. Your guests will appear in the Invitations section.
www.clickmeeting.com
11
ClickMeeting for Salesforce - User Manual
Note: The Active ClickMeetings drop-down list contains only ongoing events and
events with a future Start Date. If you don’t see a particular event on the list, the
event date has passed, or the user has already been invited to the event.
Editing Events
To change the details of your event, go to the ClickMeeting tab and select an event to
edit. On the event detail page, click the Edit button.
Enter the changes and click Save. If you decide to reschedule the event, change its
name, or change the access type to password or token, attendees will receive a new
invitation with new event details.
If you edit the meeting using ClickMeeting and want to see the changes in Salesforce,
you can wait for automatic sync or update the event manually by clicking the Import
data now button.
www.clickmeeting.com
12
ClickMeeting for Salesforce - User Manual
www.clickmeeting.com
13
ClickMeeting for Salesforce - User Manual
Joining an Event
Join an event as a host by clicking the Join Meeting Now button on the meeting detail
page.
To use the Join Meeting Now button immediately after creating the meeting, refresh the
page or click the Import data now button.
Guests can join an event by clicking the URL provided in the invitation email.
Browsing Historical Events
For access to past ClickMeeting webinars and meetings, your system administrator
must synchronize data between Salesforce and ClickMeeting.
Users assigned as Creators or Viewers can view all records but not edit them. Only the
owner of an active record can edit it.
If you are an assigned ClickMeetingCreator, you can use the Assign To Me button to
change the ownership of a record you own.
www.clickmeeting.com
14
ClickMeeting for Salesforce - User Manual
Registration
The ClickMeeting for Salesforce app enables users to browse data provided by
participants during meeting registration.
When a Participant or Presenter enters data during registration, the app matches the
email address to an existing Lead or Contact and binds new data to the existing record.
If the email address does not match an existing record, the app adds the email address
as a new Lead.
If meeting registration is not enabled, participants provide name and email address.
● If an email address does not exist as a Lead or Contact, a new Lead is created,
and fields such as Last Name, Company, and Lead Source are filled in with the
“ClickMeeting” value. First Name is filled in using registration data.
● If an email address exists as a Lead or Contact, Salesforce data is not modified.
Registration data goes into a separate field called Login.
If meeting registration is enabled, participants provide their first name, last name, email
address, and (optionally) other fields.
● If an email address does not exist as a Lead or Contact, a new Lead is created,
and fields such as First Name and Last Name are filled in using registration data.
Company and Lead Source are filled in with the “ClickMeeting” value.
● If an email address exists as a Lead or Contact, data stored in Salesforce is not
modified. Registration data goes into separate fields called Login and
Registration.
To display data gathered during a specific registration:
www.clickmeeting.com
15
ClickMeeting for Salesforce - User Manual
Go to the Contacts or Leads tab
Select a Contact or Lead
Go to the ClickMeeting section of the Contact profile and click a meeting to display.
www.clickmeeting.com
16
ClickMeeting for Salesforce - User Manual
In the invitation section, click the Attendee Number of the Contact or Lead.
Registration data appears on the Attendee detail screen in registration and login fields.
www.clickmeeting.com
17
ClickMeeting for Salesforce - User Manual
www.clickmeeting.com
18
ClickMeeting for Salesforce - User Manual
Browsing Polls, Chats, Documents, and Recordings
After your meeting or webinar, the event detail page displays data such as total visitors,
peak visitors, poll statistics, chats, files, and recordings.
The Invitation section displays guest activity: present or absent, role, login, arrival and
departure times, and duration of their visit.
The Poll Statistics section displays links to survey results and attendee answers to
questions.
The Chat History section displays the chat stream of each ClickMeeting event:
www.clickmeeting.com
19
ClickMeeting for Salesforce - User Manual
The Files section displays links to recordings captured and documents attached during
the meeting. To download a file, click the Document Name. When the detail screen
appears, click the URL.
From a Contact or Lead Profile, browse meeting data such as meetings, chats and poll
answers.
www.clickmeeting.com
20
ClickMeeting for Salesforce - User Manual
Getting Help
If you have questions or need advice, our Customer Success Team is always glad to
help. Visit the ClickMeeting Contact page to reach us by email, phone, or chat.
www.clickmeeting.com
21