1
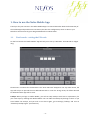
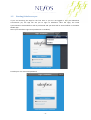
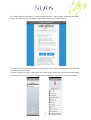
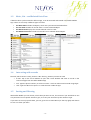
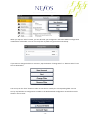
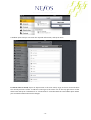
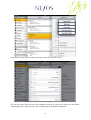
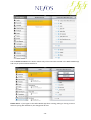
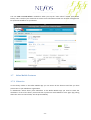
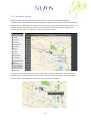
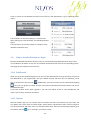
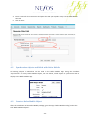
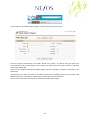
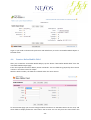
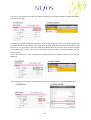
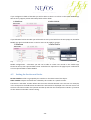
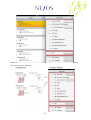
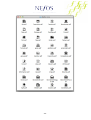
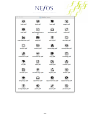
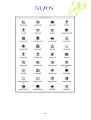
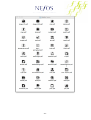
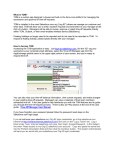
Nefos Mobile User Manual and Configuration Guide Contents 1. How to use the Nefos Mobile App ....................................................................................................... 2 1.1 First launch – setting the PIN code ............................................................................................. 2 1.2 Starting Salesforce sync ................................................................................................................... 3 1.3 Main-‐, List – and Related Lists View ........................................................................................... 5 1.4 Interacting with records .................................................................................................................. 5 1.5 Sorting and Filtering .......................................................................................................................... 5 1.6 Create, Edit, Clone and Delete a record ..................................................................................... 7 1.7 Nefos Mobile Features ................................................................................................................... 11 1.7.1 Libraries ........................................................................................................................................... 11 1.7.2 Accounts Nearby .......................................................................................................................... 13 1.7.3 Calendar ........................................................................................................................................... 14 1.8 Link to standard Salesforce Apps ............................................................................................. 16 1.8.1 Dashboard ....................................................................................................................................... 16 1.8.2 Chatter .............................................................................................................................................. 16 2. Nefos Mobile Settings ............................................................................................................................ 17 3. Nefos Mobile Personal Edition – Standard Configuration ..................................................... 19 4. Nefos Mobile Enterprise & Platform Editions – Custom Configuration .......................... 20 4.1 Installing Salesforce AppExchange Package ........................................................................ 20 4.1.1 Install the package ....................................................................................................................... 20 4.1.2 Assign users to the package ..................................................................................................... 20 4.1.3 Change the user profile ............................................................................................................. 21 4.1.4 Add Remote Sites ......................................................................................................................... 21 4.2 Synchronize objects and fields with Nefos Mobile ............................................................ 22 4.3 Create a Nefos Mobile Object ...................................................................................................... 22 4.4 Create a Nefos Mobile Field ......................................................................................................... 24 4.5 Setting the Section and Order .................................................................................................... 26 4.6 Setting a Sync Filter ........................................................................................................................ 28 4.7 Configure icons for the fields ...................................................................................................... 29 4.8 Using the Bulk Configurator ........................................................................................................ 30 Appendix 1: Available Icons ........................................................................................................................ 32 -‐ 1 -‐ 1. How to use the Nefos Mobile App Thank you for your interest in the Nefos Mobile App. This manual describes both the functionality of the mobile App and possible user interactions, but also the configuration, which is done in your Salesforce environment by your designated Salesforce administrator. 1.1 First launch – setting the PIN code On the first launch the “Nefos Mobile” App will ask you to set-‐up a PIN code. The PIN code is 4 digits long. Please enter 4 numbers for the PIN twice. The “Enter PIN view” disappears. On any other launch, the App will ask you to provide the once defined PIN code. In case of 5 wrong retries, all offline data will be deleted and the App will be reset. Tooltips When you login to Nefos Mobile, you will see Help Tooltips with hints or explanation, for your next steps by working with Nefos Mobile. You can hide the Tooltips by clicking on them. If you have hidden the tooltips, and you wish to see them again, go to Settings /Tooltips, and turn on “Show help tooltips again” (see section 2). -‐ 2 -‐ 1.2 Starting Salesforce sync If you are launching the App for the first time or you are not logged in into your Salesforce environment yet, the App will ask you to login to Salesforce. After the login, the initial synchronization with Salesforce will be performed and your data will be stored offline in the Nefos Mobile App. Select your Salesforce Login Host (Production or Sandbox): Provide your user name and password: -‐ 3 -‐ The “Nefos Mobile for Salesforce” is requesting permission to:… page appears. Please tap the “Allow” button. The Salesforce page disappears and the app starts the sync with Salesforce. As soon as the sync is finished, the objects configured in the Salesforce environment will be displayed in the Main Menu on the left. In order to trigger sync again, upload your local modifications to Salesforce and download latest data from Salesforce at some later point of time, please pull down the menu on the left side of the App. -‐ 4 -‐ 1.3 Main-‐, List – and Related Lists View If data has been synchronized for offline usage, it can be accessed and viewed in the Nefos Mobile App. There are currently 4 different types of views: • The Main View includes all Objects, which are synchronized with Salesforce. • The List View includes all records from a current selected Object. • The Detail View displays the record selected in the list view. • The Related List View includes all records from a selected related Object. 1.4 Interacting with records Records, which contain e-‐mail, phone or URL-‐ data e.g. Account, Contact or Lead • E-‐mail: Tap on the e-‐mail address to open the e-‐mail window and send an e-‐mail to the contact straight from the Nefos Mobile App. • Call: Type the phone number, to call the contact – works on iPhone and on iPad using Skype • URL: Type the URL-‐link to open it in a web browser inside the app. 1.5 Sorting and Filtering With Nefos Mobile you can choose, which data you want to see, for instance if you would like to see only Accounts from a specific Account Type, or to sort your Accounts by their Account Type. If you want to see only specific data, you can go to the List View Menu (on the top right) and choose to sort or to filter your data. -‐ 5 -‐ When you tap the “Filter” button, you see all fields you configured in the Nefos Mobile configuration in Salesforce as filterable. You can currently filter by fields of type Picklist and Lookup. If you want to change the filter or remove it, tap the buttons “Change Filter” or “Remove Filter” from the List View Menu. You can tap on the “Sort” button in order to sort the list view by the corresponding field. You can sort by any field that is configured as sortable in the Nefos Mobile configuration in Salesforce and is shown in the list view. -‐ 6 -‐ If you sort by a field of type date (e.g. Opportunity Close Date), you will see a column on the right of the List View (please see the picture below with the red square) displaying the year and month. If you tap on one entry in this column the list will scroll to that year and month. If you want to see the total number of records in your list, you need to tap the “#” Symbol, visible at the bottom of the column on the right. If you sort by a field of type text (e.g. Account Name), you will see in the column on the right the first letter of the field. To jump to a specific Account starting with a specific letter tap on that letter in this column. 1.6 Create, Edit, Clone and Delete a record To create a new record, choose an object and tap in the List View Menu the button “New [Object Name]”. -‐ 7 -‐ A window opens and you can enter the required information, and tap on Save. To edit or clone a record, tap on an object name in the main menu, to go to the list view and select the record you want to edit. To edit this record go to the menu icon in the top right corner of the detail view and tap on “Edit Record” or “Clone Record”. A window with the record data opens where you can edit the data and save the changes. -‐ 8 -‐ From this menu you can also create a new related record e.g. Event or Task. You can find newly created records and modified records in the main menu under the row named “Modified Records”. When you sync, these changes will be uploaded to Salesforce. -‐ 9 -‐ You can delete a record on the iPad or iPhone only if the record was created in the Nefos Mobile app and not yet synchronized to Salesforce. Please notice – if you logout in the Nefos Mobile app after creating, editing or cloning a record without syncing with Salesforce, the changes will be lost. -‐ 10 -‐ You can view a record online in Salesforce when you tap the “View online” button (see picture below). This is useful if you would like to access some information which has not been configured to be synchronized offline on your device. 1.7 Nefos Mobile Features 1.7.1 Libraries In the Library Folder in the Nefos Mobile app you can access all the libraries and files you have permissions in your Salesforce organization. To download a whole library from Salesforce to the Nefos Mobile app you need to check the checkbox in front of the library name and then synchronize with Salesforce once again (by pulling down the menu on the left side, see the picture below). -‐ 11 -‐ To download only specific file from a Library folder in the Nefos Mobile app, you need to tap on the library that contains the file, check the checkbox in front of the document name and then synchronize with Salesforce once again (by pulling down the menu on the left side). When the synchronization is finished, you can open the file by taping on it. -‐ 12 -‐ 1.7.2 Accounts Nearby When you tap on Accounts Nearby in the main menu, you can see all Accounts near you. A window opens and displays all accounts around your position. The Accounts can be marked with different colours, dependent from their account type e.g. accounts with account type “Partner” are marked in purple, accounts with account type “Customer” are marked in green, account with account type “Prospect” are marked in red (see the picture below). If you tap on a marked account in Account Nearby (e.g. account with account type “Customer” marked in green), you will see the account name, and you can tap on the blue arrow (next to the account name), and navigate to the account record (see picture below). -‐ 13 -‐ You can tap on “Find Me” to see your position, or on “Close” to close the window. Pre-‐Conditions for using the Account Nearby feature are: • The latitude (Standard Field Name: BillingLatitude) and longitude (Standard Field Name: BillingLongitude) coordinates of the account address must be available in Salesforce • This functionality is only available when you are online. Please define the search and zoom distance around your location in the Nefos Mobile Settings on your Device (see section 2 below). 1.7.3 Calendar You can see the iOS Calendar and events in the Nefos Mobile app and create related Salesforce events. iOS Calendar on the iPad: The Nefos Mobile Calendar contains only the events from your default iOS calendar. -‐ 14 -‐ When you go to a specific event on your Nefos Mobile Calendar, you can open the event by tapping on it and review the event details. You can reject or accept the event invitation from this page. You can also tap on the menu button on the top right corner , and view the information available in Salesforce for the attendees of this -‐ 15 -‐ event, or create an new Salesforce event from this event in the iOS calendar, e.g. for capturing a visit report. You can define an Event by taping on “Create Event”. After choosing an event attendee, the following window opens: The information in the new window is copied from the iOS Device Calendar entry. 1.8 Link to standard Salesforce Apps Both the Dashboard and Chatter buttons open the corresponding standard Salesforce apps if they are installed on the device. If they are not installed, both buttons will open the corresponding online web-‐page of your Salesforce environment. 1.8.1 Dashboard When you go to the Dashboard App you can sync the app with Salesforce to get the latest versions of the dashboards in your organization, that you viewed recently and those you are following. To do this, go to the home view and tap . Additionally, you can see when you last refreshed by tapping . Here you can go also to “Help” and you can read more detailed information about, how to use the Dashboard app. If you lose network access when signed in, you still have offline access to some dashboards and reports you recently viewed on the device. 1.8.2 Chatter With the Chatter App you can connect with co-‐workers and share information from your iPad. You can update your status, post to Chatter feeds, attach photos and Salesforce files, mention people in post and comments and much more. For detailed information about the Chatter App features go to the Chatter and tap , go to “Settings” and choose “Help”. -‐ 16 -‐ 2. Nefos Mobile Settings You can review your Nefos Mobile settings, when you scroll down in the Main View. Go to Settings to review or change them. -‐ 17 -‐ Hint: The first sync will be a full sync so the App gets all the data configured for syncing. After a full sync finished successfully the next sync will be a Delta Sync. If you wish to always do a full sync, you can turn on “Always perform full sync” (see picture above). If the configuration in Salesforce changes, the next sync will be a full sync, so the app gets the new configured data. The Full Sync requires more time than the Delta Sync, because the app syncs all the data with Salesforce. The Delta Sync only syncs the new modified records from Salesforce and the offline modified and created data from the app to Salesforce. You can reset the App in the iOS Settings App on your iPad or iPhone. Go to your iPad or iPhone Settings. Navigate in the Main Menu to the Nefos Mobile App and turn the “Reset App” switch to ON. The encrypted local data and the Nefos Mobile App pin code will reset on the next app launch. -‐ 18 -‐ 3. Nefos Mobile Personal Edition – Standard Configuration The more precise description of Nefos Mobile editions can be found online here: http://www.nefos.com/wp-‐content/uploads/2013/10/NefosMobileServiceDescription.pdf In the Personal Edition, the Nefos Mobile App only supports the standard configuration, which contains predefined Standard Objects and Fields. The following Standard Objects are available in the standard configuration: -‐ 19 -‐ 4. Nefos Mobile Enterprise & Platform Editions – Custom Configuration The Enterprise and Platform Editions of Nefos Mobile require an installation of an AppExchange package, which will be used for configuration of the App. More details about different editions can be found in this document: http://www.nefos.com/wp-‐ content/uploads/2013/10/NefosMobileServiceDescription.pdf The next chapters describe how the configuration package can be used. It should be performed by the administrator of your Salesforce environment. 4.1 Installing Salesforce AppExchange Package 4.1.1 Install the package To install the Nefos Mobile Package from the AppExchange: 1. Go to Setup -‐> AppExchange Marktplace and search for the Nefos Mobile App, or go directly to www.appexchange.com, and browse the AppExchange site to find the application. 2. Click “Get it Now” from the application information page. 3. Select your environment type (production or sandbox) and login to the AppExchange with your Salesforce credentials. 4. Click “Install” 5. Choose the option “Grant access to admins only”: a. Object permissions “Read”, “Create”, “Edit”, “Delete”, “View All”, and “Modify All” are all enabled. b. Field level security: Set to visible and editable for all fields 6. Click “Install”. After the App installation, you will find the new Salesforce application called “Nefos Mobile Config” inside your Salesforce environment, which will contain the tabs “NeMo Objects”, “NeMo Fields” and “NeMo Bulk Configurator”. This step will also create an initial version of the configuration for Nefos Mobile including the default records for “NeMo Objects” and “NeMo Fields”. 4.1.2 Assign users to the package This step is necessary to provision the configuration package to Salesforce users in your environment. 1. Go to Setup -‐> Installed Packages 2. Search for the package “Nefos Mobile Configuration” 3. Click on the package Name 4. Click the Button “Manage licenses” to assign Nefos Mobile licenses to users 5. Click “Add Users”, select users from the list and click “Add” -‐ 20 -‐ The number of users you can assign to the package is limited by the license which your company has purchased for Nefos Mobile Enterprise or Platform Edition. After a first trial installation, a license for 5 users is granted for a limited time frame of 1 month. Users which are not provisioned with a license and are not assigned to the Nefos Mobile Configuration AppExchange Package can only see the default standard Objects and Fields. 4.1.3 Change the user profile Change the user profile so that users can access the objects “NeMo Fields” and “NeMo Objects”. Go to Profiles, choose a Profile and go to the section “Custom objects Permissions”. Click “Edit” and give read only access to the profiles of all relevant users. 4.1.4 Add Remote Sites In order to use the Bulk Configurator (see chapter 4.8), the URL of your Salesforce instance needs to be set up as a remote site. The procedure for this is the same for normal and sandbox instances, just follow these steps: 1. Go to Setup -‐> Administer -‐> Security Controls -‐> Remote Site Settings 2. Copy the server URL from the address bar of your browser 3. Click on New Remote Site -‐ 21 -‐ 4. Enter a name for the remote site and paste the URL you copied in step 2 to the field Remote Site URL 5. Click on Save 4.2 Synchronize objects and fields with Nefos Mobile All existing objects in Salesforce can be used in the Nefos Mobile App. Using the checkbox “Synchronize” on every Nefos Mobile Object, we can define, which object to synchronize and to display in the Nefos Mobile app. 4.3 Create a Nefos Mobile Object After the Installation of the Nefos Mobile package, go to the App “Nefos Mobile Config” and to the tab “Nefos Mobile Objects”. -‐ 22 -‐ Tap the button “New Nefos Mobile Object” and the following window opens: Enter the required information in the fields “Name” and “Order”, and add an Icon (see point 4.6). The Name has to be the API Object name. Objects are ordered by their Order number in the Main View of the offline app. Here you can configure what Nefos Mobile Object should be editable, creatable or deletable in the offline app. Optionally you can add a sync filter to set which records will be available offline. The sync filter is the WHERE clause you would add to a SOQL query, please find more details below. Click on Save and review the data of the new Nefos Mobile Object again: -‐ 23 -‐ Login on your iPad or iPhone and synchronize with Salesforce, to see the new Nefos Mobile Object in the Main View. 4.4 Create a Nefos Mobile Field After you created the new Nefos Mobile Object, tap the button “New Nefos Mobile field” from the new Nefos Mobile Object page. Enter the required information Name, Section and Order. The new fields are grouped by their section number in the detail view of an object. With the Order number, the fields are ordered within the same section. On the field edit page you can also configure which field we use as the Main field in the List view, and which fields to display bellow the main field in the list view. You can only have one main field in the -‐ 24 -‐ List View. If you choose more than one field we display the first field ordered by Section and Order (see the section 4.4). In addition to the Main field you can display up to 3 fields in the list view. If you choose more fields the Nefos Mobile app will display only the first three fields ordered by their Section and Order (see the section 4.4). If you didn’t select any fields to be displayed in the List View, and you have selected only a Main Field, you can see only the Main Field in the List View in the Nefos Mobile app (see picture above). If you have selected in your configuration a Main Field and an additional field you will see the following: If you configured a field as not editable you will see the field greyed out in the Nefos Mobile app: -‐ 25 -‐ If you configured a field as filterable you will be able to select it as a filter in the Nefos Mobile app. We currently support picklist and lookup fields as filter fields: If you defined a field as sortable you will be able to sort by this field from the Sort popup in the Nefos Mobile app. Only the fields shown in the list view can be used for sorting: If you have required fields in the Salesforce data model, we you need to add them to your Nefos Mobile configuration – otherwise you will not be able to create new records in the mobile app. Please be aware, that required fields which are defined as required on the page layout in Salesforce are not required fields in Nefos Mobile. 4.5 Setting the Section and Order Section number: Fields are grouped by this number on the detail view of the object. Order number: Objects and Fields are ordered by this number in a specific section. The Section-‐ and Order number define also the order of fields selected in the list view. For example, in the next picture the fields Phone and Email are selected to be displayed in the list view. So we can see here the Phone number first (Section 0 Order 6) and then the Email (Section 0 Order 7), because of their Section and Order number setting. -‐ 26 -‐ When you compare your field definition in Salesforce and the section and order in the Nefos Mobile App, you will see the following: -‐ 27 -‐ 4.6 Setting a Sync Filter When you don’t need to synchronize all the records from Salesforce with the Nefos Mobile app, you can use the Sync Filter field on the Nefos Mobile Object configuration page. Go to the “Nefos Mobile Config” App in Salesforce, go to the Tab “Nefos Mobile Objects” and choose and Object. Click on “Edit” to add a Sync Filter (see picture above). There are many ways to configure a Sync Filter. Here are some examples: Nefos Mobile Sync Filter Description Object Lead IsConverted = FALSE Don’t display in the Nefos Mobile app converted Leads. Standard or CreatedDate = THIS_YEAR Display in the Nefos Mobile app only Custom Object records created this year. Standard or Active__c = TRUE AND CreatedDate Display in Nefos Mobile app only records, Custom Object = THIS_YEAR where the checkbox “Active” is set to true created this year. Standard or CreatedById = '$currentUser' Display in the Nefos Mobile app only the Custom Object records created the current user. Standard or CreatedById = '$currentUser' AND Display in the Nefos Mobile app only Custom Object CreatedDate = THIS_YEAR records created by the current user created this year. Standard or IsActive = true AND Display in the Nefos Mobile app only Custom Object ProfileId<>'00eD00000012RNt' records, where “Active” is set to true, and the ProfileId is not equal to -‐ 28 -‐ Standard or Custom Object CreatedDate = THIS_QUARTER Standard or Custom Object CreatedDate > LAST_N_QUARTERS:2 '00eD00000012RNt'. Display in the Nefos Mobile app only records created this quarter Display in the Nefos Mobile app only records created in the last two quarters In general, any expression which can be used in the WHERE clause of an SOQL query can be specified here. Additionally, we support the '$currentUser' placeholder which will be replaced with the current User ID. 4.7 Configure icons for the fields To set an icon, please enter the Icon name in the Icon field, in the Nefos Mobile Object-‐ or Nefos Mobile Field definition. Go to the “Nefos Mobile Config” app in Salesforce, go to the Tab “Nefos Mobile Object”, select a Nefos Mobile Object, click on “Edit”, and enter the icon name. The list of all icons, which currently can be used in the app, can be found in Appendix 1) Go to the “Nefos Mobile Config” app in Salesforce, go to the tab “Nefos Mobile Fields”, go to a Nefos Mobile Field, click on “Edit”, and enter an Icon. -‐ 29 -‐ Screenshots of the available Nefos Mobile icons you can use are available at Appendix 1. 4.8 Using the Bulk Configurator The Nefos Bulk Configurator allows you to create the initial configuration for the standard objects and fields and also custom objects and fields in your environment. Click on the NeMo Bulk Configurator Tab to open the Bulk Configurator Page: This tab has 2 sections. The first section, “NeMo Objects and Fields”, displays the number of NeMo Objects and Fields that have already been setup in your org. If you have just installed the package, all numbers will be 0. -‐ 30 -‐ The second section, “Bulk Operations”, has 4 buttons that execute some convenient mass updates as part of the configuration tasks of NeMo. Since creating and configuring all NeMo Objects and Fields one by one, as described in the previous chapters, can be a tedious and daunting task, the bulk configurator offers you tools for achieving a working configuration in as painless a manner as possible. It is probably best practice to use the bulk configurator to quickly get Nefos Mobile going, and than do your tweaking manually, where necessary, as explained in the previous chapters. • Create Standard Objects and Fields: Nefos Mobile comes with a default configuration for some of the most useful standard objects and fields. This default configuration is stored in external configuration files, which are part of the Nefos Mobile package, and are installed as static resources during the package installation process. Clicking on this button will set up Nefos Mobile with this standard configuration, which is a good starting point for using the app. This step will be automatically executed on the initial package installation. • Create All Custom Objects: This button creates NeMo Objects for all existing custom objects in the org. The attributes “Editable”, “Creatable” and “Deletable” are set to TRUE by default. • Create All Custom Fields: This button creates NeMo fields for a) all custom fields of Standard Objects (for which NeMo Objects already exist) b) all custom and standard fields of Custom Objects (for which NeMo Objects already exist) The attributes “Editable”, “Filterable”, “Sortable” and “Synchronize” are set to TRUE by default. All fields are placed in Section “0” by default, and assigned a random order. The “Name” field of each custom object is marked as “Main Field”, and the first 3 custom fields for each custom object (according to the randomly assigned order) are marked as “Show in List View”. • Delete All Objects and Fields: Deletes all NeMo Objects and Fields and gives you a clean slate so you can start afresh. -‐ 31 -‐ Appendix 1: Available Icons -‐ 32 -‐ -‐ 33 -‐ -‐ 34 -‐ -‐ 35 -‐ -‐ 36 -‐ -‐ 37 -‐