1
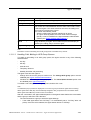
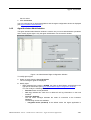
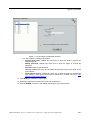
Legal notice:
T-Systems and the T-Systems logo are trademarks of T-Systems Business
Services GmbH. All other trademarks are the property of their respective
owners.
The information presented is subject to change without notice.
T-Systems assumes no responsibility for inaccuracies contained herein.
Copyright © 2014 T-Systems. All rights reserved.
The CE mark indicates that this product conforms to the following Council
Directives:
- 2004/108/EC (concerning electro-magnetic compatibility)
- 2006/95/EC (concerning electrical safety)
- 1999/5/EC (R&TTE)
Chapter 1
Agent Assistant
Introduction to the Agent Assistant ................................................ 1.1
Limitations ..................................................................................................... 1.1
Connecting to the Agent Assistant .................................................. 1.1
Connecting as an Agent ................................................................................ 1.1
Connection Errors .......................................................................................... 1.2
Closing the Agent Assistant ........................................................................... 1.3
Octopus Open Call Center Agent Mode ......................................... 1.3
Agent Assistant Interface ............................................................................... 1.3
Toolbar .......................................................................................................... 1.4
Agent Information .......................................................................................... 1.4
Performing an Outgoing Call ......................................................................... 1.4
Agent Status .................................................................................................. 1.5
Call Information ............................................................................................. 1.5
Phone Number Field ...................................................................................... 1.6
Call Log ......................................................................................................... 1.7
Customer Database ......................................................................................1.10
Agent Parameters .........................................................................................1.14
Traffic Visualization ......................................................................................1.16
Agent Administration Mode ............................................................... 1.20
Connecting as an Agent Administrator .........................................................1.20
Agent Assistant Administration .....................................................................1.21
0-1
!" #
0-2
1.1
Introduction to the Agent Assistant
The Agent Assistant is a software to install on the agent's IT workstation. It provides
continuous communication with the call center integrated with the communications server.
In receive mode, the Agent Assistant receives information on the Octopus Open Call Center
(Automatic Call Distribution) load in real time and the agent can consult traffic statistics. As the
system receives an incoming call to the agent's station, the Agent Assistant simultaneously
receives all the information about the call: the caller's waiting time, caller number, etc. In this
way the Agent Assistant can interact with external information systems to display the customer
record.
In outgoing call mode, the Agent Assistant offers the agent a user-friendly addition to his
telephone set. In practice, agents cannot only declare their status more easily (on duty, off
duty, etc.), but also indicate their skills (Octopus Open Call Center group), declare themselves
on any position (free-seating), describe the calls and perform internal/external calls.
There are two ways to perform an outgoing call:
1.1.1
-
By means of the telephone set. This is not considered as an Octopus Open Call Center
activity.
-
By means of the Click2Call feature (from Call Log and Customer Information). This is
considered as an Octopus Open Call Center activity.
Limitations
Following the re-looking of Octopus Open Call Center PC based applications from OmniPCX
R6.0 up to recent and future implementations, the Agent Assistant is no more windows like.
The consequences are:
-
The display font size for PC desktop screen must remain the default value (100%) to
guarantee a good display of all Octopus Open Call Center application layouts
-
A mouse right click on the application icon on windows tasks bar has no effect (no
contextual menu is proposed)
In addition, the minimal display resolution of the screen must be: 1024 x 768 pixels
1.2
Connecting to the Agent Assistant
There are two ways to connect to the agent assistant:
1.2.1
-
As an Octopus Open Call Center agent to process customer calls (see: Connecting as an
Agent )
-
As the agent administrator to manage agent rights (see: Connecting as an Agent
Administrator )
Connecting as an Agent
To connect to the Agent Assistant:
1-1
Chapter
1
1. Start the Agent Assistant.
The connection window is displayed:
Figure 1.1: Octopus Open Call Center Agent Connection Window
2. Select your identifier from the list of declared agents
3. Extension: enter the extension number associated with the agent PC
4. Server name: enter the name or the IP address of the communication server
5. Language: select the agent language
6. Password: enter your password (optional)
This field is displayed only when a password is configured.
7. Click Connection
You are connected as an Octopus Open Call Center agent and the main window is
displayed (see Agent Assistant Interface ).
Automatically connect: validate this check box to connect automatically to the same server
when the Agent Assistant starts.
1.2.2
Connection Errors
Connection fails when:
-
1-2
The number of connected agents exceeds the license number:
• For the Welcome Office package, 10 agents are allowed
• For the Welcome Office Pro package, 20 agents are allowed
1.2.3
-
The selected agent is already connected on another workstation
-
The workstation is already used by another agent
Closing the Agent Assistant
When the agent closes the application, a confirmation window is displayed.
When the Agent Assistant is closed, the agent status is set according to the agent parameters:
Unlog extension (free seating mode) and Retain agent state when logging off
When:
-
Neither of the boxes is checked, the agent is placed off-duty automatically. Nevertheless
he has the possibility to set himself on duty via his associated phone set.
-
The Retain agent state when logging off is checked, the agent status is not changed.
-
The Unlog extension (free seating mode) is checked, the agent is placed off-duty
automatically and the associated workstation is no more handled by the call center. To use
again this workstation (handled by the call center) the agent must restart the Agent
Assistant.
-
The Retain agent state when logging off and Unlog extension (free seating mode)
check boxes are validated, the agent is put off-duty automatically and the associated
workstation is no longer handled by the call center. When the agent wants to use the
terminal again (as a workstation handled by the call center), he must restart the Agent
Assistant
1.3
Octopus Open Call Center Agent Mode
1.3.1
Agent Assistant Interface
Figure 1.2: Agent Main Window
The agent interface includes several areas:
1. Toolbar
2. Agent information
3. Agent status
4. Call information
1-3
Chapter
1
5. Agent activity: this area is presented in the supervisor manual
6. Phone number field
1.3.2
Toolbar
Figure 1.3: Agent Toolbar
The toolbar allows access to:
1. Call Log (see Call Log )
2. Customer information (see Customer Database )
3. Agent parameters (see Agent Parameters )
4. Agent Assistant information window (this displays the application release)
5. Online help
1.3.3
Agent Information
Figure 1.4: Agent Information Area
This field contains:
1.3.4
-
The agent identifier
-
The agent extension number
-
Group number(s) to which the agent is assigned
Performing an Outgoing Call
The Click2Call feature enables an agent to perform internal and external calls.
Note:
All Click2Call calls are seen and recorded as professional calls.
The agent can perform private (or Non-Octopus Open Call Center) outgoing calls by means of the
telephone set but not through the Click2Call feature.
The Octopus Open Communication Server Universal Directiory Access (UDA) feature provides
the Agent Assistant application with the internal directory numbers by invoking a Web Service
request.
1-4
The dial by name feature returns the phone number corresponding to a given family name.
From "On Duty" status, the agent is automatically set to "Clerical Work" when he dials from the
Click2Call.
From "Off Duty" or "Temporary Absence" status, a confirmation pop-up will be raised to the
agent, to accept or not the change.
-
If the agent accepts the change, he is set automatically to "Clerical Work" before using the
Click2Call feature.
-
If the agent refuses the change, the operation is cancelled and he keeps his previous
status.
After the conversation, the "Clerical Work" icon will blink to warn the agent that he must
change the status to "On Duty" or to confirm the fact he wants to remain on "Clerical Work".
1.3.4.1
Performing Click2Call calls
To perform Click2Call calls, refer to Call Log and Customer Database .
1.3.5
Agent Status
Figure 1.5: Agent Status Area
These icons display agent status. To modify the status click the associated icon:
Icon
1.3.6
Status
Meaning
On duty
the agent is ready to answer calls (the Force automatic call answer feature is disabled)
On duty
the agent is ready to answer calls (the Force automatic call answer feature is enabled)
On clerical work
the agent is not ready to answer calls. The agent is
completing administration work due to a previous
call.
Temporary absence
the agent is not available to answer calls
Off duty
the agent is not available
Call Information
The call information area gives information about the current call.
1-5
Chapter
1
Figure 1.6: Call Information Area
Icon
Meaning
This field displays the calling number
This field displays the dialed number
This field displays the DTMF numbers dialed by the caller for client code identification
This field displays the called group. An agent can belong to several groups
This field displays the waiting time of the call
This field displays the time spent in communication, clerical work, temporary
absent
Call qualification: the agent uses this drop-down list to qualify a call.
This qualification is used for agent/group of agents calls and duration statistics (the means and
the total). Items in the call qualification list are defined by the administrator of each group.
1.3.7
Phone Number Field
This field allows to enter a phone number to call or to use the Dial by Name feature (last name
(family name) or first characters of the last name):
-
Directly using the keyboard or
-
By copying/pasting a number from any document (yellow pages, e-mailers, text
documents)
Search results may display several entries for a contact with, for example, main phone
number, mobile phone number and home phone number. When a result returns a Collective
Speed Dial number, the main phone number is displayed in a specific format, called
destination number (short code). The destination number does not include the outgoing prefix.
This short code is the only number which can be used to redial.
Example:
1-6
Perrot 0620950502 (8000).
Figure 1.7: Search Result Display Example
To launch the call, perform any of the following:
1.3.8
-
Press the Enter key
-
Click the Call icon
Call Log
The Call Log window displays the history of calls which have occurred on the local machine.
Note:
All outgoing calls (including the Click2Call feature) are seen as "Other Call". There is no change in
Octopus Open Call Center statistics. Click2Call calls are taken into account in statistics, in the clerical
work activity.
To access the Call Log window click the
button.
1-7
Chapter
1
Figure 1.8: Call Log Window
The top part of the window is used to set filters. These filters limit the number of displayed
items.
Filters can be set for:
-
Date: only calls received between the two specified dates are displayed
-
Type: only calls with the specified qualification are displayed
-
Requested Grp: only calls for the specified group are displayed.
If a call is displayed with a different Group (defined by the filter), it means that at the time
of the call, the requested group was closed or saturated and the call was treated by a
different group.
-
Time: only calls with a duration superior to the time selected from the drop-down menu are
displayed
The information for each call is displayed and includes:
-
Date: the date and time of the call
-
Client: the client name
-
Agent: the name of the agent who dealt with the call
-
Time: the duration of the conversation with the agent
-
Called Party: the called number
-
Calling Party: the calling number
-
Type: the call qualification
-
Requested Grp: the requested group
Notes:
Octopus Open Call Center incoming calls are indicated with green arrows
Octopus Open Call Center Click2Call calls are indicated with red arrows
Export
Click Export to create a text file containing the information of the call log window. In this text
file, fields are separated by a ";" character.
The default name: journal.txt can be modified and the directory where to save the file can
be changed.
1.3.8.1
Performing a Call from the Call Log Window
There are two ways to perform a call from the Call Log window (part of Click2Call feature):
a. Double click a row:
1. Double click a row from the call log to open a pop up window displaying the calling
party phone number
2. Click the Call Icon: the call is launched
1-8
b. Right Click a row:
1. Right click a row from the call log
2. select Make a call: ... in the contextual menu: the call is launched
1-9
Chapter
1.3.8.2
1
Performing calls through Customer Information Pop-up Window
See: Performing Calls through the Customer Information Pop-up Window
1.3.9
Customer Database
The customer database stores information on customers.
There is one customer form per customer.
To display the customer form:
-
Manual display: click the
button to display the list of customers and select your
customer (see: List of Customer ).
-
1.3.9.1
1-10
Automatic display: when you are connected to a customer call, the corresponding
customer form is displayed automatically (see: figure: Client Information Form ).
The system retrieves customer information according to:
• The customer code, transmitted via DTMF
• The calling number
To select the used information, see the Expert documentation.
When the customer code and the calling number are unknown in the database, the system
operates as if it was a new customer calling. An empty customer form is displayed.
Automatic display requires that your Automatic screen pop up parameter is validated
(see: Agent Parameters ).
List of Customer
Figure 1.11: Customer List Tab
The List tab displays the customer list.
You can:
1.3.9.2
-
Display (or modify) customer details: double click a customer, the customer information
form is displayed (see figure: Client Information Form )
-
Create a new customer: double click New record, the customer information form is
displayed (see figure: Client Information Form )
-
Filter the customer list: validate the Apply search filter check box and fill one or several
fields
-
Suppress a customer record:
1. Select a record
2. Right click
3. Select: Suppress the record
4. Confirm the suppression
Customer Form
1-11
Chapter
1
Figure 1.12: Client Information Form
The Client information tab provides access to the customer details in the Customer
Information pop-up window.
You can:
-
Modify the fields in the Customer information pages directly,
Click Change to confirm the modifications.
-
Consult the customer information, click Cancel to close the Customer information page
after consultation
-
Perform calls through the Customer Information pop-up window
Note:
The Contract end date field is for information only. It is not associated with any functionality and could
be used, for example, to indicate the final date of the customer's contract.
1.3.9.3
Performing Calls through the Customer Information Pop-up Window
There are two ways to perform a call through the Customer Information pop-up window (part
of Click2Call feature):
a. Simple Left Click
1. Left click the call icon, to open a Make a call pop-up window, displaying the different
numbers of the customer
1-12
2. Click a phone number (or select the phone number by means of the keyboard)
3. Click the call icon: the call is launched
b. Simple Right Click
1. Right click the call icon
2. Select Make a call: ... in the contextual menu: the call is launched
1-13
Chapter
1.3.10
1
Agent Parameters
These parameters define the working environment for the agent.
To Modify agent parameters:
1. Click the
button
The Agent parameters window is displayed:
1-14
Figure 1.15: Agent Parameters Window
2. Validate one or more of the check boxes:
• Unlog extension (free seating mode): validate the check box to change the agent
state to Off duty on closing the application. See Closing the Agent Assistant
• Start with agent on duty: validate the check box to change the agent state to On
duty on starting the application
• Retain agent state when logging off: validate the check box to remain the same
agent state on closing the application. See Closing the Agent Assistant
• Always visible: validate the check box to always display the Agent Assistant window
in the foreground
• Hide application while starting: validate the check box to hide the main application
window when starting. Click the icon on the task bar to display the application window
• Automatic customer's info Pop up: validate the check box to display customer
information when receiving an incoming call
• Groups: this field displays the list of available groups. Validate the associated check
box to assign the group to the agent. An agent is assigned to a group by the supervisor
or can be assigned by the agent (depending on specific agent access rights). See
Agent Assistant Administration
Note 1:
The groups names are configured in the Octopus Open Call Center general parameters of OMC:
see the Expert Documentation
•
•
Modify the password: validate this check box and fill the associated fields to modify
agent password. Specific rights are required.
Graphic: validate this check box to display the agents in conversation and the status of
the calls in the queue, for each group to which the agent belongs (see: Traffic
Visualization )
1-15
Chapter
1
•
Visual Queue Control: validate this check box to visualize calls waiting in ACD group
queues (see: Traffic Visualization )
Note 2:
This field is available provided that the agent has the right to visualize calls waiting in ACD group
queues. This right is defined in the Agent Assistant Administration window (see: figure: Agent
Right Configuration Window ).
•
Group to visualize: validate the associated check boxes to display the calls waiting in
ACD group queues for the corresponding groups (see: Traffic Visualization )
Note 3:
This field is available provided that the agent has the right to visualize calls waiting in ACD group
queues. This right is defined in the Agent Assistant Administration window (see: figure: Agent
Right Configuration Window ).
•
Automatically connect: validate this check box to automatically connect to the same
server when the Agent Assistant starts
3. Click OK to validate or click Cancel to close the Agent parameters window without saving
your modifications
1.3.11
Traffic Visualization
The traffic visualization window displays real-time information on group activity.
Figure 1.16: Traffic Visualization Window Example
The traffic visualization window provides two information areas:
1. The top area displays the agents in conversation and the status of calls in the queue for
each group (see: Agents in Conversation and Status of Calls in the Queue for each group)
The concerned groups are the groups to which the agent belongs.
2. The second area displays information on the calls waiting in ACD group queues, before
being distributed to a group (see: Calls Waiting in ACD Group Queues )
The concerned groups are the groups that the agent has decided to visualize. Visualization
may include groups to which the agent does not belong. Select the groups to visualize by
validating the Group to visualize check boxes of the Agent parameters window (see:
Agent Parameters ).
1-16
The two areas can be displayed or hidden independently.
Note:
The groups names are configured in the Octopus Open Call Center general parameters of OMC: see the
Expert Documentation.
1.3.11.1
Agents in Conversation and Status of Calls in the Queue
Agents in conversation and status of calls in the queue are displayed in the traffic visualization
window when the Graphic check box of the Agent parameters window is validated (see:
Agent Parameters ).
Figure 1.17: Agents in Conversation and Status of Calls in the Queue
For each group, the following information is displayed:
-
Agents in conversation (on the right of the window)
Each green circle corresponds to an agent in conversation with a customer
-
Status of each call in the queue (on the left of the window)
Each circle corresponds to one position in the queue. The color of the each circle indicates
the status of the position:
• Grey: this position is empty
• White: a call is waiting in this position
• Orange: a call is waiting for a time exceeding the S1 threshold (defined in system
parameters)
• Red: a call is waiting for a time exceeding the S2 threshold (defined in system
parameters)
Note 1:
The number of circles is defined by the Queue Length. The queue length is defined by the number
of agents assigned to the queue multiplied by the number of calls per agent. The Queue Length
parameter is configured by the system administrator.
Example:
In figure: Agents in Conversation and Status of Calls in the Queue :
-
In the RD queue, there are four empty positions (four grey circles) and one agent is in conversation
(1 green circle)
-
In the Accounting queue:
1-17
Chapter
1
•
•
•
•
•
There are six waiting positions
Two calls are waiting for a time exceeding the S2 threshold (two red circles)
One call is waiting for a time exceeding the S1 threshold (one orange circle)
This queue is full (no gray circle)
Three agents are in conversation (three green circles)
Note 2:
When a queue is full, new calls are dissuaded.
1.3.11.2
-
In the Sales queue, only one call is waiting. and two agents are in conversation (two green circles)
-
The other queues are closed
Calls Waiting in ACD Group Queues
Calls waiting in ACD group queues are displayed in the traffic visualization window when the
Visual Queue Control check box of the Agent parameters window is validated (see: Agent
Parameters ).
Figure 1.18: Calls Waiting in ACD Group Queues Display Example
Calls waiting in ACD group queues are sorted in descending order of the greater waiting time
duration.
For each call waiting in an ACD group queue, the following information is displayed:
Field
Meaning
Calling party
The incoming call is identified by the calling number or the calling
name, provided the Automatic Customer’s info pop-up check box
of the Agent parameters window is validated (see: Agent Parameters )
Important:
When this information is complete (calling name and number displayed), the calling name is used.
Client code
1-18
Client code of the calling party, if defined
Field
Meaning
Company name
Company name of the calling party, if defined
Waiting time in queue Time elapsed since the call has been waiting in an ACD group queue
Number of calls
Number of times the calling party has tried to reach an agent
This counter is incremented each time the same client code is used
to reach an agent. If the client code does not exist, the calling number is used to increment the counter.
The counter automatically resets:
- After the calling party has been handled by an agent
- At a given time. By default, the timer value is set to midnight
(00:00). It can be modified in the agent assistant administration
window (see: Agent Assistant Administration )
Total waiting time in
queue
Total duration the calling party has remained in the queue without
being handled by an agent. This includes all previous attempts performed by the calling party to reach an agent
Requested group
Group to which the call is distributed
Note:
Information on each call waiting in an ACD group queue is refreshed every second.
1.3.11.3
Handling Calls Waiting in ACD Group Queues
To handle a call waiting in an ACD group queue, the agent must be in any of the following
situation/status:
-
On duty
-
Off duty
-
Clerical work
-
Temporary absence
-
Standby time after call processing
The agent must have the rights to:
-
Change from the current group to another one. The Change ACD group option must be
validated (see: Agent Assistant Administration )
-
Visualize the calls waiting in ACD group queues. The Visual Queue Control option must
be validated (see: Agent Parameters )
To handle a call waiting in an ACD group queue, double click a row.
Note:
A confirmation pop-up window is displayed if it is a call to a group to which the agent does not belong.
When agents select Yes, they are automatically assigned to this group before the conversation starts.
When agents select No, they remain in their current status.
After the conversation, the agent status depends on the agent's status before the conversation
and the group to which the call is directed:
-
The call is directed to a group to which the agent belongs:
• If the initial agent status was "Off Duty", it is automatically set to "On Duty" after call
pickup. Once the call is released, the agent status returns to "Off Duty".
1-19
Chapter
1
•
-
If the initial agent status was Clerical work, Standby time, or Temporary Absence, it is
automatically set to "On Duty" after call pickup. Once the call is released, the agent
status remains "On Duty" after the standard standby time and must be changed
manually, if necessary.
The call is directed to a group to which the agent does not belong:
Once the call is released, the agent remains in this group. The agent must change the
group manually, if necessary.
1.4
Agent Administration Mode
1.4.1
Connecting as an Agent Administrator
To connect to the Agent Assistant:
1. Start the Agent Assistant.
The connection window is displayed:
Figure 1.19: Agent Administration Connection Window
2. Select ADMIN from the list of declared agents
3. Extension: this field is not used, leave this field empty or keep the default value.
The agent administrator has no extension.
4. Server name: enter the name or the IP address of the communication server
5. Language: select the agent language
6. Password: enter the ADMIN password.
When the password is correct, the Connection button color changes to green to indicate
1-20
that it is active.
7. Click Connection
You are connected as an agent administrator and the agent configuration window is displayed
(see Agent Assistant Administration ).
1.4.2
Agent Assistant Administration
The agent assistant administration window is used to carry out some administration operations
and to modify agents rights. Only the agent administrator can access this window.
Figure 1.20: Administrator Right Configuration Window
To modify agent rights:
1. Select an agent from the List of all agents
The current agent rights are displayed.
2. Modify rights:
• When selecting item number 0: ADMIN, the rights of administrator are displayed in the
right part of the window (see: figure: Administrator Right Configuration Window )
You can modify the following information:
• Password: enter a new password
• Call Log: validate this check box to delete all call log information on the local
machine
• Customer database:
The call center manager indicates the mode of connection to the Customer
Database.
The following choices are available:
• Integrated mode (standard) is the default mode: the Agent application is
1-21
Chapter
1
•
1-22
provided with a Manage Customer Records program (GestFiche.exe) to
store key customer information and to ensure the customer record pops up on
the screen (Screen pop-up) when a call is received.
• Linked mode (script): this mode causes a script (Windows Scripting Host) to
be executed during an incoming call and when the agent clicks the Manage
Records button in the agent application.
The Agent application comes with a default script file. The language used is
VBScript. However, the call center manager can modify the script file as he
sees fit to ensure it works with his applications. This operating mode is
generally used to access a customer database in MS Outlook. It offers a great
flexibility since all modifications can be made to the script without having to
modify the Agent application. Please contact T-Systems Customer Service for
any additional information you may need on using customized scripts.
• Specific mode: This final mode works by connecting the Agent application to a
third-party application. Several companies use their own" Customer Relations
Management" software. The call center manager can specify an application to
be called up by the Agent application when receiving an Octopus Open Call
Center call. When a call is assigned to an agent, the associated agent
application runs the command line entered in this section, followed by the three
parameters for the call: the caller's number, the number called and the user
code.
The syntax is as follows:
program
[option]
/1:number_caller
/2:number_called
/3:user_code
By default, for example, program [option] is the same as Wscript.exe
post_it.vbs.
• Time of call counters resetting: enter the time at which the counter and time
duration applied to the calls waiting in ACD group queues are set to 0. When calls
are waiting in ACD group queues while the timer is elapsed, they remain in queue
and the counters retain their value (see: Calls Waiting in ACD Group Queues ).
By default, the timer value is set to 00:00 (midnight).
When selecting any other item, the rights of the selected agent are displayed in the
right part of the window:
Figure 1.21: Agent Right Configuration Window
You can modify the following information:
• Change ACD group: validate the check box to allow the agent to change his
assigned groups
• Modify password: validate the check box to allow the agent to change his
password
• Password: enter a new password
• Call Log: validate this check box to delete call log information for this agent on the
local machine
• Visual Queue Control: validate this check box to allow the agent to visualize the
calls waiting in ACD group queues and to handle one of these calls (see: Calls
Waiting in ACD Group Queues )
3. Click Modify to validate the agent rights
4. Restart the application to take into account the modifications
To close the ADMIN connection: click Close at the bottom right of the window.
1-23
Chapter
1-24
1