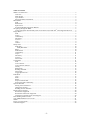
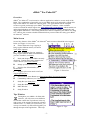
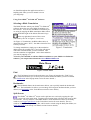
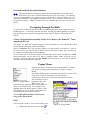
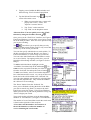
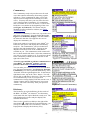
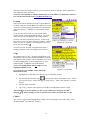
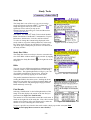
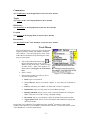
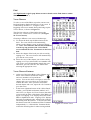
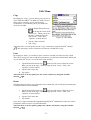
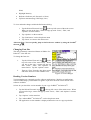
1
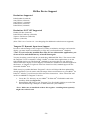
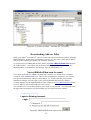
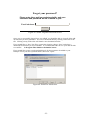
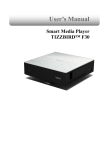
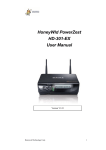
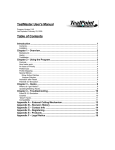
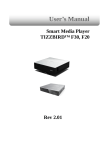
User Manual
-1-
Table of Contents
eBible™ For Palm OS® .............................................................................................................................3
Overview .............................................................................................................................................3
Main Screen.........................................................................................................................................3
Tips Window .......................................................................................................................................3
Selecting a Bible Translation...............................................................................................................4
Main Menu ...............................................................................................................................................4
Find......................................................................................................................................................4
Bookmarks...........................................................................................................................................4
Split Screen..........................................................................................................................................4
Forward and Back Navigation Buttons................................................................................................5
Navigating through the Bible ...................................................................................................................5
5-Way Navigation Functionality with Verse Chooser (for Palm OS® 5 and supported devices) ........5
Popup Menu .............................................................................................................................................5
Find......................................................................................................................................................5
Topics ..................................................................................................................................................7
Commentary ........................................................................................................................................8
Dictionary ............................................................................................................................................8
Lexicon ................................................................................................................................................9
Copy ....................................................................................................................................................9
Cancel ..................................................................................................................................................9
Study Tools.............................................................................................................................................10
Study Bar ...........................................................................................................................................10
Study Bar Slider............................................................................................................................10
Bible ..................................................................................................................................................10
Find Results .......................................................................................................................................10
Commentary ......................................................................................................................................11
Topics ................................................................................................................................................11
Dictionary ..........................................................................................................................................11
Lexicon ..............................................................................................................................................11
Devotional .........................................................................................................................................11
Tools Menu.............................................................................................................................................11
Find....................................................................................................................................................12
Verse Chooser....................................................................................................................................12
Verse Chooser Features .....................................................................................................................12
Library ...............................................................................................................................................13
Bookmarks.........................................................................................................................................13
Reading Schedule ..............................................................................................................................14
Devotional .........................................................................................................................................16
Toggle Split Screen............................................................................................................................16
Edit Menu ...............................................................................................................................................17
Copy ..................................................................................................................................................17
Paste...................................................................................................................................................17
Beam..................................................................................................................................................17
Export to Memo Pad..........................................................................................................................18
Export Personal Commentary............................................................................................................18
Options Menubar....................................................................................................................................18
Setting Your Preferences ...................................................................................................................18
Changing Font Size............................................................................................................................19
Reading Version Numbers.................................................................................................................19
Hi-Res Device Support...........................................................................................................................20
Resolutions Supported .......................................................................................................................20
Resolutions NOT YET Supported .....................................................................................................20
Tungsten T3 Dynamic Input Area Support........................................................................................20
Downloading Add-on Titles ...................................................................................................................21
Your eBibleforPalm.com Account .........................................................................................................21
eShelf......................................................................................................................................................22
Forgot your password? ...........................................................................................................................23
Technical Support...................................................................................................................................24
-2-
eBible™ For Palm OS®
Overview
eBible™ for Palm OS® is an innovative software application conducive to true study of the
Bible. The combination of powerful, easy-to-use Bible study tools and quality content titles
help set the eBible™ for Palm OS® software apart. This User Manual will be a helpful
resource to guide you through your eBible™ for Palm OS® software. Other available
resources include the online support site www.bibletoolbox.com/support, which contains an
online knowledgebase of Frequently Asked Questions, Software Updates, Downloads, and
other helpful information. The Getting Started sheet that accompanied your eBible™ for Palm
OS® software also contains valuable information that you need when first using your eBible™
for Palm OS® software.
Main Screen
Several key features of the eBible™ for Palm OS® main screen are identified in the legend
below (see Figure 1: Overview):
A
Nelson Electronic Logo: tapping it
brings up the different menus (see menus
Tools, Edit, Options)
B
Bible Translation Version: tapping it
brings up the different Bible translations that
you have installed (see Bible)
C
Book and chapter of the Bible currently
displayed. Tapping here brings launches the
Verse Chooser (see Verse Chooser)
D
Brings up Find interface (see Find)
E
Displays list of Bookmarks (see
Bookmarks)
Figure 1: Overview
F
Toggles split screen mode on/off (see
Toggle Split Screen)
G
Previous/Next Verse Button (see Forward and Back Navigation Buttons)
H
Commentary Indicator (see Commentary)
I
Study Bar (see Study Bar)
J
Study Bar Slider (see Study Bar)
K
Bible Window
L
Study Window
Tips Window
Throughout your eBible™ for Palm OS®
software, you will come across different
screens that contain the Tip indicator in the top
right corner of the window (denoted by a button
with the letter “i”). When you see this icon, you
can tap it to launch a tip that will help guide you
through that part of the application. These tips
-3-
Figure 2: Tips
are found throughout the application and are a
helpful guide when your user manual is not at
your fingertips.
Using Your eBible™ for Palm OS® Software
Selecting a Bible Translation
The Bible Window within your eBible™ for Palm OS®
software shows the text of the Bible Translation you
have chosen. You can see what Bible Translation you
are using by tapping the Bible translation abbreviation
to the immediate right of the Nelson Electronic logo
at the top right-hand corner of the screen
(indicated by the “B” in Figure 1: Overview).
*In Figure 3: Translations, the Bible abbreviation is
denoted by the letters “NCV,” the abbreviation for New
Century Version).
To change translations, simply tap on the translation
abbreviation (for example NCV), and a list will appear
with other translations that you have installed. The
current translation is highlighted. Select the translation
you want by tapping on it.
Figure 3: Translations
*Note: If you would like to add new Bible translations to your eBible™ for Palm OS®
software, you can purchase them from www.eBibleforPalm.com
Main Menu
Figure 4: Main Menu
Find
The Find button located in the main menu (see Figure 4) launches the “Find Verse”
window that allows you to do keyword searches within the Bibles you have installed.
(See Find Results in the Popup menu section for more details.)
Bookmarks
The bookmarks button in the main menu allows you to quickly launch the bookmarks
list. The bookmarks list allows you to manage and categorize bookmarks that you have
added. (see Bookmarks in the Tools Menu section for more details.)
Split Screen
The eBible™ for Palm OS® screen can be split into two sections by tapping the split
screen icon in the main menu. Tapping on the button again will return the screen to full
screen mode. The top window is the Bible window, while the bottom window is the Study
window (see Toggle Split Screen in the Tools Menu section for more details). The two
windows are separated by the Study Bar, which can be resized using the Study Bar Slider (see
Study Bar Slider in the Study Tool Menu section for more details).
-4-
Forward and Back Navigation Buttons
The forward and back navigation buttons in the top right-hand corner of the main
menu allow you to move forward and backward in your verse history. For example,
if you are reading Matthew 6:1 and then use the verse chooser to select 2 Timothy 3:16, you
can return to Matthew 6:1 by tapping on the back button. To go forward to 2 Timothy 3:16,
tap the forward button. eBible™ for Palm OS® will remember up to 50 verses in your verse
history.
Navigating through the Bible
To scroll down to the next page in the Bible, push the down button on your Palm Powered™
handheld device. To scroll up, push the up button. Pressing up at the beginning of a chapter
will open the previous chapter. Pressing down at the end of a chapter will open the next
chapter.
5-Way Navigation Functionality with Verse Chooser (for Palm OS® 5 and
supported devices)
The eBible™ for Palm OS® software supports 5-way navigation for users with the latest PDA
models that take advantage of this functionality.
When you SELECT the 5-way navigator button, you will open the verse chooser. Once in
the verse chooser, you will be able to quickly move to the book, chapter, and verse that you
are looking for by using the directional buttons.
As well, when you are in the main eBible™ for Palm OS® screen, when you choose the LEFT
directional button, you are able to go back a complete chapter within the book you are
studying. Likewise, when you select the RIGHT directional arrow, you are able to advance
one chapter ahead within that same book.
Popup Menu
Anytime you tap on a single word in the main eBible™ for Palm
OS® screen, a popup menu will appear (see Figure 5: Popup
Menu).
The Popup Menu provides a quick and easy inteface to some of the
study tools, such as word searches, topical references,
commentaries, dictionaries, and Greek and Hebrew Lexicons.
The word that you tap or
highlight in the main
Bible screen will
automatically be entered in the study tool that you
select or are already using. For example, if you
highlight the word “bread”and tap “Topics” in the
Popup Menu, the word “bread” will be entered as
the lookup term in the topical reference.
Figure 5: Popup Menu
*Note: Highlighting multiple words will not
bring up the Popup Menu.
Find
You can begin a word or verse search in three ways:
1. Tapping the find button in the toolbar
-5-
Figure 6: Popup Menu
2. Tapping a word within the Bible window and
then selecting “Find” from the Popup Menu
3. Tap the Nelson Electronic logo
corner of the main screen
in top left
a. When you tap on the logo, a menu will
pop up with “Tools,” “Edit,” and
“Options” as menu choices.
b. Tap “Tools” on the menu bar.
c. Tap “Find” on the dropdown menu.
*Shortcut Note: You can quickly access the “Find”
function by using the Graffiti® shortcut
Once you are in the “Find Verse” interface (see Figure 5:
Find Verse Window), you can enter your word to search
for in the field provided. There are a few options to help
you in your searching.
box allows you to specify that you only
The
want verses that contain all the words, or any verses that
contain any of the words you entered.
You can also specify which books to search within. To
do this, tap on the box beside “Books” (see Figure 7:
Find Verse Window) to set the range of your search.
You can select individual books of the Bible to search
in, or sets of books. By tapping on this box, you will
launch the Select Range window (see Figure 8: Select
Range).
To add an individual book, highlight it in the
“Available” list and and tap on the add button
. To
remove a title, tap on the book that you’d like to remove
.
from the “Selected” list and tap the remove button
Figure 7: Find Verse window
Figure 6: Find Verse window
To add a set of books, select a set from the dropdown
box at the bottom of the screen. As you tap on the set of
books, the books will be added to the “Selected” list.
You can select multiple sets of books by selecting other
sets from the dropdown list. They will all be added to
the “Selected” list accordingly.
The “Reset” button clears the “Selected” list.
Once you are finished selecting the books of the Bible
you wish to search, tap “Done” to return to the main
Find Verse screen (see Figure 7: Find Verse Window).
When you have all of your search parameters set up, tap
“Find” to begin your search.
Figure 8: Select Range
Your search results will show up in the bottom Study
Window as “Find Results” (see Figure 9: Find Results).
The number of verses found that contain the search term
is listed on the right side of the study bar.
*Note, this is not the number of occurances of
the words themselves, rather the number of
verses containing the search terms.
-6-
Figure 9: Find Results
By tapping on any of the verses that the Find
feature displays in the “Find Results”, you will
automatically launch that verse in the main Bible
window above the find results.
Topics
Topical references organize the Bible based on topics. Example
topics could be “salvation”, or “God”. Several different topical
references may be available in the eBible™ for Palm OS®
depending on what content is loaded on your Palm Powered™
handheld.
Topical references can be accessed in two ways. If the study
window is open, tap on the left dropdown box and select
“Topics”. You can also access topics by tapping on the word or
topic you wish to study and selecting “Topics” from the Popup
Menu (see Figure 10).
In the Topical Reference study bar, the right dropdown box lists
the available topical reference content.
Verses that appear in the Topical Reference content are
automatically linked to the text in the Bible. The verses are
underlined. Tapping on them displays the verse in the Bible
window, starting with the first verse in that reference.
Figure 10: Topical popup
New topics can be entered either by tapping on new words and
selecting “Topics” or by entering the new word into the space
provided (see Figure 11).
The topical reference screen supports “auto completion”, that is,
the program will try to complete the word you are entering as you
enter letters. For example, if you want to look up the the word
“pentecost”, the topical reference detects it after a few letters if
the word is in the topical reference content (see Figure 12: Auto
Completion).
Once the word is complete (either through entering the full word,
or letting eBible™ for Palm OS® complete it for you), tap on the
enter button ( ) to begin the search. If there is no content found,
the study window will display the words “not found”. If the word
is found, the content will be displayed. To scroll up or down in
the commentary content, use the slider bar on the right side of the
screen.
Figure 11: Topical Reference
If you are not sure of your spelling, there is a right dropdown box
beside the enter button that will show you the topics close to the
word you entered (see Figure 13: Word List).
Figure 12: Auto Completion
-7-
Figure 13: Word List
Commentary
The Commentary study tool provides notes for each
verse that contains commentary from many popular
references. These commentaries allow you to look
deeper into the background and meaning of certain
verses. You may also enter your own notes for each
verse in the Personal Commentary. If a commentary
note is available for a verse, an asterix (*) can be seen
beside the verse number at the beginning of the verse
(see Figure 14, John 6:47). This feature may be
disabled from the preferences window (see Setting
Your Preferences).
To view the commentary for that verse, tap on the verse
and select “Commentary” from the Popup Menu (see
Figure 15: Commentary Popup). This tells eBible™
for Palm OS® that the verse tapped is the verse to
display the commentary for.
If the study window is not already open, eBible™ for
Palm OS® will open it and display the Commentary
study bar. The commentaries you have loaded will
appear in the right dropdown box. Tapping on the
dropdown box shows a list of the commentaries
available to you. The commentaries with content will
have a check mark beside them. Select the commentary
you wish to view by tapping on it. To scroll up or down
in the commentary content, use the slider bar on the
right side of the screen.
Figure 14: Commentary List
Figure 15: Commentary Popup
*Note: If you would like to add new commentaries to
your eBible™ for Palm OS® software, you can
purchase them from www.eBibleforPalm.com
You can make your own notes on verses and add them
to a “Personal Commentary” (see Figure 16: Personal
Commentary). To enter a personal commentary, select
“Personal” from the right dropdown list. In the bottom
right-hand corner, tap on the “New” button. You will
now be able to add notes to that verse. The entry will be
saved automatically. If one of your personal
commentaries is being displayed for the current verse, a
“Delete” button will be at the bottom of your screen.
“Delete” will remove that entry from your personal
commentary.
Figure 16: Personal Commentary
Dictionary
The Dictionary provides definitions for the words of
the Bible. In eBible™ for Palm OS®, the Dictionary
works much like the Topical Reference study tool. The
right dropdown box in the study bar displays the
available dictionaries.
There is also a word list available to the right of the
enter button ( ). Much like the Topical Reference, you
can tap on a word and select “Dictionary” from the
Popup Menu to display the dictionary entry.
-8-
Figure 17: Dictionary
The space below the study bar allows you to enter new words to look up. Auto completion is
also supported in the dictionary.
*Note: If you would like to add new dictionaries to your eBible™ for Palm OS® software,
you can purchase them from www.eBibleforPalm.com
Lexicon
The Lexicon shows definitions for the original Hebrew
or Greek words used in the Bible. The Hebrew or Greek
words are referenced using the numerical convention in
“The New Strong’s™ Exhaustive Concordance of the
Bible”.
To access the Lexicon, tap on a word on the Bible
reading screen. In the Popup Menu, tap on “Lexicon”.
The Lexicon will be displayed in the study window.
Lexicons can also be looked up directly. In the study
bar, there is a space to enter a Strong’s number. Choose
either “Greek” or “Hebrew” in the dropdown box and
tap on the enter button ( ).
Figure 18: Lexicons
Lexicons can only be used in translations that have
Strong’s numbers, such as the King James Version.
Copy
By tapping on the “Copy” from the Popup Menu, you
can quickly copy any word within the eBible™ for Palm
OS® Bible screen so that it can be copied for use in your
Personal Commentary or other applications on your
Palm Powered™ handheld, such as MemoPad.
*Note: The Popup Menu will not appear if you
highlight multiple words.
If you want to copy mutiple words, follow the
instructions below:
Figure 19: Lexicons
1. Highlight the words that you’d like to copy in the Bible window.
in the top left corner of the main screen. When
2. Tap the Nelson Electronic logo
you tap on the logo, a menu will pop up with “Tools”, “Edit,” and “Options” as menu
choices.
3. Tap the “Edit” menu bar.
4. Tap “Copy” and the entire portion of text that you highlighted will be copied.
*Shortcut Note: You can quickly use the “Copy” function by using the Graffiti®
shortcut
after selecting a word or selection of text that you would like to copy.
Cancel
The “Cancel” option in the Popup Menu simply cancels the popup screen and returns you to
the main eBible™ for Palm OS® window.
-9-
Study Tools
Study Bar
The Study Bar is one of the ways you can access the
study tools that are built into eBible™ for Palm OS®. The
Study Bar appears when you click on the
splitscreen icon or when you tap on the
Nelson Electronic logo and go to Tools and then select
“Toggle Split Screen”.
The eBible™ for Palm OS® Study Tools include Parallel
Bible Translations, Find Results, Commentaries, Topical
References, Dictionaries, Lexicons, and Devotionals.
To select or change the content being displayed in the
study window, tap on the left dropdown box in the study
bar, and a menu will pop up with the list of study tools.
Tap on the type of study tool you wish to view and use in
the study window.
Figure 20: List of Study Tools
Study Bar Slider
The Study Bar can be moved up or down to customize the
size of the Bible window and the Study window by tapping
and sliding the Study Bar Slider
study bar.
on the right side of the
Bible
You can view two different translations simultaneously by
selecting “Bible” in the left dropdown box of the Study
Tools menu. The right dropdown box will give you a list
of available translations to choose from. Select the
translation you want by tapping on it in the menu.
Figure 21: Parallel Translations
The parallel translation function works much like
reading the Bible in the main screen. Pushing the down
button on your palm device will page both the Bible and
Study screens down, and pushing up will page both the
Bible and Study screens up.
Find Results
Selecting “Find Results” in the left dropdown box of the
Study Tools bar displays the results of the last find you
performed (see Figure 22: Find Results).
The number of verses found that contain the search term is
listed on the right side of the study bar. Note, this is not the
number of occurances of the words themselves, rather the
number of verses containing the search terms.
Figure 22: Find Results
To go to a specific verse listed in the search results, simply tap on that verse (see Find
Results in the Popup Menu section for more details).
- 10 -
Commentary
(See Commentary in the Popup Menu section for more details)
Topics
(See Topics in the Tools Popup Menu for more details)
Dictionary
(See Dictionary in the Popup Menu section for more details)
Lexicon
(See Lexicon in the Popup Menu section for more details)
Devotional
(See Devotional in the Tools Menubar section for more details)
Tools Menu
The Tools Menu bar is your way of accessing some
of the key features within your eBible™ for Palm
OS® software. You can bring up any of the Tools
within the Tools Menu bar by following the same
steps to access them:
in
1. Tap on the Nelson Electronic logo
the top left-hand corner of the screen.
When you tap on the logo, a menu will pop
up with “Tools”, “Edit”, and “Options” as
menu choices (see Figure 23: Tools Menu
bar).
2. Select “Tools”.
Figure 23: Tools Menu bar
3. Choose the tool that you’d like to access
from the dropdown list.
•
Find: begin a word search.
•
Verse Chooser: choose a new book, chapter, or verse that you would like to
study
•
Library: tells how your eBible™ for Palm OS® content is organized
•
Bookmarks: helps you keep track of favorite Bible passages.
•
Reading Schedule: allows you to create a custom schedule for reading the
Bible or portions of it with a variety of helpful settings.
•
Devotional: allows you to display a daily devotional in the study window.
•
Toggle Split Screen: allows you to switch back and forth between split and
full screen modes.
Each of the Tools within the Tools Menu also have Graffiti® shortcuts to some of the
common tasks and tools of your eBible™ for Palm OS® software. Each of the features of the
Tools Menubar is covered in detail below.
- 11 -
Find
(See Find Results in the Popup Menu section for details on the Find features within
eBible™ for Palm OS®)
Verse Chooser
To select a verse of the Bible, tap on the current verse
book and chapter displayed at the top of you screen. It
is indicated by the letter “C” in Figure 1 at the
beggining of this user manual. Doing this brings up the
Verse Chooser, as shown in Figure 24.
The first line at the top of the window shows the
current verse. In this case it is John 6:47 (see Figure
24: Verse Chooser).
Choosing a different verse occurs with three taps.
1) To choose the book, tap the abbreviation of the
book. The verse chooser will automatically
advance to the chapter screen, as shown in Figure
25. *Note: You will notice that the Old Testamant
is in the top top portion of the “Select Book”
screen and that the New Testament is in the lower
half.
Figure 24: Verse Chooser
2) Select the chapter of the book you wish to read by
tapping on it. The verse chooser will automatically
go to the the verse screen.
3) Select the verse of the chapter you wish to read by
tapping on it. If you selected the verse number with
your stylus, you will immediately launch the verse.
Otherwise, you can select the “Go” button after
selecting the appropriate verse.
Figure 25: Select Chapter
Verse Chooser Features
•
•
At the top of the Select Book, Select Chapter, and
Select verse windows (beside the chapter
and verse numbers) are up and down
arrows. You can use these to navigate to select the
chapter and verse you wish to go to if the book
remains the same. Once you have selected the
desired chapter and verse, tap on the “Go” button to
go to that verse.
In the lower right-hand corner of the “Select Book”
window, you will find two buttons labeled “A-Z”
and “G-R” (see Figure 24: Verse Chooser) that allow
you to toggle the order of the books of the Bible (see
Figure 3). Tapping “A-Z” displays the books of the
Bible in alphabetical order. Tapping “G-R” displays
the books in traditonal order, starting with “Genesis”
and ending with “Revelation”. You will notice that
this feature sorts Old Testament and New Testament
independently: i.e., Old and New Testament books
will not be mixed together in either sorting method.
- 12 -
Figure 26: Arrow Keys
Figure 27: Select Verse
•
The button with the letter “i” in the top right-hand corner of each screen displays tips if
you tap on it.
*Note: You can also navigate around the verse chooser by tapping on the book name,
chapter or verse number and using the directional arrows if you have a Palm Powered™
handheld that supports 5-Way Navigation.
Library
The Library is how your eBible™ for Palm OS® content
is organized. When you tap on the title of one of the
books, the copyright information for the title is
displayed. If you wish to delete any of your content,
select it and tap on the “Delete” button (see Figure 28:
Library).
Tap “Done” to exit the screen.
*Shortcut Note: You can quickly launch the
“Library” by using the Graffiti® shortcut
Figure 28: Library
Bookmarks
Bookmarks are available to mark your favorite verses,
your last reading point, and verses you’d like to
memorize. You can launch the bookmark features of
your eBible™ for Palm OS® in 4 different ways.
1. Accessing “Bookmarks” from the Tools menu
(see Figure 23: Tools Menu bar)
2. Clicking on the bookmarks icon on the top menu
bar
3. Through the Popup menu that appears when you
click on a word within the Bible window (see
Figure 29: Bookmarks)
Figure 29: Bookmarks
4. Use the Graffiti® shortcut
Bookmarks are specific to each version of the Bible.
Setting a bookmark in an New King James Version does
not mean that the same bookmark will appear while
reading a King James translation.
To set a bookmark, tap anywhere in the verse you wish
to bookmark from the Bible screen and select
“Bookmark” when the Popup Menu appears. Your
bookmark list will then appear (see Figure: 30
Bookmark List).
In your bookmark list, you can enter bookmark names
for each verse by tapping on the line to the right of the
verse reference. You can then name that bookmark
using Graffiti® or your keyboard. Tapping on the verse
reference will take you to that verse in the Bible
window. Tapping the “Go” button will also take you to
the bookmarked verse as long as you have tapped the
description of the bookmark and the flashing cursor is
present.
- 13 -
Figure 30: Bookmark List
You can also categorize the bookmarks by tapping on
the space to the right of the verse reference and tapping
“Details” (see Figure 31: Bookmark Details).
In the details window, you can delete the bookmark or
categorize it. To categorize a bookmark, the category
needs to be created first. If the category is not there,
select “Edit Categories...” in the dropdown box. The
“Edit Categories” window will appear (see Figure 32:
Bookmark Categories).
In the “Edit Categories” window, you can create a new
category and rename or delete an existing category. To
create a new category, tap on “New” and enter the new
category name in the space provided. To rename or
delete an existing category, select the category you
wish to change or remove and tap the “Rename” or
“Delete” button accordingly (see Figure 32:
Bookmark Categories).
Figure 31: Bookmark Details
*Shortcut Note: You can quickly launch the
“Bookmarks” by using the Graffiti® shortcut
Reading Schedule
The reading schedule is a tool that allows you to
customize a schedule for reading books, chapters, or
verses of the Bible over a specified period of time.
Figure 32: Bookmark Categories
You can launch the Reading Schedule in 2 different
ways.
1. Accessing “Reading Schedule” from the Tools
menu (see Figure 23: Tools Menu bar)
2. Use the Graffiti® shortcut
Once you have launched the Reading Schedule, you
will at first see a screen that looks like Figure 33.
When you see that screen, you can tap on “New” in the
upper right-hand corner. A screen similar to the one
shown in Figure 34 will then appear, and you can
begin to customize a reading schedule.
Figure 33: Reading Schedule
First choose a Bible Translation that you would like to
base your reading schedule on. You can do this by
tapping on the drop down menu at the top of the screen
and selecting the Bible you’d like to use.
You can then select the range of Bible books that you
would like to include in the reading schedule by
tapping on the box to the right of “Passage”. You can
select individual books of the Bible to search in, or sets
of books. To choose an individual book, highlight it in
the “Available” list and and tap on the add button
to
move those books into the “Selected” list (see Figure
35: Select Range).
- 14 -
Figure 34: New Schedule
To remove a title, select one from the “Selected” list
and tap the remove button
. To add a set of books,
select a set from the drop down box at the bottom of the
screen. As you tap on the set of books, the books will
be added to the “Selected” list.
You can select multiple sets of books by selecting other
sets from the drop down list that is located at the
bottom of the “Select Range” screen and is marked
with “Entire Bible” that denotes a drop down menu (see
Figure 36: Drop Down menu). The series of books
that you select will be added to the “Selected” list. The
“Reset” button clears the “Selected” list (see Figure
36: Drop Down menu). Once you are finished
selecting the books of the Bible you wish to search, tap
“Done” to return to the main reading schedule screen.
The next step is to select the days of the week that you
would like to build your reading schedule around. The
highlighted days indicate the days you have selected.
You can choose your start and finish date as well as the
number of weeks, readings, and verses per reading by
tapping on the boxes and then selecting the numbers on
the popup “New Reading Schedule Keyboard” (see
Figure 37). Click “Done” to continue. Pressing
“Confirm” will confirm the reading schedule you have
build. Tapping “Cancel” will cancel that particular
reading schedule and will bring you back to the main
Reading Schedule screen.
If you pressed “Confirm”, the next screen will be the
Reading Schedule status screen where you can track
your results. When you have completed a particular
reading, you can mark it completed by tapping the check
box to the left of the date and verse reference. This will
automatically adjust the progress percentage. If you
would like to jump to a passage that you have yet to
read, simply highlight that verse and select “Goto”.
Figure 35: Select Range
Figure 36: Drop Down menu
Figure 37: New Reading
Schedule Keyboard
*Shortcut Note: You can quickly launch the
“Reading Schedule” by using the Graffiti® shortcut
Figure 38: Reading Schedule
Progress Indicator
- 15 -
Devotional
Devotionals come in a series. Just as there are different
magazines, there are different devotional series. Each
series contains daily devotionals with helpful thoughts
and insights.
You can launch the Devotional through different
methods.
1. The first way is to Tap on the Nelson
Electronic logo
in the top left-hand
corner of the screen.
a. Select the Tools menu (see Figure 23:
Tools Menu bar).
b. Select “Devotional”.
Figure 39: Devotional
2. Another way to launch the devotional is to
select “Devotional” from the left dropdown
box of the Study Menu bar.
3. Use the Graffiti® shortcut
.
The right dropdown box of the study bar displays the
available devotional content. *Note: If you would like
to add new devotionals to your eBible™ for Palm
OS® software, you can purchase them from
www.eBibleforPalm.com
Tapping on the clock icon
(on the right of the
Study Menu bar) will pop up a calendar that allows you
to select the date for the devotional you wish to read
(see Figure 40: Devotional Calendar). Select the date
for the devotional you wish to read to display the
devotional.
Figure 40: Devotional Calendar
Verse references in the text of the devotional are linked to the verses in the main window. For
example, in Figure 39, tapping on the verse reference “Psa 91:1” brings up Psalm 91:1 in the
main window.
You can scroll up and down in the devotional content using the slider bar on the right side of
the Study Menu window (lower).
*Shortcut Note: You can quickly launch the “Devotional” by using the Graffiti®
shortcut
Toggle Split Screen
The “Toggle Split Screen” fucntion allows you to quickly toggle between full screen and split
screen modes by tapping the split screen icon. Tapping on the button again will return the
screen to full screen mode. The top window is the main window, while the bottom window is
the study or resource window. The two windows are separated by the Study Bar menu.
*Shortcut Note: You can quickly launch the “Toggle Split Screen” by using the Graffiti®
shortcut
- 16 -
Edit Menu
Copy
By tapping on “Copy” you are able to copy any text or
verse within the eBible™ for Palm OS® main screen so
that it can be copied for use on your Personal
Commentary or your Memo pad on your Palm OS®
device for example.
1. Tap the Nelson Electronic logo
in the top left corner of the
main screen. When you tap on
the logo, a menu will pop up
with “Tools”, “Edit”, and
“Options” as menu choices.
Figure 41: Edit Menu
1. Tap the “Edit” menu bar.
2. Tap “Copy”.
*Shortcut Note: You can quickly use the “Copy” function by using the Graffiti® shortcut
after selecting a word or selection of text that you would like to copy.
Paste
By tapping on “Paste” you are able to paste a word or text that you had previously copied.
This can be used if you want to add the copied text to your Personal Commentary, Memo pad
on your Palm OS® device, or even the Find Verse function.
in the top left corner of the main screen.
1. Tap the Nelson Electronic logo
When you tap on the logo, a menu will pop up with “Tools”, “Edit”, and
“Options” as menu choices.
2. Tap the “Edit” menu bar.
3. Tap “Paste”.
*Shortcut Note: You can quickly use the “Paste” function by using the Graffiti®
shortcut
Beam
The Beam function allows you to beam the same content that you would export to Memo pad
to another Palm Powered™ handheld.
in the top left corner of the main screen.
1. Tap the Nelson Electronic logo
When you tap on the logo, a menu will pop up with “Tools”, “Edit”, and
“Options” as menu choices.
2. Tap the “Edit” menu bar.
3. Tap “Beam”.
If you are in range of another IR compatible Palm Powered™ handheld, the other user will be
prompted to either accept or reject the IR transfer.
*Shortcut Note: You can quickly jump to the “Beam” function by using the Graffiti®
shortcut
- 17 -
Export to Memo Pad
The Export to Memo Pad function allows you to export sections of text that you highlighted
in the eBible™ for Palm OS® screens (main screen or resource window) to the Memo Pad on
your Palm Powered™ handheld. You do not need to “copy” the text to export it. Highlight it
by dragging your stylus over the text that you want to export and then follow these steps:
in the top left corner of the main screen.
1. Tap the Nelson Electronic logo
When you tap on the logo, a menu will pop up with “Tools”, “Edit”, and
“Options” as menu choices.
2. Tap the “Edit” menu bar.
3. Tap “Export to Memo Pad” on the dropdown menu
4. You will then be prompted to accept the text export. If you could like to
categorize where in the Memo pad application you export this content to, click
the drop down menu and select the appropriate category or click on the “Edit
Catogeries” option at the buttom of the drop down menu to create new categories.
5. Click Yes or No to either accept the export or to cancel and return to the main
eBible™ for Palm OS® screen.
*Shortcut Note: You can quickly jump to the “Export to Memo Pad” window by using
the Graffiti® shortcut
Export Personal Commentary
The Export Personal Commentary function allows you to export the personal commentary
that you have created to the Memo Pad within your Palm Powered™ handheld. In order to
export your personal commentary, follow these steps:
in the top left corner of the main screen.
1. Tap the Nelson Electronic logo
When you tap on the logo, a menu will pop up with “Tools”, “Edit”, and
“Options” as menu choices.
2. Tap the “Edit” menu bar.
3. Tap “Export Personal Commentary” on the drop down menu.
4. You will then be prompted to accept the Personal Commentary export. If you
would like to categorize where in the Memo pad application your personal
commentary is exported to, click the drop down menu and select the appropriate
category or click on the “Edit Catogeries” option at the bottom of the drop down
menu to create new categories.
5. Click Yes or No to either accept the export or to cancel and return to the main
eBible™ for Palm OS® screen.
Options Menubar
Setting Your Preferences
To customize your eBible™ for Palm OS® software, you can use
the preferences dialog to make a variety of changes. The
changes you can make within Preferences include:
•
Verse on New Line (On or Off)
•
Show Verse No. (Bold, Underline, Parenthesis, and
- 18 -
Figure 42: Preferences
None)
•
Highlight Intensity
•
Reference Indicator (All, Personal, or None)
•
Up/Down Amount (Page, Half Page, Line)
To view and make changes within the Preferences dialog:
1. Tap the Nelson Electronic logo
in the top left corner of the main screen.
When you tap on the logo, a menu will pop up with “Tools,” “Edit,” and
“Options” as menu choices.
2. Tap “Options” on the menu bar.
3. Tap “Preferences” on the drop down menu
4. Tap “Done” to return to the main screen
*Shortcut Note: You can quickly jump to the Preference window by using the Graffiti®
shortcut
Changing Font Size
The most commonly customized feature of eBible™ for
Palm OS® is the font size.
To change the font size:
1.
in the
Tap the Nelson Electronic logo
top left corner of the main screen. When
you tap on the icon, a menu will pop up
with “Tools”, “Edit”, and “Options” as
menu choices. Tap the “Options” menu.
2.
Then tap “Font” from the drop down menu
and select from one of the available sizes.
Figure 43: Font changes
Reading Version Numbers
Version numbers are commonly used by software applications. Checking an application’s
version number helps you determine at a glance if you have the most recent version of the
software available.
So how do you check the version number of your copy of eBible™ for Palm OS®?
in the top left corner of the main screen. When
1. Tap the Nelson Electronic logo
you tap on the logo, a menu will pop up with “Tools”, “Edit”, and “Options” as menu
choices.
2. Tap “Options” on the menu bar.
3. Tap “About eBible™ for Palm OS®” on the drop down menu.
4. The application version number is displayed below the icon in a pop-up window.
- 19 -
Hi-Res Device Support
Resolutions Supported
Palm Standard (160x160)
Sony Hi-Res (320x320)
Sony Hi-Res+ (320x480)
Palm Hi-Res (320x320)
Palm Hi-Res (320x480)
Resolutions NOT YET Supported
Handera Hi-Res (240x320)
Palm Hi-Res Landscape (320x480)
Tapwave Full Screen (480x320)
Tapwave (320x320)
(Note: This is as of version 1.0 - See changelogs for additional resolutions now supported)
Tungsten T3 Dynamic Input Area Support
In order to take advantage of the Tungsten T3's ability to minimize, maximize, and rotate the
display, you must install two additional .prc files onto your Palm Powered™ handheld.
*Note: If you've already installed these files for use with another application, you
do not need to and should not try to install them again.
You may be asking yourself why do you need these additional PRC files? The reason is that
the Tungsten T3 has a retractable "virtual" Graffiti® area that allows applications to use the
full 320x480 pixel screen. The Palm OS® standard for accessing this area was still being
defined when the Tungsten T3 first shipped, so PalmSource included non-standard support for
this feature. A Tungsten T3 right out of the box doesn't have full, standard support for the
retractable Graffiti® area.
While it may be possible that future Tungsten T3 devices will ship with these updated files
already installed, if you do want to take advantage of these new feautures on your eBible™ for
Palm OS® software, you will need to follow the below instructions. *Note: These PRC addon files are ONLY for Tungsten T3 devices.
1. Locate the "T3" directory on your eBible™ for Palm OS® CD-ROM located in the
AutoPlay folder (see Figure 44)
2. Download the PRC files to your Tungsten T3 by first double-clicking on each of the
files and then doing a HotSync® to install them onto your handheld.
*Note: Make sure to install both of these files together - installing them separately
might cause a hard reset!
- 20 -
Figure 44: T3 Folder of eBible™ for Palm OS® CD-ROM
Downloading Add-on Titles
While your eBible™ for Palm OS® software comes with a good selection of content, including
Bible translations, dictionaries, commentaries, lexicons, etc., there are a great deal of add-on
titles to greatly expand your eBible™ for Palm OS® software.
To view the list of available add-on titles, please visit www.eBibleforPalm.com and click
on “Add-On titles”. You will be able to choose from a large library of available content,
including Bibles, Commentaries, Devotionals, Topicals, Dictionaries, etc.
Your eBibleforPalm.com Account
If you have registered your eBible™ for Palm OS® software, you already have a customer
account at www.eBibleforPalm.com. This account is important to memorize, as it contains
your personal information, address, e-mail address, etc. In the event that your personal
information changes, you can login to your account and make the necessary changes.
To make changes to your eBibleforPalm account, please go to www.eBibleforPalm.com and
click on “Sign In” (on the left-hand side of the screen).
You will then see a screen that will allow you to login to your account. You will need to use
the login and password that you selected when you first registered your software.
Figure 45: eBibleforPalm.com login screen
- 21 -
If you have forgotten your password, you will need to enter your Login, and then select the
radio button option to “Please E-mail Me My Password” (see Figure 45). Clicking this will
generate an e-mail to the account that you provided when you registered.
Once you have logged in to your account, you will notice that the main eBibleforPalm.com
screen welcomes you to the site with a “Welcome back,” and then your name. By clicking on
the “Welcome back” message, you are able to view and edit your account information.
eShelf
Your eShelf account will be the account that stores all of your add-on titles that you have
purchased. Your eShelf account is different from your main eBibleforPalm.com account;
however, we highly encourage you to use the same user name and password for both for
simplicity sake.
Your eShelf is a virtual library of your add-on purchases and provides customers with many
benefits, including the ability to re-download titles if you have either accidentally or
intentionally deleted them from your Palm Powered™ handheld.
The first time you purchase any add-on titles for your eBible™ for Palm OS® software from
www.eBibleforPalm.com, you will be prompted to create an eShelf account. Again, it will be
very important for you to remember your username and password, as you will be unable to
login to your eShelf without them.
*Note: It is recommended that you select the same username and password that you
selected in setting up your eBibleforPalm.com account.
After your initial set-up of your eShelf, you can access it at any time by clicking on the eShelf
login (on the upper right-hand corner of the www.eBibleforPalm.com screen).
You will then be prompted to Login with your username and password that you used to setup your eShelf with initially (when you first purchased something from the
eBibleforPalm.com site. See Figure 46: eShelf Login Screen).
Please Login to Your eShelf
username:
password:
Submit
Forgot your login?
Figure 46: eShelf Login Screen
If you have forgotten your login, you can click the “Forgot your login” below the “Submit”
button on the eShelf login screen.
The “Forgot your password?” screen will then direct you to enter the e-mail address that you
registered with. Click the “Remind me!” button and your e-mail address will be e-mailed to
you.
- 22 -
Forgot your password?
Please enter the e-mail you registered with, and your
username and password will be e-mailed to you.
E-mail address:
Remind me!
Figure 47: eShelf Forgotten Password Screen
Once you’ve successfully logged in to your eShelf, you should be able to view all of the addon titles that you have purchased. You can re-download them by clicking on the title of the
file. Clicking on any of the titles will launch a new download window.
If you would like to “Save” the file to a particular location, choose “Save” and select a
download location that you will remember. A recommended folder to save your add-on titles
to would be: C:\Program Files\eBible for PalmOS\Content
If you would like to open your download directly for that content to be added to your
HotSync list on your next synchronization, then click “Open”.
Figure 48: Palm File Add Screen
- 23 -
Figure 49: Palm Quick Install Screen
Technical Support
Visit our Customer Service Web site at http://www.bibletoolbox.com/support
for:
•
Updated documentation
•
Searchable Knowledgebase
•
User forum
•
eBible™ for Palm OS® software updates
* Please consult your Getting Started, User Manual, and the online knowledgebase
before contacting our technical support department.
Web Support:
http://www.bibletoolbox.com/support
E-mail support:
[email protected]
Phone Support:
(403) 920-4440
[Monday - Friday, 10 A.M. to 5 P.M. MST]
We aim to respond to all inquires within 2 business days.
- 24 -