1
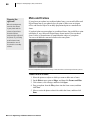
10 Saving and Printing Pictures
95
Saving Pictures
If you’re like most people, you can’t bear to throw photos away, even if they’re
imperfect. You probably have a large box or two filled with envelopes of old
negatives and photographic prints. Keeping track of all of your old prints and
negatives can be a formidable task.
Fortunately, digital photography makes saving, storing, and organising photos
much easier. However, there are some important things you should know about
saving your photos to make sure they’ll be in good condition whenever you
want to enjoy them.
Saving Multiple Versions
Once you’ve imported a photo from your camera to your computer and erased
it from your camera, your computer’s hard disk contains the only copy of that
photo. This original version should be treated like a film negative: You don’t
want to do anything to it that will alter the original content. Except rotation
to correct orientation or renaming the file, the original version should be left
alone.
When you want to edit a photo or add it to a project, you should always save
a copy of the original and work with the copy. That way, if you make some
editing changes that you regret later, you can always go back to the original,
make a new copy, and start over.
To make a copy of a picture:
1. Open the picture.
2. On the File menu, click Save As.
The Save As dialog box opens.
3. Click the folder where you want to save the copy of the original.
4. In the File name box, enter a name for the copy.
5. Click Save.
The Save As dialog box closes, with the new copy of the picture open in
the workspace.
Microsoft® Digital Image 2006 Suite Edition User’s Manual