1
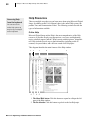
4
Chapter 1: Installation
Completing the Installation Wizard
The Installation Wizard will show you a series of dialog boxes that provide
setup status and some installation preference options. For most users, the
default preferences will be appropriate. Information about the different setup
options is provided below.
Installation Folder Dialog Box
The Installation Folder dialog box allows you to choose where the program will
be installed on your computer. To install the program to a folder other than the
folder in the Installation folder box, do one of the following:
• Type a different path in the Installation Folder box.
• Click Change, select a folder in the Change Installation Folder dialog
box, and then click OK.
Note that some files will be installed to the Program Files drive even if you
choose to install the program to a different drive.
Installation Options Dialog Box
The Installation Options dialog box allows you to choose between Typical
installation and Full installation.
• Typical installation takes up less space on your hard drive, and is
recommended for most users. With Typical installation, you will have
to insert the Microsoft Digital Image CD in your CD-ROM drive to use
some of the projects and clip art while you are using the program.
• Full installation copies all of the Microsoft Digital Image projects and
clip art to your hard drive, so you will not have to reinsert a Microsoft
Digital Image CD while you are using the program. Look under
Description for the disk space required for this option.
Microsoft® Digital Image 2006 Suite Edition User’s Manual