1
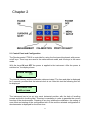
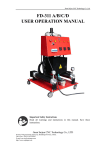
Brake tester – decelerometer CT3010
CAR-TECH
USER’S GUIDE
Version 8.++
Index
Chapter 1
- Application and measurements
- Specifications
- Decelerometer accessories and options
- Principle of measurement
- Report printing
1.1
1.2
1.3
1.4
1.5
Chapter 2
- Control Panel and Configuration
- Configuration
- Calibration, Measurements and Printing
- Menu Selection
- Data Clearing
- Recording Interval
- The six possibilities to start the measurement
- Threshold
- Display Contrast
- Backlight
- Time and Date
- Header of the report
- Filter
- Basic Menu Settings
- Connection to a PC
- Stability of the Measurement
2.1
2.2
2.3
2.4
2.4.0
2.4.1
2.4.2
2.4.3
2.4.4
2.4.5
2.4.6
2.4.7
2.4.8
2.4.9
2.5
2.6
Chapter 3
- Service and Maintenance
- Battery Charging
- Replacement of paper and ink ribbon
3.1
3.2
3.3
2
Glossary
Application
Fast check up of brake systems of the traffic vehicles intended for:
• stations for the technical inspections of cars
• car repair shops
• car owners
• the benefit of judicial experts and police
Type:
Portable Decelerometer set with built-in printer, LCD display and keyboard, including
the software for PC Windows. Optional connection of force sensor or pressure
sensor.
Measured quantities:
The measurement of the overall brake deceleration and its dependence on the
controlling force applied to the brake pedal or its dependence on the air pressure in
the air pressure brakes. The results of measurements are graphs of the time
dependencies and the numerical calculated average value of the overall
deceleration
Specifications:
Maximal braking deceleration ... 20 m/s2
Controlling force applied to the brake pedal ... up to 1000 N
Air pressure in the air pressure brake.... up to 1 MPa
Hydro pressure in the oil pressure brake.... up to 20 MPa (option)
Weight... up to 8T (option)
Sampling rate 1..50s for CT3010
Sampling rate 5..300s for CT3010XL
Printing
• graph with numerical values
• date and time of measurements
• company headings
• two lines of measurement confirmation
Power supply
• build in NiMH rechargeable battery. Charging from AC adapter.
Measured data memory
• storage of 128 measurements. Possibility of printing any of the stored
measurements.
3
Decelerometer CT 3010 accessories
• force sensor for the measurement of the force applied to the brake pedal
• pressure sensor for the air pressure measurement in the air pressure brake
• AC adapter for charging of the NiMH battery
• external start button
• interface cable for connection to PC computer
• Software Program for Windows
• User’s manual
• Carrying Case
4
Chapter 1
1.1 Application and measurements
Decelerometer is used for the measurement of the overall brake deceleration of the
traffic vehicles. The value of deceleration is measured, as well as its dependence on the
controlling force applied to the brake pedal or its dependence on the air pressure in the
air pressure brakes. The results of measurements are: graphical records time related,
the numerical calculated average value of overall deceleration and the average value of
control force or the average value of air pressure.
The following three options can be ordered:
- Decelerometer only
- Decelerometer with external sensor for controlling force applied to the brake pedal
- Decelerometer with external sensor for air pressure in the air pressure brake system
The measurement of the controlling force applied to the brake pedal and the
measurement of the air pressure in the air pressure brake is possible only with the
external force sensor or with the external pressure sensor. After the required sensor is
connected, the decelerometer will configure automatically. The external sensors are
supplied as accessories.
External sensors from different decelerometers are not exchangeable without the
manufacturer’s calibration.
The measurement is very easy. The instrument must be placed into the vehicle in such
a way, that the arrow on the instrument coincides with the direction of travel. With the
help of levelling screws and built-in levelling libel the instrument is adjusted into exact
horizontal position. After switching-on, the display leads through the instructions. When
the calibration is finished, the vehicle can be set into the motion. The measurement is
started by pressing the starting button. Than the vehicle is slowed-down until stop by its
braking system. The wheels are not allowed to blocked. The maximal values appear at
the display and the detailed report is printed. The results of measurements will remain in
the internal memory as long as the power is switched-on.
1.2 Specifications
Design and specifications of the decelerometer are based on the regulation of Ministry
of transport,“ About regular technical inspections and emission measurements of the
road-bound vehicles “ No 103/1995 Sb/CZ.
Measurement Ranges:
- Braking deceleration 0 - 20 ms-2
- Controlling force applied to the brake pedal 0 - 1000 N
- Air pressure in the air pressure brake 0 - 1 MPa
Accuracy of the measurements:
- braking deceleration +/- 3 %
- controlling force applied to the brake pedal +/- 35 N
- air pressure in the air pressure brake +/- 25 kPa
5
Printing :
- Company headings
- Date and time
- Graphical expression with numerical values
- Two lines containing the confirmation of measurement
- Additional information about decelerometer configuration
Power supply:
- build in NiMH rechargeable battery, charging from AC adapter
Measured flash data memory:
- Memory for up to 128 measurements. Printing of any stored measurement
Features:
- Two line LCD display with back light
- Keypad with 9 keys
- Built-in matrix printer
- Possible connection to PC with control and evaluation program
1.3 Decelerometer accessories and options
The decelerometer consists of measuring instrument itself, set of options and
accessories which facilitate the measurements:
- Decelerometer CT3010
- Pressure sensor 1MPa with a cable
- Force sensor 1000N with a cable
- External start button
- AC adapter for NiMH battery
- interface cable for connection to PC computer
- Diskette with program for PC (Windows)
- Extra paper for the printer
- Users manual
- Carrying Case
Option (extra order)
- Pressure hydro 20MPa sensor with cable
- Weight sensor 8T with cable
Use the pressure sensor or the force sensor, depending on the application. The
interface cable to PC computer may be connected. The decelerometer may be
configured and used as stand alone or the measured data may be transferred to the
PC. With the help of external start button the measurement can be initiated by the driver
of the vehicle.
6
1.4 The principle of measurement
The measurement is based on simultaneous recording of vehicle brake deceleration
and the controlling force applied to the brake pedal, or recording of the vehicle
deceleration and the air pressure in the air pressure braking system. All data are stored
in the internal memory after the button Start has been applied. The measurement of the
deceleration, the controlling force applied to the brake pedal and the air pressure in the
air pressure brake is realised with the build-in deceleration sensor, the force sensor or
the pressure sensor. At the end of the measurement the maximal values are shown at
the display. A detailed report is printed. During the printing the average value of the
overall deceleration, the average value of control force or the average value of the air
pressure is calculated.
At the beginning of the measurement, the recording interval has to be set. The range of
setting is from 1 to 50 seconds (5 to 300 seconds for CT3010XL). An averaging filter is
available with a filtering constant from 0 (no filter) to 10 (long time constant).
There are more possibilities to start the measurement and the recording:
Starting button MEAS
External starting button
Setting the threshold value
or combination of the these above.
The recording clearly shows whether the measured smallest average value of the
overall deceleration is as prescribed, and whether the controlling force applied to the
brake pedal or the air pressure have achieved the required values.
The results of measurements (up to 128 data sets) will be stored in its flash memory
and may be printed. With the help of the supplied program, the records may be
transferred to the PC.
After each measurement the hydro sensor or the weight sensor can be connected and
used. Press the button MEAS again. After the display shows steady reading, press
MEAS again. The pressure or weight measurement are stored.
7
1.5 Report printing
When all measurements are stored in the memory, the report can be printed. The
record contains the company’s head (can be disabled), time and date, and the
measured values versus time. The maximum deceleration value and the duration of
measurements will be printed as well. After entering the time interval, in which the
average values have to be calculated, the average value of overall deceleration and the
average value of the force or the air pressure will be calculated and printed.
If hydro sensor or weight sensor is used, their results will be printed as well. Two lines
of text are added to the printed report, containing the identification of vehicles and
confirmation of the measurement.
The printing on the 57.5mm wide paper is done with ink. This guarantee long lasting
quality. The printing of one report takes about 15 seconds. The report may be printed
several times, but the selected interval in which the average values have to be
calculated must be entered all the time. The reports of previous measurements may be
printed more times as well.
8
Chapter 2
2.1 Control Panel and Configuration
The Decelerometer CT3010 is controlled by using the front panel keyboard, with poweron/off keys. Three keys are used in the measurement mode, and four keys in the menu
mode.
With the keys ON and OFF the power is applied to the instrument. After the power is
switched on, the display shows
Brake tester
***
eter
The internal memory and the calibration data are tested. The time and date is displayed
for 3 seconds, provided that the internal clock is set. After this test the following text will
be displayed
Horizont set
with screw
The instrument has to be set into exact horizontal position with the help of levelling
screws and built-in levelling libel. This step is mandatory in order to garantee the correct
function of the decelerometer. Pressing of any key initiates the calibration, the setting of
zero offset and starting of the configuration test. At the end the selected configuration of
decelerometer is displayed for the short time.
9
Decelerometer only:
Deceleromete
r
Decelerometer and external force sensor:
Deceleromete
r
Force sensor
Decelerometer and external pressure sensor:
Deceleromete
r
Pressure
The instrument requests for switching into the measuring or the menu mode.
Select
funct
ion
Selection by MEAS or MENU. When a measurement has already been done, this
information appears, e.g. with decelerometer only:
Measure N. 1
Max 9.8 m/s2
Decelerometer and external force sensor:
Measure N. 1
9.8 m/s2 500N
Decelerometer and external pressure sensor:
Measure N. 1
9.8 m/s2
300kPa
10
2.2 Configuration
By pressing the appropriate keys in the mode measurement, the measurement, the
calibration or the printing can be started, or the previous measurement can be
displayed. By pressing MENU the menu mode is initiated, which is described in detail in
the paragraph 2.4.
2.3 Calibration, Measurements and Printing.
In the measuring mode the instrument measures, calibrates or prints the data. Any of
these activities may be selected by depressing one of the keys MEAS, CAL or PRN.
After pressing CAL the offsets of the deceleration sensor, the force sensor or the
pressure sensor are set for zero reference values.
Calibr.,offset
wait ….
When MEAS is pressed, the mode changes into measurement. The decelerometer
waits for some time until the conditions for the correct measurements are fulfilled. This
time delay depends on the decelerometer configuration, on the set threshold and on the
way how the measurement will be started. As soon as these conditions are met, the
measurement starts and the results are recorded during the time interval set in the
mode menu. The values of deceleration, force or pressure are calculated. The
measured data are filtered in accordance with the filter setting. At the end of
measurement the maximal values of deceleration, force or pressure are displayed, as
well as the serial number of the measurement.
After pressing PRN, the paper from the printer is advanced. When pressed longer, the
data is printed as a graph.
Papier eject
or printing
After this text the print can be selected
For printing
Push button
11
After the graph is finished, the average values of overall deceleration, force or pressure
will be printed. The beginning and the end of the time interval, in which the average
values have to be calculated, must be entered with help of up and down keys. The
interval has to be selected in which the deceleration is steady, nearly constant.
start 0.8 s
value 6.0m/s2
The selected values have to be confirmed by pressing the right arrow cursor. The
beginning of the interval is determined first. The end of the interval has to be confirmed
afterwards.
end 2.5 s
value 3.4m/s2
The average values of measured parameters are calculated within this interval only.
Afterwards the second part of the report is printed.
When MEAS is pressed again, the new measurement is initiated. The previous
measurements are not deleted, but stored in the memory. Up to 128 measurements can
be stored. By using the down arrow key the previous measurement can be called. With
the up arrow key the next measurement can be started. The serial numbers of the
selected measurements are displayed. With 14 measurements the capacity of the
memory is exhausted. Next measurements may be done as described in 2.4.0.
2.4 Menu Selection
By pressing MENU the instrument enters the menu mode. This mode is for setting of
the time interval, the recording, the starting way of the measurement, setting of the
threshold, the display contrast, the backlight, the time and the date, the texts of the
head, the transfer rate and the filter. The up and the down arrow and the right arrow
keys will be used. By pressing MEAS the measuring mode is initiated (see 2.3).
12
2.4.0 Data Clearing
After pressing MENU following text appears:
Data clearing
N
hh:mm:ss
After pressing right arrow the measured data N (1..128) at time hh:mm:ss and date
dd.mm will be deleted. All records 2..128 are shifted to 1..127. After erasing all data the
following text will be displayed:
*** No data **
************
All data can be deleted at the same time when the key right arrow is pressed for a
longer time.
All clearing
push button
Display blinking. After 10 seconds all data are erased.
When PRN is pressed, the paper is ejected from the printer. When pressed longer, the
list of all measured stored is printed.
2.4.1 Recording Interval
After pressing MENU following text will be displayed
Sample
setting
Recording xx
With up arrow and down arrow the recording interval can be set from 1 to 50 seconds
(5 to 300 seconds for ct3010XL).
13
2.4.2 Six possibilities how to initiate the measurement
After pressing MENU one of the six possible ways of initiating the measurement can be
selected. The selection is with up or down arrow keys.
Start with the key MEAS
Start setting
Internal=M
Start with the external button
Start setting
External
button
Start when the deceleration threshold is higher then value set
Start setting
Decel.thresho
ld
Start when the force/pressure threshold is higher then value set
Start setting
Thres.frce/pre
ss
Start with external button and the deceleration threshold higher then the value set
Start setting
Butt.+decel.
Start with external button and force/pressure threshold higher then the value set
Start setting
Butt.+frce/pr.
14
2.4.3 Threshold
After pressing MENU the display will show:
Threshold set
Value xx %
By using the up and down arrows the threshold can be set in % from the upper limit XX.
The upper limit of deceleration is 20 m/s 2, for the force 1000N and for the pressure
1MPa. The limit of deceleration, force or pressure will be selected in accordance with
the configuration of the decelerometer (see 1.1)
2.4.4 Display Contrast
After pressing MENU the display will show:
Contrast sel
Higher - lower
Set the required contrast with up and down arrows.
2.4.5 Backlight
After pressing MENU the display will show:
Backgr. light
On - Off
Set the required light with up and down arrows.
15
2.4.6 Time and Date
After pressing MENU the display will show:
Time hh:mm:ss
dd.mm.yyyy
Point to the value to be changed with the right arrow cursor (flashing). With up and
down arrows set the value.
2.4.7 Header of the Report
After pressing MENU the display will show:
Line 1:
Text in the line
1
Decelerometer
The text is a factory default. Each line contains three parts. The bottom line contains
one third of the text which is going to be printed. The text can be changed with the
cursor keys or from PC by using the SW program enclosed. The exclamation mark at
the first position on the line prevents the printing of the text. The letter being set is
flashing. The cursor can be moved to the right only. After the first part of the first line is
displayed, the entry of the second part of the first text line and then the third part of the
first line can be performed. After the third part of the line is entered, the cursor will return
to the first position of the line. The following three lines will be set similarly. By pressing
MENU the next line will be enabled for entry.
Line 2:
Text in the line
2
Orbit Controls
Line 3:
Text in the line
3
Zurcherstrasse
Line 4:
Text in the line
4
Manufacture
16
2.4.8 Filter
After pressing MENU the display will show:
Setting of
filter
Multiplicity :
By pressing up or down arrow the filter constant can be set. The range is from 1 to 10.
2.4.9 Basic Menu Settings.
The factory default settings is suitable for most general applications.
Recording interval 5 s
Initialising the measurement with the deceleration threshold
Threshold value 20 %
Display contrast higher
Background lighting yes
Time and Date set in the factory
Header of the report set in the factory
Auto switched on
Filter multiplicity 1
After the setting the decelerometer can be placed into the vehicle, switched-on and
leveled into the horizontal position. The vehicle can be moved to the required speed
and the key MEAS pressed. When the vehicle stops due to the function of its own
braking system, the report of the measurements will be printed. The recording time is 5
sec. The measurements will start at the beginning of the braking action.
17
2.5 Connection to a PC
The software program for Windows is enclosed to each decelerometer. The program
starts by clicking on the icon CT3010.
The communication with a PC is via the serial data port
RS232. When only the recently stored data are
processed and the decelerometer shall not be
reconfigured, the connection to the PC is not required.
The communication between the decelerometer and the
PC is only in the measurement mode. It is not possible to connect the decelerometer
to the PC while performing the measurement.
2.6 Stability of the Measurement
The error free measurements are guaranteed for the ambient temperature 0 oC to 30 oC.
The electronics, the deceleration sensor and the external sensors are factory calibrated.
The accuracy described in 1.2 is guaranteed.
The factory calibration constants are stored in the memory and are checked every time,
when the power is turned on. When the stored parameters change, the display informs
about the necessity of urgent recalibration. The decelerometer with all accessories has
to be returned to the factory for recalibration.
18
Chapter 3
3.1 Service and Maintenance
The paper and the ribbon of the printer have to be replaced when necessary. The
battery has to be charged with the enclosed battery charger (9V, 1.2A) in regular
intervals. The printer is prone to dust environments.
All repairs of the decelerometer should be performed by the manufacturer.
3.2 Battery Charging
When the message "Warning! It is time to charge the accumulator" is displayed, the
battery has to be charged. When the battery voltage is bellow a certain limit, the
backlight of the display is automatically switched off. When the instrument is not used
for a longer time, the battery has to be fully charged. It is recommended to charge the
battery one in a month.
The battery has to be charged only when the decelerometer is switched off,
otherwise the instrument could be damaged. Do not use the decelerometer
switched-on with the battery charger connected.
The green LED flashes during the battery is being charged. When the battery is fully
charged, the LED lights continuously. The charging time is approx. 3 hours. The
electronic prevents overcharging of the battery. The battery life expectation is about
1000 charging cycles. Charge the battery at the room temperature.
The charging level may roughly be checked by pressing the right arrow cursor key at
the time, when the display prompts to select the measurement or menu mode. When
the key is pressed for longer time, the display shows the battery voltage. The fully
charged battery shows 5.6 Volts.
3.3 Replacement of paper and ink ribbon.
The paper can be replaced after the printer cover with label has been opened. The
paper width is 57.5mm. When PRN is pressed, the paper is advanced into the printer.
The proper function of the printer can be checked by pressing PRN for longer time. The
head of the Report will be printed. It is recommended to use the wood free paper
supplied by the manufacturer of the decelerometer. Otherwise the printing matrix might
be damaged.
The ink ribbon can be replaced after the paper has been removed from the printer. The
cartridge will be shifted sideward by pressing at the point PUSH. The new cartridge can
be inserted and the ribbon tightened by the notched wheel on the left side.
Last update: 14 / 6 / 2010
19