1
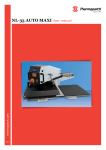
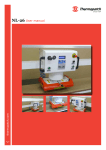
NL-27 User manual ATTENTION! All persons involved in installation, commissioning, operation, maintenance and repair of this product should be made available to these instructions. ENG V.1.2 Feb. 2014 Copyrights thermopatch.com © 2014, Thermopatch bv, Almere, The Netherlands. No part of this publication may be reproduced by any means without the prior written permission of Thermopatch bv, The Netherlands. Thermopatch and the Thermopatch logo, Thermoseal and Thermocrest are registered trademarks of Thermopatch. ENG V.1.2 Feb. 2014 Manual NL-27 V.1.2 ENG QC/TDPT/mn-fh February 2014 2 Introduction Dear User, Welcome to the growing group of Thermopatch users. Your purchase has been manufactured with the utmost care to ensure that you benefit as long as possible from your Thermopatch product. The products by Thermopatch are designed with special attention to your convenience. Should you discover any fault or damage upon receipt of this product, please contact your local Thermopatch vendor. ATTENTION! thermopatch.com In order to make safe and optimal use of the NL-27, it is important to take note of and understand the contents of this manual. ENG V.1.2 Feb. 2014 Manual NL-27 V.1.2 ENG QC/TDPT/mn-fh February 2014 3 Contents thermopatch.com Copyrights Introduction Contents DECLARATION OF CONFORMITY 1. General description 1.1 Delivery 1.2 Conditions of warranty 2. Intended use 3. Technical specifications 3.1 Specifications of the NL-27 4. Overview of safety measures and warnings 4.1 Safety 5. Transport and storage 5.1 Transport 6. Operating instruction 7. Installation 7.1 Installation of the NL-27 8. Maintenance instructions 8.1 Daily maintenance 9. Technical annexes Image 01 NL-27 Drawing 02 Electrical wiring diagram 10. Faults 11. End of life ENG V.1.2 Feb. 2014 Manual NL-27 V.1.2 ENG QC/TDPT/mn-fh February 2014 4 2 3 4 5 6 6 6 7 8 8 9 9 9 10 10 11 13 13 14 14 15 15 16 17 18 DECLARATION OF CONFORMITY We, Thermopatch B.V. Draaibrugweg 14 1332 Almere The Netherlands herewith declare, on our own responsibility, that the machinery: Thermopatch Thermoseal NL-27 which this declaration refers to, is in accordance with the conditions of the following Directive(s): 2006/95/EG (Low voltage directive) 2004/108/EG (EMC directive) The Netherlands, Almere, 12-02-2014 thermopatch.com Jan Bausch, Director ENG V.1.2 Feb. 2014 Manual NL-27 V.1.2 ENG QC/TDPT/mn-fh February 2014 5 1. General description The NL-27 is a practical heat seal press for the application of textile labels, company emblems, repair patches, transfers. In short all Thermopatch materials for marking and repair can be easily and permanently pressed on all types of fabric. 1.1 Delivery The NL-27 is mounted onto a pallet, covered with a wooden box. The following articles can be found at: • NL-27 heat seal machine • Power cord • Quick installation guide • quality checklist • Manual on CD-ROM • CE Declaration of Conformity can be found in this manual If one of these articles should be missing or faulty, please contact your Thermopatch supplier. thermopatch.com 1.2 Conditions of warranty Thermopatch points to its warranty and product liability conditions as laid down in our conditions of sales. These can be obtained at your Thermopatch supplier. ENG V.1.2 Feb. 2014 Manual NL-27 V.1.2 ENG QC/TDPT/mn-fh February 2014 6 2. Intended use The pneumatic NL-27 is a heat seal machine that is especially intended for the application of heat sealable transfers. But all Thermopatch marking and mending materials can be applied with the NL-27. WARNING! thermopatch.com Any use other than described above can be dangerous and cause damage and thus qualifies as ‘misuse’ which excludes Thermopatch bv from any liability. ENG V.1.2 Feb. 2014 Manual NL-27 V.1.2 ENG QC/TDPT/mn-fh February 2014 7 3. Technical specifications 3.1 Specifications of the NL-27 thermopatch.com NL-27 Power Power supply Operating temperature Temperature range Press Time range Discharge pressure range Machine height (open) Machine width Machine depth Gross weight, including packaging Net weight Size sealing pads, round Fuses ENG V.1.2 Feb. 2014 Manual NL-27 V.1.2 ENG QC/TDPT/mn-fh February 2014 8 2500 Watts 230 Volt <250 °C 0 - 250 °C 0-9 min 59sec. 0 - 0.3 kg/cm² 460 mm 453 mm 753 mm 70 kg 40 kg 160 mm 2x T10AL-230V 4. Overview of safety measures and warnings 4.1 Safety No specific safety measures were provided for this machine. Warning symbols The following warning symbols have been mounted onto the machine for added safety: WARNING! Hot surface WARNING! Electric tension ATTENTION! Make sure you are informed about the contents of this manual before starting to work with the NL-27. This ensures an optimal and safe use of the machine. ATTENTION! Always turn the power off (unplug it) when you need to carry out maintenance work or when cleaning the machine. ATTENTION! thermopatch.com Take care that there is enough space around the machine. Cables and connections must not get pinched. Although the heat radiation of the press is low, there should be enough space for cooling down. ENG V.1.2 Feb. 2014 ATTENTION! Avoid contact with the press cover and the heating element. ATTENTION! Pull the fabrics tight around the press pad and ensure that your hands are away from the sealing pad before operating the machine. ATTENTION! Hold the handle while opening the machine after finishing the sealing cycle. The handle will come up forcefully when not guided manually. Manual NL-27 V.1.2 ENG QC/TDPT/mn-fh February 2014 9 5. Transport and storage 5.1 Transport When the machine needs to be moved, Thermopatch advises to use the original packaging. thermopatch.com 5.2 Storage When the machine needs to be stored, Thermopatch advises to use the original packaging. The machine should be stored on a pallet, off the floor, in dry conditions. ENG V.1.2 Feb. 2014 Manual NL-27 V.1.2 ENG QC/TDPT/mn-fh February 2014 10 6. Operating instruction 6.1 USAGE It is recommended to read carefully the “instruction manual” before you start any pressing operation. Before starting any heat sealing jobs, please take note of this manual. The heat seal press should be operated by a qualified person who has been informed of the risks of working with heat seal equipment. Be careful not to put irregular shaped, thick or sharp objects under the press, such as zippers, buttons, paperclips or staples. These will damage the teflon sheet protecting the heating element and the press cushion on the lower platen. 6.2 CONTROL PANEL UP Selection key LED Indicator Temp.° LED Indicator Time DOWN thermopatch.com POWER ON Switch the NL-27 on with the ON-OFF switch mounted on the back. After switching the machine on, the display shows the set temperature. TEMPERATURE SETTINGS Push the selection key twice (2x) for temperature setting (thermometer symbol) after which the LED indicator lights up. Push the Up (Arrow upward) key to increase the temperature. Push the Down (arrow downward) key to decrease the temperature. TIME SETTINGS Push the selection key once (1x) for setting the time (hourglass symbol) after which the LED indicator lights up. Push the Up (Arrow upward) key to increase the time. Push the Down (arrow downward) key to decrease the time. ENG V.1.2 Feb. 2014 Manual NL-27 V.1.2 ENG QC/TDPT/mn-fh February 2014 11 PRESSURE ADJUSTMENT The pressure is obtained by bringing the upper/hot plate to the lower/cold plate together. • Then unlock the knurled nut underneath the adjustment wheel. • Turn the wheel on top of the heating plate: • clockwise to increase the pressure • anticlockwise to decrease it • Tighten the knurled nut to lock the pressure setting. thermopatch.com HEAT SEALING TRANSFERS • Turn on the machine by switching the power button. • Adjust the desired temperature at 185°C (or depending on the type of transfer); See TEMPERATURE SETTINGS on page 11). • Adjust the time at 12 Sec (or depending on the type of transfer); See TIME SETTINGS on page 11). • Adjust the pressure (depending on the type of transfer); See PRESSURE ADJUSTMENT on page 12 (above). • Place the item, for instance a T-shirt, on the lower/cold plate. • Add your transfer on top of it, glue side downwards on the textile. • Lower the heating plate using the handle (once the plate has reached the desired temperature). • When the plate is in contact with the T-shirt, the timer starts. • At the end of the countdown, the buzzer will ring. • Pull the heating plate up (support the heating plate by the handle until fully risen). • Take the item off the press and peel the carrier off of the transfer after cooling down for a while. • Re-seal when necessary, with the peeled off carrier replaced loose on top of the transfer. ENG V.1.2 Feb. 2014 Manual NL-27 V.1.2 ENG QC/TDPT/mn-fh February 2014 12 7. Installation 7.1 Installation of the NL-27 Unpack the machine from the box and install it safely on a suitable work table. To move the press, make sure it is cold and handle it by grabbing both plates (upper and lower) at the same time (machine closed) for lifting the machine. WARNING! Do not lift or transport the machine by the operating handle. This will damage the machine and due to the force by the spring controlled handle, injuries may occur. Remove the bolt labelled « Transport security » before opening the press. Take care that there is enough free space around the machine. Also take care that there are no items near the machine that are sensitive to heat radiation. thermopatch.com 7.2 Electrical requirements Plug the machine electrically (230 Volt, earthed, 50 or 60 Hertz) into a suitbable wall socket into the mains. ENG V.1.2 Feb. 2014 Manual NL-27 V.1.2 ENG QC/TDPT/mn-fh February 2014 13 8. Maintenance instructions 8.1 Daily maintenance Daily: Clean the teflon cover of the heating plate with a dry cloth. Depending on use: • Change the silicon rubber as soon as it is damaged or if it has lost its properties. • Grease the axels of the machine every 6 months 8.2 Parts for regular replacement for maintenance: Description Qty SPA27-001 Electronic Card 1 SPA27-002 Micro Switch with Tongue 1 SPA27-003 Bipolar Relay 25 Amp 1 SPA27-004 Main Switch + Power cord connector 1 SPA27-005 Heat Element Mica 2500 W, 400 x 500 mm 1 SPA27-006 Gas spring for NL27 1 SPA27-007 Teflon cover for heating element, 400 x 500 mm 1 SPA27-008 Silicone rubber 400 x 500 mm 1 SPA27-009 Fuse T10Amp 20 x 5 mm 1 thermopatch.com Article Number ENG V.1.2 Feb. 2014 Manual NL-27 V.1.2 ENG QC/TDPT/mn-fh February 2014 14 9. Technical annexes Image 01 NL-27 Press handle Electromagnet Pressure adjustment wheel Control panel Heating plate Teflon cover sheet Power entry and On/Off switch thermopatch.com Silicone rubber cushion Lower platen ENG V.1.2 Feb. 2014 Manual NL-27 V.1.2 ENG QC/TDPT/mn-fh February 2014 15 Drawing 02 Electrical wiring diagram sonde temperature relais om5 Electromagnet thermopatch.com Combi switch 220V / F-16A Thermopatch b.v. Draaibrugweg 14 1332 AD Almere ELECTRICAL WIRING DIAGRAM NL-27 ENG V.1.2 Feb. 2014 Manual NL-27 V.1.2 ENG QC/TDPT/mn-fh February 2014 16 10. Faults If a problem should occur, please consult the list below; if the problem you are facing cannot be solved by yourselves contact your supplier. WARNING! All repair and maintenance operations should be done when the machine is turned off and unplugged from the main electric power supply. The heating element can cause burns. The user must ensure the temperature is below 25°C on the display, before any intervention. Fault Heating plate does not heat up. Possible cause Solutions 1. One or both fuses are out of 1. When the display does not light order up after switching on the NL-27, check the fuses en replace if necessary. The fuse is located in the power entry, on the back of the machine. 2. The relay is damaged 2. Check and replace when necessary. 3. Sensor out of order and / or 3. Replace the sensor regulator displays ER1 Heating plate overheats 1. The relay is stuck 2. The card is damaged 1. Replace the relay 2. Replace the card 1. The microswitch is not acti- 1. Correct by ensuring that the levated ver of the microswitch touches the press arm. The buzzer sounds continuously 1. The microswitch is stuck thermopatch.com Timer does not start ENG V.1.2 Feb. 2014 Manual NL-27 V.1.2 ENG QC/TDPT/mn-fh February 2014 17 1. loosen the microswitch or replace it. 11. End of life Choose to dispose of the machine responsibly when it has reached its end of life. Electrical machinery, accessories and packaging should be recycled as much as possible in an environmentally responsible manner. - Dismantle the machine groups: steel parts components / electrical components - These can be separated and returned for recycling. ATTENTION! thermopatch.com Always dispose according to current and locally applied guidelines for health and safety and disposal requirements. ENG V.1.2 Feb. 2014 Manual NL-27 V.1.2 ENG QC/TDPT/mn-fh February 2014 18 thermopatch.com Thermopatch Thermopatch Thermopatch Thermopatch Corporate Headquarters European Headquarters Australia Pty Ltd Canada Inc USA The Netherlands Australia Canada T T T T +1 315 446-8110 +31 36 549 11 11 +61 395325722 +1 519 748-5027 F F F F +1 315 +31 36 +386 2 +1 519 445-8046 532 03 98 80 55 232 748-1543 [email protected] [email protected] [email protected] [email protected] Concept Feb2014