1
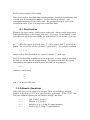
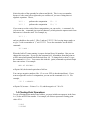
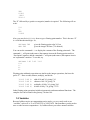
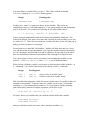
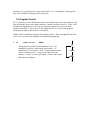
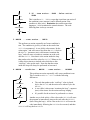
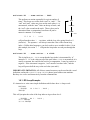
1. PROCEDURAL PROGRAMMING
The Finite State Machine portions of IsoMax™ are now covered. What remains to be
discussed is the procedural portions of the conditions and actions.
The IsoMax procedural language is very similar to the programming language Forth.
There are some significant changes because of the Finite State Machine functions, the
Object-Oriented functions, and the architecture of the IsoPod™ processor (which has
separate data and program memories, and can’t address memory as bytes). But if you are
familiar with Forth, and particularly Max-Forth, you can skip most of this section.
1.1. The Dictionary
All of the commands and operations known to IsoMax are kept in a “dictionary.” You
will frequently hear these commands and operations called “words,” because they are the
words in the IsoMax language. In fact, you can print out a list of all the words known to
IsoMax with the command
WORDS
This just prints a list of the words. Their definitions are much longer! You can find short
definitions for all these words in section 18 of this manual (IsoMax Glossary).
Possible point of confusion: Don’t confuse a “word” in the language, with a “word” of
memory. A memory word (on the IsoPod™) is 16 bits of storage. A word of the
language can be any symbol made of non-blank characters. When there is risk of
confusion, we will generally refer to 16 bits of storage as a “cell” of memory.
1.2. The Stacks
Numbers, addresses, and data which is being operated upon are normally held on stacks.
Like the name implies, when you put something on a stack, it becomes the topmost item
on the stack, and everything that was already on the stack is effectively “pushed down”
one deeper. Likewise, when you take something off the top of the stack, the stuff
underneath it “pops up” one position, and what was the second item on the stack becomes
the new top item on the stack.
For the most part, the operation of stacks is invisible and automatic. One visible effect
(which will be familiar to owners of Hewlett-Packard calculators) is that arithmetic
operations require you to place the two operands on the stack first, and then specify the
operation to be performed. In other words, instead of saying
2 + 3
in IsoMax you would say
2 3 +
We’ll see more examples of this shortly.
There is one stack for fixed-point data (including integers, characters, and addresses), and
a second stack for floating-point numbers. You don’t need to specify this – each
operation automatically uses the correct stack. But you might need to be aware of the
two different stacks, if you’re moving values to and from them.
1.2.1. Stack Notation
Whenever you type a number, IsoMax puts it on the stack. (Integers on the integer stack,
floating-point numbers on the floating-point stack.) If you type a second number, it gets
put on the stack and the previous number gets pushed down. So, for instance, if you type
1 2 3
the “3” will be the topmost item on the stack, “2” will be under it, and “1” will be on the
bottom. You can see this with the command .S (“print stack”). Try typing the command
1 2 3 .S
and you will see how the numbers are “stacked” (with the “3” on the top).
When we are describing parameters to be put on the stack, or values which are placed on
the stack, we will use this left-to-right notation. The rightmost item in the description
corresponds to the topmost item on the stack. So when you see parameters
a b c
you know it really means
c
b
a
with “c” on the top of the stack.
1.3. Arithmetic Operations
Most of the time you’ll be using 16-bit integers. These can be treated as unsigned
numbers, in the range 0..65535, or as signed numbers, in the range –32768..+32767. The
four basic arithmetic operators are add, subtract, multiply, and divide:
10
10
10
10
2
2
2
2
+
*
/
adds 10 and 2, giving 12
subtracts 10-2, giving 8
multiplies 10 by 2, giving 20 (signed numbers)
divides 10 by 2, giving 5 (signed numbers)
Notice the order of the operands for subtract and divide. This is easy to remember,
because it’s the same left-to-right order you would use if you were writing these as
algebraic equations. That is,
10 2 10 2 /
performs the computation
performs the computation
10 – 2
10 / 2
If you want to see the result of these computations, you can use the .S command. Or,
you can use the . command (just a period character), which prints the topmost stack item
and removes it from the stack. For example, try
10 3 / .
and you should see the result 3. Why 3 and not 3.33333? We’re using integer math, so
we get “3 with a remainder of 1,” not 3.33333. To see the remainder. use the MOD
command:
10 3 MOD .
When the IsoPod™ starts running, it expects decimal (base 10) numbers. But you can
change this at any time. If you type the command HEX, all numbers from that point on
will be entered and printed in hexadecimal (base 16). To change back to base 10, type
the command DECIMAL. You can use this with the . (print) command to perform simple
base conversions. For example:
HEX A0 DECIMAL .
will print 160, the decimal equivalent of A0 hex.
You can type negative numbers, like –12 or even –FFF (in hexadecimal base). If you
want to negate the result of a computation, you can use the command NEGATE. For
example,
-12 3 * NEGATE .
will print 36, because –12 times 3 is –36, and the negative of –36 is 36.
1.4. Floating-Point Operations
To type a floating-point number into IsoMax, you must include an exponent, in the form
Enn, as the suffix of the number. For example, all of these represent a floating-point
value of 2.0:
2.0E0
2.000E0
2E0
0.2E1
.2E01
20.E-1
The “E” followed by a (positive or negative) number is required. The following will not
work:
2.0
2.
002
2.000
Also, you must be in DECIMAL base to type a floating point number. This is because “E”
is a valid hexadecimal digit. So,
DECIMAL 2E0
HEX 2E0
gives the floating-point value 2.0, but
gives the integer 2E0 hex (736 decimal)
You can use the command F.S to display the contents of the floating-point stack. The
command F. will print (and remove) the topmost item on the floating-point stack in a
“fixed point” notation, and the command E. will print (and remove) the topmost item in
an “exponential” notation. To see this, try
DECIMAL 1.E1 2.E1 3.E1
F.S
F.
E.
E.
Floating-point arithmetic operations are similar to the integer operations, but have the
prefix “F”. Here are add, subtract, multiply, and divide:
10.E0
10.E0
10.E0
10.E0
3.E0
3.E0
3.E0
3.E0
F+
FF*
F/
adds 10.0 and 3.0, giving 13.0
subtracts 10.0-3.0, giving 7.0
multiplies 10.0 by 3.0, giving 30.0
divides 10.0 by 3.0, giving 3.3333
Other floating-point operations include trigonometric and transcendental functions. The
complete list can be found in the glossary, Section 18.4.
1.5. Variables
Because IsoMax carries out computations on its stacks, you very rarely need to use
“variables” such as X or Y or VELOCITY or VOLTAGE. But sometimes you do need to
store a value between computations. So, IsoMax allows you to have named variables.
You must define a variable before you use it. This is done with the command
VARIABLE (integer) or FVARIABLE (floating-point):
Integer
Floating-point
VARIABLE name
FVARIABLE name
In either case, “name” is a name you choose for the variable. This can be any
combination of up to 31 non-blank characters. Even special characters and punctuation
may be freely used. For example, the following are all valid variable names:
X
Y1
Velocity
$PROFIT
$
4TH_SPEED
%#@!
Names can begin with numbers, and can be entirely non-alphabetic characters. Two
restrictions, though. First, don’t use a name that’s already in use by IsoMax (as you can
see with WORDS) . This will cause confusion. IsoMax will allow it, but will warn you by
telling you that your name is “not unique.”
Second, don’t use a name that’s all numbers. IsoMax will allow that, and won’t warn
you, and then when you type that number, you’ll get the variable instead of the number.
As you can imagine, this will lead to no end of confusion. Be sure that all your names
have one non-numeric character (and remember that A through F are digits in hex)!
You can use upper or lower case in your names, but remember that IsoMax is casesensitive. VELOCITY, VELocity, and Velocity are all different names.
When you have defined a variable, you can store a value into that variable with the ! or
F! commands. You can fetch the stored value with the @ and F@ commands.
Integer
Floating-point
name !
name @
name F!
name F@
stores a value in variable “name”
fetches a value from variable “name”
This is not like other languages, which let you use just the name of a variable in place of
a number in an equation. To get the value of a variable, you must use @ (for integer
variables) or F@ (for floating-point variables). So, if you want to multiply (floatingpoint) Principal by Interest to compute a payment, you’d have to type
Principal F@
Interest F@
F*
F.
Of course, before you could do this you would have had to define the variables
FVARIABLE Principal
FVARIABLE Interest
and you would have had to store some values into these variables, e.g.,
10000.E0 Principal F!
0.05E0 Interest F!
1.6. Accessing Memory and I/O
When you define a VARIABLE, what you’re really doing is reserving a memory location
and giving that memory location a name. The operators @ and ! fetch from a memory
location, and store to a memory location, respectively.
You can use @ and ! with any memory locations, not just variables. Suppose that you
know a value is stored at memory address $6A2. You can get that value with
HEX 6A2 @
Suppose you want to store a value of $1234 into that location. You can use
HEX 1234 6A2 !
When might this be useful? Most of the time, you’ll want to use named VARIABLEs,
because a variable will always be placed in an unused part of memory. If you try to
choose memory addresses yourself, you might choose an address that’s being used by
IsoMax for something else.
But there is one situation when you might want to read or write a known memory
location. The input and output of the IsoPod’s DSP56F805 CPU is memory-mapped.
This means that, instead of accessing the peripherals with IN and OUT instructions, you
use normal memory fetch and store instructions. So, @ and ! give you access to the
complete I/O capability of the IsoPod processor!
For example, the Port A Data Register is located at address $0FB1. The Port A Data
Direction Register (DDR) is located at address $0FB2, and the Peripheral Enable
Register (PER) is at $0FB3. Writing zero to both the DDR and PER will make Port A an
input port, and you can then read the Data Register to read the eight input pins.
HEX
0 0FB2 !
0 0FB3 !
0FB1 @
This is not for the inexperienced user. There are no restrictions on @ and !, so it’s
quite possible for you to lock up the IsoPod completely by writing the wrong value to the
wrong location. You should refer to Motorola’s DSP56F801/803/805/807 16-Bit Digital
Signal Processor User’s Manual for a complete description of the on-chip I/O of the
DSP56F805 processor, and its memory addresses.
Besides, isn’t this easier?
PORTA GETBYTE
ServoPod owners note: The ServoPod uses the DSP56F807 processor, which has
different I/O addresses from the IsoPod’s DSP56F805.
1.7. Logical Operations
IsoMax also lets you perform logical operations on 16-bit values. The four basic
arithmetic operators are AND, OR, XOR, and INVERT:
HEX
HEX
HEX
HEX
3A
3A
3A
3A
0F AND
0F OR
0F XOR
INVERT
bitwise logical AND, giving 0A
bitwise logical OR, giving 3F
bitwise exclusive OR, giving 35
bitwise inversion, giving FFC5
Notice that INVERT takes only one parameter. Also, all of the logical operations act on
16 bit values. If you try to print the result with the . operator, you may be surprised:
HEX 3A INVERT .
prints -3B
This is because FFC5 is a negative number in two’s complement notation, and . prints
signed numbers. To print unsigned numbers, use the U. (“unsigned print”) operator:
HEX 3A INVERT U.
prints FFC5
The logical operations are is especially useful when you’re working with I/O, when you
need to act on specific bits. For example, suppose you need to read the low 4 bits of port
A as a hex number from 0 to F. You could read the four bits individually, and write some
code to merge them into a 4-bit value. But it’s much easier to say
PORTA GETBYTE HEX 0F AND
which reads all 8 bits of the port, and then “masks off” the unwanted bits.
What if you need the high 4 bits of the port? It’s only an 8-bit port, so the “mask” should
be F0 instead of 0F. You then need to shift the bits “down” four places:
PORTA GETBYTE HEX F0 AND
2/ 2/ 2/ 2/
The 2/ operator (“two-divide”) gives a one-bit right shift. For integers, this is equivalent
to dividing by two, hence the name. Applying it four times gives a total of four shifts to
the right.
The corresponding left-shift operator is 2* (“two-times”).
1.8. Adding New Definitions
Much of the time you will be using the IsoMax operations interactively -- as we have
seen above -- or in the CONDITION or CAUSES phrases of an IsoMax state machine.
What you have learned so far is sufficient for these uses, although you’ll probably want
to look at the IsoMax Glossary in Section 18 to see the full range of operations which are
available to you.
But there may come a time when you want to create a procedural subroutine. This might
be because
•
•
There’s a complex function you perform frequently, and you’re tired of typing it
all the time, or
You want to write a computer program (in the traditional sense) and commit it to
the IsoPod’s memory.
In either case, you do this by adding a new word to the IsoMax dictionary. This new
word will contain your complex function or your application program.
Just like with an English dictionary, you add a new word by first giving the name of the
new word, and then defining that word using only words which are already known.
IsoMax marks the start and end of a new definition with : and ; as follows:
: name-of-new-word
...definition...
;
The spaces after : and before ; are required. The name of the new word can be any
combination of up to 31 non-blank characters, just like VARIABLE names.
Let’s go back to our recent example, and assume that a 4-bit DIP switch is connected to
the high 4 bits of Port A. We know how to read this port, mask the bits, and shift them to
the low 4 bits. But we’re going to be doing this a lot, and we don’t want to type that long
phrase every time. Also, to make the code more readable (and more maintainable), we’d
like to call it something meaningful like GET-DIP-SWITCH. Here’s how you can do it:
HEX
: GET-DIP-SWITCH
2/ 2/ 2/ 2/ ;
PORTA GETBYTE F0 AND
Here we are telling IsoMax to add a new word, GET-DIP-SWITCH, to the dictionary.
The “definition” of this new word is PORTA GETBYTE HEX F0 AND 2/ 2/ 2/
2/. What this means in practice is that, whenever IsoMax sees GET-DIP-SWITCH, it
will perform the action PORTA GETBYTE HEX F0 AND 2/ 2/ 2/ 2/. (Strictly
speaking, we’ve created a subroutine containing those IsoMax instructions.)
Remember that IsoMax is free-format so you can split the definition across multiple lines,
and use spaces to indent. TAKE NOTE: if you’re going to use numbers inside the
definition, you must specify the number base outside the definition. In this example, we
put HEX before we started the definition.1
GET-DIP-SWITCH will have exactly the same stack effect as its definition. Since
PORTA GETBYTE HEX F0 AND 2/ 2/ 2/ 2/. leaves a single value on the stack,
GET-DIP-SWITCH will leave a single value on the stack.
Of course, we could also have written something which takes values from the stack.
Maybe we need a four-bit right shift frequently:
: RIGHT-SHIFT-4
2/ 2/ 2/ 2/ ;
This will take a value on the stack, shift it right four times, and then leave the result on
the stack. So you see, the stack is how we pass values to a function, and how we get
results from a function. These are the input parameters and output parameters of the
function.
Well, once we’ve told IsoMax what RIGHT-SHIFT-4 means, why can’t we use that to
define GET-DIP-SWITCH? We can:
: RIGHT-SHIFT-4
HEX
: GET-DIP-SWITCH
2/ 2/ 2/ 2/ ;
PORTA GETBYTE F0 AND RIGHT-SHIFT-4 ;
1.8.1. Removing definitions
If you’ve been typing this example in, you’ve probably seen the warning GET-DIPSWITCH NOT UNIQUE. This is IsoMax telling you that you’ve defined a word twice in
its dictionary. This won’t break IsoMax, but it will cause you some confusion, since you
won’t necessarily know what definition is being used at any given time.
It’s better for all concerned if you tell IsoMax to forget your previous definition of the
word. You do this with the command
FORGET GET-DIP-SWITCH
This gets rid of the old definition, and leaves you free to start a new one. (Strictly
speaking, FORGET gets rid of the most recent definition of the word. If you’ve defined
the word twice, you’ll need to use FORGET twice to get rid of both definitions.)
TAKE NOTE: FORGET will not just forget the word you specify, it will forget all words
you have defined since that word. In the last example, if you had typed FORGET
RIGHT-SHIFT-4, you would also lose the definition of GET-DIP-SWITCH. This can
be useful: if you’ve written a few dozen words, and you want to forget them all (so you
1
If you put HEX inside the definition, that number base won’t take effect until later, when you execute
GET-DIP-SWITCH. This is sometimes useful, but usually is not what you want.
can start over), you don’t need to type a few dozen FORGET commands. Just forget the
first word, and all the following words will go too.
1.9. Program Control
We’ve seen how to write subroutines (as new word definitions), how to do arithmetic and
logical functions, how to store data in memory variables, and how to do I/O. There’s still
one thing missing before we can write any computer program: how do we perform
actions conditionally? That is, how do we change the flow of control of the program,
based upon an input or the result of a calculation?
IsoMax offers six different constructs for program control. These correspond to the basic
control structures from the discipline of structured programming.
1. IF
...some action... THEN
This performs an action if some condition is true. The
condition is given by a value on the stack when IF is
encountered. A zero value is “false”, and any nonzero value
will be considered “true.” A true value causes the code
between IF and THEN to be performed. A false value causes
that code to be skipped.
false
IF
true
...action...
THEN
false
2. IF ..true action.. ELSE ..false action..
THEN
IF
true
..trueaction..
ELSE
..false action..
This is similar to IF..THEN, except that it performs one action if
the condition is true (nonzero), and a different action if the
condition is false (zero). Remember that, unlike some other
languages, THEN terminates the control structure. The code
following then is always executed.
THEN
3. BEGIN
...some action... UNTIL
This performs an action repeatedly until some condition is
true. The condition is given by a value on the stack when
UNTIL is encountered. A zero (false) value means “do the
action again,” and will cause a loop from the UNTIL back to
the BEGIN. A nonzero (true) value means “terminate the
loop,” and will cause execution to continue on to the code
after the UNTIL. Note that it is the action inside the loop
that produces the true/false value for UNTIL! Whatever else
is done, this action must include code which leaves this
“exit/loop” value on the stack. Note also that the action
inside the loop will always be performed at least once!
4. BEGIN ...condition... WHILE ...some action...
BEGIN
...action...
false
UNTIL
true
REPEAT
This performs an action repeatedly while some condition is true.
This is similar to BEGIN..UNTIL with the following
differences:
BEGIN
•
...condition...
WHILE false
true
...action...
•
•
The code that produces the “exit/loop” value is placed
before the WHILE, and the action to be taken is after the
WHILE.
A zero (false) value means “terminate the loop”; a nonzero
(true) value means “do the action and keep looping.”
It’s possible for the action to be performed zero times.
Another way to look at this: a false value at the WHILE will cause
the program to immediately jump to the code after the REPEAT
(thus exiting the loop). A true value at the WHILE will cause the
code immediately following the WHILE to be executed, and then
REPEAT will loop back to BEGIN.
REPEAT
end start DO
...some action... LOOP
This performs an action repeatedly for a given number of
times. This loops over values from “start” to “end-1”. The
“end” and “start” values are given on the stack when DO is
encountered, with the “start” value on the top of stack, and
the “end” value second on the stack. These values can be
determined from a computation, but often will just be
numeric constants. For example
10 0 DO
I .
DO
...action...
< end
LOOP
>= end
LOOP
will perform the action I . ten times, with the loop index going from 0 to 9
(inclusive). The operator I will always return the value of the current loop
index. (Unlike other languages, you don’t need to use a variable for this.) So in
this example, the action I . will print the loop index on each pass through the
loop.
end start DO
...some action... n +LOOP
This is similar to DO..LOOP except that the loop index is incremented by “n”
instead of 1. “n” is the value on top of the stack when +LOOP is encountered; it is
usually a constant, but could be the result of a computation. It may be positive or
negative. If the increment is negative, “end” must be less than “start,” and the
loop will proceed all the way to the end value (not end-1).
IMPORTANT LIMITATION: All of these control structures can be used inside a word
definition, and inside a CONDITION or CAUSES phrase in an IsoMax state machine.
But they can not be used interactively from the command line.
1.9.1. DO Loop Example
It’s instructive to write some simple definitions which show how DO loops work:
DECIMAL
: TEST#1
TEST#1
10 0 DO I . LOOP ;
This will just print the value of the loop index as it goes from 0 to 9.
: TEST#2
DO I . LOOP ;
10 0 TEST#2
30 20 TEST#2
This has the same action as TEST#1, but instead of “hard coding” the loop limits inside
the definition, we are passing them as parameters on the stack. So we can try the loop
with a number of different start and end parameters.
: TEST#3 DO I . 3 +LOOP ;
10 0 TEST#3
This illustrates an increment greater than 1. You can try different end values -- say, 11,
12, and 13 -- and you’ll see that the loop always stops short of the end value.
: TEST#4
DO I . -2 +LOOP ;
0 10 TEST#4
This illustrates a negative increment. You’ll see that the loop will include the end value
if it can, but it will not go past it. (Try end values of 1 and -1 instead of 0.)
Remember: The most common mistake made with DO loops is to get the order of the
start and end values backwards. The “start” value is the last thing put on the stack.
1.10.
Comparisons
Now that you have the ability to change the flow of your program based on a condition,
you need some operators to create those true or false flags. IsoMax has four operators
which will let you compare two numbers:
a
a
a
a
b
b
b
b
=
>
<
U<
returns true if a=b
returns true if a>b (signed numbers)
returns true if a<b (signed numbers)
returns true if a<b (unsigned numbers)
Here “a” and “b” refer to any two numbers on the stack. “b” is on top of the stack,
exactly as though you had typed the numbers “a b” at the keyboard.
You’ll note that there isn’t a U> operator. We’ll see in the next section how to construct
one. There also isn’t a U= operator, since = works for both signed and unsigned
numbers.
IsoMax also has three operators which let you examine a single number:
a 0=
a 0>
a 0<
returns true if a is zero
returns true if a is greater than zero
returns true if a is less than zero (negative)
Finally, there is an operator which will turn true to false, and false to true:
a NOT
logical inverse of a
Do not confuse NOT with INVERT. INVERT is a bitwise operator, which individually
inverts all 16 bits of a value on the stack. NOT is a logical operator, which returns true (a
nonzero value, actually $FFFF) if the value on the stack is false (zero), and returns false
(zero) if the value on the stack is true (any nonzero value). INVERT is for bits. NOT is
for true/false values.
Of course, these comparisons are also useful in IsoMax state machines. The phrase
between CONDITION and CAUSES must leave a true/false value on the stack. How this
value is produced is up to you; it might come from testing an input bit, or it might come
from comparing two numeric values.
1.11.
Stack Operations
For most short pieces of code, like IsoMax CONDITION and CAUSES phrases, you’ll
only have one or two things on the stack, and they’ll be in the right place at the right
time. But sometimes values get put on the stack in the wrong order, or you have an extra
value that you don’t need, or maybe you need a value twice. To handle these little
details, IsoMax provides an assortment of stack operators.
Another word about stack notation: recall that we use the notation
a b c
to signify that there are three values on the stack, with “a” on the bottom, “b” in the
middle, and “c” on the top. (This is how they’d be on the stack if you typed three
numbers on the command line, in the same left to right order.) Since the stack operators
rearrange the values on the stack, we need “before” and “after” pictures to illustrate their
operation. The common notation for this is
a b c --- x y z
where “a b c” is the stack data before the operation, and “x y z” is the stack data after the
operation. We’ll see how this works in a moment.
First, let’s look at words that get rid of items on the stack:
Word
Stack effect (before --- after)
DROP
2DROP
a --a b ---
DROP simply takes whatever is on top of the stack, and gets rid of it. 2DROP gets rid of
the top two items on the stack. Anything else that may be deeper on the stack is
unaffected, so it’s not shown in the stack notation. So, if you have 1 2 3 on the stack and
you do a DROP, you’ll wind up with 1 2 on the stack...only the 3 is DROPped.
There are also words to duplicate items on the stack:
DUP
OVER
a --- a a
a b --- a b a
DUP just takes whatever is on top of the stack, and makes a second copy of it on the stack
(so then you have two of them). You might want to do this if you need to test if a value
is zero or nonzero, and then if it’s nonzero, perform some computation with it.
OVER is trickier: it makes a copy of the second item on the stack, and pushes that copy
onto the top of the stack (pushing everything else down). If that sounds confusing, just
remember that OVER takes “a b” and gives you “a b a”.
To rearrange the values on the stack, you can use:
SWAP
ROT
a b --- b a
a b c --- b c a
SWAP just “swaps” the top two stack items (the second becomes first, and the first
becomes second). ROT is short for “rotate”; it rotates the top three items on the stack,
such that the deepest item becomes the topmost item. If you do three rotates -- that is,
ROT ROT ROT -- you‘ll get right back to where you started.
IsoMax has many more stack operators, and you’re encouraged to look at the IsoMax
Glossary in Section 18 to learn about more of them. But these six will handle the most
of the manipulations you’ll need to perform.
1.11.1.
Example
Remember that we don’t have a U> operator? It ought to look like this:
a b U>
should return true if a>b (unsigned numbers)
Well, if a>b, then it follows that b<a. And we do have an operator for unsigned-less-than
(U<). So all we need to do is reverse the order of a and b, and then use U<:
a b SWAP U<
returns true if b<a, and thus if a>b
We can take this one step further, and use our ability to make definitions to add this as a
new part of the IsoMax language!
: U>
SWAP U< ;
This defines a new word named U> which does the same thing as SWAP U<. Presto!
What’s nice is that this new word becomes a part of the language, just like all the words
originally “known” to IsoMax. Any place you could use the built-in word U<, you can
use your new word U>. There is no distinction between “built-in operators” and “user
functions”; you can add new comparison, arithmetic, and logical operators as you please.
For this reason, IsoMax is called an extensible language -- you can add new language
elements at any time.
1.12.
Word list
The complete word list is found in the IsoMax Glossary (Section 18) at the end of this
manual.