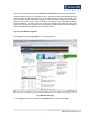
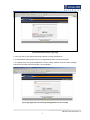
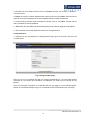
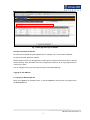
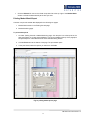
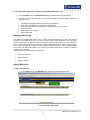
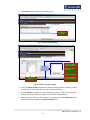
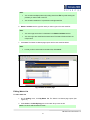
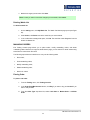
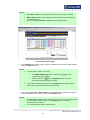
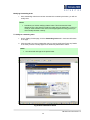
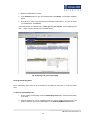
1
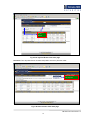
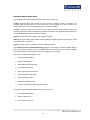
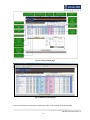
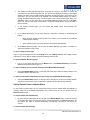
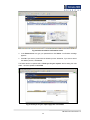
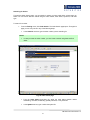
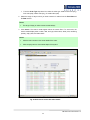
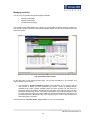
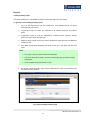
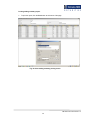
EMIRATES NBD SECURITIES L.L.C EBroker USER MANUAL 1 EBroker User manual version 1.5 6/16/2013 TABLE OF CONTENTS PREFACE------------------------------------------------------------------------------------------------------------------------4 PURPOSE OF THIS DOCUMENT-----------------------------------------------------------------------------------------4 TARGET AUDIENCE ---------------------------------------------------------------------------------------------------------4 EBROKER REGISTRATION ------------------------------------------------------------------------------------------------4 MAILING ADDRESS-----------------------------------------------------------------------------------------------------------5 USER NAME BY SMS---------------------------------------------------------------------------------------------------------5 PASSWORD BY E MAIL------------------------------------------------------------------------------------------------------5 RSA TOKEN ---------------------------------------------------------------------------------------------------------------------6 LOGGING ON TO YOUR EBROKER -------------------------------------------------------------------------------------6 LOG ON TO YOUR EBROKER USING RSA ---------------------------------------------------------------------------7 ACTIVATION OF USER------------------------------------------------------------------------------------------------------8 CHANGE PASSWORD-----------------------------------------------------------------------------------------------------10 SECURITY CONSTRAINTS ON EBROKER --------------------------------------------------------------------------11 LOGGING OFF YOUR EBROKER --------------------------------------------------------------------------------------11 ACCOUNTS-------------------------------------------------------------------------------------------------------------------12 MANAGING MARKET MONITORING---------------------------------------------------------------------------------13 VIEWING MARKET INDEX DETAILS ---------------------------------------------------------------------------------15 VIEWING MARKET WATCH --------------------------------------------------------------------------------------------15 SETTING REFRESH OPTION OF MARKET WATCH ------------------------------------------------------------16 PRINTING MARKET WATCH REPORT-------------------------------------------------------------------------------17 VIEWING COMPANY’S HISTORICAL NEWS-----------------------------------------------------------------------18 VIEWING COMPANY’S MARKET DEPTH----------------------------------------------------------------------------18 MANAGING WATCH LISTS ---------------------------------------------------------------------------------------------19 ADDING WATCH LIST ----------------------------------------------------------------------------------------------------19 EDITING WATCH LIST ----------------------------------------------------------------------------------------------------21 DELETING WATCH LIST -------------------------------------------------------------------------------------------------22 MANAGING ORDERS ---------------------------------------------------------------------------------------------------22 PLACING ORDER------------------------------------------------------------------------------------------------------------22 VIEWING OUTSTANDING ORDERS ----------------------------------------------------------------------------------26 MODIFYING OUTSTANDING ORDER --------------------------------------------------------------------------------28 DELETING OUTSTANDING ORDER ----------------------------------------------------------------------------------29 SEARCHING FOR ORDERS ---------------------------------------------------------------------------------------------31 MANAGING PORTFOLIOS -----------------------------------------------------------------------------------------------33 VIEWING PORTFOLIO POSITION---------------------------------------------------------------------------------------34 VIEWING ACCOUNT BALANCES----------------------------------------------------------------------------------------35 PERSONAL INFORMATION PAGE-------------------------------------------------------------------------------------35 RESET PASSWORD---------------------------------------------------------------------------------------------------------36 CHANGE PERSONAL INFO-----------------------------------------------------------------------------------------------36 REPORTS-----------------------------------------------------------------------------------------------------------------------37 TRADING SUMMARY REPORT------------------------------------------------------------------------------------------37 PRINTING TRADING SUMMARY REPORT---------------------------------------------------------------------------38 2 EBroker User manual version 1.5 6/16/2013 TABLE OF FIGURES FIGURE: 1 EBROKER HOME PAGE--------------------------------------------------------------------------------- 7 FIGURE: 2 LOGIN PAGE-----------------------------------------------------------------------------------------------8 FIGURE: 3 LOGIN PAGE ----------------------------------------------------------------------------------------------8 FIGURE: 4 PASSWORD AND TOKEN LOGIN PAGE----------------------------------------------------------9 FIGURE: 5 LOGIN PAGE WITH ERROR MESSAGE WRONG PASSWORD ENTRY---------------10 FIGURE: 6 CHANGE PASSWORD PAGE --------------------------------------------------------------------- 10 FIGURE: 7 HOME PAGE AFTER LOGIN TO EBROKER ----------------------------------------------------- 11 FIGURE: 8 HOW TO EBROKER LOGOFF EBROKER FROM HOME PAGE----------------------------- 12 FIGURE: 9 ACCOUNT SELECTIONS FROM HOME PAGE ----------------------------------------------12 FIGURE: 10 TRADING CONSOLE PAGE------------------------------------------------------------------------14 FIGURE: 11 MARKET MONITORING PAGE --------------------------------------------------------------------14 FIGURE: 12 MARKET INDEX DETAILS PAGE -----------------------------------------------------------------15 FIGURE: 13 PRINTING MARKET PRICES PAGE --------------------------------------------------------------17 FIGURE: 14 COMPANY HISTORICAL NEWS PAGE---------------------------------------------------------- 18 FIGURE: 15 MARKET DEPTH OF THE COMPANY PAGE---------------------------------------------------18 FIGURE: 16 TRADING CONSOLE PAGE ------------------------------------------------------------------------19 FIGURE: 17 WATCH LIST PAGE------------------------------------------------------------------------------------20 FIGURE: 18 CREATION OF WATCH LIST PAGE---------------------------------------------------------------20 FIGURE: 19 WATCH LIST NAMES PAGE-------------------------------------------------------------------------22 FIGURE: 20 TRADING CONSOLE PAGE-------------------------------------------------------------------------23 FIGURE: 21 ORDER ENTRY DETAILS----------------------------------------------------------------------------25 FIGURE: 22 OUT STANDING ORDERS SCREEN--------------------------------------------------------------26 FIGURE: 23 OUTSTANDING ORDERS SCREEN---------------------------------------------------------------27 FIGURE: 24 ORDER MODIFICATION DETAILS-----------------------------------------------------------------28 FIGURE: 25 THANK YOU FOR YOUR REQUEST PAGE-----------------------------------------------------29 FIGURE: 26 ORDER CANCELLATION CONFIRMATION SCREEN---------------------------------------30 FIGURE: 27 THANK YOU FOR YOUR REQUEST PAGE AFTER CANCELLATION------------------30 FIGURE: 28 ORDER SEARCH PAGE------------------------------------------------------------------------------31 FIGURE: 29 ORDER SEARCH SCREEN WITH ORDER DETAILS----------------------------------------32 FIGURE: 30 PORTFOLIO BALANCE SCREEN------------------------------------------------------------------33 3 EBroker User manual version 1.5 6/16/2013 FIGURE: 31 ACCOUNT INFORMATION PAGE------------------------------------------------------------------34 FIGURE: 32 PERSONAL SETTINGS PAGE----------------------------------------------------------------------36 FIGURE: 33 CHANGE PASSWORD PAGE-----------------------------------------------------------------------36 FIGURE: 34 CLIENTS TRADING SUMMARY PAGE-----------------------------------------------------------37 FIGURE: 35 CLIENTS TRADING SUMMARY PRINTING SCREEN----------------------------------------38 Preference EBroker is a Web-based application that acts as one of the channels to the stock market. This service requires registration by the user to be able to access the stock market information. It offers investors and shareholders unlimited real-time market information. It shows full detailed information about companies' status, share price, change in price, daily lows and highs, as well as other categories, which help users take right decisions regarding their investments. EBroker also enables investors to create their watch lists. Using such watch lists, users can monitor only market performance of certain companies they select. It also offers some features and functions that suit a wide range of users’ needs. For example, it displays the market depth information on each company, a feature that allows the user to watch orders of best bids and offers by price and order. In addition to monitoring market performance of companies belonging to certain sector or watch list, users can actually place orders through EBroker Web site. Modifying and deleting outstanding orders that have not yet been executed by the market is also accessible. Clients can view their portfolio and account information, manage their personal settings, and generate and print certain reports such as client statement report. Purpose of This Document The aim of this document is to instruct clients how to carry out the following tasks: 2. 3. 4. 5. 6. 7. 8. Manage market monitoring; Manage watch lists; Manage orders; Manage portfolios; Manage reports; Manage client’s different accounts; Manage client’s personal settings. Target Audience This document is intended for EBroker clients who will be using this Web site to carry out certain transactions such as placing orders and monitoring market performance. EBroker Registration To register for EBroker (online trading) facility with ENBDS, client needs to Open a brokerage account and obtain a Trading ID. For Account opening procedures please Click here Fill up and sign the internet service agreement. To Download the form please Click here 4 EBroker User manual version 1.5 6/16/2013 Hand over the original application to any of the Emirates NBD Bank branches (which will forward same to ENBDS by internal mail) OR Send the original application by mail or hand over same at the ENBDS head office. Mailing Address: Emirates NBD Securities L.L.C, th Dubai world Trade Center, 11 Floor, P.o.Box. 9409. Dubai, UAE Once the form is received, ENBDS will verify the details and register the client for EBroker. Once registration is done system generated User ID via SMS and temporary password via email to the client’s registered mobile & email id. User Name by SMS Dear Customer, As per your request, please note that your Ebroker User ID is XXXXXX. Your password is sent to your registered Email; please contact ENBDS at +97143032233 to activate your password. Password by E mail 5 EBroker User manual version 1.5 6/16/2013 The RSA token will be dispatched to the client’s registered mailing address. RSA Token : Once customer receive the user ID, password and the RSA token, the client need to call ENBDS at 00971 4 3032233 for activation of user ID. ENBDS will verify the customer details and activates the client EBroker. Once User ID is activated customer can login and change his password. Logging on to Your EBroker When you first navigate to EBroker Web site, you first encounter EBroker main page. From this page, you can log on to your EBroker to make your transactions and set your personal information. Logging on to your EBroker is done through the Login area found at the top right of EBroker page. You may be able to multi-log on to the system. In this case you log on to the system with different user accounts, user name and password. Each user account used has the privilege of accessing certain assigned portfolios to determine which markets to trade in. This enables you to give access to a user on certain portfolio only to trade using it in certain market. For example: A client owns three portfolios; portfolio 1 (DFM), portfolio 2 (ADX), and portfolio 3 (NASDAQ Dubai). The multi-logon feature enables this client to have more than one user account. Each user account accesses certain portfolios of the client. A user account (user name and password) is created to access portfolio and portfolio while another user account accesses portfolio and portfolio while a third user account accesses all the portfolios. 6 EBroker User manual version 1.5 6/16/2013 Enter your username and password in the Username and Password text boxes using the keyboard. Using RSA method to log on to your EBroker account. The RSA is a second factor authentication that protects customer interest and provides secure and reliable channel for trading. The purpose of the RSA method is to increase the security of logging on to EBroker and that is by typing your username, password, and a token number. That is to make it more difficult to gain unauthorized access to restricted resources. The token code is the number that appears on the RSA token device and changes every 60 seconds. The token code is generated by the RSA solutions and authenticated by RSA Authenticated Manager application, and then issued to users. Log on to your EBroker using RSA In the Login area, click the Login page link. The Login page opens. Fig: 1 EBroker home page 1. In the Login area, type your username in the Username text box, and then click Login. 7 EBroker User manual version 1.5 6/16/2013 Fig: 2 login page Activation of user: If customer is new user and if User ID is not activated customer will receive below message when trying to login and will not be able to trade online. +9714 3032233 Fig: 3 login page with error message 2. Type your password in the Password text box. 3. Type the Random no., displayed on token which was issued, and then click on login. 4. You can navigate back to the Username page by clicking the Back button. 8 EBroker User manual version 1.5 6/16/2013 Fig: 4 Password and Token Login Page 5. Once you click on login system will prompt customer to change the password 6. In Old password textbox please enter your 8 digit password which you receive by email. 7. If customer enters wrong user ID/password or Token number customer will receive below message and user ID and Token will be locked after 3 wrong attempts. Fig: 5 login page with error message wrong password or user id entry 9 EBroker User manual version 1.5 6/16/2013 8. Customer user ID is locked customer need to call ENBDS customer care at 00971 4 3032233 to unlock the user ID. 9. ENBDS will verify the customer details and will unlock the user ID. Once ENBDS unlock the user ID customer will receive temp password on his/her registered email to change the password. 10. Incase Existing customer forget the password customer need to call ENBDS customer care at 00971 4 3032233 to reset the password. 11. ENBDS will verify the details and will send temp password to customer registered email address. 12. Once customer receive temp password customer can change password. Change password: 13. Customer can set new password by following password policy given on the screen, and then click on submit button. Fig: 6 change password page When you log on to your EBroker and after you change the password sign, your home page displays information on your portfolio plus information on transactions you made from your last log off from EBroker. At the top of the page, information on the last date and time you logged on to your EBroker appears. Number of unsuccessful attempts to log on to your EBroker is also mentioned at the top of the page. 10 EBroker User manual version 1.5 6/16/2013 Fig: 7 Home page after login to EBroker Security Constraints on EBroker No shortcuts are enabled using the keyboard keys, for example: Ctrl + V don't paste on EBroker. No right-click mouse options are enabled. EBroker sessions times out if the application remains idle for a specific period of time; this is to prevent session hijacking. When the session times out, the application routes you to the Login page where you need to log on again. You can navigate back to your home page by clicking on Emirates NBD logo. Logging off Your EBroker To log off your EBroker Web site Either click Logout in the navigation menu, or click the Logout link at the top left of any page next to the User Profile Link. 11 EBroker User manual version 1.5 6/16/2013 Click to log off your EBroker Fig: 8 how logoff to EBroker from home page Accounts: From drop down list we can select the portfolio account to place the orders. Select the portfolio from drop down Fig: 9 Account selection from home page 12 EBroker User manual version 1.5 6/16/2013 MANAGING MARKET MONITORING The navigation menu has five tabs and each of them have sub functions. Trading: Through trading Tab customer can have access to Trading console and customer can generate Trade summary report of all the trades done over the period of 60 days. Customer can perform Order search for the orders placed with in the period of 60 days. Portfolio: Through Portfolio Tab customer can view Portfolio position under selected account and purchase power (Cash balance available to purchase) and customer can generate Client statement for all portfolio transactions with in the period of 60 days. Market: Through Market Tab customer can monitor the market. Settings: Through Settings Tab customer access personal information page and customer can create favorite watch list of companies. Logout: Through Logout Tab customer can log off EBroker session. The Trading Console and Market Monitoring pages are the medium in EBroker Website through which you monitor the market prices of companies trading in the market. You can access the Trading Console and Market Monitoring pages when you are logged on to your page. Through the Trading Console page, you can View market index details; Monitor market prices; Set market watch refresh option; Print market watch report; View companies’ historical news; View companies’ market depth. View outstanding orders Execute and Manage orders Access to portfolio page and Cash balance page On the other hand, through the Market Monitoring page, you can View market index details; Monitor market prices; Print market watch report. 13 EBroker User manual version 1.5 6/16/2013 Fig: 10 Trading console page Fig: 11 Market monitoring page The aim of this section is to describe in detail how to carry out all of the above mentioned Tasks. 14 EBroker User manual version 1.5 6/16/2013 Viewing Market Index Details The Trading Console and Market Monitoring pages allow you to view details of the indices of the selected market session you are trading in. Note: The prices displayed may be delayed or real-time ones. To view the market details through the Trading Console page On the Trading Console page, click the Index link above the Market Watch section. The Market Index Details page opens. Click to select the chart type Click to refresh data fed from the market Fig: 12 Market index details page To view the market details through the Market Monitoring page 1. From the Market menu, click Market Monitoring. The Market Monitoring page opens. 2. Click the Index link above the Market Watch section. The Market Index Details page opens. The Market Index Details page displays information on each index in the selected Trading session. Moreover, it displays a chart comparing the performance of each Index to the other indices in the selected trading session. Viewing Market Watch You can watch and monitor the prices of companies whether rising or falling through the Trading Console and Market Monitoring pages. The differences between the Trading Console and Market Monitoring pages are as follows: 15 EBroker User manual version 1.5 6/16/2013 The Trading Console page displays prices of symbols of a sector or a portfolio or a watch list you select from the sectors drop-down list. The sectors are displayed according to the trading session you select from the trading session drop-down list that may exist in any market. On the other hand, you can view prices of all symbols in the selected trading session you trade in through the Market Monitoring page. This is because in the Trading Console page there is no “No filter” option. On the other hand, on the Market Monitoring page, there is a “No filter” option. So, you can view prices of all symbols in a selected market session without the need to filter by sectors. In the Trading Console page, you will refresh the market prices both manually and automatically. In the Market Monitoring, you can also refresh the data either manually or automatically as follows: When selecting market monitoring with the no filters, you will refresh the full selected market session manually. When selecting a filter you will refresh both manually and automatically. In the Market Monitoring page, you can filter the Market Monitoring by sector, or portfolio, or watch list in addition to the no filter. To open Trading Console page Log on to your home page then from the Trading menu, click Trading Console. The Trading Console page opens. The top section displays the selected trading session prices To open the Market Monitoring page Log on to your home page then from the Market menu, click Market Monitoring. The Market Monitoring page opens (see Figure 11). To select a trading session from the Trading Console/Market Monitoring Page Above the Market Watch section, at the right part of the page, select the trading session from the trading session drop-down list. To select a sector/watch list/portfolio from the Trading Console/Market Monitoring page Above the Market Watch section, at the right part of the page to the left of the trading session drop-down list, select the sector or watch list or portfolio from the sectors drop-down list. Setting Refresh Option of Market Watch On the Trading Console page, you can refresh data coming from the market either automatically or manually. Data can be refreshed automatically every certain period of time you choose from the Refresh drop-down list. To refresh market data automatically On the Trading Console page, at the top right of the Market Watch section, select the number of seconds after which you want the page to refresh period from the Refresh drop-down list (see Figure 22). Data is refreshed periodically, automatically, according to the period you choose. To refresh market data manually 16 EBroker User manual version 1.5 6/16/2013 Click the Refresh link next to the refresh drop-down list at the top right of the Market Watch section to refresh the data manually at the time you want. Printing Market Watch Report Customer can print the market data displayed in the following two pages: 1. Market Watch section in the Trading Console page. 2. Market Monitoring page. To print market prices 1. On either Trading Console or Market Monitoring page, click the print icon at the top left of the page (see Figure 10). A page opens displaying your account details at the top of the page plus the symbols prices of the selected sector in the selected trading session. 2. Click the Print button at the bottom of the page. The print wizard opens. 3. In the print wizard, select the options you want then click Print. Fig: 13 printing market prices page 17 EBroker User manual version 1.5 6/16/2013 Viewing Company’s Historical News On the Trading Console page, through the Market Watch section, you can view historical news of a company. To view historical news of a company On the Trading Console page, click the Historical News icon view its market news (see Figure 11). next to the Company you want to 1. On the page that opens, select the range of days in which you want to search for news from the From Date and To Date text boxes. Fig: 14 company historical news page 2. Click Search. If there is news for the symbol in the period you have selected, the news appears below the From Date and To Date text boxes. You find date in which this news has been published plus a more link to the page displaying the full article. Viewing Company’s Market Depth The Trading Console and Market Monitoring pages allow you to view the market depth of a symbol. To view the market depth of any company from the Trading Console page On the Trading Console page, click the company name you want to view its market depth (see Figure 11). The Market Depth page opens. Last refresh time Click to display the best trades Click to display today’s summary Click to refresh the market information feed. Click to display trades of the day Fig : 15 market depth of the company page 18 EBroker User manual version 1.5 6/16/2013 To view the market depth of any company from the Market Monitoring page 1. From the Market menu, click Market Monitoring. The Market Monitoring page opens. 2. Click the company name you want to view its market depth. The Market Depth page opens (see Figure 11). The Market Depth page displays information on the following: Time, price, and volume of the last trade on the company; Best bid and best offer on the company as regards order, price, and volume; Today’s summary; Best trades on the company; Trades of the day. Managing Watch Lists The Watch List Names page allows you to create customized watch lists. A watch list contains products of your selection for which you want to monitor their market performance. You can group different companies from different sectors belonging to different markets that you are interested in. Hence, from the sectors drop-down list found on either Market Monitoring or Trading Console pages, you can select a watch list you have created to view the market performance of the products included in the watch list. Watch lists enable you to monitor the market performance of symbols in different markets at the same time. The following three topics describe in detail how to Add a new watch list; Edit a watch list; Delete a watch list. Adding Watch List To add a new watch list 1. On the Setting menu, click My Watch list. The Watch List Names page opens. Fig: 16 Trading console page 19 EBroker User manual version 1.5 6/16/2013 2. Click Add New List. The Watch list Info page opens. Click to add new watch list Fig: 17 watch list names page Click to add All the products immediately Click to add product to watch list Click to remove product from watch list Click to remove All the products immediately Type the name of watch list Fig: 18 creation of watch list page 3. From the Trading Session drop-down list, select the trading session from which you want to select sectors. The Sectors drop-down list is updated accordingly. 4. From the Sectors drop-down list, select the sector from which you want to select products. Products belonging to that sector appear in the box below the dropdown list. 5. Select the product name you want to add to your watch list then click Add Product. The selected products are added to the Selected Products box. 20 EBroker User manual version 1.5 6/16/2013 Note: You can select multiple products by holding down the CTRL key while clicking the products you want to add or remove. You can add a maximum of 15 products to a single watch list. 6. Watch List Name text box, type the name you want to give to the new watch list. Note: You cannot type more than 15 characters in the Watch List Name text box. You cannot give two watch lists the same name. Each watch list should have its unique name. 7. Click Save. The Watch List Names page opens with the new watch list added. Note: In case you don’t want to add a new watch list, click Cancel. New watch list has been added Fig: 19 watch list names page Editing Watch List To edit a watch list 1. On the Setting menu, click My Watch list. The Watch List Names page opens (See Figure 19). 2. Under Action, click Modify/Copy next to the watch list you want to edit. Note: You cannot edit the watch list name. 21 EBroker User manual version 1.5 6/16/2013 3. Make the changes you want then click Save. Note: In case you want to cancel the changes you have made, click Cancel. Deleting Watch List To delete a watch list 1. On the Setting menu, click My Watch list. The Watch List Names page opens (see figure 20). 2. Under Action, click Delete next to the watch list you want to delete. 3. In the confirmation message that opens, click Ok. The watch list name disappears from the Watch List Names list. MANAGING ORDERS The Trading Console page allows you to place orders, modify outstanding orders, and delete outstanding orders. Moreover, through the Order Search page, you can search for certain orders using some filters to narrow down the result. The following topics discuss in detail how to carry out the following tasks: Place order; View outstanding orders; Modify outstanding order; Delete outstanding order; Search for orders. Placing Order To place a new order 1. From the Trading menu, click Trading Console. 2. In the Order Entry/Maintenance section, click Buy if you want to buy products Sell if you want to sell products. 3. From the Order Type drop-down list, select Limit Order or Market Order or Hit/Take Order. 22 EBroker User manual version 1.5 6/16/2013 Notes: Limit Order means the user specifies the price they want to buy or sell with. Market Order means the user leaves the market to decide the price according to market best price. When you select Limit Order, the Price text box becomes active. Fig: 20 trading console page 4. In the Symbol text box, either type or select the symbol ID. The company name appears next to the Symbol text box. Notes: You can select a symbol in two ways: 1. In the Market Monitoring section, click the arrow next to the company owning the symbol 2. Click the search icon next to the Symbol text box. For more information about searching for a symbol. If you know the symbol ID, then type it in the Symbol text box directly without searching for its ID using the above-mentioned ways. 5. If you select Limit Order or Market Order from the Order Type drop-down list, type the number of shares you want to buy or sell in the Quantity text box Notes: The Discl. Vol text box becomes active when you type an amount of shares equal to or exceeding a certain number in the Quantity text box. Your broker determines such a number. You must enter the quantity in number format. 23 EBroker User manual version 1.5 6/16/2013 6. If you select Limit Order from the Order Type drop-down list, type the price you desire in the Price text box. Notes: You must enter the price in number or decimal format according to its price tolerance range. 7. From the Period drop-down list, select the “good till specified period” date. Notes: If you select Day, date of today’s trading date appears in the Date text box. This means the order stays valid in queue for the end of today’s trading day then expires. If you select GTW, date of the last trading day in this week appears in the Date text box. GTW (Good till Week) means the order will stay valid until the end of this week to be executed. If it is not executed fully or partially by the end of this week, it expires. If you select GTM, date of the last trading day in this month appears in the Date text box. GTM (Good till Month) means the order will stay valid until the end of this month to be executed. If it is not executed by the end of this month, it expires. If you select GTD, you must select a date from the Date text box. GTD (Good till Date) means the order will stay valid until the day you specify. If the order is not executed by the end of the day you specify, it expires. For more information about how to select a date, The date you select cannot be a day in the past. 8. From the Fill Term drop-down list, select the condition on which the broker executes the order. Notes: If you select Market Default, the Min Qty text box becomes inactive. Market Default means this order applies to market rules. If you select All or Non (AON), the Min Qty text box becomes inactive. AON means you want to either buy or sell all quantity of your order or none. 9. If the Discl. Vol text box is active, then type the fraction of the order you want to disclose to the market. 24 EBroker User manual version 1.5 6/16/2013 Notes: The Discl. Vol text box becomes active when you type an amount equal to or exceeding a certain number in the Quantity text box. If you don't type any value in the Discl. Vol text box, the order's total Quantity is disclosed to the market The value you type in the Discl. Vol text box should not be less than 10% of the order quantity and at the same time should not be greater than or equal to the order quantity You must enter the disclosed volume value in number format. 10. In the Password text box, type your login password. 11. Click Execute Notes: T When you click Execute, a confirmation message opens displaying the details of the order to h confirm before sending it to Market. e Order Placing section is replaced with a “Thank you for your request” section displaying the order status, number, amount, fees, and trade amount. Moreover, the order appears with a unique ID in the list of Outstanding Orders to the left of Order Entry/Maintenance section. Fig: 21 order entry details 25 EBroker User manual version 1.5 6/16/2013 Fig: 22 outstanding orders screen Notes: If you want to cancel the order before executing it, click Cancel. A warning pop up message is displayed in the following cases: 1. You try to place or modify or cancel an order in a market that has a non-trading status. 2. You try to place or modify or cancel an order on a product that has a nontrading status in a market that has a trading status. When you click OK in the warning pop up message, the order is placed or modified or canceled depending on your request. Viewing Outstanding Orders When you click the Outstanding Order tab to the left of the Order Entry/Maintenance section on the Trading Console page, you can view a list of all the outstanding orders of the selected portfolio that the client has the privilege to access (see Figure 20). An outstanding order can be one of the Following: An order that you submitted to the broker but has not been yet executed by the market. An order that has been partially executed and the remaining quantity are still valid and queued in the market. 26 EBroker User manual version 1.5 6/16/2013 In either cases case, you still can modify the order or delete it. For each order, you view the order number, order type whether buy or sell, company name, no. of shares, price per share (whether market price or the price you defined), and remaining quantity. To view more details on each order Click the hyperlinked order number. A page opens displaying more information about the order plus the transaction details. Notes: Click the Refresh button on the page displaying the order details to refresh in the market data. Click the Refresh link next to the Order Entry/Maintenance link to refresh the Outstanding Orders list (see Figure 22). In the Outstanding Orders list, details on sell orders appear in red whereas details on buy order appear in green. Fig: 23 outstanding orders screen 27 EBroker User manual version 1.5 6/16/2013 Modifying Outstanding Order 1. Since outstanding orders have not been executed in the market by the broker, you still can modify them. Notes: Sometimes you find the modifying feature locked. This is because the broker determined only a time frame for modifying orders during the trading day. If you try to modify an order outside this time frame, a message appears informing you that you cannot modify this order currently. To modify an outstanding order 1. On the Trading Console page, click the Outstanding Orders tab in the bottom left section of the page. 2. Click the modify icon next to outstanding order you want to modify (see Figure 23). Details of the order you want to modify appear in the Order Entry/Maintenance section. Notes: You cannot edit order type or the symbol name. Fig: 24 Order modification details 28 EBroker User manual version 1.5 6/16/2013 3. Make the modifications you want. 4. In the Password text box, type your password then click Modify. A confirmation message opens. 5. Click Ok if you want to proceed with the modifications. Otherwise, if you want to cancel your modifications, click Cancel. The Modify section is replaced with a “Thank you for your request” section displaying the order status, number, amount, fees, and trade amount. Fig: 25 thank you for your request page Deleting Outstanding Order Since outstanding orders have not been executed in the market by the broker, you still can delete them. To delete an outstanding order 1. On the Trading Console page, click the Outstanding Orders tab in the bottom left section of the page. 2. Click the delete icon next to outstanding order you want to delete (see Figure 23). The details of the order you want to delete appear in the Order Entry/Maintenance section. 29 EBroker User manual version 1.5 6/16/2013 Fig: 26 Order cancellation confirmation screen 3. In the Password text box, type your password then click Delete. A confirmation message appears. 4. Click Ok if you want to proceed with the deletion process. Otherwise, if you want to cancel the deletion process, click Cancel. The Delete section is replaced with a “Thank you for your request” section stating the order status has been updated to cancelled. Fig: 27 thank you for your request page after cancellation 30 EBroker User manual version 1.5 6/16/2013 Searching for Orders Through the Order Search page, you can search for orders you have made within a time range you select. You can narrow down the results using the order number, order status, symbol ID, and order type. To search for an order 1. From the Trading menu, click Order Search. The Order Search page opens. Through this page you can carry out all or any of the following steps: In the Order No. text box, type the order number you are searching for. Notes: In case you enter the order number, you don’t have to search using Start and End dates Fig: 28 Order Search page From the Order Status drop-down list, select the order status whether market outstanding, cancelled, outstanding, partially executed, or fully executed. In the Symbol text box, type or select the symbol ID. 31 EBroker User manual version 1.5 6/16/2013 From the Order Type drop-down list, select the order type whether limit order (buy), limit order (sell), market order (buy), or market order (sell). 2. Select the range of days in which you want to search for orders from the From Date and To Date text box. Notes: The range of days you select cannot exceed 60 days 3. Click Search. The search results appear below the search filter. For each order, the search results display order number, date, and type, share name, share price, remaining quantity, expiry date, and order status. Notes: Click the order number to view more details of the order. Click company name to view market depth of the symbol Fig: 29 Order search screen with order details 32 EBroker User manual version 1.5 6/16/2013 Managing portfolios: You can view your portfolio through three pages in EBroker: Trading Console page Portfolio Position page Your EBroker home page. The Trading Console page displays only a briefing on your portfolio as regards names of products you have bought, number of shares in each product, available shares, and the current market value of all shares per product. Fig: 30 Portfolio balance screen On the other hand, on the Portfolio Position page, you can view more details on your portfolio. This page is divided into two sections: The first section, Account Information, displays more information on your portfolio such as total number of shares you have purchased per product, number of pledged shares, outstanding sell orders’ quantity, available shares you have, average cost with which you bought the shares per product, last Market price per share, total cost with which you have purchased all shares per product. This section also displays the unrealized gain/loss in case you want to sell your shares in a product. Meaning it subtract the Market Price of all share from the Purchased Cost of all shares to see if you are going to gain or lose in case of selling your shares belonging to a product. The second section, Purchase Power, displays details on your account settlement. 33 EBroker User manual version 1.5 6/16/2013 Fig: 31 Account information page The following topic shows you how to access your portfolio. Viewing Portfolio Position To view your portfolio on the Trading Console page 4. Log on to your EBroker, then from the Trading menu, click Trading Console. The Trading Console page opens. 5. At the top of the bottom-left section of the page, click the Portfolio tab. The portfolio details appear. To view your portfolio position on the Portfolio Position page When you are logged on to your EBroker, from the Portfolio menu, click Portfolio Position. The Portfolio Position page opens displaying full details about your portfolio and account settlement. 34 EBroker User manual version 1.5 6/16/2013 Notes: Click the print icon to print the whole Portfolio Position page. Click the company name to view market depth of the company. Click the Refresh button to refresh market data. You can find the last time you refreshed the page displayed on the top right of the page, next to the print icon (see Figure ). Viewing Account Balances You can view your account balances on two pages in your EBroker: Trading Console page Portfolio Position page. To view your account balance on Trading Console page 1. Log on to your EBroker then from the Trading menu, click Trading Console. The Trading Console page opens. 2. At the top of the bottom-left section of the page, click the Account Balances tab. The Account balances appear (see Figure 31). To view your account balance on Portfolio Position page Log on to your EBroker then from the Portfolio menu, select Portfolio Position. The Portfolio position page opens. Account balance information appears in the Purchase Power section. Personal Information Page Through the Personal Information page, you can carry out the following tasks: 1. You can down load the form to change the existing registered email address and mobile number. 35 EBroker User manual version 1.5 6/16/2013 Click here to down load the form Click here to change the password Fig: 32 Personal settings page 2. You can change the password When you click on the hyper link to change the password a page will open to change the password. Enter Old password, new password and confirm the new password. Then click on submit button. Fig: 33 change password page 36 EBroker User manual version 1.5 6/16/2013 Reports Trading summary report: This report enables you to view details on all types of executed orders you have placed. To generate a client trading summary report 1. Log on to your EBroker then from the Trading menu, click Trading Summary. The Client Trade Summary page opens. 2. To generate a report on orders you submitted for all products, select the All Products option. 3. To generate a report on order you submitted for a specific product, select the Choose option then type or select the symbol ID. 4. Select the range of days on which you want to generate the report form the From Date and To Date text box. 5. Click View. A page opens displaying the report. At the top of the report you find client name Note: The range of days you select cannot exceed 60 days. You cannot select the To Date in the future. Nearest date you can select is today’s trading date. The From Date cannot precede the To Date. 6. ID, account number and name, report name, market name in which you are trading, and the period you have selected. Fig: 34 Client trading summary page 37 EBroker User manual version 1.5 6/16/2013 Printing trading summary report: 7. To print the report, click the Print button at the bottom of the page. Fig: 35 Client trading summary printing screen 38 EBroker User manual version 1.5 6/16/2013