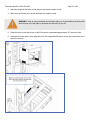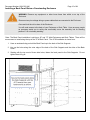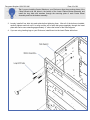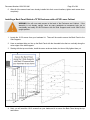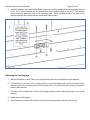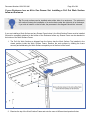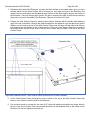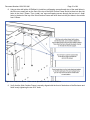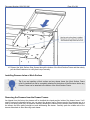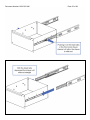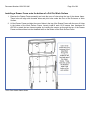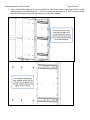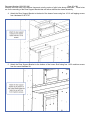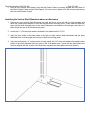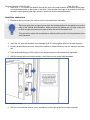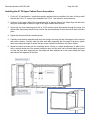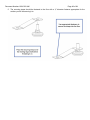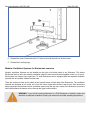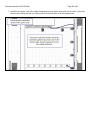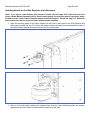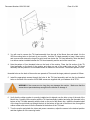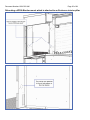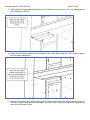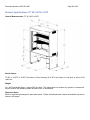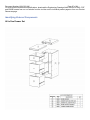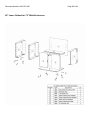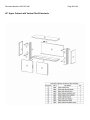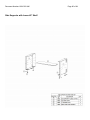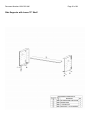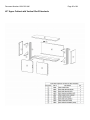
1
Document Number:10010102-UM Page 1 of 94 Enclosure Group 2 User Manual: This manual is for the following product assemblies: 81030 Mini Office Enclosure Free Standing 45”W X 36”H, All in One Drawer Set 81031 Mini Office Enclosure Free Standing 72”W X 36”H, All in One Drawer Set 81032 Mini Office Enclosure Free Standing 45”W X 64”H, All in One Drawer Set 81033 Mini Office Enclosure Free Standing 72”W X 64”H , All in One Drawer Set 81034 Mini Office Enclosure Free Standing 72”W X 36”H, 45”W Lower Cabinet 81035 Mini Office Enclosure Free Standing 72”W X 64”H, 45”W Lower Cabinet 81036 Mini Office Enclosure Free Standing 45”W X 36”H, All in One Drawer Set,45”W Upper Cabinet 81090 POS Kiosk Enclosure Free Standing 45”W X 36”H 81091 POS Kiosk Enclosure Free Standing 72”W X 36”H 81092 POS Kiosk Enclosure Free Standing 45”W X 64”H 81093 POS Kiosk Enclosure Free Standing 72”W X 64”H 81094 POS Kiosk Enclosure Free Standing 45”W X 36”H, Upper Cabinet 81120 Work Bench Enclosure Free Standing 45”W X 36”H, All in One Drawer Set 81121 Work Bench Enclosure Free Standing 72”W X 36”H, All in One Drawer Set 81122 Work Bench Enclosure Free Standing 45”W X 64”H, All in One Drawer Set 81123 Work Bench Enclosure Free Standing 72”W X 64”H, All in One Drawer Set 81124 Work Bench Enclosure Free Standing 72”W X 36”H, 45”W Lower Cabinet 81125 Work Bench Enclosure Free Standing 72”W X 64”H, 45”W Lower Cabinet 81126 Work Bench Enclosure Free Standing 45”W X 36”H, All in One Drawer Set, 45”W Upper Cabinet Document Number:10010102-UM Page 2 of 94 PN 81030 PN 81031 PN 81032 PN 81033 PN 81034 PN 81035 PN 81036 PN 81090 PN 81091 PN 81092 PN 81093 PN 81094 PN 81120 PN 81121 PN 81122 PN 81123 PN 81124 PN 81125 PN 81126 Document Number:10010102-UM Page 3 of 94 Enclosure Group 2 User Manual:............................................................................................................................................ 1 Introduction .......................................................................................................................................................5 Safety Information.............................................................................................................................................6 Tools Needed ...................................................................................................................................................7 How to use Self Tapping Screws ......................................................................................................................8 Basic Steps.......................................................................................................................................................9 Unpacking the Enclosure ..............................................................................................................................9 Inspecting the Enclosure, Accessories, and Hardware Kits..........................................................................9 If you have access to a forklift or equipment lift for building Freestanding Enclosures.................................9 Installing a 14” Deep Lower Shelf between two Side Supports ..................................................................11 Installing the Side Supports on a Enclosure ...............................................................................................13 Installing a Back Panel Below a Freestanding Enclosure...........................................................................15 If your Enclosure has a Lower Cabinet: Lower Cabinet Overview.............................................................17 Attaching the Lower Cabinet Shelves .........................................................................................................17 Attaching the Lower Cabinet bottom assembly...........................................................................................18 Installing the Lower Cabinet Back Panel ....................................................................................................20 Installing a Back Panel Behind a 72”W Enclosure with a 45”W Lower Cabinet..........................................23 Installing the 45" Wide Lower Cabinet Door Assemblies ............................................................................25 Adjusting the leveling legs ..........................................................................................................................27 If your Enclosure has an All-in One Drawer Set: Installing a Pull Out Work Surface below an Enclosure .28 Installing Drawers below a Work Surface ...................................................................................................32 Removing the Drawers from the Drawer Frames .......................................................................................32 Installing a Drawer Frame onto the bottom of a Pull Out Work Surface .....................................................34 Installing the Vertical Shelf Standards above an Enclosure .......................................................................37 If your Enclosure has an Upper Cabinet: Upper Cabinet Overview............................................................38 Pre assembly for the Upper Cabinet...........................................................................................................38 Install the cabinet top ..................................................................................................................................39 Installing the Upper Cabinet sides and back section ..................................................................................41 Installing the bottom of the Upper Cabinet..................................................................................................42 Installing the 45” W Upper Cabinet Doors Assemblies ...............................................................................44 Securing a Freestanding Enclosure to the Wall and Floor..........................................................................45 Installing cabling through cable path openings ...........................................................................................49 Installing flexible grommet material around cable path openings ...............................................................50 Operating the roll up door and lock.............................................................................................................51 Connecting the Enclosure to 110VAC power..............................................................................................51 Optional Steps ................................................................................................................................................52 Changing the orientation of a Side Support ................................................................................................52 Modular Ventilation Systems for Enclosures overview ...............................................................................53 Testing and Regulating the Internal Temperature of Enclosures or Lower Cabinet ...................................55 Relocating a Modular Ventilation System from one side of an Enclosure to the other ...............................55 Installing wheels on the Side Supports of an Enclosure .............................................................................59 Adjusting the height of a full length interior Wire Rack Shelf ......................................................................60 Installing a VESA Monitor on a mount which is attached to an Enclosure interior pillar .............................60 Relocating a VESA Monitor mount which is attached to an Enclosure interior pillar ..................................62 Relocating Low Voltage Cable Management Rings....................................................................................65 Relocating a bin box mounting bar inside of an Enclosure .........................................................................66 Relocating an 18”W interior Wire Rack Shelf..............................................................................................66 Adjusting the height of a full length interior Wire Rack Shelf ......................................................................67 Relocating a Multiple Outlet Strip................................................................................................................67 Installing Drawers below an Enclosure WITHOUT a Work Surface ...........................................................68 Connecting Freestanding Enclosures together side by side.......................................................................73 Connecting Freestanding Enclosures together back to back......................................................................73 Product Short Descriptions .............................................................................................................................75 Product Specifications 45” W x 66”H x 30”D ..................................................................................................79 Product Specifications 72” W x 66”H x 30”D ..................................................................................................80 Document Number:10010102-UM Page 4 of 94 Product Specifications 45” W x 94”H x 30”D ..................................................................................................81 Product Specifications 72” W x 94”H x 30”D ..................................................................................................82 Product Specifications 72” W x 67”H x 30”D ..................................................................................................83 Product Specifications 72” W x 95”H x 30”D ..................................................................................................84 Product Specifications 72” W x 66”H x 30”D ..................................................................................................85 Product Specifications 45” W x 92”H x 30”D ..................................................................................................86 Engineering Drawing Reference Notes: .........................................................................................................86 Identifying External Components ....................................................................................................................87 All in One Drawer Set .................................................................................................................................87 45” Lower Cabinet for 72” Wide Enclosures ...............................................................................................88 45” Upper Cabinet with Vertical Shelf Standards........................................................................................89 Side Supports with Lower 45” Shelf............................................................................................................90 Side Supports with Lower 72” Shelf............................................................................................................91 45” Upper Cabinet with Vertical Shelf Standards........................................................................................92 Warranty Information ......................................................................................................................................93 Service and Support .......................................................................................................................................94 Document Number:10010102-UM Page 5 of 94 Introduction This manual is designed to assist you in unpacking, assembling, installing, and using your PQS equipment safely and efficiently. Please refer to the cover of this manual for the applicable configurations. PQS products are modular and can be configured in numerous ways for a variety of applications. This manual contains information about the general setup of your PQS product, but cannot cover the multitude of configurations possible with this modular system. Please refer to the table of contents to reference the part or procedure that is most closely associated with your desired setup. If you are viewing this manual in electronic format: Using the ‘bookmarks’ tool in Adobe Acrobat is an efficient way to navigate this PDF document. Click the bookmarks tab to the left of the screen to view thumbnails of each page. The table of contents items are linked to their respective sections. Clicking on a TOC item will bring you to the appropriate section. You can also use ctrl+ f to bring up a search dialogue so you can search for key words or part numbers. The information in this manual is subject to change without notice. PQS is not liable for errors contained herein or for incidental or consequential damages in connection with the furnishing, performance, or use of this material. Because PQS products are always being improved, the illustrations and descriptions in this manual may differ from the products you receive. This document contains proprietary information that is protected by copyright. No part of this document may be photocopied, reproduced, or translated into another language without the prior written consent of PQS. ©2009 Practical Quality Systems. All rights reserved. PQS is a registered trademark. All other trademarks belong to their respective companies. Common notifications in this manual: Messages like those below indicate special information: WARNING: Failure to follow instructions that appear in these cautionary boxes could result in the injury or death of personnel and/ or damage to equipment and loss of data. Tip: Instructions that appear next to a light bulb icon are designed to make the assembly of your unit go more easily and to help you avoid losing time due to mistakes. Document Number:10010102-UM Page 6 of 94 Safety Information This part of the manual provides an overview of safety guidelines to be observed when assembling, installing and using your PQS equipment. Keep a printed copy of this User’s Manual, especially the following safety information, in or near the Enclosure, Work Table, or Shelving System . WARNINGS • Improper use of this product may lead to serious injury or death. Read and understand all instructions prior to the assembly or use of this product. • Be advised that some parts of the product components may have sharp edges, please handle all pieces carefully. •Hire a professional electrician to connect permanent power circuits to equipment assemblies. It is advised against to route electricity to or within the unit without expert knowledge. • Have each unit individually grounded to the Telecommunication Ground Circuit (TGC) or signal reference grid to protect equipment and personnel from dangerous electrical charges. If you do not know how to do this, hire a professional electrician. • If you will be housing electronics in a PQS Enclosure or Cabinet, make sure that there is adequate ventilation to keep your electronics at a safe operating temperature. Refer to the section titled “Modular Ventilation Systems Overview” for further reference. • Be sure to use sufficient personnel to move the products safely. Most assembly and installation steps will require more than one person to comfortably and safely complete the task. Do not attempt to move large parts by yourself. Obtain adequate assistance to prior to moving heavy parts or hire professional equipment riggers if necessary. • Make sure loose items are removed from within the unit prior to moving it. Items shifting within assemblies can cause instability. • Move equipment on installed casters with extreme care. Sudden changes in direction, forces, or the surface over which the product is being moved can cause the unit to fall over. Never push on the sides. Casters are only for moving your unit to the desired location. Once in place, attach the leveling feet and secure the unit in place. • A standalone unit should be level, stable, and anchored to the floor. • Two or more units can be coupled together to enhance their stability. Even when coupled, anchor each individual unit to the floor and wall. • Consult you local building codes for seismic regulations regarding securing heavy equipment and ensure that your enclosure is secured according to your local laws. • Before loading equipment into or onto an Enclosure or Worktable, be sure that it is stable and level. Always anchor the leveling feet or the frame to the floor. • When servicing equipment in rack mount drawers: Document Number:10010102-UM Page 7 of 94 If you have multiple rack mount drawers, only unlock and extend the drawer you are servicing. Extending multiple racks at once may cause the entire unit to fall over. Extend only one rack mount drawer at a time. Extend rack mount drawers slowly. Sudden deployment of the rack could cause tipping. Always load heavy items at the bottom of the rack mount drawer first, and add lighter equipment on higher levels. Putting heavy items high up is dangerous. • There is a safety risk when equipment is mounted on a shelf installed more than 30 inches above the floor. Unsecured equipment may slide off of shelves and injure personnel. Be sure equipment on shelves over 30 inches from the ground is secured to the frame of your Enclosure, Work Table, or Shelving System. •PQS products can be configured in many ways. The amount of force required to make the units unstable is different in each configuration. Read and fully understand all safety considerations in this entire manual before you assemble your configuration. • There are task specific safety notes throughout this manual. Please read the entire manual and observe the warnings for each specific step. Tools Needed You may need some or all of these tools and possibly others depending on your particular assembly: Socket Wrench 7/16”, 9/16”, ½” Heads Power Drill For fastening self tapping screws and drilling holes Standard Drill Bits For drilling holes when mounting accessories Screwdriver Bit #2 Phillips Head Flat File For taking down any sharp edges on sheet metal Blue Painter’s Tape For marking mounting positions on shelving standards Scissors For cutting flexible grommet stripping to length Marker For marking any holes to be drilled when mounting accessories Measuring Tape For verifying shelf heights Round File For deburring any holes you’ve drilled Level For help adjusting leveling legs and shelves Document Number:10010102-UM Page 8 of 94 How to use Self Tapping Screws Many of the parts of the product assemblies are attached with Self Tapping Screws that must be installed into predrilled pilot holes. You’ll need an electric screw gun or drill and a #2 Phillips Screw Driver to install these screws. 1-Observe the construction of the screws. Note that the point of the screw is shaped and operates like its own drill bit. Also note the length of the threaded shaft portion of the screw and that the head of the screw is a Type #2 Phillips. 2- Install the correctly sized Phillips screw driver bit into the chuck of the electric screw gun or drill. These screw driver bits are often magnetized to hold the head of the metal screw in place while driving it into the metal. Set the clutch of the drill to about half of its total range. If the clutch begins to slip before the screw is fully installed; increase the clutch setting slightly and try it again. 3- Start by placing a screw in the bit and then carefully align the point of the screw directly against one of the pre drilled pilot holes. Be sure to hold the drill straight and apply only enough pressure to guide the screw and keep it centered in the pilot hole. 4-Press the trigger of the drill to slowly begin the rotation of the screw. As the tip of the screw begins to drill into the surface of the metal, you may slightly increase the pressure against the screw. Keep even pressure on the screw as the screw point penetrates the surface of the metal and the threaded shaft of the screw is drawn into the newly made hole. Stop the drill when the head of the screw contacts the surface of the metal. Document Number:10010102-UM Page 9 of 94 Basic Steps Unpacking the Enclosure The Enclosure will arrive on a pallet or skid. It is recommended that the unpacking of the pallet or skid be done in close proximity to where the final installation will be. The Enclosure itself will be bolted to the pallet or skid through the bottom near the four corners. As shipped from the factory, the door will be closed and locked with any accessories and hardware that were small enough to be fit inside the Enclosure attached to the interior surfaces. Around the outside of the Enclosure there may be additional pieces that were too big to fit inside the Enclosure. This instruction manual should be attached to the top of the shipment. 1. Read this manual in its entirety paying particular attention to safety warnings throughout. 2. Remove the components from around the outside of the shipment and lay them aside. 3. The keys that are packaged with these instructions are for unlocking the Enclosure. Insert the keys into the lock in the lower portion of the door and use the finger bar to slide the door open. 4. Remove any accessories and hardware that are packaged inside the Enclosure and put them aside. 5. Using a ½ “ socket wrench, unbolt the Enclosure from the pallet or skid. Inspecting the Enclosure, Accessories, and Hardware Kits With all of the components laid out, take some time to identify all of the pieces you ordered. It is recommended that you become familiar with all of the parts before you begin the installation. 1. Refer to the product descriptions near the end of this manual for a basic list of components that are included in your assembly. Verify that all the components are present. 2. Inspect all of the pieces to ensure there aren’t any defects or damage that occurred during shipping. 3. Identify the hardware kits. These bags contain the fasteners that you will need for the final assembly of your product. They will be marked with their hardware kit number and contents. If you have access to a forklift or equipment lift for building Freestanding Enclosures WARNING: Enclosures are heavy. If you are not experienced in setting up or handling heavy equipment, it is strongly recommended that you hire professional equipment riggers. The process of assembling an Enclosure can be made simpler by supporting it with a forklift or powered equipment lift. With this method, you can assemble the product in its upright position, and you will not have to lay the Enclosure on its back to attach bottom pieces. To do this: 1. Adjust the width of your forks to be as wide as possible without interfering with the mounting holes that are at each corner of the Enclosure. 2. Align the forks with the Enclosure so that they are centered on it and so that the longer side of the bottom will span the gap between the forks (see pictures below). Document Number:10010102-UM Page 10 of 94 3. Adjust the height of the forks so that they sit level with the pallet or skid. 4. Make sure the Enclosure is not still fastened to the pallet or skid. WARNING: Have as many assistants as necessary help you to comfortably and safely slide the Enclosure off of the pallet or skid and onto the forks of your lift. 5. Raise the forks so that the bottom of the Enclosure is suspended approximately 30” above the floor. 6. Assemble the lower parts of the assembly onto the suspended Enclosure as per the instructions in the rest of the manual. Document Number:10010102-UM Page 11 of 94 Installing a 14” Deep Lower Shelf between two Side Supports The process of installing a Lower Shelf is the same whether you have a 45” or 72” wide Enclosure or Work Table. The pictures in this section show 45” wide configurations. The 14” deep shelf is installed across the rear section below an Enclosure or Work Table. The shelf has three adjustable positions. Examine the three sets of shelf mounting holes along the sides and backs of the Side Supports. The upper shelf position creates an 18” tall space below the shelf, the middle shelf position creates two 14” tall spaces one above and one below the shelf, and the lower shelf position creates an 18” tall space above the shelf. 1. Determine which shelf position best suits your application. Document Number:10010102-UM Page 12 of 94 2. Orient the shelf so that the solid top section is facing up towards the bottom of the Enclosure or Work Table and the open corners are towards the back of the Enclosure. 3. Retrieve the ¼”X 20 X 1” screws from Hardware Kit #75704. Loosely insert four ¼”X 20 X 1“L screws through each of the right and left Side Supports and thread them into the four tapped holes on each end of the shelf. Verify that the shelf is aligned correctly and then tighten all of the screws on both of the Side Supports. Tip If you will be assembling a lower cabinet, refer to the section entitled “Lower Cabinet Overview,” before returning the Enclosure to its upright position. If you have Leveling legs installed on your Enclosure or Work Table, adjust each of the legs to the same height before returning the assembly to its upright position. Document Number:10010102-UM Page 13 of 94 Installing the Side Supports on a Enclosure The process of installing Side Supports is the same whether you have a 45” or 72” wide Enclosure or Work Table. The pictures in this section show 45” wide configurations. WARNING: Remove any equipment or other loose items from within or on top of the Enclosure. Disconnect any low voltage wiring or power cables that are connected to the Enclosure. Close and lock the roll up door of the Enclosure. You will need access to the bottom of your Enclosure or Work Table. Have as many people as necessary assist you to safely and comfortably lay the Enclosure on its back. 1. Place the right and left Side Supports so that the flat sides of each are facing outward and align the tops of each of the Side Supports with the twelve threaded holes on the left and right sides of the bottom of the Enclosure. Document Number:10010102-UM Page 14 of 94 2. Locate the 5/16" x 1/2" L hex head bolts from Hardware Kit. There will be 24 or 36 of them depending on what assembly was ordered. Loosely thread all twelve of the 5/16” bolts with washers into the twelve threaded holes of the Insert Plates on both sides of the bottom of the Enclosure. Verify that the right and left Side Supports are installed correctly and then tighten all 24 of the bolts. Tip It is usually easier to first install the lower shelf onto the Side Supports and then install the Side Supports onto the bottom of an Enclosure or Work Table. Please refer to the section titled “Installing a 14” Deep Lower Shelf between two Side Supports” for further reference. Tip If you will be assembling a lower cabinet, refer to the section entitled “Installing the Lower Cabinet below a Free Standing Enclosure,” before returning the Enclosure to its upright position. Document Number:10010102-UM Page 15 of 94 Installing a Back Panel Below a Freestanding Enclosure WARNING: Remove any equipment or other loose items from within or on top of the Enclosure. Disconnect any low voltage wiring or power cables that are connected to the Enclosure. Close and lock the roll up door of the Enclosure. You will need access to the back of your Enclosure or Work Table. Have as many people as necessary assist you to safely and comfortably move the assembly into its standing position if it is not already standing. *Note: The Back Panel installation is similar on 45” and 72” Wide Enclosures and Work Tables. There will be more screws to install along the top of the 72”W Back Panel. The 45”W installation is shown here. 1. Have an assistant help you hold the Back Panel up to the back of the Side Supports. 2. Line up the holes along the outer edge of the back of the Side Supports and the sides of the Back Panel. 3. Starting with the top most of these side holes, fasten the back panel to the Side Supports. Do not tighten them fully yet. Document Number:10010102-UM Page 16 of 94 4. Now locate the 10-16 Self Tapping Screws from your hardware kit. These will be used along the top of the Back Panel and will secure it to the bottom of your Desk Top of your Enclosure or Work Table. 5. Drive the Self Tapping screws into the pilot holes on the back of the Desk Top. Do not fully tighten these screws yet. 6. Locate two more 10-32 screws form your hardware kit. These will be used to fasten the Back Panel to the Lower Shelf. 7. Install these two screws through the back panel and into the middle of the Lower Shelf. 8. Ensure that all the holes are registering correctly, and securely fasten all of the screws on the Back Panel. Document Number:10010102-UM Page 17 of 94 If your Enclosure has a Lower Cabinet: Lower Cabinet Overview There are three basic types of Lower Cabinets that are available in Standard and Rack Mount configurations: A two door, 45” wide Lower Cabinet assembly installed below a 45” Wide Enclosure or Work Table. A three door, 72” wide Lower Cabinet assembly installed below a 72” Wide Enclosure or Work Table. A two door, 45” wide Lower Cabinet assembly installed below a 72” Wide Enclosure or Work Table. The two door 45” wide Lower Cabinet assemblies installed below a 72” Wide Enclosure or Work Table can be ordered with the option to install the cabinet below the right or left sides of the 72” Wide Enclosure or Work Table. Note that the Side Supports are engineered to be universal and can be configured to be installed either on the right or left side simply by changing where the Side Support Front Brace is attached. To relocate the Side Support Front Brace, remove the three screws that attach it to the Side Support flip the Side Support upside down and reinstall the Front Brace. If you plan on having the chair on the right side and the 45”Wide Lower Cabinet on the left side, configure two Side Supports to be rights and configure one to be a left. Alternately, if you plan on having the chair on the left side and the 45”Wide Lower Cabinet on the right side, configure two Side Supports to be lefts and configure one to be a right. Rack Mount Lower Cabinets are be equipped with Vented Doors, Modular Ventilation Systems and Rack Mount Drawers. If you are installing rack mount drawers inside of your lower cabinet; refer to the section “Installing Rack Mount Drawers in an Enclosure or Lower Cabinet” and install the rack mount drawer slides onto the bottom panel before you assemble your lower cabinet. Standard two Lower Cabinet Kit- Includes two Lower Cabinet two door assemblies with stainless steel fronts, one galvanized Lower Cabinet bottom assembly, one galvanized Lower Cabinet back panel, two galvanized half shelves to create one full depth shelf and a hardware kit. The Shelf has three adjustable positions to create an 18” tall space above or below the shelf. The cabinet Doors feature heavy duty magnetic catches and door handles that can be secured with any standard padlock either keyed or combination type (not included). Cabinet interior dimensions measure approximately 30”H X 44”W X 30” D Attaching the Lower Cabinet Shelves Two of the 14” Half Depth Shelves are used together as rear and front sections to create one 28” Full Depth Shelf. The shelf has three adjustable positions. Examine the three sets of shelf mounting holes along the sides and backs of the Side Supports. The upper shelf position creates an 18” tall space below the shelf, the middle shelf position creates two 14” tall spaces one above and one below the shelf, and the lower shelf position creates an 18” tall space above the shelf. Determine which shelf position best suits your application. 1. Orient the first half of the shelf so that the solid top section is facing up towards the bottom of the Enclosure and the open corners are towards the back of the Enclosure, this shelf will act as the rear section of the full depth shelf. 2. Loosely insert four ¼”X 20 X 1/2“ L screws from Hardware Kit # 75704 through each of the right and left Side Supports and thread then into the four tapped holes on the ends of the shelf. Document Number:10010102-UM Page 18 of 94 3. Orient the second half of the shelf so that the solid top section is facing up towards the bottom of the Enclosure or Work Table and the open corners are towards the front of the rear half of the shelf. This shelf will act as the front section of the full depth shelf. Loosely insert four ¼”X 20 X 1/2" L screws through each of the right and left Desk Sides and thread then into the four tapped holes on the ends of the shelf. 4. After all 16 of the ¼”X 20 X 1/2" L screws are inserted through each of the right and left Side Supports and are threaded into the ends of the shelf, check that the front and rear sections of the shelf are aligned correctly and then tighten all of the screws securely. Tip There are also 4 screws which attach the shelves to the back, but you will install these later when the assembly is upright. Attaching the Lower Cabinet bottom assembly 1. Lift the Lower Cabinet Bottom Assembly and align the mounting holes on it with the holes on the bottom of the Side Supports. 2. Locate the 5/16”x 1 ¾” L bolts from your Lower Cabinet Hardware Kit . The kit number will be different depending on which Lower Cabinet you ordered, It will be labeled either 75707, 75708, or 75709; Document Number:10010102-UM Page 19 of 94 Tip If you are installing Caster Wheels on your Enclosure; align the mounting plates of the Caster Wheels with the holes in the bottom of the Lower Cabinet Bottom assembly and install the long bolts with washers through the mounting plate of each Caster Wheel Assembly and into the bottom assembly. 3. Loosely install all four bolts into each plate before tightening them. After all of the bolts are installed, carefully tighten each bolt until it is snug and the end of each bolt goes completely through the Insert plate and can be seen extending approximately ½” above the bottom of the Side Supports. 4. If you are using Leveling legs on your Enclosure, install them into the Insert Plates at this time. Document Number:10010102-UM Page 20 of 94 5. Now install and tighten a 5/16” nut and a washer onto each of the threaded ends of the 16 bolts that are extending approximately ½” above the bottom of the Side Supports. WARNING If you have Caster Wheels installed on your Enclosure, actuate the brake mechanisms to keep the wheels from turning. If you have Leveling legs installed on your Enclosure, adjust each of the legs to the same height. Have as many assistants as necessary help you to comfortably and safely lift the Enclosure with the Side Supports and Lower Shelf to the upright position. 6. At this time, you can complete the installation of the shelves by installing the final 4 10-32 x ¼” screws from Hardware Kit #75704 through the back of the side supports and into the shelves: Two into the left and two into the right. Installing the Lower Cabinet Back Panel WARNING You will now need access to the back of the Enclosure and Cabinet. If the assembly is not already upright, have as many assistants as necessary help you to comfortably and safely lift the Enclosure with the Side Supports and Lower Shelf to the upright position. Document Number:10010102-UM Page 21 of 94 The process of installing a Lower Cabinet Back Panel is similar for 45” or 72” wide Enclosures or Work Tables. There will be more Self Tapping screws to install along the top and bottom of 72” Wide Back Panels. The pictures in this section show 45” wide configurations. 1. Align the Back Panel with the holes along the back of the Side Supports, the back of the bottom of the Enclosure or Work table and the back of the Lower Shelf. 2. Loosely install the eight 10-32 x 3/8”L screws, through each side of the back of the Lower Cabinet Back Panel, and into the threaded holes on the Side Supports. Document Number:10010102-UM Page 22 of 94 3. Loosely install the 10-16 x ½” self tapping screws into the top and bottom rows of the Lower Cabinet Back Panel. 4. Insert two 10-32 x 3/8”L through the Back Panel and into the rear of the Lower Shelf. Document Number:10010102-UM Page 23 of 94 5. After all of the screws have been loosely installed into their correct locations, tighten each screw down completely. Installing a Back Panel Behind a 72”W Enclosure with a 45”W Lower Cabinet WARNING You will now need access to the back of the Enclosure and Cabinet. If the assembly is not already upright, have as many assistants as necessary help you to comfortably and safely lift the Enclosure with the Side Supports and Lower Shelf to the upright position. 1. Locate the 10-32 screws from your hardware kit. These will be used to secure the Back Panel to the Side Supports. 2. Have an assistant help you line up the Back Panel with the threaded holes that run vertically along the outer edges of the side supports. 3. Starting with the top most holes, install the screw as shown below, but do not fully tighten them yet. 4. Next, you will need the 10-16 screws from your hardware kit to secure the Back Panel along the top and bottom. Document Number:10010102-UM Page 24 of 94 5. Install the self tapping screws through the Back Panel and into the back edge of the Desk Top. Do the same along the back of the bottom Pan. 6. The final two 10-32 screws are installed into the Lower Shelf through the Back panel. 7. Make sure all of the fastening points are lined up correctly and tighten them down snugly. Document Number:10010102-UM Page 25 of 94 Installing the 45" Wide Lower Cabinet Door Assemblies 1. Open the hinge and observe the screws that attach the hinge to the door. You will be attaching the hinge to the Side Supports through the holes that are diagonal from these screws, so that they do not interfere with one another. 2. Hold one of the Lower Cabinet Door assemblies the so that the holes in the hinge aligns with threaded holes along the inside edges of either the right or left Side Supports. 3. Attach the hinge to the Side Support through with the pattern shown below using the 10-32 x 3/8”L screws from your Lower Cabinet Hardware Kit until they are screwed down completely, but not yet fully tightened down. *Left Door attachment shown. Side Support omitted for clarity Tip When attaching doors on lower cabinet, the hinge is fastened to the Side Support or door spacer through the holes in the hinge that aren’t lined up with the screws which attach it to the door. The hinge will not be able to close all of the way if the screws do not ‘alternate’. Document Number:10010102-UM Page 26 of 94 4. Carefully close the door assembly and verify that it aligns correctly with the front of the bottom edge of the Enclosure and the front edge of the Lower Cabinet Bottom Assembly. 5. Carefully open the door and while supporting the free edge of the door, tighten each screw along the hinge to secure the door to the Side Support. 6. Repeat the above process with the remaining door. 7. If there is a slight misalignment of either of the doors, carefully loosen the screws holding the door just until the door can be moved slightly and raise or lower the door while supporting the free edge and then retighten all of the screws along the hinge and recheck the alignment of the doors. 8. Locate the magnetic door catch, the magnetic door catch mounting plate, two 6-32 x 1"L machine screws, two 6-32 lock nuts, and two 6-32 x 3/8"L from your Lower Cabinet Hardware Kit # 75707 or 75708. Document Number:10010102-UM Page 27 of 94 9. Install the magnetic door catch in the middle of the lower shelf by attaching the mounting plate with two 6-32 x 3/8” L machine screws into the tapped holes on the bottom middle of the shelf. Two machine screws and nuts attach the catch to the mounting plate. When installed properly, the faces of the magnets should make contact with the closed lower cabinet doors. Adjusting the leveling legs 1. With the Enclosure or Work Table in its upright position, place a level lengthwise on the desktop. 2. If the desktop is not level, use a crescent wrench to turn the leveling feet on the side that is lower. Assuming that you are looking down at the Leveling Foot, you will be turning the wrench clockwise in order to raise that side. 3. Turn each of the leveling feet on that side an equal amount of times until the desk top is level in that direction. 4. Rotate the level 90 degrees. 5. If the desktop is not level in this direction, repeat the leveling procedure with side that is lower. Document Number:10010102-UM Page 28 of 94 If your Enclosure has an All-in One Drawer Set: Installing a Pull Out Work Surface below an Enclosure Tip The work surface can be installed under either side of an enclosure. The pictures in this section illustrate the installation of a work surface under the right side of an enclosure. If you wish to install it on the left side, the processes in the diagrams should be “mirrored”. If you are installing a Work Surface and any Drawer Frame below it, the Work Surface Frame must be installed first and be completely attached to the bottom of the Enclosure before any Drawer Frame can be attached to the bottom of the Work Surface Frame. 1. The Pull Out Work Surface as shipped from the factory has the Work Surface Top installed in the closed position inside the Work Surface Frame. Remove the work surface by holding the frame securely and withdrawing the Work Surface completely out of the front of the frame. 2. Examine the top of the Work Surface Frame and note the rows of different sized punched holes. Document Number:10010102-UM Page 29 of 94 3. Determine which side of the Enclosure you want the Work Surface to be located under. Once you have decided which side the Work Surface will be mounted on, look under the front of the Enclosure and examine the four bolts which are threaded through the front of the Side Support and into the bottom of the Enclosure. There will be two pairs of bolts, one pair is closest to the side of the Enclosure and the other pair is closest to the middle of the Enclosure. Remove all 4 of the 5/16” bolts. 4. Prepare the Work Surface Frame by attaching three Spacer Washers with the double sided adhesive rings to the top of the frame. Remove the paper backing from the adhesive rings and place one Spacer Washer over the hole in the top of the Work Surface Frame that will align with the back bolts that you just removed from the bottom of the of the Enclosure. Place two more Spacer Washers over each of the smaller holes that are at the ends of the last row of holes along the back of the top of the Work Surface Frame. *Right side installation shown. Mirror spacer washer placement for left side installation. 5. Lift the Work Surface Frame and align the rows of holes on the top of the Work Surface Frame with those on the C beams under the front of the Enclosure. 6. Use a socket wrench to reinsert the two inner 5/16” bolts with washers through the two larger holes in the top of the Work Surface Frame and thread the bolts into the threaded holes in the bottom of the Enclosure. Do not fully tighten these bolts yet. Document Number:10010102-UM *Right side installation shown. Mirror bolt placement for left side installation. 7. Retrieve the 10-16 x ½” L self tapping screws from Hardware Kit #75705. Page 30 of 94 Document Number:10010102-UM Page 31 of 94 8. Using a driver drill with a #2 Phillips bit, install two self tapping screws through two of the small holes in the first row or small hole on the front of the top of the Work Surface Frame and drive them into the pilot holes in the front C Beam. Then, install two more self tapping screws through the last row of small holes in the back of the top of the Work Surface Frame and drive them into the pilot holes in the middle front C Beam. *Right side installation shown. Mirror screw placement for left side installation. 9. Verify that the Work Surface Frame is correctly aligned with the front of the bottom of the Enclosure and finish evenly tightening the two 5/16” bolts. Document Number:10010102-UM Page 32 of 94 10. Reinsert the Work Surface Stop Screws through the bottom of the Work Surface Frame and then slowly pull the Work Surface out to verify that it stops correctly. Installing Drawers below a Work Surface Tip If you are installing a Work surface and any drawer frame, the Work Surface Frame must be installed first and be completely attached to the bottom of the Enclosure before any Drawer Frame can be attached to the bottom of the Work Surface Frame. Removing the Drawers from the Drawer Frames As shipped from the factory the drawers will be installed the closed position inside of the drawer frame. You’ll need to remove the drawers before you can mount the drawer frame. Remove each of the drawers one at a time by first pulling them fully out and then carefully releasing the catches on the drawer slides on both sides of the drawer and then pulling straight out and withdrawing the drawer. Carefully push the middle rails of the drawer slides back in after removing each drawer. Document Number:10010102-UM Page 33 of 94 Document Number:10010102-UM Page 34 of 94 Installing a Drawer Frame onto the bottom of a Pull Out Work Surface 1. Examine the Drawer Frame assembly and note the rows of holes along the top of the drawer frame. These holes will align with threaded holes and pilot holes under the front of the Enclosure or Work Surface. 2. Lift the Drawer Frame and align the rows of holes in the top of the Drawer Frame with the rows of Holes in the bottom of the Work Surface Frame. Loosely install 8 each 10-32 screws from Hardware Kit #75705 to attach the two frames together by inserting the screws up through the top of the Drawer Frame and thread them into the threaded holes on the bottom of the Work Surface Frame. *All-In-One drawer frame shown Document Number:10010102-UM Page 35 of 94 3. There are slots and holes on the front edge of the side of the drawer frame that will line up with threaded holes on the Side Supports. Use 10-32 screws from Hardware Kit # 75707 to loosely attach the sides of the drawer frame through these slots to the Side Supports. Document Number:10010102-UM Page 36 of 94 Examine the back side of the drawer frame and note the series of pilot holes along either side. These holes are for the mounting of the Rear Support Bracket that will further stabilize the drawer assembly. 4. Attach the Rear Support Bracket to the back of the drawer frame using four 10-16 self tapping screws from Hardware Kit # 75707. 5. Attach the Rear Support Bracket to the bottom of the Lower Shelf using four 10-32 machine screws from the same Hardware Kit. Document Number:10010102-UM Page 37 of 94 6. After all of the screws are installed, verify that the Drawer Frame is correctly aligned with the bottom of the Work Surface Frame and the Side Support, if it looks correct, tighten all of the screws along the top and side of the Drawer Frame. Installing the Vertical Shelf Standards above an Enclosure 1. Examine the two Vertical Shelf Standards and note that there is one left and one right standard and each has a base plate attached to one end that has three mounting holes. These mounting holes will align with the three threaded holes in the Insert Plates that are installed in left and right rear ends of C beam inside the rear of the Enclosure top panel. 2. Locate the 6 - 5/16 bolts and washers included in the Hardware Kit # 75712. 3. Align the three holes in the base plates of the left and right Vertical Shelf Standards with the three threaded holes in left and right rear corners of the Enclosure top panel. 4. Using the ratchet and a ½” socket wrench, loosely install the 5/16” bolts with washers through the base plates of the shelf standards and into each of the 6 threaded holes. Check that the base plates are correctly aligned with the corners of the Enclosure top panel and then tighten the bolts securely. Document Number:10010102-UM Page 38 of 94 If your Enclosure has an Upper Cabinet: Upper Cabinet Overview The Upper Cabinet Kits- 45” wide cabinets include two Upper Cabinet two door assemblies and 72”wide cabinets include three door assemblies and two door dividers. All cabinets include two stainless steel sides, one galvanized Upper Cabinet back panel, two 14” shelves with stainless steel tops that will create the top and bottom of the cabinet, four galvanized shelf brackets, and a hardware kit. The cabinet doors feature heavy duty magnetic catches with have integral door handles that can be secured with a padlock either keyed or combination type (not included). On 72" wide assemblies a padlock with a 3.5" Long shackle is needed to reach between doors. Interior dimensions for cabinets are approximately 18”H X 44”W X 14” D 45” wide cabinets and 18”H X 71”W X 14” D for 72” wide cabinets. Note that the top and bottom sections of the Upper Cabinet assembly are made of standard Half Depth Shelves with Stainless Steel tops. In the standard configuration the bottom Shelf is turned upside down in order to place the Stainless Steel side on the outside of the bottom of the cabinet and place the lower Shelf brackets on the inside of the cabinet. Pre assembly for the Upper Cabinet Assemble two shelves 1. Lay the shelf assemblies solid side down. 2. Place the shelf brackets on the shelf so that the four slots line up with the four threaded holes on the bottom of the shelf. 3. Align the four slots in the tops of the shelf brackets with the four threaded holes in the bottom of the shelf. Document Number:10010102-UM Page 39 of 94 4. Insert four ¼” -20 screws with washer through the slots in the shelf brackets and loosely thread them into the threaded holes on the bottom of the shelf. Verify that the front edge of the bracket is flush with the shelf, before tightening the eight screws to secure the shelf to the shelf brackets. Install the cabinet top 1. Determine where you want your cabinet to sit on the vertical shelf standards. Tip Use a small piece of paper tape to mark the desired position for the cabinet’s top on the sides of the Vertical Shelf Standard. Make note that the cabinets are 18” high, so be sure to allow enough room below your mark to allow the rest of the cabinet to fit. This step will be easier with an assistant to hold the shelf up while it is being fastened to the shelf standards. 2. Insert the 3/8” bolts with washers from Hardware Kit # 75710 through the holes on the shelf brackets. 3. Loosely thread channel strut nuts (See pictures below for visual reference) from the same kit onto each bolt. 4. Have an assistant help you lift the shelf to the desired location on the vertical shelf standards. 5. With the channel strut nuts turned vertically, insert them into the vertical shelf standards. *Shelf omitted for clarity 6. With the nuts inside the channel, use a screwdriver or other rigid probe to turn them horizontal. Document Number:10010102-UM *Shelf omitted for clarity 7. Tighten the bolts down until they hold up the shelf on their own. 8. Use a level to make sure the shelf is horizontal. 9. Tighten the bolts down fully. Page 40 of 94 Document Number:10010102-UM Page 41 of 94 Installing the Upper Cabinet sides and back section 1. Lift one of the Upper Cabinet Side sections and align the bent edge towards the front edge of the shelf. 2. Align the four 1/4” holes along the lower edges of the side section with the four threaded holes in one of the shelf. 3. Insert 4 -1/4”-20 SS screws from Hardware Kit # 75710 through the four holes in the side section and thread them loosely the four threaded holes in the ends of the shelf. 4. Now install another side section on the other end of the top shelf in the same way. Do not tighten the screws until all of them started in the threaded holes. *The 45” W configuration is shown. The shelves which compose the top and bottom of the 72" cabinets are proportionally longer than pictured. 5. Have an assistant help you lift the Upper Cabinet back section up so that the four holes in the lip of it line up with the pilot holes in the very back of the upper shelf. Document Number:10010102-UM Page 42 of 94 6. Attach the Upper Cabinet Back Section with 10-16 self tapping screws from the same Hardware Kit to the back of the top shelf. Installing the bottom of the Upper Cabinet 1. Lift the other shelf and turn it so that the Stainless Steel top is facing down and the split galvanized side is facing up (you are installing another shelf upside down to be the bottom of the cabinet). 2. Insert two more 3/8” bolts with washers from your Hardware Kit and looselt thread Channel strut nuts onto the end. 3. Make sure to turn rear edge with the cut out corners toward the back of the cabinet assembly, and carefully slide the shelf between the two side sections and up against the inside of the back section. 4. Turn the channel strut nuts horizontal in the same manner when the upper section was installed. Tip The process of lifting, aligning, and attaching the pieces onto the vertical shelf standards will be made much easier by having one or more people assist you. 5. Align the holes along the bottoms of the side sections with the threaded holes in the ends of the shelf and loosely thread 4 -1/4”-20 SS screws through the holes in each of the side sections and into the threaded holes on the ends of the shelf. Document Number:10010102-UM Page 43 of 94 Tip Do not tighten the screws until all of them are started in the threaded holes. 6. Now attach the Upper Cabinet Back Section with 10-16 self tapping screws to the back of the bottom Shelf. 7. Install the last four ¼ x 20 screws in the front corners of the sides. These should thread into the front of the brackets. 8. Verify that the shelf is aligned correctly and then tighten all of the screws and bolts. Document Number:10010102-UM Page 44 of 94 Installing the 45” W Upper Cabinet Doors Assemblies 1. For the 45” W configuration: Install the magnetic catches below the middle of the front of the top shelf with the two 6-32 x 1”L screws from Hardware Kit # 75710. See below for visual reference. 2. Hold one of the Upper Cabinet Door assemblies the so that the holes in the hinge align with the holes along the inside edges of either the right or left Upper Cabinet side sections. 3. Secure the top most fastening point with a 10-32 machine screw that passes through the hinge, the cabinet side, and loosely thread a lock nut from the same Hardware Kit onto the end so that it is held in place. 4. Repeat this process with the remaining holes. 5. Carefully close the door assembly and verify that it aligns correctly with the front edges of the of the top and bottom shelves. Carefully open the door and while supporting the free edge of the door, tighten each screw along the hinge to secure the door to the Cabinet side sections or the door divider. 6. Repeat the above process with the remaining doors. If there is a slight misalignment of either of the doors, carefully loosen all of the screws holding the door until the door can be moved slightly and raise or lower the door while supporting the free edge and then retighten all of the screws along the hinge and recheck the alignment of the door. Document Number:10010102-UM Page 45 of 94 Securing a Freestanding Enclosure to the Wall and Floor WARNING: This is a critical safety step. Enclosures should always be fastened to a secure structure to prevent tipping. 1. Remove the screws that attach the inner rear panel and remove the inner rear panel. *Side omitted for clarity Document Number:10010102-UM Page 46 of 94 Note that there are columns of predrilled pilot holes in the outer back panel that are located to align with wall studs which are spaced at 16” intervals. Drill out the pilot holes to accommodate the fasteners that you are using to attach the Enclosure to the wall. These fasteners are not included in your Hardware Kit because different materials require different types of fasteners. Determine the appropriate fastener for the surface into which you will be securing the Enclosure. *Side omitted for clarity Note that if your Enclosure is a 64” high model, you will need to remove two rear inner panels instead of one in order to access all of the wall attachment holes on the outer rear panel. 2. Other holes can be drilled through the outer back panel as needed. 3. Once the Enclosure is secured to wall structure, reinstall the rear inner panel. Document Number:10010102-UM Page 47 of 94 Note that there are also two vertical columns of mounting holes provided along the back sections of the side supports where they meet the wall. These holes are located so that they will align with wall studs which are spaced at 16” intervals. The row of holes closest to the outside of the side support is spaced to align with studs when side supports are used with 72” wide enclosures. The columns of holes on the inside are used with 45” wide enclosures. 4. Fasten the Side Supports to a secure structure using the same type of fastener that were used on the back panel. Document Number:10010102-UM Page 48 of 94 5. The securing straps should be fastened to the floor with a ½” diameter fastener appropriate for the surface you will be securing it to. Document Number:10010102-UM Page 49 of 94 Installing cabling through cable path openings There are six Cable Path Openings on the 45” wide Enclosures with one on each of the right and left sides of the top near the rear, one on the right and left sides of the bottom panel near the rear and one on each side of the Enclosure near the back. The 72” wide Enclosures have an additional cable path opening in the center of the bottom panel. 1. To open any of the cable passage slots; remove the single screw at the end of the cover. 2. Slightly loosen the two screws on the sides of the cover so that the cover can be slid open as needed. Tip After installing the associated cabling, slide the cable path cover down to reduce the open size of the cable passage slot to a minimum area. Be sure to leave enough room so that the flexible grommet stripping can be installed on the edges around the cables. See the next section for detailed instructions on flexible grommet stripping. 3. Once the opening is the desired size, retighten the two screws on the sides of the cover. If you have Side Supports on your Enclosure, note that there are also two Cable Path Openings on each of the side supports one at the top and one at the bottom. There are additional cable passage slots through the rear corners of the rear Half Depth Lower Shelf. If your Enclosure has a Full Depth Lower Shelf, there are also additional cable passage slots through sides of the middle of the Shelf as well. The cable passage slots in the shelves do not have covers. Document Number:10010102-UM Page 50 of 94 Installing flexible grommet material around cable path openings WARNING: The edges of the cable path opening may be sharp. installing the flexible grommet material. Use caution when The flexible grommet material is included to protect against possible wear on wiring resulting from contact with the cable path openings. It is necessary to install this edging on every sheet metal opening that wiring passes through to protect your equipment and to prevent wiring from becoming damaged. *Note: This procedure assumes that you have already adjusted your cable path opening to the desired width. If you have not done this, please refer to the section entitled "Installing low voltage cabling." 1. Find the flexible grommet edging material from your hardware kit #75702. 2. Holding one edge of the flexible grommet edging start pressing it onto one of the four corners of the cable path opening. 3. Continue pressing the flexible grommet onto the edge of the cable path opening until it has completely covered all four sides. 4. Use shears to snip off any excess edging. Document Number:10010102-UM Page 51 of 94 Operating the roll up door and lock The Roll Up Doors are made of flat sections of aluminum extrusion with inner and outer hinge features on each edge. The hinge features are fitted over one another so that each door section is connected along its entire length to the next. The ends of each door section include self lubricating plastic guides which travel in the tracks along each side of the door openings. A balancer mechanism is installed behind the header of the enclosure which offsets the weight of the door to greatly reduce the amount of force needed to raise and lower it. Raise and lower the door slowly using only your finger tips on the finger bar. Use extra care particularly when raising the door; even a properly adjusted door balancer might have a slight upward or downward pull to it at some positions. Before lowering the door; check that both tracks and the area where the door will rest against the bottom of the enclosure are free from obstructions. The locking mechanism features two flat latching bars with ends that travel into slots in each of the tracks to secure the door. Insert the key and turn it clock wise (to the right) to lock the door; to unlock the door; turn the key counter clockwise to the left. Note that when the door is new; it may be necessary to apply a slight downward pressure or slight shaking motion on the finger bar to ease the engagement and disengagement of the lock bars. Always remove the key from the lock after unlocking the door and before raising the door. Connecting the Enclosure to 110VAC power If your enclosure has a multiple outlet strip you can route the cord from it out through one of the Cable Path Openings and plug it into a power receptacle. For permanent installations, an electrician can install a power receptacle inside of the enclosure. Document Number:10010102-UM Page 52 of 94 Optional Steps Changing the orientation of a Side Support 1. Remove the four 5/16” bolts and washers that secure each of the Insert Plates. 2. If your Enclosure has Caster Wheels attached to the Insert Plates, remove the four 5/16 bolts and washers that secure each of the Caster Wheels and then remove the wheels. 3. Note that the Side Supports are engineered to be universal and can be configured to be installed either on the right or left side simply by changing where the Side Support Front Brace is attached. See drawings below for visual reference. 4. To relocate the Side Support Front Brace, remove the three screws that attach it to the Side Support then turn the Side Support upside down and reinstall the Front Brace. Document Number:10010102-UM Page 53 of 94 5. Reinstall the Insert Plates with the 5/16” bolts on the side that will now be the bottom. 6. Reinstall the Leveling Legs. Modular Ventilation Systems for Enclosures overview Modular Ventilation Systems can be installed on the right or left sides inside of any Enclosure. This allows Enclosures that use only one modular ventilation system to have one side placed against a wall or in a corner. Each system can support up to eight fans. 72” wide Enclosures can be equipped with two separate ventilation systems with one system installed on each side. There are sections of slots at the middle of the top and bottom of each side of the Enclosures. The ventilation systems are designed to pull cooler air in from the lower slotted inlet sections, then the air flows across the warm equipment and is drawn into the ventilation system near the top, rear, center of the Enclosure by the fans which then exhaust the warmer air out through the upper outlet sections. WARNING: If you will be housing electronics in a PQS Enclosure or Cabinet, make sure that there is adequate ventilation to keep your electronics at a safe operating temperature Document Number:10010102-UM Page 54 of 94 Document Number:10010102-UM Page 55 of 94 Testing and Regulating the Internal Temperature of Enclosures or Lower Cabinet Maintain at least 12" of clear space along the entire sides of Enclosures with active intake and exhaust sections and at least 12" of clear space in front of the intake and exhaust sections of cabinet doors. Factors such as the ambient temperature in which the Enclosure is installed and the amount of electronic equipment installed inside it will affect the internal temperature. To test whether you have adequate ventilation, install the electronics you wish the Enclosure or Cabinet to house along with an attached thermometer, bring them up to operating temperature, make sure the fans are activated, close the doors, and check the internal temperature every 2 hours over a 24 hour period. If the operating temperature exceeds the optimum operating temperature recommended by your electronic equipment's manufacturer, stop the test. You have three options that will potentially lower the internal temperature of your Enclosure or Cabinet. You can expand your modular ventilation system (PQS ventilation systems can be expanded up to 8 fans per vent box reference the section, “Adding fans to a modular ventilation system”), you can relocate the Enclosure or Cabinet to a cooler area, or you can lower the ambient temperature in which the Enclosure or Cabinet is installed with air conditioning. Be sure to test the temperature again once you have made the necessary changes to verify that your electronics are running at the optimum temperature recommended by the manufacturer. Relocating a Modular Ventilation System from one side of an Enclosure to the other As shipped from the factory, all Enclosures that are equipped with ventilation systems have them installed on the right side. WARNING To relocate a ventilation system, first unplug the power cord, verify that the fans are off and remove the power cord from the cable clamps which attach the power cord to the inside of the enclosure. WARNING Be advised that the sheet metal edges of the ventilation systems may be sharp. Please handle them carefully. Document Number:10010102-UM Page 56 of 94 1. Remove the screws that attach the fan cover to the ventilation system and remove the fan cover with the cord. 2. Remove the screws from inside the ventilation system that attach it to the top of the enclosure. Document Number:10010102-UM Page 57 of 94 3. Remove the screws and nuts which attach the Ventilation System Blank Covers from the “new ventilation system location” side of the enclosure and remove the covers from the sections of lower inlet and upper exhaust slots on the side of the enclosure. 4. Reinstall the Ventilation System Blank Covers over the sections of inlet and exhaust slots on the “old ventilation system location” side of the enclosure. 5. Align the mounting holes in the top of the ventilation system with the pilot holes in the middle C Beam in the top of the enclosure on the “new ventilation system location” side and install the screws to secure it. 6. Reinstall the fan cover in the ventilation system. Install the power cord with the cord grommet in the slot of the fan cover and reinstall the fan panel cover in the ventilation system. Document Number:10010102-UM Page 58 of 94 7. Install the fan power cord in the cable clamps and plug the power cord back into an outlet. Verify that the fans are working and that air is flowing into the inlet slots and out of the exhaust slots. Document Number:10010102-UM Page 59 of 94 Installing wheels on the Side Supports of an Enclosure *Note: If you have a Lower Cabinet, this process is similar, but the longer 5/16" bolts that secure the Lower Cabinet Bottom Assembly will be used to pass through the mounting plate of the caster wheel, the bottom of the Lower Cabinet, and the bottom of the Side Support. Secure the long 5/16" bolts with same locking nuts that are use in the lower cabinet bottom assembly. 1. Align the mounting plates of the Caster Wheels with the holes in the bottom of the Side Supports and then loosely reinstall the four 5/16” bolts with washer washers through the mounting plates of each of the Caster Wheel Assemblies and into each of the four Insert plates. 2. After all of the bolts with washers are installed check that the Caster Mounting plates are properly aligned with the Insert Plates and then carefully tighten all of the bolts. Document Number:10010102-UM Page 60 of 94 Adjusting the height of a full length interior Wire Rack Shelf The full length Wire rack shelves have support brackets at either end which are secure to channels by means of bolts and Channel Strut nuts. WARNING Remove any equipment and items from the shelves. 1. Mark the new desired shelf height on the channels with a piece of tape. 2. Place a level on top of the shelf lengthwise. 3. Have someone assist you by holding the shelf up as you loosen the bolts with a socket wrench on the inside of the brackets. Do not loosen the bolts all the way. The Channel Strut nuts can slide inside the channels without removing the bolts completely. 4. Once the bolts are loose enough the shelf should be able to slide up and down with the nuts still inside the channels. 5. Lift the shelf to its new desired location. 6. Begin to tighten down the bolts once again making sure that channel strut nuts are still spanning the opening of the channel. 7. Verify that the shelf is level. 8. Tighten all of the bolts until the shelf is once again secure. Installing a VESA Monitor on a mount which is attached to an Enclosure interior pillar The VESA monitor mount will support monitors up to 24” in size that are either 75mm or 100mm VESA compatible. If the monitor has a desk top mount attached to it; you will need to remove it before proceeding. 1. Find a smooth clean surface which will not scratch the monitors screen and carefully set the monitor down with the screen side facing down. 2. Examine the monitor mount inside of the enclosure and become familiar with the basic components; The Stand Off Bracket assembly with a large five point knob attaches the Mount Arm to the pillar. The Mount Arm connects between the Stand Off Bracket assembly and the Tilt Head assembly and the monitor attaches to the flat section of the Tilt Head assembly. Note that the large five point knob on the Stand off bracket assembly secures the side to side position of the Mount Arm at the mounting point. Note that the two four point knobs on the sides of the Tilt Head assembly are used to adjust and secure the up and down position of the screen on the end of the Mount Arm. Note that large five point knob below the Tilt Head assembly is used to adjust and secure the side to side position of the screen on the end of the Mount Arm. Document Number:10010102-UM Page 61 of 94 3. You will need to remove the Tilt Head assembly from the end of the Mount Arm and attach it to the VESA mounting holes on the back of your monitor. Hold the Tilt Head assembly to keep it from turning and unscrew and remove the large five point knob from below the Tilt Head assembly. Note that there is a rubber washer installed between the Tilt Head assembly and the end of the mount arm. 4. Note the pattern of four threaded holes on the back of the monitor. Place the flat section of the Tilt Head assembly on the back of the monitor and align one set of the eight holes on the Tilt Head assembly with the pattern of four threaded holes on the back of the monitor. The smaller pattern of four threaded holes on the back of the monitor are spaced at 75mm and the larger pattern is spaced at 100mm. 5. Install the appropriate screws through the holes in the Tilt Head assembly and into the four threaded holes on the back of the monitor. M4 X 8MM screws are supplied with you hardware kit # 75701. WARNING If the screws are too long they may damage the monitor. Make sure that the screws do not penetrate deep enough into the monitor to damage it. 6. Verify that the rubber washer is correctly installed and is aligned over the hole on top of the end of the Mount Arm. Carefully lift the monitor with the Tilt Head assembly installed and align the threaded in the bottom of the Tilt Head assembly with the hole on the end of the Mount Arm. Install the threaded shaft of the large five point knob up through the hole in the bottom of the end of the Mount Arm, through the rubber washer and screw it into the threaded in the bottom of the Tilt Head. 7. Turn the monitor and attach the video and power connectors, adjust the screen to the desired position and then tighten all of the securing knobs. Document Number:10010102-UM Page 62 of 94 Relocating a VESA Monitor mount which is attached to an Enclosure interior pillar Document Number:10010102-UM Page 63 of 94 Examine the monitor mount inside of the enclosure and become familiar with the basic components; The Stand Off Bracket assembly with a large five point knob attaches the Mount Arm to the pillar. The Mount Arm connects between the Stand Off Bracket assembly and the Tilt Head assembly and the monitor attaches to the flat section of the Tilt Head assembly. If you are just moving the mount, you can skip steps 1 and 2 below. 1. If the monitor is already attached to Tilt Head on the Mount Arm, you will need to remove it before relocating the Mount Arm. Turn the monitor and disconnect the video and power cables. Support the full weight of the monitor and unscrew and remove the large five point knob from below the Tilt Head assembly. Note that there is a rubber washer installed between the Tilt Head assembly and the end of the mount arm. 2. Find a smooth clean surface which will not scratch the monitor’s screen and carefully set the monitor down with the screen side facing down. 3. Remove the rubber washer from the end of the Mount Arm and set it aside. 4. Support the Mount Arm and use a Phillips screw driver to remove the four ¼” -20 screws which attach the Stand Off Bracket assembly to the pillar. Carefully reach into the slot adjacent to where the Stand Off Bracket assembly was attached to the pillar and support the Mounting Plate; remove the two small 6-32 screws which secure the Mounting Plate to the pillar and carefully remove the Mounting Plate from the slot in the Pillar. 5. Slide the Mounting Plate into the slot on the Pillar that will be the new mounting location and loosely reinstall the two small 6-32 screws which secure the Mounting Plate to the Pillar. Verify that the four threaded holes in the Mounting Plate are correctly aligned with the four holes in the Pillar, adjust as needed and then gently tighten the two small 6-32 screws. Document Number:10010102-UM Page 64 of 94 6. Support the Mount Arm, align the four holes in the Stand Off Bracket assembly the four threaded holes in the Mounting Plate and then reinstall the four ¼” -20 screws to secure the Stand Off Bracket assembly to the Pillar. *Monitor not shown 7. Verify that the rubber washer is correctly installed and is aligned over the hole on top of the end of the Mount Arm. Carefully lift the monitor with the Tilt Head assembly installed and align the threaded in the bottom of the Tilt Head assembly with the hole on the end of the Mount Arm. Install the threaded shaft of the large five point knob up through the hole in the bottom of the end of the Mount Arm, through the rubber washer and screw it into the threaded in the bottom of the Tilt Head. 8. Turn the monitor and attach the video and power connectors, adjust the screen to the desired position and then tighten all of the securing knobs. Document Number:10010102-UM Page 65 of 94 Relocating Low Voltage Cable Management Rings There are locations around the perimeter of every Enclosure’s inner panel and along the entire length of every C-beam on the top of all Lower Cabinets. Locate the patterns of pilot holes that are located diagonally from each other. 1. Decide the orientation in which you wish to mount your cable management ring. Remember to use an orientation in respect to the opening on the cable ring that will allow you to easily add or remove cabling in your desired equipment configuration. 2. Remove the two self tapping screws which secure the cable management ring to the rear panel. 3. Reorient the ring in its new desired configuration. 4. Use two self-tapping screws to secure two of the four slots on the cable management ring into the inner rear panel. Document Number:10010102-UM Page 66 of 94 Relocating a bin box mounting bar inside of an Enclosure There are Bin Box Bars that mount to the back panel, and there are bin box bars that mount to the internal shelf standards on the sides of Enclosures. To move the Bin Box Bars that are mounted to the back panel: 1. Use a drill with a #2 phillips head bit to remove the self tapping screws that secure the bar to the back panel. 2. Hold the bar up to its new desired position to determine which of the pilot holes in the back panel line up with the holes in the bar. 3. Secure the outermost coincident holes with the same self tapping screws were previously removed. 4. Secure the remaining coincident holes. To move the Bin Box Bars that are mounted to the internal shelf standards: 1. Mark the new desired location of Bin Box Bar with a piece of tape. 2. Use a 7/16” socket wrench to loosen the two ¼” bolts that secure the Bin Box Bar to the internal shelf standards. It is easier if you do not completely remove the bolts from the channel strut nuts. 3. Slide the whole assembly to your new desired height. 4. Retighten the bolts with the socket wrench. Relocating an 18”W interior Wire Rack Shelf The 18” wide Wire Rack Shelf is preinstalled at the factory but can be removed and relocated as needed. 1. Note the two aluminum mounting clips that are secure with Self tapping screws that attach the 18” Wire rack shelf to the Inner Rear Panel of the Enclosure. 2. Using a drill with a #2 phillips head bit, remove the two 10-16 self tapping screws that pass through the mounting clips from the back panel 3. Hold the Wire Rack shelf up to its new desired location, and find the pilot holes in the Back Panel that best coincide with the new mounting location. 4. If none of the existing pilot holes are suitable, you can drill new pilot holes in the Back Panel. 5. Reinstall the two 10-16 self tapping screws through the clips and into the new pilot holes. Document Number:10010102-UM Page 67 of 94 Adjusting the height of a full length interior Wire Rack Shelf The full length Wire rack shelves have support brackets at either end which are secure to channels by means of bolts and Channel Strut nuts. WARNING Remove any equipment and items from the shelves. 9. Mark the new desired shelf height on the channels with a piece of tape. 10. Place a level on top of the shelf lengthwise. 11. Have someone assist you by holding the shelf up as you loosen the bolts with a socket wrench on the inside of the brackets. Do not loosen the bolts all the way. The Channel Strut nuts can slide inside the channels without removing the bolts completely. 12. Once the bolts are loose enough the shelf should be able to slide up and down with the nuts still inside the channels. 13. Lift the shelf to its new desired location. 14. Begin to tighten down the bolts once again making sure that channel strut nuts are still spanning the opening of the channel. 15. Verify that the shelf is level. 16. Tighten all of the bolts until the shelf is once again secure. Relocating a Multiple Outlet Strip 1. Consider the best orientation of the corded end of the strip in respect to where you will be plugging the cord into a power outlet. 2. Use a drill with a #2 phillips head bit to remove the self tapping screws that secure the strip to the back panel. 3. Hold the outlet strip across the back of the enclosure where it will work best in your application. It is recommended that if you are installing the strip near the bottom that you provide at least three inches below the bottom of the strip to provide space for larger power transformers. Use a level to confirm that the strip is level and mark the centers of the mounting holes on the back panel of the enclosure. 4. Use a self tapping screw alone to first pre drill each hole, then align the mounting holes in the strip with the new holes and install the self tapping screws with the washers to secure the strip. Document Number:10010102-UM Page 68 of 94 Installing Drawers below an Enclosure WITHOUT a Work Surface As shipped from the factory the drawers will be installed in the closed position inside of the drawer frame. 1. Remove each of the drawers one at a time by first pulling them fully out and then carefully releasing the catches on the drawer slides on both sides of the drawer and then lifting up and withdrawing the drawer. Carefully push the middle rails of the drawer slides back in after removing each drawer. See section titled, “Removing the Drawers from the Drawer Frames” if you need a visual reference. 2. Determine which side of the Enclosure you want the drawer to be located under. Tip This section shows the drawer frame being mounted on the right side of an Enclosure. A drawer frame can be mounted on either side of an Enclosure or Work Table. Simply mirror the fastener placement shown in the drawings below for a left side installation. Examine the top of the Drawer Frame and note the rows of different sized punched holes. 1. Prepare the Drawer Frame by attaching three Spacer Washers with the double sided adhesive rings to the top of the frame. Remove the paper backing from the adhesive rings. and place one spacer washer over the hole in the top of the Drawer Frame that will align with the back bolts that you just removed from the bottom of the Enclosure. Place two more spacer washers over each of the smaller holes that are at the ends of the last row of holes along the back of the top of the Drawer Frame. *Right side installation shown. Mirror spacer washer placement for left side installation. 2. Look under the front of the Enclosure and examine the four bolts which are threaded through the front of the Side Support and into the bottom of the Enclosure. There will be two pairs of bolts, one pair is Document Number:10010102-UM Page 69 of 94 closest to the side of the Enclosure and the other pair is closest to the middle of the Enclosure. Remove all 4 of the 5/16” bolts in this pattern. 3. Hold the drawer frame up to the bottom of the Enclosure so that two of the larger holes in the drawer frame line up with two of the holes in the bolt pattern that was just removed 4. Re-insert the inner two bolts through the drawer frame to secure it to the bottom of the desktop. *Right side installation shown. Mirror bolt placement for left side installation. Document Number:10010102-UM Page 70 of 94 5. Use 4 self tapping 10-16 screws from Hardware Kit # 75707 to fasten the bottom drawer frame to the cbeams on the underside of the enclosure. Since the drawer frame is being installed without a Pull Out Work Surface above it, you must use the 4 inner most holes from the front and rear 4 hole patterns. There will be no pilot holes to receive the screws on the outer most 4 of these patterns. *Right side installation shown. Mirror screw placement for left side installation. 6. Retrieve the 10-32 screws from the same Hardware Kit Document Number:10010102-UM Page 71 of 94 7. Now, loosely install 10-32 screws through the side of the Drawer Frame and into the threaded holes in the inner side of the Side Support wherever they line up. 8. Examine the back side of the drawer frame and note the series of pilot holes along either side. These holes are for the mounting of the Rear Support Bracket that will further stabilize the drawer assembly. Document Number:10010102-UM Page 72 of 94 9. Attach the Rear Support Bracket to the back of the drawer frame using four 10-16 self tapping screws from Hardware Kit # 75707. 10. Attach the Rear Support Bracket to the bottom of the Lower Shelf using four 10-32 machine screws from the same Hardware Kit. 11. After all of the screws are installed, verify that the Drawer Frame is correctly aligned with the bottom of the Work Surface Frame and the Side Support, if it looks correct, tighten all of the screws along the top and side of the Drawer Frame. Document Number:10010102-UM Page 73 of 94 Connecting Freestanding Enclosures together side by side Tip If you are planning on connecting two Enclosures together in a side to side configuration; be sure to verify that the ventilation systems are not installed on the sides Enclosures that will face each other. If any of your ventilation systems needs to be reconfigured, refer to the section entitled, “Relocating a Modular Ventilation System from one side of an Enclosure to the other.” 1. Obtain eight ¼”- 20 x 1”L bolts, 16 ¼” fender washers, and lock nuts to attach two Side supports together. 2. Move the Enclosures or Work Tables to their final side by side positions and align the front and rear, top most vertical slots that are near the tops of the Side Supports. 3. Put a washer onto each bolt and insert them through the slots in the Side Supports, install a washer and a nut onto the end of the bolts and then tighten the bolts just enough so as to draw the Side Supports snuggly together. Connecting Freestanding Enclosures together back to back 1. Obtain eight ¼”- 20X 1” L bolts with two washers and one nut for each bolt. 2. Remove the Inner Rear Panel from both Enclosures and note the vertical rows of ¼ holes in the Back Panel, bolts are inserted through these holes to hold the Enclosures together. Note the two vertical rows of ¼” holes on the back of each Side Support Assembly; bolts are inserted through these holes to hold the Side Supports together. 3. Move both Enclosures to their final positions and then adjust the leveling legs on both Enclosures to bring them to the same height so that the holes in the Back Panel and Side Supports are closely aligned. Tip A large Philips Screw driver can be used to make fine adjustments to the alignment of the holes by inserting it through the holes in both Enclosures to make carefully levering adjustments to align the holes. 4. Insert the bolts with washers through the four holes nearest the outside corners at the top and bottom on both the Side Supports and the back of one Enclosure and through the holes in the other Enclosure. Loosely thread a nut with a washer onto the end of each bolt. Do not tighten the nuts until all of the bolts have been installed. *Note: If both of your Enclosures have Shelving Systems installed above the Enclosures; install one additional bolt through the top most slot in of each of the Vertical Shelving Standards. Document Number:10010102-UM Page 74 of 94 *Side of Enclosure omitted for clarity 5. After all of the bolts are installed, tighten them securely to connect the Enclosures together, verify that they are both level and adjust as needed. 6. Reinstall the Inner Rear Panels of both Enclosures. Document Number:10010102-UM Page 75 of 94 Product Short Descriptions For complete descriptions of all items included in your assembly; please refer to the sections entitled “Standard Features” and “Included Options” on the individual product information sheets. All product information sheets are available in PDF format on our website from the tool bar on the individual product pages or from our Product Resources page. Mini Office Enclosure Free Standing 45W X 36H w/ All in One Drawer Set PN 81030 Configured as a free standing desk. Includes 2- Side Support assemblies w/ 4- Leveling Legs , 1- 44.75"W X 14"D shelf below the Enclosure, a locking Roll Up Door, a light, an 18"W Wire Rack Shelf, a 34"H Side Shelf System with a 18"W Side Shelf, a Modular Ventilation System with 2- Fans, an outlet strip, cable management rings, a VESA monitor mount, 4-Bin Boxes 5 3/8"Lx4 1/8"W x 3"H and a 19"W Bin Box Mounting Bar a Lower Back Panel, and an All in One Drawer Kit with a Pull Out Work Surface, 1 half sized drawer and 2 full sized file drawers. Mini Office Enclosure Free Standing 72W X 36H w/ All in One Drawer Set PN 81031 Configured as a free standing desk. Includes 2- Side Support assemblies w/ 4- Leveling Legs , 1- 71.75"W X 14"D shelf below the Enclosure, a locking Roll Up Door, a light, an 18"W Wire Rack Shelf, a 34"H Side Shelf System with a 18"W Side Shelf, a Modular Ventilation System with 4- fans, an outlet strip, cable management rings, a VESA monitor mount, 4-Bin Boxes 5 3/8"Lx4 1/8"Wx3"H, 4-Bin Boxes 7 3/8"Lx4 1/8"Wx3"H and 2-19"W Mounting Bars a Lower Back Panel, and an All in One Drawer Kit with a Pull Out Work Surface, 1 half sized drawer and 2 full sized file drawers Mini Office Enclosure Free Standing 45W X 64H w/ All in One Drawer Set PN 81032 Configured as a free standing desk. Includes 2- Side Support assemblies w/ 4- Leveling Legs , 1- 44.75"W X 14"D shelf below the Enclosure, a locking Roll Up Door, a light, an 18"W Wire Rack Shelf, a 62"H interior Shelving System with 2- 36"W X 18"D Wire Rack Shelves and 1- 18"W Side Shelf, a Modular Ventilation System with 4- fans, an outlet strip, cable management rings, a VESA monitor mount, 4-Bin Boxes 5 3/8"Lx4 1/8" x 3"H and a 19"W Mounting Bar, a Lower Back Panel, and an All in One Drawer Kit with a Pull Out Work Surface, 1 half sized drawer and 2 full sized file drawers. Mini Office Enclosure Free Standing 72W X 64H w/ All in One Drawer Set PN 81033 Configured as a free standing desk. Includes 2- Side Support assemblies w/ 4- Leveling Legs , 1- 71.75"W X 14"D shelf below the Enclosure, a locking Roll Up Door, a light, an 18"W Wire Rack Shelf, a 62"H interior Shelving System with 2- 60"W X 18"D Wire Rack Shelves and 1- 18"W Side Shelf, a Modular Ventilation System with 8 Fans, an outlet strip, cable management rings, a VESA monitor mount, 9-Bin Boxes 5 3/8"Lx4 1/8"Wx3"H, 9Bin Boxes 7 3/8"Lx4 1/8"Wx3"H and 2-38"W Mounting Bars, a Lower Back Panel, and an All in One Drawer Kit with a Pull Out Work Surface, 1 half sized drawer and 2 full sized file drawers. Mini Office Enclosure Free Standing 72W X 36H w/ 45W Lower Cabinet PN 81034 Configured as a free standing desk. Includes 3 Side Support assemblies with 6 Leveling Legs, a locking Roll Up Door, a light, an 18"W Wire Rack Shelf, a 34"H Side Shelf System with a 18"W Side Shelf, a Modular Ventilation System with 4- fans, an outlet strip, cable management rings, a VESA monitor mount, 4-Bin Boxes 5 3/8"Lx4 1/8"Wx3"H, 4-Bin Boxes 7 3/8"Lx4 1/8"Wx3"H and 2-19"W Mounting Bars, , a Lower Back Panel, a Lower Cabinet assembly with 2 doors and a 44.75"W X 28"D interior shelf. Document Number:10010102-UM Page 76 of 94 For complete descriptions of all items included in your assembly; please refer to the sections entitled “Standard Features” and “Included Options” on the individual product information sheets. All product information sheets are available in PDF format on our website from the tool bar on the individual product pages or from our Product Resources page. Mini Office Enclosure Free Standing 72W X 64H w/ 45W Lower Cabinet PN 81035 Configured as a free standing desk. Includes 3 Side Support assemblies with 6 Leveling Legs, a locking Roll Up Door, a light, an 18"W Wire Rack Shelf, a 62"H interior Shelving System with 2- 60"W X 18"D Wire Rack Shelves and 1- 18"W Side Shelf, a Modular Ventilation System with 8 Fans, an outlet strip, cable management rings, a VESA monitor mount, 9-Bin Boxes 5 3/8"Lx4 1/8"Wx3"H, 9-Bin Boxes 7 3/8"Lx4 1/8"Wx3"H and 2-38"W Mounting Bars, , a Lower Back Panel, and a Lower Cabinet assembly with 2 doors and a 44.75"W X 28"D interior shelf. Mini Office Enclosure Free Standing 45W X 36H w/ All in One Drawer Set and a 45W Upper Cabinet PN 81036 Configured as a free standing desk. Includes 2- Side Support assemblies w/ 4- Leveling Legs , 1- 44.75"W X 14"D shelf below the Enclosure, a locking Roll Up Door, a light, an 18"W Wire Rack Shelf, a 34"H Side Shelf System with a 18"W Side Shelf, a Modular Ventilation System with 2- Fans, an outlet strip, cable management rings, a VESA monitor mount, 4-Bin Boxes 5 3/8"Lx4 1/8"W x 3"H and a 19"W Mounting Bar and an All in One Drawer Kit with a Pull Out Work Surface, 1 half sized drawer and 2 full sized file drawers. Also includes an Upper Shelving System and an Upper Cabinet with 2 doors. POS Kiosk Enclosure Free Standing 45W X 36H PN 81090 Configured as a free standing Kiosk that includes 2- Side Support assemblies w/ 4Leveling Legs , one 44.75"W X 14"D shelf below the Enclosure. Includes a locking Roll Up Door, a light, an 18"W Wire Rack Shelf, an interior 34"H Side Shelf System with a 18"W Side Shelf, 1- Modular Ventilation System equipped with 2- Fans, an outlet strip, cable management rings, 2 front mounted POS terminal mounts that swing out, 4-Bin Boxes 5 3/8"Lx4 1/8"W x 3"H and a 19"W Mounting Bar. POS Kiosk Enclosure Free Standing 72W X 36H PN 81091 Configured as a free standing Kiosk that includes 2- Side Support assemblies w/ 4Leveling Legs , one 71.75"W X 14"D shelf below the Enclosure. Includes a locking Roll Up Door, a light, an 18"W Wire Rack Shelf, an interior 34"H Side Shelf System with a 18"W Side Shelf, 1- Modular Ventilation System with 4- fans, an outlet strip, cable management rings, 2 front mounted POS terminal mounts that swing out, 4- Leveling Legs, 4-Bin Boxes 5 3/8"Lx4 1/8"Wx3"H, 4-Bin Boxes 7 3/8"Lx4 1/8"Wx3"H and 2-19"W Mounting Bars. POS Kiosk Enclosure Free Standing 72W X 64H PN 81093 Configured as a free standing Kiosk that includes 2- Side Support assemblies w/ 4Leveling Legs , one 71.75" X 14"D shelf below the Enclosure. Includes a locking Roll Up Door, a light, an 18"W Wire Rack Shelf, a 62"H interior Shelving System with 2- 60"W X 18"D Wire Rack Shelves, one 18"W X 19"D Gal shelf, 1- Modular Ventilation System equipped with 8 Fans, an outlet strip, cable management rings, 2 front mounted POS terminal mounts that swing out, 9-Bin Boxes 5 3/8"Lx4 1/8"Wx3"H, 9-Bin Boxes 7 3/8"Lx4 1/8"Wx3"H and 2-38"W Mounting Bars. Document Number:10010102-UM Page 77 of 94 For complete descriptions of all items included in your assembly; please refer to the sections entitled “Standard Features” and “Included Options” on the individual product information sheets. All product information sheets are available in PDF format on our website from the tool bar on the individual product pages or from our Product Resources page. POS Kiosk Enclosure Free Standing 45W X 36H w/ 45W Upper Cabinet PN 81094 Configured as a free standing Kiosk that includes 2- Side Support assemblies w/ 4Leveling Legs , one 44.75"W X14"D shelf below the Enclosure. Includes a locking Roll Up Door, a light, an 18"W Wire Rack Shelf, an interior 34"H Side Shelf System with a 18"W Side Shelf, 1- Modular Ventilation System equipped with 2- Fans, an outlet strip, cable management rings, 2 front mounted POS terminal mounts that swing out, 4-Bin Boxes 5 3/8"Lx4 1/8"Wx3"H, 4-Bin Boxes 7 3/8"Lx4 1/8'Wx3"H and 2-19"W Mounting Bars. Also includes an Upper Shelving System and an Upper Cabinet with 2 doors. Work Bench Enclosure Free Standing 45W X 36H w/ All in One Drawer Set PN 81120 Configured as a free standing enclosed bench that includes 2- Side Support assemblies w/ 4- Leveling Legs , one 44.75"W X 14"D shelf below the Enclosure. Includes a locking Roll Up Door, a light, an 18"W Wire Rack Shelf, 1- Modular Ventilation System equipped with 2- Fans, an outlet strip, cable management rings, a VESA monitor mounting kit, 4-Bin Boxes 5 3/8"Lx4 1/8"Wx3"H, 8-Bin Boxes 7 3/8"Lx4 1/8"Wx3'H and 9-Bin Boxes 10 7/8"Lx5"Wx5"H 2-19"W, 2-19" Mounting Bars and 2-38" Mounting Bars. Also includes an All in One Drawer Kit that can be installed on either the right or left side below the Enclosure and includes a Pull Out Work Surface, 1 half sized drawer and 2 full sized file drawers. Work Bench Enclosure Free Standing 72W X 36H w/ All in One Drawer Set PN 81121 Configured as a free standing enclosed bench that includes 2- Side Support assemblies w/ 4- Leveling Legs , 1- 71.75"W X 14"D shelf below the Enclosure. Includes a locking Roll Up Door, a light, an 18"W Wire Rack Shelf, an interior 34"H Side Shelf System with a 18"W Side Shelf, 1- Modular Ventilation System equipped with 2- Fans, an outlet strip, cable management rings, a VESA monitor mounting kit, 4-Bin Boxes 5 3/8"Lx4 1/8"Wx3"H, 13-Bin Boxes 7 3/8"Lx4 1/8"Wx3"H and 7-Bin Boxes 10 7/8"Lx5"Wx5"H 219"W, 2-19" Mounting Bars and 2-38" Mounting Bars. Also includes an All in One Drawer Kit that can be installed on either the right or left side below the Enclosure and includes a Pull Out Work Surface, 1 half sized drawer and 2 full sized file drawers. Work Bench Enclosure Free Standing 45W X 64H w/ All in One Drawer Set PN 81122 Configured as a free standing Desk that includes 2- Side Support assemblies w/ 4Leveling Legs , one 44.75"W X14"D shelf below the Enclosure. Includes a locking Roll Up Door, a light, an 18"W Wire Rack Shelf, a 62"H interior Shelving System with 2- 36"W X 18"D Wire Rack Shelves, 1- Modular Ventilation System equipped with 6 Fans, an outlet strip, cable management rings, a VESA monitor mounting kit, 4-Bin Boxes 5 3/8'Lx4 1/8"Wx3"H, 19-Bin Boxes 7 3/8"Lx4 1/8"Wx3"H and 11-Bin Boxes 10 7/8"Lx5"Wx5"H 219"W, 2-19" Mounting Bars and 2-38" Mounting Bars. Also includes an All in One Drawer Kit that can be installed on either the right or left side below the Enclosure and includes a Pull Out Work Surface, 1 half sized drawer and 2 full sized file drawers. Document Number:10010102-UM Page 78 of 94 For complete descriptions of all items included in your assembly; please refer to the sections entitled “Standard Features” and “Included Options” on the individual product information sheets. All product information sheets are available in PDF format on our website from the tool bar on the individual product pages or from our Product Resources page. Work Bench Enclosure Free Standing 72W X 64H w/ All in One Drawer Set PN 81123 Configured as a free standing Desk that includes 2- Side Support assemblies w/ 4Leveling Legs , one 71.75"W X14"D shelf below the Enclosure. Includes a locking Roll Up Door, a light, an 18"W Wire Rack Shelf, a 62"H interior Shelving System with 2- 60"W X18"D Wire Rack Shelves, one 18"W X19"D Gal shelf, 1- Modular Ventilation System equipped with 8 Fans, an outlet strip, cable management rings, a VESA monitor mounting kit, 8-Bin Boxes 5 3/8"Lx4 1/8"Wx3"H, 15-Bin Boxes 7 3/8"Lx4 1/8"Wx3"H and 11-Bin Boxes 10 7/8"Lx5" Wx5"H 2-19"W, 2-19" Mounting Bars and 2-38" Mounting Bars. Also includes an All in One Drawer Kit that includes a Pull Out Work Surface, 1 half sized drawer and 2 full sized file drawers. The All in One Drawer Kit can be installed below the Enclosure on either the right or left sides or in the middle to create a separation between 2 chairs. Work Bench Enclosure Free Standing 72W X 36H w/ 45W Lower Cabinet PN 81124 Configured as a free standing enclosed bench that includes 2- Side Support assemblies w/ 4- Leveling Legs, a Lower Cabinet assembly with 2 doors that have stainless steel fronts, one Lower Cabinet bottom assembly, one Lower Cabinet Back Panel and 2 Gal 44.75"W X 14" D shelves that create 1- 44.75"W X 28"D shelf. Includes a locking Roll Up Door, a light, an 18"W Wire Rack Shelf, an interior 34"H Side Shelf System with a 18"W Side Shelf, 1- Modular Ventilation System with 4- fans, an outlet strip, cable management rings, a VESA monitor mounting kit, 8-Bin Boxes 5 3/8"Lx4 1/8"Wx3"H, 15-Bin Boxes 7 3/8"Lx4 1/8"Wx3"H and 11-Bin Boxes 10 7/8"Lx5½"Wx5"H 2-19"W, 2-19"Bin Box Mounting Bars and 2-38" Bin Box Mounting Bars. When the 45" wide Lower Cabinet is installed below one side of a 72" wide Enclosure it creates a 26"W open space for a chair on the opposite side. Work Bench Enclosure Free Standing 72W X 64H w/ 45W Lower Cabinet PN 81125 Configured as a free standing Desk that includes 2- Side Support assemblies w/ 4Leveling Legs , a Lower Cabinet assembly with 2 doors that have stainless steel fronts, one Lower Cabinet bottom assembly, one Lower Cabinet Back Panel and 2- 44.75"W X14"D shelves that creates 1- 44.75"W X 28"D shelf. Includes a locking Roll Up Door, light, an 18"W Wire Rack Shelf, a Shelving System with 2- 36"W X18"D Wire Rack Shelves, 1-18"W X19"D Gal shelf, 1- Modular Ventilation System with 8- Fans, an outlet strip, cable management rings, a VESA monitor mounting kit, 8-Bin Boxes 5 3/8"Lx4 1/8"Wx3"H, 15-Bin Boxes 7 3/8"Lx4 1/8"Wx3"H and 11-Bin Boxes 10 7/8"Lx5"Wx5"H 2-19"W, 2-19" Mounting Bars and 2-38" Mounting Bars. When the 45" wide Lower Cabinet is installed below one side of a 72"W Enclosure it creates a 26"W open space for a chair on the opposite side. Work Bench Enclosure Free Standing 45W X 36H w/ All in One Drawer Set and a 45W Upper Cabinet PN 81126 Configured as a free standing enclosed bench that includes a Shelving System with 230"H Vertical Shelf Standards, a Stainless steel Upper Cabinet assembly- 18"H X 45"W X 14"D with 2- doors, 2- Side Support assemblies w/ 4- Leveling Legs, one 44.75"W X14"D shelf below the Enclosure. Includes a locking Roll Up Door, a light, an 18"W Wire Rack Shelf, 1- Modular Ventilation System equipped with 2- Fans, an outlet strip, cable management rings, a VESA monitor mounting kit, 4-Bin Boxes 5 3/8"Lx4 1/8"Wx3"H, 8Bin Boxes 7 3/8"Lx4 1/8"Wx3"H and 9-Bin Boxes 10 7/8"Lx5"Wx5"H 2-19"W, 2-19" Mounting Bars and 2-38" Mounting Bars. Also includes an All in One Drawer Kit that can be installed on either the right or left side below the Enclosure and includes a Pull Out Work Surface, 1 half sized drawer and 2 full sized file drawers. Document Number:10010102-UM Page 79 of 94 Product Specifications 45” W x 66”H x 30”D General Measurements: 45” W x 66”H x 30”D Interior Space: 43.42”L x 26.87”D x 28.06”H (to bottom of door housing) & 28.87”H (to bottom of vent box) or about 18.95 cubic feet Weight: 45 x 36 Freestanding Bare = approx 335 lbs. Note: This weight does not include any options or accessories. Each Enclosure will probably contain at least 50 lbs. of accessories. Dimension Notes: Refer to engineering drawings for exact dimensions. Please be advised some external assemblies may not be shown in all images. Document Number:10010102-UM Page 80 of 94 Product Specifications 72” W x 66”H x 30”D General Measurements: 72” W x 66”H x 30”D Interior Space: 70.39”L x 26.87”D x 28.06”H (to bottom of door housing) & 28.87”H (to bottom of vent box) or about 30.71 cubic feet Weight: 72 x 36 Freestanding Bare = approx 500 lbs. Note: This weight does not include any options or accessories. Each Enclosure will probably contain at least 50 lbs. of accessories. Dimension Notes: Refer to engineering drawings for exact dimensions. Please be advised some external assemblies may not be shown in all images. Document Number:10010102-UM Page 81 of 94 Product Specifications 45” W x 94”H x 30”D General Measurements: 45” W x 94”H x 30”D Interior Space: 43.42”L x 26.87”D x 55.06”H (to bottom of door housing) & 56.87”H (to bottom of vent box) or about 37.17 cubic feet Weight: 45 x 64 Freestanding Bare = approx 440 lbs. Note: This weight does not include any options or accessories. Each Enclosure will probably contain at least 50 lbs. of accessories. Dimension Notes: Refer to engineering drawings for exact dimensions. Please be advised some external assemblies may not be shown in all images. Document Number:10010102-UM Page 82 of 94 Product Specifications 72” W x 94”H x 30”D General Measurements: 72” W x 94”H x 30”D Interior Space: 70.39”L x 26.87”D x 55.06”H (to bottom of door housing) & 56.87”H (to bottom of vent box) or about 60.26 cubic feet Weight: 72 x 64 Freestanding Bare = approx 585 lbs. Note: This weight does not include any options or accessories. Each Enclosure will probably contain at least 50 lbs. of accessories. Dimension Notes: Refer to engineering drawings for exact dimensions. Please be advised some external assemblies may not be shown in all images. Document Number:10010102-UM Page 83 of 94 Product Specifications 72” W x 67”H x 30”D General Measurements: 72” W x 67”H x 30”D Interior Space: 70.39”L x 26.87”D x 28.06”H (to bottom of door housing) & 28.87”H (to bottom of vent box) or about 30.71 cubic feet Weight: 72 x 36 Freestanding With 45 Lower Cabinet Bare = approx 600 lbs. Note: This weight does not include any options or accessories. Each Enclosure will probably contain at least 50 lbs. of accessories. Dimension Notes: Refer to engineering drawings for exact dimensions. Please be advised some external assemblies may not be shown in all images. Document Number:10010102-UM Page 84 of 94 Product Specifications 72” W x 95”H x 30”D General Measurements: 72” W x 95”H x 30”D Interior Space: 70.39”L x 26.87”D x 55.06”H (to bottom of door housing) & 56.87”H (to bottom of vent box) or about 60.26 cubic feet Weight: 72 x 64 Freestanding With 45 Lower Cabinet Bare = approx 700 lbs. Note: This weight does not include any options or accessories. Each Enclosure will probably contain at least 50 lbs. of accessories. Dimension Notes: Refer to engineering drawings for exact dimensions. Please be advised some external assemblies may not be shown in all images. Document Number:10010102-UM Page 85 of 94 Product Specifications 72” W x 66”H x 30”D General Measurements: 72” W x 66”H x 30”D Interior Space: 70.39”L x 26.87”D x 28.06”H (to bottom of door housing) & 28.87”H (to bottom of vent box) or about 30.71 cubic feet Weight: 72 x 36 Freestanding Bare = approx 500 lbs. Note: This weight does not include any options or accessories. Each Enclosure will probably contain at least 50 lbs. of accessories. Dimension Notes: Refer to engineering drawings for exact dimensions. Please be advised some external assemblies may not be shown in all images. Document Number:10010102-UM Page 86 of 94 Product Specifications 45” W x 92”H x 30”D General Measurements: 45” W x 92”H x 30”D Interior Space: 43.42”L x 26.87”D x 28.06”H (to bottom of door housing) & 28.87”H (to bottom of vent box) or about 18.95 cubic feet Weight: 45 x 36 Freestanding With 45 Upper Cabinet Bare = approx 425 lbs. Note: This weight does not include any options or accessories. Each Enclosure will probably contain at least 50 lbs. of accessories. Dimension Notes: Refer to engineering drawings for exact dimensions. Please be advised some external assemblies may not be shown in all images. Engineering Drawing Reference Notes: To view and manipulate 3D models of any assembly; visit www.edrawingsviewer.com and download the free eDrawings viewer software, then open the eDrawings format files (.EASM) found in our Engineering Drawings folders. Document Number:10010102-UM Page 87 of 94 For more product dimensional specifications; download the Engineering Drawings folder for files in DWG, PDF and EASM formats from on our website from the tool bar on the individual product pages or from our Product Resources page. Identifying External Components All in One Drawer Set Document Number:10010102-UM 45” Lower Cabinet for 72” Wide Enclosures Page 88 of 94 Document Number:10010102-UM 45” Upper Cabinet with Vertical Shelf Standards Page 89 of 94 Document Number:10010102-UM Side Supports with Lower 45” Shelf Page 90 of 94 Document Number:10010102-UM Side Supports with Lower 72” Shelf Page 91 of 94 Document Number:10010102-UM 45” Upper Cabinet with Vertical Shelf Standards Page 92 of 94 Document Number:10010102-UM Page 93 of 94 Warranty Information LIMITED WARRANTY WHAT IS COVERED Practical Quality Systems, Inc. (PQS) guarantees manufactured products and each part or component thereof against all defects in material and/or workmanship. HOW LONG COVERAGE LASTS The warranty extends for a period of one year from the date of installation or initial use, provided that this period shall not exceed 18 months from the original date of shipment from PQS. WHAT IS NOT COVERED This warranty does not extend to products that have been subjected to neglect, accident or improper use, nor to units that have been altered by non-PQS technicians. WHAT PQS WILL DO PQS agrees to remedy any manufacturing defect either through replacement or repair at no charge, provided that the defective unit is returned, transportation prepaid, to PQS. HOW TO GET SERVICE In order to be eligible for service under this warranty you must return the warranty registration card within 30 days of purchase. • Authorization to return any product purchased from PQS for inspection must be obtained from an authorized Practical Quality Systems representative. All returns must be accompanied by a completed PQS return material authorization (RMA). An RMA will be generated by customer service department and must be pre-approved. We will inspect your product and contact you within 72 hours with the results. • Any product that has been repaired or replaced shall be similarly warranted on its repair or replacement for the remaining product warranty period or 90 days from the date of repair or replacement, whichever expires last. WARRANTY SCOPE No warranties other than those set forth in this section are given or implied with respect to the products furnished. PQS shall, in no event, be liable for consequential damages, for loss, damage or expense directly or indirectly arising from the use of the products, for any inability to use materials or from any other cause. YOUR RIGHTS UNDER STATE LAW This warranty gives you specific legal rights, you may have other rights which vary state to state. DAMAGE OR LOSS IN TRANSIT Title to goods sold passes upon delivery to the carrier. Practical Quality Systems accepts no responsibility for damage or loss in transit. Practical Quality Systems will use commercially reasonable efforts to assist the Buyer in initiating action against the carrier for such losses. The Buyer must notify Practical Quality Systems in writing and the carrier as soon as the loss or damage is known and in any event, no later than 4 days after delivery. • Practical Quality Systems shall not be responsible or liable for any delays, losses or damages caused by strikes, lockouts, labor trouble, acts of war, acts of God, public calamity, or other causes beyond its control, or acts not directly caused by Practical Quality Systems. Document Number:10010102-UM Page 94 of 94 Service and Support For answers to your questions, please email our technicians at [email protected], or call our office at (818) 993-1022 Monday to Friday, 9 a.m. to 5 p.m., Pacific Standard Daylight Savings Time. Mailing Address: Practical Quality Systems PO BOX 4624 Chatsworth, CA 91313 www.practicalqualitysystems.com