1
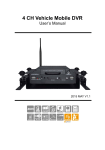
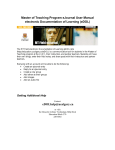
UCIT BASIC-LIVE 2 CAMERA
Vehicle Video Recorder
Desktop Viewer User Guide
!
2015 JUN V 1.1
Introduction
This user guide will walk you through how to use and operate the Desktop Viewer
Software for your UCIT 2 Camera System.
Note: This is a Windows Application.
Table of Contents
A.
Downloading the Desktop Software…………………………………1
B.
Removing and Inserting the Micro SD Card into camera system……1-2
C. Inserting into Computer…………………………..………………….. 2
D. Launching the viewer software and Viewer Layout….……………… 3
E.
Playback……………………………………………………………… 4-5
F.
Backup…………………………………………………..……………. 6
G. Configuration………………………………………………..…………7-9
H. Format…………………………………………………………………. 9
I. Calendar and Snapshot………………………………………………… 10
!
A. Downloading the Desktop Software
1. Go to our website: www.safetytrack.net
2. Hover over the support tab at the top and select Camera Installation and User
Manuals.
3. One of the first items listed is the UCIT 2 Channel System. Under “Basic” you
will see Desktop SD Card Player. Click this link and you will start to download
the zip file for the software.
4. Go through the installation steps and be mindful of where you save the
application. It is best sometimes to check the “Create a desktop icon”.
5. Once installation is complete you should have the application on your desktop
(Orange icon with a yellow car called CARBOX PLAYER).
B. Removing and Inserting the Micro SD Card:
Removal:
To remove the micro SD card, open the rubberized SD Card flap on the right side
of camera system. Next, push IN the SD card until you hear a “click”. You will
then hear a second “click” telling you that the SD card is released. The SD card
Tray is spring loaded so be careful not to lose it as it comes out. 1
Insertion:
To replace the micro SD card, push the SD card into the slot until you hear a
“click”. Let go as you will hear a second “click” telling you that card is in position.
Be sure to close the rubberized flap once inserted.
C. Inserting into Computer:
1. Once you have recovered the SD card, using the best combination of supplied
adapters, insert into your computer.
2. Once inserted, close the autoplay window that commonly pops up and open the
Desktop SD card player.
(We have found that it always works best if the SD card is inserted into the
computer before you run the application)
2
D. Launching the Viewer Software
Viewer Layout:
15
16
1
2
3
4
5
6
7
8
9
10
11
13
14
12
After Clicking the software Icon
1- Close Application
2- Minimize Application
3- Playback
4- Calendar
5- Backup
6- Snapshot
7- Configuration
8- Format
9- G-Sensor
10- Compass
you will see the screen above.
11- Vehicle Speed
12- Volume Control
13- Playback Control
14- Rear View Camera
15- Forward View Camera
16- Google Map/GPS
3
E. Playback
Play back is of course used to playback the video recorded on to the SD card.
Once you select Playback, number 3 according to the above layout, you will enter
the playback window.
Step 1: Select “Removable Storage” and choose the proper drive your SD
card is in. Once the drive is selected video data will populate in red
as shown.
Step 2: Double click to start playback.
You can also choose to playback video that you have backed up to your computer
as well. This is done by selecting “Backup File”, clicking Browse and locating the
file folder that the videos were placed when backing up.
Recordings are labeled with an ID #, Time and date start (Record Time), Event
Type, Time and date end (Time End) and Total Times (duration of recording).
4
Depending on the configuration of your SD card. You may see up to 3 different
types of events. Two of them will not be overwritten (Push Button and G-Sensor).
1. Record Start - This is general continuous recorded video. This is captured
when the camera system receives power. This video can be overwritten.
2.
Push Button By Not Overwrite - This is video that is highlighted when the
force record button is physically pressed on the camera system. In most
situations this button is pressed in emergencies. This video will not be
overwritten.
3.
G-Sensor By Not Overwrite - This is video that is highlighted when a G-sensor
event is triggered. Such as an accident, hard braking, harsh acceleration or
a hard turn.
5
F. Backup
Here you can save recorded files to your PC. This is done by clicking on Backup,
number 5 according to the layout. The Backup window will appear like the one
below.
Step 1: Assuming you want to backup a video(s) from your Micro SD card to your
PC, you will just need to select the drive your Micro SD is in under
“Removable Storage”.
Step 2: To the left of the ID # you will see a white box. Check the video(s) you
want to backup by clicking in the box.
Step 3: After you have selected your video(s) you will now want to select the
Format to the right.
(1) RAW Backup File (*sd) (Recommended)
(2) AVI Backup File (*avi) 6
*NOTE: If you backup by original format of Micro SD card (*sd), the file recorded
with location of GPS, speed and G-Sensor. (Carbox Player is used to
playback these type of backups.)
If backup by the format of (*.avi), the file recorded date, video and audio.
Step 4: Backup Path: Select your backup destination (e.g.: C:\blackbox)
Step 5: Select “Backup” and your video(s) will start to save. Time to backup
depends on the size of the file.
G. Configuration
With your SD card inserted, select the Configuration icon. (#7) The configuration
window will appear and below will describe configuration settings:
4
5
6
1
7
2
6
8
9
3
10
11
12
First you will want to select the drive that your Micro SD card is in at the top left
of the window. This will unlock the fields to configure the Micro SD Card.
7
1- Video Quality: Adjust the video quality to High, Normal or Low. High is of
course recommended for the best video quality. You can adjust to Normal or low
to have more space on your Micro SD Card. The Higher the quality of video the
more storage space it uses.
2- Video Frame Rate: This gives you a drop down menu to adjust the frame rate.
It is set to highest as a standard at 30 NTSC FPS so that the video is smooth.
Again, this can be adjusted to get the most storage out of your Micro SD card and
sacrifice some frames.
3- Car Information: Easily identify vehicle information. Vehicle license plate
number, model, VIN etc can be input here to identify this information quickly.
4- Password: This is a feature of the Micro SD card encryption, to prevent others
from accessing any data. Set a password, then that password is required to access
the playback files, settings or to format the Micro SD card.
5- Time Zone: Set time zone here. GPS has an auto time correction.
6- Copy Me To SD Card: It saves configuration settings to be used at a later time.
7- Unit of Speed: Adjust the unit of speed to your preference. Mile per hour,
Kilometer per hour, Knot per hour.
8- Playback Password: This is an on screen playback password. When enabled
you need to enter password first before entering playback mode. Change settings
first then set the password. Set password from 0-9.
9- G-Sensor Sensitivity: Here you set the sensitivity for the G-Sensor. OFF, Light,
Low, Normal, High, Heavy. (light meaning less sensitive and heavy being more
sensitive.) Example: Set to light if you live in a place like Michigan, otherwise
you will have repeated emergency recording that won’t be overwritten. This is
because of the potholes and uneven roads.
10- Sensor Sensitivity: This has to do with the IR’s (camera lights) and the
sensitivity of them to come on at night.
8
Very low, low, normal, high, very high. Set the settings according to the night
conditions. Example: Set to very high if you want the IR’s to provide light to
the lens at the slightest sign of darkness.
11- Audio Recording: Choose On or Off to enable or disable audio recording.
12- Daylight Savings Time: Choose On or Off to enable or disable daylight
savings time.
H. Format
When you receive your camera system it will be formatted to the default settings.
If you want to clear/format the sd card from all video data be sure to select the
correct drive under “removable storage” then click Format.
If you want to clear the formatting and Restore to full disk space (just like you
purchased it new from the store) choose Restore.
9
I. Calendar and Snapshot
Calendar: Choosing the calendar icon (#4) allows you to view a calendar and
See how far back the video recording goes back. These days and times
will be highlighted once you have started to playback video. This also
makes it more convenient in finding a video from a particular day at
a particular time.
Snapshot: While playing the recorded file, you can use this function (icon #6)
to take a snapshot/picture and save it into your PC. The default saving
path for snapshot picture will be in /Snapshot folder.
File type: BMP
10