1
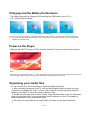
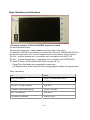
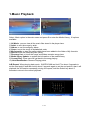
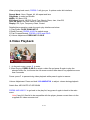
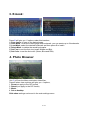
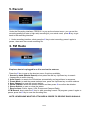
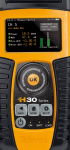
RICCO DIGITAL www.ricco.tv www.riccodigital.co.uk USER’S MANUAL MODEL: S100 1 / 13 Precautions This manual contains important safe measurement and correct operational information, so please read all the information carefully before you use the device in order to avoid any unexpected accidents. Do not put the player in the condition of high temperature, humidity or dust. Do not put the player in high temperature place (over 40℃), especially not in the cars with window closed in summer. Do not knock or hit the player, especially do not shake TFT screen to avoid TFT being damaged or displayed abnormally. Select suitable volume to protect your ears. Do not disconnect the player abruptly during the formatting, uploading, or downloading; otherwise, it will cause the program error. We will not be responsible for any obligation for any memory loss caused by product damage, repair or other reasons. Please always backup important files. The player will be charged once it is connected to a USB port, no matter it is powered on or not. Do not dismantle the player personally as it will void the warranty and it might cause personal injury. Do not use alcohol, thinner or benzene to clean the surface of the player. Do not use the player in the electronics-prohibited area, such as in the airplane. 2 / 13 Specifications MP3 Player Type Flash Memory Based, SD Card Expandable Large 3”QVGA, 400x240 Pixels Resolution, Display 16 Million Colours, 16:9 LTPS TFT Screen. Capacity 4GB Expandable Controller Chipset Ingenic 4732 PC Interface USB 2.0 High Speed EQ Modes Normal, Rock, Pop, Classic, Bass, Jazz, Vocal,Treble Lossless Sound: APE FLAC, MP3 WMA WAV Audio Repeat, Intro, All, Once, Shuffle. Lyric Display RM RMVB AVI MP4 FLV MPE MPG MPEG DAT Video DivX, Xvid, MPEG-4 SP. SWF FLASH 7.0 (Youtube Videos) FM 87.5-108MHz,Manual/Auto Search, Preset/Save 40 Channels FM Radio FM Internal Recording Recording Built-in Microphone, will last up to 60 hours per 1GB memory. eBook .TXT files, Bookmarks, auto play, auto page. Photo Browsing JPG, GIF, BMP and a lot more Language Multilingual, including most European Languages supported. Customisable Background; Built-in Speaker; Other Functions Support multi-tasking capabilities, while listening to music while watching the book TOUCH CONTROL BUTTONS Expansion Slot Battery Micro SD Card Built-in 900mA Li-ion Battery. Up to 15 Hours Audio,5 Hours Video. Earphone 3.5mm Jack Colour Black Weight 45.000g Dimensions 93×47×10mm Accessories Earphone, Mains Charger, USB Lead. Software and Manual Downloadable. Compatible OS Windows2000/XP/vista 3 / 13 Charging and the Battery Performance The Player can either be charged by Connecting the USB cable to your PC, or a 5V, 500mA Mains adapter The Player is charging Note: To get a better battery life, Please slide the power button to ON and charge the new player for concessive 5 hours (no more than 8 hours) for the first two times, and charge it for 2~3 hours thereafter. Power saving options available from SETUP menu. Power-on the Player Slide the left ON/OFF button to PLAY position and Hold, Power-on Interface will show up: Note Please switch off the player normally, i.e., switch according to the above instruction instead of sliding the Power key to the Power OFF position directly ,otherwise any modifications to the settings will not be saved. Organising your media files You can connect your PC to the Player to organize digital media files After connecting the player to a PC, two new Removable Device will show up in My Computer, for example E:\ and F:\ Drive. One of them(E:\) will be the player’s Built-in Memory, the other(F:\) will be the player’s Memory Card. Double Click the new drive to enter, Simply Copy the media files in your PC and paste them onto the new drive. You may create as many folders as you like. For example a folder called Music and a folder called Video. Do not put too many files into a single folder as it takes a long time to seek files. 4 / 13 Preset Folders There are designated folders for files to store in, for example: MUSIC folder: for keeping music files in the formats of MP3 and WMA, VIDEO folder: for keeping video files in the formats of RM, RMVB and AVI. PICTURE folder: for keeping picture files in the formats of JPG, BMP and PNG, FLASH folder: for keeping animated files in the format of SWF. TXT folder: for keeping files in the format of TXT. RECORD folder: system folder for keeping recorded voice files generated by the Player. If any file is not kept in its corresponding folder, you will need to manually use "Browse ALL files" Menu. Use of Expansion Card: Please insert and pull a SD Card when power is off! Otherwise, it may lead to loss or damage to the files in the unit! Use of an SD Card may reduce battery life as it needs power to read the information from the card. 5 / 13 Keys Switches and Interfaces This player contains 5 TOUCH CONTROL keys and 1 switch A: fast forward/next track, B: rewind/previous track, or exit / return to previous upper main menu C: Mode key: PRESS as confirmation or to enter the sub menus, PRESS AND HOLD to return to the main menu. Also use as Playback button in some Music, Video interface. D: VOL + Volume increase key, or navigation key to navigate to the RIGHT/ UP E: VOL- Volume decrease key, or navigation key to navigate to the LEFT/DOWN F: ON/OFF Switch: SLIDE DOWN AND HOLD to power on / off. Pause/Play: Slide down during playback to pause/ play. A-B Repeat button: Slide down and hold during playback to define A-B repeat points. Basic Operations: To Press SWITCH ON/OFF SILDE F DOWN AND HOLD ENTER a menu PRESS C SELECT or PLAY an item PRESS C PAUSE or RESUME playing SILDE F DOWN EXIT or CANCEL PRESS B VOLUME UP/DOWN Press D OR E 6 / 13 1.Music Playback Select Music option in the main menu and press C to enter the Media Library, 10 options available: 1) All Music: you can view all the music files stored in the player here. 2) Artist: to sort the songs by artist. 3) Album: to sort the songs by album 4) Genre; to sort the songs in alphabetical order 5) My favourite: to store the songs which have been added to the folder of My favourite 6) Record: store the Recording files (WAV) 7) Directory List: to list all the songs and folders contains songs here 8) Media library Update: to update the information of the media library 9) Current Play: Press once will get back to the song playing. 10) Hold Recollection: Resume Playing points A-B Repeat: When playing back music, SLIDE DOWN and hold F for about 2 seconds to set the start point A and then hold it about 2 seconds again to set the end point B, then it will playback the A-B section repeatedly; during A-B repeat, hold the Switch key about 2 seconds to return to the normal playback. 7 / 13 When playing back music, PRESS C will give you 6 options under this interface; Repeat Mode: Once, Repeat. All, All repeat and Intro Play Mode: In order and Shuffle MSEQ; 3D, Bass, LEQ EQ Select: Normal, MS EQ, Rock, Pop, Classic, Bass, Jazz, User EQ User EQ Setup: set each value of user EQ mode Display: ID3, Lyric, Frequency Chart, Closed Detailed keys operation under the music play interface as below: 1) Play/Pause: SLIDE DOWN KEY F 2) Back/Forward: PRESS A OR B to switch songs 3) Fast Forward/Rewind: PRESS A OR B and HOLD 4) Volume Adjustment: PRESS KEY D OR E 2.Video Playback 1.) In the main menu, press C to enter. 2.) Start Playing: PRESS D OR E to select a video file and press C again to play the selected video file; it will enter the full screen mode if there has no key operations more than 5 seconds Pause: press F to pause during video playback while press it again to resume. Volume Adjustment: Press and hold VOLUME KEYS to adjust volume during playback Switch files: NEVIGATE UP OR DOWN PRESS AND HOLD C to go back to the play list; long press it again to back to the main menu. Note:If any AVI files fail to be compatible with the player ,please convert them via the supplied AVI video converter tool. 8 / 13 3. E-book: Press C will give you 6 options under this interface; 1) Page Jump: to jump to the desired page 2) Save Mark: to set the current page as a bookmark; you can create up to 8 bookmarks. 3) Load Mark: select the desired bookmark and then press C to load it. 4) Delete Mark: to delete the saved bookmarks. 5) Set Font: to set the font size (small, Middle and Big). 6) Set Color: to set the font color (Green, Blue and Red). 4. Photo Browser Use C to Enter the Menu and select folder/files. Press C when view a picture will give you 4 options, 1. Zoom(not apply to the GIF format) 2. Rotate (not apply to the GIF format) 3. Music 4. Set as desktop Slide show settings can be set in the main settings menu. 9 / 13 5. Record Under the Recording interface, PRESS C to pop up the shortcut menu ,you can set the recording quality(low rate or high rate) according to your actual need, press B key to get back to the recording interface. 1. Under recording interface, short press the C key to start recording; press it again to pause; then save the current recording file. 6. FM Radio Earphone has to be plugged in as it is used as the antenna. Press the C key to pop up the shortcut menu, 8 options available: 1. Search by hand (Manual Search): short press the dial key Up/Down key to search frequencies at certain interval. 2. Auto Search: to search the FM stations automatically and saved them in sequence. 3. Preset Mode: to read the preset stations here, press the Up/Down key to switch stations 4. Save Channel: to save the current station, 5. Delete channel: select the desired channel and then press C to confirm the deletion. 6. Stereo Switch: to open or close the stereo. 7. Receive Area: China, Japan, USA, Europe and Campus Radio 8.FM Record: short press the C key to start recording current FM program ;press it again to pause ;press the C key to save the recording files. NOTE: HEADPHONE MUST BE ATTACHED IN ORDER TO RECEIVE RADIO SIGNALS. 10 / 13 7. Explorer 7.1 Select a file/folder You can view all the files stored in the flash memory here. Back/Forward to select the desired file or folder and press the C key to confirm. 7.2 Delete a file Select the desired file, then short press the C key, it will pop up a shortcut menu, select the Delete File option and press the C key to confirm the deletion. 8. Settings . There have 6 options here, details as below: 1) Display Setting: Light Time (5 sec,10sec, 15sec, 20sec, 30 sec , Always On) and Brightness(One, Two, Three, Four , Five) 2) System Setting: two options include Upgrade and Restorable (System Restore) 3) Desktop setting: Set desktop styles and themes 4) Language: English and Chinese 5) System information: Manufacturer, Product name, Chip ID, Software ID, and Local Memory Size 6) Auto shut time: 15 min, 30 min, 60min, 120 min and No automatic shutdown 11 / 13 Troubleshooting FM radio channels unable to work normally Since there is no independent antenna, the MP4 uses the connected earphone to receive FM radio signals. There are also wrong setting that caused the problem: Check if the reception sensitivity and Radio Zone are correctly set. Unable to switch on the player Check if the machine if charged Check if the HOLD button is enabled Try to reset the player if possible if everything fails. Battery does not last as long as expected There are many factors to reduce battery life. Check if you have the power saving methods (e.g. Screen off time) set up in the settings menu. External speaker, playing video, use of a memory card are also major factors losing power quickly. Noise in playing. The damaged music file or impurity of the earphone jack may cause the problem; so is the loose connection Unable to download file Check if the computer and the player are properly connected. Check if the memory is full. Check if the USB cable is damaged. Unable to Charge Check if the power button is turned to ON position to allow charge Check if the mains adapter is faulty or in the wrong voltage. Check if the connecting USB cable is faulty. SD Card not recognized by the player Make sure the card is within the maximum allowed size Check if the player is compatible with SDHC cards Check if you have enabled the card in the settings, reboot the machine if needed. Check if the card is fake or faulty. Strange characters found on the machine after resetting the machine. It should be foreign language set by the default..The language options should be found in the setting menu. If you are not able to resolve your problem, contact the technical support for information about how to obtain personal assistance from us or your local retailer. 12 / 13 Legal Notice Information in this document, including URL and other Internet Web site references, is subject to change without notice. Unless otherwise noted, the example companies, organizations, products, domain names, e-mail addresses, logos, people, places, and events depicted herein are fictitious, and no association with any real company, organization, product, domain name, e-mail address, logo, person, place, or event is intended or should be inferred. Complying with all applicable copyright laws is the responsibility of the user. Without limiting the rights under copyright, no part of this document may be reproduced, stored in or introduced into a retrieval system, or transmitted in any form or by any means (electronic, mechanical, photocopying, recording, or otherwise), or for any purpose, without the express written permission by us.We may have patents, patent applications, trademarks, copyrights, or other intellectual property rights covering subject matter in this document. Except as expressly provided in any written license agreement from us, the furnishing of this document does not give you any license to these patents, trademarks, copyrights, or other intellectual property. © 2008 Ricco Digital. All rights reserved. Ricco is a registered trademark.. The names of actual companies and products mentioned herein may be the trademarks of their respective owners. 13 / 13