1
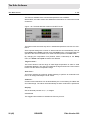
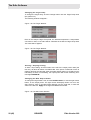
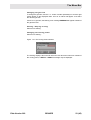
EDTE : VTU Software
User manual
Edte
Version
BRUKER
002
The information in this manual may be altered without notice.
BRUKER accepts no responsibility for actions taken as a result
of use of this manual. BRUKER accepts no liability for any mistakes contained in the manual, leading to coincidental damage,
whether during installation or operation of the instrument. Unauthorised reproduction of manual contents, without written
permission from the publishers, or translation into another language, either in full or in part, is forbidden.
This manual was written by
Patrice FRITSCH
© April 3, 2000: Bruker SA
Wissembourg, France
Manual P/N: Z31464
DWG-Nr: 1171/ 002
Contents
Contents ............................................................... 3
Index ..................................................................... 5
1
1.1
1.2
1.3
2
2.1
2.2
2.3
2.4
2.5
2.6
3
3.1
4
4.1
4.2
5
5.1
Edte Version 002
The Edte Software .................................................. 7
Starting EDTE ..................................................................... 7
Edte Main Window ............................................................... 8
The Menu Bar ...................................................................... 8
The File menu ..................................................................8
The Setup Menu ............................................................10
The Control menu ..........................................................11
The Data menu ..............................................................15
The Dual menu ..............................................................20
The Help menu ..............................................................21
The Display Area ...........................................................21
The Status Bar ...............................................................24
Self-Tune ............................................................... 25
What is a self-tune ............................................................. 25
Self-Tune process .............................................................. 25
When should a self-tune be carried out ? ........................... 26
How to perform a self-tune ................................................. 27
How to store temperature parameters ................................ 28
Save a set of temperature parameters ............................28
Read in a set of temperature parameters .......................28
Adaptive Tune .................................................................... 28
Batman .................................................................. 29
Bruker Adjustment Temperature MANagement ................... 29
Directories and File Formats ................................ 31
Edte Directories ................................................................. 31
Edte Files .......................................................................... 31
Record Files ..................................................................31
TCF Files .......................................................................33
Correction files ..............................................................34
AU Program and Command Line instructions ..... 37
Using the XWin-Nmr command line .................................... 37
The TE parameter ..........................................................37
TESET ...........................................................................37
BRUKER
3 (45)
Contents
5.2
TEGET .......................................................................... 38
TEREADY ..................................................................... 38
TEPAR .......................................................................... 38
Using an AU Program ........................................................ 38
The TE parameter ......................................................... 39
TEGET .......................................................................... 39
TESET .......................................................................... 39
TEREADY ..................................................................... 39
TEPAR .......................................................................... 39
Example ........................................................................ 40
Figures ................................................................. 41
Tables ................................................................... 43
4 (45)
BRUKER
Edte Version 002
Index
Edte Version 002
BRUKER
5 (45)
Index
6 (45)
BRUKER
Edte Version 002
The Edte Software
1
1
Although the Eurotherm controller may be operated manually it is far easier to use
the XWIN-NMR software. This enables the value of various parameters, in particular the target temperature, to be set.
For routine use only, the following two operations are regularly carried out :
1. A self-tune is performed.
2. The target temperature is set.
Both operations are most easily carried out using the software.
Starting EDTE
1.1
To start the Edte Graphical User Interface, enter edte in the XWIN-NMR command line. A first window appears, indicating that the program is initializing :
Figure 1.1. Edte Splash Screen
After a few seconds, this window disappears and the Main Window is displayed. It
may have different aspects regarding to the connected temperature unit. With a
BDTC, BVT3000,or BVT3300, the main window looks like this :
Figure 1.2. Edte Main Window
Edte Version 002
BRUKER
7 (45)
The Edte Software
Edte Main Window
1.2
The Main Window is divided into three parts :
•
•
•
The Menu Bar
The Display Area
The Status Bar
The Menu Bar
1.3
The menu bar contains six sub-menus : Program, Setup, Control, Data, Dual
and Help.
The File menu
1.3.1
Save configuration...
Creates a configuration file (*.tcf) used to store some parameters of the temperature unit such as Target, Max Output-Power, Gas Flow and Self-Tune settings
(Proportional Band, Integral and Derivative time).
The file is located in the /u/exp/stan/nmr/lists/eurotherm/tcf directory. The user
has only to give a name to the configuration file in this window :
Figure 1.3. Save Configuration Window
Load configuration...
To reload the parameters saved in a tcf file. A directory browser shows the available files :
8 (45)
BRUKER
Edte Version 002
The Menu Bar
Figure 1.4. Load Configuration Window
Download to temperature unit
Activating this menu will allow to update the software of the BVT3000 or BVT3300
mainboard. Edte asks for the NMR-superuser (or root) password to begin the
process.
This menu should only be used by the Bruker Service Engineers.
Figure 1.5. Download Window
In the download window, the user will have to select a file in the proposed list, and
click the start button to begin the download process. The files are located in the
/u/exp/stan/nmr/lists/eurotherm/hex directory.
While downloading, the program displays the percentage already transferred.
At the end, the windows informs the user that the download was successful.
As this function is only available on a BVT3000 or 3300, the menu is grayed if another model is detected.
Upload to temperature unit
As it is possible to download, it is also possible to upload the software of the
BVT3000 or BVT3300 mainboard in order to save the software.
Edte asks for the NMR-superuser (or root) password to begin the process.
This menu should only be used by the Bruker Service Engineers.
Edte Version 002
BRUKER
9 (45)
The Edte Software
Figure 1.6. Upload Window
Edte automatically generates a file name and the user has just to click the start
button to begin the upload process. The total number of bytes already uploaded is
displayed while uploading.
At the end, the window informs the user that the upload was successful.
The files are located in the /u/exp/stan/nmr/lists/eurotherm/hex directory.
As this function is only available on a BVT3000 or 3300, the menu is grayed if another model is detected.
Exit
Quit the program.
The Setup Menu
1.3.2
Units
Allows the user to select the desired temperature unit (Celsius, Kelvin, Fahrenheit). The currently active temperature unit is marked. Not available temperature
units are grayed.
Sensors
Choose the sensor you have connected. Only the available sensors are proposed, others are grayed.
Display
Set the decimal precision to 0, 1, or 2 digits. Unavailable for most temperature
controllers.
Lock front
This toggle button enables or disables the front key access.
10 (45)
BRUKER
Edte Version 002
The Menu Bar
The Control menu
1.3.3
Temperature correction...
This menu displays the following window :
Figure 1.7. Temperature Correction Window
For information, the current probehead is displayed.
In this window, you can define if a correction must be applied, and set the offset
and slope values. To apply the new values, use the Apply or OK button.
If correction is used, the Eurotherm target is recalculated in the following way :
EurothermTarget = Slope x SampleTarget + Offset
(Eq. 1.1)
The corrections can be saved or recalled from a correction file using the Save to
file... and Load from file... buttons. The correction file contains the Slope and
Offset values, and if the correction is used or not. The probehead id and description are also saved. When recalling a correction file, edte verifies that the current
probehead matches the saved one, and asks for a user confirmation if not.
Figure 1.8. Temperature Correction is used
In this example, the user has defined a 2 degree offset between the Sample and
the Eurotherm Target temperature. If he sets the Sample Target temperature to
320 Kelvin, the eurotherm will be programmed to reach 322.
When correction is used, a toggle button in the status bar of the main window
changes color to blue. When no correction is applied, the toggle button is grayed
as shown in the following pictures :
Edte Version 002
BRUKER
11 (45)
The Edte Software
Figure 1.9.
Correction is used (The toggle button is blue)
Figure 1.10. No Correction (The toggle button is gray)
Target-Limits...
This menu allows to set the range of valid Target temperature in order to avoid
probehead damages. The user has to defined the high and low limit. These values
must fit into the sensor temperature range.
Figure 1.11. Target Limit Window
Self-Tune...
This menu displays the Self-Tune window :
Figure 1.12. Self-Tune Window
12 (45)
BRUKER
Edte Version 002
The Menu Bar
To perform a self-tune, just give the Self-Tune target temp, and the max output
power. The self-tune will be started when the Self-Tune toggle button is set. It can
be interrupted by activating the manual button. In manual mode, you can change
the Proportional Band, Integral and Derivative Time values and apply with the Apply Changes button. Initial Values will reload the original Proportional Band, Integral and Derivative time (P.I.D.) values.
When the self-tune is running the status bar shows the following message :
Figure 1.13. Selft Tune is running
When the self-tune is finished the new P.I.D. values are loaded and the status bar
shows the following message :
Figure 1.14. Self-Tune is performed
Cutback...
Overshoot and undershoot can be eliminated by the correct setting of cutback low
and cutback high. The values are automatically set when a self-tune is performed.
Figure 1.15. Cutback Window
Adaptive Tune
This toggle button menu allows to switch from a fixed P.I.D. based regulation to a
adaptive tune regulation. This feature will overwrite the parameters P,I and D
when a disturbance indicates that they are incorrect.
Ramp...
This menu enables the use of ramp functions :
Edte Version 002
BRUKER
13 (45)
The Edte Software
Figure 1.16. Ramp Window
To use ramps, the user has to define the temperature to reach and the speed.
Then click the Run button to start the ramp. The Reset stops the ramps (switch to
P.I.D. mode). The status bar displays the remaining time. While the ramp is running, the user may change the target by entering a new value and hit the return
key.
The Monitor Window displays a 3 segment ramp with different Ramp Rate :
Figure 1.17. Monitoring Ramps
14 (45)
BRUKER
Edte Version 002
The Menu Bar
The Data menu
1.3.4
Monitor temperature and Output Power
This menu displays a window containing a graphical tool that displays the evolution in the 2 last minutes of sample and target temp, and output power. One point
is taken every second.This setting can be modified with the Setup... button.
Figure 1.18. Monitor Window
The Save to file button performs a quick data saving to disk in a file located in the
/u/exp/stan/nmr/lists/eurotherm/record directory. The name is generated automatically using the following pattern : myyyymmdd-n.rec where yyyy is the year,
mm the month, dd the day and n and incremental number :
Table 1.1.
Example of AutoSave Generated Filename
m19970715-1.rec
m19970715-2.rec
m19970715-3.rec
m19970715-4.rec
m19970715-5.rec
m19970715-6.rec
m19970715-7.rec
m19970715-8.rec
m19970715-9.rec
m19970715-10.rec
m19970715-11.rec
m19970715-12.rec
m19970716-1.rec
m19970716-2.rec
...
These files can be viewed using the Display Recorded Datas... menu.
The scale is automatically calculated but the user may change these values. To
change the temperature scale, move the mouse pointer to the Temperature Axis
and press the left mouse button. Move the mouse to define the region to zoom in
on. A gray rubber band shows the delimited region. Release the mouse button to
Edte Version 002
BRUKER
15 (45)
The Edte Software
zoom the area. To zoom in on the output power, follow the same process on the
right axis.
To go back to automatic scale, click the toggle button AutoScale.
With the right mouse button, a menu can be activated. It displays informations
about the current Graphic Display Settings (Duration and Interval). This menu
also displays the name of each displayed sensor. Toggle buttons, associated to
the displayed sensors, can be set (unset) to show (hide) the curve.
Monitor settings
This menu displays a window for setting the monitor parameters.
Figure 1.19. Monitor Setting Window
Set the Monitor duration using the hh:mm:ss or HHh MMm SSs format (00 :10 :00
or 10m). Time Interval defines the interval between two temperature acquisitions.
Auxiliary sensor module
This menu displays the Auxiliary sensor module window.
Figure 1.20. Auxiliary Sensor Module Window
It displays the sensor type, the measured value, and the scan status. Only the
scanned channels are displayed. It is possible to switch from Celcius to Kelvin
units. A description can be assigned to each channel.
16 (45)
BRUKER
Edte Version 002
The Menu Bar
Record Settings...
Recording allows to store in an ASCII file, several parameters values concerning
the temperature unit at a given time interval.
The recording status is displayed in the status bar of the main window :
Figure 1.21. State 1 (No settings for recording)
Figure 1.22. State 2 (Record can be started / is stopped)
Figure 1.23. State 3 (Recording is active)
The user has to set the filename, the time interval between two points, general informations and the parameters to store :
Time Interval can be entered using the HH :MM :SS or HHh MMm SSs format.
Standard time intervals are proposed by Edte when clicking the right button over
the Time Interval text field.
When the settings are applied the record bitmap indicator of the main window status bar changes from 1to 2. If the file already exists, the user has to confirm that
he wants to overwrite the file. The files are located in the /u/exp/stan/nmr/lists/eurotherm/record directory.
Start Recording
Starts recording, the bitmap indicator changes from 2 to 3. Recording can also be
started by clicking the bitmap in the state 2.
Stop Recording
Stops recording, the bitmap changes from 3 to 2. Recording can be stopped by
clicking the bitmap in the state 3.
Edte Version 002
BRUKER
17 (45)
The Edte Software
Display recorded datas...
Recorded Datas can be displayed with a viewer. The user has to select the record
file using the file browser :
Figure 1.24. Load Recorded File Window
When a file is selected, a viewer, similar to the Monitor, appears.
Figure 1.25. Viewer Window
When moving the mouse over the series of points, a vertical axis is displayed. The
(Elapsed/Absolute) time and the sensor values and description are displayed in
the right part of the screen. Time can be displayed as elapsed (First point is taken
as time reference) or absolute time (Date is also displayed).
18 (45)
BRUKER
Edte Version 002
The Menu Bar
The viewer allows zooming on the x and y axis using the mouse. Press the left
mouse button in the background and drag to define the interest area. Release the
mouse button to define the zoom area. Use the horizontal and vertical scrollbar to
move the interest area.
To reset the zoom, click the Reset Zoom button.
The Info... button displays a window containing informations about the record file
(date, time, user, comment).
The user can enable or disable a serie of point in the popup menu attached to the
right mouse button.
Edte Version 002
BRUKER
19 (45)
The Edte Software
The Dual menu
1.3.5
This menu is available if the connected temperature unit is a BEST.
With a BEST, the main window has additional inforrmations to control the second
eurotherm :
Figure 1.26. The Main Window enhanced in BEST mode
The buttons work the same way as for a standard temperature unit with one eurotherm.
Some special settings are common to both eurotherm and automatically send to
the Liquid and the Probe controller using the Setup menu. If a functionnality was
specific to the second eurotherm, its menu has been placed in the Dual menu.
By changing the temperature unit (Celsius, Kelvin, Fahrenheit) in the Setup
menu, the Probe and Liquid eurotherm are affected.
Target-Limits...
This menu allows to set the range of valid Target temperature in order to avoid
probehead damages. The user has to defined the high and low limit. These values
must fit into the sensor temperature range.
Self-Tune...
This menu displays the self-tune window allowing to perform an automatic selftune or to change manually the P.I.D. values.
Cutback...
Overshoot and undershoot can be eliminated by the correct setting of cutback low
and cutback high. The values are automatically set when a self-tune is performed.
Display
Set the decimal precision to 0, 1, or 2 digits.
Lock front
This toggle button enables or disables the front key access.
20 (45)
BRUKER
Edte Version 002
The Menu Bar
The Help menu
1.3.6
This menu contains informations about how to reach us.
Comments and suggestions are welcome. Please send your request to the support email : [email protected]
Display informations...
Activating this menu will display informations about Edte, the Eurotherm, and the
MainBoard (if available).
Figure 1.27. Information Window
Edte User’s Manual (pdf)...
Displays this manual with Acrobat Reader.
The Display Area
1.3.7
The display area contains the most important informations coming from the temperature unit :
•
•
•
•
•
The sensor temperature
The target temperature
The heater power / state
The gas flow level / state
The cooling power / state
and several buttons to setup and activate different temperature unit functions :
•
•
•
•
•
•
Edte Version 002
Setting target temp
Start / Stop heating
Setting max power
Increase / decrease gas flow level
Start / Stop cooling
Setting cooling power
BRUKER
21 (45)
The Edte Software
Changing the target temp
To change the target temp, click the Change button near the Target Temp value
(the yellow one).
The following window will appear :
Figure 1.28. Set Target Window
Enter in the Sample Target Temp field, the desired temperature. If temperature
correction is used, a new value will be calculated in the Sensor Target Temp field.
This value will be applied.
Figure 1.29. Set Target Window
Starting / Stoping heating
To start / stop heating, click the button at the left of the output power value (the
red one). Its label will switch from Off to On. If the power is switched off due to
missing gas flow, the label will show the heater status (switch to Off without user
interaction). If there is overheating, the output power will contain a blinking error
message OVERHEAT.
Changing the Max Output Power
To change the High Power Limit, click the Set Max button, or use the right mouse
button, on the output power. The right mouse will display values in a list in 5%
step. Select a value. In the Max Power Window, use the scale bar, or enter the
value in the text box. Apply the changes and Close the window.
Figure 1.30. Set Max Power Window
22 (45)
BRUKER
Edte Version 002
The Menu Bar
Changing the gas flow
To change the gas flow, use the + or - button. Another possibility is to use the right
mouse button on the displayed value. A list of 16 values will appear. Just select
the desired gas flow.
If there is no gas flow, the blinking error message MISSING will appear instead of
the gas flow level.
Starting / Stoping cooling
Same as for Heating.
Changing the cooling power
Same as for Heating :
Figure 1.31. Set Cooling Power Window
The Cooling display is also used to inform the user about the LN2 level. Instead of
the cooling power, a REFILL or EMPTY message may be displayed :
Edte Version 002
BRUKER
23 (45)
The Edte Software
The Status Bar
1.3.8
The status bar displays information about recording, temperature correction, the
temperature unit type and the availability of some options, like evaporator, exchanger, auxiliary sensors module and booster.
Figure 1.32. No settings for recording
Figure 1.33. Record can be started / is stopped
Figure 1.34. Recording is active
Figure 1.35. No correction is applied (gray)
Figure 1.36. Correction is active (blue)
24 (45)
BRUKER
Edte Version 002
Self-Tune
2
2000000
2
The Eurotherm controller is used to monitor and control the temperature of the
gas flow surrounding the sample. To do this optimally it needs to measure how the
system responds to changes in the regulation heater power. The required information is obtained during the self-tune routine. If a proper self-tune is not carried
out, then the system will be slow to reach equilibrium and there may be a large
overshoot or undershoot when a new target temperature is set.
What is a self-tune
2.1
A tuning is necessary to match the characteristics of the controller to that of the
process being controlled in order to obtain good control. This means :
1. Stable control of the temperature at the setpoint without fluctuation
2. No overshoot or undershoot
3. Quick response to deviation from the setpoint.
Self-tune involves calculating and setting the values of the P.I.D. parameters :
Proportional Band (P)
The Proportional Band is the bandwith over which the output power is proportioned between 0 and the max power. Outside this bandwidth, the max power is
applied.
Integral Time (I)
Determines the time taken by the controler to remove steady-state error signals.
Derivative Time (D)
Determines how strong the controller will react to the rate-of-change of the measured value.
Self-Tune process
2.2
The regulation heater is switched on at maximum power (subject to the setting of
HO - high output) for one or several short periods of time. The Eurotherm controller measures the response of the system to this power. From the response, three
parameters TI, TD and XP (P.I.D. parameters) are automatically calculated and
set.
Edte Version 002
BRUKER
25 (45)
Self-Tune
Figure 2.1. Self-Tune process
A further parameter (LB overshoot limitation) may also be set, if the range over
which the self-tune is carried out is sufficiently large.
When should a self-tune be carried out ?
2.3
Initially when the system is installed, or, whenever a significant change in the operating conditions is made.
Changes that warrant reactivating self-tune are :
1. Changing the rate of flow of input gas as displayed on the BVT3000 front panel.
2. Large changes in temperature of input gas. Minor temperature fluctuations
caused by room temperature changes will not upset the temperature regulation.
3. Altering the position of the thermocouple.
4. Exchanging a probe.
5. Changing the target temperature by more than 10 K.
Changes that do not require reactivating self-tune :
1. Changing the sample.
2. Changing the target temperature by less than 10 K.
3. Turning sample spin on or off.
26 (45)
BRUKER
Edte Version 002
How to perform a self-tune
How to perform a self-tune
2.4
1. The self-tune should be carried out under the exact conditions of operation. Insert the heater, thermocouple and sample. The heater can be switched on but
first ensure that the target temperature is not too high. If a cooling unit or N2
heater are to be used, then they should be operating normally. Ensure that the
gas flow is attached to the probe base. If the experiments are normally carried
out with spinning samples, then the sample should spin during the self-tune.
2. Enter the command “edte".
3. Be sure the heater is on and click the Control - Self-Tune menu to activate the
Self-Tune Window :
Figure 2.2. The Self-Tune Window
4. The self-tune target is set to the current target temperature. This value can be
changed. The self-tune max power is set to the current Output Power. It may
also be changed.
5. Start the self-tune process by clicking the Self-Tune toggle-button. Self-Tune
is running is displayed in the status-bar. Clicking the Manual toggle button will
stop the selfr-tune process.
6. When Self-Tune is performed, the values of XP, TI and TD are loaded. These
values may be changed manually and applied with the Apply changes button.
7. The new target temperature is automatically set to the Self-tune target temp
and regulation is active.
It is possible to have Proportional only, or ‘PD’ or ‘PI’ control. Just set the Integral or/and Derivative time to 0.0 before starting a self-tune. The tuner will
leave them off and will not calculate a value for them.
Edte Version 002
BRUKER
27 (45)
Self-Tune
How to store temperature parameters
2.5
Different operating conditions may require different P.I.D. parameters. For example, two types of routine experiments may be regularly carried out, room temperature work with a 5mm probe and low temperature work with a 10mm probe.
It is possible to store the two sets of edte parameters in two separate files which
can quickly be loaded.
Save a set of temperature parameters
2.5.1
1. Enter Edte.
2. When a suitable set of parameters has been set, use the menu File - Save
Configuration...
3. In the browser, type in a new name .(e.g.10mmlow) and press OK. The parameters are stored in the file 10mmlow.tcf in the /u/exp/stan/nmr/lists/eurotherm/tcf directory,
Some operators prefer to carry out a self-tune each time a probe is changed and
do not keep a set of stored parameters.
Read in a set of temperature parameters
2.5.2
1. Enter “edte”.
2. Click on File - Load Configuration... menu
3. The browser will display the stored files. Select the one to be loaded and click
OK.
Adaptive Tune
2.6
For routine work, it is recommended that you operate with ADAPTIVE TUNE set
to “off”. Adaptive tune is designed for systems that experience changing conditions e.g. change in rate of air flow, change in input air temperature etc. Such variations are not normal for routine NMR work and so adaptive tune should not be
required.
However, if you wish to ensure that the P.I.D. parameters are constantly monitored
and optimized then there may be an advantage to working with ADAPTIVE TUNE
set to “on” by activating the Control - Adaptive-Tune check menu.
28 (45)
BRUKER
Edte Version 002
Batman
3
3000000
3
Bruker Adjustment Temperature MANagement
3.1
The sensor does not directly measure the sample temperature but the temperature just bellow the sample. There might be a difference between the real sample
temperature and the measured value. Batman has been developped in order to
determine the eurotherm target temperature in order to have the desired temperature in the sample.
Batman is an AU program, launched from within XWIN-NMR, that
automatically calculates this temperature difference. The process may need several steps :
1. Set initial eurotherm target temperature to the desired sample temp
2. Set the temperature
3. Wait for stabilization
4. Compute the real sample temperature using the chemical shift
5. Compute the new eurotherm target temp
6. repeat steps 2..5 until the desired sample temperature is reached
In order to perform this set of calculations, BATMAN first requires the input of several fundamental parameters :
Target temperature in K (the desired probe temperature)
Stabilization time in seconds (the minimum period of thermal stability that
must elapse before data are accquired)
Precision (the maximum amount of temperature fluctuation allowed above
and below the target temperature -- the temperature is considered «stable»
when within this range)
Sample type ((G)lycol or (M)ethanol)
Sample origin ((P)ure MeOH/Glycol or (B)ruker MeOH/Glycol sample
The final entry made by the user is a «CR» when the sample has been introduced
into the spectrometer. Subsequently, BATMAN, picks the appropriate peaks from
the acquired spectrum and stores the chemical shift difference in the file peaklist.
Additional chemical shift measurments, made using this program, are stored in
the same file. These values are processed to generate the linear systems used to
correlate sample temperature to target/probe temperature.
Edte Version 002
BRUKER
29 (45)
Batman
Figure 3.1. Thermal stabilization process
The curve shows a diminishing thermal fluctuation until stability around the target
temperature is achieved. Shaded regions represent times at which stabilization
occurs. These times must be longer than the prescribed stabilization time (st) in
order for a signal to be acquired.
Factors that slow the signal acquisition process are :
i) prescription of a long stabilization time
ii) prescription of a narrow precision window
30 (45)
BRUKER
Edte Version 002
Directories and File
Formats
4
Edte Directories
4
4.1
Edte uses 5 directories all located in /u/exp/stan/nmr/lists/eurotherm.
•
config
This directory contains configuration files used internaly by edte.
The user should not modify these files.
•
hex
This directory contains HEX files. These files are used to update the Variable Temperature Unit firmware.
These files are reserved to the Bruker Service Engineers.
•
corr
This directory contains the correction files generated by the Save to file...
button in the Temperature Correction window. They have all the same extension (.cor). The same directory is used to display the available file to
load a temperature correction parameter set.
•
record
This directory contains the record files generated by the Monitor or the
Record feature included in Edte. All files have the same extension (.rec).
•
tcf
This directory contains the Variable Temperature Unit configuration files
generated by the File - Save Configuration... menu. The same directory is
used to display the list of available files when the Load Configuration...
menu is activated.
Edte Files
4.2
Record Files
4.2.1
The Record Files format is similar to the Microsoft INI files format. It is divided into
sections, and each value is assigned to a Key.
A Record File contains 4 sections :
Edte Version 002
BRUKER
31 (45)
Directories and File Formats
Info Section
This section contains general informations like User and Title, but also Date,
Time and the data Source.
Cols Section
This section describes which sensors are stored. C1 (Date), C2 (Time) and C3
(Elapsed Time) are always present.
AuxSensors Section
When auxiliary sensor are used, their name and Type are stored.
Aux?Desc is the description of the sensor
Aux?Type is the sensor Type (T, K, E, Pt100)
? = 1,2,3 or 4
Data Section
The data section contains the sensor values. They are stored from left to right and
correspond to the sensors defined in the cols section. The first column is C1
(Date), the second one is C2 (Time), the third one is C3 (Elapsed Time) and so
on.
Example
[Info]
Source=xTempRecording
Date=07/08/1997
Time=14:30:03
User=Patrice
Title=Long Time Stability Test
[Cols]
C1=Date
C2=Time
C3=Elapsed Time
C4=Sample
C5=Target
C6=Output Power
C7=Aux1
C8=Aux2
C9=Aux3
C10=Aux4
[AuxSensors]
Aux1Desc=Outside
Aux1Type=E
Aux2Desc=Unused
Aux2Type=E
Aux3Desc=Room Temp
Aux3Type=K
Aux4Desc=Not connected
Aux4Type=K
[Data]
08/07/1997
08/07/1997
08/07/1997
32 (45)
14:30:09
14:30:14
14:30:19
6
11
16
BRUKER
300.00 300.00 1.60 23.40 25.30 25.20 1372.00
300.00 300.00 1.70 23.40 25.30 25.20 1372.00
300.00 300.00 1.70 23.40 25.30 25.20 1372.00
Edte Version 002
Edte Files
08/07/1997
08/07/1997
08/07/1997
08/07/1997
08/07/1997
...
14:30:25
14:30:30
14:30:35
14:30:40
14:30:46
22
27
32
37
43
300.00
300.00
300.00
300.00
300.00
300.00
300.00
300.00
300.00
300.00
1.60
1.50
1.70
1.50
1.60
23.40
23.40
23.40
23.40
23.40
25.30
25.30
25.30
25.30
25.30
25.20
25.20
25.20
25.20
25.20
1372.00
1372.00
1372.00
1372.00
1372.00
TCF Files
4.2.2
A TCF file contains several informations about the Variable Temperature Unit.
These files are generated when using the File - Save (Load) Configuration...
menu.
Two section are used to store the VTU parameters.
Version
This section identifies the Variable Temperature Type. A BVT3000 tcf file may not
be compatible with a BDTC tcf file. The software checks the version type.
Parameters
This section contains the parameters of the Variable Temperature Unit.
The setpoint value is associated to the SP parameter.
HO represents the Max Ouput Power (0-100).
AF is the value of the GasFlow (0-15).
NH is the nitrogen heater power (0-100%).
XP, TI, TD are the PID values.
All these values can be set using the Edte Graphic User Interface.
There is no way to add other parameters to a tcf file. If it is necessary to add
other parameters, modifications must be done in the software.
Example
[Version]
Version=BVT3000
[Parameters]
SP=320.00
HO=20.00
AF=6
NH=-1
XP=68.40
TI=160.00
TD=26.70
Compatibility
Files stored with a previous version of Edte (before XWin-NMR 2.0) cannot
be loaded with this new version of the software.
The user will have to create new tcf files.
Edte Version 002
BRUKER
33 (45)
Directories and File Formats
As previous parameter files are ASCII files, it is possible to print them from a unixshell. They are located in the /u/exp/stan/nmr/lists/eurotherm directory and
have the following format :
SL 303.3
HO 20.0
TI 10.0
TD 1.7
HB 7.6
LB 26.3
XP 5.3
HP1
NP0
BP 0.0
RR 0.0
TR 17.0
S2 298.0
OS> 0
XS> 4
XP, TI, TD are the PID values. They can be manualy entered in the Self-Tune Window.
SL is the setpoint (SP)
HO is the Max Output Power.
NP is the Nitrogen Power.
toEdte
Another solution is to use the toEdte PerlScript to convert older parameter files.
This script is located in /u/exp/stan/nmr/lists/eurotherm.
The Syntax is :
toEdte <parfile>
This PerlScript converts the file <parfile> to a new file parfile.tcf located in the tcf
sub-directory. It extracts the XP, TI, TD, SP , HO, NP from the older file and generates a new parameter file compliant with the new structure.
Correction files
4.2.3
Correction files are used to store the temperature corrections parameters as set in
the Temperature Correction... menu. They are saved in the /u/exp/stan/nmr/
lists/eurotherm/corr directory.
Parameters
This file contains two sections : [ProbeHead] and [Correction].
The [ProbeHead] section contains the Id and Description of the current probehead as set with edhead. A warning is displayed if the user wants to load a correction file which probehead does not match the current one.
The [Correction] section contains the correction parameters (Offset and Slope)
and the flag indicating it is enabled or not (Corr = On or Off).
34 (45)
BRUKER
Edte Version 002
Edte Files
Exemple 1
This example show the correction file when Correction is disabled.
[ProbeHead]
Id=7
Desc= 5 mm QNP 1H/13C/31P/19F Z-grad
[Correction]
Corr=Off
Slope=1.00000
Offset=0.00000
Exemple 2
This example shows a linear correction of 2 degrees
[ProbeHead]
Id=7
Desc= 5 mm QNP 1H/13C/31P/19F Z-grad
[Correction]
Corr=On
Slope=1.00000
Offset=2.00000
With this set of correction applied, a sample target temperature of 320K will be
send to the Eurotherm as a 322K sensor target temperature.
Edte Version 002
BRUKER
35 (45)
Directories and File Formats
36 (45)
BRUKER
Edte Version 002
AU Program and
Command Line
instructions
5
Using the XWin-Nmr command line
5
5.1
One parameter and four commands are available to the user to interact with the
temperature unit within an AU program or usng the XWin-Nmr command line.
The TE parameter
5.1.1
TE is always in KELVIN
TE contains the last target temperature applied or to be applied to the eurotherm.
In the following two lines :
te 320.0
teset
the TE parameter is set to 320.0K and it's value is applied as the new target temperature..
The following two lines :
teget
1s TE
display the current sample temperature loaded with TEGET.
TESET
5.1.2
This command allows the user to send the value stored in TE to the temperature
as the new target temperature.
Syntax :
teset
or
teset temp
When TESET is used without parameters, TE is used,
Edte Version 002
BRUKER
37 (45)
AU Program and Command Line instructions
TEGET
5.1.3
This command loads the TE parameter with the current target temperature.
Syntax :
teget
The command 1s TE displays the value loaded with TEGET.
TEREADY
5.1.4
This command waits for a stabilisation time after that the defined precision has
been reached.
Syntax :
teready Stabilisation_Time Precision
This command is used in conjonction with TESET in the following way (xwin-nmr
command line) :
teset 320.0
teready 300 0.5
The target temperature will be set to 320K and TEREADY will way additionnal five
minutes (300 seconds) after the measured temperature had been 10 seconds in a
0.5K stabilization range (319.5 .. 320.5).
TEPAR
5.1.5
This command loads a parameter file previously stored with Edte using the File Save Configuration... menu.
Syntax :
tepar
or
tepar file.tcf
When no parameter file is specified, the list of available parameter files are displayed in a list. Click a filename to apply it's values.
Using an AU Program
5.2
All the above described function can be included in an AU Program. The syntax is
a little bit different for some commands.
38 (45)
BRUKER
Edte Version 002
Using an AU Program
The TE parameter
5.2.1
Setting TE
STOREPAR("TE", value);
Reading TE
FETCHPAR("TE", &value);
where value is a float.
Reading the Sample Temperature
To read the Sample Temperature use FETCHPARS instead of FETCHPAR after a
TEGET command :
TEGET;
FETCHPARS("TE", &value);
TEGET
5.2.2
Syntax :
TEGET;
If a compilation error occurs use the following line instead of TEGET :
{ SETCURDATA AUERR=CPR_exec( "teget", WAIT_TERM);}
TESET
5.2.3
Syntax :
TESET;
TEREADY
5.2.4
Syntax :
TEREADY(Stability_Duration, Precision);
where Stability-Duration is an integer, and Precision a float.
TEPAR
5.2.5
Syntax :
TEPAR(filename);
where filename is a string variable or constant string.
Edte Version 002
BRUKER
39 (45)
AU Program and Command Line instructions
Example
5.2.6
The following AU Program
...
STOREPAR("TE", 320.0);
TESET
TEREADY(300, 0.5)
TEGET
Proc_err(1, «Sampe Temperature is : %.2fK.\n», fTE);
...
sets the target to 320.0K, waits for a 5 minutes stabilization time after a precision
of +-0.5K and displays the reached Sample Temperature.
40 (45)
BRUKER
Edte Version 002
Figures
1
The Edte Software
Figure
Figure
Figure
Figure
Figure
Figure
Figure
Figure
Figure
Figure
Figure
Figure
Figure
Figure
Figure
Figure
Figure
Figure
Figure
Figure
Figure
Figure
Figure
Figure
Figure
Figure
Figure
Figure
Figure
Figure
Figure
Figure
Figure
Figure
Figure
Figure
2
1.1.
1.2.
1.3.
1.4.
1.5.
1.6.
1.7.
1.8.
1.9.
1.10.
1.11.
1.12.
1.13.
1.14.
1.15.
1.16.
1.17.
1.18.
1.19.
1.20.
1.21.
1.22.
1.23.
1.24.
1.25.
1.26.
1.27.
1.28.
1.29.
1.30.
1.31.
1.32.
1.33.
1.34.
1.35.
1.36.
3
Edte Version 002
Edte Splash Screen ...............................................................7
Edte Main Window .................................................................7
Save Configuration Window ...................................................8
Load Configuration Window ...................................................9
Download Window .................................................................9
Upload Window ...................................................................10
Temperature Correction Window ..........................................11
Temperature Correction is used ...........................................11
Correction is used (The toggle button is blue) .....................12
No Correction (The toggle button is gray) .............................12
Target Limit Window ............................................................12
Self-Tune Window ...............................................................12
Selft Tune is running ............................................................13
Self-Tune is performed ........................................................13
Cutback Window ..................................................................13
Ramp Window .....................................................................14
Monitoring Ramps ...............................................................14
Monitor Window ...................................................................15
Monitor Setting Window .......................................................16
Auxiliary Sensor Module Window .........................................16
State 1 (No settings for recording) .......................................17
State 2 (Record can be started / is stopped) ........................17
State 3 (Recording is active) ................................................17
Load Recorded File Window ................................................18
Viewer Window ....................................................................18
The Main Window enhanced in BEST mode .........................20
Information Window .............................................................21
Set Target Window ..............................................................22
Set Target Window ..............................................................22
Set Max Power Window .......................................................22
Set Cooling Power Window ..................................................23
No settings for recording .....................................................24
Record can be started / is stopped ......................................24
Recording is active ..............................................................24
No correction is applied (gray) .............................................24
Correction is active (blue) ....................................................24
Self-Tune
Figure 2.1.
Figure 2.2.
7
25
Self-Tune process ................................................................26
The Self-Tune Window .........................................................27
Batman
29
BRUKER
41 (45)
Figures
Figure 3.1.
42 (45)
Thermal stabilization process .............................................. 30
4
Directories and File Formats
31
5
AU Program and Command Line instructions
37
BRUKER
Edte Version 002
Tables
1
The Edte Software
Table 1.1.
Edte Version 002
7
Example of AutoSave Generated Filename .................... 15
2
Self-Tune
25
3
Batman
29
4
Directories and File Formats
31
5
AU Program and Command Line instructions
37
BRUKER
43 (45)
Tables
44 (45)
BRUKER
Edte Version 002
Lastpage
Edte Version 002
BRUKER
45 (45)


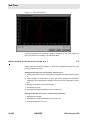
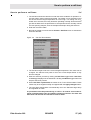


![j:j_"Xt$l"j:]:":,lg]:"r/Human Resources have been duty - e](http://vs1.manualzilla.com/store/data/005657435_1-26d97049bf04f0fd92265d73e45a9ab3-150x150.png)