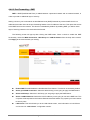
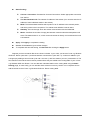
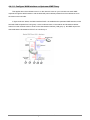
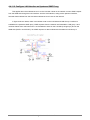
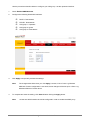
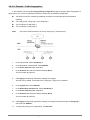
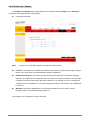
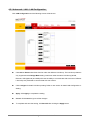
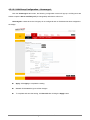
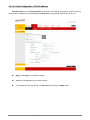
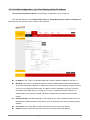
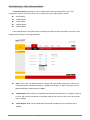
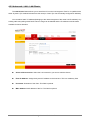
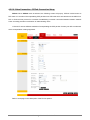
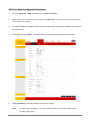
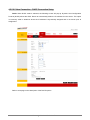
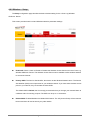
1
Copyright
The contents of this publication may not be reproduced in any part or as a whole, stored, transcribed in
an information retrieval system, translated into any language, or transmitted in any form or by any means,
mechanical, magnetic, electronic, optical, photocopying, manual, or otherwise, without the prior written
permission.
Trademarks
All product, company, brand names are trademarks or registered trademarks of their respective
companies. They are used for identification purpose only. Specifications are subject to be changed without
prior notice.
4 Ports 11g Wireless ADSL2/2+ Router
i
FCC Radiation Norm
This equipment has been tested and found to comply with limits for a Class B digital device pursuant to 47
CFR, Part 2 and Part 15 of the Federal Communication Commission (FCC) rules. Operation is subject to the
following two conditions:
1.
This device may not cause harmful interference
2.
This device must accept any interference received including interferences that may cause
undesired operations.
CE Radiation Norm
This equipment has been tested and found to comply with the limits of the European Council Directive
99/5/EC on the approximation of the law of the member states relating to EN 300 328 V1.4.1 (2003-04), EN
301 489-1 V1.4.1 (2002-08) and EN 301 489-17 V1.2.1 (2002-08) and EN 60950.
FCC & CE Compliance Statement
These limits are designed to provide reasonable protection against radio interference in a residential
environment. This equipment can generates, uses and radiate radio frequency energy and, if not installed
and used in accordance with the instructions, may cause harmful interference to radio communications.
However, there is no guarantee that interference will not occur in a particular installation. If this equipment
does cause harmful interference to radio or television reception, which is found by turning the equipment ON
and OFF, the user is encouraged to try to reduce the interference by one or more of the following measures:
•
Reorient or relocate the receiving antenna
•
Increase the separation between the equipment and the receiver
•
Connect the equipment into an outlet on a circuit different from that to which the receiver is connect to
•
Consult a dealer or an experienced technician for assistance
CAUTION!
The Federal Communication Commission warns the user that changes or modifications to the unit not
expressly approved by the party responsible for compliance could void the user’s authority to operate the
equipment.
4 Ports 11g Wireless ADSL2/2+ Router
ii
Contents
COPYRIGHT ...................................................................................................................................................... I
CHAPTER 1 INTRODUCTION ......................................................................................................................... 1
1.1 Features ...................................................................................................................................................... 2
1.2 Scope .......................................................................................................................................................... 5
1.3 Audience...................................................................................................................................................... 6
1.4 Document Structure..................................................................................................................................... 7
1.5 System Requirement................................................................................................................................... 8
1.6 Packet Contents .......................................................................................................................................... 9
CHAPTER 2 KNOWING THE 4 PORTS 11G WIRELESS ADSL2/2+ ROUTER........................................... 10
2.1 Front Panel:............................................................................................................................................... 10
2.2 Back Panel: ............................................................................................................................................... 11
2.3 Connection Mechanism:............................................................................................................................ 12
CHAPTER 3 SETTING UP THE TCP/IP IN WINDOWS................................................................................. 14
3.1 Windows ME / 98 ...................................................................................................................................... 15
3.2 Windows 2000........................................................................................................................................... 16
3.3 Windows XP .............................................................................................................................................. 17
3.4 Checking TCP/IP Configuration ................................................................................................................ 18
CHAPTER 4 DEVICE ADMINISTRATION...................................................................................................... 21
4.1 Login.......................................................................................................................................................... 22
4.2 Setup Wizard............................................................................................................................................. 25
4.3 Tools .......................................................................................................................................................... 34
4.3.1 Tools – System Commands.................................................................................................................... 35
4.3.2 Tools – Remote Log ............................................................................................................................... 37
4.3.3 Tools – User Management ..................................................................................................................... 39
4.3.4 Tools – Update Gateway ........................................................................................................................ 41
4.3.4.1 Update Gateway Procedure................................................................................................................ 42
4.3.5 Tools – System Log ................................................................................................................................ 44
4.3.6 Tools – Ping Test .................................................................................................................................... 45
4.3.6.1 Ping Test Procedure ............................................................................................................................ 46
4.3.7 Tools – ATM Test .................................................................................................................................... 47
4.4 Advanced................................................................................................................................................... 48
4.4.1 Advanced – Advanced............................................................................................................................ 49
4.4.2 Advanced – SNMP ................................................................................................................................. 51
4.4.3 Advanced – UPnP .................................................................................................................................. 53
4 Ports 11g Wireless ADSL2/2+ Router
iii
4.4.3.1 Configure UPnP .................................................................................................................................. 54
4.4.4 Advanced – SNTP .................................................................................................................................. 55
4.4.4.1 SNTP Configuration Procedure........................................................................................................... 57
4.4.5 Advanced – TR-069................................................................................................................................ 58
4.4.5.1 Configure TR-069................................................................................................................................ 60
4.4.6 Advanced – Port Forwarding.................................................................................................................. 61
4.4.6.1 Port Forwarding Configuration Procedure........................................................................................... 63
4.4.6.2 Port Forwarding – New IP ................................................................................................................... 66
4.4.6.3 Port Forwarding – DMZ ....................................................................................................................... 67
4.4.6.3.1 DMZ Configuration Procedure ......................................................................................................... 68
4.4.6.4 Port Forwarding – Custom Port Forwarding........................................................................................ 69
4.4.7 Advanced – IP Filter ............................................................................................................................... 71
4.4.7.1 IP Filters Configuration Procedure ...................................................................................................... 72
4.4.7.2 IP Filters – Custom IP Filters............................................................................................................... 75
4.4.8 Advanced – TR-068................................................................................................................................ 77
4.4.8.1 Create Temporary User Account (WAN-Side)..................................................................................... 78
4.4.9 Advanced – Routing ............................................................................................................................... 79
4.4.9.1 Dynamic Routing Configuration Procedure......................................................................................... 83
4.4.9.2 Static Routing Configuration Procedure .............................................................................................. 84
4.4.10 Advanced – DDNS ............................................................................................................................... 86
4.4.10.1 Enable Dynamic DNS........................................................................................................................ 87
4.4.11 Advanced – IGMP................................................................................................................................. 88
4.4.11.1 Configure WAN Interface as Upstream IGMP Proxy......................................................................... 90
4.4.11.2 Configure LAN Interface as Upstream IGMP Proxy .......................................................................... 92
4.4.12 Advanced – Web Access Control ......................................................................................................... 94
4.4.12.1 Enable Web Access Control (WAN-Side).......................................................................................... 95
4.4.13 Advanced – Bridge Filter ...................................................................................................................... 96
4.4.13.1 Bridge Filters Configuration Procedure ............................................................................................. 98
4.4.14 Advanced – Web Filters ....................................................................................................................... 99
4.4.15 Advanced – Policy Routing ................................................................................................................ 100
4.4.15.1 Example – Traffic Segregation ........................................................................................................ 103
4.4.15.2 Example – Handling DNS Packets.................................................................................................. 104
4.4.16 Advanced – Ingress............................................................................................................................ 105
4.4.16.1 Ingress Untrusted Mode.................................................................................................................. 106
4.4.16.2 Ingress Layer 2 Configuration ......................................................................................................... 107
4.4.16.2.1 Ingress Layer 2 Priority Bits to CoS Configuration....................................................................... 108
4.4.16.3 Ingress Layer 3 Configuration ......................................................................................................... 109
4.4.16.3.1 Ingress Layer 3 Configuration ...................................................................................................... 110
4.4.16.4 Ingress Static Configuration .............................................................................................................111
4.4.16.4.1 Ingress Static Configuration Procedures...................................................................................... 112
4.4.16.5 Ingress Payload Database Configuration........................................................................................ 113
4.4.16.6 WLAN Ingress Support.................................................................................................................... 115
4 Ports 11g Wireless ADSL2/2+ Router
iv
4.4.17 Advanced – Egress ............................................................................................................................ 116
4.4.17.1 No Egress Mode.............................................................................................................................. 117
4.4.17.2 Egress Layer 2 Configuration.......................................................................................................... 118
4.4.17.3 Egress Layer 3 Configuration.......................................................................................................... 119
4.4.17.4 WLAN Egress Support .................................................................................................................... 120
4.4.18 Advanced – Shaper ............................................................................................................................ 121
4.4.18.1 HTB Queue Discipline Enabled....................................................................................................... 122
4.4.19 Advanced – SSH Access Control ....................................................................................................... 123
4.5 Advanced – LAN...................................................................................................................................... 124
4.5.1 Advanced – LAN – LAN Configuration ................................................................................................. 125
4.5.1.1 LAN Configuration Procedures ......................................................................................................... 126
4.5.1.2 LAN Group Configuration .................................................................................................................. 128
4.5.1.2.1 LAN Group Configuration – Unmanaged ....................................................................................... 131
4.5.1.2.2 LAN Configuration – Obtain an IP Address Automatically ............................................................. 132
4.5.1.2.3 LAN Configuration – PPP IP Address ............................................................................................ 133
4.5.1.2.4 LAN Configuration – Use The Following Static IP Address............................................................ 134
4.5.2 Advanced – LAN – Ethernet Switch ..................................................................................................... 137
4.5.3 Advanced – LAN – LAN Clients ........................................................................................................... 139
4.5.3.1 LAN Clients Configuration Procedure ............................................................................................... 140
4.5.4 Advanced – LAN – LAN Isolation ......................................................................................................... 141
4.5.4.1 LAN Isolation Configuration Procedure............................................................................................. 142
4.5.5 Advanced – WAN ................................................................................................................................. 143
4.5.5.1 Advanced – WAN – ADSL ................................................................................................................. 144
4.5.5.2 Advanced – WAN Connection ........................................................................................................... 145
4.5.5.2.1 Advanced – WAN – New Connection............................................................................................. 146
4.5.5.2.1.1 Advanced – WAN – Host Trigger ................................................................................................ 147
4.5.5.2.2 New Connection – PPPoE Connection Setup ............................................................................... 148
4.5.5.2.2.1 PPPoE Configuration Procedures............................................................................................... 152
4.5.5.2.3 New Connection – PPPoA Connection Setup................................................................................ 156
4.5.5.2.3.1 PPPoA Configuration Procedures ............................................................................................... 160
4.5.5.2.4 New Connection – Static Connection Setup .................................................................................. 164
4.5.5.2.4.1 Static Configuration Procedures.................................................................................................. 168
4.5.5.2.5 New Connection – DHCP Connection Setup ................................................................................. 172
4.5.5.2.5.1 DHCP Configuration Procedures ................................................................................................ 175
4.5.5.2.6 New Connection – Bridge Connection Setup................................................................................. 179
4.5.5.2.6.1 Bridge Configuration Procedures ................................................................................................ 182
4.5.5.2.7 New Connection - CLIP Connection Setup .................................................................................... 186
4.5.5.2.7.1 CLIP Configuration Procedures .................................................................................................. 189
4.6 Advanced – Wireless............................................................................................................................... 193
4.6.1 Save Your Changes.............................................................................................................................. 194
4.6.2 Wireless – Setup .................................................................................................................................. 195
4.6.2.1 Wireless – Setup – User Isolation ..................................................................................................... 197
4 Ports 11g Wireless ADSL2/2+ Router
v
4.6.3 Wireless – Security............................................................................................................................... 198
4.6.3.1 Wireless – Security – None............................................................................................................... 199
4.6.3.2 Wireless – Security – WEP ............................................................................................................... 200
4.6.3.2.1 How to configure WEP? ................................................................................................................. 202
4.6.3.3 Wireless – Security – 802.1x............................................................................................................. 203
4.6.3.4 Wireless – Security – WPA................................................................................................................ 204
4.6.4 Wireless – Configuration ...................................................................................................................... 206
4.6.4.1 Configure Multiple SSID .................................................................................................................... 209
4.6.5 Wireless – Management....................................................................................................................... 211
4.6.5.1 Wireless – Management – Access List ............................................................................................. 212
4.6.5.1.1 Access List Configuration Procedure ............................................................................................. 213
4.6.5.1.2 Wireless – Management – Associated Stations ............................................................................. 214
4.6.6 Wireless – WDS ................................................................................................................................... 215
4.7 Advanced – Status................................................................................................................................... 217
4.7.1 Status – Network Statistic..................................................................................................................... 218
4.7.1.1 Status – Network Statistic – Ethernet ................................................................................................ 219
4.7.1.2 Status – Network Statistic – DSL....................................................................................................... 220
4.7.1.3 Status – Network Statistic – Wireless................................................................................................ 221
4.7.2 Status – DDNS Status .......................................................................................................................... 222
4.7.3 Status – DHCP Clients ......................................................................................................................... 223
4.7.4 Status – ADSL Status ........................................................................................................................... 224
4.7.5 Status – Info ......................................................................................................................................... 225
4.7.6 Status – WDS Report ........................................................................................................................... 226
APPENDIX A: ROUTER TERMS ................................................................................................................. 227
APPENDIX B: FREQUENTLY ASKED QUESTIONS .................................................................................. 229
APPENDIX C: TROUBLESHOOTING GUIDE............................................................................................. 233
APPENDIX D: UPNP SETTING ON WINDOWS XP (OPTIONAL).............................................................. 236
APPENDIX E: GLOSSARY .......................................................................................................................... 240
4 Ports 11g Wireless ADSL2/2+ Router
vi
Chapter 1 Introduction
Congratulations on your purchase of this outstanding 4 Ports 11g Wireless ADSL2/2+ Router. This
device is an IEEE 802.11g Wireless and 4 Port Switch built-in ADSL2/2+ Router that allows
ADSL/ADSL2/ADSL2+ connectivity while providing Wireless LAN capabilities for residential, industries and
SOHO environments. Wireless-G or the so-called 11g is the upcoming 54Mbps wireless networking standard
that’s almost 5 times faster than the widely deployed Wireless-B or the so-called 11b products found in homes,
businesses, and public wireless hotspots around the world.
ADSL2/2+ is a transmission technology used to carry user data over a single twisted-pair line between
the Central Office and the Customer Premises. The downstream data rates can go up to 24 Mbps and the
upstream data rates can go up to 1Mbps with length reach up to 22Kft for ADSL2/2+ connection and 54Mbps
transfer data rate for the 11g connection. This device allows ADSL2/2+ connectivity while providing Wireless
LAN capabilities for home or office users. This asymmetric nature lends itself to applications such as Internet
access and video delivery.
With minimum setup, you can install and use the router within minutes.
4 Ports 11g Wireless ADSL2/2+ Router
1
1.1 Features
ADSL Standards Compliance
Full rate ANSI T1.413 Issue2, ITU-T G.992.1 and ITU-T G.992.2 standards compliant.
ITU G.992.3, ITU G.992.5 and READSL2 ADSL2/2+ standards compliant.
Support Annex M and Annex L specification.
Downstream and Upstream data rates up to 24Mbps and 1Mbps.
Reach length up to 22Kft.
Support Dying Gasp functionality.
ATM and PPP Protocols
Support ATM ALL0, ALL2 & ALL5.
Support OAM F4/F5 loop back.
Support up to 8PVCs.
Multiple Protocols over AAL5 (RFC 2684 / RFC 1483).
Support Bridged and Routed Ethernet Encapsulation.
Classical IP over ATM (RFC2225 / RFC1577).
Support VC and LLC based Multiplexing.
Support PPPoA (RFC 2364) standard.
Support PPPoE (RFC 2516) standard.
Support UBR, CBR, rt-VBR and nrt-VBR Traffic shaping QoS.
Support TR-068 (VPI/VCI Auto-Detection functionality).
Support TR-069 (WAN-side CPE Remote Management features).
Network Protocols & Features
IP Routing – RIPv1 and RIPv2.
Support Static Routing.
DHCP Server, Relay and Client.
Support DNS Relay.
Support DDNS features.
Support SNMP functionality.
Support SNTP functionality.
Support IP QoS features.
Support IGMP functionality
IP Filter, Bridge Filter and Web Filter features supported.
Support Port Forwarding features.
Support DMZ functionality.
Support NAT and NAPT (PAT) functionality with extensive ALG supported.
Support IPSec, L2TP, PPTP Pass-Through.
Support VPN Pass-Through.
Built-in Firewall features.
4 Ports 11g Wireless ADSL2/2+ Router
2
Bridging
Support IEEE 802.1d Transparent Bridging.
Support IGMP Snooping.
Support WAN Bridge functionality.
Support MAC Learning Address features.
IEEE 802.11g Wireless Standards
IEEE 802.11b/g standards compliant.
Support data rates up to 54Mbps (Auto-Rate Capable).
Support 11g+ with data transmission rate up to 125Mbps (Optional)
Support OFDM (64QAM, 16QAM, QPSK, BPSK) and DSSS (DBPSK, DQPSK, CCK)
modulation.
Conforms to Wireless Ethernet Compatibility Alliance (WECA) Wireless Fidelity (Wi-Fi)
Standard.
Support WEP/WPA/WPA2/802.1X Encryption for data security.
Support AP Client features.
Support Wireless Access Control functionality.
Support Hidden SSID and Multiple SSID features.
Support WDS features.
Support WMM features.
Support 2.412GHZ ~ 2.484GHz frequency ranges.
Management
Web-based Configuration / Management.
Support FTP/TFTP/Telnet Management / Configuration.
Support Remote Access Management / Configuration.
Support SSH features.
Firmware upgrade and Reset to default via Web management.
Restore factory default setting via Web or hardware reset button.
WAN and LAN connection statistics.
Support Password Authentication.
Device System Log.
Built-in Diagnostic Test.
UPnP
Support UPnP functionality (Optional).
4 Ports 11g Wireless ADSL2/2+ Router
3
Ethernet Standards
Built-in 4 Ports 10/100Mbps Ethernet Switch which compliant with IEEE 802.3x standards
Automatic MDI/MDI-X crossover for 100BASE-TX and 10BASE-T ports.
Auto-negotiation and speed-auto-sensing support.
Port based VLAN supported in any combination (Optional).
4 Ports 11g Wireless ADSL2/2+ Router
4
1.2 Scope
This document provides the descriptions and usages for the 4 Ports 11g Wireless ADSL2/2+
Router’s Web pages that are used in the configuration and setting process. Both basic and advanced
descriptions and concepts are discussed. To help the reader understand more about these Web pages,
some questions and answers (Q&A) are appended after the definition of each Web page along with the
appendices at the end of the guide.
4 Ports 11g Wireless ADSL2/2+ Router
5
1.3 Audience
This document is prepared for use by those customers who purchase the 4 Ports 11g Wireless
ADSL2/2+ Router and using the provided or embedded firmware. It assumes the reader has a basic
knowledge of ADSL/ADSL2/ADSL2+ Wireless and networking.
4 Ports 11g Wireless ADSL2/2+ Router
6
1.4 Document Structure
Chapter 1:
Introduction, provides a brief introduction to the product and user guide.
Chapter 2:
Knowing The 4 Ports 11g Wireless ADSL2/2+ Router, provides device specifications
and hardware connection mechanism.
Chapter 3:
Setting Up TCP/IP In Windows, provides Windows system Network’s configurations.
Chapter 4:
Device Administration, describes the pages found under the Admin menu. These pages
allow the user to view, change, edit, update, and save the 4 Ports 11g Wireless
ADSL2/2+ Router’s configurations or settings.
Appendix A:
Router Terms, provides an introduction to basic Router Terms.
Appendix B:
Frequently Asked Questions, is a compilation of useful questions regarding the 4 Ports
11g Wireless ADSL2/2+ Router.
Appendix C:
Troubleshooting Guide, is a compilation of questions and answers relating to
common problems dealing with Windows networking and the 4 Ports 11g Wireless
ADSL2/2+ Router Configurations.
Appendix D:
UPnP Setting, provides UPnP configurations procedures under Windows XP.
Appendix E:
Glossary, provides definitions of terms and acronyms of this 4 Ports 11g Wireless
ADSL2/2+ Router.
4 Ports 11g Wireless ADSL2/2+ Router
7
1.5 System Requirement
Check and confirm that your system confirm the following minimum requirements:
Personal computer ( PC/Notebook ).
Pentium III compatible processor and above.
Ethernet LAN card or IEEE 802.11b or IEEE 802.11g Wireless adaptor installed with TCP/IP
protocol.
USB Port ( Optional )
64 MB RAM or more.
50 MB of free disk space ( Minimum ).
Internet Browser.
CD-ROM Drive.
4 Ports 11g Wireless ADSL2/2+ Router
8
1.6 Packet Contents
The 4 Ports 11g Wireless ADSL2/2+ Router package contains the following items:
One 4 Ports 11g Wireless ADSL2/2+ Router
One Power Adapter
One RJ-11 ADSL Cable
One CAT-5 Ethernet Cable
One CD-ROM ( Driver / Manual / Quick Setup Guide )
If any of the above items are damaged or missing, please contact your dealer immediately.
4 Ports 11g Wireless ADSL2/2+ Router
9
Chapter 2 Knowing The 4 Ports 11g Wireless ADSL2/2+ Router
2.1 Front Panel:
The 4 Ports 11g Wireless ADSL2/2+ Router’s LEDs indicators display information about the
device’s status.
PWR
WL/ACT
1
2
3
4
ADSL
PPP
Lights up when 4 Ports 11g Wireless ADSL2/2+ Router is powered on.
Lights up when Wireless system is ready.
Blinking when 4 Ports 11g Wireless ADSL2/2+ Router is sending/receiving data.
Blinking when Port 1 of this 4 Ports 11g Wireless ADSL2/2+ Router is Sending or
Receiving data.
Blinking when Port 2 of this 4 Ports 11g Wireless ADSL2/2+ Router is Sending or
Receiving data.
Blinking when Port 3 of this 4 Ports 11g Wireless ADSL2/2+ Router is Sending or
Receiving data.
Blinking when Port 4 of this 4 Ports 11g Wireless ADSL2/2+ Router is Sending or
Receiving data.
Lights up when a successful ADSL2/2+ connection is established.
Blinking when 4 Ports 11g Wireless ADSL2/2+ Router is sending/receiving data.
Lights up when a PPP connection is established.
4 Ports 11g Wireless ADSL2/2+ Router
10
2.2 Back Panel:
The back panel of the 4 Ports 11g Wireless ADSL2/2+ Router contains ADSL, Ethernet Switches, ,
Power Adapter connection, 2.4GHz Dipole Antenna connector and Reset button.
ADSL
Port for connecting to the ADSL/ADSL2/ADSL2+ Service Provider.
Ports 1~4
Four 10/100Mbps Ethernet Ports for connecting to the network devices.
Power
Power adapter connector.
Antenna
2.4GHz dipole Antenna
Reset
Restore the 4-ports 11g wireless ADSL 2/2+ Router to factory default setting.
All the Ethernet port of the 4 Ports 11g Wireless ADSL2/2+ Router
!
supports auto-crossover capability.
RESET Button:
!
Reboot & Restore the 4 Ports 11g Wireless ADSL2/2+ Router to factory
defaults.
Resetting Factory Defaults:
The reboot and restore to factory defaults feature will set the device to its factory default configuration by
resetting the 4 Ports 11g Wireless ADSL2/2+ Router.
To Reset the 4 Ports 11g Wireless ADSL2/2+ Router:
Ensure that the device is powered on.
Press the Reset button for 10~15 seconds and release. The LED indicators will turns OFF and ON
again indicates that the reset is in progress. Do not power off the device during the reset process.
Reset is completed when the LED indicator return to steady green. The default settings are now
restored.
4 Ports 11g Wireless ADSL2/2+ Router
11
2.3 Connection Mechanism:
This section describes the hardware connection mechanism of 4 Ports 11g Wireless ADSL2/2+ Router
on your Local Area Network (LAN) connected to the Internet, how to configure your 4 Ports 11g Wireless
ADSL2/2+ Router for Internet access or how to manually configure your Internet connection.
You need to prepare the following items before you can establish an Internet connection through your 4
Ports 11g Wireless ADSL2/2+ Router:
1.
A computer/notebook which must have an installed Ethernet Adaptor and an Ethernet Cable, or
2.
A computer/notebook which have Wireless-b or Wireless-g wireless adaptor properly installed.
3.
ADSL/ADSL2/ADSL2+ service account and configuration information provided by your Internet
Service Provider (ISP). You will need one or more of the following configuration parameters to
connect your 4 Ports 11g Wireless ADSL2/2+ Router to the Internet:
a.
VPI/VCI parameters
b.
Multiplexing Method or Protocol Type or Encapsulation Type
c.
Host and Domain Names
d.
ISP Login Name and Password
e.
ISP Domain Name Server (DNS) Address
f.
Fixed or Static IP Address.
Figure below shows the overall hardware connection mechanism of your 4 Ports 11g Wireless ADSL2/2+
Router.
4 Ports 11g Wireless ADSL2/2+ Router
12
Following are the steps to properly connect your 4 Ports 11g Wireless ADSL2/2+ Router:
1.
Turn off your computer/notebook.
2.
Connect the ADSL port of your 4 Ports 11g Wireless ADSL2/2+ Router to the wall jack of the
ADSL/ADSL2/ADSL2+ Line with a RJ-11 cable.
3.
Connect the Ethernet cable (RJ-45) from your 4 Ports 11g Wireless ADSL2/2+ Router (Switch ) to
the Ethernet Adaptor in your computer.
4.
Connect the Power adaptor to the 4 Ports 11g Wireless ADSL2/2+ Router and plug it into a Power
outlet.
The Power light will lit after turning on the 4 Ports 11g Wireless
!
ADSL2/2+ Router.
Auto and self-diagnostic process will turn the LED indicators ON and
OFF during the process.
Use the Power Adaptor exclusively in combination with the equipment
!
supplied and do not use any other kind of power adaptor for the
equipment.
5.
Turn on your computer.
6.
Refer to the next section to setup or configure your system’s Network Adaptor.
4 Ports 11g Wireless ADSL2/2+ Router
13
Chapter 3 Setting up the TCP/IP in Windows
The instruction in this chapter will help you configure your computers to be able to communicate with this
4 Ports 11g Wireless ADSL2/2+ Router.
Computers access the Internet using a protocol called TCP/IP (Transmission Control Protocol/ Internet
Protocol). Each computer/notebook on your network must have TCP/IP installed and selected as its
networking protocol. If a Network Interface Card (NIC) is already installed in your PC, then TCP/IP is probably
already installed as well.
The following description assumes 4 Ports 11g Wireless ADSL2/2+ Router been set to factory default. (If
not, please hold the reset button down for 5~10 seconds). The default of the 4 Ports 11g Wireless ADSL2/2+
Router’s LAN IP is 192.168.1.1.
Follow the procedures below to set your computer/notebook function as a DHCP Client.
Restart and Reboot your Windows system might be necessary after setting your
!
computer function as a DHCP Client. In order to properly activate your choice, click
“OK” to restart your Windows system.
4 Ports 11g Wireless ADSL2/2+ Router
14
3.1 Windows ME / 98
Step 1: Click Start→Settings→Control Panel.
Step 4: Go to IP Address icon and select
Obtain an IP address.
Step 2: Double-click the Network icon.
Step 5: Go to Gateway icon and erase all
previous setting.
Step 3: Go to Configuration icon, select network
adapter installed and click Properties.
Step 6: Go to DNS Configuration icon, select
Disable DNS and click OK.
1
1
2
2
4 Ports 11g Wireless ADSL2/2+ Router
15
3.2 Windows 2000
Step 1: Click Start→Settings→Control Panel.
Step 4: Select Internet Protocol (TCP/IP) and click
Properties.
1
2
Step 2: Double-click the Network and Dial-up
Connections.
Step 5: Select Obtain an IP address automatically
and DNS server address automatically.
Then, click OK.
Step 3: Right Click the Local Area Connection and
1
select Properties.
2
1
3
2
4 Ports 11g Wireless ADSL2/2+ Router
16
3.3 Windows XP
Step 1: Click Start→Control Panel→Classic View.
Step 4: Go to General icon, select Internet Protocol
(TCP/IP) and click Properties.
1
2
Step 2: Double-click the Network Connections.
Step 5: Go to General icon, select Obtain an IP
address automatically and DNS server
address automatically.
Then, click OK.
Step 3: Right Click on the Local Area Connection and
select Properties.
1
2
1
3
2
4 Ports 11g Wireless ADSL2/2+ Router
17
3.4 Checking TCP/IP Configuration
After your PC is configured and the system has rebooted, you can check the TCP/IP configuration using
the following utility provided by your Windows system:
A. Windows 98/ME:
1.
Click on “Start” and “Run”.
2.
In the open field, enter “Command”, then press “OK”.
3.
In the command prompt, type “Winipcfg”, and then press “Enter”. All the Ethernet adapter
information will be shown in the appears Windows. Check if you can get the following setting:
The IP Address as 192.168.1.x
The Subnet Mask as 255.255.255.0
The Default Gateway as 192.168.1.1
4.
Type “Exit” to end up the MS-DOS Prompt.
4 Ports 11g Wireless ADSL2/2+ Router
18
B. Windows 2000:
1.
Click “Start” and “Run”.
2.
In the open field, enter “cmd” then click “OK”.
3.
In the command prompt, type “ipconfig /all”, then press “Enter”.
All the Ethernet adapter information will be shown in the appear Windows. Check if you can
get the following setting:
The IP Address as 192.168.1.x
The Subnet Mask as 255.255.255.0
The Default Gateway as 192.168.1.1
4.
Type “Exit” to end up the process.
4 Ports 11g Wireless ADSL2/2+ Router
19
C. Windows XP:
1.
Click “Start” and “Run”.
2.
In the open field, enter “cmd” then click “OK”.
3.
In the command prompt, type “ipconfig /all”, then press “Enter”
All the Ethernet adapter information will be shown in the appear Windows. Check if you can
get the following setting:
IP address as 192.168.1.x
The Subnet Mask as 255.255.255.0
the default gateway as 192.168.1.1
4.
Type “Exit” to end up the process.
4 Ports 11g Wireless ADSL2/2+ Router
20
Chapter 4 Device Administration
For your convenience, an Administrative Utility has been programmed into 4 Ports 11g Wireless ADSL2/2+
Router. This chapter will explain all the functions in this utility. All the 4 Ports 11g Wireless ADSL2/2+ Router
based administrative tasks are performed through this web utility.
4 Ports 11g Wireless ADSL2/2+ Router
21
4.1 Login
To access the 4 Ports 11g Wireless ADSL2/2+ Router Configuration screens, follow the following steps will
enable you to log into the 4 Ports 11g Wireless ADSL2/2+ Router:
1.
Launch the Web browser (Internet Explorer, Netscape, etc).
2.
Enter the 4 Ports 11g Wireless ADSL2/2+ Router default IP address (Default Gateway)
http://192.168.1.1 in the address bar then press Enter to Log in.
3.
Entry of the username and password will be prompted. Enter the default login “Username” and
“Password”: The default login Username of the administrator is “Admin”, and the default login
Password is “Admin”.
!
Note that the Username and Password are case sensitive.
“Username” and “Password” can be changed after login. Refer to the Tools configuration
section for further instruction.
4 Ports 11g Wireless ADSL2/2+ Router
22
Upon entering the address into the web browser, the system HOME page with all the device information
will pop up as shown below:
Home: The Home section show the current 4 Ports 11g Wireless ADSL2/2+ Router’s connection
status and System information.
Setup Wizard: The Setup Wizard is a presetting wizard which meant to help you install the 4
Ports 11g Wireless ADSL2/2+ Router quickly and easily.
Tools: The Tools section lets you carry out system commands, firmware update, device
management and perform simple system tests.
Advanced: The Advanced section lets you configure advanced features like RIP, SNTP, SNMP,
IP QoS … etc.
4 Ports 11g Wireless ADSL2/2+ Router
23
Connection Status: Shows the current device connection status.
Description: This field displays the ADSL ISP name.
Type: Shows the connection type use by your ISP.
IP: This field displays the WAN IP address which will be provided by your ISP.
State: Shows the ADSL connection status.
Online: This field display your ADSL online time.
Disconnect Reason: Display the ADSL disconnect reason.
System Information: Shows the current device connection status.
System Uptime: This field displays the time of the 4 Ports 11g Wireless ADSL2/2+ Router
has been in operation.
DSL Status: Shows the 4 Ports 11g Wireless ADSL2/2+ Router connection status.
DSL Speed: This field displays the 4 Ports 11g Wireless ADSL2/2+ Router
Downstream/Upstream data rate in Kbps
Ethernet: This field displays the link up or down for the Ethernet connection.
Software Version: This field displays the 4 Ports 11g Wireless ADSL2/2+ Router’s data
pump code version.
Firmware Version: This field displays the 4 Ports 11g Wireless ADSL2/2+ Router’s
firmware version.
SSID: The Service Set Identifier (SSID) is a unique name for your wireless network. If you
have other wireless access points in your network, they must share the same SSID. The
default SSID is Default.
Log Out: Click to Log Out the Administration configuration page.
Refresh: Click to Refresh current page.
4 Ports 11g Wireless ADSL2/2+ Router
24
4.2 Setup Wizard
The Setup Wizard is a presetting wizard which meant to help you install the 4 Ports 11g Wireless
ADSL2/2+ Router quickly and easily.
Click on “Setup Wizard” and the following screen will pop-up:
Follow the “Steps” describe below to complete your installation.
4 Ports 11g Wireless ADSL2/2+ Router
25
Step 1:
Select your country from the Country list and the ADSL service provider from the ISP List (If there
are more than two ISP in your country) and note the “Encapsulation” type and “VPI & VCI”
setting. Click “Next” to continue.
1
2
Click “Config” if you can’t find any available parameters from the
!
presetting country list.
Check your ISP immediately for the setting/configuration details.
4 Ports 11g Wireless ADSL2/2+ Router
26
A.
For countries with the following “Encapsulation” type after clicking the “Next” button at Step 1, you
will enter into set Username and Password window as shown below:
PPPoA VC-Mux
PPPoA LLC
PPPoE VC-Mux
PPPoE LLC
1
2
Manually enter your “Username” and “Password” which will be provided by your Service Provider
(ISP). Click “Apply” after setup.
4 Ports 11g Wireless ADSL2/2+ Router
27
B.
For countries with the following “Encapsulation” after clicking the “Next” button at Step 1, the
following window will pop-up:
1483 Routed IP VC-Mux
1483 Routed IP LLC
1483 Routed IP LLC (1577)
1483 Bridged IP VC-Mux
1483 Bridged IP LLC
In this current window, you will find TWO different Connection Type:
Static (Fixed IP by ISP)
DHCP (Get IP dynamically from ISP)
Click “Config” if you can’t find any available parameters from the
!
presetting country list.
Check your ISP immediately for the setting/configuration details.
4 Ports 11g Wireless ADSL2/2+ Router
28
Static:
Click the radio button to enable Static (Fixed IP by ISP) option then click
“Next”, the following window will pop-up.
1
2
Manually enter the “IP Address”, “Mask”, “Default Gateway” and “DNS”
which will be provided by your ISP. Click “Apply” after your setting.
Static Setup: Static IP Settings are for users who have a Static IP Address (WAN side) from
their ISP.
IP Address: This is the static IP Address given by the ISP.
Range for IP Address is x.x.x.y, where 0 ≦ x≦ 255 and 1 ≦ y≦ 254.
Mask: This is the subnet mask provided by the ISP.
Range for Subnet Mask is x.x.x.x, where 0 ≦ x ≦ 255.
Default Gateway: This is your gateway IP address.
Range for Gateway is x.x.x.y, where 0 ≦ x≦ 255 and 1 ≦ y≦ 254.
DNS: This is the DNS address specify by the user or ISP. Check your ISP for setting
detail.
Range for DNS Address is x.x.x.y, where 0 ≦ x≦ 255 and 1 ≦ y≦ 254.
4 Ports 11g Wireless ADSL2/2+ Router
29
DHCP (Get IP dynamically from ISP): Click the radio button to enable DHCP (Get IP dynamically
from ISP) option then click “Next”, the following window will pop-up:
1
Nothing to be filled under this mode. Just click the “Apply” button to confirm your setting.
4 Ports 11g Wireless ADSL2/2+ Router
30
Step 2:
The following configuration home page with the device setup information will pop-up after your
confirmation at Step 1.
Check the following items when the above window pop-up. All the setting should be exactly the
same with your setting in STEP1.
Description: Show the ISP name you’d selected in STEP 1.
Type: Show the Encapsulation type selected in STEP 1.
NOTE: If the final setting are differ from what you’d selected in STEP 1, click Setup Wizard and redo the
setup procedures or else check your dealer immediately for technical support.
NOTE: The 4 Ports 11g Wireless ADSL2/2+ Router can be configured to maintain up to 8 Connection
Profiles. Different Connection Profiles may be required if you connect to more than one ADSL service
provider, or if you vary the connection type/setting you use.
Note that in many cases, only one Connection Profile will be required and only one Connection
Profile in used at one time.
4 Ports 11g Wireless ADSL2/2+ Router
31
Step 3:
Click the “Refresh” button and check the “System Information”. The “DSL Status” and “DSL
Speed” under “System Information” shows you the ADSL connection status and connection
speed (Upstream/Downstream) in Kbps.
2
Step 4:
1
Launch your web browser, and enter the Google Website Address: “www.google.com” in
the address field then press “Enter”.
4 Ports 11g Wireless ADSL2/2+ Router
32
Step 5:
The following Google website index page will display on your screen. This shows your ADSL
connection is correctly set and access to the Internet is now available.
4 Ports 11g Wireless ADSL2/2+ Router
33
4.3 Tools
Figure below shows the Tools main screen, which can be accessed by clicking on the Tools tab from
the top of the screen. This screen provides access to the following tools screens:
System Commands
Remote Log
User Management
Update Gateway
System Log
Ping Test
ATM Test
System Commands: Save the current configuration, restart the 4 Ports 11g Wireless ADSL2/2+
Router and restore to factory defaults setting.
Remote Log: Setup Remote Log Information.
User Management: Configure user name and password.
Update Gateway: Upgrade the 4 Ports 11g Wireless ADSL2/2+ Router firmware.
System Log: Display the 4 Ports 11g Wireless ADSL2/2+ Router’s log.
Ping Test: Run a ping test.
ATM Test: Use to check weather the 4 Ports 11g Wireless ADSL2/2+ Router is properly
connected to the WAN network.
4 Ports 11g Wireless ADSL2/2+ Router
34
4.3.1 Tools – System Commands
Figure below shows the default System Commands screen, which can be accessed by clicking on the
System Commands link.
Restart: This button enables you to restart the system. If you have not saved your configurations,
the 4 Ports 11g Wireless ADSL2/2+ Router will revert back to the previously save configuration
upon re-starting.
The following wizard will pop-up after clicking the “Restart” button. Click “OK” to confirm your
setting.
Note: Connectivity to the unit will be lost. You can reconnect after the unit reboots.
4 Ports 11g Wireless ADSL2/2+ Router
35
Restart Access Point: Use this button to restart the Wireless Access Point. It is important to
Restart the Access Point any time when changing the Wireless Setting.
The following wizard will pop-up after clicking the “Restart Access Point” button. Click “OK” to
confirm your setting.
Restore Defaults: Use this button to restore factory default configurations.
The following wizard will pop-up after clicking the “Restore Defaults” button. Click “OK” to
confirm your setting.
Note: You will be redirected to the 4 Ports 11g Wireless ADSL2/2+ Router Homepage after the
unit has successfully been restored to factory default configurations.
4 Ports 11g Wireless ADSL2/2+ Router
36
4.3.2 Tools – Remote Log
Figure below shows the default Remote Log screen. The remote log feature will forward all logged
information to the remote PC. The type of information forwarded to the remote PC depends upon the Log
level. Each log message is assigned a severity level, which indicates how seriously the triggering event
affects router functions. When you configure logging, you must specify a severity level for each facility,
messages that belong to the facility and are rated at that level or higher are logged to the destination.
Log Level: The default log level is “Notice”. There are eight log levels in the order of its severity:
Panic: System panic or other condition that causes the router to stop functioning.
Alert: Conditions that require immediate correction, such as a corrupted system database.
Critical: Critical conditions, such as hard drive errors.
Error: Error conditions that generally have less serious consequences than errors in the
emergency, alert, and critical levels.
Warning: Conditions that warrant monitoring.
Notice: Conditions that are not errors but might warrant special handling.
Info: Events or non-error conditions of interest.
Debug: Software debugging message. Specify the level only when so directed by a
technical support representative.
Note: when you select a log level, all log information within this severity level and level(s) above
(meaning, more severe levels) will be sent to the remote PC.
4 Ports 11g Wireless ADSL2/2+ Router
37
Add an IP Address: You can also enter additional IP address to which you want the log
information be forwarded to other than the remote PC. Any IP address you add here will show up
in the drop-down list of the next field: Select a logging destination.
Select a logging destination: You can select a destination IP to which the log information will be
sent from the drop-down list. You can customize the list using the Add and/or Delete buttons.
Delete: Delete the logging destination IP Address from the drop down list.
Apply: Click Apply to complete the setting.
Cancel: Click Cancel to ignore all the changes.
To complete and save the setting, click Save All after clicking the Apply button.
4 Ports 11g Wireless ADSL2/2+ Router
38
4.3.3 Tools – User Management
The User Management page enables you to change your User Name and/or Password. It is
recommended that you change the User Name and password from the default Admin to ensure the security
of the 4 Ports 11g Wireless ADSL2/2+ Router.
For security reasons, the router has its own user name and password. Also, after a period of inactivity
for a set length of time, the administrator login will automatically disconnect. When prompted, enter the router
User Name: Admin and the router Password: Admin to log in.
NOTE: If you forget your user name and password, access to the 4 Ports 11g Wireless ADSL2/2+ Router can
only be gained by resetting the unit to factory defaults. Pressing the “Reset” button for 10 seconds, the LED
indicators will turns OFF and ON again indicates that the Reset process is successfully done.
User Name: “Admin” is your default user name. You can enter your new user name here.
Password: ”Admin” is your default password. You can enter your new password here.
Note: If you forget your password, you can press and hold the reset to factory default button for 10
seconds (or more). The 4 Ports 11g Wireless ADSL2/2+ Router will reset to its factory default
configuration and all custom configuration will be lost.
Confirm Password: Enter your new password here again to confirm your previous setting.
Idle Timeout: The default is 30 minutes. You will need to log back onto the 4 Ports 11g Wireless
ADSL2/2+ Router if it is been inactive for 30 minutes. You can change the timeout here.
4 Ports 11g Wireless ADSL2/2+ Router
39
Apply: Click Apply to complete the setting.
Cancel: Click Cancel to ignore all the changes.
To complete and save the setting, click Save All after clicking the Apply button.
4 Ports 11g Wireless ADSL2/2+ Router
40
4.3.4 Tools – Update Gateway
Firmware is the software that controls the 4 Ports 11g Wireless ADSL2/2+ Router and also provides the
user interface that is subject of this manual. The Firmware resides in the 4 Ports 11g Wireless ADSL2/2+
Router internal Flash memory; currently loaded firmware version can be found under Home
System
Information.
Note: It is recommends that you back up your configuration before doing a firmware upgrade. After the
upgrade is complete, you may need to restore your configuration settings.
To access Firmware Updates, click on Tools
Update Gateway. The following window screen will
pop-up.
Select a File: Click on the Browse… button to locate the Firmware or update image file from your
computer's hard drive.
Update Gateway: Click the Update Gateway button to upgrade your 4 Ports 11g Wireless
ADSL2/2+ Router. The system will be restarted automatically after the Firmware/Image is
successfully uploaded. You will need to reconnect again to configure your setup.
Get Configuration: You may download your configuration file from the system by clicking Get
Configuration. Follow the instruction and save your configuration file in your hard drive.
Note: When uploading Firmware/Configuration File to the 4 Ports 11g Wireless ADSL2/2+ Router,
it is important not to interrupt the Web browser by closing the window, clicking a link, or loading
a new page. If the browser is interrupted, it may corrupt the upgrading process. When the
upload is complete, your 4 Ports 11g Wireless ADSL2/2+ Router will automatically reboot and
restart. The upgrade process will typically take about 3~4 minutes.
4 Ports 11g Wireless ADSL2/2+ Router
41
4.3.4.1 Update Gateway Procedure
Use the following procedures to update firmware for your ADSL2/2+ Router.
1.
Download and save the latest firmware (From your ADSL service provider or local dealer) to your
computer’s hard drive.
2.
Press the “Reset” button of your ADSL2/2+ Router for 10~15 seconds and release to restore the
factory default setting.
3.
Launch the Web browser (Internet Explorer, Netscape, etc) and enter the ADSL2/2+ Router’s default IP
address (Default Gateway) http://192.168.1.1 in the address bar then press “Enter” to Log in.
4.
Entry of the username and password will be prompted. Enter the default login “Username” and
“Password”: The default login Username of the administrator is “Admin”, and the default login
Password is “Admin”.
5.
Click on Tools
Update Gateway and displayed the Firmware update homepage. Click Browse and
select the file to update. The file name will appear in the Select a File field.
6.
Click Update Gateway. The uploading status will pop-up another window screen. When the uploading
process finished, the status screen will shut down automatically and a downloading complete notice
screen will display. Click the “Home” button and log back in.
7.
Re-enter your Username and Password to log back in.
Note: If you want to make sure the firmware is properly upgraded, go to Home
System Information
and check on
the Firmware and Software version information on the System Information screen.
8.
Click Setup Wizard and redo the setup procedures (Refer to Quick Start Guide or Section 4.2 for the
setup procedures).
9.
If you would like a copy of the configuration file (config.bin) saved to the ADSL2/2+ Router’s flash, click
Get Configuration to download. The following screen display after clicking the “Get Configuration”
button.
4 Ports 11g Wireless ADSL2/2+ Router
42
Follow the on screen instruction to complete your Get Configuration process.
4 Ports 11g Wireless ADSL2/2+ Router
43
4.3.5 Tools – System Log
You can display your 4 Ports 11g Wireless ADSL2/2+ Router’s log by clicking on the System Log link
from the Tools Main screen. The System Log screen allows you to view all logged information. Depending
upon the severity level, the logged information will generate log reports to a remote host (if remote logging is
enabled). This page contains information that is dynamic and will refresh every 5~10 seconds.
Refresh: Click Refresh button to reload Web browser.
4 Ports 11g Wireless ADSL2/2+ Router
44
4.3.6 Tools – Ping Test
Once you have your 4 Ports 11g Wireless ADSL2/2+ Router configured, it is a good idea to make sure
you can Ping the network. Figure below shows the default Ping Test screen, which can be accessed by
clicking on the Ping Test link from the Tools screen. If you have your PC connected to the 4 Ports 11g
Wireless ADSL2/2+ Router via the default DHCP configuration, you should be able to Ping the network
address 192.168.1.1. If the pings for both the WAN side and the LAN side are complete, and your have the
proper protocol configures, you should be able to surf the Internet.
Enter IP Address to ping: Enter the IP address that you want to ping. The default is set to the
default IP address of your 4 Ports 11g Wireless ADSL2/2+ Router is “192.168.1.1”.
Packet size: You can define the packet size of the ping test. The default is 64 bytes.
Number of echo requests: You can define how many times the IP address will be pinged. The
default is 3 times.
Test: Click Test to start the ping test. The result will be shown in the window underneath.
4 Ports 11g Wireless ADSL2/2+ Router
45
4.3.6.1 Ping Test Procedure
1.
Click Ping Test from the Tools menu to access the Ping Test screen.
2.
Change or leave the default settings of the following fields:
Enter IP Address to ping
Packet size
Number of echo requests
3.
Click Test.
4.
The ping results will be displayed in the box on the screen. If the ping test was successful, it means that
the TCP/IP protocol is up and running. If the Ping test failed, the TCP/IP protocol is not loaded for some
reason, you should restart the 4 Ports 11g Wireless ADSL2/2+ Router.
4 Ports 11g Wireless ADSL2/2+ Router
46
4.3.7 Tools – ATM Test
The ATM Test is used to check weather your Modem is properly connected to the WAN network. This
test may take a few seconds to complete. Before running this test, make sure you have at least one WAN
connection configured and have valid ADSL link; if the ADSL link is not connected, the test will fail. Figure
below illustrates the ATM Test screen with one WAN connections (Hinet) pre-configured.
Connection: The WAN connections you have available.
Note: You will not be able to perform a modem test without any WAN connection configured.
Type: The type of the WAN connection.
VPI/VCI: Virtual Path identifier/Virtual Channel Identifier.
Test Type: There are 4 test types:
F4 End: F4 end to end.
F4 Seg: F4 segment.
F5 End: F5 end to end.
F5 Seg: F5 segment.
4 Ports 11g Wireless ADSL2/2+ Router
47
4.4 Advanced
The Advanced Menu provides access to advanced networking, management and routing capabilities.
Click the Advanced tab and the following screen will pop-up.
The Advanced tab allows you to perform advanced configuration functions for existing connections
including:
Enabling and disabling of key features including SNTP, UPnP, SNMP, IP QoS, RIP, TR-069,
TR-068 … etc.
Management of LAN port interfaces, packet flow, isolation and filtering.
Management of WAN port interface, ADSL protocols management and creating new connection.
Configure the Wireless Access setting, Security and Management.
Showing the details of the network statistics.
At least one WAN connection must be configured before implementing advanced WAN configuration
features. At least on LAN group must be defined before implementing advanced LAN configuration features.
4 Ports 11g Wireless ADSL2/2+ Router
48
4.4.1 Advanced – Advanced
Figure below shows the Advanced main page, which is accessed by clicking the Advanced tab at the
top of the page.
This page provides access to the following configuration pages:
SNMP: Configure SNMP Management.
UPnP: Configure UPnP for different connections.
SNTP: Configure SNTP to configure time server on Internet.
TR-069: TR-069 is CPE Management Protocol from WAN side, intended for communication
between a CPE and Auto-Configuration Server (ACS).
Port Forwarding: Configure Firewall and NAT pass-through to your hosted applications.
IP Filters: Configure Firewall to block your LAN PCs from accessing the Internet.
IP QoS: Configure IP Quality of Service for different connections.
TR-068: The TR-068 WAN Access enables you to give temporary permission to someone (such
as technical support staff) to be able to access your 4 Ports 11g Wireless ADSL2/2+ Router from
the WAN side
Routing: Configure Static & Dynamic Routing.
DDNS: Dynamic DNS feature allows you to register your 4 Ports 11g Wireless ADSL2/2+ Router
with a DNS server and access your 4 Ports 11g Wireless ADSL2/2+ Router each time using the
same host name.
IGMP: Enables message forwarding from external sources such as your ISP, based on the
Internet Group Management Protocol.
4 Ports 11g Wireless ADSL2/2+ Router
49
Web Access Control: Configure access control list.
Bridge Filters: Select to setup Bridge Filters.
Web Filters: Select to setup Web Filters.
Policy Routing: This page enables you to configure policy routing and QoS.
Ingress: The Ingress page enables you to configure QoS for packets as soon as they come into
the 4 Ports 11g Wireless ADSL2/2+ Router.
Egress: For packets going out of the 4 Ports 11g Wireless ADSL2/2+ Router, the marking (CoS :
Class of Service) need to be translated to the mappings understood by the network domains. The
reverse CoS and domain mapping is configured using the Egress page.
Shaper: Configure the QoS bandwidth.
SSH Access Control: The SSH Access Control page allows you to access the 4 Ports 11g
Wireless ADSL2/2+ Router remotely via SSH from the WAN side.
>>>>: Next Page.
<<<<: Previous page
4 Ports 11g Wireless ADSL2/2+ Router
50
4.4.2 Advanced – SNMP
SNMP: Simple Network Management Protocol (SNMP) is a troubleshooting and management
protocol, which uses the UDP protocol on port 161 to communicate between clients and servers.
SNMP uses a manager MIB (management information base) agent solution to fulfill the network
management needs. The agent is a separate station that can request data from an SNMP agent in each of
the different managed system in the network.
The agent uses the MIBs as dictionaries of manageable objects. Each SNMP-managed device has at
least one agent that can respond to the queries from the NMS. The SNMP agent supports GETS, SETS, and
TRAPS for 4 groups with MIB-II: System, Interface, IP, and ICMP.
Enable SNMP Agent: Click to enable the SNMP Agent. An SNMP agent is a node that resides on
the network, typically a computer or a router. The SNMP agent is controlled and configured by the
NMS by sending SNMP messages between one another. SNMP agents are logged and identified
in a Management Information Base (MIB), in which they are identified by an object identifier (OID).
Enable SNMP Traps: Click to enable the SNMP Traps. SNMP traps are used to notify network
managers of significant events that have taken place in the network. These traps are sent to the
SNMP NMS ( NMS Server located at Trap IP ) through the specified Ports.
Name: An administratively-assigned name for the 4 Ports 11g Wireless ADSL2/2+ Router. By
convention, this is the node's fully-qualified domain name.
Location: The physical location of the 4 Ports 11g Wireless ADSL2/2+ Router.
4 Ports 11g Wireless ADSL2/2+ Router
51
Contact: Contact person and/or contact information for the 4 Ports 11g Wireless ADSL2/2+
Router.
Vendor OID: Vendor Object Identifier. Private MIDBs fit under OID 1.3.6.1.4.1. The enterprise
number of this device is 294.
Note: The System Name, System Contact, and System Location can be up to 127 characters.
Community: SNMP defines a community to be a relationship between an SNMP agent and one or
more SNMP managers. Once the clear-text community name corresponds to a community known
to the receiving SNMP entity, the sending SNMP entity is considered to be authenticated as a
member of that community and is granted different levels of access: read-only or read-write.
Name: Name of community. SNMP supports up to 3 communities including the default
community name of “Public”.
Access Right: Two options are offered:
ReadOnly: Allows a GET or a GETNEXT operation to all objects with access rights of
READ-ONLY in the MIB.
ReadWrite: Allows a GET or a GETNEXT operation to all objects with access rights of
READ-WRITE in the MIB.
Traps: Trap is event notification. There are 4 standard traps supported in this 4 Ports 11g Wireless
ADSL2/2+ Router: WarmStartTrap, LinkUpTrap, LinkDownTrap, and AuthenticationFailureTrap.
Destination IP: Destination IP address of trap. Trap can be sent to 3 different destinations.
Trap Community: Community name of the trap.
Trap Version: Two trap versions/formats are supported: SNMPv1 & SNMPv2C.
Apply: Click Apply to complete the setting.
Cancel: Click Cancel to ignore all the changes.
To complete and save the setting, click Save All after clicking the Apply button.
4 Ports 11g Wireless ADSL2/2+ Router
52
4.4.3 Advanced – UPnP
Universal plug and play (UPnP), NAT, and firewall traversal allow traffic to pass through the 4 Ports 11g
Wireless ADSL2/2+ Router for applications using the UPnP protocol. This feature requires one active WAN
connection. In addition, the PC should support this feature. In the presence of multiple WAN connections,
select a connection on which the incoming traffic is present, for example, the default WAN connection.
Enable UPnP: Place a check to enable UPnP feature.
1.
WAN Connection: Select the WAN Connection from the drop down manual.
2.
LAN Connection: Select the LAN Connection from the drop down manual.
Apply: Click Apply to complete the setting.
Cancel: Click Cancel to ignore all the changes.
4 Ports 11g Wireless ADSL2/2+ Router
53
4.4.3.1 Configure UPnP
Follow the following procedures to configure the UPnP features:
1.
Check Enable UPnP. This enables the WAN Connection and LAN Connection fields.
2.
Select the WAN Connection and LAN Connection that will use UPnP from the drop-down
lists.
3.
Click Apply to temporarily activate the settings.
Note:
The changes take effect when you click Apply; however, if the 4 Ports 11g
Wireless ADSL2/2+ Router configuration is not saved, these changes will be lost
upon the 4 Ports 11g Wireless ADSL2/2+ Router reboot.
4.
To make the change permanent, click Save All (at the top of the page).
4 Ports 11g Wireless ADSL2/2+ Router
54
4.4.4 Advanced – SNTP
SNTP: SNTP (Simple Network Timing Protocol) is a protocol used to synchronize the system time to the
public SNTP servers. It uses the UDP protocol on port 123 to communicate between clients and servers.
Place a check at Enable SNTP to enable the SNTP functionality.
When the SNTP feature is enabled, your 4 Ports 11g Wireless ADSL2/2+ Router will start querying for
the time clock information from the primary SNTP server. If it fails to get a valid response within the “Timeout”
period, it will try for “Retry” number of times, before moving to the Secondary SNTP server. If it fails to get a
valid response from Secondary STNP server within valid retry times, it starts querying Tertiary SNTP server.
If it fails to get a valid response from all the servers, then the program stops. When a valid response is
received from one of the server, the program sleeps for “Polling Interval” amount of minutes, before starting
the whole process again.
Enable SNTP: Place a check to enable SNTP feature.
Primary SNTP Server: The IP address or the host name of the primary SNTP server.
Secondary SNTP Server: The IP address or the host name of the secondary SNTP server.
Tertiary SNTP Server: The IP address or the host name of the tertiary SNTP server.
Timeout: A time limit for an operation. If the 4 Ports 11g Wireless ADSL2/2+ Router failed to
connect to a SNTP server within the “Timeout” period, it will retry the connection.
Polling Interval: The length of time (In Minutes) the 4 Ports 11g Wireless ADSL2/2+ Router
retrieves the time from the SNTP Server. Time between a successful connection with a SNTP
server and a new attempt to connect to an SNTP server.
4 Ports 11g Wireless ADSL2/2+ Router
55
Retry Count: Enter the Retry Count to access the SNTP Server. The number of times the 4 Ports
11g Wireless ADSL2/2+ Router will try to connect to an SNTP server before it try to connect to the
next server in line.
Time Zone: This specifies the time zone ( Geographical location ).
Day Light: Place a check at the Day Light to activate Daylight Savings Time.
Apply: Click Apply to complete the setting.
Cancel: Click Cancel to ignore all the changes.
To make the change permanent, click on Save All.
4 Ports 11g Wireless ADSL2/2+ Router
56
4.4.4.1 SNTP Configuration Procedure
1.
Check Enable SNTP.
2.
Use the previous section as a reference and configure the following fields:
Primary SNTP Server
Secondary SNTP Server
Tertiary SNTP Server
Timeout
Polling Interval
Retry Count
Time Zone
Day Light
3.
Click Apply to temporarily save the setting.
4.
A SNTP system time warning wizard will pop-up. Click OK to confirm your setting.
5.
To complete and save the setting, click Save All after clicking the Apply button.
4 Ports 11g Wireless ADSL2/2+ Router
57
4.4.5 Advanced – TR-069
TR-069 is CPE Management Protocol from WAN side, intended for communication between a CPE and
Auto-Configuration Server (ACS). The CPE WAN Management Protocol defines a mechanism that
encompasses secure auto-configuration of a CPE, and also incorporates other CPE management functions
into a common framework.
The CPE WAN Management Protocol is intended to support a variety of functionalities to manage a
collection of CPE, including the following primary capabilities:
Auto-configuration and dynamic service provisioning
Software/firmware image management
Status and performance monitoring
Diagnostics
Figure below shows the default TR-069 page, which is accessed by clicking the TR-069 link on the
Advanced page. The TR-069 page allows you to set up connection parameters and may not be seen by the
end user.
ACS URL: URL of the auto configuration server (ACS) provided by the ISP.
Periodic Inform Enabled: Enable/disables the 4 Ports 11g Wireless ADSL2/2+ Router to connect
to the ACS periodically. If you enable this feature, you should enter a value in the Periodic Inform
Interval field.
4 Ports 11g Wireless ADSL2/2+ Router
58
Periodic Inform Interval: This field is enabled only when the Periodic Inform Enabled field is
checked. It defines the amount of time (in seconds) between a successful connection with an ACS
server and a new attempt to connect to an ACS server. A recommended value is 86400 seconds
(1 day).
ACS Connect: By clicking the ACS Connect button, you manually connect the 4 Ports 11g
Wireless ADSL2/2+ Router to the ACS.
ACS Connection Request:
Username/Password : The username/password are used when the ACS wants to initiate a
connection with the 4 Ports 11g Wireless ADSL2/2+ Router. The 4 Ports 11g Wireless
ADSL2/2+ Router authenticates the ACS using the username/password. The
username/password are provided by the ISP.
4 Ports 11g Wireless ADSL2/2+ Router
59
4.4.5.1 Configure TR-069
Use the previous section’s description as a reference and follow the following procedures to configure
parameters related to TR-069.
1.
Leave the default URL in the ACS URL field.
2.
Check Periodic Inform Enabled and enter a value in the Periodic Inform Interval field.
or
Click ACS Connect to manually connect to the ACS. Once a connection is established, the ACS can
update all three fields: ACS URL, Periodic Inform Enabled, and Periodic Inform Interval.
3.
To allow ACS to initiate a connection with your 4 Ports 11g Wireless ADSL2/2+ Router, you can enter
the ACS Connection Request Username and Password.
The 4 Ports 11g Wireless ADSL2/2+ Router uses these two fields to authenticate the ACS.
4.
Click Apply to temporarily activate the settings.
Note: The changes take effect when you click Apply; however, if the 4 Ports 11g Wireless ADSL2/2+
Router configuration is not saved, these changes will be lost upon 4 Ports 11g Wireless ADSL2/2+
Router reboot.
5.
To complete and save the setting, click Save All after clicking the Apply button.
4 Ports 11g Wireless ADSL2/2+ Router
60
4.4.6 Advanced – Port Forwarding
Port Forwarding (or Virtual Server) allows you to direct incoming traffic to specific PCs based on a
service port number and protocol. Using the Port Forwarding page, you can provide local services (for
example web hosting) for people on the Internet or play Internet games. Port Forwarding is configurable per
LAN segment.
A database of predefined Port Forwarding rules allows you to apply one or more rules to one or more
members of a defined LAN group. You can view the rules associated with a predefined category, and add the
available rules for a given category. You can also create/edit/delete your own Port Forwarding rules.
WAN Connection: Select the WAN connection you are going to apply the port forwarding feature.
Allow Incoming Ping: Place a check to enable the incoming ping. Enabling incoming ping (ICMP)
requests on the Port Forwarding page allows the router to respond to a ping from the Internet.
Select LAN Group: Select the LAN Group you are going to apply the port forwarding feature.
LAN IP: Select the IP address that will host the service.
Custom Port Forwarding: This link takes you to the Custom Port Forwarding screen, more is
discussed in “Custom Port Forwarding” section.
4 Ports 11g Wireless ADSL2/2+ Router
61
DMZ: Demilitarized Zone (DMZ). More information on DMZ is available in the “DMZ Setting”
section.
Category: Custom and user-defined categories.
Available Rules: Predefined and/or user-defined IP filtering rules for each category.
View: Select an available rule then click View to dhows the detail of the rule management.
Applied Rules: The IP filtering rules you select to apply for each given category.
4 Ports 11g Wireless ADSL2/2+ Router
62
4.4.6.1 Port Forwarding Configuration Procedure
1.
From the Port Forwarding configuration screen, select WAN Connection, LAN Group, and LAN IP.
If the desired LAN IP is not available in the LAP IP drop-down menu, you can add it using the LAN Client
screen, which can be accessed by clicking NEW IP.
2.
Select the available rules for a given category, click View to view the rule associated with a predefined
filter (Figure below shows the DirectX (7,8) Games rule), click Add to apply the rule for this category.
Note: You can click View to view the rule associated with a predefined filter on the Rule Management
page.
3.
If a rule is not in the list, you can create your own in the user category. With User category selected,
click New. The Rule Management screen will populate for you to create new rules.
Note: The New, View, and Delete buttons become available only when the User category is selected.
All the custom rules you create fall under the User Category.
4 Ports 11g Wireless ADSL2/2+ Router
63
4.
The Rule Management page populates for you to create new rules. Enter Rule Name, Protocol, Port
Start, Port End, and Port Map fields, then click Apply.
5.
The rules you create become available in the User category. You are able to view or delete the rules
you create.
6.
Continue to add rules as they apply from each category.
4 Ports 11g Wireless ADSL2/2+ Router
64
7.
Click Apply when you finish to temporarily activate the settings.
Note: The changes take effect when you click Apply; however, if the 4 Ports 11g Wireless ADSL2/2+
Router configuration is not saved, these changes will be lost upon 4 Ports 11g Wireless ADSL2/2+
Router reboot.
8.
To complete and save the setting, click Save All after clicking the Apply button.
Note:
You can also use the Custom Port Forwarding link to add programs to the existing list, which is
discussed in Custom Port Forwarding section.
4 Ports 11g Wireless ADSL2/2+ Router
65
4.4.6.2 Port Forwarding – New IP
New IP: If you wish to manually add a LAN client so that you can apply rules to it, click on the New IP
button. The following screen will pop-up. Refer to Advanced
LAN
LAN Clients setting for more details.
Enter the IP Address, Hostname and MAC Address as shown then click Apply to save your setting.
4 Ports 11g Wireless ADSL2/2+ Router
66
4.4.6.3 Port Forwarding – DMZ
DMZ: A DMZ (Demilitarized Zone) is added between a protected network and an external network, in
order to provide an additional layer of security.
Setting a host on your local network as demilitarized zone (DMZ) forwards any network traffic that is not
redirected to another host via the port forwarding feature to the IP address of the host. This opens the access
to the DMZ host from the Internet. This function is disabled by default. By enabling DMZ, you add an extra
layer of security protection for hosts behind the firewall.
The following screen will pop-up after clicking the DMZ button. Place a check to enable the DMZ
functionality. Select the WAN Connection, LAN Group and LAN IP Address from the drop down manual.
Click Apply to save and activate your setting.
Enable DMZ: Enable/disables the Demilitarized Zone feature. This field is unchecked by default.
Select your WAN Connection: Select the WAN Group you are going to apply the DMZ feature.
Select LAN Group: Select the LAN Group you are going to apply the DMZ feature.
Select a LAN IP Address: Select the LAN IP address you are going to use as the DMZ host. This
computer will be exposed to the Internet. Be aware that this feature may expose your local network
to security risks.
LAN Clients: This link will take you to the LAN Clients screen, more information on LAN Clients
can be found in “LAN Clients” configuration section.
4 Ports 11g Wireless ADSL2/2+ Router
67
4.4.6.3.1 DMZ Configuration Procedure
1.
From the Port Forwarding Configuration screen, click the DMZ link. You will be taken to the DMZ
settings screen as shown below.
2.
Check the Enable DMZ box on the DMZ setting screen.
3.
Select the WAN Group, LAN Group, and LAN IP Address. DMZ is configurable per LAN segment.
4.
Click Apply when you finish to temporarily save the settings.
Note:
You can access the LAN Clients page by clicking the LAN Clients link.
Note:
The changes take effect when you click Apply; however, if the 4 Ports 11g Wireless
ADSL2/2+ Router configuration is not saved, these changes will be lost upon the 4 Ports 11g
Wireless ADSL2/2+ Router reboot.
5.
To complete and save the setting, click Save All after clicking the Apply button.
4 Ports 11g Wireless ADSL2/2+ Router
68
4.4.6.4 Port Forwarding – Custom Port Forwarding
Custom Port Forwarding: If there is no pre-defined Port Forwarding Rule for a particular application, a
user rule can be created which defines the required Ports, Protocols and Port forwarding rules. Click the
Custom Port Forwarding button and the following screen will pop-up.
The Custom Port Forwarding screen allows you to create up to 15 custom ports forwarding entries to
support specific services or applications; such as Concurrent NAT/NAPT operation.
To create a custom rule you will need to know the specific port number and port type that the application
requires. Some applications specify a range of ports in which case you will need to know both the starting and
ending port numbers in the range, which are mapped by the start port and end port fields.
The Port Map specifies the internal port that the data will be directed to on the LAN Client. When dealing
with port ranges, the Internal Port will be the same as the first port in the range. When you simply want to
forward a single port from outside to inside, then all three fields (Port Start, Port End and Port Map) will have
the same port number.
Connection: Select the WAN connection on which the Custom Port Forwarding rule is to be
applied.
Enable: The Enable button is checked by default, meaning this rule is applied when you click on
the Apply button.
Application: Name of the application for which your ports will be opened.
Protocol: There are three options available: TCP, UDP, and TCP and UDP.
4 Ports 11g Wireless ADSL2/2+ Router
69
Source IP Address: You can define the source IP address from which the incoming traffic will be
allowed. Enter “0.0.0.0” for all.
Source Netmask: Netmask of the source IP address. Enter “255.255.255.255” for all.
Destination IP Address: The LAN-side destination IP address for incoming traffic.
Destination Netmask: The LAN-side destination netmask for incoming traffic. The default value of
this field is 255.255.255.255.
Destination Port Start: The starting port number that will be made open for this application.
Destination Port End: The ending port number that will be made open for this application.
Destination Port Map: Destination port mapped on the LAN (destination) side to which packets
will be forwarded. There are two types of port mapping:
One-to-one (one port mapped to one)
Multiple-to-one (multiple ports mapped to one port)
WAN
Multiple-to-One
One-to-One
[500 … 600]
[500 … 600]
…
LAN
700
[500 … 600]
4 Ports 11g Wireless ADSL2/2+ Router
70
4.4.7 Advanced – IP Filter
The IP Filtering feature allows you to block specific applications/services based on the IP address of a
LAN device. You can use the IP Filters page to block specific traffic (for example, block web access) or any
traffic from a host on your local network.
A database of predefined IP filters allows you to apply one or more filtering rules to one or more
members of a defined LAN group. You can view the rules associated with a predefined filter and add the
available rules for a given category. You can also create, edit, or delete your own IP filter rules. Click the
Advanced – IP Filter tab, the following screen display.
Select LAN Group: Select the LAN Group you are going to apply the IP Filters feature.
LAN IP: Select the IP address in the given LAN group that you are going to apply the IP Filters
feature.
Block All Traffic: When checked, complete network access is blocked for the specific IP address.
Block Outgoing Ping: Blocking outgoing ping (ICMP) generated from a particular LAN IP can be
used if your PC has a virus that attempts a Ping-of-Death Denial of Service attack.
Custom IP Filters: This link takes you to the Custom IP Filter screen, more is discussed in
“Custom IP Filters Screen” section.
Available Rules: Predefined and/or user-defined IP filtering rules for each category.
Applied Rules: The IP filtering rules you select to apply for each given category.
4 Ports 11g Wireless ADSL2/2+ Router
71
4.4.7.1 IP Filters Configuration Procedure
1.
From the IP Filters configuration screen, select LAN Group and LAN IP.
If the desired LAN IP is not available in the LAP IP drop-down menu, you can add it using the LAN Client
screen, which can be accessed by clicking NEW IP.
2.
Select the available rules for a given category, click View to view the rule associated with a predefined
filter, click Add to apply the rule for this category.
3.
If a rule is not in the list, you can create your own rule in the User category. Select User, then click New.
Note:
The New, View, and Delete buttons become available only when the User category is
selected. All the custom rules you create fall under the User Category.
4 Ports 11g Wireless ADSL2/2+ Router
72
4.
The Rule Management page (figure below) populates for you to create new rules. Enter Rule Name,
Protocol, Port Start, Port End, and Port Map fields, then click Apply.
The rules you create appear in the Available Rules box in the User category. You can view or delete
the rules you create.
5.
Continue to add rules as they apply from each category using the Add button.
4 Ports 11g Wireless ADSL2/2+ Router
73
6.
Click Apply when you finish to temporarily activate the settings.
Note:
The changes take effect when you click Apply; however, if the 4 Ports 11g Wireless
ADSL2/2+ Router configuration is not saved, these changes will be lost upon 4 Ports 11g
Wireless ADSL2/2+ Router reboot.
7.
To complete and save the setting, click Save All after clicking the Apply button.
Note:
You can also use the Custom IP Filters link to add programs to the existing list. This is
discussed in the following section.
4 Ports 11g Wireless ADSL2/2+ Router
74
4.4.7.2 IP Filters – Custom IP Filters
Customer IP Filters are different from Port forwards, or Block All traffic because they allow greater
scopes of IP addresses to be included in the block.
The Custom IP Filters function allows creation of up to 20 custom IP filtering entries to block specific
services or applications based on:
Source/Destination IP address and Netmask
TCP Port (ranges supported)
Protocol
TCP
UDP
TCP and UDP
ICMP
Any
Filter Name: Name of the IP filter rule you are about to create.
Enable: The Enable button is checked by default, meaning this rule is applied when you click on
the Apply button.
Source IP: Since IP filtering is for outgoing traffic, the source IP is the IP address on your LAN
side that you want to block network traffic from.
4 Ports 11g Wireless ADSL2/2+ Router
75
Source Netmask: Netmask of the source IP on your LAN side.
Destination IP: You can define the destination IP address to which your source IP will be banned
the access. Enter “0..0.0.0” for all.
Destination Netmask: Netmask of the destination IP. Enter “255.255.255.255” for all.
Port Stat: The starting port number that will be blocked for this application.
Port End: The ending port number that will be blocked for this application.
Protocol: There are five options available: TCP, UDP, TCP and UDP, ICMP, and Any.
Apply: Click Apply to complete the setting.
Cancel: Click Cancel to ignore all the changes.
To complete and save the setting, click Save All after clicking the Apply button.
4 Ports 11g Wireless ADSL2/2+ Router
76
4.4.8 Advanced – TR-068
The TR-068 WAN Access page enables you to give temporary permission to someone (such as
technical support staff) to be able to access your 4 Ports 11g Wireless ADSL2/2+ Router from the WAN side.
From the moment the account is enabled, the user is expected to log in within 20 active minutes, otherwise
the account expires. Once the user has logged in, if the session remains inactive for more than 20 minutes,
the user will be logged out and the account expires.
WAN Update: Check this field to give the account read and write access.
WAN Access: Check this field to give the account read-only access.
User Name: User name of the WAN access account.
Password: Password of the WAN access account.
Port: Enter the port number to be opened for the temporary WAN access.
4 Ports 11g Wireless ADSL2/2+ Router
77
4.4.8.1 Create Temporary User Account (WAN-Side)
1.
Check WAN Update to enable write privilege of the 4 Ports 11g Wireless ADSL2/2+ Router.
2.
Check WAN Access to enable read privilege of the 4 Ports 11g Wireless ADSL2/2+ Router.
3.
Enter a user name and password in the User Name and Password fields.
4.
Enter a port number In the Port field (for example, 51003).
5.
Click Apply to temporarily activate the settings on the page.
Note:
The changes take effect when you click Apply; however, if the 4 Ports 11g Wireless
ADSL2/2+ Router configuration is not saved, these changes will be lost upon 4 Ports 11g
Wireless ADSL2/2+ Router reboot.
6.
To complete and save the setting, click Save All after clicking the Apply button.
7.
To access your 4 Ports 11g Wireless ADSL2/2+ Router remotely, enter the following in the URL:
Syntax: http(s)://WAN IP of the 4 Ports 11g Wireless ADSL2/2+ Router:Port Number
4 Ports 11g Wireless ADSL2/2+ Router
78
4.4.9 Advanced – Routing
The Dynamic Routing feature enables the 4 Ports 11g Wireless ADSL2/2+ Router to dynamically
define routes for subnet(s) on the WAN/LAN side. Dynamic Routing uses RIP (Routing Information Protocol)
for exchanging routing information with other routers in the network. It is supported across both WAN and
LAN interfaces. When RIP (Routing Information Protocol) is enabled the router builds its own routing tables
utilizing request and response packets. A request packet tells the router to build a list of its routing table
contents with the network/host IP to which the table belongs, Netmask for the network and RIP host. After
obtaining this information, the router will send a response to the machine that sent the original request. RIP
will also update the main routing table.
If the router is required to serve more than one network, you will need to set up a Static Route between
the networks. Static routing can be used to allow users from one IP domain to access the Internet through the
Router in another domain. A Static Route provides the defined pathway that network information must travel
to reach the specific host or network which is providing Internet access. Up to 16 routes can be added.
4 Ports 11g Wireless ADSL2/2+ Router
79
Dynamic Routing:
Enable RIP: If this box is checked, Dynamic Routing is enabled.
Protocol: Select the protocol from the drop-down manual. The choice is dependent upon the
network environment. Most networks support RIP v1. If RIP v1 is selected, routing data will
be sent in RIP v1 format. If RIP v2 is selected, routing data will be sent in RIP v2 format using
Subnet Broadcasting. If RIP v1 Compatible is selected, routing data will be sent in RIP v2
format using Multicasting.
RIP v1: RIP Version 1: One of the first dynamic routing protocols introduced used in
the Internet, RIPv1 was developed to distribute network reach ability information for
what is now considered simple topologies.
RIP v2: RIP Version 2: Shares the same basic concepts and algorithms as RIPv1 with
added features such as subnet masks, authentication, external route tags, next hop
addresses, and multicasting in addition to broadcasting.
RIP v1 Compatible: RIP v1 compatible (UDP protocol with multicast format)
Note:
Routers using RIP v1 or RIP v1-compatible protocol can talk to each other, but not
to routers using RIP v2 protocol.
Enable Password: This is an optional field. RIP version v2/Compatibility allows you to
provide simple plaintext password based authentication to RIP packets. This field is disabled
if RIP v1 protocol is selected.
Password: The 16 character long plain text password.
Direction: Normally when RIP is enabled on a router it dynamically learns/provides routes
on all it's configured interfaces. This parameter allows you to select the interfaces on which
RIP is expected to learn and distribute routing information. This feature allows the user to
control how and which routes get distributed through the network e.g. by selecting “In Only”
mode, it prevent routes to the private LAN networks from being sent over to the WAN side
router. The following four direction options are available:
Both: Receive updates on the interface and also send it's routing table to other
routers connected to that interface.
In: Receive routing updates from other routers connected to that interface but NOT
send routing updates on that interface.
Out: Send routing updates but not receive updates on this interface from the other
routers connected to that interface.
None: Ignores this interface and not send or receive routing updates through this
interface.
4 Ports 11g Wireless ADSL2/2+ Router
80
To demonstrate the use of the dynamic routing feature, consider the figure as shown below. As shown
in the figure, you have a network with two LAN connections (192.168.1.x and 172.168.1.x), and each has a
router and a subnet.
How can host A in subnet 1 (193.168.1.x) talk to host B in subnet 2 (173.168.1.x)? You have two
options:
1.
Using the static routing feature, you can add both subnets to the routing table using the Static
Routing page. Refer to Section 4.4.8.2 on how to setup your Static Routing feature.
2.
You can enable dynamic routing on all routers without having to manually enter the individual
routes. Keep in mind that you need to enable all routers on this network and they should use the
same protocol to be able to communicate with each other. Section 4.4.8.1 shows you how to
enable and configure the dynamic routing feature on your 4 Ports 11g Wireless ADSL2/2+ Router.
4 Ports 11g Wireless ADSL2/2+ Router
81
Static Routing:
Choose a Connection: Presents list of saved Connections. Select appropriate connection
from the list.
The New Destination IP: The network IP address of the subnet. (You can also enter the IP
address of each individual station in the subnet).
Mask: The Subnet Mask identifies which portion of an IP address is the network portion,
and which portion is the host portion. The subnet mask defaults is 255.25.255.0
Gateway: The LAN through which the subnet communicates with the WAN/LAN.
Metric: It defines the number of hop(s) the between network nodes that data packets will
travel. The default value is “0”, which means the subnet is directly one level down the local
LAN network.
Apply: Click Apply to complete the setting.
Cancel: Click Cancel to ignore all the changes.
To complete and save the setting, click Save All after clicking the Apply button.
Suppose you have a network like the one shown in below. In your LAN, you have a 4 Ports 11g Wireless
ADSL2/2+ Router (192.168.1.1) and three stations connected to it (192.168.1.x). A subnet is added to your
LAN group by adding a second router (192.168.1.5/10.0.0.1) with four stations (10.0.0.x) connected to it. The
four stations in the subnet cannot receive packets unless they are added to the routing table of your 4 Ports
11g Wireless ADSL2/2+ Router. You can add each individual station to the routing table using the Static
Routing page, or more easily, you can add the whole subnet in one entry. Section 4.4.8.2 explains how to
add the subnet to the 4 Ports 11g Wireless ADSL2/2+ Router routing table.
4 Ports 11g Wireless ADSL2/2+ Router
82
4.4.9.1 Dynamic Routing Configuration Procedure
1.
Check Enable RIP.
2.
Select the RIP Protocol RIP v2 for training purpose. The Enable Password field is enabled.
Note:
The same RIP protocol should be used to enable dynamic routing on all routers on the
network.
3.
Check Enable Password and enter a password. This is an optional field for additional security.
4.
For LAN group 1 and LAN group 2, leave Both checked in the Direction field.
5.
Click Apply to temporarily activate the settings.
Notice you did not need to enter the subnet IP, mask, or gateway when using the dynamic routing
feature. The 4 Ports 11g Wireless ADSL2/2+ Router can receive and transmit routing information and
add it to their own routing tables.
You also need to enable dynamic routing on routers 2 and 3.
6.
Click Apply again when you finish making all the changes.
Note:
The changes take effect when you click Apply; however, if the 4 Ports 11g Wireless
ADSL2/2+ Router configuration is not saved, these changes will be lost upon 4 Ports 11g
Wireless ADSL2/2+ Router reboot.
7.
To complete and save the setting, click Save All after clicking the Apply button.
4 Ports 11g Wireless ADSL2/2+ Router
83
4.4.9.2 Static Routing Configuration Procedure
1.
From the Choose a connection drop-down menu, select your LAN connection “Hinet” (For example).
2.
Enter or leave the default entry for the following parameters:
New Destination IP: 10.0.0.2 (the network IP address of the subnet)
Mask: 255.255.255.0 (the subnet mask)
Gateway: 192.168.1.6 (the LAN-side IP address of the second router, through which the stations
in the subnet access the network)
Metric: 0
You are telling the 4 Ports 11g Wireless ADSL2/2+ Router that a new subnet with an IP of 192.168.1.2
and a Netmask of 255.255.255.0 has been added and can access the 4 Ports 11g Wireless ADSL2/2+
Router via station 192.168.1.6.
The metric is 0 since the subnet is one level down on the LAN.
3.
Click Apply to temporarily save the settings. You have added the subnet to the routing table (Figure
below). You have added the subnet to the routing table (Figure below). The four stations in the subnet
can receive packets from the WAN.
4 Ports 11g Wireless ADSL2/2+ Router
84
Note: You can add up to 16 entries. You can also delete any entry using the Delete checkbox.
4.
Click Apply again when you finish making all the changes.
Note:
The changes take effect when you click Apply; however, if the 4 Ports 11g Wireless
ADSL2/2+ Router configuration is not saved, these changes will be lost upon 4 Ports 11g
Wireless ADSL2/2+ Router reboot.
5.
To complete and save the setting, click Save All after clicking the Apply button.
4 Ports 11g Wireless ADSL2/2+ Router
85
4.4.10 Advanced – DDNS
Each time your 4 Ports 11g Wireless ADSL2/2+ Router connects to the Internet, your ISP assigns a
different IP
address to your 4 Ports 11g Wireless ADSL2/2+ Router. In order for you or other users to access your 4 Ports
11g Wireless ADSL2/2+ Router from the WAN-side, you need to manually track the IP that is currently used.
The Dynamic DNS feature allows you to register your 4 Ports 11g Wireless ADSL2/2+ Router with a DNS
server and access your 4 Ports 11g Wireless ADSL2/2+ Router each time using the same host name.
The Dynamic DNS Client page (Figure below) allows you to enable/disable the Dynamic DNS feature.
Connection: This field defaults to your 4 Ports 11g Wireless ADSL2/2+ Router’s WAN connection
over which your 4 Ports 11g Wireless ADSL2/2+ Router will be accessed.
DDNS Server: This is where you select the server from different DDNS service providers. A
charge may occur depends on the service you select.
DDNS Client: Enables/disables the DDNS client feature for the WAN connection. This field is
disabled by default.
User Name: User name assigned by the DDNS service provider.
Password: Password assigned by the DDNS service provider.
Domain Name: Domain name to be registered with the DDNS server.
4 Ports 11g Wireless ADSL2/2+ Router
86
4.4.10.1 Enable Dynamic DNS
Use Section 4.4.9 as a reference and follow below’s procedures to enable Dynamic DNS feature on
your 4 Ports 11g Wireless ADSL2/2+ Router.
1.
On the Dynamic DNS Client page, configure the following fields:
Connection
DDNS Server
DDNS Client
User Name
Password
Domain Name
2.
Click Apply to temporarily activate the settings.
Note:
The changes take effect when you click Apply; however, if the 4 Ports 11g Wireless
ADSL2/2+ Router configuration is not saved, these changes will be lost upon 4 Ports 11g
Wireless ADSL2/2+ Router reboot.
3.
To complete and save the setting, click Save All after clicking the Apply button.
4 Ports 11g Wireless ADSL2/2+ Router
87
4.4.11 Advanced – IGMP
Multicasting is a form of limited broadcast. UDP is used to send datagrams to all hosts that belong to
what is called a Host Group. A host group is a set of one or more hosts identified by a single IP destination
address. The following statements apply to host groups:
Anyone can join or leave a host group at will.
There are no restrictions on a host’s location.
There are no restrictions on the number of members that may belong to a host group.
A host may belong to multiple host groups.
Non-group members may send UDP datagrams to the host group.
Multicasting is useful when the same data needs to be sent to more than one device. For instance, if
one device is responsible for acquiring data that many other devices need, then multicasting is a natural fit.
Note that using multicasting as opposed to sending the same data to individual devices uses less network
bandwidth. The multicast feature also enables you to receive multicast video streams from multicast servers.
IP hosts use Internet group management protocol (IGMP) to report their multicast group memberships
to neighboring routers. Similarly, multicast routers use IGMP to discover which of their hosts belong to
multicast groups. Your 4 Ports 11g Wireless ADSL2/2+ Router supports IGMP proxy that handles IGMP
messages. When enabled, your 4 Ports 11g Wireless ADSL2/2+ Router acts as a proxy for a LAN host
making requests to join and leave multicast groups, or a multicast router sending multicast packets to
multicast groups on the WAN side.
4 Ports 11g Wireless ADSL2/2+ Router
88
The IGMP Proxy page (Figure above) allows you to enable multicast on available WAN and LAN
connections.
You can configure the WAN or LAN interface as one of the following:
Upstream: The interface that IGMP requests from hosts are sent to the multicast router.
Downstream: The interface data from the multicast router are sent to hosts in the multicast
group database.
Ignore: No IGMP request nor data multicast are forwarded.
You can perform one of the two options:
1.
Configure one or more WAN interface as the upstream interface.
2.
Configure one or more LAN interface as the upstream interface.
Each option is discussed in more details as follows.
4 Ports 11g Wireless ADSL2/2+ Router
89
4.4.11.1 Configure WAN Interface as Upstream IGMP Proxy
This applies when the multicast server in on the network. Hosts on your LAN side can send IGMP
requests through the WAN interface. And the WAN will pass multicast packets from the multicast server to
the hosts on the LAN side.
In figure as shown below, the WAN interface DHCP1 is enabled as the upstream IGMP interface, which
forwards IGMP requests from LAN group 1 to the multicast router on the network and forwards multicast
frames from the multicast router to hosts on the downstream interface (LAN group 1). No IGMP request nor
data multicast are forwarded to PPPoE1 or LAN Group 2.
4 Ports 11g Wireless ADSL2/2+ Router
90
Use the procedures describe below to configure a WAN connection as the upstream interface.
1.
Check Enable IGMP Proxy.
2.
Configure the following WAN/LAN interfaces:
DHCP1: Upstream
PPPoE1: Ignore
LAN group 1: Downstream
LAN group 2: Ignore
3.
Click Apply to temporarily activate the settings.
Note:
The changes take effect when you click Apply; however, if the 4 Ports 11g Wireless
ADSL2/2+ Router configuration is not saved, these changes will be lost upon 4 Ports 11g
Wireless ADSL2/2+ Router reboot.
4.
To complete and save the setting, click Save All after clicking the Apply button.
4 Ports 11g Wireless ADSL2/2+ Router
91
4.4.11.2 Configure LAN Interface as Upstream IGMP Proxy
This applies when the multicast server in on the LAN side. Hosts on the network can sent IGMP request
from the WAN side through the LAN interface. And the LAN interface, acting as the upstream interface,
forwards data multicast from the LAN-side multicast server to hosts on the network.
In figure as shown below, there is a multicast router on the LAN side and LAN Group 1 interface is
enabled as the upstream IGMP proxy. IGMP requests from the network are forwarded to LAN group 1 and
multicast frames from multicast router 1 are forwarded to hosts on the LAN side (LAN group 3) and on the
WAN side (DHCP1 and PPPoE1). No IGMP request nor data multicast are forwarded to LAN Group 2.
4 Ports 11g Wireless ADSL2/2+ Router
92
Use the procedures describe below to configure your LAN group 1 as the upstream interface.
1.
Check Enable IGMP Multicast.
2.
Configure the following WAN/LAN interfaces:
DHCP1: Downstream
PPPoE1: Downstream
LAN group 1: Upstream
LAN group 2: Ignore
LAN group 3: Downstream
3.
Click Apply to temporarily activate the settings.
Note:
The changes take effect when you click Apply; however, if the 4 Ports 11g Wireless
ADSL2/2+ Router configuration is not saved, these changes will be lost upon 4 Ports 11g
Wireless ADSL2/2+ Router reboot.
4.
To complete and save the setting, click Save All after clicking the Apply button.
Note:
At least one WAN interface should be configured in order to enable the IGMP proxy.
4 Ports 11g Wireless ADSL2/2+ Router
93
4.4.12 Advanced – Web Access Control
The Web Access Control page (Figure below) allows you to access the 4 Ports 11g Wireless
ADSL2/2+ Router remotely via the web from the WAN side.
Enable: Enables/disables the remote web access feature.
Choose a connection: Select the WAN connect over which the remote web access feature is
enabled.
Remote Host IP: Enter the IP address of the remote host.
Remote Netmask: Enter the netmask of the remote host.
Redirect Port: You can enter a port number in this field that is different from the well-known IP
port number 80. The port number that you enter will be viewed externally and mapped to port 80
internally in the 4 Ports 11g Wireless ADSL2/2+ Router.
If you want to access your 4 Ports 11g Wireless ADSL2/2+ Router at home from a remote location such
as your office, use Section 4.4.11 as a reference and configure your WAN IP address using procedure
describe in Section 4.4.11.1.
4 Ports 11g Wireless ADSL2/2+ Router
94
4.4.12.1 Enable Web Access Control (WAN-Side)
Follow the procedures describe below to enable your Web Access feature.
1.
Check Enable to enable the Web access control feature.
2.
In the Choose a Connection field, leave the default WAN connection selected.
3.
In the Remote Host IP field, enter the WAN-side IP address you will use to access your 4 Ports 11g
Wireless ADSL2/2+ Router (for example, 192.168.1.1).
4.
In the Remote Netmask field, enter the netmask of your WAN-side IP address.
5.
Enter a port number In the Redirect Port field (for example, 80).
6.
Click Apply to temporarily activate the settings on the page.
This WAN address is added to the IP Access List. This allows you to access your 4 Ports 11g Wireless
ADSL2/2+ Router at home from a WAN IP (192.168.1.1) via Web.
Note:
The changes take effect when you click Apply; however, if the 4 Ports 11g Wireless
ADSL2/2+ Router configuration is not saved, these changes will be lost upon 4 Ports 11g
Wireless ADSL2/2+ Router reboot.
7.
To complete and save the setting, click Save All after clicking the Apply button.
8.
To access your 4 Ports 11g Wireless ADSL2/2+ Router from the remote IP (192.168.1.1), enter the
following in the URL:
http(s)://192.168.1.1:80
Syntax: http(s)://WAN IP of RG:Port Number
4 Ports 11g Wireless ADSL2/2+ Router
95
4.4.13 Advanced – Bridge Filter
The bridge filtering mechanism provides a way for you to define rules to allow or deny frames through
the bridge based on source MAC address, destination MAC address, frame type, and physical ports.
When bridge filtering is enabled, each frame is examined against every defined filter rule in sequence.
When a match is found, the appropriate filtering action (allow or deny) is performed.
Note that the bridge filter only examines frames from interfaces that are part of the bridge itself. Up to 20
filter rules are supported with bridge filtering.
Click on Advanced – Bridge Filter tab, the following screen display. The Bridge Filters page allows you
to enable, add, edit, or delete the filter rules.
Refer to Section 4.4.12.1 on how to enable and configure bridge filters.
Enable Bridge Filters: Place a tick at the check box to enable the Bridge Filters functionality. If
the check box is selected, Bridge Filtering is enabled according to the list of Bridge Filter Rules
that has been created. If the box is de-selected, Bridge Filtering will not be enabled, even if Bridge
Filter Rules have been created.
Enable Bridge Filter Management Interface: Place a check to enable the Bridge Filter
Management Interface. When checked, it enables the Bridge Filter Management Interface field.
This ensures that you do not get locked out of the RG on the interface of the LAN group specified
in the next two fields.
4 Ports 11g Wireless ADSL2/2+ Router
96
Select LAN: Select your LAN group to enable the Bridge Filter Management Interface feature.
Bridge Filter Management Interface: Select the interface of the LAN group to have the Bridge
Filter Management Interface feature enabled. Depending on the LAN group that is selected, the
interface selections are Ethernet, USB, and/or WLAN.
SrC MAC: The source MAC address. It must be in a xx-xx-xx-xx-xx-xx format, with
00-00-00-00-00-00 as “don't care”. Blanks can be used in the MAC address space, and would be
considered also as “don't care”.
SrC Port: Source port. You can choose from Any, Ethernet, USB, WLAN, or WAN Bridge
Connection Port for the particular bridge. If any of the selections are not available, please check
your DSL connection.
Dest MAC: The destination MAC address.
Dest Port: Destination port. You can choose from Any, Ethernet, USB, and WLAN.
Protocol: You can choose from the following options: PPPoE Session, PPPoE Discovery, IPX Ethernet II, RARP, IPv6, IPv4, and Any.
Mode: Select t Allow or Deny for the rule.
Delete: Place a check adjacent to the Bridge Filter Rule and click Apply to Delete the Bridge Filter
Rule.
Add: Click Add button to add the rule to the list of rules.
Apply: Click Apply to complete the setting.
Cancel: Click Cancel to ignore all the changes.
To complete and save the setting, click Save All after clicking the Apply button.
4 Ports 11g Wireless ADSL2/2+ Router
97
4.4.13.1 Bridge Filters Configuration Procedure
1.
Check Enable Bridge Filters.
2.
To add a rule, enter source MAC address, destination MAC address and frame type with desired
filtering type, and click Add.
Note:
You can also edit a rule that you created using the Edit checkbox. You can delete a rule
using Delete.
3.
Click Apply to temporarily activate the settings.
Note:
The changes take effect when you click Apply; however, if the 4 Ports 11g Wireless
ADSL2/2+ Router configuration is not saved, these changes will be lost upon 4 Ports 11g
Wireless ADSL2/2+ Router reboot.
4.
To complete and save the setting, click Save All after clicking the Apply button.
4 Ports 11g Wireless ADSL2/2+ Router
98
4.4.14 Advanced – Web Filters
Web Filter is a tool that have the ability to filter Internet content. Using an easy, category-based listing,
you can control exactly what website content can or can not be accessed. Click the radio button to Enable or
Disable the filter rules to ensure an accurate representation of the world of information reachable on the
Internet.
The following content types are disabled by default:
Proxy Server
Cookies
Java Applets
ActiveX Controls
Pop-Ups
To enable, simply check Enabled, then click Apply.
Apply: Click Apply to complete the setting.
Cancel: Click Cancel to ignore all the changes.
To complete and save the setting, click Save All after clicking the Apply button.
4 Ports 11g Wireless ADSL2/2+ Router
99
4.4.15 Advanced – Policy Routing
The Policy Routing Configuration page (Figure below) is accessed by selecting Policy Routing on
the Advanced home page. This page enables you to configure policy routing and QoS. The policy routing
configuration is discussed as follows. The QoS configuration is discussed in next section (Section 4.4.15)
Ingress Interface: The incoming traffic interface for a Policy Routing rule. Selections include LAN
interfaces, WAN interfaces, Locally generated (traffic), and not applicable. Examples of Locally
generated traffic are: voice packets, packets generated by applications such as DNS, DHCP, etc.
Destination Interface: The outgoing traffic interfaces for a Policy Routing rule. Selections include
LAN Interfaces and WAN interfaces.
DiffServ Code Point: The DiffServ Code Point (DSCP) field value ranges from 1 to 255. This field
cannot be configured alone, additional fields like IP, Source MAC, and/or Ingress Interface should
be configured.
Class of Service: The selections are (in the order of priority): CoS1, CoS2, CoS3, CoS4, CoS5,
CoS6, and N/A.
Source IP: The IP address of the traffic source.
4 Ports 11g Wireless ADSL2/2+ Router
100
Mask: The source IP netmask. This field is required if the source IP has been entered.
Destination IP: The IP address of the traffic destination.
Mask: The netmask of the destination. This field is required if the destination IP has been entered.
Protocol: The selections are TCP, UDP, ICMP, Specify, and none. If you choose Specify, you
need to enter the protocol number in the box next to the Protocol field.
This field cannot be configured alone, addtional fields like IP, Source MAC, and/or Ingress
Interface should be configured.
This field is also required if the source port or destination port has been entered.
Source Port Start: The starting port number of the source protocol. You cannot configure this field
without entering the protocol first.
Source Port End: The ending port number of the source protocol. You cannot configure this field
without entering the protocol first.
Destination Port Start: The starting port number of the destination protocol port. You cannot
configure this field without entering the protocol first.
Destination Port End: The ending port number of the destination protocol. You cannot configure
this field without entering the protocol first.
Source MAC: The MAC address of the traffic source.
4 Ports 11g Wireless ADSL2/2+ Router
101
Local Routing Mark: This field is enabled only when Locally Generated is selected in the Ingress
Interface field. The mark for DNS traffic generated by different applications are described below:
Dynamic DNS: 0xE1
Dynamic Proxy: 0xE2
Web Server: 0xE3
MSNTP: 0xE4
DHCP Server: 0xE5
IPtables Utility: 0xE6
PPP Deamon: 0xE7
IP Route: 0xE8
ATM Library: 0xE9
NET Tools: 0xEA
RIP: 0xEB
RIP v2: 0xEC
UPNP: 0xEE
Busybox Utility: 0xEF
Configuration Manager: 0xF0
DropBear Utility: 0xF1
Voice: 0
Currently routing algorithms make decision based on destination address, i.e., only Destination IP
address and subnet mask is supported. The Policy Routing page enables you to route packets on the basis
of various fields in the packet. The following fields can be configured for Policy Routing:
Destination IP address/mask
Source IP address/mask
Source MAC address
Protocol (TCP, UDP, ICMP, etc)
Source port
Destination port
Incoming interface
DSCP
4 Ports 11g Wireless ADSL2/2+ Router
102
4.4.15.1 Example – Traffic Segregation
In this example, we will use the Policy Routing Configuration page to configure traffic segregation. In
figure below, your 4 Ports 11g Wireless ADSL2/2+ Router has the following configuration:
Two WAN connection: PPPoE1 (broadband connection) and PPPoE2 (dial-up and default
gateway).
Two LAN groups: LAN group 1 and LAN group 2
Two computers in LAN group 1
Two computers in LAN group 2
Goal:
You want to reserve PPPoE1 for use by LAN group 1 computers only.
1.
In the Ingress field, select LAN Group 1.
2.
In the Destination Interface field, select PPPoE1.
3.
In the Class of Service field, select N/A.
4.
In the Protocol field, leave the default selection None.
This is to select all protocols.
5.
Click Apply to temporarily activate the settings on the page.
The first rule is created. Voice traffic from LAN group 1 will go out on PPPoE1.
6.
In the Ingress field, select PPPoE1.
7.
In the Destination Interface field, select LAN Group 1.
8.
In the Class of Service field, select N/A.
9.
In the Protocol field, leave the default selection None.
This is to select all protocols.
10.
Click Apply to temporarily activate the settings on the page. Packets arriving into LAN group 1
will come from PPPoE1.
11.
To temporary saving your configuration, click Save All.
4 Ports 11g Wireless ADSL2/2+ Router
103
4.4.15.2 Example – Handling DNS Packets
In this example (Figure below), you will learn how to handle DNS packets. The policy routing
configuration for all four types of DNS packets are discussed below.
DNS packets generated by voice application, the following settings should be configured:
Ingress interface: Locally generated
Destination interface: PPPoE2
Protocol: UDP
Destination port: 53 (DNS port)
Local marker: 0
DNS packets generated by applications such as DDNS, the following settings should be
configured:
Ingress interface: Locally generated
Destination interface: PPPoE3
Protocol: UDP
Destination port: 53 (DNS port)
Local marker: 225 (0xE1)
DNS requests from DHCP clients (when the RG is the DHCP/DNS server), the following settings
should be configured:
Ingress interface: Locally generated
Destination interface: PPPoE3
Protocol: UDP
Destination port: 53 (DNS port)
Local marker: 226 (0xE2)
DNS requests from the LAN side (When there is a external DHCP/DNS server)
Ingress interface: LAN Group 1 or N/A (not Locally generated)
Source IP address: 192.168.1.3
Mask: 255.255.255.255
Protocol: UDP
Destination port: 53 (DNS port)
4 Ports 11g Wireless ADSL2/2+ Router
104
4.4.16 Advanced – Ingress
The Ingress page (Figure below) enables you to configure QoS for packets as soon as they come into
the 4 Ports 11g Wireless ADSL2/2+ Router. This page is accessed by selecting Ingress on the Advanced
main page. The domain mappings are converted to CoS (the common language) so that the priority marking
is carried over.
There are four modes that are discussed in the next few sections.
4 Ports 11g Wireless ADSL2/2+ Router
105
4.4.16.1 Ingress Untrusted Mode
Untrusted is the default Ingress page setting for all interfaces. In this mode, no domain mapping is
honoured in the 4 Ports 11g Wireless ADSL2/2+ Router. All packets are treated as CoS6 (best effort) as
shown in figure below.
4 Ports 11g Wireless ADSL2/2+ Router
106
4.4.16.2 Ingress Layer 2 Configuration
Layer 2 page (Figure below) enables you to map an incoming packet with VLAN priority to CoS. This
feature is only configurable on the WAN interfaces as VLAN is only supported on the WAN side in the current
software release.
Interface: Select the WAN interface here to configure the CoS for incoming traffic. Only WAN
interface can be selected as VLAN is currently supported only on the WAN side.
Class of Service: The selections are (in the order of descending priority): CoS1, CoS2, CoS3,
CoS4, CoS5, and CoS6.
User Priority: The selections are 0, 1, 2, 3, 4, 5, 6, 7.
4 Ports 11g Wireless ADSL2/2+ Router
107
4.4.16.2.1 Ingress Layer 2 Priority Bits to CoS Configuration
Use Section 4.4.15.2 as a reference and follow the following procedures to configure Ingress Layer 2
QoS settings.
1.
From Interface drop-down box, select PPPoE1.
You are configuring QoS on this WAN interface.
2.
Select CoS1 in Class of Service and 5 in Priority Bits.
Any packets with priority marking 5 is mapped to CoS1, the highest priority that is normally given to the
voice packets.
3.
Click Apply to temporarily activate the settings.
4.
Select CoS2 in the Class of Service field and 1 in the Priority Bits field.
Any packets that have a priority bits of 1 is mapped to CoS2, which is the second highest priority. This is
given to the high priority packets such as video.
5.
Click Apply to temporarily activate the settings.
Note:
The changes take effect when you click Apply; however, if the 4 Ports 11g Wireless
ADSL2/2+ Router configuration is not saved, these changes will be lost upon 4 Ports 11g
Wireless ADSL2/2+ Router reboot.
6.
Repeat step 2-5 to add more rules to PPPoE1. Up to eight rules can be configured for each interface.
Note:
7.
Repeat step 1-6 to create rules to another WAN interface.
Note:
8.
Any priority bits that have not been mapped to a CoS default to CoS6, the lowest priority.
Any WAN interface that is not configured has the default Untrusted mode.
To complete and save the setting, click Save All after clicking the Apply button.
4 Ports 11g Wireless ADSL2/2+ Router
108
4.4.16.3 Ingress Layer 3 Configuration
The Layer 3 page (Figure below) allows you to map ToS bits of incoming packets from the IP network to
CoS for each WAN/LAN interface.
Interface: For both WAN and LAN interfaces, you can configure QoS for layer 3 (IP) data traffic.
Class of Service: This CoS field allows you to map incoming layer 3 WAN/LAN packets to one of
the following CoS (in the order of descending priority): CoS1, CoS2, CoS3, CoS4, CoS5, and
CoS6.
Tos: The type of service field takes values from 0 to 255.
Default Non IP: A static CoS can be assigned to all layer 3 incoming packets (per interface) that
do not have an IP header, such as PPP control packets and ARP packets. The default is CoS1
(recommended).
4 Ports 11g Wireless ADSL2/2+ Router
109
4.4.16.3.1 Ingress Layer 3 Configuration
Use Section 4.4.15.3 as a reference and follow the following procedures to configure Ingress Layer 3
QoS settings.
1.
From Interface drop-down box, select LAN Group 1.
You are configuring QoS on this interface.
2.
Select CoS1 in Class of Service and enter 22 in Type of Service (ToS).
Any incoming packet from LAN Group 1 (layer 3) with a ToS of 22 is mapped to CoS1, the highest
priority, which is normally given to the voice packets.
3.
Leave the default value CoS1 in Default Non-IP.
Any incoming packet from LAN Group 1 without an IP is mapped to CoS1, the highest priority.
4.
Click Apply to temporarily activate the settings.
Note:
The changes take effect when you click Apply; however, if the 4 Ports 11g Wireless
ADSL2/2+ Router configuration is not saved, these changes will be lost upon 4 Ports 11g
Wireless ADSL2/2+ Router reboot.
5.
Repeat step 2-4 to add more rules to LAN Group 1. Up to 255 rules can be configured for each
interface.
Note:
6.
Repeat step 1-5 to create rules to another WAN/LAN interface.
Note:
7.
Any ToS that have not been mapped to a CoS is treated as CoS6, the lowest priority.
Any WAN/LAN interface that is not configured has the default Untrusted mode.
To complete and save the setting, click Save All after clicking the Apply button.
4 Ports 11g Wireless ADSL2/2+ Router
110
4.4.16.4 Ingress Static Configuration
The Ingress - Static page (Figure below) enables you to configure a static CoS for all packets received
on a WAN or LAN interface.
To configure, follow the procedures describe in Section 4.4.15.4.1 to configure Ingress static QoS
settings.
4 Ports 11g Wireless ADSL2/2+ Router
111
4.4.16.4.1 Ingress Static Configuration Procedures
1.
At the Interface drop-down box, select PPPoE1.
You are configuring QoS on this interface only.
Any WAN/LAN interface that is not configured has the default Untrusted mode.
2.
Select CoS1 in Class of Service.
All incoming traffic from the PPPoE1 interface receives CoS1, the highest priority.
3.
Click Apply to temporarily activate the settings.
Note:
The changes take effect when you click Apply; however, if the 4 Ports 11g Wireless
ADSL2/2+ Router configuration is not saved, these changes will be lost upon 4 Ports 11g
Wireless ADSL2/2+ Router reboot.
4.
To complete and save the setting, click Save All after clicking the Apply button.
4 Ports 11g Wireless ADSL2/2+ Router
112
4.4.16.5 Ingress Payload Database Configuration
The Policy Routing Configuration page (Figure below) is accessed by selecting Policy Routing on
the Advanced home page. This page enables you to configure QoS payload database and policy routing.
The QoS payload database configuration will be discussed here. The policy routing configuration will be
discussed in the Policy Routing section.
QoS Related field.
QoS can be configured in the Ingress and Egress pages on a per interface basis. The Policy Routing
page enables you to classify packets on the basis of various fields in the packet.
The following fields (highlighted in figure above) can be configured for QoS:
CoS
Source IP address/mask
Destination IP address/mask
Protocol
Source Port Start
Source Port End
Destination Port Start
Destination Port End
Source Mac address
4 Ports 11g Wireless ADSL2/2+ Router
113
You can configure any or all field as needed. Description below describes the QoS-related fields on the
Policy Routing Configuration page.
Ingress Interface: This field is applicable for policy routing configuration only and is discussed in
Policy Routing section.
Destination Interface: This field is applicable for policy routing configuration only and is
discussed in Policy Routing section.
DiffServ Code Point: This field is applicable for policy routing configuration only and is discussed
in Policy Routing section.
Class of Service: The selections are (in the order of priority): CoS1, CoS2, CoS3, CoS4, CoS5,
CoS6, and N/A.
Source IP: The IP address of the traffic source.
Mask: The source IP netmask. This field is required if the source IP has been entered.
Destination IP: The IP address of the traffic destination.
Mask: The netmask of the destination. This field is required if the destination IP has been entered.
Protocol: The selections are TCP, UDP, ICMP, Specify, and none. If you choose Specify, you
need to enter the protocol number in the box next to the Protocol field.
This field cannot be configured alone, additional fields like IP and/or Source MAC should be
configured.
This field is also required if the source port or destination port has been entered.
Source Port Start: The starting port number of the source protocol. You cannot configure this field
without entering the protocol first.
Source Port End: The ending port number of the source protocol. You cannot configure this field
without entering the protocol first.
Destination Port Start: The starting port number of the destination protocol port. You cannot
configure this field without entering the protocol first.
Destination Port End: The ending port number of the destination protocol. You cannot configure
this field without entering the protocol first.
Source MAC: The MAC address of the traffic source.
Local Routing Mark: This field is applicable for policy routing configuration only and is discussed
in Policy Routing section.
Note: Wildcard (*) entries are allowed for IP Address/Netmask and Port range fields.
4 Ports 11g Wireless ADSL2/2+ Router
114
4.4.16.6 WLAN Ingress Support
WLAN Ingress is supported; however, it is hard-coded and is not configurable on the Ingress pages.
More information is available at WLAN QoS Support section.
4 Ports 11g Wireless ADSL2/2+ Router
115
4.4.17 Advanced – Egress
For packets going out of the 4 Ports 11g Wireless ADSL2/2+ Router, the marking (CoS) need to be
translated to the mappings understood by the network domains. The reverse CoS and domain mapping is
configured using the Egress page (Figure below). This page is access by selecting Egress on the Advanced
main page.
4 Ports 11g Wireless ADSL2/2+ Router
116
4.4.17.1 No Egress Mode
The default Egress page setting for all interfaces is No Egress. In this mode, the domain mappings of
the packets are untouched.
4 Ports 11g Wireless ADSL2/2+ Router
117
4.4.17.2 Egress Layer 2 Configuration
The Egress Layer 2 page (Figure below) enables you to map the CoS of an outgoing packet to user
priority bits, which is honoured by the VLAN network. Again, this feature is only configurable on the WAN
interfaces as VLAN is only supported on the WAN side in the current release.
Connection: Select the WAN interface to configure the QoS for outgoing packets. LAN interface
can not be selected as VLAN is currently supported on the WAN side only.
Unclassified Packet: Some locally generated packets might not have been classified and thus do
not have a CoS value, such as PPP control packet and ARP packet.
You can define the CoS for all unclassified outgoing packets on layer 2 using this field, which will
then pick up the user priority bits based on the mapping rules you create.
The selections are (in the order of descending priority): CoS1, CoS2, CoS3, CoS4, CoS5, and
CoS6. The default value is CoS1 (recommended).
Class of Service: The selections are (in the order of descending priority): CoS1, CoS2, CoS3,
CoS4, CoS5, and CoS6.
User Priority: The selections are 0, 1, 2, 3, 4, 5, 6, 7.
4 Ports 11g Wireless ADSL2/2+ Router
118
4.4.17.3 Egress Layer 3 Configuration
The Egress Layer 3 page (Figure below) enables you to map CoS to ToS so that the priority marking of
outgoing packets can be carried over to the IP network.
Connection: Select the WAN/LAN interface here to configure the QoS for outgoing traffic to the IP
network.
Default Non-IP: Locally generated packets (such as ARP packets) do not have a CoS marking.
You can define the CoS for all unclassified outgoing packets on layer 3 using this field.
The selections are (in the order of descending priority): CoS1, CoS2, CoS3, CoS4, CoS5, and
CoS6. The default value is CoS1 (recommended).
Class of Service: The selections are (in the order of descending priority): CoS1, CoS2, CoS3,
CoS4, CoS5, and CoS6.
Translated ToS: The Type of Service field takes values from 1 to 255. The selections are 0, 1, 2,
3, 4, 5, 6, 7.
4 Ports 11g Wireless ADSL2/2+ Router
119
4.4.17.4 WLAN Egress Support
WLAN Egress is supported; however, it is hard-coded and is not configurable on the Egress pages.
More information is available in the WLAN QoS Support section.
4 Ports 11g Wireless ADSL2/2+ Router
120
4.4.18 Advanced – Shaper
The Shaper Configuration page (Figure below) is accessed by selecting Shaper on the Advanced
main page. The shaper algorithms only support:
HTB Queue Discipline
Note:
Egress TCA is required if shaper is configured for that interface.
Interface: The selections are WAN/LAN interfaces except WLAN, which does not support Shaper
feature. This field needs to be selected before shaper configuration.
HTB Queue Discipline: The hierachical token bucket queue discipline is a rate-based shaping
algorithm. This algorithm rate shapes the traffic of a class over a specific interface. All CoSx traffic
is assigned a specific rate to which data will be shaped to. For example: If CoS1 is configured to
100Kbps then even if 300Kbps of CoS1 data is being transmitted to the interface only 100Kbps will
be sent out.
Max Rate: This field is applicable for the HTB Queue Discipline and Low Latency Queue
Discipline, both are rate-based shaping algorithms.
An example of the configuration is given as follows.
4 Ports 11g Wireless ADSL2/2+ Router
121
4.4.18.1 HTB Queue Discipline Enabled
In the example below, HTB Queue Discipline is enabled. The Hinet connection has a total of 300 Kits
of bandwidth, of which 100 Kits is given to CoS1 and another 100 Kits is given to CoS2. When there is no
CoS1 or CoS2 packets, CoS6 packets have the whole 300 Kbits of bandwidth.
4 Ports 11g Wireless ADSL2/2+ Router
122
4.4.19 Advanced – SSH Access Control
The SSH Access Control page (Figure below) allows you to access the 4 Ports 11g Wireless
ADSL2/2+ Router remotely via SSH from the WAN side.
The configuration of a WAN IP address for SSH access control is very similar to the configuration of a
WAN IP address for Web access control. Refer to Web Access Control Page for field descriptions and
configuration procedures.
4 Ports 11g Wireless ADSL2/2+ Router
123
4.5 Advanced – LAN
The LAN Configuration page allow you to select or assign physical interfaces to LAN group and
configure LAN IP Address and DHCP functionality. Meanwhile,
Click LAN Configuration and the following screen will be shown.
4 Ports 11g Wireless ADSL2/2+ Router
124
4.5.1 Advanced – LAN – LAN Configuration
Click LAN Configuration and the following screen will be shown.
Click Add or Remove Interfaces from list under the different LAN Group. The LAN Group features
only supported under Bridge Mode setting. Interfaces under the same LAN Group (WLAN,
Ethernet, USB (Optional) and SSID) will have the ability to communicate with each other. Different
LAN Group are prohibited to communicate with one another.
Click Configure for detail LAN Group setting. Refer to next section for detail LAN Configuration or
Setting.
Apply: Click Apply to complete the setting.
Cancel: Click Cancel to ignore all the changes.
To complete and save the setting, click Save All after clicking the Apply button.
4 Ports 11g Wireless ADSL2/2+ Router
125
4.5.1.1 LAN Configuration Procedures
1.
Select WLAN interface in LAN Group and click Remove. WLAN moves to the Interface box on the left
as shown in figure below.
Note:
You can configure the WLAN interface to a different LAN group. However, the Ethernet
interface is default in LAN group 1 and cannot be moved.
4 Ports 11g Wireless ADSL2/2+ Router
126
2.
Select WALN in the Interface box and click Add next to LAN group 2. WLAN moves to LAN group 2 as
shown in figure below. The Configure link for LAN group 2 has also been generated, which allows
additional configurations for the defined LAN group.
3.
Click Apply to temporarily save the changes.
4.
To complete and save the setting, click Save All after clicking the Apply button.
4 Ports 11g Wireless ADSL2/2+ Router
127
4.5.1.2 LAN Group Configuration
The LAN Group Configuration screen allows you to configure settings for each defined LAN group.
Figure below illustrates the default LAN group configuration screen for the default LAN group 1.
Notice that you can also view the status of advanced services that can be applied to this LAN group.
Click the “Configure” button beside each LAN Group and the following screen display.
Unmanaged: Unmanaged is a state when the LAN group is not configured and no IP address has
been assigned to the bridge.
Obtain an IP address automatically: When this function is enabled, your 4 Ports 11g Wireless
ADSL2/2+ Router acts like a client and can request IP address from the DHCP server.
IP Address: You can assign an IP address to your 4 Ports 11g Wireless ADSL2/2+ Router
or retrieve one from the DHCP server using the release and renew button.
Netmask: The subnet mask of your 4 Ports 11g Wireless ADSL2/2+ Router.
PPP IP Address: Enables/disables PPP unnumbered feature.
IP Address: The IP address should be different from but in the same subnet as the
WAN-side IP address.
4 Ports 11g Wireless ADSL2/2+ Router
128
Use the following Static IP address: This field enables you to change the 4 Ports 11g Wireless
ADSL2/2+ Router’s IP address.
IP Address: Your 4 Ports 11g Wireless ADSL2/2+ Router’s default IP address is
192.168.1.1.
Netmask: Your 4 Ports 11g Wireless ADSL2/2+ Router ‘s default subnet mask is
255.255.255.0. This subnet will allow the 4 Ports 11g Wireless ADSL2/2+ Router to support
254 users. If you want to support a larger number of users you can change the subnet mask;
but remember. The DHCP server is defaulted to only give out 255 IP addresses. Further
remember that if you change your 4 Ports 11g Wireless ADSL2/2+ Routers’ IP address and
you have DHCP enabled, the DHCP configuration must reside within the same subnet.
Default Gateway: The default gateway is the routing device used to forward all traffic that is
not addressed to a station within the local subnet. Your ISP will provide you with the default
gateway Address.
Host Name: The hostname can be any alphanumeric word that does not contain spaces.
Domain: The domain name is used to in conjunction with the host name to uniquely identify
the gateway. To access the 4 Ports 11g Wireless ADSL2/2+ Router ‘s web pages you can
type 192.168.1.1 (the 4 Ports 11g Wireless ADSL2/2+ Router ‘s default IP address).
Enable DHCP Server: Enables/disables DHCP. By default, your 4 Ports 11g Wireless ADSL2/2+
Router has DHCP server (LAN side) enabled. If you already have a DHCP server running on your
network, you must disable one of the two DHCP servers; if you plug a second DHCP server into
the network, you will experience network errors and the network will not function properly.
Start IP: The Start IP Address is where the DHCP server starts issuing IP addresses. This
value must be greater than the 4 Ports 11g Wireless ADSL2/2+ Router’s IP address value.
For example if the 4 Ports 11g Wireless ADSL2/2+ Router IP address is 192.168.1.1 (default)
than the starting IP address must be 192.168.1. 2 (or higher).
Note: If you change the start or end values, make sure the values are still within the same
subnet as the gateways IP address. In other words, if the 4 Ports 11g Wireless ADSL2/2+
Router IP address is 192.168.1.1 (default) and you change the DHCP start/end IP addresses
to be 192.128.1.2/192.128.1.100, you will not be able to communicate to the 4 Ports 11g
Wireless ADSL2/2+ Router if your PC has DHCP enabled.
End IP: The End IP Address is where the DHCP server stops issuing IP addresses. The
ending address cannot exceed a subnet limit of 254. Hence the max value for our default 4
Ports 11g Wireless ADSL2/2+ Router is 192.168.1.254. If the DHCP server runs out of
DHCP addresses, users will not get access to network resources. If this happens you can
increase the Ending IP address (to the limit of 255) or reduce the lease time.
4 Ports 11g Wireless ADSL2/2+ Router
129
Note: If you change the start or end values, make sure the values are still within the same
subnet as the 4 Ports 11g Wireless ADSL2/2+ Router IP address. In other words, if the 4
Ports 11g Wireless ADSL2/2+ Router’s IP address is 192.168.1.1 (default) and you change
the DHCP start/end IP addresses to be 192.128.1.2/192.128.1.100, you will not be able to
communicate to the gateway if your PC has DHCP enabled.
Lease Time: The Lease Time is the amount of time a network user will be allowed
connection to the Router with their current dynamic IP address. The amount of time is in units
of minutes; the default value is 3600 minutes (60 hours).
Enable DHCP Relay: In addition to the DHCP server feature, the 4 Ports 11g Wireless ADSL2/2+
Router supports the DHCP relay function. When the 4 Ports 11g Wireless ADSL2/2+ Router is
configured as DHCP server, it assigns the IP addresses to the LAN clients. When the 4 Ports 11g
Wireless ADSL2/2+ Router is configured as DHCP relay, it is responsible for forwarding the
requests and responses negotiating between the DHCP clients and the server.
Relay IP: The IP address of the DNHCP relay server.
Server and Relay Off: By turning off the DHCP server and relay the network administrator must
carefully configure the IP address, Subnet Mask and DNS settings of every computer on your
network. Do not assign the same IP address to more than one computer and your 4 Ports 11g
Wireless ADSL2/2+ Router must be on the same subnet as all the other computers.
4 Ports 11g Wireless ADSL2/2+ Router
130
4.5.1.2.1 LAN Group Configuration – Unmanaged
Click the Unmanaged radio button, the following configuration screen will pop-up. All filling items are
hidden except the Server and Relay Off (Unchangeable) radio button will turn on.
Unmanaged is a state when the LAN group is not configured and no IP address has been assigned to
the bridge.
Apply: Click Apply to complete the setting.
Cancel: Click Cancel to ignore all the changes.
To complete and save the setting, click Save All after clicking the Apply button.
4 Ports 11g Wireless ADSL2/2+ Router
131
4.5.1.2.2 LAN Configuration – Obtain an IP Address Automatically
Obtain an IP address automatically: The following configuration screen will pop-up. All filling items will
be hidden except the Host Name, Domain Name and Server and Relay Off (Unchangeable) radio button
will turn on.
When this function is enabled, your 4 Ports 11g Wireless ADSL2/2+ Router acts like a client and can
request IP address from the DHCP server.
Host Name: Can be any alpha-numeric expression that does not contain spaces.
Domain Name: Used in conjunction with the host name to uniquely identify the gateway. To
access the 4 Ports 11g Wireless ADSL2/2+ Router's web pages, the user can type 192.168.1.1
(The default IP Address) or type mygateway1.ar7 in the Web browser’s address bar.
Apply: Click Apply to complete the setting.
Cancel: Click Cancel to ignore all the changes.
To complete and save the setting, click Save All after clicking the Apply button.
4 Ports 11g Wireless ADSL2/2+ Router
132
4.5.1.2.3 LAN Configuration – PPP IP Address
PPP IP Address: Click the PPP IP Address radio button, the following configuration screen will pop-up.
All filling items are hidden except the Server and Relay Off (Unchangeable) radio button will turn on.
Apply: Click Apply to complete the setting.
Cancel: Click Cancel to ignore all the changes.
To complete and save the setting, click Save All after clicking the Apply button.
4 Ports 11g Wireless ADSL2/2+ Router
133
4.5.1.2.4 LAN Configuration – Use The Following Static IP Address
Use the following Static IP address: The following configuration screen will pop-up.
Click the radio button to select Enable DHCP Server or Enable DHCP Relay or Server and Relay Off.
Manually enter the necessary items based on each selection.
IP Address: The 4 Ports 11g Wireless ADSL2/2+ Router’s default IP address is 192.168.1.1.
Netmask: The 4 Ports 11g Wireless ADSL2/2+ Router’s default subnet mask is 255.255.255.0.
This subnet will allow the gateway to support 254 users. If you want to support a larger number of
users you can change the subnet mask. The DHCP server is defaulted to only give out 255 IP
addresses. Remember that if you change your 4 Ports 11g Wireless ADSL2/2+ Router’s IP
address and you have DHCP enabled, the DHCP configuration must reside within the same
subnet
Default Gateway: The default gateway is the routing device used to forward all traffic that is not
addressed to a station within the local subnet. Your ISP will provide you with the default gateway
Address.
Host Name: Can be any alpha-numeric expression that does not contain spaces.
Domain: Used in conjunction with the host name to uniquely identify the gateway.
4 Ports 11g Wireless ADSL2/2+ Router
134
Enable DHCP Server: Click the radio button to enable the DHCP Server. By default, your Ports
11g Wireless ADSL2/2+ Router has DHCP server (LAN side) enabled. If you already have a
DHCP server running on your network, you must disable one of the two DHCP servers; if you plug
a second DHCP server into the network, you will experience network errors and the network will
not function correctly.
Start IP: The Start IP Address indicates the beginning of the range at which the DHCP server
starts issuing IP addresses.
This value must be greater than the Routers IP address value. If the Routers IP address is
192.168.1.1 (The default) than the starting IP address must be 192.168.1. 2 or higher.
Note: If you change the start or end values, make sure the values are still within the same
subnet as the gateways IP address. In other words, if the gateways IP address is 192.168.1.1
(default) and you change the DHCP start/end IP addresses to be 192.128.1.2/192.128.1.100,
you will not be able to communicate to the gateway if your PC has DHCP enabled.
End IP: The End IP Address indicates the end of the IP address range.
The ending address must not exceed a Subnet Limit of 253; hence the maximum value that
can be entered in this example is 192.168.1.254.
If the DHCP server runs out of DHCP addresses, users will not get access to network
resources. If this happens you can increase the Ending IP address (to the limit of 255) or
reduce the lease time.
Note: If you change the start or end values, make sure the values are still within the same
subnet as the gateways IP address. In other words, if the gateways IP address is 192.168.1.1
(default) and you change the DHCP start/end IP addresses to be 192.128.1.2/192.128.1.100,
you will not be able to communicate to the gateway if your PC has DHCP enabled.
Lease Time: Lease Time is the amount of time a network user will be allowed connection to
the 4 Ports 11g Wireless ADSL2/2+ Router with their current Dynamic IP address. The
amount of time is in units of minutes; the default value is 3600 minutes (60 hours).
Enable DHCP Relay: Click the radio button to enable the DHCP Relay. When the gateway is
configured as DHCP server, it assigns the IP addresses to the LAN clients. When the gateway is
configured as DHCP relay, it is responsible for forwarding the requests and responses negotiating
between the DHCP clients and the server.
Relay IP: This is the IP Address given by the ISP.
4 Ports 11g Wireless ADSL2/2+ Router
135
Server and Relay Off: Click the radio button to enable. By turning off the DHCP server and relay
the network administrator must carefully configure the IP address, Subnet Mask and DNS settings
of every computer on your network. Do not assign the same IP address to more than one
computer and your Gateway must be on the same subnet as all the other computers.
Apply: Click Apply to complete the setting.
Cancel: Click Cancel to ignore all the changes.
To complete and save the setting, click Save All after clicking the Apply button.
4 Ports 11g Wireless ADSL2/2+ Router
136
4.5.2 Advanced – LAN – Ethernet Switch
The Ethernet Switch port settings can be configured to meet the requirements of your LAN
configuration. As seen in the drop down menu in figure below, port setting options include:
Auto (default)
10/Half duplex
10/Full duplex
100/Half duplex
100/Full duplex
In the example shown, the system has auto detected an Ethernet cable connected to LAN Port 1 and
assigned a port setting of 100 mbps full duplex.
Auto: The 4 Ports 11g Wireless ADSL2/2+ Router will automatically sense which mode to use,
selecting between 100 Mbps Full Duplex, 100 Mbps Half Duplex, 10 Mbps Full Duplex, and 10
Mbps Half Duplex. Default setting is “Auto”.
10/Half Duplex: Data cannot be transferred and received at the same time. For example, data can
be sent, and once the transmission is complete, data can be received. This is done at a transfer
rate of 10Mbps.
10/Full Duplex: Data can be transferred and received simultaneously at the transfer rate of
10Mbps.
4 Ports 11g Wireless ADSL2/2+ Router
137
100/Half Duplex: Data cannot be transferred and received at the same time. For example, data
can be sent, and once the transmission is complete, data can be received. This is done at a
transfer rate of 100Mbps.
100/Full Duplex: Data can be transferred and received simultaneously at the transfer rate of
100Mbps.
Apply: Click Apply to complete the setting.
Cancel: Click Cancel to ignore all the changes.
To complete and save the setting, click Save All after clicking the Apply button.
4 Ports 11g Wireless ADSL2/2+ Router
138
4.5.3 Advanced – LAN – LAN Clients
The LAN Clients feature allows you to see all the PCs on the LAN segment. Each PC is qualified to be
either "dynamic" (PC obtained a lease from this router) or "static" (PC has a manually configured IP address).
You can add a "static" IP address (belonging to the network segment of the router LAN IP address). Any
existing static entry falling within DHCP server's range can be deleted and the IP address would be made
available for future allocation.
Select LAN Connection: Select the LAN connection you want to add the client to.
Enter IP Address: Assign the dynamic IP address to the host here. This is a mandatory field.
Hostname: Hostname of the client. This field is optional.
MAC Address: MAC address of the PC. This field is optional.
4 Ports 11g Wireless ADSL2/2+ Router
139
4.5.3.1 LAN Clients Configuration Procedure
1.
From the LAN Clients screen, select LAN Connection, and enter IP Address, Hostname, and MAC
Address.
2.
Click Apply. The IP address is allocated and it shows up in the list of LAN clients as a "dynamic" entry.
3.
You can convert the dynamic entry into static by clicking Reserve, then Apply. As shown in below, the
IP is now changed to static address. You can delete this entry using the Delete checkbox.
4.
When you finish, click Apply to temporarily save the settings.
5.
To complete and save the setting, click Save All after clicking the Apply button.
4 Ports 11g Wireless ADSL2/2+ Router
140
4.5.4 Advanced – LAN – LAN Isolation
LAN Isolation allows you to disable the flow of packets between up to three-user-defined LAN groups
(WLAN, USB, and Ethernet). This allows you to secure information in private portions of the LAN from other,
publicly accessible LAN segments.
4 Ports 11g Wireless ADSL2/2+ Router
141
4.5.4.1 LAN Isolation Configuration Procedure
1.
Check the traffic between the two LAN groups that you want to disable the packets flow.
2.
Click Apply to temporarily save the settings.
Note:
The changes take effect when you click Apply; however, if the 4 Ports 11g Wireless
ADSL2/2+ Router configuration is not saved, these changes will be lost upon 4 Ports 11g
Wireless ADSL2/2+ Router reboot.
3.
To complete and save the setting, click Save All after clicking the Apply button.
4 Ports 11g Wireless ADSL2/2+ Router
142
4.5.5 Advanced – WAN
The Advanced – WAN configuration page shows you the device modulation type and making/creating
new WAN connection profile.
Click the Advanced – WAN tab, the following screen display.
4 Ports 11g Wireless ADSL2/2+ Router
143
4.5.5.1 Advanced – WAN – ADSL
The WAN ADSL configuration page show you the ADSL modulation type and allows you to select the
modulation type including:
No_MODE
ADSL_G.dmt
ADSL_G.lite
ADSL_G.dmt.bis
ADSL_G.dmt.bis_DELT
ADSL_2plus
ADSL_2plus_DELT
ADSL_re-adsl
ADSL_re-adsl_DELT
ADSL_ANSI_T1.413
MULTI_MODE
ADSL_G.dmt.bis_AnxM
ADSL_2plus_AnxM
Leave the default value if you are unsure or the ISP/Telecom did not provide this information. For most
all cases, this screen should not be modified.
4 Ports 11g Wireless ADSL2/2+ Router
144
4.5.5.2 Advanced – WAN Connection
Before the gateway will pass any data between the LAN interface(s) and the WAN interface, the WAN
side of the modem must be configured. Depending upon your DSL service provider or your ISP, you will need
some (or all) of the information outlined below before you can properly configure the WAN:
Your ADSL account Username and Password
Your ADSL line VPI and VCI
Your ADSL encapsulation type or multiplexing (Either LLC or VC. Check your ISP for detail)
Your ADSL Training Mode or Handshaking Mode (default is MMODE)
For PPPoA or PPPoE users, you also need these values from your ISP:
Your account Username
Your account Password
For RFC 1483 users, you may need these values from your ISP:
Your ADSL fixed Internet IP address
Your Subnet Mask
Your Default Gateway address
Your primary DNS IP address
Since multiple users can use the 4 Ports 11g Wireless ADSL2/2+ Router, the 4 Ports 11g Wireless
ADSL2/2+ Router can simultaneously support multiple connection types; hence, you must set up different
profiles for each connection. The gateway supports the following protocols:
PPPoE (RFC 2516)
PPPoA (RFC 2364)
Static
DHCP
Bridged (RFC 1483)
CLIP (RFC 1577)
The WAN Setup configuration page enable the user to create, save and select connection profiles as
required. (In many cases, only one connection profile will be required and only one connection profile will be
used at one time).
4 Ports 11g Wireless ADSL2/2+ Router
145
4.5.5.2.1 Advanced – WAN – New Connection
Click New Connection to setup or create a new connection profile. A New Connection is basically a
virtual connection. This 4 Ports 11g Wireless ADSL2/2+ Router can support up to 8 different (Unique) virtual
connections. If you have multiple different virtual connections, you may need to utilize the static and dynamic
routing capabilities of the modem to pass data correctly.
Before you make a new WAN connection, you should make sure you have ADSL connection.
The next few sections will describe in detail how to set up each of these connection types and save
them as Connection Profiles.
4 Ports 11g Wireless ADSL2/2+ Router
146
4.5.5.2.1.1 Advanced – WAN – Host Trigger
This field is used in conjunction with the On-Demand feature and is enabled only when the On Demand
field is checked. There are three types of packets:
LAN packets (type 1): packets routed through the 4 Ports 11g Wireless ADSL2/2+ Router from
LAN to WAN.
Proxy packets (type 2): packets generated by the 4 Ports 11g Wireless ADSL2/2+ Router after
receiving packets from the LAN side, such as DNS proxy.
Locally generated packets (type 3): Packets generated by the 4 Ports 11g Wireless ADSL2/2+
Router, such as Voice, SNMP, etc.
When the On-Demand feature is enabled and Host Trigger is unchecked, only flow of type 1 packets
keeps the link active, i.e., if the 4 Ports 11g Wireless ADSL2/2+ Router has not received type 1 packets for x
mount of time (as specified in the Time Out field), the connection times out.
If Host Trigger is checked, type 2 and type 3 packets can keep the link active as well. You can
configure the packets using the Trigger Traffic page, which is accessed by clicking the Configure button
next to Host Trigger. The following fields can be used to identify the traffic of type 2 and/or type 3 that will
keep the link alive:
Source Port (the character * is used to denote any port)
Destination Port (the character * is used to denote any port)
Protocol (TCP, UDP, ICMP, or Specify the protocol number)
4 Ports 11g Wireless ADSL2/2+ Router
147
4.5.5.2.2 New Connection – PPPoE Connection Setup
PPPoE: When PPPoE Mode is selected, the following screen will pop-up. Point-to-Point Protocol
( PPP ) is a method of establishing a network connection between network hosts. PPPoE, also known as
RFC 2516, adapts PPP to work over Ethernet for ADSL connections. PPPoE provides a mechanism for
authenticating users by providing User Name and Password fields and it is a connection type provided by
many ISP or Telecom.
Refer to next page on the description of the PPPoE options.
4 Ports 11g Wireless ADSL2/2+ Router
148
Common Setup:
Name: Enter the PPPoE connection name. The name must be unique and must not contain
spaces and must not begin with a number.
Options: Click to enable “NAT” and/or “Firewall” functionality. Default is “Enable”.
Type: Connection Type : PPPoE.
Sharing: Select “Disable”, “Enable” or “VLAN” sharing. Default setting is “Disable”.
VLAN ID: If “VLAN” is selected, manually enter the “VLAN ID” and select “Priority Bits” from
the drop down manual.
Priority Bits: Priority is given to a VLAN connection from 0-7, 0 being the highest priority.
ATM Settings:
PVC: This field allows you to choose the specific PVC for the PPP session.
VPI: Virtual Path Identifier is a virtual path used for cell routing that is identified by an eight bit field
in the ATM cell header. The VPI field specifies this eight bit identifier for routing.
VCI: A Virtual Channel Identifier is a virtual channel that is identified by a unique numerical tag that
is defined by a 16-bit field in the ATM cell header. The purpose of the virtual channel is to identify
where the cell should travel. The VCI field specifies this 16 bit numerical tag that determines the
destination.
QoS: Select the Quality of Service (QoS) type. If in doubt leave as default.
PCR: Peak Cell Rate. This is an ATM (Asynchronous Transfer Mode) term to describe the rate
cells per second that the source device may never exceed. Available only when VBR QoS is
chosen.
SCR: Security Cell Rate. This is an ATM (Asynchronous Transfer Mode) term to describe the
security cell transmitted per second.
MBS: Maximum Burst Size. A term used in ATM (Asynchronous Transfer Mode) to specify the
maximum number of cells which can be transmitted at the contracted PCR (Peak Cell Rate).
Available only when VBR QoS is chosen.
CDVT: Cell Delay Variation Time. The Cell Delay Variation is a term used in ATM (Asynchronous
Transfer Mode) to describe the time difference that is acceptable between cells being presented at
the receiving host. Available only when VBR QoS is chosen.
Auto PVC: Click to enable Auto PVC features. Auto PVC allows detection of virtual channels via
the built-in mechanism for communicating ATM Layer information from DSLAM to the 4 Ports 11g
Wireless ADSL2/2+ Router.
4 Ports 11g Wireless ADSL2/2+ Router
149
PPPoE Setup:
Username: Your ISP Account ID. Check your ISP for details.
Password: Your ISP Account Password. Check your ISP for details.
Idle Timeout: Specifies that PPPoE connection should disconnect if the link has no activity
detected for n seconds. This field is used in conjunction with the On-Demand feature and is
enabled only when the On Demand field is checked. To ensure that the link is always active, enter
a 0 in this field.
Keep Alive: When the On-Demand option is not enabled, this value specifies the time to wait
without being connected to your provider before terminating the connection. To ensure that the link
is always active, enter 0 in this field.
Authentication: The different types of available authentications are:
Auto: When auto is selected, PAP mode will run by default. However, if PAP fails, then will
run as the secondary protocol. This is the default setting.
PAP: Password Authentication Procedure. Authentication is done through username and
password.
CHAP: Challenge-Handshake Authentication Protocol. Typically more secure than PAP,
CHAP uses username and password in combination with a randomly generated challenge
string which has to be authenticated using a one-way hashing function.
MTU: Maximum Transmission Unit. The largest size packet that can be sent by the modem. If the
network stack of any packet is larger than the MTU value, then the packet will be fragmented
before the transmission. This can be set from a minimum 128 to maximum 1500.
On Demand: Enables on-demand mode. The connection will disconnect if no activity is detected
after the specified idle timeout value. When checked, this field enables the Idle Timeout field.
Enforce MTU: Check box if you experience problems accessing the Internet over a PPPoE
connection. This feature will force all TCP traffic to conform with PPP MTU by changing TCP
Maximum Segment Size to PPP MTU. MTU (Maximum Transmission Unit) is defined as the
maximum packet size (In bytes), that a particular interface can handle.
PPP Unnumbered: This is a special feature for telecommunication. It enables PPP connection to
act like a bridge connection. ISP can assign blocks of public addresses to the client and make the
PPP appear as pass-through from WLAn side to the LAN side.
Default Gateway: If checked, this connection becomes the default gateway to the Internet.
Debug: Click to enable the Debug function. It is for ISP /testers to simulate packets go through
from WAN side. The complete debugging information will show and listed in the System Log file.
LAN: The LAN field is associated with the PPP UNunmbered field and is enabled when the PPP
UNnumbered field is checked. You can specify the LAN group the packets need to go through
when the PPP UNnumbered feature is activited.
4 Ports 11g Wireless ADSL2/2+ Router
150
Connect: Click Connect to attempt an ADSL connection under this connection profile.
Disconnect: Click Disconnect to drop the ADSL connection under this connection profile.
Apply: Click Apply to complete the connection profile’s setting.
Delete: Click Delete to delete a connection.
Cancel: Click Cancel to ignore all the changes.
To complete and save the connection profile, click Save All after clicking the Apply button.
4 Ports 11g Wireless ADSL2/2+ Router
151
4.5.5.2.2.1 PPPoE Configuration Procedures
1.
From the Advanced – WAN main page, click on New Connection. The default PPPoE connection
setup is displayed.
2.
Enter a unique name for the PPPoE connection in the Name field. The name must not have spaces and
cannot begin with numbers.
3.
The Network Address Translation (NAT) and the Firewall options are enabled by default. Leave
these in the default mode.
Note:
NAT enables the IP address on the LAN side to be translated to IP address on the WAN side.
If NAT is disabled, you will not be able to go outside.
4.
Leave the Sharing option as its default mode.
4 Ports 11g Wireless ADSL2/2+ Router
152
5.
Under the ATM Setting mode, enter the values of VPI and VCI settings.
Note:
Your ADSL service provider or your ISP will supply these. In this case the DSL service
provider is using 0,35.
6.
Select the Quality of Service (QoS); Leave the default value if you are unsure or the ISP did not
provide this information
7.
Under the PPPoE Setup mode, enter your Username and Password which will be provided by your
ISP/Telecom.
8.
Leave the rest of the field as its default.
9.
Click the Apply button to complete the connection setup. This will temporarily save this connection as
illustrated in below. A new link has been created for this connection in the left-hand column. You can
connect/disconnect/apply/delete/cancel this connection using this screen.
10.
To complete and save the connection profile, click Save All after clicking the Apply button..
4 Ports 11g Wireless ADSL2/2+ Router
153
Figure below show the PPPoE profile created. A new link has been created for this connection in the
left-hand column.
4 Ports 11g Wireless ADSL2/2+ Router
154
Figure below illustrates the Connection Status page.
4 Ports 11g Wireless ADSL2/2+ Router
155
4.5.5.2.3 New Connection – PPPoA Connection Setup
PPPoA: When PPPoA mode is selected, the following screen will pop-up. PPPoA is also known as
RFC 2364. It is a method of encapsulating PPP packets over ATM cells which are carried over the ADSL line.
PPP or Point-to-Point protocol is a method of establishing a network connection/session between network
hosts. It usually provides a mechanism of authenticating users.
LLC and VC are two different methods of encapsulating the PPP packet. Contact your ISP to make sure
which encapsulation is being supported.
Refer to next page on the description of the PPPoA options.
4 Ports 11g Wireless ADSL2/2+ Router
156
Common Setup:
Name: Enter the PPPoA connection name. The name must be unique and must not contain
spaces and must not begin with a number.
Options: Click to enable “NAT” and/or “Firewall” functionality. Default is “Enable”.
Type: Connection Type : PPPoA.
ATM Settings:
VPI: Virtual Path Identifier is a virtual path used for cell routing that is identified by an eight bit field
in the ATM cell header. The VPI field specifies this eight bit identifier for routing.
VCI: A Virtual Channel Identifier is a virtual channel that is identified by a unique numerical tag that
is defined by a 16-bit field in the ATM cell header. The purpose of the virtual channel is to identify
where the cell should travel. The VCI field specifies this 16 bit numerical tag that determines the
destination.
QoS: Select the Quality of Service (QoS) type. If in doubt leave as default.
PCR: Peak Cell Rate. This is an ATM (Asynchronous Transfer Mode) term to describe the rate
cells per second that the source device may never exceed. Available only when VBR QoS is
chosen.
SCR: Security Cell Rate. This is an ATM (Asynchronous Transfer Mode) term to describe the
security cell transmitted per second.
MBS: Maximum Burst Size. A term used in ATM (Asynchronous Transfer Mode) to specify the
maximum number of cells which can be transmitted at the contracted PCR (Peak Cell Rate).
Available only when VBR QoS is chosen.
CDVT: Cell Delay Variation Time. The Cell Delay Variation is a term used in ATM (Asynchronous
Transfer Mode) to describe the time difference that is acceptable between cells being presented at
the receiving host. Available only when VBR QoS is chosen.
Auto PVC: Click to enable Auto PVC features. Auto PVC allows detection of virtual channels via
the built-in mechanism for communicating ATM Layer information from DSLAM to the 4 Ports 11g
Wireless ADSL2/2+ Router.
4 Ports 11g Wireless ADSL2/2+ Router
157
PPPoA Setup:
Encapsulation: The technique used by layered protocols in which a layer adds header
information to the protocol data unit (PDU) from the layer above. Two options are provided: Logical
Link Control (LLC) and Virtual Channel (VC).
Username: Your ISP Account ID. Check your ISP for details.
Password: Your ISP Account Password. Check your ISP for details.
Idle Timeout: Specifies that PPPoA connection should disconnect if the link has no activity
detected for n seconds. This field is used in conjunction with the On-Demand feature and is
enabled only when the On Demand field is checked. To ensure that the link is always active, enter
a 0 in this field.
Keep Alive: When the On-Demand option is not enabled, this value specifies the time to wait
without being connected to your provider before terminating the connection. To ensure that the link
is always active, enter 0 in this field.
Authentication: The different types of available authentications are:
Auto: When auto is selected, PAP mode will run by default. However, if PAP fails, then will
run as the secondary protocol. This is the default setting.
PAP: Password Authentication Procedure. Authentication is done through username and
password.
CHAP: Challenge-Handshake Authentication Protocol. Typically more secure than PAP,
CHAP uses username and password in combination with a randomly generated challenge
string which has to be authenticated using a one-way hashing function.
MTU: Maximum Transmission Unit. The largest size packet that can be sent by the modem. If the
network stack of any packet is larger than the MTU value, then the packet will be fragmented
before the transmission. This can be set from a minimum 128 to maximum 1500.
On Demand: Enables on-demand mode. The connection will disconnect if no activity is detected
after the specified idle timeout value. When checked, this field enables the Idle Timeout field.
PPP Unnumbered: This is a special feature for telecommunication. It enables PPP connection to
act like a bridge connection. ISP can assign blocks of public addresses to the client and make the
PPP appear as pass-through from WLAn side to the LAN side.
Default Gateway: If checked, this connection becomes the default gateway to the Internet.
Debug: Click to enable the Debug function. It is for ISP /testers to simulate packets go through
from WAN side. The complete debugging information will show and listed in the System Log file.
LAN: The LAN field is associated with the PPP UNunmbered field and is enabled when the PPP
UNnumbered field is checked. You can specify the LAN group the packets need to go through
when the PPP UNnumbered feature is activited.
4 Ports 11g Wireless ADSL2/2+ Router
158
Connect: Click Connect to attempt an ADSL connection under this connection profile.
Disconnect: Click Disconnect to drop the ADSL connection under this connection profile.
Apply: Click Apply to complete the connection profile’s setting.
Delete: Click Delete to delete a connection.
Cancel: Click Cancel to ignore all the changes.
To complete and save the connection profile, click Save All after clicking the Apply button.
4 Ports 11g Wireless ADSL2/2+ Router
159
4.5.5.2.3.1 PPPoA Configuration Procedures
1.
From the Advanced – WAN main page, click on New Connection. The default PPPoE connection
setup is displayed.
2.
Enter a unique name for the PPPoA connection in the Name field. The name must not have spaces and
cannot begin with numbers. In this case the unique name is PPPoA1.
3.
The Network Address Translation (NAT) and the Firewall options are enabled by default. Leave these in
the default mode.
4.
At the Type field select PPPoA. The PPPoA connection setup page displayed as shown.
5.
Under ATM Settings, enter the values of VPI and VCI settings.
Note:
Your ADSL service provider or your ISP will supply these. In this case the ADSL service
provider is using 0,35.
6.
Select the Quality of Service (QoS); leave the default value if you are unsure or the ISP did not provide
this information.
4 Ports 11g Wireless ADSL2/2+ Router
160
7.
Under PPPoA Setup, select the encapsulation type (LLC or VC).
Note:
If you are not sure just use the default mode.
8.
Enter your Username and Password which will be provided by your ISP/Telecom.
9.
Leave the rest of the field as its default.
10.
Click the Apply button to complete the connection setup. This will temporarily save this connection as
illustrated in below. A new link has been created for this connection in the left-hand column. You can
connect/disconnect/apply/delete/cancel this connection using this screen.
11.
To complete and save the connection profile, click Save All after clicking the Apply button.
4 Ports 11g Wireless ADSL2/2+ Router
161
Figure below show the PPPoA profile created. A new link has been created for this connection in the
left-hand column.
4 Ports 11g Wireless ADSL2/2+ Router
162
Figure below illustrates the Connection Status page.
4 Ports 11g Wireless ADSL2/2+ Router
163
4.5.5.2.4 New Connection – Static Connection Setup
Static: When Static mode is selected, the following screen will pop-up. Most Internet users are provided
with a dynamic IP address by their ISP for each session, however certain situations call for a Static IP
address. Static is used whenever a known static IP is assigned. The accompanying information such as the
Subnet mask and the gateway should also be specified. Up to three Domain Name Server (DNS) addresses
can also be specified. These servers would enable you to have access to other web servers. Valid IP
addresses range is from 0.0.0.0 to 255.255.255.255.
The following PPPoE configuration home page display when clicking the WAN – New Connection tab.
4 Ports 11g Wireless ADSL2/2+ Router
164
Click and select the “Static” from the Type drop down manual, the following screen display:
Refer to next page on the description of the Static options.
4 Ports 11g Wireless ADSL2/2+ Router
165
Common Setup:
Name: Enter the Static connection name. The name must be unique and must not contain spaces
and must not begin with a number.
Options: Click to enable “NAT” and/or “Firewall” functionality. Default is “Enable”.
Type: Connection Type : Static.
Sharing: Select “Disable”, “Enable” or “VLAN” sharing. Default setting is “Disable”.
VLAN ID: If “VLAN” is selected, manually enter the “VLAN ID” and select “Priority Bits” from
the drop down manual.
Priority Bits: Priority is given to a VLAN connection from 0-7, 0 being the highest priority.
ATM Settings:
VPI: Virtual Path Identifier is a virtual path used for cell routing that is identified by an eight bit field
in the ATM cell header. The VPI field specifies this eight bit identifier for routing.
VCI: A Virtual Channel Identifier is a virtual channel that is identified by a unique numerical tag that
is defined by a 16-bit field in the ATM cell header. The purpose of the virtual channel is to identify
where the cell should travel. The VCI field specifies this 16 bit numerical tag that determines the
destination.
QoS: Select the Quality of Service (QoS) type. If in doubt leave as default.
PCR: Peak Cell Rate. This is an ATM (Asynchronous Transfer Mode) term to describe the rate
cells per second that the source device may never exceed. Available only when VBR QoS is
chosen.
SCR: Security Cell Rate. This is an ATM (Asynchronous Transfer Mode) term to describe the
security cell transmitted per second.
MBS: Maximum Burst Size. A term used in ATM (Asynchronous Transfer Mode) to specify the
maximum number of cells which can be transmitted at the contracted PCR (Peak Cell Rate).
Available only when VBR QoS is chosen.
CDVT: Cell Delay Variation Time. The Cell Delay Variation is a term used in ATM (Asynchronous
Transfer Mode) to describe the time difference that is acceptable between cells being presented at
the receiving host. Available only when VBR QoS is chosen.
Auto PVC: Click to enable Auto PVC features. Auto PVC allows detection of virtual channels via
the built-in mechanism for communicating ATM Layer information from DSLAM to the 4 Ports 11g
Wireless ADSL2/2+ Router.
4 Ports 11g Wireless ADSL2/2+ Router
166
Static Setup:
Encapsulation: The technique used by layered protocols in which a layer adds header
information to the protocol data unit (PDU) from the layer above. Two options are provided: Logical
Link Control (LLC) and Virtual Channel (VC).
IP Address: IP address of the static connection.
Mask: Subnet mask provided by your ISP.
Default Gateway: Your 4 Ports 11g Wireless ADSL2/2+ Router’s IP address.
DNS: DNS Server address provided by your ISP.
Mode: The Bridged and Routed modes are available.
Apply: Click Apply to complete the connection profile’s setting.
Delete: Click Delete to delete a connection.
Cancel: Click Cancel to ignore all the changes.
To complete and save the connection profile, click Save All after clicking the Apply button.
4 Ports 11g Wireless ADSL2/2+ Router
167
4.5.5.2.4.1 Static Configuration Procedures
1.
From the Advanced – WAN main page, click on New Connection.
2.
Enter a unique name for the Static connection in the Name field. The name must not have spaces and
cannot begin with numbers.
3.
The Network Address Translation (NAT) and the Firewall options are enabled by default. Leave these in
the default mode.
4.
At the Type field select Static. The Static connection setup page is displayed as shown below.
5.
Under PVC Settings, enter the values of VPI and VCI settings.
Note:
Your DSL service provider or your ISP will supply these. In this case the DSL service
provider is using 0,35.
4 Ports 11g Wireless ADSL2/2+ Router
168
6.
Select the Quality of Service (QoS); leave the default value if you are unsure or the ISP did not provide
this information.
7.
Under Static Setup, select the encapsulation type (LLC or VC).
Note:
8.
If you are not sure just use the default mode.
Based upon the information your ADSL/ISP provided, enter your assigned IP address, Subnet Mask,
Default Gateway (if provided), and Domain Name Services (DNS) values (if provided).
9.
For the static configuration, you can also select a Bridged connection or a Routed connection. Since
static IP address is typically used to host WEB servers, you may want to use a bridge connection.
10.
Click the Apply button to complete the connection setup. This will temporarily save this connection as
illustrated in below. A new link has been created for this connection in the left-hand column. You can
apply/delete/cancel this connection using this screen.
11.
To complete and save the connection profile, click Save All after clicking the Apply button.
4 Ports 11g Wireless ADSL2/2+ Router
169
Figure below show the Static profile created. A new link has been created for this connection in the
left-hand column.
4 Ports 11g Wireless ADSL2/2+ Router
170
Figure below illustrates the Connection Status page.
4 Ports 11g Wireless ADSL2/2+ Router
171
4.5.5.2.5 New Connection – DHCP Connection Setup
DHCP: When DHCP mode is selected, the following screen will pop-up. Dynamic Host Configuration
Protocol (DHCP) allows the ADSL Router to automatically obtain the IP address from the server. This option
is commonly used in situations where the IP address is dynamically assigned and is not known prior to
assignment.
Refer to next page on the description of the DHCP options.
4 Ports 11g Wireless ADSL2/2+ Router
172
Common Setup:
Name: Enter the DHCP connection name. The name must be unique and must not contain spaces
and must not begin with a number.
Options: Click to enable “NAT” and/or “Firewall” functionality. Default is “Enable”.
Type: Connection Type : DHCP.
Sharing: Select “Disable”, “Enable” or “VLAN” sharing. Default setting is “Disable”.
VLAN ID: If “VLAN” is selected, manually enter the “VLAN ID” and select “Priority Bits” from
the drop down manual.
Priority Bits: Priority is given to a VLAN connection from 0-7, 0 being the highest priority.
PVC Settings:
PVC: This field allows you to choose the specific PVC for the PPP session.
VPI: Virtual Path Identifier is a virtual path used for cell routing that is identified by an eight bit field
in the ATM cell header. The VPI field specifies this eight bit identifier for routing.
VCI: A Virtual Channel Identifier is a virtual channel that is identified by a unique numerical tag that
is defined by a 16-bit field in the ATM cell header. The purpose of the virtual channel is to identify
where the cell should travel. The VCI field specifies this 16 bit numerical tag that determines the
destination.
QoS: Select the Quality of Service (QoS) type. If in doubt leave as default.
PCR: Peak Cell Rate. This is an ATM (Asynchronous Transfer Mode) term to describe the rate
cells per second that the source device may never exceed. Available only when VBR QoS is
chosen.
SCR: Security Cell Rate. This is an ATM (Asynchronous Transfer Mode) term to describe the
security cell transmitted per second.
MBS: Maximum Burst Size. A term used in ATM (Asynchronous Transfer Mode) to specify the
maximum number of cells which can be transmitted at the contracted PCR (Peak Cell Rate).
Available only when VBR QoS is chosen.
CDVT: Cell Delay Variation Time. The Cell Delay Variation is a term used in ATM (Asynchronous
Transfer Mode) to describe the time difference that is acceptable between cells being presented at
the receiving host. Available only when VBR QoS is chosen.
Auto PVC: Click to enable Auto PVC features. Auto PVC allows detection of virtual channels via
the built-in mechanism for communicating ATM Layer information from DSLAM to the 4 Ports 11g
Wireless ADSL2/2+ Router.
4 Ports 11g Wireless ADSL2/2+ Router
173
DHCP Setup:
Encapsulation: The technique used by layered protocols in which a layer adds header
information to the protocol data unit (PDU) from the layer above. Two options are provided: Logical
Link Control (LLC) and Virtual Channel (VC).
Default Gateway: Your 4 Ports 11g Wireless ADSL2/2+ Router’s IP address.
Renew: If your ADSL line is connected and your ISP provider is supporting DHCP, you can click
the renew button and the gateway will retrieve an IP address, Subnet mask, and Gateway address.
At anytime, you can renew the DHCP address by clicking on the renew button; in most cases you
will never have to use this button.
Release: At any time, you can release the DHCP address by clicking Release button.
Apply: Click Apply to complete the connection profile’s setting.
Delete: Click Delete to delete a connection.
Cancel: Click Cancel to ignore all the changes.
To complete and save the connection profile, click Save All after clicking the Apply button.
4 Ports 11g Wireless ADSL2/2+ Router
174
4.5.5.2.5.1 DHCP Configuration Procedures
1.
From the Advanced – WAN main page, click on New Connection.
2.
Enter a unique name for the DHCP connection in the Name field. The name must not have spaces and
cannot begin with numbers.
3.
The Network Address Translation (NAT) and the Firewall options are enabled by default. Leave these in
the default mode.
4.
At the Type field select DHCP. The DHCP connection setup page is displayed as shown.
5.
Under PVC Settings, enter the values of VPI and VCI settings.
Note:
Your DSL service provider or your ISP will supply these. In this case the DSL service
provider is using 0,35.
4 Ports 11g Wireless ADSL2/2+ Router
175
6.
Select the Quality of Service (QoS); leave the default value if you are unsure or the ISP did not provide
this information.
7.
Under DHCP Setup, select the encapsulation type (LLC or VC).
Note:
8.
If you are not sure just use the default mode.
Check to enable the Default Gateway if you wish your connection becomes the default gateway to the
Internet.
9.
Click the Apply button to complete the connection setup. This will temporarily save this connection as
illustrated in below. A new link has been created for this connection in the left-hand column. You can
apply/delete/cancel this connection using this screen.
10.
To complete and save the connection profile, click Save All after clicking the Apply button.
11.
If your ADSL line is connected and your ISP provider is supporting DHCP, you can click the Renew
button and the gateway will retrieve an IP address, Subnet mask, and Gateway address.
At anytime, you can release the DHCP address by clicking on the Release button, and renew the DHCP
address by clicking on the Renew button.
12.
To check on the status, click on Status (at the top of the page) and select Connection Status.
4 Ports 11g Wireless ADSL2/2+ Router
176
Figure below show the DHCP profile created. A new link has been created for this connection in the
left-hand column.
4 Ports 11g Wireless ADSL2/2+ Router
177
Figure below illustrates the Connection Status page.
4 Ports 11g Wireless ADSL2/2+ Router
178
4.5.5.2.6 New Connection – Bridge Connection Setup
Bridge: When Bridge mode is selected, the following screen will pop-up. A Bridged connection basically
disables the routing, firewall and NAT features of the 4 Ports 11g Wireless ADSL2/2+ Router. In a Bridged
connection, the 4 Ports 11g Wireless ADSL2/2+ Router acts as a modem or hub, and just transmits packets
between the WAN interface and the LAN interface. A Bridged connection assumes that another device is
providing the routing functionality that is now disabled in the 4 Ports 11g Wireless ADSL2/2+ Router.
Refer to next page on the description of the Bridge options.
4 Ports 11g Wireless ADSL2/2+ Router
179
Common Setup:
Name: Enter the Bridge connection name. The name must be unique and must not contain spaces
and must not begin with a number.
Type: Connection Type : Bridge.
Sharing: Select “Disable”, “Enable” or “VLAN” sharing. Default setting is “Disable”.
VLAN ID: If “VLAN” is selected, manually enter the “VLAN ID” and select “Priority Bits” from
the drop down manual.
Priority Bits: Priority is given to a VLAN connection from 0-7, 0 being the highest priority.
PVC Settings:
PVC: This field allows you to choose the specific PVC for the PPP session.
VPI: Virtual Path Identifier is a virtual path used for cell routing that is identified by an eight bit field
in the ATM cell header. The VPI field specifies this eight bit identifier for routing.
VCI: A Virtual Channel Identifier is a virtual channel that is identified by a unique numerical tag that
is defined by a 16-bit field in the ATM cell header. The purpose of the virtual channel is to identify
where the cell should travel. The VCI field specifies this 16 bit numerical tag that determines the
destination.
QoS: Select the Quality of Service (QoS) type. If in doubt leave as default.
PCR: Peak Cell Rate. This is an ATM (Asynchronous Transfer Mode) term to describe the rate
cells per second that the source device may never exceed. Available only when VBR QoS is
chosen.
SCR: Security Cell Rate. This is an ATM (Asynchronous Transfer Mode) term to describe the
security cell transmitted per second.
MBS: Maximum Burst Size. A term used in ATM (Asynchronous Transfer Mode) to specify the
maximum number of cells which can be transmitted at the contracted PCR (Peak Cell Rate).
Available only when VBR QoS is chosen.
CDVT: Cell Delay Variation Time. The Cell Delay Variation is a term used in ATM (Asynchronous
Transfer Mode) to describe the time difference that is acceptable between cells being presented at
the receiving host. Available only when VBR QoS is chosen.
Auto PVC: Click to enable Auto PVC features. Auto PVC allows detection of virtual channels via
the built-in mechanism for communicating ATM Layer information from DSLAM to the 4 Ports 11g
Wireless ADSL2/2+ Router.
4 Ports 11g Wireless ADSL2/2+ Router
180
Bridge Setup:
Encapsulation: The technique used by layered protocols in which a layer adds header
information to the protocol data unit (PDU) from the layer above. Two options are provided: Logical
Link Control (LLC) and Virtual Channel (VC).
Select LAN: Select the LAN Group (Ethernet Bridge) from the drop down list.
Apply: Click Apply to complete the connection profile’s setting.
Delete: Click Delete to delete a connection.
Cancel: Click Cancel to ignore all the changes.
To complete and save the connection profile, click Save All after clicking the Apply button.
4 Ports 11g Wireless ADSL2/2+ Router
181
4.5.5.2.6.1 Bridge Configuration Procedures
1.
From the Advanced – WAN main page, click on New Connection.
2.
Enter a unique name for the Bridge connection in the Name field. The name must not have spaces and
cannot begin with numbers.
3.
At the Type field select Bridge. The Bridge connection setup page is displayed as shown below.
4.
Under PVC Settings, enter the values of VPI and VCI settings.
Note:
Your DSL service provider or your ISP will supply these. In this case the DSL service
provider is using 0,35.
5.
Select the Quality of Service (QoS); leave the default value if you are unsure or the ISP did not provide
this information.
4 Ports 11g Wireless ADSL2/2+ Router
182
6.
Under Bridge Setup, select the encapsulation type (LLC or VC).
Note:
7.
If you are not sure just use the default mode.
Select the LAN Group from the drop down manual. Leave the default value if you are unsure or the ISP
did not provide this information.
8.
Click the Apply button to complete the connection setup. This will temporarily save this connection as
illustrated in below. A new link has been created for this connection in the left-hand column. You can
apply/delete/cancel this connection using this screen.
9.
To complete and save the connection profile, click Save All after clicking the Apply button.
4 Ports 11g Wireless ADSL2/2+ Router
183
Figure below show the Bridge profile created. A new link has been created for this connection in the
left-hand column.
4 Ports 11g Wireless ADSL2/2+ Router
184
Figure below illustrates the Connection Status page.
4 Ports 11g Wireless ADSL2/2+ Router
185
4.5.5.2.7 New Connection - CLIP Connection Setup
CLIP: When CLIP mode is selected, the following screen will pop-up. The Classical IP over ATM (CLIP)
support provides the ability to transmit IP packets over an ATM network, CLIP support will encapsulate IP in
an AAL5 packet data unit (PDU) frame using RFC1577 and utilizes an ATM-aware version of the ARP
protocol.
Refer to next page on the description of the Bridge options.
4 Ports 11g Wireless ADSL2/2+ Router
186
Common Setup:
Name: Enter the Bridge connection name. The name must be unique and must not contain spaces
and must not begin with a number.
Options: Click to enable “NAT” and/or “Firewall” functionality. Default is “Enable”.
Type: Connection Type : CLIP.
PVC Settings:
VPI: Virtual Path Identifier is a virtual path used for cell routing that is identified by an eight bit field
in the ATM cell header. The VPI field specifies this eight bit identifier for routing.
VCI: A Virtual Channel Identifier is a virtual channel that is identified by a unique numerical tag that
is defined by a 16-bit field in the ATM cell header. The purpose of the virtual channel is to identify
where the cell should travel. The VCI field specifies this 16 bit numerical tag that determines the
destination.
QoS: Select the Quality of Service (QoS) type. If in doubt leave as default.
PCR: Peak Cell Rate. This is an ATM (Asynchronous Transfer Mode) term to describe the rate
cells per second that the source device may never exceed. Available only when VBR QoS is
chosen.
SCR: Security Cell Rate. This is an ATM (Asynchronous Transfer Mode) term to describe the
security cell transmitted per second.
MBS: Maximum Burst Size. A term used in ATM (Asynchronous Transfer Mode) to specify the
maximum number of cells which can be transmitted at the contracted PCR (Peak Cell Rate).
Available only when VBR QoS is chosen.
CDVT: Cell Delay Variation Time. The Cell Delay Variation is a term used in ATM (Asynchronous
Transfer Mode) to describe the time difference that is acceptable between cells being presented at
the receiving host. Available only when VBR QoS is chosen.
Auto PVC: Click to enable Auto PVC features. Auto PVC allows detection of virtual channels via
the built-in mechanism for communicating ATM Layer information from DSLAM to the 4 Ports 11g
Wireless ADSL2/2+ Router.
4 Ports 11g Wireless ADSL2/2+ Router
187
CLIP Setup:
IP Address: Enter the IP Address provided by your ISP.
Mask: Enter the Subnet mask specified by your ISP.
ARP Server: Address Resolution Protocol (ARP) server. Leave as Default ( 0.0.0.0 ) unless
advised by ISP.
Default Gateway: Enter the Default Gateway as specified by the ISP.
Apply: Click Apply to complete the connection profile’s setting.
Delete: Click Delete to delete a connection.
Cancel: Click Cancel to ignore all the changes.
To complete and save the connection profile, click Save All after clicking the Apply button.
4 Ports 11g Wireless ADSL2/2+ Router
188
4.5.5.2.7.1 CLIP Configuration Procedures
1.
From the Advanced – WAN main page, click on New Connection.
2.
Enter a unique name for the Static connection in the Name field. The name must not have spaces and
cannot begin with numbers.
3.
The Network Address Translation (NAT) and the Firewall options are enabled by default. Leave these in
the default mode.
4.
At the Type field select CLIP. The CLIP connection setup page is displayed as shown in figure below.
5.
Under PVC Settings, enter the values of VPI and VCI settings.
Note: Your ADSL service provider or your ISP will supply these.
6.
Select the Quality of Service (QoS); leave the default value if you are unsure or the ISP did not provide
this information.
4 Ports 11g Wireless ADSL2/2+ Router
189
7.
Under CLIP Setup, enter your assigned IP address, Mask, ARP server, and Default Gateway. These
setting will be provided by your ADSL service provider.
8.
Click the Apply button to complete the connection setup. This will temporarily save this connection as
illustrated in figure below. A new link has been created for this connection in the left-hand column. You
can Apply/Delete/Cancel this connection using this screen.
10.
To complete and save the connection profile, click Save All after clicking the Apply button.
4 Ports 11g Wireless ADSL2/2+ Router
190
Figure below show the CLIP profile created. A new link has been created for this connection in the
left-hand column.
4 Ports 11g Wireless ADSL2/2+ Router
191
Figure below illustrates the Connection Status page.
4 Ports 11g Wireless ADSL2/2+ Router
192
4.6 Advanced – Wireless
The Wireless configuration page describe the detail instruction on Setup, Configuration, Channel Range,
Security and Management for 11g Wireless user.
Click on Advanced – Wireless tab, the following Wireless Setup screen display.
4 Ports 11g Wireless ADSL2/2+ Router
193
4.6.1 Save Your Changes
Any changes you make to the Wireless screen DO NOT get saved automatically. Clicking on the
“Apply” button on the individual page is not sufficient for the changes you made to take effect.
For change(s) you made to any Wireless screen to take effect, you will need to perform the following
steps:
Step 1:
Click the “Apply” button.
Step 2:
Click “Save All” after clicking the Apply button.
2
1
Step 3:
Go to Tools – System Commands page then click on Restart Access Point.
3
4 Ports 11g Wireless ADSL2/2+ Router
194
4.6.2 Wireless – Setup
The Setup configuration page describe the basic wireless setting for the 4 Ports 11g Wireless
ADSL2/2+ Router.
This screen provides basic local and Wireless networks parameter settings.
Enable AP: Place a check to Enable or Disable the Wireless Access Point built in the 4 Ports 11g
Wireless ADSL2/2+ Router. The Wireless Access Point must be enabled to allow wireless stations
to access the Internet.
Primary SSID: The Service Set Identifier, also known as the Wireless Network name. The Service
Set Identifier (SSID) is a unique name for your wireless network. If you have other wireless access
points in your network, they must share the same SSID.
The default SSID is Default, but it is strongly recommends that you change your network Name to
a different value for security purpose. The SSID can be up to 31 characters.
Hidden SSID: Enables/disables the Hidden SSID feature. The AP (Access Point) will not transmit
beacon and thus will not be seen by any other station.
4 Ports 11g Wireless ADSL2/2+ Router
195
Channel B/G: The channel on which the AP and the wireless stations will communicate. Different
domain will have different ranges of channels. For FCC in 2.4GHz, the default is 11. The channel
can be selected according to the band selection.
802.11 Mode: The default is “Mixed”, which allows both 802.11g and 802.11b wireless stations to
access this device. You can select from the following mode:
Mixed mode: The legacy SR IE contains the 802.11b legacy supported rates and the
additional OFDM supported rates. Extended SR IE contains the extended supported rates, if
present. Beacon & Probe Response Frames are sent in “11b” rate.
11b only Mode: The legacy SR IE contains only the 802.11b legacy supported rates. The
extended SR IE is not present.
11b+ Mode: Similar to the “802.11b-only” mode except that 22Mbps PBCC rate/modulation
is included, which is TI proprietary.
11g only Mode: The legacy SR IE contains only the OFDM additional supported rates. The
extended SR IE contains the extended supported rates, if present.
4X: Same as TI’s “11b+” mode, which enables/disables the 4x feature. This function is TI
proprietary and is only available when both TI wireless station card and TI ADSL2/2+ modem are
used.
User Isolation: If enabled, Wireless Stations will not be able to communicate with each other or
with stations on the wired network. This feature normally should be disabled.
QoS Support: Click to enable QoS feature for your Wireless connection.
Apply: Click Apply to complete the setting.
Cancel: Click Cancel to ignore all the changes.
To complete and save the setting, click Save All after clicking the Apply button.
4 Ports 11g Wireless ADSL2/2+ Router
196
4.6.2.1 Wireless – Setup – User Isolation
When User Isolation is enabled, wireless users will not be able to directly access other wireless users.
Access can be controlled by the AP. This is enabled on the network side. Figure below demonstrates the
User Isolation feature.
1.
AP disabled BSS (Basic Service Set) bridging
2.
All data sent to WAN (Wide Area Network)
3.
Enable/Disable flag
4 Ports 11g Wireless ADSL2/2+ Router
197
4.6.3 Wireless – Security
The Security page describes how to configure the Wireless Security Level of your 4 Ports 11g Wireless
ADSL2/2+ Router. There are four security level provided by this 4 Ports 11g Wireless ADSL2/2+ Router :
None: No security used.
WEP (Wired Equivalent Privacy): Enable legacy stations to connect the AP.
802.1x: Enable stations with 802.1x capability to connect the AP.
WPA (Wi-Fi Protected Access): Enable stations with WPA capability to connect the AP.
NOTE:
You MUST click “RestartAP” for wireless changes to take effect after your setting or
configuration.
4 Ports 11g Wireless ADSL2/2+ Router
198
4.6.3.1 Wireless – Security – None
None: Wireless security is not used. No encryption will be applied. This setting is useful for
troubleshooting your wireless connection, but leaves your wireless data fully exposed.
Select an SSID: Select a SSID from the drop down manual. This router supports multiple SSID,
which means that you can set more than one SSID for this router.
Apply: Click Apply to complete the setting.
Cancel: Click Cancel to ignore all the changes.
To complete and save the setting, click Save All after clicking the Apply button.
Go to Tools – System Commands page then click on Restart Access Point button for the
changes to take effect.
4 Ports 11g Wireless ADSL2/2+ Router
199
4.6.3.2 Wireless – Security – WEP
WEP: Wired Equivalent Privacy. WEP is a security protocol for wireless local area networks defined in
the 802.11b standard. WEP is designed to provide the same level of security as that of a wired LAN. WEP
aims to provide security by encrypting data over radio waves so that it is protected as it is transmitted from
one end point to another.
The 4 Ports 11g Wireless ADSL2/2+ Router supports 3 levels of WEP encryption:
64 Bit encryption
128Bit encryption
256 Bit encryption
With WEP, the receiving station must use the same key for decryption. Each radio NIC and access point,
therefore, must be manually configured with the same key. Figure below illustrates the default setting of the
WEP Wireless Security screen.
Select an SSID: Select a SSID from the drop down manual. This router supports multiple SSID,
which means that you can set more than one SSID for this router.
Enable WEP Wireless Security: Place a check to enable WEP Security.
4 Ports 11g Wireless ADSL2/2+ Router
200
Authentication Type: Authentication algorithm to use when the security configuration is set to
Legacy. When the security configuration is set to 802.1x or WPA, the authentication algorithm is
always open. This field is enabled when the WEP security field is checked. There are three
options:
Open: In open-system authentication, the access point accepts any station without verifying
its identify.
Shared: Shared-key authentication requires a shared key (WEP encryption key) be
distributed to the stations before attempting authentication.
Both: If both is selected, the access point will perform shared-key authentication, then
open-system authentication.
Encryption Key: This field is enabled when the WEP security field is checked. The key's value
that is used when the security configuration is set to legacy. The key length must match the WEP
cipher. This field is not used when the security configuration is set to 802.1x or WPA.
For 64 bit WEP, enter 10 Hexadecimal digits (any combination of 0-9, A-F).
For 128 bit WEP, enter 26 Hexadecimal digits (any combination of 0-9, A-F).
For 256 bit WEP, enter 58 Hexadecimal digits (any combination of 0-9, A-F).
WEP Cipher: This field is enabled when the WEP security field is checked. You can select from 64
bits, 128 bits, and 256 bits. The WEP cipher that is used when the security configuration is set to
Legacy or 802.1x. This field is not used when the security configuration is set to WPA.
Apply: Click Apply to complete the setting.
Cancel: Click Cancel to ignore all the changes.
To complete and save the setting, click Save All after clicking the Apply button.
Go to Tools – System Commands page then click on Restart Access Point button for the
changes to take effect.
4 Ports 11g Wireless ADSL2/2+ Router
201
4.6.3.2.1 How to configure WEP?
WEP is disabled by default. Use the following procedures to enable WEP on your access point.
1.
Check Enable WEP Wireless Security.
2.
Select an SSID: Select a SSID from the drop down manual. This router supports multiple SSID, which
means that you can set more than one SSID for this router.
3.
Select Authentication Type.
4.
Enter Encryption key and select Cipher from the drop down manual.
Format of the Encryption Key: AA BB CC DD EE (A “Blank” is a must in between 2 Hexadecimal digits)
Note:
You will need to enter the same key for the first time configuration of each station.
5.
Click Apply to complete the setting.
6.
To complete and save the setting, click Save All after clicking the Apply button.
7.
Go to Tools – System Commands page then click on Restart Access Point button for the changes to
take effect.
4 Ports 11g Wireless ADSL2/2+ Router
202
4.6.3.3 Wireless – Security – 802.1x
802.1x is a security protocol for Wireless Local Area Networks (WLAN). It is a port-based network
access control that keeps the network port disconnected until authentication is completed. 802.1x is based on
Extensible Authentication protocol (EAP). EAP messages from the authenticator to the authentication server
typically use the RADIUS (Remote Authentication Dial-In User Service) protocol. Figure below illustrates the
default setting of the 802.1x Wireless Security screen.
Select an SSID: Select a SSID from the drop down manual. This router supports multiple SSID,
which means that you can set more than one SSID for this router.
Server IP Address: The LAN-side RADIUS (Remote Authentication Dial-In User Service) server's
IP address.
Port: The RADUIS server's port.
Secret: Enter the Radius shared key. The secret that the AP shares with the RADIUS server. You
can enter up to 63 characters in this field.
Group Key Interval: The group key interval that is used to distribute the group key to 802.1x and
WPA stations.
Apply: Click Apply to complete the setting.
Cancel: Click Cancel to ignore all the changes.
To complete and save the setting, click Save All after clicking the Apply button.
Go to Tools – System Commands page then click on Restart Access Point button for the
changes to take effect.
4 Ports 11g Wireless ADSL2/2+ Router
203
4.6.3.4 Wireless – Security – WPA
WPA is a security protocol for WLAN. WPA uses a sophisticated key hierarchy that generates new
encryption keys each time a mobile device establishes itself with an AP.
Protocols including 802.1X, EAP, and RADIUS are used for strong authentication. Like WEP, keys can
still be entered manually (pre-shared keys); however, using a RADIUS authentication server provides
automatic key generation and enterprise-wide authentication. WPA uses temporal key integrity protocol
(TKIP) for data encryption. WPA2, also known as 802.11i, uses advanced encryption standard counter mode
CBC-MAC protocol (AES-CCMP) for data encryption.
Figure below shows the default setting of the Wireless Security - WPA page.
Select an SSID and its Security Level: If multiple SSID is enabled, use this drop-down menu to
select the SSID that you want to apply wireless security to.
WPA: Enables stations that support WPA v.1 to connect to the AP.
WPA2: Enables stations that support WPA v.2 to connect to the AP.
AnyWPA: Enables stations that support WPA v.1 and WPA v.2 to connect to the AP.
Enable WPA2 Pre-authentication: Enables/disables WPA2 pre-authentication. This field is
activated only when WPA2 or AnyWPA is enabled.
4 Ports 11g Wireless ADSL2/2+ Router
204
Group Key Interval: This value is measured in seconds.
Radius Server: When selected, the WPA stations authenticate with the RADIUS server using
extensible authentication protocol - transport layer security (EAP-TLS) over 802.1x.
IP Address: IP address of the RADIUS server.
Port: The protocol port of the RADIUS server.
Secret: The secret that the AP shares with the RADIUS server. You can enter up to 63
alpha-numeric characters in this field.
Pre-shared Key: When selected, the WPA stations do not authenticate with the RADIUS server
using EAP-TLS. Instead they share a pre-shared secret with the AP (ASCII format).
PSK String: Pre-shared key string. The PSK string needs to be entered in the first-time
configuration of each station. You can enter 8 - 63 alpha-numeric characters in this field.
Apply: Click Apply to complete the setting.
Cancel: Click Cancel to ignore all the changes.
To complete and save the setting, click Save All after clicking the Apply button.
Go to Tools – System Commands page then click on Restart Access Point button for the
changes to take effect.
4 Ports 11g Wireless ADSL2/2+ Router
205
4.6.4 Wireless – Configuration
The Configuration page describes how to configure the wireless features of your 4 Ports 11g Wireless
ADSL2/2+ Router. This screen provides an advanced wireless network parameter settings.
This 4 Ports 11g Wireless ADSL2/2+ Router support Multiple SSID. The Enable Multiple SSID field
allows you to create multiple SSIDs for the AP.
Configuration:
Beacon Period: Enter a value between 1 ~ 65535 milliseconds. The Beacon Interval value
indicates the frequency interval of the beacon. A beacon is a packet broadcast by the 4 Ports 11g
Wireless ADSL2/2+ Router to synchronize the wireless network. The default value is 200.
DTIM Period: This value, between 1 ~ 65535, indicates the interval of the Delivery Traffic
Indication Message (DTIM). A DTIM field is a countdown field informing clients of the next window
for listening to broadcast and multicast messages. When the 4 Ports 11g Wireless ADSL2/2+
Router has buffered broadcast or multicast messages for associated clients, it sends the next
DTIM with a DTIM Interval value. Its clients hear the beacons and awaken to receive the broadcast
and multicast messages. The default value is 2.
4 Ports 11g Wireless ADSL2/2+ Router
206
RTS Threshold: The range is 0 ~ 3000 bytes. If a network packet is smaller than the preset RTS
threshold size, the RTS/CTS mechanism will not be enabled. The 4 Ports 11g Wireless ADSL2/2+
Router sends Request to Send (RTS) frames to a particular receiving station and negotiates the
sending of a data frame. After receiving an RTS, the wireless station responds with a Clear to
Send (CTS) frame to acknowledge the right to begin transmission. This default setting is 2347.
However, when 4x is enabled on the setup page, the RTS threshold value changes to 4096.
Frag Threshold: The Fragmentation Threshold. The range is 256 ~ 2346 bytes. It specifies the
maximum size for a packet before data is fragmented into multiple packets. If you experience a
high packet error rate, you may slightly increase the Fragmentation Threshold. Setting the
Fragmentation Threshold too low may result in poor network performance. Only minor
modifications of this value are recommended. This default setting is 2346. However, when 4x is
enabled on the setup page, the fragmentation threshold value changes to 4096.
Power Level: Select “Full”, “75%”, “50%”, “25%” or “6%” Power Level from the drop down manual.
The default is “Full”.
Current Reg. Domain: It is not recommended for the end users to configure this feature.
Private Reg. Domain: It is not recommended for the end users to configure this feature.
4 Ports 11g Wireless ADSL2/2+ Router
207
Multiple SSID:
Enable Multiple SSID: Enables/disables multiple SSID.
Secondary SSID: The secondary SSID of the AP, is up to 32 characters and is unique from the
primary SSID.
Hide this SSID: Click to hide this SSID.
4 Ports 11g Wireless ADSL2/2+ Router
208
4.6.4.1 Configure Multiple SSID
Follow the following procedures to create multiple SSIDs.
1.
Check Enable Multiple SSID.
2.
Enter the following fields and click Add after setup.
Secondary SSID (SSID2 in this example)
Depends on your application, you can place a check to Hide this SSID.
The following screen pop-up after clicking the “Add” button.
Note:
The SSID field takes up to 32 alpha-numeric characters.
4 Ports 11g Wireless ADSL2/2+ Router
209
3.
Repeat first part of step 2 to add more SSID.
Note:
4.
Up to 3 secondary SSIDs are supported (in addition to the primary SSID).
To delete an SSID, check the SSID, then click Delete in the pop-up window. To delete all SSIDs, check
Delete All.
Note:
When the last secondary SSID is deleted, WLAN QoS is disabled and the VLAN ID of the
primary SSID is changed to the default 0.
5.
Apply: Click Apply to complete the setting.
6.
Cancel: Click Cancel to ignore all the changes.
7.
To complete and save the setting, click Save All after clicking the Apply button.
8.
Go to Tools – System Commands page then click on Restart Access Point button for the changes to
take effect.
4 Ports 11g Wireless ADSL2/2+ Router
210
4.6.5 Wireless – Management
Unlike wired network data, your wireless data transmissions can extend beyond your walls and can be
received by anyone with a compatible adapter. The Management function gives another level of security to
your 4 Ports 11g Wireless ADSL2/2+ Router. It allows you to create an allowed access list or a banned
access list (not both), and view a list of stations associated with your access point.
Click on Wireless then Management, the following screen will pop-up.
4 Ports 11g Wireless ADSL2/2+ Router
211
4.6.5.1 Wireless – Management – Access List
Access List: By default, any wireless computer that is configured with the correct wireless network
name or SSID will be allowed access to your wireless network. For increased security, you can restrict access
to the wireless network to only specific computers based on their MAC addresses.
You can create an “Allowed” or “Banned” access list from the Access List screen by performing the
following procedures describe in next section.
Select an SSID: If multiple SSID is enabled, use this drop-down menu to select the SSID that you
want to apply wireless security to.
Enable Access List: Select Allow or Ban to setup your Access List.
MAC Address: Enter the MAC Address of the wireless network that are Allow or Ban to access
your 4 Ports 11g Wireless ADSL2/2+ Router. Then click Add to include to your Access List.
Apply: Click Apply to complete the setting.
Cancel: Click Cancel to ignore all the changes.
To complete and save the setting, click Save All after clicking the Apply button.
Go to Tools – System Commands page then click on Restart Access Point button for the
changes to take effect.
4 Ports 11g Wireless ADSL2/2+ Router
212
4.6.5.1.1 Access List Configuration Procedure
1.
Select a SSID from the drop down list.
2.
Check Enable Access List.
3.
Select Allow to create an allowed access list or Ban to create a banned list.
Note:
4.
You can not create both.
Enter a MAC (Medium Access Control) address of an allowed or banned station, then click the Add
button. This station will appear in your allowed or banned access list.
5.
Repeat this step for each station you want to add to your access list.
6.
Apply: Click Apply to complete the setting.
7.
Cancel: Click Cancel to ignore all the changes.
8.
To complete and save the setting, click Save All after clicking the Apply button.
9.
Go to Tools – System Commands page then click on Restart Access Point button for the changes to
take effect.
4 Ports 11g Wireless ADSL2/2+ Router
213
4.6.5.1.2 Wireless – Management – Associated Stations
By clicking Associated Stations on the Wireless Management page, you are taken to the Associated
Stations page (Figure below). This page allows you to see a list of all stations associated with the access
point. You can ban any stations on the list by clicking Ban Station next to the MAC Address.
If the Allowed Access list is enabled, this station will be deleted from the Allowed Access List. If the
Banned Access list is enabled, this station will be added to the Banned Access List.
Apply: Click Apply to complete the setting.
Cancel: Click Cancel to ignore all the changes.
To complete and save the setting, click Save All after clicking the Apply button.
Go to Tools – System Commands page then click on Restart Access Point button for the
changes to take effect.
4 Ports 11g Wireless ADSL2/2+ Router
214
4.6.6 Wireless – WDS
Wireless distribution system (WDS) is a system that interconnects BSS to build a premise wide network.
WDS network allows users of mobile equipment to roam and stay connected to the available network
resources. You can configure your 4 Ports 11g Wireless ADSL2/2+ Router as WDS mode using the WDS
page (Figure below).
WDS Mode: The following WDS modes are available:
Bridge: In Bridge mode, the AP basic service set (BSS) service is enabled.
Repeater: In Repeater mode, the AP BSS is disabled when connection to the upper layer AP
is established.
Crude: In Crude mode, the AP BSS service is always enabled; however, the links between
APs are configured statically and are not maintained.
Disabled (Default): WDS inactive.
In Both Bridge and Repeater modes, WDS uses management protocol to establish and maintain
links between APs.
WDS Name: The WDS name is used to identify WDS network. The field takes up to eight
characters. Two or more WDS networks may exist in the same area.
Activate as Root: This field must be checked for the root device in WDS hierarchy. Only one
WDS root device may exist in WDS network. This field is not applicable for Crude mode.
4 Ports 11g Wireless ADSL2/2+ Router
215
WDS Privacy: Checking this field commands WDS manager to use a secured connection between
APs in the WDS network. Security settings must be the same in all APs in the WDS network.
Note:
WDS privacy is not supported in Crude mode.
Secret: The 32-character alpha-numeric privacy key.
Uplink Connection Check Box: The BSS ID of the upper device in the WDS hierarchy. This
uplink cannot be configured if Root is enabled.
Downlink Connection Check Boxes: The BSS ID of the lower device in the WDS hierarchy
connected to this AP. Up to four downlinks can be configured.
4 Ports 11g Wireless ADSL2/2+ Router
216
4.7 Advanced – Status
Figure shows the Status main screen, which can be accessed by clicking on the Status tab under the
Advanced section. This screen provides access to the following status screens:
Network Statistics
DDNS Status
DHCP Clients
ADSL Status
Info
WDS Report
4 Ports 11g Wireless ADSL2/2+ Router
217
4.7.1 Status – Network Statistic
The Network Statistics show the Select Network Interface type to peruse statistics for each type of
connection. You can access the Network Statistics page by clicking the Network Statistics link from the
Status main page. Click to view the statistics of the following four interfaces:
Ethernet
DSL
Wireless
4 Ports 11g Wireless ADSL2/2+ Router
218
4.7.1.1 Status – Network Statistic – Ethernet
Ethernet: Shows the Transmit/Receive Frames, Error Frames, Collision and CRC Errors information of
the Ethernet Interface. The traffic counter will reset if the device is rebooted.
Refresh: Click Refresh button to reload Web browser.
4 Ports 11g Wireless ADSL2/2+ Router
219
4.7.1.2 Status – Network Statistic – DSL
DSL: Shows the Total Bytes Receive/Transmit and Error Count information of the ADSL (WAN)
Interface. The traffic counter will reset if the device is rebooted.
Refresh: Click Refresh button to reload Web browser.
4 Ports 11g Wireless ADSL2/2+ Router
220
4.7.1.3 Status – Network Statistic – Wireless
Wireless: Shows the packets transmit/receive information through the Wireless Interface. The traffic
counter will reset if the device is rebooted.
Refresh: Click Refresh button to reload Web browser.
4 Ports 11g Wireless ADSL2/2+ Router
221
4.7.2 Status – DDNS Status
You can view the DDNS update status of your WAN connection from the DDNS Status page (Figure
below). To access, click the DDNS Status link from the Status main page.
As you can see from this page, the DDNS client is disabled by default for your 4 Ports 11g Wireless
ADSL2/2+ Router. To enable the DDNS client feature, refer to Advanced – DDNS section for details.
When DDNS client is enabled, the DDNS client updates every time the 4 Ports 11g Wireless ADSL2/2+
Router gets a new IP address.
Connection: This field defaults to your 4 Ports 11g Wireless ADSL2/2+ Router’s WAN connection
over which your 4 Ports 11g Wireless ADSL2/2+ Router will be accessed.
DDNS Server: This is where you select the server from different DDNS service providers. Only
DynDNS and TZO are supported by your 4 Ports 11g Wireless ADSL2/2+ Router at this time.
Refresh: Click Refresh button to reload Web browser.
4 Ports 11g Wireless ADSL2/2+ Router
222
4.7.3 Status – DHCP Clients
If you have enabled the DHCP server, you can view a list of the DHCP clients from the DHCP Clients
screen. From the Status main screen, click the DHCP Clients link, select the LAN connection, and the
following information of the DHCP LAN Clients will be displayed:
MAC Address
IP Address
Host Name
Lease Time
Refresh: Click Refresh button to reload Web browser.
4 Ports 11g Wireless ADSL2/2+ Router
223
4.7.4 Status – ADSL Status
The ADSL Status page shows the 4 Ports 11g Wireless ADSL2/2+ physical layer or link status. The
information displayed on this page is either inherent to the 4 Ports 11g Wireless ADSL2/2+ Router or set by
the ADSL Central Office (CO) DSLAM, neither of which cannot be changed by the user.
Refresh: Click Refresh button to reload Web browser.
4 Ports 11g Wireless ADSL2/2+ Router
224
4.7.5 Status – Info
You can display the hardware and software information for your 4 Ports 11g Wireless ADSL2/2+ Router
by clicking the Info link on the Status main page. Figure below shows the product information.
4 Ports 11g Wireless ADSL2/2+ Router
225
4.7.6 Status – WDS Report
You can view the WDS report for your 4 Ports 11g Wireless ADSL2/2+ Router (AP) by clicking the WDS
Report link from the Status main page. The WDS Report page (Figure below) allows you to view the
following WDS-related wireless activities:
WDS configuration and states
WDS management statistics
WDS database
4 Ports 11g Wireless ADSL2/2+ Router
226
Appendix A: Router Terms
What is a firewall?
A firewall is a device that protects one network from another, while allowing communication between the two.
A firewall incorporates the functions of the NAT router, while adding features for dealing with a hacker
intrusion or attack. Several known types of intrusion or attack can be recognized when they occur. When an
incident is detected, the firewall can log details of the attempt, and can optionally send email to an
administrator notifying them of the incident. Using information from the log, the administrator can take action
with the ISP of the hacker. In some types of intrusions, the firewall can fend off the hacker by discarding all
further packets from the hacker’s IP address for a period of time.
What is NAT?
NAT stands for Network Address Translation. Another name for it is Connection Sharing. What does this
mean? Your ISP provides you with a single network address for you to access the Internet through. However,
you may have several machines on your local network that want to access the Internet at the same time. The
router provides NAT functionality that converts your local network addresses to the single network address
provided by your ISP. It keeps track of all these connections and makes sure that the correct information gets
to the correct local machine.
Occasionally, there are certain programs that don't work well through NAT. Some games, and some specialty
applications have a bit of trouble. The router contains special functionality to handle the vast majority of these
troublesome programs and games. NAT does cause problems when you want to run a SERVER though.
When running a server, please see the DMZ section below.
What is a DMZ?
DMZ really stands for Demilitarized Zone. It is a way of separating out part of your local network so that is
more open to the Internet. Suppose that you want to run a web-server, or a game server. Normal servers like
these are blocked from working by the NAT functionality. The solution is to "isolate" the single local computer
into a DMZ. This makes the single computer look like it is directly on the Internet, and others can access this
machine.
Your machine isn't really directly connected to the Internet, and it really has an internal local network address.
When you provide the servers network address to others, you must provide the address of the router. The
router "fakes" the connection to your machine.
You should use the DMZ when you want to run a server that others will access from the Internet. Internal
programs and servers (like print servers, etc) should NOT be connected to the DMZ
4 Ports 11g Wireless ADSL2/2+ Router
227
What is a Gateway?
The Internet is so large that a single network cannot handle all of the traffic and still deliver a reasonable level
of service. To overcome this limitation, the network is broken down into smaller segments or subnets that can
deliver good performance for the stations attached to that segment. This segmentation solves the problem
of supporting a large number of stations, but introduces the problem of getting traffic from one subnet to
another.
To accomplish this, devices called routers or gateways are placed between segments. If a machine wishes to
contact another device on the same segment, it transmits to that station directly using a simple discovery
technique. If the target station does not exist on the same segment as the source station, then the source
actually has no idea how to get to the target.
One of the configuration parameters transmitted to each network device is its default gateway. This address
is configured by the network administrators and it informs each personal computer or other network device
where to send data if the target station does not reside on the same subnet as the source. If your machine
can reach all stations on the same subnet (usually a building or a sector within a building), but cannot
communicate outside of this area, it is usually because of an incorrectly configured default gateway.
4 Ports 11g Wireless ADSL2/2+ Router
228
Appendix B: Frequently Asked Questions
The Frequently Asked Questions addresses common questions regarding 4 Ports 11g Wireless
ADSL2/2+ Router settings.
Some of these questions are also found throughout the guide, in the sections to which they reference.
1.
How do I determine if a link between the Ethernet card (NIC) and the 4 Ports 11g Wireless
ADSL2/2+ Router has been established?
Ans. A ping test would determine if a connection is established between your 4 Ports 11g Wireless
ADSL2/2+ Router and computer. Using, the ping command, ping the IP address of the 4 Ports 11g
Wireless ADSL2/2+ Router, in this case, 192.168.1.1 (default). For more information on Ping
Testing, refer to Appendix C: Troubleshooting Guide. Alternatively, if the Ethernet LINK LED is
solidly on, then the Ethernet link is established.
2.
How do I determine if a link between the 4 Ports 11g Wireless ADSL2/2+ Router and the
Internet has been established?
Ans. Similar to the previous question, a ping test would determine whether or not a connection is
established. However, this time use a URL instead of and IP Address, such as www.google.com.
Alternatively, if the ADSL LED is solidly on, then the ADSL link is established.
3.
How can I find/verify my 4 Ports 11g Wireless ADSL2/2+ Router and/or computer Ethernet
MAC Address?
Ans. Refer to Status – Info section for details.
4.
I can’t get the Internet game, server, or application to work properly.
Ans. If you are having difficulties getting any Internet game, server, or application to function properly,
consider exposing one computer to the Internet using DeMilitarized Zone (DMZ) setting. Refer to
Advanced – Port Forwarding section for the setting detail.
5.
I need to upgrade the firmware.
Ans. In order to upgrade the firmware with the latest features, check with your local dealer or ISP
for technical support.
4 Ports 11g Wireless ADSL2/2+ Router
229
6.
I forgot my password.
Ans. Reset the 4 Ports 11g Wireless ADSL2/2+ Router to factory default by pressing the Reset button
for 10~15 seconds and then releasing it.
If you are still getting prompted for a password when saving settings, then perform the following
steps:
1.
Access the 4 Ports 11g Wireless ADSL2/2+ Router’s web-based utility by going to
http://192.168.1.1 or the IP address of the 4 Ports 11g Wireless ADSL2/2+ Router. Enter the
default username and password Admin, and click the Tools – User Management tab.
2.
Enter a different password in the 4 Ports 11g Wireless ADSL2/2+ Router Password field, and
enter the same password in the second field to confirm the password.
3.
7.
Click the Apply button then click Save All to activate your setting.
What is ad-hoc mode?
Ans. When a wireless network is set to ad-hoc mode, the wireless-equipped computers are configured
To communicate directly with each other, peer-to-peer without the use of an access point.
8.
What is infrastructure mode?
Ans. When a wireless network is set to infrastructure mode, the wireless network is configured to
communicate with a network through a wireless access point.
9.
What is roaming?
Ans. Roaming is the ability of a portable computer user to communicate continuously while moving
freely throughout an area greater than that covered by a single access point. Before using the
roaming function, the computer must make sure that it is the same channel number with the
access point of dedicated coverage area.
10.
What is ISM band?
Ans. The FCC and their counterparts outside of the U.S. have set aside bandwidth for unlicensed use in
the ISM (Industrial, Scientific and Medical) band. Spectrum in the vicinity of 2.4 GHz, in particular,
is being made available worldwide. This presents a truly revolutionary opportunity to place
convenient high-speed wireless capabilities in the hands of users around the globe.
11.
What is MAC Address?
Ans. Short for Media Access Control Address. It is a hardware address that uniquely identifies each
node of a Ethernet networking device. This address is usually permanent.
12.
What is IEEE 802.11b standard?
Ans. IEEE 802.11b is an extension standards to 802.11 that applies to Wireless LAN and provides
11Mbps transmission speed in the 2.4 GHz band.
4 Ports 11g Wireless ADSL2/2+ Router
230
13.
What is IEEE 802.11g standard?
Ans. IEEE 802.11g is an extension standards to 802.11 that applies to Wireless LAN and provides
54Mbps transmission speed in the 2.4 GHz band.
14.
What is NAT (Network Address Translation) and what is it used for?
Ans. NAT translates multiple IP Address on the private LAN to one public IP Address (in WAN) that is
sent out to the Internet. NAT adds a level security since the IP address of a PC connected to the
private LAN is never transmitted on the Internet.
15.
What can I do when I am not able to get the web configuration screen for this 4 Ports 11g
Wireless ADSL2/2+ Router?
Ans. Remove the proxy settings on your Internet Browsers or remove the dial-up settings on your
browser.
16.
What is DMZ (DeMilitarized zone)?
Ans. DMZ allows one IP Address (computer) to be exposed to the Internet. Some applications require
multiple TCP/IP ports to be open. It is recommended that you set your computer with a static IP if
you want to use DMZ features.
17.
What is BSS ID?
Ans. A specific Ad-Hoc LAN is called a Basic Service Set (BSS). Computers in a BSS must be
configured with the same BSS ID.
18.
What is SSID?
Ans. Short for Service Set Identifier. SSID is a 32 character unique identifier attached to the header of
packets sent over a WLAN that acts as a password when a mobile device tries to connect to the BSS.
The SSID differentiates one WLAN from another, so all Access Point and all devices attempting to
connect to a specific WLAN must use the same SSID. A device will not be permitted to join the BSS
unless it can provide the unique SSID.
19.
What is WEP?
Ans. Short for Wired Equivalent Privacy. WEP is a security protocol for wireless local area networks
defined in the 802.11b standard. WEP is designed to provide the same level of security as that of a
wired LAN. WEP aims to provide security by encrypting data over radio waves so that it is
protected as it is transmitted from one end point to another.
4 Ports 11g Wireless ADSL2/2+ Router
231
17.
What is WPA?
Ans. Wi-Fi Protected Access (WPA) is a specification of standards-based, interoperable security
enhancements that increase the level of data protection and access control for existing and future
wireless LAN systems.
18.
What is the maximum IP addresses supported by this 4 Ports 11g Wireless ADSL2/2+
Router?
Ans. The 4 Ports 11g Wireless ADSL2/2+ Router can support up to 253 IP addresses.
4 Ports 11g Wireless ADSL2/2+ Router
232
Appendix C: Troubleshooting Guide
The Troubleshooting Guide provides answers to common problems regarding the 4 Ports 11g Wireless
ADSL2/2+ Router settings, connections, and computer settings.
1.
The 4 Ports 11g Wireless ADSL2/2+ Router does not work (None of the LEDs light up)
Ans. Check the following:
1. Make sure that the 4 Ports 11g Wireless ADSL2/2+ Router is plugged into a power socket.
2. Make sure that you are using the correct power supply for your 4 Ports 11g Wireless
ADSL2/2+ Router device.
3. Make sure the power switch on the 4 Ports 11g Wireless ADSL2/2+ Router is turned on.
2.
I changed the LAN IP Address in the LAN configuration page and my PC is no longer able
to detect the 4 Ports 11g Wireless ADSL2/2+ Router.
Ans. After changing the LAN IP Address of the 4 Ports 11g Wireless ADSL2/2+ Router, proceed to the
following step before a PC is able to recognize the 4 Ports 11g Wireless ADSL2/2+ Router:
1.
Click “Start”
2.
In the open field, enter “cmd” then click “OK”.
3.
In the command prompt, type “ipconfig/release” then press “Enter” (For Windows
“Run”.
2000/XP Operating System).
4.
3.
Type “ipconfig/renew” then press “Enter”.
No wireless connectivity.
Ans. Check the following:
1.
Make sure both wireless client adapter and the 4 Ports 11g Wireless ADSL2/2+ Router is
allowed to connect through wireless channels as defined for local regulatory domain.
2.
4.
Make sure that the WLAN client is configured for the correct wireless settings (SSID, WEP).
Poor wireless connectivity or reach.
Ans. Check the following:
1.
Choose automatic channel selection or be careful to select a DSSS channel that doesn't
interfere with other radio channels.
2.
Check the location of the 4 Ports 11g Wireless ADSL2/2+ Router in the building.
3.
Make sure both WLAN client adapter and the 4 Ports 11g Wireless ADSL2/2+ Router is
allowed to connect through wireless channels as defined for local regulatory domain.
4 Ports 11g Wireless ADSL2/2+ Router
233
5.
LAN (Link/Act) LED does not light up.
Ans. Check the following:
1. Make sure that the LAN cables are securely connected to the 10/100Base-T port.
2. Make sure that you are using the correct cable type for your Ethernet equipment.
3. Make sure the computer's Ethernet port is configured for auto-negotiation.
6.
Failed to configure the 4 Ports 11g Wireless ADSL2/2+ Router through web browser (By a
client PC in LAN)
Ans. Check the following:
1. Check the hardware connection of the 4 Ports 11g Wireless ADSL2/2+ Router’s LAN port. The
LED will lit when a proper connection is made.
2. Check your Windows TCP/IP setting (Refer to Chapter 3 for setting details).
3. Open the Windows System Command Prompt:
For Windows 9x/ME: Manually enter winipcfg, then press Enter.
For Windows 2000/XP: Manually enter ipconfig/all, then press Enter.
4. You should have the following information listed on your Window System:
IP Address: 192.168.1.x
Submask: 255.255.255.0
Default Gateway IP: 192.168.1.1
7.
I forgot or lost my Administrator Password.
Ans. Reset the 4 Ports 11g Wireless ADSL2/2+ Router to factory default by pressing the “Reset”
button for 10~15 seconds.
If you are still getting prompted for a password when saving settings:
1. Access the Router’s web interface by going to http://192.1681.1.
2. Enter the default “username” and “password” then click “Enter” to log in.
3. Click on “Tools” then click “User Management”.
4. Enter a new “Password” and new “Username” in the “Username” and “Password” field,
and enter the same password in the second field to confirm the password.
5. Click “Apply” after setup then click Save All to activate your setting.
4 Ports 11g Wireless ADSL2/2+ Router
234
8.
I need to upgrade the Firmware.
Ans. In order to upgrade the Firmware with the latest features, check your local dealer or ISP for
technical support. Before proceed the upgrading process, check the following details:
1. Download the latest Firmware and save at your pointed location.
2. Read the firmware release note carefully before proceed the upgrading process.
3. Refer to Tools - Update Gateway section for the upgrading process.
9.
Testing LAN path to your 4 Ports 11g Wireless ADSL2/2+ Router.
Ans. To verify whether the LAN path from your PC to your 4 Ports 11g Wireless ADSL2/2+ Router is
properly connected, you can “Ping” the 4 Ports 11g Wireless ADSL2/2+ Router with the following
procedures:
1. From the Windows toolbar, click “Start” and select “Run”.
2. In the open field, type “Ping 192.168.1.1” and click “OK”
3. If the path is working, you should see the message in the following format:
Reply from 192.168.1.1 bytes = 32 time < 10ms TTL = 60
4. If the path is not working, you should see the following message:
Request timed out
If the path is not functioning correctly:
1. Make sure the LAN port LED indicator is on.
2. Check whether you are using the correct LAN cable.
3. Check your Ethernet Adaptor installation and configurations.
4. Verify that the IP address for your 4 Ports 11g Wireless ADSL2/2+ Router and your
workstation are correct and that the addresses are on the same subnet.
10.
Failed to connect with the 4 Ports 11g Wireless ADSL2/2+ Router via Wireless LAN card.
Ans. Ensure that the WL ACT LED indicator of the 4 Ports 11g Wireless ADSL2/2+ Router is correctly
illuminated.
1. Check whether your Wireless LAN setting (e.g. SSID, Channel Number) is the same as your 4
Ports 11g Wireless ADSL2/2+ Router.
2. Check whether you’d used the same WEP Key Encryption for both your Wireless LAN and
your 4 Ports 11g Wireless ADSL2/2+ Router.
4 Ports 11g Wireless ADSL2/2+ Router
235
Appendix D: UPnP Setting on Windows XP (Optional)
D.1 Adding UPnP:
If you are running Microsoft Windows XP, it is recommended to add the UPnP component to your
system.
Proceed as follows:
1.
Click “Start”
“Settings” then “Control Panel”.
2.
The “Control Panel” window appears. Click “Add or Remove Programs”.
4 Ports 11g Wireless ADSL2/2+ Router
236
3.
The “Add or Remove Programs” window appears. Click “Add/Remove Windows
Components”.
4.
The “Windows Components Wizard” appears. Select “Networking Services” in the
Components list and click “Details”.
4 Ports 11g Wireless ADSL2/2+ Router
237
5.
The “Networking Services” window appears. Select “Universal Plug and Play” and click “OK”.
6.
Click “Next” to start the installation and follow the instructions in the Windows Components
Wizard.
Note :
System may ask for original Windows XP CD-ROM. Insert the CD-ROM and direct
Windows to the proper location of the CD-ROM.
Restart your Windows system to activate your setting might be necessary.
Click “OK” to restart your Windows system.
4 Ports 11g Wireless ADSL2/2+ Router
238
7.
A “Completing the Windows Components Wizard” will appears indicating the installation was
successful. Click “Finish” to quit.
4 Ports 11g Wireless ADSL2/2+ Router
239
Appendix E: Glossary
The Glossary provides an explanation of terms and acronyms discussed in this user guide.
10BASE-T: IEEE 802.3 specification for 10 Mbps Ethernet over twisted pair wiring.
100BASE-Tx: IEEE 802.3 specification for 100 Mbps Ethernet over twisted pair wiring.
802.11b: IEEE specification for wireless networking at 11 Mbps using direct-sequence spread-spectrum
(DSSS) technology and operating in the unlicensed radio spectrum at 2.4GHz.
802.11g: IEEE specification for wireless networking at 54 Mbps using direct-sequence spread-spectrum
(DSSS) technology and operating in the unlicensed radio spectrum at 2.4GHz.
802.11x: 802.1x defines port-based, network access control used to provide authenticated network access
and automated data encryption key management. The IEEE 802.1x draft standard offers an effective
framework for authenticating and controlling user traffic to a protected network, as well as dynamically
varying encryption keys.
AP: Access Point: A station that transmits and receives data in a WLAN (Wireless Local Area Network). An
access point acts as a bridge for wireless devices into a LAN.
ATM: Asynchronous Transfer Mode: A method of transfer in which data is organized into 53-byte cell units.
ATM cells are processed asynchronously in relation to other cells.
BC: Broadcast: Communication in which a sender transmits to everyone in the network.
BER: Bit Error Rate: Percentage of Bits that contain errors relative to the total number of bits transmitted.
Bridge: A device that connects two networks and decides which network the data should go to.
Bridge Mode: Bridge Mode is used when there is one PC connected to the LAN-side Ethernet or USB port.
IEEE 802.1D method of transport bridging is used to bridge between the WAN (ADSL) side and the LAN
(Ethernet or USB) side, i.e., to store and forward.
CBR: Constant Bit Rate: A constant transfer rate that is ideal for streaming (executing while still downloading)
data, such as audio or video files.
Cell: A unit of transmission in ATM, consisting of a fixed-size frame containing a 5-octet header and a
48-octet payload.
4 Ports 11g Wireless ADSL2/2+ Router
240
CHAP: Challenge Handshake Authentication Protocol: Typically more secure than PAP, CHAP uses
username and password in combination with a randomly generated challenge string which has to be
authenticated using a one-way hashing function.
CLP: Cell Loss Priority: ATM cells have two levels of priority, CLP0 and CLP1. CLP0 is of higher priority, and
in times of high traffic congestion, CLP1 error cells may be discarded to preserve the Cell Loss Ratio of the
CLP0 cells.
CO: Central Office: In a local loop, a Central Office is where home and office phone lines come together and
go through switching equipment to connect them to other Central Offices. The distance from the Central
Office determines whether or not an ADSL signal can be supported in a given line.
CPE: Customer Premises Equipment. This specifies equipment on the customer, or LAN, side.
CRC: Cyclic Redundancy Checking: A method for checking errors in a data transmission between two
computers. CRC applies a polynomial function (16 or 32-bit) to a block of data. The result of that polynomial is
appended to the data transmission. Upon receipt, the destination computer applies the same polynomial to
the block of data. If the host and destination computer share the same result, the transmission was
successful. Otherwise, the sender is notified to re-send the data block.
DHCP: Dynamic Host Configuration Protocol: A communications protocol that allows network administrators
to manage and assign IP addresses to computers within the network. DHCP provides a unique address to a
computer in the network which enables it to connect to the Internet through Internet Protocol (IP). DHCP can
lease and IP address or provide a permanent static address to those computers who need it (servers, etc.).
DMZ: Demilitarized Zone: A computer Host or network that acts as a neutral zone between a private network
and a public network. A DMZ prevents users outside of the private network from getting direct access to a
server or any computer within the private network. The outside user sends requests to the DMZ, and the DMZ
initiates sessions in the public network based on these requests. A DMZ cannot initiate a session in the
private network, it can only forward packets to the private network as they are requested.
DNS: Domain Name System: A method to locate and translate Domain Names into Internet Protocol (IP)
addresses, where a Domain Name is a simple and meaningful name for an Internet address.
DSL: Digital Subscriber Line: A technology that provides broadband connections over standard phone lines.
DSLAM: Digital Subscriber Line Access Multiplexer: Using multiplexing techniques, a DSLAM receives
signals from customer DSL lines and places the signals on a high-speed backbone line. DSLAMs are
typically located at a telephone company’s CO (Central Office).
Encapsulation: The inclusion of one data structure within another. For example, packets can be
encapsulated in an ATM frame during transfer.
4 Ports 11g Wireless ADSL2/2+ Router
241
FEC: Forward Error Correction: An error correction technique in which a data packet is processed through an
algorithm that adds extra error correcting bits to the packet. If the transmitted message is received in error,
these bits are used to correct the errored bits without retransmission.
Firewall: A firewall is a method of implementing common as well as user defined security policies in an effort
to keep intruders out. Firewalls work by analyzing and filtering out IP packets that violate a set of rules
defined by the firewall administrator. The firewall is located at the point of entry for the network. All data
inbound and outbound must pass through the firewall for inspection.
Fragmentation: Breaking a packet up into smaller packets that is caused either by the transmission medium
being unable to support the original size of the packet or the receiving computer not being able to receive a
packet of that size. Fragmentation occurs when the sender’s MTU is larger than the receiver’s MRU.
FTP: File Transfer Protocol. A standardized internet protocol which is the simplest way to transfer files from
one computer to another over the internet. FTP uses the Internet’s TCP/IP protocols to function.
Full Duplex: Data transmission can be transmitted and received on the same signal medium and at the same
time. Full Duplex lines are bidirectional.
G.dmt: Formally G.992.1, G.dmt is a form of ADSL that uses Discrete MultiTone (DMT) technology. G.dmt
incorporates a splitter in its design.
G.lite: Formally G.992.2, G.lite is a standard way to install ADSL service. G.lite enables connections speeds
up to 1.5 Mbps downstream and 128 kbps upstream. G.lite does not need a splitter at the user end because
splitting is preformed at the remote end (telephone company).
Gateway: A point on the network which is an entrance to another network. For example, a router is a
gateway that connects a LAN to a WAN.
Half Duplex: Data transmission can be transmitted and received on the same signal medium, but not
simultaneously. Half Duplex lines are bidirectional.
HEC: Headed Error Control: ATM error checking by using a CRC algorithm on the fifth octet in the ATM cell
header to generate a check character. Using HEC, either a single bit error in the header can be corrected or
multiple bit errors in the header can be detected.
HNP: Home Network Processor
Host: In context of Internet Protocol, a host computer is one that has full two way access to other computers
on the Internet.
IAD: Integrated Access Device: A device that multiplexes and demultiplexes communications in the CPE
4 Ports 11g Wireless ADSL2/2+ Router
242
onto and out of a single telephone line for transmission to the CO.
IP: Internet Protocol: The method by which information is sent from one computer to another through the
Internet. Each of these host computers have a unique IP address which distinguishes it from all the other
computers on the internet. Each packet of data sent includes the sender’s IP address and the receiver’s IP
address.
LAN: Local Area Network: A group of computers, typically covering a small geographic area, that share
devices such as printers, hard disk drives, scanners, and optical drives. Computers in a LAN typically share
an internet connection through some sort of router that connects the computers to a WAN.
LLC: Logical Link Control: Provides an interface point to the MAC sublayer. LLC Encapsulation is needed
when several protocols are carried over the same Virtual Circuit.
MAC Address: Media Access Control Address: A unique hardware number on a computer or device that
identifies it and relates it to the IP address of that device.
MC: Multicast: Communication involving a single sender and multiple specific receivers in a network.
MRU: Maximum Receive Unit: MRU: Maximum Receive Unit (MRU) is the largest size packet that can be
received by the modem. During the PPP negotiation, the peer of the PPP connection will indicate its MRU
and will accept any value up to that size. The actual MTU of the PPP connection will be set to the smaller of
the two (MTU and the peer’s MRU). In the normal negotiation, the peer will accept this MRU and will not send
packet with information field larger than this value.
MSS: Maximum Segment Size: The largest size of data that TCP will send in a single, unfragmented IP
packet. When a connection is established between a LAN client and a host in the WAN side, the LAN client
and the WAN host will indicate their Maximum Segment Size during the TCP connection handshake.
MTU: Maximum Transmission Unit: The largest size packet that can be sent by the modem. If the network
stack of any packet is larger than the MTU value, then the packet will be fragmented before the transmission.
During the PPP negotiation, the peer of the PPP connection will indicate its MRU and will accept any value up
to that size. The actual MTU of the PPP connection will be set to the smaller of the two (MTU and the peer’s
MRU).
NAPT: Network Address and Port Translation: An extension of NAT, NAPT maps many private internal
addresses into one IP address. The outside network (WAN) can see this one IP address but it cannot see the
individual device IP addresses translated by the NAPT.
4 Ports 11g Wireless ADSL2/2+ Router
243
NAT: Network Address Translation: The translation of an IP address of one network to a different IP address
known by another network. This gives an outside (WAN) network the ability to distinguish a device on the
inside (LAN) network, as the inside network has a private set of IP address assigned by the DHCP server not
known to the outside network.
PAP: Password Authentication Protocol: An authentication protocol in which authorization is done through a
user name and password.
PDU: Protocol Data Unit: A frame of data transmitted through the data link layer 2.
Ping: Packet Internet Groper: A utility used to determine whether a particular device is online or connected to
a network by sending test packets and waiting for a response.
PPP: Point-to-Point Protocol: A method of transporting and encapsulating IP packets between the user PC
and the ISP. PPP is full duplex protocol that is transmitted through a serial interface.
Proxy: A device that closes a straight connection from an outside network (WAN) to an inside network (LAN).
All transmissions must go through the proxy to get into or out of the LAN. This makes the internal addresses
of the devices in the LAN private.
PVC: Permanent Virtual Circuit: A software defined logical connection in a network; A Virtual Circuit that is
permanently available to the user.
RIP: Routing Information Protocol: A management protocol that ensures that all hosts in a particular network
share the same information about routing paths. In a RIP, a host computer will send its entire routing table to
another host computer every X seconds, where X is the supply interval. The receiving host computer will in
turn repeat the same process by sending the same information to another host computer. The process is
repeated until all host computers in a given network share the same routing knowledge.
RIPv1: RIP Version 1: One of the first dynamic routing protocols introduced used in the internet, RIPv1 was
developed to distribute network reach ability information for what is now considered simple topologies.
RIPv2: RIP Version 2: Shares the same basic concepts and algorithms as RIPv1 with added features such as
subnet masks, authentication, external route tags, next hop addresses, and multicasting in addition to
broadcasting.
Router Mode: Router Mode is used when there is more than one PC connected to the LAN-side Ethernet
and/or USB port. This enables the ADSL WAN access to be shared with multiple nodes on the LAN. Network
Address Translation (NAT) is supported so that one WAN-side IP address can be shared among multiple
LAN-side devices. DHCP is used to serve each LAN-side device and IP address.
4 Ports 11g Wireless ADSL2/2+ Router
244
SNAP: SubNetwork Attachment Point.
SNMP: Simple Network Management Protocol: Used to govern network management and monitor devices
on the network. SNMP is formally described in RFC 1157.
SNR: Signal-to-Noise Ratio: Measured in decibels, SNR is a calculated ratio of signal strength to background
noise. The higher this ratio, the better the signal quality.
Subnet Mask: Short for SubNetwork Mask, subnet mask is a technique used by the IP protocol to filter
messages into a particular network segment, called a subnet. The subnet mask consists of a binary pattern
that is stored in the client computer, server, or router. This pattern is compared with the incoming IP address
to determine whether to accept or reject the packet.
TCP: Transfer Control Protocol: Works together with Internet Protocol for sending data between computers
over the Internet. TCP keeps track of the packets, making sure that they are routed efficiently.
TFTP: Trivial File Transfer Protocol: A simple version of FTP protocol that has no password authentication or
directory structure capability.
Trellis Code: An advanced method of FEC (Forward Error Correction). When enabled, it makes for better
error checking at the cost of slower packet transmission. Setting Trellis Code to Disabled will cause increased
packet transmission with decreased error correction.
TTL: Time To Live: A value in an IP packet that indicates whether or not the packet has been propagating
through the network too long and should be discarded.
UBR: Unspecified Bit Rate: A transfer mode that is usually used in file transfers, email, etc. UBR can vary
depending on the data type.
USB: Universal Serial Bus: A standard interface between a computer and a peripheral (printer, external
drives, digital cameras, scanners, network interface devices, modems, etc.) that allows a transfer rate of
12Mbps.
UDP: User Datagram Protocol: A protocol that is used instead of TCP when reliable delivery is not required.
Unlike TCP, UDP does not require an acknowledgement (handshake) from the receiving end. UDP sends
packets in one-way transmissions.
VBR-nrt: Variable Bit Rate – non real time: With VBR-nrt, cell transfer is variable upon certain criteria.
VC: Virtual Circuit: A virtual circuit is a circuit in a network that appears to be a physically discrete path, but is
actually a managed collection of circuit resources that allocates specific circuits as needed to satisfy traffic
requirements.
4 Ports 11g Wireless ADSL2/2+ Router
245
VCI: Virtual Channel Identifier: A virtual channel identified by a unique numerical tag that is defined by a
16-bit field in the ATM cell header. The purpose of the virtual channel is to identify where the cell should
travel.
VC-Mux: Virtual Circuit based Multiplexing: In VC Based Multiplexing, the interconnect protocol of the carried
network is identified implicitly by the VC (Virtual Circuit) connecting the two ATM stations (each protocol must
be carried over a separate VC).
VPI:Virtual Path Identifier: Virtual path for cell routing indicated by an eight bit field in the ATM cell header.
WAN: Wide Area Network: A WAN covers a large geographical area. A WAN is consisted of LANs and the
Internet is consisted of WANs.
WPA: Wi-Fi Protected Access (WPA) is a specification of standards-based, interoperable security
enhancements that increase the level of data protection and access control for existing and future wireless
LAN systems.
4 Ports 11g Wireless ADSL2/2+ Router
246