1
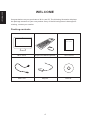
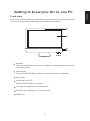
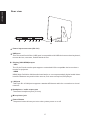
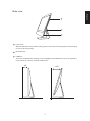
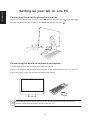
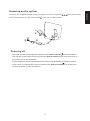
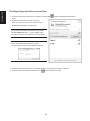
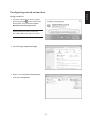
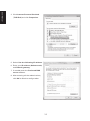
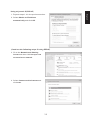
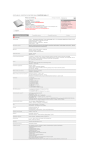
All-in-one PC
All-in-one PC
User Manual
P/N:NC2-21000-003
The warranty does not apply to the products that
have been disassembled by users
No Exposure to Liquids
DO NOT expose to or use near liquids,rain,or moisture.
This symbol of the crossed out wheeled bin indicates that the product(electrical,electronic
equipment,and mercur y-containing button cell batter y)should not be placed in municipal
waste. Check local regualtions for disposal of electronic products.
DO NOT throw the batter y in municipal waste.The symbol of the crossed out wheeled bin
inducates that the batter y should not be placed in municipal waste.
1
English
NO DISASSEMBLY
User Manual
Safety instructions
Read these instructions carefully. Keep this document for future reference. Follow all
warnings and instructions marked on the product.
Turning the product off before cleaning
Unplug this product from the wall outlet before cleaning. Do not use liquid cleaners or
aerosol cleaners. Use a damp cloth for cleaning.
CAUTION for plug as disconnecting device
Observe the following guidelines when connecting and disconnecting power to the power
supply unit:
Install the power supply unit before connecting the power cord to the AC power outlet.
Unplug the power cord before removing the power supply unit from the computer.
If the system has multiple sources of power, disconnect power from the system by
unplugging all power cords from the power supplies.
CAUTION for accessibility
Be sure that the power outlet you plug the power cord into is easily accessible and located
as close to the equipment operator as possible. When you need to disconnect power to the
equipment, be sure to unplug the power cord from the electrical outlet.
Warnings
• Do not use this product near water.
• Do not place this product on an unstable stand or table. If the product falls, it could be
seriously damaged.
• Slots and openings are provided for ventilation to ensure reliable operation of the product
and to protect it from overheating. These openings must not be blocked or covered.
The openings should never be blocked by placing the product on a bed, sofa, rug or other
similar surface. This product should never be placed near or over a radiator or heat register,
or in a built-in installation unless proper ventilation is provided.
• Never push objects of any kind into this product through cabinet slots as they may touch
dangerous voltage points or short-out parts that could result in a fire or electric shock.
Never spill liquid of any kind onto or into the product.
• To avoid damage of internal components and to prevent battery leakage, do not place the
product on a vibrating surface.
Using electrical power
• This product should be operated from the type of power indicated on the marking label.
If you are not sure of the type of power available, consult your dealer or local power
company.
• Do not allow anything to rest on the power cord. Do not locate this product where people
will walk on the cord.
2
Warning! The grounding pin is a safety feature. Using a power outlet that is not
properly grounded may result in electric shock and/or injury.
Note: The grounding pin also provides good protection from unexpected noise
produced by other nearby electrical devices that may interfere with the performance
of this product.
Taking care of your vision
Long viewing hours, wearing incorrect glasses or contact lenses, glare, excessive room
lighting, poorly focused screens, very small typefaces and low-contrast displays could
stress your eyes. The following sections provide suggestions on how to reduce eyestrain.
Eyes
• Rest your eyes frequently.
• Give your eyes regular breaks by looking away from the monitor and focusing on a distant
point.
Display
• Keep your display clean.
• Adjust the display brightness and/or contrast to a comfortable level for enhanced text
readability and graphics clarity.
3
English
• If an extension cord is used with this product, make sure that the total ampere rating of
the equipment plugged into the extension cord does not exceed the extension cord
ampere rating. Also, make sure that the total rating of all products plugged into the wall
outlet does not exceed the fuse rating.
• Do not overload a power outlet, strip or receptacle by plugging in too many devices.
The overall system load must not exceed 80% of the branch circuit rating. If power strips
are used, the load should not exceed 80% of the power strip's input rating.
• This product's power supply is equipped with a three-wire grounded plug. The plug only
fits in a grounded power outlet. Make sure the power outlet is properly grounded before
inserting the power supply plug. Do not insert the plug into a non-grounded power outlet.
Contact your electrician for details.
User Manual
WELCOME
Congratulations on your purchase of All-in-one PC,The following illustration displays
the package contents of your new product.If any of the following items is damaged or
missing, contact your retailer.
Packing contents
User ' s manual
All-in-one PC
Keyboard and Mouse(optional)
Power cord
Adapters
4
User's manual
Drive CD
Getting to know your All-in-one PC
Refer to the following diagram to identify the components on this side of the system.
The front view may differ depending on the model you purchased.
1
2
3
4
5 6 7
1
2
Webcam
The built-in webcame with the built-in digital microphone allows you to start
video chats online.
LED Display
The built-in HD LED display, With an optimal resolution of1600x900,
3
4
Power light
Hard Disk Drive LED
Indicates hard disk drive activity
5 D ecrease
the brightness / contrast button
6
Increase the brightness / contrast button
7
Display off
5
English
Front view
User Manual
Rear view
1
2
3
4
5
6
7
1
Power input connector (DC 19V)
2
USB port
This Universal Serial Bus (USB) port is compatible with USB devices such as keyboard ,
mouse devices, cameras, and hard disk drives.
3
Display(VGA/HDMI)output
◇VGA
The 15-pin D-sub monitor port supports a standard VGA-compatible device such as a
monitor or projector .
◇HDMI
HDMI(High-Definition Multimedia Interface)is an un compressed all-digital audio/video
interface between any audio/video source,such as a set-top box,DVD player.
4
LAN port
This 8-pin RJ-45 LAN port supports a standard Ethernet cable for connection to a local
network.
5
Headphone / audio output port
The stereo headphone jack (3.5mm)
6
Microphone jack
7
Power Button
The power button allows you to turn the system power on or off
6
Side view
2
3
1
Host vents
Sides and bottom vents provide cooling system used to prevent equipment Overheating,
do not cover the openings.
2
Bracket base
3
USB port
This Universal Serial Bus (USB) port is compatible with USB devices such as keyboard ,
mouse devices, cameras, and hard disk drives.
90°
120°
7
English
1
All-in-one PC
User Manual
Setting up your All-in-one PC
Connecting the wired keybaord and mouse
Connect the keyboard and mouse to the USB port on the rear panel ( 1 ). You may also
connect the keyboard and mouse to the USB port on the left side
( 2)
1
2
Connecting the wireless keybaord and mouse
1 . Install batteries to the wireless keyboard and mouse
2 . Insert the wireless keyboard / mouse receiver to the USB port on the All - in - one PC
3 . You can begin using the wireless keyboard and mouse .
The illustrations above are for reference only.Actual appearances and specifications
(wired or wireless)of the keyboard and mouse may vary.
8
Powering on the system
the Power button on the side panel ( 4
) to turn on the system .
4
2
3
1
Powering off
· To put the system into suspend mode,press the Power button
on the side panel.
To bring the system back to the OS,press the Power button again,click the mouse,or
press any key on the keyboard.
· To shut down the system completely,follow the normal Windows shutdown process.
· In the event of a system failure,press and hold the Power button
seconds until the system shuts down..
9
for at least five
English
Connect the supplied Power plug to thejack on the rearpanel ( 1 2 3 ) and then press
User Manual
Configuring a wirelles connection
1. Click the wireless network icon with an orange star
in the windows® Notification
area.
2. Select the wireless access point you
want to connect to from the list and click
Connect to build the connection.
If you cannot find the desired access point,
click the Refresh icon on the upper right
corner to refresh and search in the list again.
Enter the network security key when
connecting to a security-enabled network.
3. After a connection has been established,the connection is shown on the list.
4. You can see the wireless network icon
in the Notification area.
10
Configuring a wired connection
English
Using a static IP
1. Click the network icon with a yellow
warning trlangle
in the Windows®
Notification area and select Open
Network and Sharing Center.
Ensure that you have connected
the LAN cable to the All-in-one PC.
2. Click Change adapter settings
3. Right-click Local Area Connection
and select Properties.
11
User Manual
3. Click Internet Protocol Version4
(TCP IPv4)and click Properties.
5. Select Use the following IP address.
6. Enter your IP address,Subnet mask,
and Default gateway.
7. If needed,enter the Preferred DNS
server address.
8. After entering all the related values,
click OK to finish to configuration.
12
Using a dynamic IP(PPPoE)
2. Select Obtain an IP address
automatically and click OK.
(Continue the following steps if using PPPoE)
3. Go to the Network and Sharing
Center and then click Set up a new
connection or network.
4. Select Connect to the Internet and
click next.
13
English
1. Repeat steps 1-4 in the previous section.
User Manual
5. Select Broadband(PPPoE)and
click Next
6. Enter your User name Password, and
Connection name.Click Connect.
4. Click Close to finish the configuration.
14
English
8. Click the nework icon in the notification
area and click the connection you have
just created.
9. Enter your User name and Password,
Click Connect to the Internet
15