1
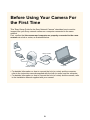
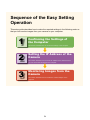
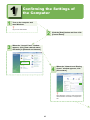
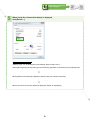
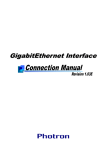
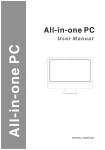
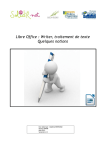
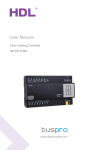
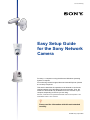
3-878-191-11 (1) Easy Setup Guide for the Sony Network Camera For setup, a computer running the Microsoft Windows Operating System is required. For monitoring camera images, Microsoft Internet Explorer (Version 6.0 or later) is required. This section describes the operation to be followed to confirm the required settings using Windows Vista as an example. Thus, the screens in this manual may be different from the screens of your computer, depending on the OS you are using. Microsoft, and Windows are registered trademarks of Microsoft Corporation in the United States and/or in other countries. Please read the information with this mark attached carefully. © 2008 Sony Corporation Before Using Your Camera For the First Time This “Easy Setup Guide for the Sony Network Camera” describes how to monitor images from your Sony network camera on a computer connected to the same network. First, confirm that the camera and computer are properly connected to the same network via a hub or router, as illustrated below. Hub (or router) Computer Network camera •For detailed information on how to connect the hub (or router) and the computer, refer to the instruction manuals supplied with the hub (or router) and the computer. •For detailed information on how to connect the hub (or router) and the camera, refer to the Installation Manual supplied with your camera. Sequence of the Easy Setting Operation This setup guide describes how to make the required settings in the following order so that you can monitor images from your camera on your computer. 1 Confirming the Settings of the Computer This section describes how to confirm the settings of the computer. 2 Setting the IP Address of the Camera This section describes how to set the IP address of the camera so that you can access the camera from the computer. 3 Monitoring Images from the Camera This section describes how to monitor the camera images on the computer. 1 1 Confirming the Settings of the Computer Turn on the computer and start Windows. Log on as an Administrator. 2 3 Click the [Start] button and then click [Control Panel]. When the “Control Panel” window appears, click [View network status and tasks] in [Network and Internet]. 4 When the “Network and Sharing Center” window appears, click [View status]. When [Status] is not active, make sure that the network cable is connected to a computer and hub. 1 5 Confirming the Settings of the Computer 2 3 When [Local Area Connection Status] is displayed, click [Details…]. When using Windows XP “Address Type” can be displayed by the following steps for steps 3 to 5. Select [All Programs], [Accessories], [Communications], [Network Connections] from the [Start] menu. When [Network Connections] is displayed, double-click [Local Area Connection]. When [Local Area Connection Status] is displayed, double-click [Support]. 1 6 Confirming the Settings of the Computer 2 3 When [Network Connection Details] is displayed, check the DHCP status. Place a check mark in the following box corresponding to the type of address in the “Address Type” box. Be sure to confirm the type of address displayed here, because the operations required in future setting procedures are different, depending on the type of address. “DHCP Enabled Yes” “DHCP Enabled No” is displayed. is displayed. When using Windows XP When using Windows XP “Assigned by DHCP” “Manually Configured” is displayed in the [Local Area Connection Status]. is displayed in the [Local Area Connection Status]. You need do nothing else here. Close any windows opened in step 2 or later, and go to 2 Setting the IP Address of the Camera Go to step 7-a. (Page 7) . (Page 11) 1 7-a 2 Confirming the Settings of the Computer 3 Confirm the IP Address, Subnet Mask, and Default Gateway at step4. Items to are required in future setting operations. Write these values in the respective boxes in advance so that you will be able to refer to these values. Go to step 7-b to change IP address. (You do not usually need to change this address.) IP Address . . . Subnet Mask . . . . . Default Gateway . The Default Gateway may not be displayed, depending on the network environment. In this case, leave the boxes for Default Gateway blank. Go to 2 Setting the IP Address of the Camera (Page 11) . 1 7-b Confirming the Settings of the Computer To change the IP address other than the IP address shown in step 4, follow the steps shown below. 1 Select [Network and Internet], [View network status and tasks] in [Control Panel] from the [Start] menu. 2 Click [View status]. 3 When [Local Area Connection Status] is displayed, click [Properties]. If the message “User Account Control – Windows needs your permission to continue” appears, click [Continue]. 2 3 1 Confirming the Settings of the Computer 2 3 4 Click the [General] tab, place a check mark in the [Internet Protocol Version4 (TCP/IPv4)] box, and then click [Properties]. If a check mark has already been placed in the [Internet Protocol Version4 (TCP/IPv4)] checkbox, click on [Internet Protocol Version4 (TCP/IPv4)], and then click [Properties]. [Internet Protocol Version 4(TCP/IPv4)] and [Internet Protocol Version 6(TCP/IPv6)] are displayed in the item list. Be sure to select [Internet Protocol Version 4(TCP/IPv4)]. When using Windows XP Select [Internet Protocol Version (TCP/IP)]. 5 Select [Use the following IP address] and type the following IP address and Subnet mask in the appropriate boxes. Example: [IP address] 192.168.0.200 [Subnet mask] 255.0.0.0 You will use the IP address and Subnet mask again when “Setting the IP Address of the Camera.” (Page 11) When there is a network administrator, ask for and obtain an IP address from the network administrator. If not, you can obtain an un-used IP address. To obtain an un-used IP address, see “Confirming an IP address that is not currently used in the network” (page 10). Click the [Use the following IP address] radio button and type the IP address and Subnet mask. 1 Confirming the Settings of the Computer 3 2 6 Confirm that [Use the following DNS server addresses] is selected. When you select [Use the following IP address] in step 5, [Use the following DNS server addresses] is selected automatically. You do not need to enter the address in the [Preferred DNS server] and [Alternate DNS server] boxes. Confirm this radio button is selected. 7 Click [OK], and close any windows opened in step 2 or later. 8 The IP address of the computer is set. Go to 2 Setting the IP Address of the Camera (Page 11) Confirming an IP address that is not currently being used in the network 1 Select [All Programs], [Accessories], [Command Prompt] from the [Start] menu. 2 When the “Command Prompt” window appears, type “ping aaa.bbb.ccc.ddd” representing the numbers you want to set as the IP address of the camera in the window described above. For example; type “ping 192.168.0.100,” and then press the [Enter] key on the keyboard. 3 If “Request timed out.” appears in the window, the IP address you entered is not used in the network. (You can then use those numbers as the IP address of the camera.) 10 . 2 Setting the IP Address of the Camera You have to set an IP address of the camera to access the camera from the computer. 1 Turn on the camera if it is not already turned on. 2 Insert the CD-ROM supplied with the camera into the CD-ROM drive of the computer. The “User’s Guide & Utility” window appears automatically in the Web browser. If this window does not appear automatically in the Web browser, double-click on the index.htm file on the CDROM. The following illustration is an example of what is displayed when the CD-ROM supplied with the SNC-RZ25 is used. 3 Click the [Setup] icon for “IP Setup Program” in the “Utility” list. 11 1 4 2 Setting the IP Address of the Camera 3 Click [Run] in the following dialog window. 5 Click [Run] in the following dialog window. 6 The “Welcome” dialog appears. Install the “IP Setup Program” on your computer using the wizard. If the Software License Agreement is displayed, read it carefully, and then click [Accept] if you wish to continue with the installation. Click [Next] or [Yes] to go to the following pages, and then, finally, click [Finish]. 12 1 7 2 Setting the IP Address of the Camera 3 When installation is completed, select [All Programs], [IP Setup Program], and then click [IP Setup Program] from the [Start] menu. If the message “User Account Control – An unidentified program wants access to your computer” appears, click [Allow]. The IP Setup Program starts, and the “Network” tab appears. The IP Setup Program detects the camera connected on the network, and lists it. Information on the cameras detected is displayed in the list. In this Setup Guide, the MAC address is described as “XX-XX-XX-XXXX and the model name as “SNC-xx.” In the list, the value of the actual MAC address and the actual model name are displayed. If the camera information does not appear in the list, the following causes may be considered. You have not set the IP address correctly on your computer. Go back to 1 Confirming the Settings of the Computer on page 4, and check whether or not the IP address is set correctly. You have not connected the camera and the computer on the same network. Check whether or not they are connected correctly, referring to “Before Using Your Camera For the First Time” on page 2. You have not turned the camera on. Check whether or not you have turned the camera on. The security level that is selected for virus scans, a personal firewall, etc., is set to the high level. Reset it to the standard level. For detailed information on how to reset it, refer to the manual for the security software first. If the problem persists, contact the maker of the security software. 13 1 8 2 Setting the IP Address of the Camera Click the camera whose IP address you want to set. The IP address of your camera has been set to the following at the factory. IP address 192.168.0.100 The operations required after this point depend on the type of address displayed in step 6 of 1 Confirming the Settings of the Computer on page 6. “DHCP Enabled Yes” “DHCP Enabled No” is displayed. is displayed. When using Windows XP When using Windows XP “Assigned by DHCP” “Manually Configured” is displayed in the [Local Area Connection Status]. is displayed in the [Local Area Connection Status]. Set the IP address item of the camera to “Obtain an IP address automatically” in accordance with the settings of the computer. Assign the appropriate IP address in accordance with the settings of the computer. Go to step 9-a. (Page 15) Go to step 9-b. (Page 16) 14 3 1 “DHCP Enabled 9-a 2 Setting the IP Address of the Camera 3 No” is displayed When using Windows XP When “Manually Configured” is displayed in the “Address Type” box Set the IP address. Select [Use the following IP address], and type the IP address, Subnet Mask, and Default Gateway, referring to the values used in items to entered in the appropriate boxes in step 7-a of 1 Confirming the Settings of the Computer on page 7. Type the values previously written in . Click this radio button. Enter numbers which are different from the values previously written in , and are not used in the same network. 1) Type the numbers previously written in . Type the numbers previously written in . (When the “Default Gateway” address is not displayed in 7-a in step 7 of 1 Confirming the settings of the computer , leave this box blank.) “Numbers which are different from those in , and not used in the same network” means: For example, if is 10, enter numbers other than 10 that are not used in the same network (for example 100). You cannot use 0 and 255, because they have already been reserved in the network. Also, avoid using numbers 250 through 255, which are frequently used in other networks. When there is a network administrator, ask for and obtain an IP address from the network administrator. If not, you can obtain an un-used IP address. To obtain an un-used IP address, see “Confirming an IP address that is not currently used in the network” (page 10). 1) Go to step 10. (Page 16) 15 1 2 Setting the IP Address of the Camera “DHCP Enabled Yes” is displayed 9-b When using Windows XP When “Assigned by DHCP” is displayed in the “Address Type” box Set the IP address. Select [Obtain an IP address automatically]. Click this radio button. 10 Confirm that the HTTP port No. is set to [80]. The HTTP port No. has been set to [80] at the factory. 16 3 2 1 11 Setting the IP Address of the Camera Type “admin” in the “Administrator name” box, and type “admin” in the “Administrator password” box. “*****” appears in the “Administrator password” box. Enter “admin” in both boxes. The factory settings of both items are “admin.” You cannot change the Administrator name and Administrator password in this window. If you want to change them, refer to “Setting the User – User setting Menu” in the User’ Guide. 12 17 Click [OK]. 3 1 13 2 Setting the IP Address of the Camera 3 If “Setting OK” is displayed, click [OK], and close all dialog boxes opened. You have finished the IP address setting process. Go to the next step to confirm that you have successfully assigned the IP address of the camera. 14 Confirm that you have assigned the IP address of the camera correctly. Close any windows and dialogs opened in step 2 to 13. Select [All Program], [IP Setup Program], and then click [IP Setup Program] from the [Start] menu. Message “User Account Control – An unidentified program wants access to your computer” may appear. In this case, click [Allow]. The IP Setup Program starts. The Network tab window appears. The program detects the network cameras connected to the local network and lists them. When the IP address set (or set automatically) is displayed in the IP address column, the IP address of the camera has been assigned correctly. 18 1 15 You have successfully assigned the IP address of the camera. Go to 3 Monitoring Images from the Camera (page 20) while the “IP Setup Program” window remains open. 19 2 Setting the IP Address of the Camera 3 3 1 Monitoring Images from the Camera Double-click your camera name on the list of cameras in the “IP Setup Program” window. Or, Start the Web browser of the computer on which you set the IP address of the camera, and manually type the IP address set in 9-a of 2 Setting the IP Address of the Camera , in the URL box, and press the [ENTER] key. The welcome page of the camera is displayed. Click [Enter] to display the Main viewer. Click this [Enter] button. If the welcome page is not displayed, go back to step 7 in address again. 2 Setting the IP Address of the Camera (page 13), and set the IP 20 1 2 2 3 Monitoring Images from the Camera Click each dialog buttons shown below to continue installing. Click anywhere in the bar. Select [Install Active X Control…]. The message “Do you want to install this software?” appears and then click [Run]. The message “User Account Control – An unidentified program wants access to your computer” may appear. In this case, click [Allow]. 21 1 3 2 3 Monitoring Images from the Camera When the “Security Warning” dialog appears, click [Install]. The ActiveX Control is installed and the Main viewer appears. The camera images are displayed. This screen is called the Main viewer. This viewer is different based on the model of the camera, or the operation mode. Thus, icons and characters different from those in the Main viewer shown above may be displayed. Even if the icons and characters are different, it is not a problem. Confirm that the camera images are displayed here. After this, you may use the various functions of the camera, referring to the User’s Guide supplied with your camera. 22 When the Main viewer is not displayed correctly: The security level of the Internet Explorer may be set to a level higher than [Medium]. Set the security level of the Internet Explorer to Medium or lower, as follows: 1 Select [Tools] from the Internet Explorer menu bar, then select [Internet Options...] and the [Security] tab in sequence. 2 Select the same mark and name as shown on the icon in the lower right corner in the “Security” tab window (the [Internet] icon (when using the camera via the Internet) or [Local intranet ] icon). To display the icon in the lower right corner, place a check mark in [View], [Status Bar]. 23 Select [Default level] in the “Security” tab window of the “Internet Options” window. When you cannot select [Default level] because it is not displayed in the “Security” tab window, the level has already been set to [Default level]. Click this [Default level] button. The level is automatically set to “Default level” (“Medium,” or “Medium or Higher”) and the level slider appears. When you wish to increase the security level for another purpose, you can set more stringent restrictions. (However, with tighter restrictions, the Main viewer will not be displayed and you cannot monitor camera images on the computer.) Next, try to display the Main viewer following the steps described in 3 again. 24 Monitoring Images from the Camera on page 20 Monitoring camera images via the internet: When you monitor camera images on a computer connected to a network different from the camera: This Easy Setup Guide describes how to monitor camera images on a computer connected to the same network as the camera. You can also monitor camera images on a computer connected to a different network via the Internet. The same network as the camera Internet A network different from that of the camera Computers monitoring the camera images To monitor camera images on a computer connected to a different network, you have to set the router (converting the IP address, etc.) in addition to making the settings described in 1 Confirming the Settings of the Computer and 2 Setting the IP Address of the Camera in this Easy Setup Guide. The setting method depends on the router. For detailed information, refer to the instruction manual supplied with your router, or contact the maker of your router. 25 When using Windows XP When the Main viewer is not displayed correctly: The security level of the Internet Explorer may be set to a level higher than [Medium]. Set the security level of the Internet Explorer to Medium or lower, as follows: 1 Select [Tools] from the Internet Explorer menu bar, then select [Internet Options...] and the [Security] tab in sequence. 2 Select the same mark and name as shown on the icon in the lower right corner in the “Security” tab window (the [Internet] icon (when using the camera via the Internet) or [Local intranet ] icon). 26 Select [Default Level] in the “Security” tab window of the “Internet Options” window. When you cannot select [Default Level] because it is not displayed in the “Security” tab window, the level has already been set to [Default Level]. Click this [Default Level] button. The level is automatically set to “Default Level” (“Medium,” or “Medium or Lower”) and the level slider appears. When you wish to increase the security level for another purpose, you can set more stringent restrictions. (However, with tighter restrictions, the Main viewer will not be displayed and you cannot monitor camera images on the computer.) Next, try to display the Main viewer following the steps described in 3 20 again. 27 Monitoring Images from the Camera on page Monitoring camera images via the internet: When you monitor camera images on a computer connected to a network different from the camera: This Easy Setup Guide describes how to monitor camera images on a computer connected to the same network as the camera. You can also monitor camera images on a computer connected to a different network via the Internet. The same network as the camera Internet A network different from that of the camera Computers monitoring the camera images To monitor camera images on a computer connected to a different network, you have to set the router (converting the IP address, etc.) in addition to making the settings described in 1 Confirming the Settings of the Computer and 2 Setting the IP Address of the Camera in this Easy Setup Guide. The setting method depends on the router. For detailed information, refer to the instruction manual supplied with your router, or contact the maker of your router. 28