1
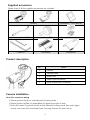
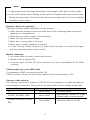
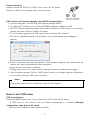
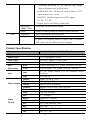
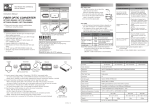
1. Check Frame rate setting based on power frequency - Set Frame rate to 25Hz if your region is using 50Hz(PAL) power frequency, or set to 30Hz for 60Hz(NTSC) region. (OSD : System Frame rate). 2. Shutter mode setup based on installation environment - INDOOR : Controls brightness for the best video quality at indoor environment. - OUTDOOR : Controls brightness for the best video quality at outdoor environment. - INDOOR/OUTDOOR-ANTI BLUR : Improves the motion blurring phenomenon than Indoor/Outdoor mode under dark environment but the brightness decreases relatively. 3. DC12V or AC24V(500mA over) power adapter must be used. 4. Please contact to qualified service personnel in case of product damage. Do not attempt to repair product by yourself. 5. Please avoid external shock and vibration on the product. 6. Do not install product under excessive heat or cold environment. (recommended operation temperature is 0°C~50°C) 7. Do not target lens to the sun. Image sensor might be damaged 8. Do not open the product under any circumstances, it could void the warranty. Natural disaster like lightning, flood will need charge for repair. 1 English Caution for installation and usage Feature HD-SDI video digital signal HD-SDI(High Definition Serial Digital Interface) is non-compressed digital signal for broadcasting, and there is no quality loss of high definition images. 2MP, Full HD high resolution picture quality Full HD(1920x1080) provides 6 times higher resolution than SD level camera, and more clear video image can be achieved through 1/3”, 2Megapixel progressive CMOS. High performance under low light environment High performance quality can be achieved under low light environment by optimizing the image handling technology on CMOS sensor. (B/W : 0.0005 Lux / Color : 0.2Lux@50IRE, F.1.2, 3100K, DSS OFF) Indoor/Outdoor function Minimizes the motion blur of object from slowly moving person(Indoor) to fast moving vehicle(outdoor) by optimizing the signal processing and controls brightness automatically to perform the best video image 3D-DNR 3D-DNR function efficiently removes video noise in dark environment, and shows clear image as a result. True Day & Night function Camera senses the surrounding brightness automatically, and insert/remove the IR-CUT filter to get the best sensitivity performance. WDR/BLC/ACE/HLC Under backlight condition, you can select the most suitable function among WDR, BLC, ACE and HLC. Auto Focusing function Auto Focusing function performs Correct and Quick focusing of camera by just one click. After the power is turned on, camera can judge reasonable brightness to execute Auto Focusing. If the environment is bright enough, it performs Auto focusing, meanwhile it keeps previous focus condition if the environment is dark. Privacy support Camera can support up to 28 privacy masking areas. OSD control and F/W upgrade OSD control and Firmware upgrade of camera can be achieved from PC or Webgate DVR through RS485 communication. 2 Supplied accessories Please check if all the supplied accessories are included. Camera Installation / User Manual Monitoring Cable(IR18) Hood Screw(IR18) Screw & Plastic Anchor L Wrench Hood(IR48) Hood(IR18) Product description No Name 1 Camera 2 Camera Hood 3 RS485 Port 4 Power input connector 5 Video output BNC connector Camera installation Auto Iris connector wiring 1) Move joystick shortly to enter Manual Focusing mode. 2) Move joystick up(Tele) or down(Wide) to adjust the angle of view. 3) Push the center of joystick shortly to exit Manual Focusing mode then push again shortly one more time to activate Auto Focusing function for exact focus. 3 <Note> 1) To adjust exact focus, the image will enlarge 2 times bigger under Auto Focusing mode. 2) In case of AF models, Zoom Tracking function will work together with zoom control under Manual Focusing mode. But this function will work normally when the focus is adjusted well before zoom control. Notice for Auto Focus operation Following conditions might make failure of auto focusing . 1. When there are changes of the scene while Auto Focus is working(sudden movement, appearance or disappearance). 2. When there are sudden change of the brightness. 3. When shooting low contrast image. 4. When there is strong light in the scene. 5. When there is foreign substance on the lens. 6. If auto focusing is failed, please try to adjust focus manually or try auto focus again with the scene which have strong contrast. Monitor connection 1. Use coaxial cable to connect camera with monitor. 2. Monitor needs to support SDI. 3. If monitor does not have SDI input connector, you may use additional SDI to HDMI converter. Cautions when you connect BNC cable The impedance of BNC connector should be 75Ω. If 50Ω connector is used, the transmission distance will be reduced approx. 10m. Caution in cable selection The maximum transmission distance of HD-SDI will vary depending on cable manufacturer and installation environment. Please refer to the below table to select suitable coaxial cable. Cable type Transmission distance Purpose 2V about 100M For analog signal 4C-FB(T), 4C-HFB(T), RG59 about 150M High-foamed, double or triple shielded cable is recommended 5C-FB(T), 5C-HFB(T), L-6CHD, RG6 about 200M Dedicated cable for HD-SDI 4 Power connection Adapter should be DC12V or AC24V. But in case use DC power, Please be careful in the polarity when connect power. OSD control and Firmware upgrade using RS485 communication 1. Connect Webgate’s HD-SDI DVR with camera through RS485. 2. Configure PTZ settings such as Protocol(C1080), Baudrate, Address in DVR. 3. Run HD Camera Upgrade program then enter IP address of DVR which is connected to camera and enter channel number of camera. - PC for Firmware upgrade and DVR need to be connected with network. - HD Camera Upgrade program and firmware can be downloaded from Webgate’s website. 4. Select a Firmware and click Load button. Then firmware upgrade will proceed and the camera will reboot automatically after completion. - Image will stop until boot completes. - If image stops over 1min, select Aux1 of selected channel to reboot camera again. 5. After firmware upgrade, DVR or CMS(Control Center) can change camera configuration by controlling camera’s OSD menu remotely. <Note> 1) All setting values will be initialized in case of F/W upgrade. How to use OSD menu OSD menu function If pressing MENU button over 1 sec continuously, OSD menu will be shown. - If OSD menu is not closed, it will be closed automatically in 1 minute. (Changed configuration value will not be saved) - Bold font with underline means factory default. 5 OSD MENU MANUAL FOCUSING Function Move joystick shortly to activate Manual Focusing mode - Zoom Tracking function will be activated when control Zoom. But this function will work normally when the focus is adjusted well before zoom control. - If you do not exit the menu, it will be closed automatically in 2 second. LENS DC This menu is activated only in AF models. Focus can be adjusted by automatically or manually - PWR-ON AF : After power is turned on, camera judges the ambient brightness. If the brightness is enough, it performs Auto Focusing automatically, but if the brightness is not enough, it keeps the previous focus condition. - Correct AF : Camera performs focusing over the fullrange (it takes max. 40seconds) - Quick AF : If the angle of view and focus is roughly adjusted condition, Quick AF performs fast focusing. But, if the focus is vague condition, Quick AF may not show good result. (it takes max. 10seconds) - Manual : Move joystick to up(Tele), down(Wide), left(Near),right(Far) to adjust angle and focus manually. DAY & Color Maintains Color(Day) mode regardless brightness. B&W Maintains B&W(Night) mode regardless brightness. NIGHT Auto In accordance with brightness, camera switches Color mode and B&W mode automatically. - LUX LEVEL(LOW, MIDDLE, HIGH) : This value is the standard for Day & Night switching. If high is selected, camera will turn to Night(B/W) mode at higher LUX level than MIDDLE or LOW. - ANTI HUNT(LOW, MIDDLE, HIGH) : This value is the standard for threshold of Day & Night switching. Higher setting value will reduce the flickering by IR-CUT filter switching caused from misjudgment. - DELAY TIME(3~30sec) : Judgment period for Day & Night switching EXPOSURE BRIGHTNESS (8, 0~20) Adjust the brightness of image. The more High value it has, the more bright image it shows SHUTTER - Indoor : controls brightness to show the best video quality at indoor environment. - Outdoor : controls brightness to show the best video 6 - quality at outdoor environment. Indoor-Anti Blur : It shows better anti-blur performance at dark indoor environment, but the brightness level decrease a little. Outdoor-Anti Blur : It shows better anti-blur performance at dark outdoor environment, but the brightness level decrease a little. - Manual : It fixes shutter speed within 1/30 ~ 1/60000. - COLOR ANTI-FLICKER Removes Flicker problem due to the discordance of light frequency. DSS (OFF, x2~x10) At night time or very dark condition, it accumulates the amount of light into the image pixels and provides more clear video image. But the higher setting value may make more severe motion blur accordingly. AGC (7, 1~10) It will amplify video gain according to the light condition, but it will also increase noise level. AWB - AUTO : This mode automatically adjusts color white balance between 1,700°K ~ 11,000°K. - PRESET : Shoot a white paper in front of camera and press MENU button then white balance working will stop suitable for the condition. You must do this process again if light condition is changed. - MANUAL : User can select color temperature among 3300°K, 4300°K, 7600°K and adjust the details by CHROMA (10, 0~20) Adjust Chroma level. SHARPNESS (5, 0~10) Adjust sharpness. The higher value will show more clear video image H-MIRROR Mirror image. Left and right will be reversed V-MIRROR Flip image. Up and down will be reversed. Digital ZOOM Zoom image by 16 steps. (1~16) PRIVACY This is for privacy zone masking KELVIN, R-GAIN and B-GAIN value. IMAGE - ZONE NO : Supports total 28 areas (0~27) - ZONE OP : Whether to use or not of selected area X, Y-POS : Set the X,Y start position of an area X, Y-SIZE : Set the width and height of an area COLOR(WHT,YEL,CYN,GRN,MAG,RED,BLU,BLK) : Select color for masking. - TRANS(0~4) : Set transparency of masking. SHADING Before execute the SHADING function, shoot a white 7 DET paper in front of the camera, and do SHADING DET. If not, abnormal video might be output. SHADING It compensates the difference of light caused by lens. To use this function, you should run Shading DET function first at System menu. WDR BLC This 3D backlight compensation function allows bright and dark area to be seen clearly together. - WDR WGT(0~4) : Select image mix ratio. The higher value, the bright part of the image appear more clearly Back light compensation function. - BLC LEVEL(LOW, MIDDLE, HIGH) : Set BLC level. - BLC OSD : Displays BLC area on the screen. - BLC POS-X, Y : Set X, Y start position. - BLC SIZ-X,Y : Set Width and Height size. - MASK : If there is very bright portion inside BLC area, this portion can be removed from the calculation of BLC compensation. This brightness level for masking can be decided by below MASK LEVEL. - MASK LEVEL(0~10) : Set brightness level for Masking. HLC High Light Compensation. If there is very bright portion inside a scene, camera can mask the portion, and the portion is removed from the calculation for exposure control. - LEVEL(5, 0~10) : Set the brightness level for masking. - Color : Set masking color ACE Adaptive Contrast Enhancement. Enhances image quality by raising the (ON, OFF) brightness of dark areas. DNR (LOW, MIDDLE, HIGH) FRAMERATE (25Hz, 30Hz) SYSTEM Reduce image noise under low light condition Power frequency 60Hz(NTSC) : 30Hz(fps) video output Power frequency 50Hz(PAL) : 25Hz(fps) video output MODEL Displays model name CAM ID Max. 8 digits for camera name. Supports alphanumeric and some special characters RS485 ID Set ID for RS485 VERSION Displays firmware version VIDEO Full-Scale(BT 709), Comp-Scale(BT 601) support RESOLUTION Set output resolution (1080p/720p). DIGITAL OUT / IR-LED Provides control signal output for sub light which is synchronized with image process. - Smart IR : When IR-LED is activated at darkness condition, the intensity of IR-LED is automatically 8 controlled according to the distance with target object (Activated only at IR models) - DURATION(0~20) : Set the one cycle duration of TTL signal output (unit : msec) - POLARITY : Set the output level of TTL signal. (0 : 0V , 1 : 3.3V) * Output cycle is decided by 30Hz/25Hz. EXIT BAUDRATE (9600, 57600) Set RS485 communication speed. RESET Makes all setting values to factory default condition SAVE&EXIT Save configuration and exit menu. EXIT Without saving configuration, exit menu. If there is no further action in menu, after 1 minute, OSD menu will exit without saving changes. Product Specification Model C1080BL-IR48-AF / C1080BL-IR18-AF Video Sensor Type 1/3” 2.1Megapixel CMOS Total Pixels 1920(H) x 1080(V) = 2.1M pixels Scanning System Progressive Scan Min B/W 0.0005Lux@50IRE, F1.2, 3100K, DSS(OFF), AGC(10) Illumination Color 0.2Lux@50IRE, F1.2, 3100K, DSS(OFF), AGC(10) Lens DC iris, 2.8mm~10mm, F1.2, IR Corrective Mega Pixel Lens type DC Auto Iris Output 1(BNC 1.0 Vp-p, 75Ω) Resolution 1080p 30fps / 25fps HD-SDI SMPTE 292M compatible Distance approx. 200m of RG6, 150m of RG59 Control Method OSD(Internal Joystic), DVR, CMS(Control Center) Filter True Day & Night AGC 1 ~ 10 steps Mirror Horizontal / Vertical WDR OFF, 0 ~ 4 setup BLC OFF, LOW, MIDDLE, HIGH ACE OFF, ON DNR OFF, LOW, MIDDLE, HIGH DSS OFF, x2 ~ x10 Lens Video Output Video Control 9 White Balance AUTO, PRESET, MANUAL Electric Shutter INDOOR, OUTDOOR, INDOOR-ANTI BLUR, OUTDOOR-ANTI BLUR, MANUAL(12 steps), ANTI-FLICKER ANTI-FLICKER Digital Zoom 0 ~ 16 steps Lens Shading OFF, ON HLC 0 ~ 10 steps Privacy OFF/ON (28 Zones ) Smart IR OFF/ON Control Interface RS485 Upgrade Firmware / OSD Control Strobe for external light TTL level(3.3v) Electricity Power Consumption C1080BL-IR18-AF DC 12V ± 10%, 4W / AC 24V ± 10%, 6W C1080BL-IR48-AF DC 12V ± 10%, 5W / AC 24V ± 10%, 8W C1080BL-IR18-AF 88(W) x 118(H) x 198(D) mm C1080BL-IR48-AF 120(W) x 140(H) x 254(D) mm C1080BL-IR18-AF 720g C1080BL-IR48-AF 1600g Mechanical Dimension Weight Environments Operation Temp. / Humidity 0 ºC ~ 50 ºC / 0%RH ~ 80%RH Certifications Certifications KC, FCC, CE, RoHS 10 Dimension (unit : mm) C1080BL-IR18-AF C1080BL-IR-48-AF 11 Warranty Product name HD-SDI Camera Model name Warranty term C1080BL-IR48-AF, 1080BL-IR18-AF Date of purchase 20 - - 2 years after Warranty term 20 - - purchase Serial number Name Customer’s address Contact Name Address of shop(Company name) Contact ◈ Please fill out vacant area before sending products. ★ For customer service ★ Please read this manual again before requesting customer service. Any simple malfunctions due to customer’s misunderstanding on the product could be resolved by customer. How to request service? Please inform details of malfunctions correctly. Free or non free repair will be decided based on details of warranty card. WebGate Division Daemyung Enterprise Co., Ltd. 6F Hanlim Venture Town B/D 689-6, Geumjeong Dong, Gunposi, Gyeonggido,Korea Main : TEL : +82-31-428-9300 Client Service : TEL : +82-1644-3421 The damages caused from following conditions will be repaired by customer’s cost. 1. Any damage comes from customer’s carelessness 2. When improper power is entered 3. When you repair unit by yourself 4. Any damage comes from natural disaster like lightning, flood, etc. 5. Consumable parts replacement 12 This equipment has been tested and found to comply with the limits for a Class A digital device, pursuant to part 15 of the FCC Rules. These limits are designed to provide reasonable protection against harmful interference when the equipment is operated in a commercial environment. This equipment generates, uses, and can radiate radio frequency energy and, if not installed and used in accordance with the instruction manual, may cause harmful interference to radio communications. Operation of this equipment in a residential area is likely to cause harmful interference in which case the user will be required to correct the interference at his own expense. Modifications not expressly approved by the manufacturer could void the user’s authority to operated the equipment under FCC rules. Correct Disposal of This Product (Waste Electrical & Electronic Equipment) (Applicable in the European Union and other European countries with separate collection systems) This marking on the product, accessories or literature indicates that the product and its electronic accessories (e.g. charger, headset, USB cable) should not be disposed of with other household waste at the end of their working life. To prevent possible harm to the environment or human health from uncontrolled waste disposal, please separate these items from other types of waste and recycle them responsibly to promote the sustainable reuse of material resources. Household users should contact either the retailer where they purchased this product or their local government office, for details of where and how they can take these items for environmentally safe recycling. Business users should contact their supplier and check the terms and conditions of the purchase contract. This product and its electronic accessories should not be mixed with other commercial wastes for disposal. Correct disposal of batteries in this product (Applicable in the European Union and other European countries with separate battery return systems.) This marking on the battery, manual or packaging indicates that the batteries in this product should not be disposed of with other household waste at the end of their working life. Where marked, the chemical symbols Hg, Cd or Pb indicate that the battery contains mercury, cadmium or lead above the reference levels in EC Directive 2006/66. If batteries are not properly disposed of, these substances can cause harm to human health or the environment. To protect natural resources and to promote material reuse, please separate batteries from other types of waste and recycle them through your local, free battery return system. 13 Global CCTV AUSTRALIA Tel : +61 8 9 !" : #$%""&'com.au Webite: www.GlobalCCTV. Mail: Info@GlobalCCTV. 14