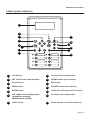
1
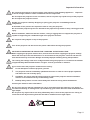
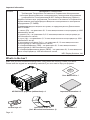
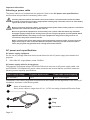
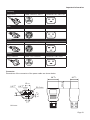
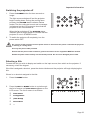
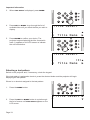
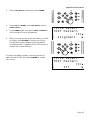
Projector NP-PH1201QL Important Information Important Information NEC Locations In Europe NEC Display Solutions Europe GmbH Address: Landshuter Allee 12-14 D-80637 München, Germany Telephone: +49 89 99699 0 Email: [email protected] In North America NEC Display Solutions of America, Inc. Address: 500 Park Boulevard, Suite 1100 Itasca, Illinois 60143, U.S.A. Telephone: +1 800 836 0655 In Oceania Australia AWA Limited. Address: 151 Arthur Street Homebush West NSW 2140 Australia Customer Call Centre Telephone: 0297647777 Email Address: [email protected] New Zealand Visual Group Ltd. Address: 28 Walls Road Penrose Auckland New Zealand Telephone: 095250740 Email Address: [email protected] In South America Brazil Videocorp Brasil Address: Avenida Conselheiro Rodrigues Alves Nro. 820 / Sala 15 - 2° Andar - Vila Mariana São Paulo - SP - Brasil CEP 04014-002 Telefone: + 55-11-2924.2910 / + 55-11-2924.2911 Page 2 In Asia NEC Display Solutions, Ltd. Address: 686-1, Nishioi, Oi-Machi, Ashigarakami-Gun, Kanagawa 258-8533, Japan Telephone: +81 465 85 2369 NEC Solutions (China) Co.,Ltd. Address: Rm 1903, Shining Building,35 Xueyuan Rd, Haidian District Beijing 100191, P.R.C. Telephone: +8610 59342706 NEC Hong Kong Ltd. Address: 25/F.,The Metropolis Tower,10 Metropolis Drive, Hunghom, Kowloon, Hong Kong Telephone: +852 2369 0335 NEC Taiwan Ltd. Address: 7F, No.167, SEC.2, Nan King East Road, Taipei, Taiwan, R.O.C. Telephone: +886 2 8500 1710 NEC Asia Pacifi c Pte Ltd. Address: 401 Commonwealth Drive, #07-02, Haw Par Technocentre, Singapore 149598 Telephone: +65 6 799 6188 NEC Corporation of Malaysia Sdn. Bhd. Address: 33rd Floor, Menara TA One, 22, Jalan P. Ramlee, 50250 Kuala Lumpur, Malaysia Telephone: +6 03 2178 3600 (ISDN) Important Information • This document (Important Information) covers information about projector safety and cautions only. Please be sure to read the user’s manual contained in the supplied CD-ROM, which provides detailed product, usage information, general notes, and troubleshooting for your NEC projector. • Dieses Dokument (Important Information) liefert Ihnen lediglich Informationen zur Sicherheit Ihres Projektors und über Vorsichtsmaßnahmen. Bitte lesen Sie das auf der mitgelieferten CD-ROM enthaltene Bedienungshandbuch, das Ihnen detaillierte Informationen zu diesem Produkt und seinem Gebrauch, allgemeine Hinweise und Hinweise zur Fehlerbehebung zu Ihrem NEC-Projektor liefert. • Ce document (Important Information) contient uniquement des consignes de sécurité pour le projecteur et des mises en garde. Veuillez lire le Mode d’emploi contenu dans le CD-ROM inclus, qui fournit pour des informations détaillées sur votre projecteur NEC, des informations d’utilisation, des notes générales et des informations pour la résolution des problèmes. • Questo documento (Important Information) contiene solo informazioni riguardanti la sicurezza del proiettore e le avvertenze. Assicuratevi di leggere il manuale dell’utente contenuto all’interno del CD-ROM in dotazione, che fornisce informazioni dettagliate sul prodotto e sul suo utilizzo, note generali e risoluzione dei problemi per il proiettore NEC. • Este documento (Important Information) proporciona exclusivamente información sobre la seguridad del proyector y precauciones. Asegúrese de leer el Manual del usuario que se encuentra en el CD-ROM suministrado, el cuál proporciona información detallada del producto y de su manejo, notas generales, así como la resolución de problemas para su proyector NEC. • Este documento (Important Information) aborda apenas informação sobre segurança e cuidados. Por favor, assegure-se que lê o manual do utilizador incluído no CD-ROM fornecido que faculta informações detalhadas sobre o produto, informação sobre o uso, notas gerais e resolução de problemas do seu projector NEC. • Detta dokument (Important Information) omfattar endast säkerhetsinformation om projektorn och varningar. Var noga med att läsa bruksanvisningen som finns i den medföljande CD-skivan, där du hittar detaljerad produktinformation, användarinformation, allmän information och felsökning för din NEC-projektor. • Этот документ (Important Information) содержит информацию только о безопасности проектора и предостережениях. Ознакомьтесь с руководством пользователя на поставляемом компакт-диске, которое содержит подробную информацию об изделии, информацию по использованию, общие замечания и устранение неисправностей проектора NEC. • ၼ (Important Information)ఊ ጃരႵቓၷ ྼႬ, ფၷ ૌጓ Ⴒิ൸ ಏ ႆབగడ. NEC ጃരႵቓၷ ႊጓ Ⴔዲ ත, ແွ Ⴒิ, ၿ ྿൲ Ⴒิ, Ⴔ ጚ Ⴒิੱ ಏ ႆఊ ା Ⴔૈ౮ CD-ROM ၷ ແွႊ අంၫ ಋཙ ႀფའཙဒ. .• ﻳﺿﻡ ﻫﺫﺍ ﺍﻟﻣﺳﺗﻧﺩ )ﻣﻌﻠﻭﻣﺎﺕ ﻣﻬﻣﺔ( ﻣﻌﻠﻭﻣﺎﺕ ﺣﻭﻝ ﺳﻼﻣﺔ ﺍﻟﺟﻬﺎﺯ ﻭﺍﻟﺗﻧﺑﻳﻬﺎﺕ ﺍﻟﻭﺍﺟﺏ ﻣﺭﺍﻋﺎﺗﻬﺎ ﻓﻘﻁ ﻳﺭﺟﻰ ﺍﻟﺗﺄﻛﺩ ﻣﻥ ﻗﺭﺍءﺓ ﺩﻟﻳﻝ ﺍﻻﺳﺗﺧﺩﺍﻡ ﺍﻟﻣﻭﺟﻭﺩ ﻓﻲ ﺍﻟﻘﺭﺹ ﺍﻟﻣﺩﻣﺞ ﺍﻟﻣﺭﻓﻕ ﻭﺍﻟﺫﻱ ﻳﺣﺗﻭﻱ ﻋﻠﻰ ﻣﻌﻠﻭﻣﺎﺕ ﺗﻔﺻﻳﻠﻳﺔ ﺣﻭﻝ ﺍﻟﻣﻧﺗﺞ ﻭﻣﻌﻠﻭﻣﺎﺕ ﺍﻻﺳﺗﺧﺩﺍﻡ . ﺧﺎﺻﺗﻙNEC ﻭﻣﻼﺣﻅﺎﺕ ﻋﺎﻣﺔ ﺑﺷﺄﻥ ﺍﺳﺗﻛﺷﺎﻑ ﺍﻷﻋﻁﺎﻝ ﻭﺇﺻﻼﺣﻬﺎ ﺑﺟﻬﺎﺯ ﻋﺭﺽ Page 3 Important Information Contents Symbols used in the User Manual................................................................................................5 Electrical and physical specifications.........................................................................................5 Non-accessible laser parameters.................................................................................................5 Labels....................................................................................................................................................6 Product Label..................................................................................................................................6 Other labels.....................................................................................................................................7 Label locations................................................................................................................................7 Location of laser aperture...............................................................................................................8 Interlock switches.............................................................................................................................8 Location...........................................................................................................................................8 Interlock switch control block diagram........................................................................................8 Important safeguards.......................................................................................................................9 Laser precautions...........................................................................................................................9 General precautions.......................................................................................................................9 Installation and handling..............................................................................................................10 Power supply.................................................................................................................................13 Fire and shock precautions.........................................................................................................14 Cleaning.........................................................................................................................................14 Light module..................................................................................................................................15 Networking configuration.............................................................................................................15 Compliance with international standards................................................................................16 RF Interference..............................................................................................................................16 Machine Noise Information Regulation.......................................................................................16 European Waste Electrical and Electronic Equipment (WEEE) Directive...............................16 DOC compliance notice................................................................................................................16 Turkish RoHS information relevant for Turkish market............................................................16 Ukrainian RoHS information relevant for Ukrainian market.....................................................17 What’s in the box?...........................................................................................................................18 Basic setup and operation instructions....................................................................................19 Positioning the screen and projector..........................................................................................19 Selecting a power cable...............................................................................................................20 AC power work specifications.....................................................................................................20 Connecting the power supply......................................................................................................22 Switching the projector off...........................................................................................................23 Selecting a title..............................................................................................................................23 Selecting a test pattern.................................................................................................................24 Adjusting the lens.........................................................................................................................26 Adjusting the brightness of the projected image (Light Setup)...............................................26 Assembling the lens.....................................................................................................................27 Inserting a new lens......................................................................................................................29 Removing the lens........................................................................................................................31 Cleaning and replacing the rear air filters..................................................................................33 Cleaning and replacing the front air filter...................................................................................35 Control panel reference.................................................................................................................37 Full information about operating, connecting and setting up the projector can be found in the User Manual, located on the CD. Page 4 Important Information Symbols used in the User Manual LASER WARNING: this symbol indicates that there is a potential hazard of eye exposure to laser radiation unless the instructions are closely followed. ELECTRICAL WARNING: this symbol indicates that there is a danger of electrical shock unless the instructions are closely followed. WARNING: this symbol indicates that there is a danger of physical injury to yourself and/or damage to the equipment unless the instructions are closely followed. NOTE: this symbol indicates that there is some important information that you should read. Specifications are subject to change without notice. Electrical and physical specifications Mains Voltage Operating Temperature Operating Temperature (Portrait Mode) Storage Temperature Operating Humidity Weight Power Consumption Thermal Dissipation 200-240 VAC 50-60 Hz (single phase) 0°C to 35°C (32 to 95F) 0°C to 30°C (32 to 86F) -10°C to 50°C (14 to 122F) 20% to 80% non-condensing 67 kg (148 lb) without lens 1600 W 5027 BTU/hr Non-accessible laser parameters Wavelength Laser Power for classification Total internal power Apparent Source Size Divergence Mode of operation Modulation, due to frame rate 435 - 462 nm < 330 mW < 35 W < 10 mm at aperture ≤ ± 7.3 - 28°, lens dependent CW 23 - 192 Hz Page 5 Important Information Labels Product Label 1 4 NWGQ E176726 Made in UK This cabinet is constructed of Metal(AL) and Plastic(PC/ABS) Tegangan dan Frekuensi : 200-240V ~ 50/60Hz Produksi UK This device complies with part 15 of the FCC Rules. Operation is subject to the following two conditions: (1) This device may not cause harmful interference, and (2) This device must accept any interference received, including interference that may cause undesired operation. CAN ICES-3 (A)/NMB-3(A) 2 Complies with FDA performance standards for laser products except for deviations pursuant to Laser Notice No. 50, dated June 24, 2007 NEC Display Solutions, Ltd. 4-28, Mita 1-chome, Minato-ku, Tokyo, Japan 115-364C Contact address for EMEA NEC Display Solutions Europe GmbH Landshuter Allee 12-14 80637 Munich, Germany 5 3 Within the Product Label: 1 Manufacturer’s Identification Manufacturer’s name, address and projector model name 2 Certification Statement Complies with FDA performance standards for laser products except for deviations pursuant to Laser Notice No. 50, dated June 24, 2007 3 Hazard Warning Symbol 4 Serial Number 5 Explanatory Label Laser Radiation. Avoid direct eye exposure. Class 3R laser product. Wave length: 455-470 nm Max output: ˂ 330 mW. IEC/EN 60825-1:2007 Page 6 1 Important Information Other labels Aperture Label with Hazard Warning Symbol Protective Housing Label (optionally interlocked) CAUTION CLASS 4 LASER LIGHT WHEN OPEN AVOID EYE OR SKIN EXPOSURE TO DIRECT OR SCATTERED LIGHT Due to the product having no customer service access, the Protective Housing Label is not present on the exterior of the product. Protective Housing Labels are only used on the interior of the product. The label is located under the top cover. See Label locations for information on label locations, including protective housing label. Label locations NWGQ E176726 Made in UK This cabinet is constructed of Metal(AL) and Plastic(PC/ABS) Tegangan dan Frekuensi : 200-240V ~ 50/60Hz Produksi UK This device complies with part 15 of the FCC Rules. Operation is subject to the following two conditions: (1) This device may not cause harmful interference, and (2) This device must accept any interference received, including interference that may cause undesired operation. CAN ICES-3 (A)/NMB-3(A) Complies with FDA performance standards for laser products except for deviations pursuant to Laser Notice No. 50, dated June 24, 2007 NEC Display Solutions, Ltd. 4-28, Mita 1-chome, Minato-ku, Tokyo, Japan 115-364C Contact address for EMEA NEC Display Solutions Europe GmbH Landshuter Allee 12-14 80637 Munich, Germany 1 PH1201QL 2 3 Product Label Protective Housing Label (under the top cover and only visible to service personnel) Aperture Label with Hazard Warning Symbol CAUTION CLASS 4 LASER LIGHT WHEN OPEN AVOID EYE OR SKIN EXPOSURE TO DIRECT OR SCATTERED LIGHT 1 2 3 Page 7 Important Information Location of laser aperture 1 1 Laser aperture Interlock switches Five interlock switches installed at the main frame, inside the cover, will power-off the system individually when activated. Location 1 Will be activated when the top cover is removed. 2 Will be activated when the lens is removed. 3 Will be activated when the side cover is removed. 4 x2. Will be activated when the front cover is removed. 5 Will be activated when the lens access cover is removed. 1 3 2 4 Interlock switch control block diagram 54 V POWER SUPPLY 12 V DC-DC Regulator OR Interlock Switch Page 8 DC-DC Converter Laser Driver 5V MicroController Laser Diodes 5 Important Information Important safeguards These safety instructions are to ensure the long life of your projector and to prevent fire, shock, damage and injury. Please read them carefully and heed all warnings. Laser precautions This product is classified as Class 3R of IEC60825-1 and 21 CFR Part 1040.10 Safety Standards. CAUTION Visible Laser Light Do Not Stare into Beam No eyewear is required for unintentional viewing. Avoid staring into visible beams. GaN Laser Diodes OD N/A @ 462 nm Class 3R laser CLASS 3R LASER PRODUCT This Laser Product is designated as Class 3R during all procedures of operation. LASER LIGHT - AVOID DIRECT EYE EXPOSURE. Do not point laser or allow laser light to be directed or reflected toward other people or reflective objects. Direct or scattered light can be hazardous to eyes and skin. There is a potential hazard of eye exposure to laser radiation if the included instructions are not followed. Caution – use of controls or adjustments or performance of procedures other than those specified herein may result in hazardous radiation exposure. Class 2 range. Class 3R laser product, per IEC 60825-1, has limited risk of laser hazard and is safe for non-intrabeam viewing. It is recommended to keep the audience 100 cm away from the exit plane of the lens hood and reduce the laser hazard to a much safer class 2. Non-laser emission. There remains non-laser emission from the projection lens. This portion of emission has been tested per IEC/EN 62471 to be Risk Group 1 (Low Risk). General precautions This is a Class A product. It has been tested and found to comply with the limits for a Class A digital device, pursuant to Part 15 of the FCC Rules. These limits are designed to provide reasonable protection against harmful interference when the equipment is operated in a commercial environment. Operation of this equipment in a residential area is likely to cause harmful interference in which case the user will be required to correct the interference at his own expense. In order to reduce any interference with radio and television reception, use a signal cable with ferrite core attached. Use of signal cables without a ferrite core attached may cause interference with radio and television reception. Page 9 Important Information The unit is never to be operated if the unit is defective or the cover or seal is damaged. The end user is not allowed to open or modify the product. No maintenance allowed by end user. Do not open the cabinet. There are no user serviceable parts inside. No service is allowed except by authorized personnel. Installation and handling HEALTH PRECAUTIONS TO USERS VIEWING 3D IMAGES Before viewing, be sure to read health care precautions that may be found in the user’s manual included with your 3D eyeglasses or your 3D compatible content such as Blu-ray Discs, video games, computer’s video fi les and the like. To avoid any adverse symptoms, heed the following: • • • • • • Do not use 3D eyeglasses for viewing any material other than 3D images. Allow a distance of 2 m/7 feet or greater between the screen and a user. Viewing 3D images from too close a distance can strain your eyes. Avoid viewing 3D images for a prolonged period of time. Take a break of 15 minutes or longer after every hour of viewing. If you or any member of your family has a history of light-sensitive seizures, consult a doctor before viewing 3D images. While viewing 3D images, if you get sick such as nausea, dizziness, queasiness, headache, eyestrain, blurry vision, convulsions, and numbness, stop viewing them. If symptoms still persist, consult a doctor. View 3D images from the front of the screen. Viewing from an angle may cause fatigue or eyestrain. The projector must be installed only by suitably qualified personnel, in accordance with local building codes. Consult your dealer for information about transporting and installing the projector. Do not attempt to transport and install the projector yourself. The projector must be installed by qualified technicians in order to ensure proper operation and reduce the risk of bodily injury. Do not point the projection beam toward other people or reflective objects. The projector should be installed as close to the power outlet as possible. The power connection should be easily accessible, so that it can be disconnected in an emergency. Place the projector on a flat, level surface in a dry area away from dust and moisture. Tilting the front of the projector up or down from level could reduce laser life. Do not put the projector on its side when the laser is on. Doing so may cause damage to the projector. Page 10 Important Information Do not place the projector in direct sunlight, near heaters or heat radiating appliances. Exposure to direct sunlight, smoke or steam could harm internal components. Do not expose the projector to rain or moisture, and do not place any liquids on top of the projector. Do not expose the projector to dust. Handle your projector carefully. Dropping or jarring your projector could damage internal components. A minimum of four persons are required in order to carry the projector. Do not hold the projector by the lens. Otherwise the projector may tumble or drop, causing personal injury. Before installation, make sure that the surface, ceiling or rigging that is to support the projector is capable of supporting the combined weight of the projector and lens. Do not place heavy objects on top of the projector. Turn off the projector and disconnect the power cable before moving the projector. CAUTION ON CARRYING THE PROJECTOR / HANDLING THE OPTIONAL LENS When shipping the projector with the lens, remove the lens before shipping the projector. Always attach the dust cap to the lens whenever it is not mounted on the projector. The lens and the lens shift mechanism may encounter damage caused by improper handling during transportation. The cooling fan settings need to be configured when using the projector in a location at an altitude of approximately 5500 feet/1600 meters or higher. Consult your dealer in advance. If you wish to have the projector installed on the ceiling: • • • • Do not attempt to install the projector yourself. The projector must be installed by qualified technicians in order to ensure proper operation and reduce the risk of bodily injury. In addition, the ceiling must be strong enough to support the projector and the installation must be in accordance with any local building codes. Backup safety chains or wires should always be used with ceiling mount installations. Consult your dealer for more information. Do not cover the lens with the supplied lens cap or equivalent while the projector is on. Doing so can lead to distorting or melting of the cap and burning your hands due to the heat emitted from the light output. Do not place any objects which are easily affected by heat, in front of the projector lens. Doing so could lead to the object melting from the heat that is emitted from the light output. Page 11 Important Information The projector can be operated in numerous positions, as described below. PITCH The projector can be positioned at any angle around the pitch axis. Please consider the following: • • When the projector is within 15° to either side of the vertical plane, the temperature of the operating environment needs to be between 0 and 30°C. In every other position, the operating temperature is between 0 and 35°C. ROLL The projector can be positioned in numerous positions around the roll axis. Please consider the following: • • When the projector is within 15° to either side of the vertical plane (in portrait mode) with the inputs pointing upward, the temperature of the operating environment needs to be 0 to 30°C. In every other position, the operating temperature is between 0 and 35°C. ±15° ±15° 0-30°C not allowed 0-30°C 0-35°C 0-35°C 0-35°C • The projector cannot be positioned within 15° to either side of the vertical plane (in portrait mode) with the inputs pointing downward. 0-35°C 0-30°C ±15° ±15° Pitch Roll Portrait mode installation requires fitting a safety guard underneath the projector (as shown in the illustration below). Unauthorised personnel should not attempt to carry out portrait mode installation. Please contact NEC or a dealer if you wish to use the projector in portrait mode. Page 12 Important Information Projectors are not designed to be stacked on top of each other unless a rigging frame is used. When stacking projectors, the stack MUST be vertical, to ensure that the stresses are distributed to all four chassis corners. Power supply The projector is so designed that it operates with the power supply voltage described below. • AC200–240V 8.2 A 50/60Hz Single-phase Ensure that your power supply fits this requirement before attempting to use your projector. Use only the power cable provided. Use a power cable that meets the standards and power supply voltage of the country where you are using the projector. Refer to user’s manual for details on connecting the power cable. Ensure that the power outlet includes a Ground connection, as this equipment MUST be earthed. Handle the power cable carefully. A damaged or frayed power cable can cause electric shock or fire. • • • • Do not bend or tug the power cable excessively. Do not place the power cable under the projector, or any heavy object. Do not cover the power cable with other soft materi- als such as rugs. Do not heat the power cable. Placing the power cable and the signal cable closely to each other can cause beat noise. If this happens, keep the two separated so that beat noise is not generated. Beat noise is corruption of the picture often seen as a rolling band moving through the image. Do not touch the projector or the power plug during a thunder storm. Doing so can cause electrical shock or fire. When installed on the ceiling, install the breaker in a location that is easy to reach by hand. Do not unplug the power cable from the wall outlet or projector when the projector is powered on. Doing so can damage the projector. Do not unplug in the following circumstances: • • While projecting images While cooling after the projector has been turned off. (The POWER button LED blinks in green, the SYSTEM status indicator blinks in amber and the LCD screen shows the following message: “Now processing, please wait...”) Do not turn of the AC power for 90 seconds after the laser is turned on and while the POWER indicator is blinking green. Doing so could cause premature laser failure. Use of a wall outlet with a 20 A or more circuit breaker is recommended. Page 13 Important Information Fire and shock precautions Ensure that there is sufficient ventilation and that vents are unobstructed to prevent potentially dangerous concentrations of ozone and the build-up of heat inside your projector. Allow at least 12 inches (30cm) of space between your projector and a wall. In particular, clear a space of 27.6 inches (70 cm) or more in front of the air outlet on the rear surface and 19.8 inches (50 cm) or more in front of the air outlet on the Laser side. Do not install the projector close to anything that might be affected by its operational heat, for instance, polystyrene ceiling tiles, curtains etc. Prevent foreign objects such as paper clips and bits of paper from falling into your projector. Do not attempt to retrieve any objects that might fall into your projector. Do not insert any metal objects such as a wire or screwdriver into your projector. If something should fall into your projector, disconnect it immediately and have the object removed by a qualified service person. Turn off the projector, unplug the power cable and have the projector serviced by a qualified service personnel under the following conditions: • • • • • When the power cable or plug is damaged or frayed. If liquid has been spilled into the projector, or if it has been exposed to rain or water. If the projector does not operate normally when you follow the instructions described in the user manual. If the projector has been dropped or the cabinet has been damaged. If the projector exhibits a distinct change in perfor- mance, indicating a need for service. Keep any items such as magnifying glass out of the light path of the projector. The light being projected from the lens is extensive, therefore any kind of abnormal objects that can redirect light coming out of the lens, can cause unpredictable outcome such as fire or injury to the eyes. When using a LAN cable, for safety, do not connect to the connector for peripheral device wiring that might have excessive voltage. Connect the LAN cable only to a computer LAN connection. Other similar connectors may have a dangerously high voltage source. Do not look into the lens while the projector is on. Serious damage to your eyes could result. Do not try to touch the air outlets on the projector during normal projector operation as it is hot. Cleaning Turn off the projector and unplug the power cable before cleaning the cabinet or replacing the laser. Do not touch the projector or the power plug with wet hands. Doing so can cause electrical shock or fire. Page 14 Important Information Clean the cabinet periodically using a damp, not wet, cloth. If heavily soiled, use a mild detergent. Never use strong detergents or solvents such as alcohol or thinner. Use a blower or lens paper to clean the lens, and be careful not to scratch or mar the lens. Light module A light module containing multiple laser diodes is included in the product as the light source. These laser diodes are sealed in the light module. No maintenance or service is required for the performance of the light module. End user is not allowed to replace the light module. Contact a qualified distributor for light module replacement and further information. Networking configuration Do not make changes to the networking configuration unless you understand what you are doing, or have taken advice from your Network Manager. If you make a mistake, it is possible that you will lose contact with the projector. Always double-check your settings before applyinjg any changes to your networking configuration. Always keep a written note of the original settings, and any changes you have made. Software update should NOT be carried out except by, or with the supervision of, NEC Service personnel. Page 15 Important Information Compliance with international standards RF Interference FCC The Federal Communications Commission does not allow any modifications or changes to the unit EXCEPT those specified by NEC in this manual. Failure to comply with this government regulation could void your right to operate this equipment. This equipment has been tested and found to comply with the limits for a Class A digital device, pursuant with Part 15 of the FCC Rules. These limits are designed to provide reasonable protection against harmful interference when the equipment is operated in a commercial environment. This equipment generates, uses, and can radiate radio frequency energy and, if not installed and used in accordance with the instruction manual, may cause harmful interference to radio communications. Operation of this equipment in a residential area may cause harmful interference, in which case the user will be responsible for correcting any interference. Machine Noise Information Regulation The highest sound pressure level is less than 70 dB (A) in accordance with EN ISO 7779. European Waste Electrical and Electronic Equipment (WEEE) Directive NEC is fully committed to minimising Waste Electrical and Electronic Equipment. Our products are designed with reuse, recycling and recovery of all components in mind. To this end, at end of life, your projector may be returned to NEC or its agent so that the environmental impact can be minimised. DOC compliance notice This Class A digital apparatus meets all requirements of the Canadian Interference-Causing Equipment Regulations. WARNING TO CALIFORNIA RESIDENTS: Handling the cables supplied with this product will expose you to lead, a chemical known to the State of California to cause birth defects or other reproductive harm. WASH HANDS AFTER HANDLING. Turkish RoHS information relevant for Turkish market EEE Yönetmeliğine Uygundur. Page 16 Important Information Ukrainian RoHS information relevant for Ukrainian market English Declaration of Conformity with the requirements of Technical Regulation on the Restriction of the Use of Certain Hazardous Substances in Electrical and Electronic Equipment (adopted by Order №1057 of Cabinet of Ministers of Ukraine) The Product is in conformity with the requirements of Technical Regulation on the Restriction of the Use of Certain Hazardous Substances in Electrical and Electronic Equipment (TR on RoHS). The content of hazardous substance with the exemption of the applications listed in the Annex №2 of TR on RoHS: 1. Lead (Pb) – not over 0,1wt % or 1000wt ppm; 2. Cadmium (Cd) – not over 0,01wt % or 100wt ppm; 3. Mercury (Hg) – not over 0,1wt % or 1000wt ppm; 4. Hexavalent chromium (Cr6+) – not over 0,1wt % or 1000wt ppm; 5. Polybrominated biphenyls (PBBs) – not over 0,1wt % or 1000wt ppm; 6. Polybrominated diphenyl ethers (PBDEs) – not over 0,1wt % or 1000wt ppm. NEC Display Solutions, Ltd. Ukrainian Декларація про Відповідність Вимогам Технічного Регламенту Обмеження Використання деяких Небезпечних Речовин в електричному та електронному обладнанні (затвердженого Постановою №1057 Кабінету Міністрів України) Виріб відповідає вимогам Технічного Регламенту Обмеження Використання деяких Небезпечних Речовин в електричному та електронному обладнанні (ТР ОВНР). Вміст небезпечних речовин у випадках, не обумовлених в Додатку №2 ТР ОВНР: 1. свинець(Pb) – не перевищує 0,1 % ваги речовини або в концентрації до 1000 частин на мільйон; 2. кадмій (Cd) – не перевищує 0,01 % ваги речовини або в концентрації до 100 частин на мільйон; 3. ртуть(Hg) – не перевищує 0,1 % ваги речовини або в концентрації до 1000 частин на мільйон; 4. шестивалентний хром (Cr6+) – не перевищує 0,1 % ваги речовини або в концентрації до 1000 частин на мільйон; 5. полібромбіфеноли (PBB) – не перевищує 0,1% ваги речовини або в концентрації до 1000 частин на мільйон; 6. полібромдефенілові ефіри (PBDE) – не перевищує 0,1 % ваги речовини або в концентрації до 1000 частин на мільйон. NEC Display Solutions, Ltd. Page 17 Important Information Russian Декларация о Соответствии Требованиям Технического Регламента об Ограничении Использования некоторых Вредных Веществ в электрическом и электронном оборудовании (утверждённого Постановлением №1057 Кабинета Министров Украины) Изделие соответствует требованиям Технического Регламента об Ограничении Использования некоторых Вредных Веществ в электрическом и электронном оборудовании (ТР ОИВВ). Содержание вредных веществ в случаях, не предусмотренных Дополнением №2 ТР ОИВВ: 1. свинец (Pb) – не превышает 0,1 % веса вещества или в концентрации до 1000 миллионных частей; 2. кадмий (Cd) – не превышает 0,01 % веса вещества или в концентрации до 100 миллионных частей; 3. ртуть (Hg) – не превышает 0,1 % веса вещества или в концентрации до 1000 миллионных частей; 4. шестивалентный хром (Cr6+) – не превышает 0,1 % веса вещества или в концентрации до 1000 миллионных частей; 5. полибромбифенолы (PBB) – не превышает 0,1 % веса вещества или в концентрации до 1000 миллионных частей; 6. полибромдифеноловые эфиры (PBDE) – не превышает 0,1 % веса вещества или в концентрации до 1000 миллионных частей. NEC Display Solutions, Ltd. What’s in the box? Make sure your box contains everything listed. If any pieces are missing, contact your dealer. Please save the original box and packing materials if you ever need to ship your projector. User Manual CD x 1 NP-PH1201QL projector (without lens) x 1 service keys x 2 Page 18 lens motor cover x 1 (incl. M2 socket head screws x 2) Important Information x 1 lens holder x 1 Important Information Basic setup and operation instructions Positioning the screen and projector 1. Install the screen, ensuring that it is in the best position for viewing by your audience. 2. Mount the projector, ensuring that it is at a suitable distance from the screen for the image to fill the screen. Set the adjustable feet so that the projector is level, and perpendicular to the screen. The drawing below shows the bottom of the projector. The positions of the feet for table mounting, and the fixing holes for ceiling mounting are clearly visioble. The illustration also shows the positions of the four handles which facilitate safe carriage. 1 1 2 2 3 3 4 4 2 2 4 4 4 4 3 3 2 2 1 1 1 Four adjustable feet 2 Six M6 holes for ceiling mount (set A) The screws should not penetrate more than 15 mm into the body of the projector. 3 Handles for safe carriage 4 Six M6 holes for ceiling mount (set B) The screws should not penetrate more than 15 mm into the body of the projector. Page 19 Important Information Selecting a power cable The power cable is not included with the projector. Refer to the AC power work specifications section below and provide the necessary power cable. Carefully read the contents described in this section before connection and connect the cables according to the proper procedure. Inappropriate handling may cause fatal, serious or other bodily injuries due to fire or electric shock. Before connecting the power cables, check that the main power switch of the projector is turned off. Implement the connection with AC power shut off. Be sure to ground the equipment to ensure safety. Use a power cable that meets the standards and power supply voltage of the country where you are using the projector (see AC power work specification below), and always connect the equipment to the ground. If the ground is not connected, it may cause electrical shocks. When connecting the power cable plugs to the AC IN and the electrical outlet, securely insert the plugs all the way in. If the connection between the power cable plug and the electrical outlet is loose, the plug area may generate heat, causing burns and accidents. AC power work specifications AC power supply equipment Do not use any voltage other than those shown below for the AC power supply connected to the projector: • 200–240V AC, single phase, power, 50/60Hz AC power supply cable for the projector The projector is equipped with an IEC60320 C20 inlet to connect an AC power supply cable. Use an IEC60320 C19 compliant AC power cable connector and ensure that the connector meets the following current capacity specifications. Power supply voltage Projector input current Power cable current capacity AC 200-240 V 8.2 A 250 V 15 A or higher Furthermore, use cables, plugs and connectors that are suitable for the regulations of the country of installation, as shown in the following table. Users in North America: Use a power cable no longer than 4.5 m / 14.76 ft according to National Electrical Code. 1 2 1 Cable 2 Plug 3 Page 20 3 Connector Important Information Germany Plug: CEE7 Cable: H05VV-F 3G1.5 Connector: IEC 320 C19 Cable: SJT 3 x AWG 14 Connector: IEC 320 C19 Cable: VCTF 3 x 2.0mm Connector: IEC 320 C19 Cable: RVV 300/500 Connector: GB17465.1 USA Plug: NEMA 6-15P Japan Plug: JIS C 8303 China Plug: GB2099 Connector Dimensions of the connector of the power cable are shown below. +0 +0 13 ± 0,2 R3.5 min +0,5 6,0 +0,5 -0 2,5 -0 8 ± 0,2 2,5 +0,5 -0 20 -0,7 20 min 28 -0,9 + 0,5 7 -0 Unit: mm Page 21 Important Information Connecting the power supply When the projector is viewed from the back, the AC mains inlet 1 is located on the right hand side, toward the rear. Make sure the power switch 2 above the inlet is in the OFF position, then push the mains connector in firmly. Ensure that the power outlet includes a ground connection as this equipment MUST be earthed. Handle the power cable carefully and avoid sharp bends. Do not use a damaged power cable. 1 2 Switching the projector on 1. Make sure the power switch above the AC mains inlet is in the OFF position. Connect the power cable between the mains supply and the projector, then turn the power switch on. See Connecting the power supply above. The SYSTEM status indicator lights a steady amber to show that the projector is now in STANDBY mode. 2. (optional step) If no button is pressed within 30 seconds of the projector entering STANDBY mode, the control panel becomes locked. To unlock the control panel, press and hold the KEY LOCK button for one second or longer. 3. To switch from STANDBY to ON mode, press and hold the POWER button for three seconds or longer. During the startup process, the SYSTEM status indicator flashes green. When the projector is fully switched on, the SYSTEM status indicator lights a steady green. Page 22 Important Information Switching the projector off 1. Press the POWER button for three seconds or longer. The light source switches off and the projector begins cooling down. During the cooling down process, the SYSTEM status indicator flashes amber. The fan continues to work and a message is displayed on the LCD screen to show that the projector is still not switched off. When the fan switches off, the SYSTEM status indicator lights a steady amber to indicate that the projector is now in STANDBY mode. 2. To switch the projector off completely, turn the power switch OFF. Do not turn off the projector from the power switch or disconnect the power cord while the projector is working or cooling down. Use only the power cable provided. Ensure that the power outlet includes a ground connection as this equipment MUST be earthed. Handle the power cable carefully and avoid sharp bends. Do not use a damaged power cable. Selecting a title Connect the title you wish to display and switch on the input source, then switch on the projector. If necessary, unlock the keypad. If the title is assigned a shortcut, press the shortcut button and the projector will begin displaying the title. If there is no shortcut assigned to the title: 1. Press the MENU button. 2. Press the LEFT or RIGHT button to cycle through the list of menus until Title Select appears on the LCD screen. The list of menus is as follows: • • • • • Title Select Configuration Title Select (Title Setup) Information ... Page 23 Important Information 3. When Title Select is displayed, press DOWN. 4. Press LEFT or RIGHT to go through the list of available titles until you reach the title you wish to display. Title Select Title Name 5. Press ENTER to confirm your choice. The projector begins displaying the title. An asterisk mark (*) appears on the LCD screen to indicate the current selection. Title Select (*) Title Name Selecting a test pattern Switch on the projector and, if necessary, unlock the keypad. If the test pattern is assigned a shortcut, press the shortcut button and the projector will begin displaying the test pattern. If there is no shortcut assigned to the test pattern: 1. Press the MENU button. 2. Press the LEFT or RIGHT button to cycle through the list of menus until Title Select appears on the LCD screen. Page 24 Title Select Important Information 3. When Title Select is displayed, press DOWN. 4. Press LEFT or RIGHT until Title Select is set to TEST Pattern. 5. Press DOWN again, then press LEFT or RIGHT to cycle through the list of test patterns. 6. When you have arrived at the test pattern you wish to display, press ENTER to confirm your choice. The projector begins displaying the test pattern. An asterisk mark (*) appears on the LCD screen to indicate the current selection. To cancel test pattern display, cycle through the list again and select OFF, then press ENTER to confirm your choice. Title Select TEST Pattern (*) Alignment Title Select TEST Pattern (*) Off Page 25 Important Information Adjusting the lens 1. Press MENU to access the menus. Title Select 2. 3. 4. Press the LEFT or RIGHT arrow button repeatedly until the Configuration menu is displayed. Press the DOWN arrow button once to access submenus, then navigate to the Lens Control submenu by pressing the LEFT or RIGHT arrow button. • 5. Configuration Configuration Lens Control Press ENTER to toggle between Lens Position and Focus Zoom modes. Adjust lens position, zoom and focus using the arrow buttons as follows: • Lens Position In Lens Position mode, each arrow button shifts the lens in the indicated direction. • In Focus Zoom mode, UP and DOWN adjust focus, LEFT and RIGHT adjust zoom. When adjustment is complete, press EXIT to return to the higher menu level. Press EXIT repeatedly until you reach the top level and exit the menus. Focus + Zoom + • • - Adjusting the brightness of the projected image (Light Setup) To adjust the brightness of the projected image: 1. Press the LIGHT button. The Light Setup screen appears. 2. Press the LEFT and RIGHT arrow buttons to adjust the light output. 3. When adjustment is complete, press EXIT to return to the higher menu level. Press EXIT repeatedly until you reach the top level and exit the menus. Page 26 Light Setup Adjust 100 [%] (*) Important Information Assembling the lens 1. Detach the retaining plates 1 from the lens holder. Use a 2.5 mm Allen key to remove the M3 socket head screws 2 . 1 2 2 1 2 2 2. Insert the lens into the lens holder. Align the notches on the lens 3 with the notch on the holder 4 . 3 3 4 Page 27 Important Information 3. Keeping the lens and holder aligned, secure the retaining plates removed earlier. 4. Attach the motor cover using the two M2 socket head screws 5 provided. Ensure the connector cable 6 is not trapped. 6 5 5 Page 28 Important Information Inserting a new lens Before changing the lens, always make sure the projector is switched off and fully disconnected from its power supply. When changing the lens, avoid using excessive force as this may damage the equipment. Take care to preserve the original lens packaging and protective caps for future use. The projector will not power on without the lens fitted. 1. Remove the remote lock cover next to the lens aperture - loosen the two captive screws 1 and release the lock 2 using the provided key. 1 1 2 2. Insert the lens into the aperture so that the wide ends of the keyhole slots 3 accommodate the location pins 4 . 3 3 3 4 4 4 Page 29 Important Information 3. As you fit the lens inside the aperture, insert the remote lock connector 5 in the socket 6 . 5 6 4. Once inside the aperture, rotate the lens clockwise to lock it into position, then tighten the two captive screws 7 . 7 7 5. Close the remote lock cover, making sure the excess cable is not trapped. Tighten the two captive screws 8 and the lock 9 using the provided key. 8 8 9 Page 30 Important Information Removing the lens Before changing the lens, always make sure the projector is switched off and fully disconnected from its power supply. When changing the lens, avoid using excessive force as this may damage the equipment. Take care to preserve the original lens packaging and protective caps for future use. The projector will not power on without the lens and lens hood fitted. 1. Loosen the two captive screws 1 on the lens remote lock cover, then release the lock 2 using the provided key. 1 1 2 2. Remove the cover. Page 31 Important Information 3. Loosen the two captive screws 3 on the lens and rotate the lens counterclockwise until it stops. 3 3 4. Unplug the remote lock connector 4 and pull the lens out of its socket. 4 Page 32 Important Information Cleaning and replacing the rear air filters Before changing the filters, always make sure the projector is switched off and fully disconnected from its power supply. When changing the filters, avoid using excessive force as this may damage the equipment. 1. Loosen the two knobs 1 holding the filter cover by turning them counterclockwise. Use a Phillips screwdriver if necessary. 1 1 The knobs are not removable. 2. Tilt the filter cover to open it. 3. Remove the filters. Grasp the top and bottom or left and right ends of each air filter and remove it by pulling toward you. Page 33 Important Information 4. If you are replacing the filters, skip this step. To clean the filters, use a vacuum cleaner brush attachment to vacuum away dust from the air filters. Avoid making direct contact without an attachment or using a nozzle attachment. 5. Mount the air filters to the projector. Look for an arrow (AIR FLOW↑) indicating the installation direction on the side of the air filter. Point the arrow towards the projector. 6. Close the filter cover. 7. Tighten the knobs clockwise to secure the cover. Page 34 Important Information Cleaning and replacing the front air filter 1. Loosen the two captive screws on the filter cover and remove the cover. 2. Remove the air filter. 3. If you are replacing the filter, skip this step. To clean the filter, use a vacuum cleaner brush attachment to vacuum away dust from the air filter. Avoid making direct contact without an attachment or using a nozzle attachment. Page 35 Important Information 4. Mount the air filter to the projector. Look for an arrow indicating the installation direction on the side of the air filter. Point the arrow towards the projector. 5. Mount the filter cover to the projector. Tighten the two captive screws to secure the cover. Page 36 Important Information Control panel reference 1 2 3 9 4 5 10 11 6 12 7 13 8 14 1 LCD display 8 not used in this configuration 2 KEY LOCK button (with indicator) 9 POWER button (with indicator) 3 Arrow buttons 10 EXIT button 4 MENU button 11 DOUSER button (with indicator) 5 ENTER button 12 LIGHT ON / OFF button (with indicator) 13 not used in this configuration 14 Preset buttons 1 to 8 (with indicators) 6 7 not used in this configuration (except for entering alphanumeric values) LIGHT button Page 37