1
VP-311DVI Automatic DVI / Audio Switcher
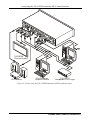
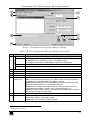
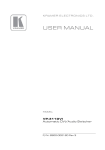
Figure 1: VP-311DVI Automatic DVI / Audio Switcher
Table 2: VP-311DVI Automatic DVI / Audio Switcher Features
5
6
7
8
Function
The red LED lights when receiving signals from the
Infra-red remote control transmitter
POWER Switch
Illuminated switch for turning the unit ON or OFF
INPUT SELECT Buttons
Press the INPUT button (from 1 to 3) to select the input to
switch to the output
BALANCED OUT
Connects the balanced stereo audio output to a balanced
Terminal Block Connector stereo audio acceptor
LINE
OUT 3.5mm Mini Jack
Connect to an unbalanced stereo audio output
IN 3.5mm Mini Jack
Connect to unbalanced stereo audio inputs (from 1 to 3)
OUT RCA Connector
Connect to a digital audio (S/PDIF) output
S/PDIF
IN RCA Connectors
Connect to digital audio (S/PDIF) inputs (from 1 to 3)
9
10
RS-232 DB 9F Port
PRIORITY SETUP Dipswitches
11
12
13
14
REMOTE Terminal Block
OUT DVI-I Connector
IN DVI-I Connectors
ETHERNET Connector
15
12V DC
2
3
4
4
Feature
IR Receiver
AUDIO
#
1
Connect to the PC or the Remote Controller
Dipswitches for setup of the machine: DIPs 1, 2, 3 are for
setting the signal priorities, DIP 4 is for setting to the
manual or the AUTO mode (see section 5.1)
Connects to a dry contact switch (see section 5.2)
Connect to the DVI acceptor
Connect to the DVI sources (from 1 to 3)
Connect to the PC or other Serial Controller through computer
networking
+12V DC connector for powering the unit
KRAMER: SIMPLE CREATIVE TECHNOLOGY