1
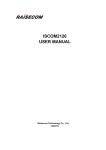
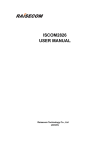
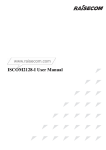
U-Pointer for Presentation User Manual Ver 1.2.7.3 APS Australia Pty Ltd 1300 550 403 U-POINTER USER MANUAL ISCommunications.Co., Ltd. Contents 1. Preface 1-1 What’s in the package 1-2 Hardware description 1-3 In the bundle CD 1-4 General Cautions 2. Installing & Running Process Overview 2-1 Installation process 2-2 Running Process 3. Mounting U-pointer Body 3-1 Mounting using Adhesive Tape 3-2 Mounting using Screw Hole 3-3 Mounting on the ceiling 4. How to Use U-pointer Pen 5. Initial Installation Process 5-1 Installing U-pointer Software 5-2 Start Wizard 5-3-1 Configuration 5-3-2 Alignment 5-3-3 Calibration 6. Running U-pointer 6-1 Running U-pointer 6-2 U-pointer Menu Description 6-2-1 Configuration 6-2-1 Start Wizard 6-2-3 Calibration 6-2-4 Execute i-Pro 6-2-5 Virtual Keyboard 7. Trouble Shooting -2- U-POINTER USER MANUAL ISCommunications.Co., Ltd. 1. Preface 1-1 What’s in the package Thank you for purchasing U-pointer. In the package, U-pointer and accessories are included. Please check below accessories and if there are accessories not included, contact to sales shop. 1-2 Hardware description To follow the instructions on this manual, It is necessary to learn the name of each part. Front Cover Screw hole Vertical knob Supporter Horizontal knob USB connector -3- U-POINTER USER MANUAL ISCommunications.Co., Ltd. Front Cap Rear Cap Tip Body 1-3 In the bundle CD In the bundle CD, driver, U-pointer software, application software i-Pro, User’s manual are included. Before using U-pointer, you should install driver and U-pointer software. After this process, you can use Upointer as wireless interactive mouse on the beamed screen. To experience the virtual electronic board, iPro should be installed. 1-4 General Caution - Clean the Front surface of the U-pointer regularly so that dust on the front surface does not influence input ray. - When cleaning the front surface, use only fabric and exclusive cleaning liquid for glass. - When writing, do not press U-pointer Pen strongly. Just touch smoothly like when you draw on whiteboard with a marker pen. - Be careful not to drop the U-pointer Pen. U-pointer pen tip is designed precisely. - Energy saving lamp may cause abnormal operation of the U-pointer. Prevent the ray of the energy saving lamp to input through the optical axis of U-pointer directly. - U-pointer utilized precisely designed optical unit. Do not open the front cover. 1-5 System requirements - Hardware requirements CPU: higher than Pentium RAM: higher than 512MB Hard Disk: higher than 20MB USB: USB 2.0 CD-ROM: higher than 8x - Operating system requirements Windows XP, Vista, Windows 7 -4- U-POINTER USER MANUAL ISCommunications.Co., Ltd. 2. Installation & Running Process Overview 2-1 Installation Process. Installation process is described in the flow chart. See details on the following chapters. Please remind that the U-pointer and a projector are needed during installation process and when to connect is designated. 2-2 Running Process You have installed two kinds of application software, U-pointer and i-Pro. There are two stages you can use U-pointer. The first stage is only to run U-pointer and the second stage is to run i-pro after running Upointer. First stage Second stage In the stage 1, you can use U-pointer pen as wireless interactive mouse. During presentation, by -5- U-POINTER USER MANUAL ISCommunications.Co., Ltd. clicking or dragging on the beamed screen, you can control window.-It’s basic function. In the stage 2, you can experience whole function that i-Pro provides. Your actions during presentation, drawing, writing, control window…, is realized on the virtual electronic board. Using basic function only or Using full function is your choice during presentation. To use only basic function, run only u-pointer, or to use full function of U-pointer run u-pointer firstly and then run i-Pro sequentially. -6- U-POINTER USER MANUAL ISCommunications.Co., Ltd. 3. Mounting U-pointer The basic of mounting U-pointer is to place of the U-pointer close to a projector and to stick the u-pointer firmly. Close placement of U-pointer from a projector will decrease the degree of disagreement of optical axis between a projector and the U-pointer. It will show better performance. After you choose position to place the U-pointer, fix U-pointer with an adhesive tape or screw hole in bottom of the supporter. 3-1 Mounting with Adhesive Tape If you want to place the U-pointer on top of table or projector, stick round shaped adhesive tape on bottom of the supporter and place the u-pointer where you want to mount. Before mounting U-pointer, clean the surface to where the U-pointer will be mounted. 3-2 Mounting with Screw Hole The screw hole of U-pointer is standard size and shape that is used for ordinary camera. Prepare screw and fixing structure in advance and mount u-pointer with prepared screw. This method is good for you to mount U-pointer on a ceiling with projector. Another variation of this method is to use mini camera tripod and to place on a table. With same method to fix a camera on a tripod, you can fix the U-pointer on the tripod. 3-3 Mounting on the ceiling If a projector is installed on the ceiling, it is necessary to mount the U-pointer on the bottom of the projector supporting structure. In this case, the U-pointer is mounted upside down so that the screen image captured by the U-pointer become upside down. So when you mount the U-pointer on the ceiling or similar situation occurs, set configuration of the U-pointer in the U-pointer program. See detail chapter 5-3-1. -7- U-POINTER USER MANUAL ISCommunications.Co., Ltd. 4. U-pointer Pen Caution : Before insert battery, Confirm (+) and (-) orientation of battery to be inserted into Pen mouse. Caution When you insert battery into the U-pointer Pen, Be careful to the polarity of battery. U-pointer Pen provides Five mouse actions, Click, Double Click, Right button, Drag and Drawing. Click : Touch an icon or a menu on the window screen softly. Double Click : Touch an icon or a menu on the window screen two times. Right button : Resemble right buttom of ordinary mouse, keep in touch with desired point over than 1.5 seconds Drag : Touch and drag an object on the screen same as ordinary mouse drag. Drawing : Same as pen writing. -8- U-POINTER USER MANUAL ISCommunications.Co., Ltd. 5. Installing software Insert the U-pointer CD into your CD/DVD-ROM driver. The Installation assistant will run automatically. Follow the instructions in the installation assistant afterwards. If the assistant does not run automatically, double click the “ setup.exe” under CD/DVD-ROM directory and then the Installation assistant will run. Caution : Do not connected USB cable during the U-pointer installation process. -9- U-POINTER USER MANUAL ISCommunications.Co., Ltd. 5-1. Installing U-pointer Software 1. Click Install U-pointer in the installation assistant. Installation begins. 2. Select a language and click confirm. 3. Installation dialog box will appear, and then click next. During installation, it is recommended to quit other application program. - 10 - U-POINTER USER MANUAL ISCommunications.Co., Ltd. 4. Click Install, installation begins. 5. Installation ends. U-pointer icon will be created on the windows background. Double click the U-pointer icon, U-pointer will run. If the U-pointer is run firstly, Start wizard will help you to set configuration of the Upointer. - 11 - U-POINTER USER MANUAL Check Point 1. Check point 2. ISCommunications.Co., Ltd. You can find the U-pointer driver in the control panel of your computer. If you Select create a desktop icon in the step 4, U-pointer icon will appear on windows background. Check point 3. When installation ends, U-pointer directory will be created on a menu. - 12 - U-POINTER USER MANUAL ISCommunications.Co., Ltd. 5-2. Start Wizard To use the U-pointer, proper setting of the U-pointer configuration is needed. Start Wizard will help you to set the configuration of the U-pointer to your computer. When you run the U-pointer software firstly after installation, Start wizard will appear automatically. From the second running of the U-pointer software, Start Wizard will not appear but the U-pointer will run. Before run Start wizard, connect the U-pointer and a projector to your computer. Caution : Before run Start wizard, connect the U-pointer and a projector to your computer. 5-2-1. Configuration Click the U-pointer icon, Dialog box appears on the Window background. 1. Select the U-pointer model : Choose the U-pointer model you would like to use. The basic mode is Default. 2. Options : In case you choose Short through model, Registering to Start Program Group : if you want to run the U-pointer when your computer starts, check the Registering to Start Program Group. Mounting the U-pointer on a ceiling : When you mount the U-pointer upside down, check this selection. - 13 - U-POINTER USER MANUAL ISCommunications.Co., Ltd. 5-2-2. Alignment of U-Pointer The captured beamed screen is displayed on the frame of dialog box. During alignment process, align the direction and angle by seeing the captured screen image on the dialog box. 1. Click "Start Alignment". The screen captured by U-Pointer shows up on the wall. 2. Rotate knobs of the U-pointer body counter clockwise direction and then the U-pointer body will be easily rotated. Under this condition, adjust U-pointer body vertically and horizontally so that the beamed screen is placed on the center of captured frame. 3. Center alignment is completed, rotate knobs of the U-pointer body clockwise direction and click next. Important Notice : U-pointer resolution is influenced by the size of the captured screen image. To use U-pointer with better resolution, place the U-pointer close to the screen. But be careful for the captured beamed image not to exceed the visible range of the U-pointer! - 14 - U-POINTER USER MANUAL ISCommunications.Co., Ltd. 5-2-3 Calibration of the U-pointer 1. Click “Start Calibration” and then calibration window will be projected to your screen. 2.Click center of the calibration cursor on the beamed screen with U-pointer Pen.. 3.When the U-pointer recognizes the U-pointer Pen , cursor will be moved to the next calibration point. Number of the calibration point is nine. After you click nine points click “Finish”. Configuration and calibration data is stored on your computer. Run U-pointer, you can use the u-pointer as wireless interactive mouse. To use powerful function during your presentation or lecture, install and run i-pro. - 15 - U-POINTER USER MANUAL ISCommunications.Co., Ltd. 6. Running U-pointer This chapter provides basic information when you run the U-pointer. During when you use the U-pointer, Upointer body may be moved or alignment and calibration may be broken. In this case, you should align or calibrate the U-pointer for accurate usage. 6-1 Running U-pointer To run the U-pointer, click U-pointer icon in the Windows background or click u-pointer icon in the iscom directory. When U-pointer is run, you can use the U-pointer as a wireless interactive mouse on the beamed screen. During the U-pointer is run, you can find the u-pointer icon in the tray area. To find menu, press u-pointer icon few seconds with an U-pointer pen and then the menu will appear. 6-2 Menu description Topical Usages of U-pointer menu are If you want to run i-pro If mounting condition of U-pointer has changed. If the calibration of the U-pointer was broken. If the alignment of the U-pointer was broken. 6-2-1 Configuration Configuration menu will be used when U-pointer model, mounting type of the U-pointer and the smooth mode in the i-Pro of the U-pointer is changed. Click configuration menu and follow the step 52-1. - 16 - U-POINTER USER MANUAL 6-2-2 ISCommunications.Co., Ltd. Start wizard If u-pointer is moved, calibration and alignment will be broken. In this case, you should run start wizard and repeat the alignment and calibration process. Click start wizard menu and follow the step 5-2. 6-2-3 Calibration During when you use the U-pointer, table, projector on which the U-pointer was placed may vibrate. As a result, cursor position of the U-pointer Pen and the contact position of the U-pointer may not be same. In this case, you have to calibrate the U-pointer again. Click calibration menu and follow the step 5-2-3 6-2-4 Executing i-Pro There are two ways to run i-Pro, the one is to click i-Pro icon and the other is to click menu of the iPro. Each case i-pro window will appear and you can use the full function of the i-Pro. But please remind that the u-pointer should be run before the i-Pro is executed. 6-2-5 Virtual keyboard If keyboard input is necessary during a presentation, click virtual keyboard. Keyboard will appear on the projected screen and then click desired key using u-pointer pen. - 17 - U-POINTER USER MANUAL ISCommunications.Co., Ltd. - 18 -