1
Powador-gridsave eco
Application Note
Installation of GS eco link and
Powador-gridsave eco - PC connection
Application Note for Powador-gridsave eco
Version: 2014-02-19
Page 1 of 22
Powador-gridsave eco – Application Note –
Installation GS eco link and Powador-gridsave eco – PC connection
Contents
1
General .............................................................3
2
"GS eco link" software ....................................3
2.1
Program versions ......................................................... 3
2.1.1 End user version ........................................................... 4
2.1.2 Integrator version ........................................................ 4
2.2
Installation wizard ....................................................... 5
3
Communication with the PC ..........................7
3.1
USB connection ............................................................ 7
3.2
RS232 connection........................................................ 9
3.3
Ethernet connection ................................................ 10
3.3.1 Installation and configuration of the
interface converter ................................................... 10
3.3.2 Powador-gridsave eco configuration ................ 19
3.3.3 Internet connection ................................................. 20
4
Other applicable documents ...................... 23
Application Note for Powador-gridsave eco
Version: 2014-02-19
Page 2 of 22
Powador-gridsave eco – Application Note –
Installation GS eco link and Powador-gridsave eco – PC connection
1 General
This Application Note describes the installation of the "GS eco link" PC Software. The software can be used to configure
the "Powador-gridsave eco" bidirectional battery inverter and establish communication with a connected PC.
To implement the procedure described here, additional hardware or software may be required (some of which is
available as accessories for the Powador-gridsave eco). KACO new energy does not offer any ongoing support in terms of
the IT infrastructure (PC or Windows problems, Ethernet connections, router configuration, etc.).
2 "GS eco link" software
The "GS eco link" software is a Windows-based program used for the configuration and monitoring of the Powadorgridsave eco.
The latest version of this program is available for download (software) from www.kaco-newenergy.com
Minimum requirements:
•
•
•
•
•
•
•
Microsoft Windows XP SP3 / Vista / 7.
o No other operating systems are currently supported
30 MB hard drive capacity
Microsoft .NET 4.0 Framework
o (if not yet installed, an additional 850 MB memory space required)
Adobe Reader
o (if not yet installed, an additional 100 MB memory space required)
1 GHz Pentium or faster
512 MB working memory
USB port
Minimum requirements for "Performance Data Viewer"
•
Microsoft Office 2003 or later
2.1 Program versions
There are two different program versions of the "GS eco link" software. The first is for the end customer, the second for the
installation engineer. These two program versions differ only in their range of functions.
Function
End user version
Integrator version
Remote access
Online monitoring
(Quick View, Data View)
Offline monitoring
(Performance Data Viewer)
Installation of firmware updates
Change of service settings
Configuration changes
Application Note for Powador-gridsave eco
Version: 2014-02-19
Page 3 of 22
Powador-gridsave eco – Application Note –
Installation GS eco link and Powador-gridsave eco – PC connection
2.1.1 End user version
This version of the "GS eco link" software is for the end customer. It provides the option of connecting to the device (both
locally via RS232 and USB, and via Ethernet with an interface converter available as an accessory). Realtime data can be
displayed as well as errors can be evaluated via "QuickView" and "DataView" tabs. The evaluation of the recorded data
can be carried out via the integrated tool "Performance Data Viewer". A program is required for this that can edit
Microsoft Excel files (*.xls). It is also possible that the end customer can update the firmware for the installation engineer.
WARNING
A firmware update can be used to impact, add or change additional settings for the Powador-gridsave eco
that significantly impact operating behaviour and potentially also security.
Please check that the Powador-gridsave eco is correctly configured for your system and that the valid
regulations and standards are observed. Settings are only permitted to be changed by an authorised and
certified system integrator.
Figure 1.
End user version of the GS eco link
2.1.2 Integrator version
CAUTION
The integrator version of the "GS eco link" software permits the changing of safety-critical system settings
and is not permitted to be forwarded to end customers!
Settings are only permitted to be changed by a qualified electrical engineer or the system integrator.
The range of functions of the "Integrator" version is the same as that in the end customer version. In addition, this
program version can be used to export and change the configuration and service settings.
The description of the GS eco link software, as well as the configuration and meaning of the individual parameters, can be
found in the enclosed instructions.
Figure 2.
Integrator (installation engineer) version of GS eco link
Application Note for Powador-gridsave eco
Version: 2014-02-19
Page 4 of 22
Powador-gridsave eco – Application Note –
Installation GS eco link and Powador-gridsave eco – PC connection
NOTE
The installation path of both program versions differs as standard. With different installation paths, both
program versions can be installed and used in parallel.
2.2 Installation wizard
Double-clicking on the setup file launches the installation wizard.
1. Read the welcome screen and confirm with "Next".
2. Select installation path.
Note: For most systems, this installation path should be
OK. The "Browse" button can be used to change the
installation path.
3. Confirm the installation with "Next".
-
Program is installed on your PC
Application Note for Powador-gridsave eco
4. Installation is run.
-
Current installation progress is displayed.
This can take a few minutes.
Version: 2014-02-19
Page 5 of 22
Powador-gridsave eco – Application Note –
Installation GS eco link and Powador-gridsave eco – PC connection
5. Finish the installation.
-
Clicking on "Close" completes the installation
process and the program can be used.
Application Note for Powador-gridsave eco
Note: There will be two new shortcuts on the desktop.
The first ("KACO GS eco link Integrator" or "KACO GS eco
link") is a simple way to start the software (without loading
the last configuration).
The second ("GS eco link Integrator Auto QuickView" or
"GS eco link Auto QuickView") starts the program GS eco
link, then loads the last active installation environment
(site file, *.SPLC) and creates the communication
connection to the Powador-gridsave eco.
Version: 2014-02-19
Page 6 of 22
Powador-gridsave eco – Application Note –
Installation GS eco link and Powador-gridsave eco – PC connection
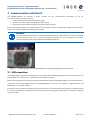
3 Communication with the PC
The Powador-gridsave eco provides a RS232 interface for the communication connection to the PC.
This interface offers three plug-in options:
1.
2.
3.
Internal connection RJ45 socket with RS232 signals
External connection 9-pole Sub-D plug with RS232 signals
External connection USB socket (internal converter to RS232 signals)
If one of these plug-in options is used, the two others can no longer be used. If another plug-in option is to be used, the
plug-in connection previously used must be disconnected.
EXAMPLE:
If an RS232 Ethernet interface converter is connected to the internal RJ45 socket, the external USB socket
can no longer be used. If this is used for maintenance purposes on site, for example, the interface
converter must first be disconnected from the Powador-gridsave eco.
Figure 3.
Powador-gridsave eco from underneath. RS232 (9 pole Sub-D plug) and USB interface visible
3.1 USB connection
The simplest option to establish a communication connection with the Powador-gridsave eco is the USB socket. The "GS
eco link" software is used to install a suitable driver for the Windows system.
When connecting the device to the PC for the first time, Windows detects the Powador-gridsave eco and loads the driver.
Starting the "GS eco link" software detects the Powador-gridsave eco and its serial number is displayed under "Site
Information" – "Connection Settings".
This makes it easy to determine whether or not the correct device is connected. If the correct device is selected, clicking
on "Connect" establishes the communication connection and then changing the configuration or monitoring the battery
system is possible.
Application Note for Powador-gridsave eco
Version: 2014-02-19
Page 7 of 22
Powador-gridsave eco – Application Note –
Installation GS eco link and Powador-gridsave eco – PC connection
Procedure for constructing a USB connection
1.
2.
3.
4.
5.
6.
Install the "GS eco link" software
Connect the Powador-gridsave eco to the PC using the USB cable supplied and wait until Windows has fully
loaded the drivers. (Note: Powador-gridsave eco must be switched on and ready for operation.)
Start the software "GS eco link" and call up the connection settings.
Select the connection type "Direct" for a direct connection to the energy storage manager. If necessary, select
the required device.
You can check the communication connection and find the connected devices using "Find GS eco".
Use the "Connect" button or the "Connection" – "Connect" menu to connect to the device (see Figure 4).
Figure 4.
Connection settings for USB communication
NOTE
If the Powador-gridsave eco is to be connected to the PC via the USB interface, the "GS eco link" software
must first be installed on the connecting PC.
Any other procedure may result in complications with the driver installation process.
NOTE
A USB cable must conform to the USB specifications. The specifications permit a maximum cable length
of 5m. The maximum length can be reduced depending on the environment and line quality.
NOTE
The "Login password" in the connection settings (Figure 5 on page 9) do not have to be changed if only
the communication connection to a local PC is incorporated. This password only protects the login to the
device. A separate password is required to change the settings on the Powador-Gridsave eco.
This password for changing system settings is not permitted to be passed to end customers as otherwise
there is a risk of critical system settings being changed.
Application Note for Powador-gridsave eco
Version: 2014-02-19
Page 8 of 22
Powador-gridsave eco – Application Note –
Installation GS eco link and Powador-gridsave eco – PC connection
3.2 RS232 connection
Another option to establish a communication connection between the Powador-gridsave eco and a PC is the RS232
connection via an appropriate cable ("serial cable") with a 9 pole Sub-D plug connector. Depending on the transmission
speed (baud rate) and the cable used, cable lengths of much longer than 100m can be used. The requirement for this is
an RS232 interface (with installed drivers) which are not always included in the standard equipment of modern
computers. If the PC is connected to the Powador-gridsave eco, the "GS eco link" software must still be configured
accordingly.
Procedure for establishing an RS232 connection
1.
2.
3.
4.
5.
6.
Connect the PC and Powador-gridsave eco using a suitable cable.
Start the "GS eco link" software and call up the connection settings.
Select the connection type "Direct" for a direct connection to the power storage manager.
Select the COM port on the PC to which the Powador-gridsave eco is connected.
Check the communication connection using "Find GS eco".
Press the "Connect" button or use the "Connection" – "Connect" menu to establish the connection to the
device.
Figure 5.
Connection settings for RS232 communication
Figure 6.
Establish the connection via the menu
Application Note for Powador-gridsave eco
Version: 2014-02-19
Page 9 of 22
Powador-gridsave eco – Application Note –
Installation GS eco link and Powador-gridsave eco – PC connection
3.3 Ethernet connection
The Powador-gridsave eco does not have an Ethernet (LAN) interface. This can only be provided via an additional interface
converter (available as an accessory).
NOTE
This document only describes the configuration of the PERLE IOLAN DS1 interface converter available as
an accessory, the connection to the Powador-gridsave eco, as well as the configuration of the Powadorgridsave eco. KACO new energy cannot provide any support for problems relating to the Ethernet
infrastructure and the configuration of other devices such as routers. Please contact an IT service provider
in this regard.
Requirements:
•
•
•
•
Installed, configured and operational Powador-gridsave eco.
Communication accessories package
o PERLE IOLAN DS1 interface converter
o RJ45 – Sub-D adapter cable
o Cable for power supply
Ethernet cable of sufficient length
Ethernet infrastructure
3.3.1 Installation and configuration of the interface converter
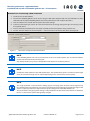
Included with the communication package are two connection cables:
-
an adapter from RJ45 to 9 pole Sub-D for RS232 communication
a connection cable for the power supply to the interface converter
The power supply to the converter can be implemented when assembling the Powador-gridsave eco via the 12V 1A
power supply on the communication card of the Powador gridsave eco. Alternatively, the converter can also be installed
outside the device; an appropriate AC power supply is included.
Figure 7.
RS232 Ethernet interface converter with data and power cables connected
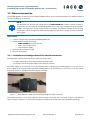
The interface converter can be easily installed in the connection area of the device as shown in Figure 8. The Ethernet
cable is fed to the outside via a cable screw connection and must be connected to the existing network technology.
Application Note for Powador-gridsave eco
Version: 2014-02-19
Page 10 of 22
Powador-gridsave eco – Application Note –
Installation GS eco link and Powador-gridsave eco – PC connection
2
3
1
3
2
Figure 8.
Integrated RS232 Ethernet interface converter (1: Ethernet cable, 2: Power supply, 3: RS232 communication
connection )
NOTE
Note the polarity of the connection of the power supply of the RS232 Ethernet as otherwise the interface
converter could be damaged.
NOTE
Please ensure that the correct RJ45 socket (RS232 port 1) is selected for the connection to the interface
converter.
Connection of the Powador-gridsave eco to the Perle IOLAN DS1 interface converter
Powador-gridsave eco
Signal
direction
RS232 – Ethernet interface
converter
RJ45 pin
Signal
GS eco
DB9M pin
Signal
IOLAN DS1
RXD
3
TXD
TXD
2
RXD
1
2
3
4
5
6
7
8
Tabelle 1.
Pin assignment of the Powador-gridsave eco to the Perle IOLAN DS1
Application Note for Powador-gridsave eco
Version: 2014-02-19
Page 11 of 22
Powador-gridsave eco – Application Note –
Installation GS eco link and Powador-gridsave eco – PC connection
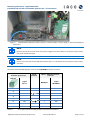
After the interface converter has been connected to the device and the system has been connected to the local network,
the configuration of the interface converter can begin.
1.
2.
3.
The interface converter requires a free, unassigned local IP address. If the address assignment is carried out
dynamically via a DHCP, it must be ensured that the interface converter is always assigned the same IP address
(e.g. 192.168.1.10).
Connect the interface converter to the local network and supply with voltage. After switching on the supply
voltage, it may take some time until the converter is ready for operation.
Install and then start "Perle DeviceManager" on the PC (included on the data medium or under
www.perlesystems.com).
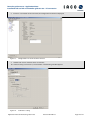
Figure 9.
4.
5.
After starting, the program scans the local network and lists the existing converters.
Select the required interface converter and click "Assign IP" to assign an IP address to the converter. This
function is only available if the device has not yet been configured (in the column "IP Address" is the note "Not
Configured").
Figure 10.
6.
Perle DeviceManager
Search for interface converter on the local network
Assign the free IP address and confirm the setting by clicking "Assign IP"
Application Note for Powador-gridsave eco
Version: 2014-02-19
Page 12 of 22
Powador-gridsave eco – Application Note –
Installation GS eco link and Powador-gridsave eco – PC connection
Figure 11.
7.
Assign IP address
Select the configured interface converter and confirm with "OK" to establish a connection to the converter.
The default password is "superuser" (see user manual for the converter)
Figure 12.
Enter login
Application Note for Powador-gridsave eco
Version: 2014-02-19
Page 13 of 22
Powador-gridsave eco – Application Note –
Installation GS eco link and Powador-gridsave eco – PC connection
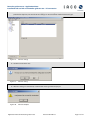
8.
If there is a connection to the converter, the configuration view will be displayed.
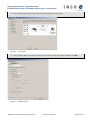
Figure 13.
Configuration view of the interface converter
9. Double-click "Serial" and then select "Serial Ports".
10. Select the entry ("Serial Port 1") and click "Edit". The following window appears:
Figure 14.
Serial Port 1 Setting
Application Note for Powador-gridsave eco
Version: 2014-02-19
Page 14 of 22
Powador-gridsave eco – Application Note –
Installation GS eco link and Powador-gridsave eco – PC connection
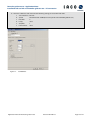
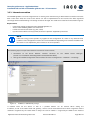
11. Select "Change Profile" right at the top and change the profile to "TCP Sockets".
Figure 15.
Select profile
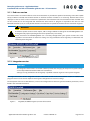
12. Then select the option "Lists for Connection" on the "General" tab and change the "TCP Port" to 10001.
Figure 16.
Change TCP port
Application Note for Powador-gridsave eco
Version: 2014-02-19
Page 15 of 22
Powador-gridsave eco – Application Note –
Installation GS eco link and Powador-gridsave eco – PC connection
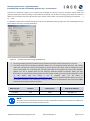
13. Go to the "Hardware" tab and make the following settings, then confirm with "OK".
a. Serial Interface: EIA-232
b. Speed:
Recommended: 57600 (must correspond to the Powador-gridsave eco)
c. Data Bits:
8
d. Parity:
none
e. Stop Bits:
1
f. Flow Control: none
Figure 17.
Set hardware
Application Note for Powador-gridsave eco
Version: 2014-02-19
Page 16 of 22
Powador-gridsave eco – Application Note –
Installation GS eco link and Powador-gridsave eco – PC connection
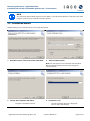
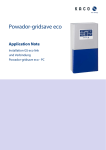
14. The bottom of the main window will display that the settings have to be transmitted to the converter
("Download required"). The transfer of the settings can be started with "Download All Changes".
Figure 18.
Transfer settings
15. Confirm transfer with "Yes".
Figure 19.
Transfer setting
16. After the settings are transferred, a confirmation message will be displayed.
Figure 20.
Transfer complete
Application Note for Powador-gridsave eco
Version: 2014-02-19
Page 17 of 22
Powador-gridsave eco – Application Note –
Installation GS eco link and Powador-gridsave eco – PC connection
17. The interface converter must now be re-started. A corresponding button will then be displayed at the bottom
of the main screen.
Figure 21.
Interface converter
18. Confirm the restart with "Yes"
Figure 22.
Carry out a re-start
19. The connection to the interface converter is then disconnected and the device is re-started.
This process can take some time.
Figure 23.
Re-start is carried out
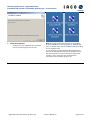
20. The question whether the configuration is to be saved can be answered with "No" if the configuration is not to
be saved on the PC for documentation purposes or similar.
21. The PERLE DeviceManager can now be ended. The interface converter is now configured.
Application Note for Powador-gridsave eco
Version: 2014-02-19
Page 18 of 22
Powador-gridsave eco – Application Note –
Installation GS eco link and Powador-gridsave eco – PC connection
3.3.2 Powador-gridsave eco configuration
The Powador-gridsave eco then needs to be configured so that a connection can be established via Ethernet. To do this,
proceed as described below:
1.
2.
3.
4.
5.
Start the "GS eco link" software and load the settings for the installation site ("Site Information" – "Open")
Under "Connection Settings", set the connection type to "Network".
It is advisable to change the login password to protect the Powador-gridsave eco against unauthorised access.
Enter the IP address and the port previously set for the interface converter. (in this case, for example, address
192.168.1.10 and port 10001)
An Ethernet connection can now be established from the PC to the Powador-gridsave eco.
Figure 24.
Connection settings for an Ethernet connection
NOTE
The "Login password" for the connection settings (Figure 24) should be changed to prevent unauthorised
access to the device.
To change this password, connect to the device and enter the new password under "Service Settings" –
"Login Password".
This password only protects the login to the device.
A separate password is required to change the settings of the Powador-gridsave eco.
NOTE
KACO new energy cannot provide any support for problems regarding the IT infrastructure (e.g. router
configuration, IP address assignment, ports, etc.) as the structure, settings and configuration of the
network environment can be complex and very different from place to place. In case of problems, please
contact an IT service provider.
Application Note for Powador-gridsave eco
Version: 2014-02-19
Page 19 of 22
Powador-gridsave eco – Application Note –
Installation GS eco link and Powador-gridsave eco – PC connection
3.3.3 Internet connection
The Powador-gridsave eco can be integrated into an existing local network using an RS232 Ethernet interface converter.
With a little extra work, the access to the device can also be implemented via the internet. This offers significant
advantages when troubleshooting or if settings need to be changed. This avoids travel costs for the installation engineer.
Requirements:
Connected, configured and operational Powador-gridsave eco.
Access to the Powador-gridsave eco via Ethernet
Permanent internet connection (e.g. DSL, cable)
Dynamic Domain Name Server (DynDNS) account of a provider supported by the router
-
NOTE
KACO new energy cannot provide any support for the configuration of a router or any other Ethernet
hardware as the configuration needs to be carried out different depending on the model and software of
the router. In case of problems, please contact an IT service provider.
The following steps are required to establish a connection via the internet:
1.
2.
Connection to the RS232 Ethernet interface converter via the "PERLE Device Manager".
(Section 3.3.1 Installation und Konfiguration Schnittstellenwandler ff)
Change the network configuration of the interface converter: "Configuration" – "Network" – "IP Settings"
Figure 25.
IP addresses and Gateway settings
A network name for the device as well as a possible domain can be entered. When setting the
IP address, as well as the subnet mask and gateway, a choice can be made between the manual assignment and the
automatic assignment by the router DHCP. If always the same IP address is assigned by the DHCP to the interface
Application Note for Powador-gridsave eco
Version: 2014-02-19
Page 20 of 22
Powador-gridsave eco – Application Note –
Installation GS eco link and Powador-gridsave eco – PC connection
converter, the automatic setting can be selected. The simplifies the setting in that no IP address, subnet mask and
gateway needs to be entered (settings are provided by the DHCP). For the manual setting, please enter the correct IP
address (in our example 192.168.1.10) and enter the IP address of the router as the gateway (normally the extension … .1
or … .254)
It is possible to refer to the network settings for the PC to help with these settings (Figure 26). The standard gateway and
the IP address of the PC is normally shown here.
Network connection settings via Windows XP
Figure 26.
3.
4.
The changed settings must be transferred to the interface converter and this must then be re-started.
The router must then be configured. Normally routers have an integrated firewall that filters the network
traffic and only forwards certain data packages to internal devices. The router must be configured so that
certain data packets are let through first and then forwarded to the interface converter of the Powadorgridsave eco. This is possible with the two functions "Network Address Translation" (NAT) and "Port
forwarding". An external port (where possible one of the ports not being used for standard applications such
as FTP, Telnet, http and similar, a list of standard ports can be found at
http://de.wikipedia.org/wiki/Liste_der_standardisierten_Ports) must be forwarded to the internal port set on
the interface converter. In our example, the external port 5340 can be forwarded to the internal port 10001
with the IP address of the interface converter.
External port
Protocol
Internal port
Internal IP address
e.g. 5340
TCP
10001
192.168.1.10
NOTE
The external port should not be used for any other application if possible or should be non-standard as
far as possible to prevent attacks from the internet.
Application Note for Powador-gridsave eco
Version: 2014-02-19
Page 21 of 22
Powador-gridsave eco – Application Note –
Installation GS eco link and Powador-gridsave eco – PC connection
INFORMATION
Each device on the internet has an IP address. These IP addresses are assigned as either fixed or dynamic
addresses by the provider.
With dynamic IP adress, the customer is normally assigned a new address by the provider after a forced
disconnection of the internet connection every 24 hours.
This IP address must be known for the connection to the Powador-gridsave eco via the internet.
To be able to access the Powador-gridsave eco despite a changing IP address, an account is required with
a DynDNS Provider.
This allows a name to be chosen that remains the same, instead of an IP address (e.g.
Gridsave_eco.dyndns.org). In the router, the DynDNS account should be set up and the router will dial in
at specific time intervals or after a forced disconnection by the DynDNS Provider.
The router notifies the provider which IP address it has. If you want to connect to the Gridsave eco via the
name (Gridsave_eco.dyndns.org), a query is sent to the DynDNS provider.
The provider knows the current IP address of the router and can therefore forward the connection query
via the router to the Powador-gridsave eco. This means that the same name (Gridsave_eco.dyndns.org)
can always be used to connect to the energy storage system.
5.
6.
7.
8.
Determine whether the internet provider assigns a fixed or dynamic IP.
With a dynamic IP address assignment, an account must be created with a DynDNS provider compatible with
the router. Enter the account data for this account (username, password, name/address or hostname) for the
router. If possible, it is recommended to check the connection to the DynDNS provider.
With a static IP address assignment by the internet provider, this must be retrieved via the router or the
relevant websites (such as http://www.wieistmeineip.de/).
The connection settings then need to be adjusted in the "GS eco link" software.
Figure 27.
9.
Connection settings for a connection via the internet
a. Connection type:
"Network"
b. Login password:
modify if changed on the device
c. Hostname or IP address: Enter DynDNS address (hostname)
d. Port:
external port (see router configuration)
Connection to the Powador-gridsave eco established via the internet
Application Note for Powador-gridsave eco
Version: 2014-02-19
Page 22 of 22
Powador-gridsave eco – Application Note –
Installation GS eco link and Powador-gridsave eco – PC connection
NOTE
The "Login password" for the connection settings (Figure 27 on page 22) should be changed to prevent
unauthorised access to the device.
To change this password, connect to the device and enter the new password required under "Service
Settings" – "Login Password".
This password only protects the login to the device.
A separate password is required to change the settings of the Powador-gridsave eco.
NOTE
KACO new energy cannot provide any support for problems regarding the IT infrastructure (e.g. router
configuration, IP address assignment, ports, etc.) as the structure, settings and configuration of the
network environment can be complex and very different from place to place. In the event of any
problems, please contact an IT service provider.
List of manufacturers of routers with free DynDNS service:
•
•
D-link: free third party service (www.dlinkddns.com)
AVM: supports the free service No-IP.com (www.no-ip.com).
4 Other applicable documents
Operating instructions for Powador-gridsave eco - bidirectional battery inverter
PERLE IOLAN DS1 User Manual
PERLE IOLAN DS1 Quick Start Guide
Application Note for Powador-gridsave eco
Version: 2014-02-19
Page 23 of 22
The text and figures reflect the current technical state at the time of printing. Subject to technical changes. Errors and omissions excepted.
Carl-Zeiss-Straße 1 · 74172 Neckarsulm · Germany · Phone +49 7132 3818-0 · Fax +49 7132 3818-703 · [email protected] · www.kaco-newenergy.de