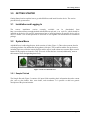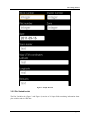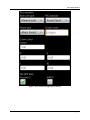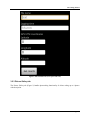
1
USER’S
MANUAL
ArboWebForest
i
USER'S MANUAL
TABLE OF CONTENTS
Page #
GENERAL INFORMATION ..................................................................................................... 1-1
1.0
1.1
System Overview.................................................................................................................... 1-1
1.2
Organization of the Manual.................................................................................................. 1-1
2.0
SYSTEM SUMMARY ................................................................................................................. 2-1
2.1
System Configuration ............................................................................................................ 2-1
2.2
User Access Levels ................................................................................................................. 2-1
2.3
Contingencies ......................................................................................................................... 2-1
3.0
GETTING STARTED ................................................................................................................. 3-1
3.1
Installation and Logging In................................................................................................... 3-1
3.2
System Menu .......................................................................................................................... 3-1
3.2.1 Sample Plot tab ........................................................................................................................................ 3-1
3.2.2 Plot Variables tab .................................................................................................................................... 3-2
3.2.3 Picture Gallery tab ................................................................................................................................... 3-4
3.2.4 Tally Trees tab ......................................................................................................................................... 3-5
3.2.5 Settings tab .............................................................................................................................................. 3-7
3.3
Changing User ID and Password ......................................................................................... 3-8
3.4
Exit System ............................................................................................................................. 3-9
4.0
USING THE SYSTEM................................................................................................................ 4-1
4.1.1 Sample Plot tab........................................................................................................................................ 4-1
4.1.2 Plot Variables tab .................................................................................................................................... 4-1
4.1.3 Picture Gallery tab ................................................................................................................................... 4-1
4.1.4 Tally Trees tab ......................................................................................................................................... 4-2
4.1.5 Settings tab .............................................................................................................................................. 4-4
4.2
5.0
Special Instructions for Error Correction........................................................................... 4-4
REPORTING ............................................................................................................................... 5-1
5.1
Report Capabilities ................................................................................................................ 5-1
5.2
Report Procedures ................................................................................................................. 5-1
User’s Manual
Page i
1.0 General Information
1.0
User’s Manual
GENERAL INFORMATION
1.0 General Information
1.0
GENERAL INFORMATION
General Information section explains in general terms the system and the purpose for which it is
intended.
1.1
System Overview
ArboWebForest is application, which allows collecting information about forest plots. The application
provides electronic version of form used in collecting plot information. The application saves data
collected to database. Its operational status is under development. ArboWebForest operates on mobile
devices with Android operating system.
1.2
Organization of the Manual
The user’s manual consists of five sections: General Information, System Summary, Getting Started,
Using The System, and Reporting.
General Information section explains in general terms the system and the purpose for which it is
intended.
System Summary section provides a general overview of the system. The summary outlines the uses of
the system’s hardware and software requirements, system’s configuration, user access levels and
system’s behavior in case of any contingencies.
Getting Started section explains how to get ArboWebForest and install it on the device. The section
presents briefly system menu.
Using The System section provides a detailed description of system functions.
Reporting section describes in what way information collected by the application are presented and how
to access the information.
User’s Manual
Page 1-1
2.0 System Summary
2.0
User’s Manual
SYSTEM SUMMARY
2.0 System Summary
2.0
SYSTEM SUMMARY
System Summary section provides a general overview of the system. The summary outlines the uses of
the system’s hardware and software requirements, system’s configuration, user access levels and
system’s behavior in case of any contingencies.
2.1
System Configuration
ArboWebForest operates on mobile devices with Android operating system. It is compatible with
Android 1.5 API level 3 and higher versions. The application requires connection to Internet in order to
save data to database, internal GPS receiver in order to obtain coordinates automatically as well as
internal photo camera. Data saved in database can be seen using any major Internet browser. After
installation on the device, ArboWebForest can be used immediately without any further configuration.
2.2
User Access Levels
Everyone can use application, but only registered users are able to save data to database.
2.3
Contingencies
In case of power outage data are not saved in internal memory of the operating device (except photos that
are stored in external storage folder of the device). In case there is no Internet connection available data
cannot be saved in internal memory of the operating device.
User’s Manual
Page 2-1
3.0 Getting Started
3.0
User’s Manual
GETTING STARTED
3.0 Getting Started
3.0
GETTING STARTED
Getting Started section explains how to get ArboWebForest and install it on the device. The section
presents briefly system menu.
3.1
Installation and Logging In
The
newest
installation
version
currently
available
can
be
downloaded
from
http://www.arbowebforest.com/php/android/ArboWebForest.apk and is an .apk file, which should be
installed on the device. For specific instruction on how to install application on specific device refer to
device’s manual. User ID and password are delivered to user together with ArboWebForest installation
package.
3.2
System Menu
ArboWebForest is tabbed application, which consists of 6 tabs (Figure 1). Three tabs represent form for
collecting plot data. One tab handles taking photos of the plot. The second last tab has user preferences,
including login area, while the last tab displays mobile map of world without user content. Major control
buttons of the program are located in Tally Trees tab. All the tabs have icon and, additionally, name at
the bottom to allow distinguishing them easily.
Figure 1. Tabs of ArboWebForest
3.2.1 Sample Plot tab
The Sample Plot tab (Figure 2) consists of 9 input fields containing basic information about the current
plot, such as plot number, date, team leader, and coordinates. It is possible to add here general
description of the plot and remarks.
User’s Manual
Page 3-1
3.0 Getting Started
Figure 2. Sample Plot tab
3.2.2 Plot Variables tab
The Plot Variables tab (Figure 3 and Figure 4) consists of 16 input fields containing information about
plot variables and site GPS data.
User’s Manual
Page 3-2
3.0 Getting Started
Figure 3. Plot Variables tab (upper part of the tab)
User’s Manual
Page 3-3
3.0 Getting Started
Figure 4. Plot Variables tab (lower part of the tab)
3.2.3 Picture Gallery tab
The Picture Gallery tab (Figure 5) handles photo-taking functionality. It allows taking up to 4 photos
with description.
User’s Manual
Page 3-4
3.0 Getting Started
Figure 5. Picture Gallery tab
3.2.4 Tally Trees tab
The Tally Trees tab (Figure 6) allows inputting information about specific tree (this part consists of 8
input fields). There are navigation’ buttons located here that allow navigating between different trees
from specific plot. In the tab, there are also buttons allowing saving plot information to phone as well as
User’s Manual
Page 3-5
3.0 Getting Started
to server (Figure 7). It is possible from here to create completely new plot, edit plots saved locally (for
example, plots downloaded from server), and delete plots stored locally. Buttons at the bottom row allow
downloading and uploading between the application and server.
Figure 6. Tally Trees tab (tree information part)
User’s Manual
Page 3-6
3.0 Getting Started
Figure 7. Tally Trees tab (control part)
3.2.5 Settings tab
The Setting tab (Figure 8) allows entering login information as well as changing some application
settings, such as source of altitude information, and time of waiting for GPS signal. It allows also
defining parameters for checking correctness of input data about trees (it includes minimum and
maximum diameter in centimeters, minimum and maximum height in meters, and diameter/height ratio).
User’s Manual
Page 3-7
3.0 Getting Started
Figure 8. Settings tab
3.3
Changing User ID and Password
User ID and password can be changed only by contacting producer.
User’s Manual
Page 3-8
3.0 Getting Started
3.4
Exit System
ArboWebForest can be closed by selecting Back action on the device.
User’s Manual
Page 3-9
4.0 Using the system
4.0
User’s Manual
USING THE SYSTEM
4.0 Using the system
4.0
USING THE SYSTEM
This section provides a detailed description of system functions.
4.1.1 Sample Plot tab
The Sample Plot tab consists of 9 input fields containing basic information about the current plot, such as
plot number, date, team leader, site coordinates, and general remarks.
Block number, cluster number, plot number and zone are numeric input fields. Team leader field is a text
input field. Date is selected automatically as current date, but it can be easily changed by typing in the
date field. Map coordinates shall be given using latitude and longitude notation in Universal Transverse
Mercator (UTM) geographic coordinates system. Remarks field is text field where user can provide
general comments and remarks about the plot.
4.1.2 Plot Variables tab
The Plot Variables tab consists of 16 input fields containing information about plot variables and site
GPS data.
Main site type, FAO land use and forest type can be selected from drop-down menus. Crown cover is a
numeric input field. Crown cover center as well as N, E, S, and W fields should be inputted as real
values. Promark 3 and MMCX are checkboxes. Note that only one of the checkboxes can be selected.
File name is a text input field. Logging time should be specified as number of hours and minutes using 24
hour system. GPS coordinates can be typed by user or automatically obtained from the device. In order to
get the coordinates automatically Get cords button should be pressed. The application will try to get
coordinates from GPS within time limit specified in the Settings tab. If GPS coordinates cannot be
retrieved the system asks for specifying them manually. If GPS on the device is disabled the application
redirects to setting screen of the device operating system to allow turning GPS on easily. Altitude can be
retrieve from GPS directly or from the Internet based on latitude and longitude parameters. It is possible
to select how to get altitude data in the Settings tab.
4.1.3 Picture Gallery tab
The Picture Gallery tab handles photo-taking functionality. Current version allows taking up to 4 photoa
with description for each plot.
When entering the tab for the first time, all image thumbnails are empty. Pressing image thumbnail
redirects to camera software of the device operating system. It allows taking photos and setting all
required parameters of the camera. In order to learn how to use your device camera refer to manual of
your device. When photo is taken, the Picture Gallery tab appears again and displays actual photo
thumbnail in the place on the list selected. Note that all photos are saved to ArboWebForest directory in
your device external storage folder. If you select from the list thumbnail that already contains photo, this
photo will be replaced by newly taken photo.
User’s Manual
Page 4-1
4.0 Using the system
4.1.4 Tally Trees tab
The Tally Trees tab allows inputting information about specific tree (this part consists of 9 input fields).
There are navigation’ buttons located here that allow navigating between different trees from specific
plot and removing trees. In the tab there are also buttons allowing saving plot information to phone as
well as to server.
In the tab following information about single tree can be entered: species code, species name, diameter
(in centimeters), height (in meters), H crown base (in meters), base (in meters), and base crown. It is
possible to add some remarks to every tree. Search button located next to species code field allows
searching for a tree species data in database by name and by code. It redirects to searching screen (Figure
9). If double clicked on one item from the list, the user is redirected to the Tally trees tab and information
about chosen tree is saved in Species code and Species name fields. To come back to the Tally Trees tab
from search screen select Back button of your device. ArboWebForest allows saving information about
desired number of trees. The number of tree displayed currently is shown at the top of the tab. It is
possible to navigate between trees information by pressing Previous or Next tree buttons. The Next tree
button automatically creates new tree screen if there was no tree with the specific number selected
before. For example if the current tree number is 4 and there is information only about 4 trees so far,
pressing the Next tree button will create empty form for fifth tree. Any tree can be deleted from the form
by pressing Delete button when information about the tree to be deleted is visible on the screen. Deleting
information about one tree causes renumbering of the other trees with higher numbers.
In the Tally Trees tab, there are control buttons of the application. Save to phone buttons saves
information about currently edited plot in local database. If plot already exists in the database user can
choose whether to overwrite this plot data or not. Save to server button saves information about currently
edited plot on server, so that user can see the plot as described in Reporting chapter of the manual. If plot
was previously downloaded from server its data is updated, otherwise new plot is created on server.
Edit saved plot button allows selecting plot for editing from all plots saved in local database. After
pressing this button list of all available plots is displayed. Double clicking on chosen plot can make
selection. Plots are displayed on the list in the following format: Plot_X_Y_Z. X represents plot index in
local database, Y represents plot id and Z is block number of the plot. If user wishes not to select any plot
it is possible to go back to the Tally Tree tab view by pressing Back button on the device. Delete plot
button removes plot from the local database if it was stored there. Create new plot button clears the form
and allows creating new plot, which can be later uploaded to server.
Download plots from server button downloads plots from server. After pressing the button list of plots
available on the server is displayed. From the list user can select plots to download. Plots are displayed in
the following format: Plot_X_Y_Z, where X represents plot index on the server, Y represents plot id and
Z is block number of the plot. It is possible to select all plots by pressing Select all button. When Select
all was pressed the button changes to Unselect all. If user wishes not to download any plot it is possible
to go back to the Tally Tree tab view by pressing Back button on the device. After plot selection has been
made plots can be downloaded by pressing Download selected button. Plots downloaded to the device are
automatically stored in local database (note that photos are not downloaded from server). When plots
already exist locally their data is updated based on information retrieved from server. Upload plots from
server button uploads plots to server. After pressing the button list of plots available on the device is
displayed. From the list user can select plots to download. Plots are displayed in the following format:
Plot_X_Y_Z. X represents plot index in local database, Y represents plot id and Z is block number of the
plot. It is possible to select all plots by pressing Select all button. When Select all was pressed the button
User’s Manual
Page 4-2
4.0 Using the system
changes to Unselect all. If user wishes not to upload any plot it is possible to go back to the Tally Tree
tab view by pressing Back button on the device. After plot selection has been made plots can be uploaded
by Pressing Upload selected button. Plots uploaded to the server are automatically saved. When plots
already exist on the server their data is updated based on information retrieved from server, otherwise
new plots are created.
Figure 9. Screen for searching information about trees species
User’s Manual
Page 4-3
4.0 Using the system
4.1.5 Settings tab
The Setting tab allows entering login information as well as changing some application setting, such as
source of altitude information, time of waiting for GPS signal and way of displaying map.
In order to log in, specify your user name and password in the User Name and Password fields and then
press Log in button. Make sure you specified both user name and password correctly. The system checks
user credentials in database and informs about results of the checking. If you entered correct credentials
and you still cannot log in, contact the producer. If you do not have user name and password, contact the
producer.
Below logging fields there are actual setting of the application. It is possible to specify GPS timeout in
seconds. When trying to retrieve GPS coordinates in the Plot Variables tab, the system tries to get
latitude and longitude for the number of seconds given here. Way of displaying map in Tab map can be
set. Selecting option ‘Open browser in new window’ will open external window of default system
browser and display map there. If option is not selected map is displayed inside the Map tab. When Take
altitude from the Internet option is marked the altitude is taken from the Internet based on latitude and
longitude values. This option requires the Internet connection. If unmarked, altitude is taken directly
from GPS. Settings are remembered automatically immediately after modification has been done.
4.2
Special Instructions for Error Correction
In case if GPS cannot be used to retrieve location data, you may want to use external GPS device and
input latitude, longitude, and altitude parameters manually. Similarly, in case of inaccuracy of GPS data
you may want to use external GPS device. Note that refreshing GPS coordinates by pressing Get coords
button few times may increase accuracy of the GPS data.
User’s Manual
Page 4-4
5.0 Reporting
5.0
User’s Manual
REPORTING
5.0 Reporting
5.0
REPORTING
Reporting section describes in what way information collected by the application are presented and how
to access the information.
5.1
Report Capabilities
Information about each plot is presented on the map. The plot is shown on the map (Figure 10) in the
location specified in GPS coordinates fields. Icon of the plot is selected based on information about land
use.
Figure 10. Map presenting information about plots
When specific plot is selected from the map all information from the form are displayed in new floating
window titled Attributes. Attributes tab contains form text data (all the fields here correspond to the field
in the application), while Attachments tab contains photo(s).
5.2
Report Procedures
The report described in previous section can be accessed by typing http://www.arbowebforest.com/ in
address bar of the Internet browser. You have to log in to access the information. User name and
password are the same as used in the application. Each user can see only information about own plots.
Data collected using the application are saved as Lidar Plots.
User’s Manual
Page 5-1