1
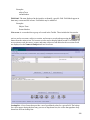
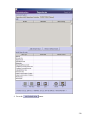
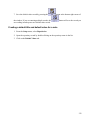
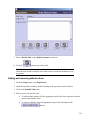
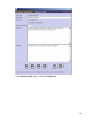
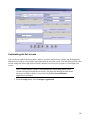
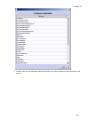
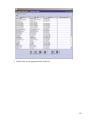
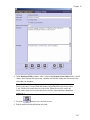
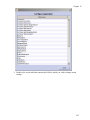
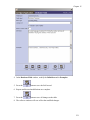
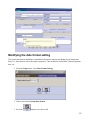
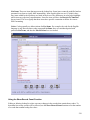
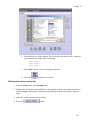
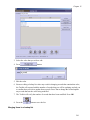
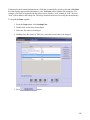
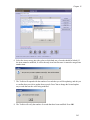
Chapter 15
Customizing the Archivists’ ToolkitTM
Overview
The Archivists’ ToolkitTM provides a number of customization features that allow for maximum
productivity by tailoring the application to your needs. You can:
•
establish default values for fields
•
configure the interface by customizing field labels, identifying which fields should appear
in list screens, modifying search settings, and editing rollover tips that appear for each field
•
edit lookup lists that provide multiple controlled values for a field
•
customize default titles for notes
•
configure user-defined fields in the accession record
•
ingest customized reports
These options can increase data entry efficiency and provide an interface that is more closely aligned
with your repository context.
Note: Customizing the Toolkit is an advanced operation, requiring some
investigation into the underlying table structure of the Toolkit’s database. Before
beginning the customization process, it is advisable to review the terminology
provided in the following section and to study the relevant appendices.
Customization options are only available to those with Superuser (Access Class
5) and Repository Manager (Access Class 4) permission levels. Superusers are
permitted to do all customizations; Repository Managers can establish default
values for their repository and edit lookup lists.
Terminology
The following terms represent concepts related to the Archivists’ ToolkitTM database or interface.
Familiarity with these terms is essential to understanding and using the customization features.
Field: A basic unit, or element, of data entry in the Toolkit.
Examples:
Title
Extent Number
Field name: The identifier for a field in the Toolkit’s database. The field name does not appear in
data entry or other interface screens and cannot be modified.
Examples:
subjectTerm
extentNumber
Field label: The term displayed in the interface to identify a specific field. Field labels appear in
data entry screens and list screens. Field labels may be modified.
Examples:
Subject Term
Extent Number
List screen: A screen that lists a group of records in the Toolkit. These include the lists used to
retrieve and access name, subject, accession, and resource records when pressing the
button from the main screen. List screens are also used to display linked records. For example, in
an accession record, the source, creator, and name subject records linked to the accession record
are displayed on the Names & Subjects tab in a list screen.
Lookup list: A list of terms that provides a set of predefined values for a given field. The lookup
list values appear during the data entry process as drop-down lists; the values that populate dropdown lists are from lookup lists.
208
Chapter 15
Table: A set of data elements that is organized into horizontal rows and vertical columns. A row
represents a record in the table and a cell is a specific instance of a field within that record.
Relational databases, such as that used in the Toolkit, are comprised of multiple tables that are
linked together. Therefore, the fields appearing on a single data entry screen may actually be stored
in different tables. In order to access a field for customization purposes, you must first identify the
table that contains the field.
Note: In order to access the specific field to be customized, you must know
which table contains the field. In the Lookup Lists appendix, you will find a
table listing the predefined lookup lists, the field to which they are linked, and
the type of lookup list.
Default values
Overview
If your repository uses boilerplate text (i.e. text that can be reused without change) for particular fields
or notes, you may wish to create a default value so that the same data does not need to be entered
repeatedly. Establishing the default value for a certain field or note will result in that default text being
input into the field or note each time you create a new record. You may then edit the default value if
you wish. For example, if you enter Materials closed until processed as a default value
for the Access Restrictions field, that phrase will be entered into the Access Restrictions field
whenever a new accession record is created for the repository. The default value can then be edited
when necessary.
Because default values are repository-specific, they are stored as part of the repository record.
Note: Not all fields will be available for establishing a default value. For
example, information such as the user and date of record creation or update is
automatically captured by the Toolkit. For a complete list of fields for which a
default value can be established, as well as a list of the Toolkit’s table names
and fields, see Fields Supporting Default Values in the appendices.
Creating a default value for a field
1. From the Setup menu, select Repositories.
2. Open the repository record by double-clicking on the repository name in the list.
3. Click on the Default Values tab.
209
4. Press the
button.
210
Chapter 15
5. Select the appropriate Table, then the Field for which you are establishing a default value.
Note: Fields Supporting Default Values appendix may assist you in locating
the field for which you want to create a default value.
Depending on which option is available:
6. Enter the default text in the Value field.
or
Check the Boolean Value box.
or
Select the appropriate Value from the drop-down list.
211
7. Save the default value record by pressing the
button at the bottom right corner of
the window. If you are entering multiple records, the
are working in and open a new default value record.
button will save the record you
Creating a default title and default value for a note
1. From the Setup menu, select Repositories.
2. Open the repository record by double-clicking on the repository name in the list.
3. Click on the Default Values tab.
212
Chapter 15
4. Double-click on the note you wish to customize.
213
5. Enter a Default Title and/or Default Content for the note.
6. Press the
button to save the record.
Note: Default notes are not automatically added to resource records. However,
when the user decides to add the note to the resource record, the default text will
be present.
Editing and removing default values
1. From the Setup menu, select Repositories.
2. Open the repository record by double-clicking on the repository name in the list.
3. Click on the Default Values tab.
4. Edit or remove the default value:
a. To edit a default, double click the appropriate entry in the list to open the record in
question and edit the value.
b. To remove a default, select the appropriate entry in the list and press the
button.
214
Chapter 15
5. Press the
button to save the record.
Configuring the application interface
Overview
Configuring the application interface will allow you to:
•
change the field labels that display on data entry screens
•
modify the field columns that appear in list screens
•
customize which fields are available in the search interface
•
edit rollover tips, including field definitions and examples
Modifying field labels
You may wish to modify field labels that appear in the Toolkit interface, for example, to reflect
terminology used in your repository or to match existing processing and procedure documentation.
Note: Changing the label of a field is a superficial change that only affects the
interface. You cannot turn a Container Summary field into a Preservation
Actions field, for example. The underlying field name, data type, and any
associated import and output mappings will not change. The user-defined fields
should be implemented for this purpose.
1. From the Setup menu, select Configure Application.
215
2. Double-click on the table that contains the field you wish to customize.
216
Chapter 15
3. Double-click on the appropriate field in the list.
217
4. In the Database Field window, modify the Field Label.
218
Chapter 15
5. Press the
button to save the field record.
6. Repeat for additional fields in the same table until all desired modifications are complete.
7. Press the
button to save all changes to the table.
8. The application will now show the modified field label in applicable screens.
219
Customizing the list screens
List screens are used for browsing name, subject, accession, and resource records, and for displaying
linked records such as a list of names associated with an accession record. You may add a field to a list
screen, change the left to right order of fields (columns) in a list screen, or remove a field from a list
screen.
Note: Customizing list screens is accomplished by customizing specific field
records. In order to modify the list screen, you must first identify the table that is
the source of fields in the list screen. Refer to the List Screen Defaults
appendix for assistance.
1. From the Setup menu, select Configure Application.
220
Chapter 15
2. Double-click on the table that contains the field you wish to add to or remove from the list
screen.
221
3. Double-click on the appropriate field in the list.
222
Chapter 15
4. In the Database Fields window, enter a value in the Return Screen Order field. A 0 will
remove the field from the list screen, a number will add the field to the list screen in the
order that you designate.
Note: The Toolkit does not prevent you from creating duplicate entries in this
field. If you enter 3 for one field and another field in the table also has the value
3, the Toolkit will reorder the rest of the fields. When the record is saved, the
fields with a return screen order other than 0 will be sorted and then renumbered
starting at 1.
5. Press the
button to save the field record.
6. Repeat until desired modifications are made.
223
7. Press the
button to save all changes to the table.
8. The field column will now appear in the List Screen view.
Note: Column listing order can also be changed by dragging and dropping the
Field Name column heading to the desired place in the screen listing. This
change is not permanent, however, and the previous order will be restored upon
leaving this list screen view.
Modifying search settings
The Toolkit's search interface allows you to search for terms within a field. You can customize which
fields are available for searching.
1. From the Setup menu, select Configure Application.
224
Chapter 15
2. Double-click on the table that contains the field for which you wish to change search
settings.
225
3. Double-click on the appropriate field in the list.
226
Chapter 15
4. In the Database Fields window, click on the Include in Search Editor checkbox to
change the setting.
5. Press
button to save the field record.
6. Repeat until desired modifications are complete.
7. Press the
button to save all changes to the table.
8. The field will now appear as an option in the drop-down list in the Search Editor.
227
Modifying rollover tips
Rollover tips contain text that appears when the cursor hovers over a field label. They provide
guidance during the data entry process. Rollover tips are composed of a definition and examples. You
may modify either of these fields. Rollovers are a good place to integrate repository processing /
description policy into the AT application.
1. From the Setup menu, select Configure Application.
228
Chapter 15
2. Double-click on the table that contains the field you wish to customize.
229
3. Double-click on the appropriate field in the list.
230
Chapter 15
4. In the Database Field window, modify the Definition and/or Examples.
5. Press the
button to save the field record.
6. Repeat until desired modifications are complete.
7. Press the
button to save all changes to the table.
8. The rollover windows will now reflect the modified changes.
231
Modifying the date format setting
The system date format establishes a standardized format for entering and displaying all transaction
dates (i.e., dates that are not for descriptive purposes). This includes accession date, acknowledgement
date, etc.
1. From the Setup menu, select Date Format Setting.
2. Choose the desired System date format.
3. Press the
button to save the record.
232
Chapter 15
4. The changes will take place once the application is restarted.
Lookup lists
Overview
Lookup lists provide a set of predefined values that can be selected during data entry to populate a
field. The Toolkit comes with a number of pre-defined lookup lists. You can modify many of these
lists, though there are some that can not be modified because either their values are necessary for
correct operation of the Toolkit, or are necessary in order to produce valid standardized outputs such as
EAD or MODS.
Note: You will find a table listing the predefined AT lookup lists, the fields to which
they are linked, and the type of lookup list in the appendices.
The Lookup Lists list view
The Lookup List list view contains the List Name, List Items, Codes, whether the List Items and
Codes are paired values, and whether the List Items are restricted To Nmtoken.
List Name. Contains the name of the lookup list. These can all be customized.
233
List Items. These are items that appear on the lookup lists. Some items cannot be modified and are
presented in red text to signify their immutability. Items listed in blue text are AT initial values.
Any items added by the repository are listed in black text. The differences in color helps highlight
which items are repository customizations. Some list items will have the Restrict To Nmtoken
box activated. This is to signify that these items have specific constraints to follow for correct
XML formatting.
Codes. Codes generally are abbreviations for List Items. For example, the code for the English
language is eng. Because these codes represent List Items, they are considered paired with
particular List Items, and thus the Paired Values box is activated.
Using the Show Record Count Function
Editing or deleting lookup list values can cause changes in the records that contain those values. To
determine how many records will be affected, use the Show Record Count function to list the number
of records that contain lookup list values.
234
Chapter 15
To use the Show Record Count function:
1. From the Setup menu, select Lookup Lists.
2. Double-click on the name of the lookup list you wish to view.
235
3. Click on the
button.
The list will now display how many records are linked to each list item
236
Chapter 15
Editing lookup lists
You may edit an existing lookup list by adding, deleting, changing, or merging items in a list, or by
importing terms.
Note: Editing a lookup list may cause changes in some records. If any of the records to
be changed are invalid, or if the edit would create duplicate records, the Toolkit will
return an error message and you will be unable to complete the operation. More
information about data cleanup of imported data is available in Chapter 6.
1. From the Setup menu, select Lookup Lists.
237
2. Double-click on the list you want to edit.
3. To add a list item:
a. Press the
button.
b. Enter in the value for the new list item, and press OK. The item will now appear in
the list.
4. To import list items:
a. Press the
button.
238
Chapter 15
b. Select the file you wish to import. The list must be in a plain text file, with each
item in the list on a single line. For example:
List item 1
List item 2
List item 3
c. Press Open. The new values will appear in the list.
d. Press the
button to save the list.
Deleting items from a lookup list
1. From the Setup menu, select Lookup Lists.
2. Double-click on the list to be modified. It is also possible to delete more than one item at a
time by using the Shift and/or Control keys and clicking on the desired items or range of
items.
3. Select the value(s) that you wish to delete.
4. Press the
button.
239
5. Because editing a lookup list value may result in changing records that contain that value,
the Toolkit will respond with the number of records that you will be updating, and ask you
to confirm that you wish to update those records. Press Yes to change the list and update
any records that use the value being modified.
6. The Toolkit will verify the number of records that have been modified. Press the
button.
Caution! If any of the records to be modified were imported into the application and
are not valid records, the operation cannot be performed, and the Toolkit will return an
error message.
7. Press the
button to save the list.
Changing items in a lookup list
1. From the Setup menu, select Lookup Lists.
2. Double-click on the list to be modified.
240
Chapter 15
3. Select the value that you wish to edit.
4. Press
button.
5. Edit the value.
6. Because editing a lookup list value may result in changing records that contain that value,
the Toolkit will respond with the number of records that you will be updating, and ask you
to confirm that you wish to update those records. Press Yes to change the list and update
any records that use the value being modified.
7. The Toolkit will verify the number of records that have been modified. Press OK.
8. Press the
button to save the list.
Merging items in a lookup list
241
If imported records contain information in a field that is controlled by a look up list and a List Item
does not already represent this information, a new List Item will be added to the lookup list. For
example, if an EAD is imported with the subject source listed as “lsch” instead of “lcsh,” the term
“lsch” will be added to the lookup list. The merge function can be used to rectify this inconsistency.
To merge List Items together:
1. From the Setup menu, select Lookup Lists.
2. Double-click on the list to be modified.
3. Select the first value to be merged.
4. Holding down the control (CTRL) key, select the second value to be merged.
5. Press
button.
242
Chapter 15
6. Select the item to merge into (the value to which both sets of records should be linked). If
the item cannot be modified, it will be the only item listed because it cannot be merged into
another item.
7. The Toolkit will respond with the number of records that you will be updating, and ask you
to confirm that you wish to update those records. Press Yes to change the list and update
any records that use the value being modified.
8. The Toolkit will verify the number of records that have been modified. Press OK.
243
9. Press the
button to save the list.
Configuring note options
For any of the descriptive notes, you can customize the label that appears in the Toolkit's interface.
Note: To customize the title of the note that is output as a header in EAD, print
finding aids, and other descriptive outputs, you must edit the default value for
notes. Instructions are provided in the Default Values section of this chapter.
1. From the Setup menu, select Notes Etc.
244
Chapter 15
2. Double-click on the note for which you wish to customize the label.
3. Edit the Label.
4. Press the
button to save the list.
5. Repeat until you have completed the desired customizations.
6. Press the
button to save the customizations.
Note: These customizations will not appear in the interface until the application
has been restarted.
Configuring user-defined fields
The Accessions record contains a User-defined fields tab. This section is specifically designed as a
means for repositories to create their own fields to capture information not already captured by the
Toolkit. User-defined fields are not included in any reports; however, repositories can create their own
customized reports to include these fields. This is discussed more fully in the Customizing Reports
section below.
User-defined data types
To configure user-defined fields, it is necessary to understand what types of data fields are available. It
is also important to understand that user-defined fields are configured for the repository and not just a
particular resource. Thus, some thought should go into determining if the user-defined element is
needed for just one resource or should be available to all resources in the database. If the answer is the
former, using a note might be the better solution.
245
The following terms are used to describe the data fields available for manipulation in the User defined
fields tab:
Date: A field that stores a specific date. Dates must be entered according to the default date
setting specified.
Boolean: A field which can have one of two values: typically true/false or yes/no.
Integer: A number field limited to whole numbers (not decimals).
Real: A number field that can accommodate decimals.
String: An alphanumeric field that can store a maximum of 255 characters.
Text: An alphanumeric field that can store an unlimited number of characters.
Configuring user-defined fields
To configure a user-defined field:
1. Decide which data type field is necessary to use for the information you want to capture.
For example, to configure a field that requires a yes/no answer, a Boolean data field should
be used. However if the field is to be a free text note of unknown length, a text data field
should be configured.
2. From the Setup menu select Configure Application.
246
Chapter 15
3. Select the Accessions table.
247
4. Scroll down to the user-defined fields and select the data type determined in Step 1. For
example, if a Boolean field was determined upon, select userDefinedBoolean1. The
Toolkit provides at least two user-defined fields for each data type.
248
Chapter 15
5. Change the Field Label to represent the information you want stored in the field.
249
6. Check the Include in Search Editor box if the field is to be included in the Search Editor
screen.
7. In the Database Field window, enter a value in the Return Screen field. A 0 will remove
the field from the list screen; a different number will add the field to the list screen in the
order that you designate.
Note: The Toolkit does not prevent you from creating duplicate entries in this
field. If you enter 3 and another field in the table also has the value 3, the
Toolkit will reorder the rest of the fields. When the record is saved, the fields
with a return screen order other than 0 will be sorted and then renumbered
starting at 1.
8. Provide a Definition for the field. This definition will appear in the rollover tips.
9. Provide Examples of data entries for the field. These examples will appear in the rollover
tips.
250
Chapter 15
10. Press the
button to save the new field.
Customizing reports
The Toolkit allows customized reports to be utilized, however customization of reports is not
supported by the Toolkit. To create and generate reports, you must use the open-source application,
JasperReports. JasperReports, which utilizes a complex report generating syntax, can be used on its
own or in conjunction with iReports, another open-source application that provides a graphical user
interface for designing JasperReports. You may use these applications to customize the Toolkit’s
reports or to create your own reports. You may also use other reporting applications designed to work
the backend databases supported by the Toolkit. Instructions for creating such reports are out of scope
for the Toolkit’s user manual, but the JasperReports manual may be purchased at
http://jasperforge.org/sf/projects/jasperreports and the iReports user manual is freely available at
http://jasperforge.org/sf/projects/ireport. Those wishing to create or customize their own reports will
also need to make use of the Toolkit’s application programming interface (API), which is available on
the Archivists’ Toolkit web site.
To add a custom report to the drop-down list of available reports:
1. Place the report in the appropriate directory within the Reports folder located in the same
folder as the Toolkit program files. For example, an accession report should be placed in
the reports/Accessions directory.
Note: The custom report will only be available in the local client in which it is
placed. It will not appear in other clients within the repository unless these steps
are repeated for each individual client.
251
2. If the application is open, close it and then relaunch it.
3. The report should now be available in the list of accession drop-down reports.
Note: The filename will appear as the report title in the Select Report dropdown list. To customize this and the Report Description, include the property
names, as well as the desired values, of reportTitle, and reportDescription
within the report.
To load a report into specific functional area for one-time processing:
1. Press the
2. Select the
button.
button.
3. A file-picker window will appear, prompting for the report file to be chosen. Select the
appropriate file and press Open.
252
Chapter 15
Note: The screen will not change after the report is loaded.
4. Input a Report Header if desired. Pick an output method from the Select Output dropdown list and click on Preview or Print.
Note: This process will not load the report into the application permanently and
the report will not appear as an option in the Select Report drop-down list.
253