1
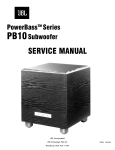
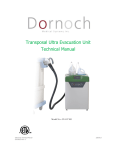
GOLD LINE CONNECTOR
203-938-2588
WWW.GOLD-LINE.COM
MODEL DSP2B- INTELLIGIBILITY METER
MODEL DSP2BP- INTELLIGIBILITY/PRIVACY METER
OPTCVOW PLATINUM SOFTWARE
USER'S MANUAL
Revision date: M_DSP2 11K3
1
Gold Line DSP2B/BP USER'S MANUAL INDEX
Page Topic
1
Manual cover sheet
2
User's Manual index
3
User's Manual index
4
General information on speech intelligibility
5
Links to technical papers & data for fire and healthcare
6
Accessory products to measure intelligibility and privacy
7
Instructions to measure intelligibility using Talkbox and push to talk
feature without computer
8
Instructions to measure intelligibility using Talkbox Test Tone output
feature without computer
8
Instructions to measure intelligibility using Fire Control Panel with
built in CD player without computer
9
DSP2B/BP Analyzer an OPTCVOW Platinum software overview
9
Directions for installing OPTCVOW Platinum software on computer
10
Directions for connecting DSP2B/BP to the computer
10
Instructions to measure intelligibility using Talkbox and push to talk
feature, without Add noise using computer
11
Instructions to measure intelligibility using Talkbox and push to talk
feature, with Add noise using computer
12
Instructions to measure intelligibility using Talkbox with Test Tone Output,
without Add noise using computer
13
Instructions to measure intelligibility using Talkbox with Test Tone Output,
with Add noise using computer
15
Instructions to measure intelligibility using Fire Control Panel with builtin CD player without Add noise using computer
15
Instructions to measure intelligibility using Fire Control Panel with builtin CD player with Add noise using computer
2
Gold Line DSP2B/BP USER'S MANUAL INDEX CONTINUED
17
Saving Empty Room measurements with CVOW PLATINUM software
17
Saving Occupied Room measurements with CVOW PLATINUM software
18
Creating detailed reports using CVOW PLATINUM software
18
Creating combined reports using CVOW PLATINUM software
19
Editing file manager information
19
Evaluating Intelligibility measurement results
20
Instructions to measure Privacy (OPT PI)
20
Evaluating Privacy measurement results
21
FCC compliance information
3
Model DSP2B & Model DSP2BP
User’s Manual
OPTion STICis® - Intelligibility & Privacy Meter
U.S. Patent 6,792,404
Now Intelligibility and Privacy Can Be Measured
Meet or Exceed International Standards
Test CD Developed by TNO Human Factors Research Laboratory in Holland Developer of STI in Europe
Speech intelligibility is not a physical quantity like Amperes, Volts or Btu’s. It is the degree to
which we understand spoken language. Speech is not necessarily intelligible simply because it is
audible. Everyone has experienced speech signals that are loud enough but overly reverberant,
suffer from echoes or distortion and therefore are not understandable. Announcements in
airports, train stations and places of worship often suffer from this problem.
Intelligibility
Intelligibility is measured by sending a test signal through the sound system and into the
listening environment. The test signal is an artificial reproduction of a range of modulated sound
frequencies important to human speech. The meter measures the received signal, compares it to
the signal specification and computes the Modulation Transfer Function (MTF). The MTF is a
measure of the change in or distortion of the signal as it passes through the sound system and as
it is affected by the listening environment. The MTF is used to compute and display the Speech
Transmission Index (STI) on the meter. The meter can convert the STI to a generic Common
Intelligibility Scale (CIS), which permits direct comparison to other test methods.
It should be noted that any “measurements’ are actually predictions of voice intelligibility.
Subject based test methods can gauge how much of the spoken information is correctly
understood by a person or group of persons for that particular test. When properly done, that
resulting value is a prediction of how much of the spoken word will be correctly understood by
others at some other time. Intelligibility meters have been developed and use a test method that
has been correlated with accepted subject based test methods. Therefore, the numbers presented
by a meter are also predictions. Still, it is common to refer the results as measurements. This is
exactly the same as audibility measurements. The definition of a decibel for sound pressure
levels is the ratio of the measured sound pressure level to the threshold of human hearing. That
is, zero decibels is the threshold of audibility. However, that threshold is a subjective number
determined many years ago by testing a large group of people with “normal” hearing.
The Speech Transmission Index (STI) is a quantitative method of measurement covered in the
International Electrotechnical Commission (IEC) standard 60268-16.
These Gold Line meters require the use of a STI-PA test signal which was developed by TNO
Human Factors Research Laboratories in the Netherlands, in conjunction with Bose and Gold
Line. This test signal and the measurement methods used by meter has been verified to correlate
to established subject based test methods. The STI-PA test signal is provided on an audio CD
and is input to the system under test. The signal can be input by a direct connection or by
playing the signal over a calibrated loudspeaker and inputting through the system microphone.
4
Alternatively, the signal could be embedded on the audio system’s sound chip. However, due to
minor differences in software implementation, users must verify that the embedded test signal is
compatible with the meter being used. Verification can be obtained from the audio system
manufacturer.
STI measurements can be made without significant training. Once the STI-PA signal has been
input to the system under test, a single button push on the DSP2B/BP will produce the STI,
which can be converted CIS as specified in IEC standard 60849. The test only requires about 15
seconds. The STI-PA signal can be left continuously playing, making it possible to simply move
the DSP2B/BP to a new position and initiate a new measurement.
“VALIDATION: The DSP2B is designed for making STI (IEC 60268-16) and CIS
measurements and has been validated for that purpose by the TNO Human Factors Group.
Model DSP2BP is capable of making PRIVACY measurements in addition to intelligibility.
The TNO Human Factors Group recommends STI-PA as the preferred objective
methodology for measuring reproduced speech intelligibility.”
TECHNICAL PAPERS & DATA FOR FIRE AND HEALTHCARE
Emergency Communications Issues
See http://www.gold-line.com/pdf/articles/p_sti01e14.pdf
Ken Jacob, presentation to the National Fire Protection Association Congress, Understanding
Speech Intelligibility and the Fire Alarm Code.
NFPA 72, National Fire Alarm and Signaling Code (NFPA, Batterymarch Park, Quincy, MA)
uses the term Emergency Communications System (ECS) to describe emergency audio systems.
Subcategories include Emergency Voice Alarm Communications Systems (EVACS) used for
fire alarm voice announcements and Mass Notification Systems (MNS) used all emergency
signaling. Where the system being tested is an ECS, users should consult NFPA 72 for
requirements such as drawings, minimum sound levels for alert tones, designation and
identification of Acoustically Distinguishable Spaces (ADSs) and other requirements that might
affect a comprehensive measurement/test protocol.
Healthcare Issues:
Increasingly Codes and liability laws are compelling modern consultants, to find a way to verify
the Privacy of a system. The new HIPAA standards for Patient Information privacy is driving the
trend towards Privacy Index measurements as the best method for assuring that masking systems
are in fact providing adequate levels of privacy. White papers from Government Studies have
recommended PI as the preferred method for assuring that speech remains confidential. Two
recent studies by Dr. Kenneth Roy, PhD have documented the superiority of Privacy Index
measurements, and the legal issues related to failure to provide speech privacy under the new
HIPAA medical regulations see:
http://www.wedi.org/cmsUploads/pdfUpload/WhitePaper/pub/P-Final-Oral_Com.pdf
http://www.wedi.org/cmsUploads/pdfUpload/eventsPresentationInformation/pub/Milleran
dSykes.pdf
5
AVAILABLE ACCESSORY PRODUCTS TO MEASURE INTELLIGIBILITY AND
PRIVACY
Gold Line offers a portable sound source, the Gold Line TalkBox™ to provide a source for the
STI-PA tones. The system includes a portable CD player that has been modified for
measurement quality performance, an internal amplifier and a small positionable loudspeaker.
The TalkBox™ system is contained in a lightweight carry case and will run on AC Power or
internal batteries. The Talkbox can be used for direct input of the test signal or for playing the
signal through the loudspeaker simulating a person talking into a microphone.
Privacy Index is essentially the inverse of the intelligibility Index. One can think of it as an
Un-Intelligibility Index. Whereas Gold Line’s intelligibility firmware tells you when people are
able to understand speech from a sound system, OPT PI (Privacy Index) does the opposite. It
tells you when speech is sufficiently blocked or masked so that people cannot understand the
content. By doing so it predicts when various degrees of privacy have been achieved.
Model DSP2B is a dedicated meter to measure Speech Intelligibility using OPT STICis
intelligibility software option. Model DSP2BP includes OPT STICis intelligibility software
module and the OPT PI firmware option to measure Privacy. In order to accept the OPT PI
firmware, a meter must have the intelligibility software, OPT STICis, since the two packages
share code.
Other Goldline analyzers that accept the OPT PI and OPT STIC options are the DSP 2, DSP30 &
DSPCIW.
UTILITY TO ADD NOISE
Both the DSP2B/BP and the DSP30B/BP have a utility to allow you to correct an STI score
measured in an empty room, to that which would be obtained with the room occupied. The noise
correction calculation requires three pieces of information:
1. An intelligibility measurement for the room when empty.
2. The spectrum of the ambient noise at the time of the intelligibility test.
3. The spectrum of the noise that the measurement is to be corrected to.
This utility permits systems to be tested prior to final occupancy to determine possible problem
locations or conditions.
6
INSTRUCTIONS FOR STAND-A-LONE MODELS DSP2B AND DSP2BP
WITHOUT USING A COMPUTER
INTELLIGIBILITY TESTING FOR VOICE EVACUATION SYSTEMS
REQUIRED EQUIPMENT:
TALKBOX (requires 110vac or 8 AA Alkaline or Ni cad/NiMH batteries)
DSP2B/BP (requires 110vac or 8 AA Alkaline or Ni cad/NiMH batteries)
STI-PA CD test tones (included with DSP2B/BP & DSP30B/BP)
In some situations, hearing protection might be warranted.
See NFPA 72 for other possible requirements where the system being tested is an
Emergency Communications System (ECS).
INSTRUCTIONS TO MEASURE INTELLIGIBILITY (OPT STIcis):
USING TALKBOX AND PUSH TO TALK FEATURE
WITHOUT COMPUTER
1. Insert PA system microphone into Talkbox holder facing the speaker
2. Position the Talkbox loudspeaker at the normal mouth to microphone distance.
NOTE: proper microphone to mouth distance should be 1 inch.(See ANNEX D of NFPA722010 for additional set-up information)
3. Play the STI-PA CD with the Talkbox
4. Insert analyzer microphone into the meter and turn on (will display the SPL dBA). Place
the tip of the DSP2B/BP microphone 1 meter or approximately 39 inches from the
Talkbox, facing directly at the loudspeaker and adjust the Talkbox level to 65dBA.SPL
5. Place meter microphone in the area to be measured at expected ear level.
6. To make an intelligibility test, set the Analyzer to the intelligibility mode by pressing the
(MODE SELECTOR) on the bottom of the analyzer, until the CIS LED is lit. If your
specification provides for STI, rather than CIS, depress the Mode Selector until the STI
LED is lit.
7. To start the test Press the [TEST] Button. Test results will display in 15 seconds
8. If “Err” is displayed, press the [dBA] Button and repeat from step 8 as reliable data
could not be collected.
NOTE: In the event of an STI failure, possible reasons may include; An unfurnished room under
test will produce a significantly lower STI value since the large flat reflective surfaces
will add echoes and the lack of absorptive materials will also increase RT60 times and
reduce the STI value further.
9. If the “BAT” symbol is shown, replace batteries.
7
INSTRUCTIONS TO MEASURE INTELLIGIBILITY (OPT STIcis):
USING TALKBOX WITH TEST TONE OUTPUT FEATURE
WITHOUT COMPUTER
1. Choose an initial room to check the SPL dBA level of your emergency voice evacuation
system.
2. Play the system's pre-recorded emergency Tone alert and take the DSP2B/BP to the room
that you previously chose.
3. Insert the microphone into the top of the analyzer and turn on the power switch at the
bottom of the analyzer.
NOTE: The DSP2B/BP will automatically start-up and read the SPL dBA measurement on the
screen.
5. Check the SPL reading and measure the SPL to confirm that it meets the design
requirements
NOTE: NFPA72-2010 requires that the Alert Tone must be +5dB above a sound that last for
more than 60 seconds or +15dB above the average SPL for an occupied period for a
public area or +10dB for a private area
6. Turn off the emergency tone.
7. Insert the STI-PA disk into the Talkbox CD player.
8. Connect the ¼ inch TEST TONE OUTPUT jack on the Talkbox to the LINE INPUT jack
on your system panel.
9. Set the VOLUME CONTROL on the Talkbox to 50% (12 noon).
10. Play the STI-PA tone through the Talkbox.
11. Go back to the same location that you made the previous SPL measurement with the
DSP2B/BP and check the SPL again.
12. Match the SPL level to your previous reading by either adjusting the Volume control on
the Talkbox or the channel input pot on your control panel.
NOTE: Do not change the systems master volume as this is already set to code. Your test
procedure is now calibrated. The SPL level of the STI-PA tone should be within +3 dB
of the Alert tone.
13. Proceed to each of the test points within the area to be tested.
14. Press the MODE SWITCH on the bottom of the analyzer until the lights on the face of
the unit read STI or CIS depending on your job specifications.
15. Press the TEST BUTTON on the analyzer and wait for the counter to count down. The
display will read the STI or CIS score depending on the mode that was chosen.
INSTRUCTIONS TO MEASURE INTELLIGIBILITY (OPT STIcis):
USING FIRE CONTROL PANEL WITH BUILT IN CD PLAYER.
WITHOUT COMPUTER
NOTE: The first step is to verify that your systems CD player is capable of producing the
STI-PA test tone accurately.
1. Insert the GOLD LINE STI-PA test tone CD into your systems CD PLAYER.
2. Play the STI-PA CD.
3. Take the DSP2B/BP to a speaker in a room to be tested.
4. Place the analyzer microphone at ear level and verify that the SPL reading confirms that
it meets the design requirements
8
NOTE: NFPA72-2010 requires that the Alert Tone must be +5dB above a sound that last for
more than 60 seconds or +15dB above the average SPL for an occupied period for a
public area or +10dB for a private area
5. Set the MODE SELECT switch on the bottom of the analyzer to STI.
6. Hold the microphone within a couple of inches from the speaker facing directly at the
center.
7. Press the TEST BUTTON on the analyzer and wait for the counter on the screen to count
down.
8. The screen will now read a STI score. As long as your score is at least .93 STI your
systems CD player is accurate enough for speech intelligibility testing.
9. Proceed to each of your test zones within the area to be tested one at a time.
10. Press the MODE SWITCH on the bottom of the analyzer until the lights on the face of
the unit read STI or CIS depending on your job specifications.
11. Press the TEST BUTTON on the analyzer and wait for the counter to count down. The
display will read the STI or CIS score depending on the mode that was chosen.
Computer Interface Overview INTELLIGIBILITY (Add Noise and Save Files)
DSP2B/BP ANALYZER AND OPTCVOW PLATINUM SOFTWARE
The DSP2B is a versatile speech intelligibility analyzer that is simple to use as a
stand-a-lone unit or in conjunction with a computer and the OPTCVOW PLATINUM software.
When the DSP2B is used alone, intelligibility can be tested with the use of the supplied Gold
Line STI-PA Test Tone CD and the push of 1 button while walking around the location that is
being tested. The optional DSP2BP is capable of measuring privacy. The STI-PA Test Tone can
either be played through a Gold Line TalkBox or played through the BUILT-IN CD PLAYER
part of the building's voice evacuation system. The advantage of using the OPTCVOWP
software is creating the ability to save measurements, create reports and add characteristic noise
of the location where the voice evacuation system is being used. With this information, you will
know that in an emergency the message will be
heard clearly and lives will be saved.
There are 2 different ways of saving intelligibility readings from your analyzer into your
computer using OPTCVOW PLATINUM SOFTWARE. Both empty and occupied rooms can
either be saved as separate files or combined files. The preferred method is saving as combined
files in order to not confuse mixing the wrong files together when adding noise and creating
reports. The order of making measurements does not matter whether the empty room or the
occupied room is done first. The process of saving measurements is the same for both methods.
Directions for using "OPTCVOW PLATINUM"
Directions for installing the OPTCVOW PLATINUM software on PC computer.
1. Load disk into CD/DVD drive on computer. (if auto start is activated on your computer the
opening menu for the disk will begin. If not open MY COMPUTER and click on the
CD/DVD drive.
2. When prompted click on RUN SETUP.EXE
9
3. Click YES to allow computer to begin setup.
4. After the opening screen appears click on the USB DRIVER icon.
5. Follow the prompts on the screen for the install shield wizard. The computer will
automatically choose the correct driver required for the operating system.
6. After the USB DRIVERS are installed click on the INSTALL SOFTWARE icon.
7. Follow the prompts on the screen to install the software.
8. After the software is installed click on the EXIT icon and remove the disk.
DIRECTIONS FOR CONNECTING THE DSP2B/BP TO THE COMPUTER
1. Connect the serial cable to the USB serial cable adapter and lightly screw together finger
tight.
2. Attach male end of the serial cable to the serial port on top of the DSP2B/BP.
3. Attach the USB end of the adapter to the USB port on the computer. (preferably not
through a USB hub.)
4. Connect the Gold Line MK8A microphone to the top of the analyzer.
5. Turn on the DSP2B/BP by the switch on the bottom right side of the analyzer.
6. Open the CVOW PLATINUM software on your computer.
7. If your screen is flashing click on the FILE button on the top of your computer screen.
Scroll down and click on SELECT COM PORT.
8. Click on correct COM PORT and then click on HIDE.
9. The computer screen will stop flashing and display the ambient sound dBa level at the
bottom center of the screen along with the Octave band frequency data.
MAKING INTELLIGIBILITY MEASUREMENTS WITH
OPTCVOW PLATINUM ON COMPUTER
INTELLIGIBILITY TESTING FOR VOICE EVACUATION SYSTEMS
REQUIRED EQUIPMENT:
TALKBOX (requires 110vac or 8 AA Alkaline or Ni cad/NiMH batteries)
DSP2B/BP (requires 110vac or 8 AA Alkaline or Ni cad/NiMH batteries)
STI-PA CD test tones (included with DSP2B/BP & DSP30B/BP)
Computer with OPTCVOW PLATINUM installed
In some situations, hearing protection might be warranted.
See NFPA 72 for other possible requirements where the system being tested is an
Emergency Communications System (ECS).
INSTRUCTIONS TO MEASURE INTELLIGIBILITY (OPT STIcis):
USING TALKBOX AND PUSH TO TALK FEATURE,
WITHOUT ADD NOISE FEATURE
USING COMPUTER
1. Connect the DSP2B/BP to the computer and open the WINCVO PROGRAM.
2. Insert PA system microphone into Talkbox holder facing the speaker
3. Position the Talkbox loudspeaker at the normal mouth to microphone distance.
10
NOTE: proper microphone to mouth distance should be 1 inch.(See ANNEX D of NFPA722010 for additional set-up information)
4. Play the STI-PA CD with the Talkbox
5. Insert analyzer microphone into the meter and turn on (will display the SPL dBa). Place
the tip of the DSP2B/BP microphone 1 meter or approximately 39 inches from the
Talkbox, facing directly at the loudspeaker and adjust the Talkbox level to 65dBa.SPL
6. Place meter microphone in the area to be measured at expected ear level.
7. Adjust the emergency communication system level until the SPL reading on the
DSP2B/BP matches the recommended level for emergency communication systems. For
additional information about levels see the white paper by Ken Jacob, presentation to the
National Fire Protection Association Congress, Understanding Speech Intelligibility and
the Fire Alarm Code. Copy attached.
8. To make an intelligibility test, place the analyzer microphone in the location to be tested.
9. On the analyzer, press the MODE SWITCH until the display reads STI or CIS depending
on your job specifications.
10. On the computer screen press the EMPTY BUTTON (without the STI-PA TONE
playing) and press MEASURE to collect the AMBIENT SOUND in the room.
11. On the Talkbox, start the CD player with the STI-PA TONE.
12. On the computer press the MEASURE BUTTON again to collect information with the
STI-PA TONE.
13. The screen on the left of the computer screen will show you your MODULATION
TRANSFER FUNCTIONS and your MEASURED STI SCORE.
NOTE: In the event of an STI failure, possible reasons may include; An unfurnished room under
test will produce a significantly lower STI value since the large flat reflective surfaces will add
echoes and the lack of absorptive materials will also increase RT60 times and reduce the STI
value further. If the “BAT” symbol is shown, replace batteries.
INSTRUCTIONS TO MEASURE INTELLIGIBILITY (OPT STIcis):
USING TALKBOX AND PUSH TO TALK FEATURE,
WITH ADD NOISE FEATURE
USING COMPUTER
NOTE: Using the ADD NOISE FEATURE requires that you take 3 separate measurements. Two
measurements will be taken with the room empty and one with the room occupied. The
order for empty or occupied does not make a difference as the ADJUSTED STI SCORE
requires all three measurements.
1. Connect the DSP2B/BP to the computer and open the WINCVO PROGRAM.
2. Insert PA system microphone into Talkbox holder facing the speaker
3. Position the Talkbox loudspeaker at the normal mouth to microphone distance.
NOTE: proper microphone to mouth distance should be 1 inch.(See ANNEX D of NFPA722010 for additional set-up information)
4. Play the STI-PA CD with the Talkbox
5. Insert analyzer microphone into the meter and turn on (will display the SPL dBa). Place
the tip of the DSP2B/BP microphone 1 meter or approximately 39 inches from the
Talkbox, facing directly at the loudspeaker and adjust the Talkbox level to 65dBA.SPL
11
6. Place meter microphone in the area to be measured at expected ear level.
7. Adjust the emergency communication system level until the SPL reading on the
DSP2B/BP matches the recommended level for emergency communication systems. For
additional information about levels see the white paper by Ken Jacob, presentation to the
National Fire Protection Association Congress, Understanding Speech Intelligibility and
the Fire Alarm Code. Copy attached.
8. To make an intelligibility test, place the analyzer microphone in the location to be tested.
9. On the analyzer, press the MODE SWITCH until the display reads STI or CIS depending
on your job specifications.
10. On the computer screen press the EMPTY BUTTON (without the STI-PA TONE
playing) and press MEASURE to collect the AMBIENT SOUND in the room.
11. On the Talkbox, start the CD player with the STI-PA TONE.
12. On the computer press the MEASURE BUTTON again to collect information with the
STI-PA TONE.
13. To save the information for the Empty room, refer to the section on (PROCESS OF
SAVING MEASUREMENTS FOR EMPTY ROOM) on page 15
14. The screen on the left of the computer screen will show you your MODULATION
TRANSFER FUNCTIONS and your MEASURED STI SCORE.
15. Return to the location that the EMPTY ROOM measurements were taken, being careful
that the same locations for each test remain the same for the OCCUPIED ROOM TEST.
NOTE: You do not need the Talkbox for the OCCUPIED ROOM TEST.
NOTE: In the event of an STI failure, possible reasons may include; An unfurnished room under
test will produce a significantly lower STI value since the large flat reflective surfaces
will add echoes and the lack of absorptive materials will also increase RT60 times and
reduce the STI value further.
16. Open the file for the EMPTY ROOM for each location 1 at a time so the OCCUPIED
information is saved into the proper EMPTY ROOM file.
17. If not already connected, connect the analyzer to the computer and click on the
OCCUPIED BUTTON.
18. Click the MEASURE BUTTON.
19. To save the information for the Occupied room, refer to the section on (PROCESS OF
SAVING MEASUREMENTS FOR OCCUPIED ROOM) on page 16
20. The screen on the left of the computer screen will show you your MODULATION
TRANSFER FUNCTIONS and your MEASURED STI SCORE along with the
ADJUSTED STI SCORE.
INSTRUCTIONS TO MEASURE INTELLIGIBILITY (OPT STIcis):
USING TALKBOX WITH TEST TONE OUTPUT, WITHOUT ADD NOISE FEATURE
USING COMPUTER
1. Choose an initial room to check the SPL dBA level of your emergency voice
communication system.
2. Play the system's pre-recorded emergency message and take the DSP2B/BP to the room
that you previously chose.
3. Insert the microphone into the top of the analyzer and turn on the power switch at the
bottom of the analyzer.
NOTE: The DSP2B/BP will automatically start-up and read the SPL dBA measurement on the
12
screen.
4. Check the SPL reading and measure the SPL to confirm that it meets the design
requirements Turn off your emergency message on your system.
5. Insert the STI-PA disk into the Talkbox CD player.
6. Connect the ¼ inch TEST TONE OUTPUT jack on the Talkbox to the LINE INPUT jack
on your system panel.
7. Set the VOLUME CONTROL on the Talkbox to 50% (12 noon).
8. Play the STI-PA tone through the Talkbox.
9. Go back to the same location that you made the previous SPL measurement with the
DSP2B/BP and check the SPL again.
10. Match the SPL level to your previous reading by either adjusting the Volume control on
the Talkbox or the channel input pot on your control panel.
NOTE: Do not change the systems master volume as this is already set to code. Your test
procedure is now calibrated. To make an intelligibility test, place the analyzer
microphone in the location to be tested.
11. On the analyzer, press the MODE SWITCH until the display reads STI or CIS depending
on your job specifications.
12. On the computer screen press the EMPTY BUTTON (without the STI-PA TONE
playing) and press MEASURE to collect the AMBIENT SOUND in the room.
13. On the Talkbox, start the CD player with the STI-PA TONE.
14. On the computer press the MEASURE BUTTON again to collect information with the
STI-PA TONE.
15. The box on the left of the computer screen will show you your MODULATION
TRANSFER FUNCTIONS and your MEASURED STI SCORE.
NOTE: In the event of an STI failure, possible reasons may include; An unfurnished room under
test will produce a significantly lower STI value since the large flat reflective surfaces
will add echoes and the lack of absorptive materials will also increase RT60 times and
reduce the STI value further. If the “BAT” symbol is shown, replace batteries.
INSTRUCTIONS TO MEASURE INTELLIGIBILITY (OPT STIcis):
USING TALKBOX WITH TEST TONE OUTPUT, WITH ADD NOISE FEATURE
USING COMPUTER
NOTE: Using the ADD NOISE FEATURE requires that you take 3 separate measurements. Two
measurements will be taken with the room empty and one with the room occupied. The
order for empty or occupied does not make a difference as the ADJUSTED STI SCORE
requires all three measurements.
1. Choose an initial room to check the SPL dBA level of your emergency voice evacuation
system.
2. Play the system's pre-recorded emergency message and take the DSP2B/BP to the room
that you previously chose.
3. Insert the microphone into the top of the analyzer and turn on the power switch at the
bottom of the analyzer.
13
NOTE: The DSP2B/BP will automatically start-up and read the SPL dBA measurement on the
screen.
4. Check the SPL reading and measure the SPL to confirm that it meets the design
requirements Turn off your emergency message on your system.
5. Insert the STI-PA disk into the Talkbox CD player.
6. Connect the ¼ inch TEST TONE OUTPUT jack on the Talkbox to the LINE INPUT jack
on your system panel.
7. Set the VOLUME CONTROL on the Talkbox to 50% (12 noon).
8. Play the STI-PA tone through the Talkbox.
9. Go back to the same location that you made the previous SPL measurement with the
DSP2B/BP and check the SPL again.
10. Match the SPL level to your previous reading by either adjusting the Volume control on
the Talkbox or the channel input pot on your control panel.
NOTE: Do not change the systems master volume as this is already set to code. Your test
procedure is now calibrated. To make an intelligibility test, place the analyzer
microphone in the location to be tested.
11. To make an intelligibility test, place the analyzer microphone in the location to be
tested.
12. On the analyzer, press the MODE SWITCH until the display reads STI or CIS
depending on your job specifications.
13. On the computer screen press the EMPTY BUTTON (without the STI-PA TONE
playing) and press MEASURE to collect the AMBIENT SOUND in the room.
14. On the Talkbox, start the CD player with the STI-PA TONE.
15. On the computer press the MEASURE BUTTON again to collect information with
the STI-PA TONE.
16. To save the information for the Empty room, refer to the section on (PROCESS OF
SAVING MEASUREMENTS FOR EMPTY ROOM) on page 15
17. The screen on the left of the computer screen will show you your MODULATION
TRANSFER FUNCTIONS and your MEASURED STI SCORE.
18. Return to the location that the EMPTY ROOM measurements were taken being
careful that the same locations for each test remain the same for the OCCUPIED
ROOM
TEST.
NOTE: You do not need the Talkbox for the OCCUPIED ROOM TEST.
NOTE: In the event of an STI failure, possible reasons may include; An unfurnished room under
test will produce a significantly lower STI value since the large flat reflective surfaces
will add echoes and the lack of absorptive materials will also increase RT60 times and
reduce the STI value further.
19. Open the file for the EMPTY ROOM for each location 1 at a time so the
OCCUPIED information is saved into the proper EMPTY ROOM file.
20. If not already connected, connect the analyzer to the computer and click on the
OCCUPIED BUTTON.
21. Click the MEASURE BUTTON.
22. To save the information for the Occupied room, refer to the section on (PROCESS
OF SAVING MEASUREMENTS FOR OCCUPIED ROOM) on page 16
The screen on the left of the computer screen will show you your MODULATION TRANSFER
FUNCTIONS and your MEASURED STI SCORE along with the ADJUSTED STI SCORE
14
NOTE: In the event of an STI failure, possible reasons may include; An unfurnished room under
test will produce a significantly lower STI value since the large flat reflective surfaces will add
echoes and the lack of absorptive materials will also increase RT60 times and reduce the STI
value further.
If the “BAT” symbol is shown, replace batteries.
INSTRUCTIONS TO MEASURE INTELLIGIBILITY (OPT STIcis):
USING FIRE CONTROL PANEL WITH BUILT IN CD PLAYER
WITHOUT ADD NOISE, WITH COMPUTER
NOTE: The first step is to verify that your systems CD player is capable of producing the
STI-PA test tone accurately.
1. Insert the GOLD LINE STI-PA test tone CD into your systems CD PLAYER.
2. Play the STI-PA CD.
3. Take the DSP2B/BP to a speaker in a room to be tested.
4. Check the SPL reading and measure the SPL to confirm that it meets the design
requirements.
5. Set the MODE SELECT switch on the bottom of the analyzer to STI.
6. Hold the microphone within a couple of inches from the speaker facing directly at the
center.
7. Press the TEST BUTTON on the analyzer and wait for the counter on the screen to count
down.
8. The screen will now read a STI score. As long as your score is at least .93 STI your
systems CD player is accurate enough for speech intelligibility testing.
9. Proceed to each of your test zones within the area to be tested one at a time.
10. Press the MODE SWITCH on the bottom of the analyzer until the lights on the face of
the unit read STI or CIS depending on your job specifications.
11. Press the TEST BUTTON on the analyzer and wait for the counter to count down. The
display will read the STI or CIS score depending on the mode that was chosen.
INSTRUCTIONS TO MEASURE INTELLIGIBILITY (OPT STIcis):
USING FIRE CONTROL PANEL WITH BUILT IN CD PLAYER
WITH ADD NOISE, WITH COMPUTER
NOTE: The first step is to verify that your systems CD player is capable of producing the
STI-PA test tone accurately.
1. Insert the GOLD LINE STI-PA test tone CD into your systems CD PLAYER.
2. Play the STI-PA CD.
3. Take the DSP2B/BP to a speaker in a room to be tested.
4. Check the SPL reading and measure the SPL to confirm that it meets the design
requirements.
5. Set the MODE SELECT switch on the bottom of the analyzer to STI.
6. Hold the microphone within a couple of inches from the speaker facing directly at the
center.
7. Press the TEST BUTTON on the analyzer and wait for the counter on the screen to count
down.
15
8. The screen will now read a STI score. As long as your score is at least .93 STI your
systems CD player is accurate enough for speech intelligibility testing.
NOTE: If not already connected, connect the DSP2B/BP to the computer.
9. To make an intelligibility test, place the analyzer microphone in the location to be tested.
10. On the analyzer, press the MODE SWITCH until the display reads STI or CIS depending
on your job specifications.
11. On the computer screen press the EMPTY BUTTON (without the STI-PA TONE
playing) and press MEASURE to collect the AMBIENT SOUND in the room.
12. On the emergency control panel, start the CD player with the STI-PA TONE.
13. On the computer press the MEASURE BUTTON again to collect information with the
STI-PA TONE.
14. To save the information for the Empty room, refer to the section on (PROCESS OF
SAVING MEASUREMENTS FOR EMPTY ROOM) on page 15
15. The screen on the left of the computer screen will show you your MODULATION
TRANSFER FUNCTIONS and your MEASURED STI SCORE.
16. Return to the location that the EMPTY ROOM measurements were taken being careful
that the same locations for each test remain the same for the OCCUPIED ROOM TEST.
17. NOTE: You do not need the STI-PA TONE for the OCCUPIED ROOM TEST.
NOTE: In the event of an STI failure, possible reasons may include; An unfurnished room under
test will produce a significantly lower STI value since the large flat reflective surfaces
will add echoes and the lack of absorptive materials will also increase RT60 times and
reduce the STI value further.
18. Open the file for the EMPTY ROOM for each location 1 at a time so the OCCUPIED
information is saved into the proper EMPTY ROOM file.
19. If not already connected, connect the analyzer to the computer and click on the
OCCUPIED BUTTON.
20. Click the MEASURE BUTTON.
21. To save the information for the Occupied room, refer to the section on (PROCESS OF
SAVING MEASUREMENTS FOR OCCUPIED ROOM) on page 16
The screen on the left of the computer screen will show you your MODULATION TRANSFER
FUNCTIONS and your MEASURED STI SCORE along with the ADJUSTED STI SCORE
NOTE: In the event of an STI failure, possible reasons may include; An unfurnished room under
test will produce a significantly lower STI value since the large flat reflective surfaces
will add echoes and the lack of absorptive materials will also increase RT60 times and
reduce the STI value further.
If the “BAT” symbol is shown, replace batteries.
16
PROCESS OF SAVING MEASUREMENTS USING OPTCVOW PLATINUM
ON COMPUTER
EMPTY ROOM
NOTE: Make sure analyzer is set for STI or CIS depending on your job specs.
1. After taking the measurement of the AMBIENT SOUND and the INTELLIGIBILITY
STI-PA TONE, click FILE located on the top left corner of the computer screen.
2. Click SAVE.
3. Fill in the JOB NUMBER, JOB NAME, COMPANY, ADDRESS, LOCATION AND
OPTIONAL NOTES ABOUT THE LOCATION.
NOTES ABOUT FILLING IN THE BLOCKS OF INFORMATION
JOB NUMBER- should be unique to entire job.
JOB NAMEThe name of the company where measurements are being taken.
COMPANYName of company taking the measurements
ADDRESSAddress of location where measurements are being taken.
LOCATIONlocation where each measurement is being taken within the job site.
(EXAMPLE-STAIRS)
NOTES(EXAMPLE- TOP OF STAIRS FACING DOWN)
NOTE: Gold Lines recommendation for saving files is first create a folder
named as the company taking the measurements. Then create a
sub folder with the job number. Save all information under the job
number using the locations as file names.
4. Click OK
5. Change file name to match location information adding the word EMPTY to end.
6. The computer screen shows the STI SCORE for the empty room.
PROCESS OF SAVING MEASUREMENTS USING OPTCVOW PLATINUM
ON COMPUTER.
OCCUPIED ROOM
NOTE: Make sure analyzer is set for STI or CIS depending on your job specs.
1.
2.
3.
4.
5.
6.
7.
8.
9.
Open OPTCVOW PLATINUM software and connect DSP2B
Click FILE on top left side of computer.
Click OPEN.
Change “FILES OF TYPE” from CVO FILES to STI FILES.
Click on the correct file from the empty room based on LOCATION.
Click OPEN.
Click OCCUPIED BUTTON on right side of computer screen.
Click MEASURE (noise levels for occupied room)
Click FILE on computer
17
10. Click SAVE
11. Fill out information in blocks. (Everything will be the same as empty room file.)
12. Click OK.
13. Change file name to match location information adding the word OCCUPIED.
14. Click SAVE.
15. Computer shows MEASURED AND CORRECTED STI SCORE for occupied room.
CREATING DETAILED AND COMBINED REPORTS USING
OPTCVOW PLATINUM
CREATING DETAILED REPORTS
1.
2.
3.
4.
Click FILE on computer.
Click OPEN MULTIPLE...
On file manager screen, click ADD FILES.
Either click only the file you want or Press and hold CTRL KEY and click on each file
you want to add.
5. Click the OPEN button.
6. Click on the file that you want to create a detailed report on ( file will turn blue when
selected.)
7. Click SELECT.
NOTE: Select button will also unselect a file.
In order to customize the title of the Detailed Report, click on REPORT HEADER fields at the
top of the file manager and type in the required information.
EXAMPLE- (line 1) Detailed STI REPORT FOR CITI BANK.
(line 2) JOB NUMBER: 1234, DATE: JANUARY 8, 2011
8. Click DETAILED REPORT.
9. On the report if required by the job you can type in the test equipment calibration
information. The information will be saved for all files within the job number folder.
10. If not connected, connect your printer to the computer.
11. Click PRINT.
NOTE: Measurements can be viewed in either STI or CIS by clicking on the STI or CIS
buttons on the file manager screen.
CREATING COMBINED REPORTS
1.
2.
3.
4.
Click FILE on computer.
Click OPEN MULTIPLE...
Click ADD FILES.
On the file manager screen press and hold the CTRL KEY and click on each file you
want to add to your combined report.
5. Click OPEN.
6. Click SELECT ALL or each file that you want to be included in the combined report.
NOTE: Select all toggles between select all and unselect all.
18
7. If the MEAN and STANDARD DEVIATION is required on the report, check the StdDev
box on the FILE MANAGER.
NOTE: On the FILE MANAGER, The JOB #, JOB NAME, COMPANY,
ADDRESS, LOCATION and COMMENT Fields can be edited. However
the actual measurements that were saved during the testing procedure
can not be altered.
NOTE: Measurements can be viewed in either STI or CIS by clicking on the
STI or CIS button on the file manager screen.
The process of editing is as follows:
1. On the file manager screen check the box marked ALLOW JOB EDITING.
2. Click on the EDIT BUTTON.
3. Click on the individual field that needs editing (field will turn blue).
4. Change the field as required.
8. In order to customize the title of the Combined Report, click on REPORT HEADER
fields at the top of the file manager and type in the required information.
EXAMPLE- (line 1) COMBINED STI REPORT FOR CITI BANK.
(line 2) JOB NUMBER: 1234, DATE: JANUARY 8, 2011
9. Click on the COMBINED REPORT BUTTON.
10. Make sure the printer is connected to the computer.
11. Press the PRINT button on the COMBINED REPORT screen.
Evaluating the results - INTELLIGIBILITY
The front label of the DSP2B has the basic instructions and the following tables
To evaluate the results of the test
According to NFPA 72 (appendix), a passing score is .70 CIS / .50 STI or higher.
STI
1.00
CIS
1.00
STI
0.45
CIS
0.65
0.95 0.90 0.85
EXCELLENT
0.98 0.95 0.93
0.40
0.35
POOR
0.60
0.54
0.80
0.75
0.90
0.87
0.70 0.65
GOOD
0.84 0.81
0.30
0.25
0.20
0.47
0.39
0.29
0.15
BAD
0.16
0.60
0.55
FAIR
0.74
0.50
0.10
0.05
0.00
0.00
0.00
0.00
0.78
0.70
19
PRIVACY INDEX MEASUREMENTS
REQUIRED EQUIPMENT:
TALKBOX (requires 110vac or 8 AA Alkaline or Ni cad batteries)
DSP2BP (requires 110vac or 8 AA Alkaline or Ni cad batteries)
STI-PA CD test tones (included with DSP2BP & DSP30BP)
INSTRUCTIONS TO MEASURE PRIVACY (OPT PI)
PI measurements are made in occupied areas, typically with the sound masking system
turned on, and set to its normal levels.
1. Insert the STI-PA CD into the TalkBox and turn on.
2. Insert analyzer microphone into the Analyzer and turn on (will display dBA SPL)
3. Place the talk box loudspeaker in the general location where the person will be speaking
during normal use of the space and set the level on the TalkBox to 65dBA, as measured
with microphone approximately 1 meter (39”) from the TalkBox loudspeaker.
4. Place DSP2BP microphone in the area to be measured for privacy (adjoining cubicle,
adjoining room, etc).
5. To make a PI test, set the DSP2BP to the PI mode by pressing the (MODE SELECTOR)
on the bottom of the analyzer, until the PI LED is lit.
6. To start the test Press the [TEST] Button. Test results will display in 48 seconds.
7. If “Err” is displayed, press the [dBA] Button and repeat the test as reliable data could not
be collected. The PI Mode has an auto reject mode, if corrupted date is detected during
the test (slamming doors, other impulsive type noises). If this occurs, you will see the
numeric box stop its count down, and go back to the start of the sequence. If this autodetect/correct mode is successful, it will take slightly longer to test, but will display a
score. If too many errors are detected, it will instead display Err, and you need to re-run
the test. Remember that PI tests measure very low levels, so it is best to do this type of
work when it is relatively quiet in the room.
8. If the “BAT” symbol is shown, replace batteries.
Evaluating the results - PRIVACY
EXCELLENT
PI
1.00
PI
.79
GOOD
.95
POOR
.70
.69
.94
.90
NO PRIVACY
FAIR
.89
.80
0.00
20
This equipment has been tested and found to comply with the limits for a Class B digital device, pursuant to part 15
of the FCC Rules. These limits are designed to provide reasonable protection against harmful interference in a
residential installation. This equipment generates, uses and can radiate radio frequency energy and, if not installed
and used in accordance with the instructions, may cause harmful interference to radio communications. However,
there is no guarantee that interference will not occur in a particular installation. If this equipment does cause harmful
interference to radio or television reception, which can be determined by turning the equipment off and on, the user
is encouraged to try to correct the interference by one or more of the following measures:
-
Reorient or relocate the receiving antenna.
Increase the separation between the equipment and receiver.
Connect the equipment into an outlet on a circuit different from that to which the receiver is connected.
Consult the dealer or an experienced radio/TV technician for help.
REVISION DATE: M_DSP2 11K3
21