1
GeDVR4S
4ch standalone network DVR
User's manual
1. Product introduction
1.1. System specification
2. Product operation
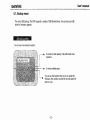
2.1. Various split screen
2.2. 1 channel audio recording & playback
2.3. USB backup
2.4. System upgrade through USB stick
2.5. Network client program with various functions
2.6. Front panel and buttons
2.7. Back panel connection
2.8. Remote controller
3. Various display mode
3.1. QUAD mode
3.2. PIP mode
3.3. FULL screen mode
3.4. AUTO rotation mode
3.5. TRIPLEX mode
4. DVR installation and operation
4.1. Recording
4.2. Playback
4.3. Searching
4.4. Zooming
4.5. Freezing
4.6. USB backup
4.7. System information
5. Menu
5.1. Setup menu
5.2. System menu
5.3. Video menu
5.4. Recording menu
5.5. Network menu
5.6. Sensor I Motion menu
5.7. Backup menu
5.8. Schedule recording menu
6. Network client software
6.1. Program installation and
operation
7. Router
7.1. Virtual server
7.2. Router IP check
7.3. Access
App. A. Troubleshooting
App. B. Product specification
GeDVR4S
User's manual
Before operating
This User's manual is explanation of GeDVR4S installation and operation . If you are not familiar with DVR, please contact
professional technicians for installation and operation. Please read thoroughly before you operate the unit for your safety.
Be careful!
Do not install the unit where vibration and shock can be made. This can cause trouble.
Turn the unit off when you do cleaning and make sure to use dry towel.
Do not expose the unit to water or moisture.
Install the unit on even place and maintain the proper temperature.
Do not put heavy things on the unit.
User's manual
GeDVR4S
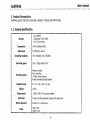
1. Product Introduction
GeDVR4S supports full triplex (recording / playback / backup) and Gut for setup.
1.1. System Specification
Storage
Up to 500GB
(supporting 24 Bit, 48 Bit)
Two (2) hard drives
Compression
M-JPEG (Modified JPEG)
Video input
4 (NTSC/PAl) channel
Recording resolution
Recording speed
704 x 240(288), 352 x 240(288)
lfps '" 120fps totally @ [IF
Manual recording
Recording mode
Plavback mode
Display
Display mode
Multi Task
Motion detection
Audio
Event recording
- Motion, Alarm detected.
Remote recording through network
FF : 2X '" 32X, REW; 2X"'16X,
120fps
- QUAD, MUX, PIP, Automated rotation
Triplex (recording, playback, backupat the same time)
5 levels, 16 x 12 grids area
Input 1 port
Output 1 port
-6-
User's manual
GeDVR4S
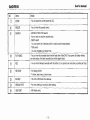
Backup
Firmware update
.
.
. .
Network viewer
Backup th rough netwo rk
AVI fi le backup
Watermark
USB memory stick, USB 2.0
Can be viewed by WINDOWS
via USB stick
Setup, Search, Backup
GeDVR4S
User's manual
2. Product operation
2.1. Various split screen
Processes 4channel video input by real time, and provides various split screen (QUAD, FULL, PIP, AUTO,
FREEZE).
2.2. 1 channel audio recording and playback
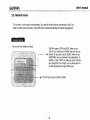
2.3. Backup to USB Thumb drive
supports USB thumb drive backup and USB 2.0. You can play back the data via remote client program.
2.4. firmware upgrade via USB stick
When you try to update the system through USB stick, save the firmware after you change the name to
'update.bin', And put it in the DVR USB port, and get in 'USB SETUP MENU' of the DVR menu to select
"FIRMWARE UPDATE'. Then it automatically begins updating. It takes about 4 N 5 minutes. After that, it will reset
itself.
2.5. Various function of network client software
- It supports various display (lchannel/4 channel/PIP/AUTO rotatlon/Triplex).
- You can save the data that are being viewed on network viewer now on your Pc.
- You can convert the data saved on your PC into AVI file.
- You can search the recorded data.
- 8-
User's manual
GeDVA4S
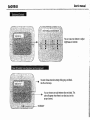
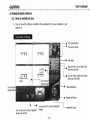
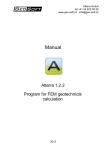
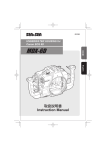
2.6. Front panel and buttons
b
:0
~O
:0
!
paRER
HOC
:
REG
:
PIAYat.oF-
:0 m:TWOR~
:0 aM~UP:
:
;
QUAD
aH1
pip
oMt
GHj
CH~
0000
c:J c=J
5EARCH
PlAy ",,-01(
=101
FREEZ
o
DICITAL VIDEO RECODER
C"'] (.
()
J
•
REO
IlI<GR UP
r--L.-_I
c: o
$ET/ EXlr
000
CD
NO
Items
Status LED
CD
®
@
@)
(§)
®
QUAD
PIP
TRIPLEX
AUTO
CHi, CH2, CH3,
CH4
Details
-
POWER: DVR is on, then LED is on.
HDD : It lights when HDD's are read or recorded.
REC : It gets on when images are recorded.
PLAY BACK; It lights when recorded data are played back:
NETWORK: DVR is accessed by client program, then it gets on.
BACKUP: If backup is being done, it gets on.
- You can use this when you want to view 4 cameras at the same time.
- You can view a few smaller screen in a main screen.
- It shows live images, playback imageson one screen.
- It shows one channel by one channel from #1 channel through #4 channel. It rotates automatically.
- You can view one channel in a full screen.
GeDVR4S
User's manual
Items
Details
(J)
ZOOM
- You can zoom the current screen by 2x2.
®
®
FREEZE
SEARCH
- RECORD START-STOP search
You can start or stop the recorded data.
- EVENT search
You can search the Event data which is motion and/or sensor(alarm).
. TIME search
@)
PLAY-BACK
- You can view the recorded data from the hard drive of the DVR. If you press this button without
any other action, the latest recorded data will be played back.
®
REC
- You can record images manually with this button . If you press it one more time, recording will stop.
@
SET/EXIT
- For Setting of DVR
- To move upper menu or main menu
@
BACKUP
- This is for USBthumb dr ive backup.
®
ARROW KEYS
- For menu setting or moving to other setting.
@
USB PORT
- USB thumb drive
NO
- You can view the paused screen.
.-
You can designate your target time.
...
- 10-
User's manual
GeDVR4S
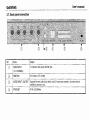
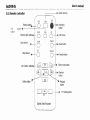
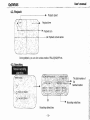
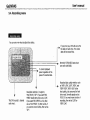
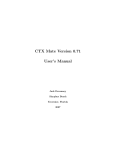
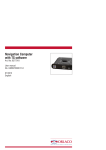
2.7. Back panel connection
NO
CD
Items
Details
VIDEO INPUT
4 composite video inputs with BNCja ck.
(lN4 CHANNEL)
®
fvlONITOR
For monitor, CCTV monitor
@
AUDIO INPUT I OUTPUT
Supports line level audio in/out which uses RCA mono type connector. You need external
amplifier to connect to mic.
@
ETHERNET
RJ-45, 1O/100Mbps
User's manual
GeDVR4S
NO
®
Items
Details
_..
ALARM/PTZ
- Alarm input (AL IN)
Supports 4 alarm inputs.
- Alarm output (AL OUT)
Supports 1 output and out internal buzzer. If alarm goes off, you can press 'ENTER'
on the front panel to reset the alarm status. Maximum volt is +SV.
@
POWER
External DC power supply (12V(5A)
User's manual
GeDVR4S
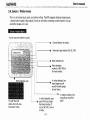
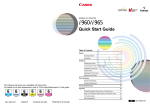
2.8. Remote controller
Button lock key
USB
Full
button
0
LOCK
0
Backup butto.'4----i_
screen + - -- - - - - - + - - - - - - QUAD
4channel split button
Zoom button
0
ZOOM
0
SET
Menu button
Auto rotatio n butto
0
F LL
C)
•
REC
Recording
button
PIP
0
PIP button
FREEZE
0
Pause button
SEARCH
0
rAUid
EJ
Setting button
Search button
Triplex mode button
Direction
button
Playback
button
~~
D
PTZ
Digital Video Recorder
PlL setting button
User's manual
GeDVR4S
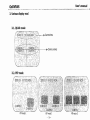
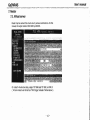
3. Various display mod
3.2. PIP mode
.'t~:2!:~:,:~\~:t21,~~~t~;;~;~1
...:, :f\,,:; ;i2t~!:~;\i:i.i~sj~l;:
·· : ,~~~~t~~;f:';~~;i':
PIP mode 1
- 14-
GeDVR4S
User's manual
3.3. FULL mode
If you press FULL mode for the proper channel, you can
view it on a full screen. It does not affect recording.
3.4. AUTO mode
If you press AUTO button, the channels rotate channel
by channel as a full screen. It does not affect recording.
User's manual
GeDVR4S
, : . ~ ..' ..
': '. ~
A' . . ~'"
•
- .,
,
1' 1 "
• . " .. , ". " "
• ' I '~'
, ,.
J' _:.,
I " .. ' 0",
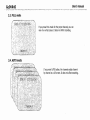
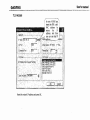
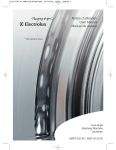
3.5. TRIPLEX mode
20 5/1/1 12'12'23
:
CA;MERA ,1
M
fN'
'"
CA¥~RA 2
PB 9AMEi?Ac3 ',
"
"
,
,
CAMERA 3' :
'.
'.
..
,
';
, '.
,
.'
'
Cii¥ERi 4
DB CAf.!!EJ;lA ii ,
' .'
...
PB cArJ.~AA 1
live and playback images are displayed together on a
screen.
"
:PB C~ lvl EOAA 2,
"
"
'"
"
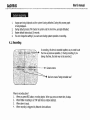
4. DVR installation and operation
1.
2.
3.
4.
5.
6,
Open the package and check the items and take the DVR out.
Connect the camera cables to the ports on the back panel.
Connect the monitor cable to the proper port on the back panel.
Connect other devices such as network, PTZ, audio etc.
Connect the supplied DC 12V power adapter ( * Make sure to use the supplied power
adapter.)
Power is automatically provided, and DVR system gets defaulted and it turns into live
mode in a couple of seconds.
- 16-
User's manual
GeDVR4S
S stem be innin .
1.
2.
3.
4.
Images are being displayed and the system is being defaulted. During this process graph
is being displayed.
During default process, DVR checks the system and the hard drive, and gets defaulted.
System default takes about 10 seconds.
You can change the setting if you want even during system operation or recording.
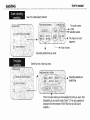
4.1. Recording
JJi~i~~t1t~~t,
In recording, this time is recorded together, so you need to set
t he time as precise as possible. ( ~ During recording, if you
change the time, the data may not be searched.)
4'ii~ffl------1...
Camera names
Red icon means "being recorded now."
When is recording done?
1. When you press REC button, recording begins. When you press one more time, it stops.
2. When Motion recording IS set 'ON' and there is motion detected.
3. When alarm is input.
4. When recordinq is triggered by Network client software.
User's manual
GeDVR4S
4.2. Playback
Playback speed
- ..
"
. ;.,
;
Playback time
,"
During playback, you can view various modes of FULL/QUAD/PIP etc.
43 S
h" •
Manual recorqing. '
searchin
. '.
The total number of
list
Selected number
, 'j
Recording ended time
Recording started time
- 18,-
User's manual
GeDVR4S
Event retarding
I
searchin
,"s', 'aCH ~fODE
:'
Search by motion/alarm/network
;:.~ > "'\' :..:'~" ~'. '~~: ~:-: .: ; ..,~,""",~(:.~
· '!)~';;;~~'bsI!;f~;J~;~~~,;:i';.)
.•· : )~ ):I,f:l,rJ~~~~~~,~;i:\!~;i ~:;,·).
Time/date
searchln
The channel of event
happened
Kind of event
Recording started time by event
Search by time / date you want.
Recording started and
ended time
This is the place where you can designate the time you want. After
designating it, you need to press "enter" ( '* You are supposed to
designate the time between START-END time to fulfill search
properly.)
User's manual
GeDVR4S
4.4. Zooming
1,~i~t1~~~i~; ;:;1; -------1~ It means the current status is "zoom".
~"+----1.
This is zoom window. You can press top/bottom/left/right
to move to where you want to zoom.
4.5. Freezing
It means the current status is "freezing",
It shows it is paused now. Press this one more time, then it is
released ( *" even though you freeze the images, recording is
done without any problems.)
- 20-
User's manual
GeDVR4S
4.6. USB backup
USB backup can be done only during playback. During playback, find the target images and press
BACKUP button. Then DVR saves that data to USB devices. In addition, if you press the button
very quickly, DVR will save that frame. If you press the button for 3 seconds, DVR will save the
images. You can press the button one more time to quit. During this process, USB icon is shown
on the screen.
------l~~
Means currently still frame is being
saved via USB port.
Means currently motion images are
being saved via USB port.
*
During backup process, if you pull the thumb
drive out, system error may be raised.
4.7. System information
Every information of DVR system is shown on screen to understand it at a glance.
Hard drive size, model, recording and playback position, network setting, recording setting,
software version etc.
User's manual
GeDVR4S
5. Menu
5.1. Setup menu
On live monitoring mode, if you press MENU/EXIT
button, you can see the main menu on the left.
For basic setting of DVR
r - - - - - - - - ------1~Dt_
For display setting
For recording setting
For netwo rk setting
For PTZ setting
For USB information and firmware update
For scheduling recording
'---------I~For
motion and alarm
*
Under the main menu, if yOL! press MENU/EXIT
button, you can get out to SETUP menu.
- 22-
GeDVR4S
User's manual
5.2. System menu
Time/date, hard drive formatting, auto rotation, system default, video signal selection, buzzer
setting, password setting, language setting.
Time/date !
To set the current date and time. Use
the buttons of top, bottom, left, and
right.
Format of date and time.
'YYV/MM/DD', 'MM/DDjYYY', or
'DD/MM/yyyY'
You can turn the time on or off.
L----
.....
The position of display.
TOP', or 'BOnOM '
User's manual
GeDVR4S
I
Hard drive format
This is to erase all the data recorded
on hard drive.
Facto
d fault
This is to have the DVR factory
defaulted.
- 24-
User's manual
GeDVR4S
Auto rotation
Assign the proper time each to the
channel. Each channel will be shown
on screen for that time.
Video si nal
\
I
Buzzer
User's manual
GeDVR4S
Language
selection
Password settin
ENGLISH/ KOREAN
Password insertin
Pia back re eat
You can use top / bottom button to select the
numbers .
- 26 -
User's manual
GeDVR4S
5.3. Video menu
This is to set-the basic environmental of live monitoring mode such as channel names, brightness,
contrast etc. In addition, boarder lines of channels, color of no video channel is set. If you select
VIDEO SETUP, you can see the menu on the right side.
Channel names
You can namethe channel here by
using arrow buttons and press
ENTER. Maximum characters are 8,
(right).
User's manual
GeDVR4S
Sri htness Contrast
You can use arrow buttons to adjust
brightness and contrast.
".'
.,
~:. \
Color of' boarder lines bounda
and back round
You can choose one coloramong white, gray, and black.
Use the arrow keys.
You can choose one color between blue and black. This
color will appear when there is no video input on the
proper channel.
BOUNDARY
User's manual
GeDVR4S
5.4. Recording menu
Record in s tu
You can use arrow keys to adjust the setting.
If you press yes, DVR will over write
the data on hard drive. The oldest
data will be erased first.
Normally'lSFid/1SEC lasts about
one week with BOGB.
To control playback
~+---H~ speed regardless of the
speed of recorded data.
This DVR records 1 channel
audio input.
Resolution selection. It supports
'MULTIPLEX', 'OF'. If you want'REC
SPEED' double time, then set as 'elF,'
if you want 'REC SPEED' as it is, then
set as 'MULTIPLEX'. In other words, if
you want to record 120ips, then set as
'CI F'.
Recorded data quality selection such
as 'VERY LOW', LOW', 'HIGH', and
'VERY HIGH'. 'VERY HIGH' is the
best quality, but consumes the hard
drive most. Normally people set as
'HIGH'. If you want more duration of
recording, then set as 'LOW' or
·VERYLOW'.
GeDVR4S
User's manual
5.5: Network menu
This is menu to set network environmental. You need to set the network environment. fir st jf you
need to control various function of the DVR and do remote monitoring and remote management.
I
Network settin
You can use arrow buttons to adjust.
This DVR supports DHCP and DDNS. When you use
static IP, you need to set as' Disable' and when you use
dynamic IP, you need to set as'Enable'. When you use
DHCP/DDNS, every environment is set automatically. In
addition, in case of DHCP set, when you access remotely,
even though the IP is changed, you can alwaysacess to
the DVR automatically through DDNS server.
""""';:+-- --1. This DVR uses the port of 5000 and 5001.
- 30 -
User's manual
GeDVR4S
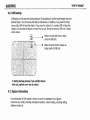
5.6. Sensor
I Motion menu
This is to set sensor input, alarm, and motion setting . This DVR supports 4channel sensor inputs ,
1 channel alarm output (relay output). And it can set mot ion recording on each channel. You can
record the images as it is set.
Sensor I motion settin
You can use arrow buttons to adjUSt.
Channel selectio n for setting
Alarm input type selection (NO, Ne, OFF)
Motion detection set
Motion detection
sensit ivity. VERY HIGH is
the most sensitive.
In motion detected, how
many images you will
record? Normally people
set two frames.
Motion detection area
;', :::' :: "; . :' 1'::
~~:
:;':
',-' . . . ;. . Ir·'
'I ~'
I· .~I · "
.i:,
1;;:'
~
.",
~..
.
I
.
I
I-~I
" ' :'
' -:'"1
,:.
,....
I."
!:.
The part fi lled wit h
yellow color is th e area
that det ects motion .
•
In motion detected, beep
goes off and you assign
that sound duration. If
you set 'NO USE', t here is
no beep.
- 31 -
In motion recordi ng, how
long will you record the
data ?
User's manual
GeDVR4S
5.7. Backup menu
This is for USB backup. This DVR supports a variety of USB thumb drives. You can also use USB
drive for firmware upgrade.
I
USB backu
settin
You can use arrow buttons to adjust.
It shows the total capacity of the USB thumb drive
hooked in.
It shows available space.
You can use this function when you try to update the
firmware. After update, you need to turn the system off
and turn it on.
- 32 -
User's manual
GeDVR4S
5.8. Schedule recording menu
You can schedule the recording for a week.
Schedule recordin settin
You can use arro w buttons to select day I time and
press 'ENTER' to fin ish. After that, you can do other
days.
If you use this function, you have to turn it 'ON' for
'SCHEDULE ENABLE'.
User's manual
GeDVR4S
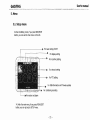
6. Network client software
6.1. How to install and use
1> You can save the software provided on the enveloped CD on your computer or just
execute it.
LiV~ remote monitoring .
The channel name
The current mode.
NG<TWOJ"'.K
v
:
~ ~
I
El
W
Live mode
~ ,. "
, i
Search mode: You can search the
data from the DVR.
NeTWORK
You can view the data on the hard
drive out of the DVR.
V
I ~ w
Display mode
button
Backup playback.
You can save
images into M
Program-off button
-
You can save the currently displayed
images into AVI file.
You can print the currently displayed
images.
- 34-
Pan/tilt button
User's manual
GeDVR4S
System sett ing
G) Press th is button.
V
I
~
(?) Insert the IP when you use
static IP.
Nii=TWQRIC
NETWOF':i'o::
W
V
N F-iT W O F'Q::;
V
I sn W
!
G
Vi
NETWCJP-l<.
V
I e; w
~i OJrfilflon
!
~
p
"I I
,
EM~/l!,~e'Ct'lernnel TI'M.far
,1 '
,'I"'",
\
1.._., '.
,'-""
Dialog
...". .. , 1-- ..
. .
•
This is the route where vou save
M-JPEG stream or AVI file.
--
~.
.
I
'Please IlJputMAC
-
l;~r.r~ pMh 1C;~\fP,\
I,
" ~ ' - ' - - - I""" ~ ---.....
'I
AVI'ec.~,o
i,, .,~dllO(Rl
I, '
.iL....,.,__.. . _..,... . ..,
QJ< -I l;.iw::e1 ' I
"
-.._-_..,....:..
.
.
.
@ Click this when you use dynamic IP
(ADSl, VDSL etc.)
'.
ID orrvour DYR
f"OA fOBfOC roo fOE- roo
IL::: ::: !r.~~!~~~~~~~:::::::::JI
Cencel
I
(4) DVR's unique MAC address. It's
shown on the manual.
'1
Woo P.:I ,2
. : ]. lot.llnd' .(1l) Video R:3 .2
Irl 61~d ~@ VldEio4 .5
. IlitelIVUV eedee
; · tJi~Itl~~\ftd P.'0 1
I lnd eo€l \lld~O 5,1I)
,
User's manual
GeDVR4S
I
Access
NETWc:JAK:
v
f
la
\III
I ,,:.
1~~90n~.:-
---'.
.
-. --
- --.
iJ .1
'h'·
;:kai:~~_ -II
.. :
QI<
~ncel
Insert the password to try to access.
Default is 0000.
You can start recording of the DVR or
stop with using this button.
- 36-
~
User's manual
GeDVR4S
I
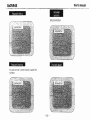
Remote search / playback
Remote search / playback is th e function th at search and playback t he
data recorded on the DVR remotely via client software.
~~~:.J ~~I)~---' J /lI,,:; n-U~1
~ .Il.x~ 1
.... "Ul"I It . . l"I
t
blllto'l l:l6 lfll
" ,
!t.NJI1'nl' la
l" ~'_h'll.(""I :rI
•
1ll1Olot\l.'!CM. «)
l
:"
, A
16
In
NeTWClRK
V \ G!1 W
NStWCRK
V
I S
W
tt
I II
.j'"
f1
it
Ill....,.
",n.~
,.01011 U ~I
IO'
J
oo,~t-
_.tIl
~~.
_ m'
000':1':11:)1
~:;,:::~~: .= :~~ ).~
"""' ...",
lIt)lt ,..
~ ' I)l
'~ I:-l' ~1 · . Ift ".
_ .....,.
,.
1Il 1'l~"
:~~ ::-~~~
-::;'!.r::: ,';:',t,~~:;: = .:;:
'"'''l '-.M '~ ''' '.0"'''01
';l~~~ ~~t,~}a: t::.
tI'l 'tl"l.~ ~ 111.1::'1111
'~Q'I'M
\' Il. ~ ...,.lt'~'l)l'lt
~ .",
. ,..~ ) . ,
hoCrn'lJl
::.~ ~
"'l~ I"IHl
OlI~'J). ;t''''<lIl
1lU'Olr.'I.:lo1I! .*)
oue.rn"':l.'I:l1
,""I "~ '.):'f''''
.......'"
1IUliI/"II 4't«J:"
"' .. ,....
/&.Cll'ft ~''':-'
~. O'I
"' (II~ ld!llUt
f*')lIlll ' ~ :1'I
tr>«I'l/QI
/lIaLO!I ... Ul
""(III.C1 .~all
Iol.t'tI'rI IU,,'
lII'CIVOII O' "
_
1.-:11
H
"" ."0ll 11 ,.,,,'
"' ~'J1 """: " J:CI
_
<Illi
'Hi
E= l!~~~:
It
IlUll.CldU6 U
0"_"'1,):1'
'.,i
.1
NeTWORK
=
~ 1l#. ' UI
I:l
It
II
11
I
"*
v
=~:'~~~::
i~''''''' lI.,:tJf.1'l::I
} 'I ~.i m ' ''' H.
,.,..ri' "lf l'll l'S
_OIl'
D ,~"'I
E·=:~R ~~:::r:::r:l:::
=:
:;~-~
:::1"
,I
lew
If you select the ist you want and
double -click it, that recorded data will be
played back.
You can categorize th e list between
'RECORD'and 'EVENT'.
(1) Select the hard drive.
® Press 'REC' or 'EVENT' button to find the list you
want and double-click it to play back.
You can select which hard drive you want
to search. This DVR supports two hard
drives, Master and Slave.
User's manual
GeDVR4S
HDD scan playback .
You can connect the hard drive out of t he DVR system to your computer
directly to play back the recorded data.
,:.,;.
~TtIIICl~
V
I
S
W
NeiTWClRK
V
I Iii< '\III
NliSIWORK
VI,",""
Hard disk selection
Playback
button
Stop
Move to end .
Move to
beginning
Playback speed
control
User's manual
GeDVR4S
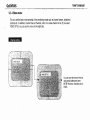
Backup
playb~ck
Backup playback is the function that plays back on your PC the backup
data on USB device and other storage device. You can connect the
backup device to the PC to play back.
.:",
NeTWORK
v J E: W
NeTWORK
V
I s; W
<:
NE-rWCl~
V
1
EO
W
NETWOP.K
v
lew
Pull the imagedata
of backup data.
Playback
Stop
Moveto end
Moveto
beginning
Playback speed control
- 39 -
User's manual
GeDVR4S
7. Router
7.1. Virtual server
Router may be various from one to one by various manufacturers. On th is
manual, the target model is MAX 400K by UNICON.
I","
:'
"
rep
rep
On router's virtual server item, assign
5000 and
5001 as DVR IP.
( );< Some routers use the terms of 'Port trigger' instead of Virtual server.)
- 40 -
GeDVR4S
7.2. Router IP check
Router 's IP address is the internet IP. The above
example shows it 192.168.1.3
User's manual
User's manual
GeDVR4S
7.3. Access
In case of DDNS use,
insert the DVR set's
MAC address to
secure
the
IP
i >I''''~ ~'~- ~'~~ " : 2c~ : / . ~:re~"~fua~; l
.:.1.: ~ ~ri;~j~:o~~ C.l1an[lal 'Tr~~~je·~ ,"~' : · : " :;.),
. ,.... ..,
, . <,"
.,' "
' , : . . , ', ,:
, . ,, ' "
"
,
" ,
, '
..• • •,
.,. , :., "" , .,., " "I'
.. .. ' .~ : : " . '" , ' . ' "
..
,"
"
"
~"
~...
, : ' ", ' .
:
, '"
·: :f;~~P~(·~8f.:.p,et;h 1~:WpvWiV: ' . .'; .:
,:.,.>-":: ':-t,: :·>·. ~,~ :~·; · ·
~~.',~::
.
nte ri eo
! eo . ,
." Inlel lndeo A Video A3.2
Inlellndeo@Video 4,5
. ' . . IntellYUV code e
l Microsoft Video I
,
'"
1 Indeo@ video 5,10
~' :1 :,1,
,
•
"
.
~ '.:
:, \~~-~~~:~,'." .', ~t,~ ·· 'o r
:. . •
'. ! •
.
".~'::;~":'''''> }':
Insert the router's IP address and press OK.
-;::
"1:"
.
..
':
. ,
"
,,
.~~.~ :'::1" · .·.:C!a·~i~tl· .
,. .
...~ ; :' ...f!·..·
User's manual
GeDVR4S
App. A. TroubleshootinCi
Symptom
Checks
The system does not get on.
- Please check the external power adapter status.
Can not view the live images.
- Please check the connection of camera video cable.
- Please checkthe connection of monitor video cable.
- Please checkthe camera power.
Live images are too bright.
- Please check the input camera status.
- Please check the camera's brightness.
- If the hard drives are full, please set the recording as overwriting,
DVR stops workinn durinq recordinn,
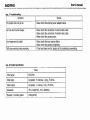
App. B. Product specification
Video
Video signal
NTSC/PAL
Video input
Composite: 4 channels, 1 Vp-p, 75 Ohms
Video output
Composite: 1 channel, 1 Vp-p 75 Ohms
Resolution
704 x 240(NTSC), 704 x 288(PAL)
Playback / recording speed
120ips(NTSC)
User's manual
GeDVR4S
Audio input / output
Audio Input,
Audio output
11 LineInput
11 Line Output
Connector
Video input ,
Composite: 4 BNC
Video output
' , Composite: 2 BNC
Audio,input
Audio output
1 RCA connector
1 RCA connector
storaqe
Main storage
Hard drives x 2pcs(Master & slave)
Backup
Via USB port
- 44-
User's manual
GeDVR4S
Generals
Unit dimension (W x D x H)
300mm x 260mm x 60mm
Unit weight
2.5Kg
Packing weight
3.0Kg
Packing dimension (W x D x H)
340mm x 260mm x 70mm
Operation temperature
5'C
N
40"(;
Operation humidity
0%
N
90%
Power
DC 12V/5A Adaptor
The specification may be changed without any prior notice for better quality.
User's manual
GeDVR4S
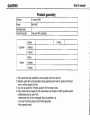
Product guaranty
Product
4 channel DVR
Model
GeDVR4S
Purchase date
Guaranty period
One year after purchase
Names
Customer
I
E-MAIL
I
Address
Contact
Name
Vendor
Installer
Contact
1. This product has been qualified by severe quality control and process.
2. Defective units with normal operation during guaranty period will be replaced with brand
news or will be repaired for free.
3. You need to submit this "Product guaranty" for free repair works.
4. Some charge will be charged for the cases below even though it's within guaranty period.
- defectiveness due to users' fault
- defectiveness due to fire, earthquake, flood, thunderbolt, etc.
- if you don't have this paper work (Product guaranty).
- After guaranty period.