1
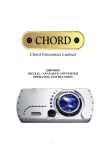
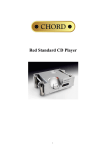
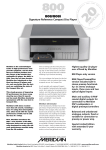
cd transport „Blu‟
Thank you for buying a Chord Electronics product.
Before you start to enjoy your CD transport, please take a couple of minutes to read how to
connect your audio equipment and loudspeakers and how to maximise your listening
experience.
inventory
As well as your Blu and this user manual, you should also have received the following
items.
1. Blu remote control
2. Mains cable
3. Chord guarantee registration card
4. Remote control manual
This unit complies with 21 CFR 1040.10 and 1040.11
1
when setting up
To ensure that your CD transport works efficiently and safely, please pay particular
attention to the following issues.
ventilation
Your Chord transport should have at least 5cm of clear space all around it to ensure a free
flow of air at all times. We do not recommend that you place Blu directly on a carpet.
mains lead and plug
All Chord equipment comes supplied with the correct mains lead and plug. This should be
used at all times.
if you need to fit a plug for UK/Europe
Connect the blue wire to the neutral terminal
Connect the brown wire to the live terminal
Connect the yellow/green wire to the earth terminal
if you need to fit a plug for US/Canada
Connect the white wire to the neutral terminal
Connect the black wire to the live terminal
Connect the green to the earth terminal
earthing issues in Europe
In some European countries a hum may occur if your Blu is connected to mains sockets
that do not have an earth. If this is the case please ensure that:
1. Your transport is connected via a multi-way mains block, which contains an earth point
at each socket outlet. This is to ensure that the chassis metalwork of each item is
connected together.
2. We recommend that an earthing method for your building be implemented.
3. Use the connecting points on your Chord unit and connect to an available earth point.
2
Safety Warnings
It is important that your transport is earthed at all times via its own mains lead. Failure to
do this may be hazardous. The power supply components within the transport are designed
to operate at lethal voltages and energy levels. Circuit designs that embody these
components conform to applicable safety requirements. Precautions must be taken to
prevent accidental contact with power-line potentials. Do not connect grounded test
equipment.
Caution: This product employs a laser that emits both visible and invisible radiation.
Removal of the top cover or tampering with any of the enclosed electronics may result in
exposure to hazardous levels of laser radiation that could cause eye damage. To prevent
injury this product should be returned for qualified service to Chord Electronics Ltd.
There are no user serviceable parts within the Blu CD transport. Unauthorised
tampering or dismantling of this product will invalidate the warranty and could
cause injury.
3
mains connection
The mains connector of Blu is at the back of the unit. Plug the female end (socket) of the
mains cable into the power connector of the transport, and the male end (plug) of the mains
cable into mains wall socket or mains extension socket.
Mains
Switch
LIVE
Mains
Connector
EARTH
NEUTRAL
Mains Connector and Switch
powering up
Press the left-hand side of the power switch labelled „I‟. Blu will now power up.
If Blu has no disc loaded, the top panel display with read “NO DISC”; if a disc has been
loaded then the number of tracks and length of the CD will be shown. Please allow a short
time for Blu to read the disc‟s Table of Contents (TOC). During this time the display will
indicate “-- ----“
powering down - long-term
1. Press the STANDBY button on the top panel or the Blu remote to put Blu into
STANDBY.
2. Press the right-hand side of the power switch labelled „O‟.
powering down - short-term
For everyday use there is no need to power Blu down completely.
Press the STANDBY button on the top panel or the supplied remote to put Blu into its
Standby mode.
4
connecting your equipment
WORDCLOCK
INPUT
DUAL DATA
OUTPUT 1
S/DIF2
OUTPUT
DUAL DATA
OUTPUT 2
CLOCK
SWITCH
OPTICAL
OUTPUT
DITHER
SWITCH
AES/EBU
OUTPUT 1
AES/EBU
OUTPUT 2
Blu - rear panel connections and switches
All the input and output connections of Blu are situated on the rear panel of the transport.
Blu has three types of digital output; Optical, Coaxial and AES/EBU.
In addition to the standard digital outputs, a special Dual Data output provides an
upsampled digital output at 176.4MHz over the “Dual Data Output” and AES/EBU outputs
shown above.
A single red LED in the top right hand corner of the Blu display indicates Dual Data mode.
IMPORTANT NOTES
Do not connect either of the Dual Data BNC outputs to a D-A converter with the clock
switch at 44.1 or 88.2kHz as this will give a distorted sound.
Do not change the clock settings when your D-A converter is selected and the volume is up
in the system - this will send a distorted signal to the loudspeakers and may cause damage.
5
coaxial digital outputs
DUAL DATA
OUTPUT 1
CLOCK
SWITCH
SPDIF
OUTPUT
DUAL DATA
OUTPUT 2
Blu - coaxial connections and Clock switch
Blu has one SPDIF and 1x Dual Data output as shown above.
All coaxial connections use BNC connectors with 75ohm impedance.
Although less
common than RCA-phono digital connectors, BNC connectors exhibit consistent
impedance behaviour and are essential for the correct transfer of digital audio data.
If your digital-analog converter only has RCA-phono coaxial digital inputs, it is worth
having a cable made by a specialist manufacturer. Please avoid RCA-BNC adaptors as
they will undoubtedly impair the sound quality. In all cases a correctly screened cable
should be used.
Clock settings
Clock switch
UP
MIDDLE
DOWN
SPDIF Output
44.1kHz
88.2kHz
88.2kHz
Dual Data Output 1
do not use
do not use
176.4kHz right
Dual Data Output 2
do not use
do not use
176.4kHz left
6
AES/EBU digital outputs
CLOCK
SWITCH
AES/EBU
OUTPUT 1
AES/EBU
OUTPUT 2
For installations that require a long run of cable between the transport and digital-analog
converter we would recommend using a balanced AES/EBU connection.
Clock settings
When the Clock switch is set to 176.4kHz (fully down), the AES/EBU outputs send the
Dual Data output as outlined in the previous section. This may be useful when using Blu
with certain high-resolution D-A converters.
When the Clock switch is in the middle position, each AES/EBU output sends data at
88.2kHz; when in the top position each output sends at 44.1kHz.
Clock switch
UP
MIDDLE
DOWN
AES/EBU 1
44.1kHz
88.2kHz
176.4kHz right
AES/EBU 2
44.1kHz
88.2kHz
176.4kHz left
7
using Blu with QBD76
Blu dual data outputs
DUAL DATA
BNC OUTPUT 1
CLOCK
SWITCH
SPDIF
OUTPUT
DUAL DATA
BNC OUTPUT 2
DUAL DATA
XLR OUTPUT 1
DUAL DATA
XLR OUTPUT 2
DUAL DATA
BNC INPUT 1
DUAL DATA
BNC INPUT 2
DUAL DATA
XLR INPUT 1
DUAL DATA
XLR INPUT 2
QBD76 dual data inputs
QBD 76
The Chord Electronics QBD76 features two sets of dual data inputs optimised for use with
Blu. For this either 2x BNC-BNC digital cables or 2x XLR-XLR digital cables are
required.
To enable Blu‟s Dual Data Output switch the clock switch on the rear panel to fully down.
This sends the data at 176.4MHz. Then connect Dual Data Output 1 to Dual Data Input 1
on the QBD76; and connect Dual Data Output 2 to Dual Data Input 2.
We strongly advise that you use proper 75ohm hard-wired BNC or XLR cables and avoid
BNC-RCA adaptors wherever possible, to avoid problems of impedance mismatch and
signal reflections.
8
RAM buffer settings for QBD76
Blu has been designed as the ultimate reference CD source for the world‟s finest digitalanalogue converters, such as our own QBD76.
As such, Blu should be significantly less reliant on QBD76‟s RAM buffer than many
designs; you may still find improved performance in your system when using the buffer.
Please refer to the QBD76 manual for further details.
9
optical digital output
OPTICAL
OUTPUT
CLOCK
SWITCH
The optical digital output uses a standard TOSlink connection and can be used with
QBD76 and several other d-a converters.
In particular an optical connection can be very useful in the prevention of earth loops, as
there is no electrical connection between two products in a system. This can be required
when combining Blu with products from other manufacturers.
Clock settings
Clock switch
UP
MIDDLE
DOWN
Optical output
44.1kHz
88.2kHz
88.2KHz
Blu has one optical output so it is not possible to use the Dual Data facility over optical.
10
dither switch
DITHER
SWITCH
Dithering systems have been used within digital Audio for many years to improve the
sound quality from digital sources.
Blu offers two different levels of dither – Normal / 24-bit (switch up) and High / 16-bit
(switch down). The High setting will offer notable improvements when using older D-A
converters. As always, the best advice is to experiment with the settings and choose
according to taste.
The dither switch affects all digital outputs.
Settings
Dither switch position
UP
DOWN
Dither
Normal / 24-bit
High / 16-bit
wordclock input
WORDCLOCK
INPUT
A dedicated wordclock input may be required in professional recording and broadcast
applications, generally wordclock outputs are not found in domestic audio products.
As Blu is a reference-grade CD transport, it is very likely that our Professional Audio
customers will use it as a CD source and so may need to synchronise it within a larger
digital system.
Professional customers should refer to their Authorised Chord Reseller or Distributor for
further details.
11
everyday use of your Blu
Loading and removing discs
Loading the disc
Firstly open the lid using the handle at the back of the player. Grab the handle firmly
between forefinger and thumb, then push upwards.
HANDLE
Blu – side view
CD DISC
Blu – top view
THUMB RECESS
(lid not shown)
CD SPINDLE
Placing the disc
Place the disc gently but firmly in the CD housing so that the centre of the disc sits right on
the spindle. Now close the lid using the handle. Wait a short time for Blu to read the disc
Table of Contents before you press Play.
12
Removing discs
Blu – top view
(lid not shown)
Using your forefingers, push the disc towards the back of the transport as shown by the
arrow above, so that the disc rises gently over the CD spindle. You should now be able to
lift the disc out with your thumb.
B
A
C
K
CD SPINDLE
Blu – cross-section
(lid not shown)
13
F
R
O
N
T
basic operation
PROG
TIME
FAST
1
2
A/B
SCAN
4
5
9
8
7
6
STANDBY
3
0
RANDOM
REPEAT
PLAY
STOP
PREVIOUS
NEXT
PAUSE
SEARCH
BACK
SEARCH
FORWARD
Blu – remote control
TRACK
PROGRAM
SCAN
SHUFFLE
A–B
DUAL DATA
INDICATOR
TOTAL
REM
REPEAT 1
PAUSE
TIME
Blu – display
For your convenience all CD functions can be accessed from the top panel and on the
supplied remote control. For the purposes of the instructions below it does not matter
which set of controls are being used.
14
PLAY
To play the disc from the beginning, press “Play” ( ).
To select a particular track, press the track number eg. 6, followed by the “Play” button.
STOP
To stop the disc, press “Stop” (
).
PAUSE
To pause the disc at a particular time, press “Pause” (
). Play can be resumed by pressing
either “Play” or “Pause”.
To select the next or previous track, press Next Track (
) or Previous Track (
To search through the disc in either direction, hold down Search Back (
Forward (
).
) or Search
)
To speed up the search, press the “FAST” key once while Search Back or Search Forward
are held down. The FAST key has no effect if pressed on its own.
STANDBY
Press the STANDBY button to put Blu into Standby and to wake it up again.
TIME
Normally the transport will display the time elapsed on the track you are playing.
Press „TIME‟ once and it will now show total time elapsed on the disc and display
TOTAL; press „TIME‟ again and the transport will show the time remaining on the disc
and display TOTAL REM. Press TIME once again to return the display to normal.
15
advanced functions
Program Mode - Programming a track selection –
Press the track number (eg. 7) followed by the „PROG‟ button, then the next track (eg. 4)
followed by PROG, and so on until all tracks have been programmed. To play your
selection, press PLAY.
If you press the PROG button before entering a track number, an error message “ERR” will
appear on the top panel display.
When in program mode, PROGRAM will be shown on the display. The Previous Track,
Next Track and Search functions will all work as normal, but will move around between
the tracks you have programmed.
The STOP button, if pressed once, returns the transport to the beginning of the
programmed selection. If you press STOP a second time then you will exit program mode
and your track selection will be lost.
REPEAT
While the disc is playing, press “REPEAT‟ once to repeat the whole disc. REPEAT will
be shown on the top panel display. Previous Track, Next Track and Search will work as
normal in this mode.
Press „REPEAT‟ again to repeat a particular track; REPEAT1 will now be shown on the
display. If you press Previous or Next track; if you Search past the beginning or end of the
track; or if you press STOP, you will exit repeat mode.
Pressing „REPEAT‟ for a third time will exit repeat mode.
RANDOM
Press „RANDOM‟ and the transport will play tracks in random order until all tracks have
been played. RANDOM will be shown on the top panel display.
If you want random play to continue indefinitely, press „RANDOM‟ and then „REPEAT‟.
Play will now continue until you press STOP.
Note that the Random control on the Blu remote is marked “SHUF”.
16
SCAN
Press „SCAN‟ to enable the scanning facility – this plays the first few seconds of each track
on the disc, and could be useful when searching for a particular piece of music if you don‟t
know the right track number.
To exit this mode, press STOP.
A-B
This function plays a particular section of your choosing in a loop between points A and B.
The selected section can be any length from a few seconds to several tracks.
When the disc is playing, press „A-B‟ to set the start point A, then let the disc continue to
your chosen end point and press „A-B‟ again to set point B. The transport will now play
only the information between points A and B, then back to A and so on. A-B will also
appear on the top panel display.
To exit this mode, press „A-B‟ for a third time and the disc will continue playing as
normal, or press STOP to stop the disc.
17
frequently asked questions
about Blu
I am not getting any sound from QBD76 (or a different D-A converter) connected via
BNC digital.
Make sure that you have connected your cable to the right digital output, and not the
wordclock input. Refer to page 5 “connecting your equipment” for details.
The sound is distorted over coaxial digital output.
Make sure you have connected the cable to the BNC digital output and not to a Dual Data
output. Refer to page 5 for details.
How do I use Blu with my DSP8000AV?
For optimal peformance, use Blu and QBD76 in conjunction with your DSP8000AV as
outlined in the DSP8000 manual and pages 7-8 of this manual.
To connect Blu to
DSP8000AV directly, select 88.2kHz or 44.1kHz (88.2kHz recommended) and connect the
BNC or optical outputs to one of the RCA-digital or optical inputs on the processor.
Why does my Blu run warm?
Advanced digital processing tends to generate a good deal of heat! Your Blu is made from
a solid billet of Aluminium, which acts like a giant heat sink, and removes the need for
fans as found on many computing devices. So if the case is warm to the touch, there is no
cause for concern.
With the dither switch down (high dither), my speakers seem noisier when a disc is
not playing.
Though it may seem strange, dither systems work by adding noise to a digital signal.
When the system is playing back audio information, this noise improves the subjective
performance of the system - a long and involved subject in itself - but when Blu is not
playing a disc, selecting high dither can cause increased background noise.
The blue lights around the CD housing do not light up when a disc is playing.
This is correct - our designers felt the lights could be distracting when you are enjoying
music.
18