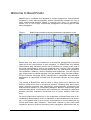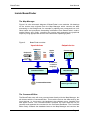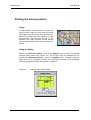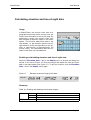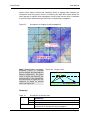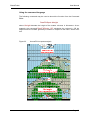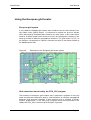
1
The BeamFinder User Manual
Manuscript
Dr. Volker Grassmann, DF5AI
March 11, 2003
Copyright (C) Dr. Volker Grassmann, 2002-2003
All rights reserved.
No part of this manual may be used or reproduced in any form or by any means, or stored in
a database or retrieval system, without prior written permission of the author except in the
case of brief quotations embodied in critical articles and reviews. Authorised users of the
BeamFinder software may, of course, store this manual together with the BeamFinder software for reference and backup purposes.
Apple, Macintosh, Mac OS, Power PC, AppleEvent, BubbleHelp and SimpleText
are all registered trademarks of Apple Computer, Inc., FileMaker Pro is a registered trademark of Filemaker Inc.
In loving memory of
Nora & Ben
License Agreement
Program usage
You may:
•
•
•
use the program BeamFinder on any computer or network;
permit other individuals to use the program either directly or on a computer
network, but not more than one user per licensed program at the same time;
make copies of the program in machine readable form solely for archival purposes, provided that you reproduce all proprietary notices on each copy.
You may not:
•
•
•
modify, translate, reverse engineer, decompile, disassemble, create derivative work based on, or copy (except for the archival copy) the program or the
BeamFinder world map or the accompanying documentation;
rent, transfer or grant any rights in the program or accompanying documentation in any form to any other person without prior written consent of the
author;
remove any proprietary notices, labels or marks on the program and any accompanying documentation.
Failure to comply with any of the above restrictions will terminate the license. This
license is not a sale. Title and copyrights to the program, the world map and the
accompanying documentation remain with the author.
Limitation of liability
In no event will the author be liable for any damages, lost profit, lost data, loss of
use, including but not limited to special, incidental, consequential or indirect
damages arising from the use of the program, however caused and on any theory of liability, even if the author has been advised of the possibility of such damages. You acknowledge that the license fee reflects this limitation of liability.
General
This agreement is the entire agreement. If any provision of this Agreement is held
invalid, the remainder of this Agreement shall continue in full force and effect.
Contents
License Agreement
Program usage
Limitation of liability
General
4
4
4
4
Welcome to BeamFinder
10
Installation
System requirements
Installation
12
12
12
Getting started
About this manual
Overview
The grid map of the world
Inside BeamFinder
13
13
14
15
18
Basic functions
Introduction
Setting the user’s home location
Entering geographical data and targets
Long and short path calculations
Plotting grid squares
Plotting the antenna pattern
Range circles and radials
The ”from-to-operator”
Display skip markers
Range of vision (radio horizon)
Calculating elevation and line-of-sight data
Calculating geomagnetic field data
Creating a map title
The site information table
The ”smart mouse cursor”
The ”rubberband”
22
22
23
26
30
31
32
34
36
38
41
43
44
46
48
50
51
Analysing radio wave propagation
Introduction
Penetration path into the atmosphere
Ionospheric ”hot spots”
Ionospheric dx targets
The Sporadic-E analyser
Hot spot analysis in Aurora/FAI propagation
Dx target analysis in Aurora/FAI propagation
Aurora/FAI scatter curve
Aurora/FAI synoptics
Bar chart analyses
Controlling BeamFinder
Introduction
52
52
53
Fehler! Textmarke nicht definiert.
Fehler! Textmarke nicht definiert.
60
65
68
70
73
75
77
77
Page 5
File functions
Clearing the map
Controlling the Command Editor
Preferences
78
79
80
82
Scripts and AppleEvents
Introduction
Using scripts in BeamFinder
Using Apple Events
86
86
87
90
Appendix
Device identifier
Using the European grid locator
References
Quick reference chart
94
94
95
97
99
Page 6
Figures
Figure 1
Figure 2
Figure 3
Figure 4
Figure 5
Figure 6
Figure 7
Figure 8
Figure 9
Figure 10
Figure 11
Figure 12
Figure 13
Figure 14
Figure 15
Figure 16
Figure 17
Figure 18
Figure 19
Figure 20
Figure 21
Figure 22
Figure 23
Figure 24
Figure 25
Figure 26
Figure 27
Figure 28
Figure 29
Figure 30
Figure 31
Figure 32
Figure 33
Figure 34
Figure 35
Figure 36
Figure 37
Figure 38
Figure 39
Figure 40
Figure 41
Figure 42
Figure 43
Figure 44
Figure 45
Figure 46
BeamFinder example analyzing transatlantic propagation on 6m
DF5AI’s DX Toolbox directory
Map dimensions (in pixels)
Map window
BeamFinder zoom levels
BeamFinder modules
Command Editor window
Home location dialog
Geographical target dialog
Antenna-beam-width dialog
Dialog for drawing range circles and radials
3rd-party-observation dialog
Skip marker dialogs
Skip markers
Extrapolated skip propagation
Height-above-ground dialog
Elevation and line-of-sight (LOS) data
Geomagnetic field data
Geomagnetic Inclination and declination
Map title dialog
Site informations dialog
Layer penetration dialog
”Hot spots” dialog
Ionospheric ”hot spots” (1-skip propagation)
Interpreting the hot-spot analysis
Ionospheric ”hot spots” (2-skip propagation)
Ionospheric dx targets (2-skip propagation)
Height colors
Sporadic-E analyser dialog
Plot results of the Sporadic-E analyser
Sporadic-E range circle for long distance communications
Aurora/FAI-hot-spot dialog
Aurora/FAI hot spots analysis
Aurora/FAI dx target analysis
Scatter curve dialog
Aurora/FAI scatter curve
Scatter curve dialog
Distance bar chart
Clear data dialog
Locator preferences
Color preferences
Map preferences
Model preferences
Sample script
Example of a logbook database
FileMaker Pro script using Apple Events
10
12
15
16
17
18
20
23
27
32
34
36
38
39
40
41
43
44
45
46
48
53
55
56
57
57
59
59
61
62
63
65
66
69
70
71
73
75
80
82
83
84
84
89
90
92
Page 7
Figure 47 Specify Apple Events in the Filemaker Pro (1)
Figure 48 Specify Apple Events in the Filemaker Pro (2)
Figure 49 Extensions to the European grid locator system
92
93
95
Page 8
Tables
Table 1
Table 2
Table 3
Table 4
Table 5
Table 6
Table 7
Table 8
Table 9
Table 10
Table 11
Table 12
Table 13
Table 14
Table 15
Table 16
Table 17
Table 18
Table 19
Table 20
Table 21
Table 22
Table 23
Table 24
Table 25
Table 26
Table 27
Table 28
Table 29
Table 30
Home location
Geographical targets
Calculations along the short and the long path
Plotting grid squares
Antenna pattern
Circles and radials
3rd-party-data, the ”from-to-operator”
Skip markers
Range of vision
Enabling and disabling the elevation display
Enabling and disabling the geomagnetic field data display
Map title
Site infromations
The ”smart mouse cursor”
The ”rubberband”
Layer penetration
Hot-spot analysis
Ionospheric dx access area
Sporadic-E analyser
Aurora/FAI hot spot analysis
Aurora/FAI dx targets
Aurora/FAI scatter curve
Aurora/FAI synoptic
Bar chart analyses
Save file functions
Clear map
Command editor functions
Preferences
Applications using BeamFinder scripts
Device identifiers
25
29
30
31
33
35
37
40
42
43
45
47
49
50
51
54
57
59
64
67
69
72
74
76
78
79
81
85
87
94
Page 9
Welcome to BeamFinder
BeamFinder is a software tool designed to conduct analyses for radio amateurs
interested in radio wave propagation studies. BeamFinder enables the user to
apply sophisticated scientific models in practical VHF dxing, e.g. Sporadic-E,
Aurora, FAI, E- and F-layer multiple-hop propagation and other types of radio
wave propagation.
Figure 1
BeamFinder example analysing transatlantic propagation on 6m
BeamFinder may also be considered a multi-purpose geographical instrument
optimised to the requirements of radio amateurs, i.e. BeamFinder may display
observational data, calculated results and dx statistics on a large screen map of
the world. BeamFinder’s easy-to-use graphical user interface (GUI) considers
quantities the radio amateur is already familiar with, e.g. grid squares, geographical coordinates, distances, antenna headings and frequencies. The user may design scripts und may upload data files from the harddisk using the build-in BeamFinder Command Language (BFCL). BeamFinder is compatible with alternative
applications as commands and data may be launched remotely by using Apple
Events.
The making of BeamFinder was an effort of many years and is based on the
author’s professional work in ionospheric research. Studying radio wave propagation combines elements from engineering, communications, geophysics and
solar-terrestrial research in a fascinating discipline. Because radio waves ignore
manmade boundaries, this discipline also stimulates the international cooperation
between scientists, engineers, technicians and, of course, between radio amateurs.
So many people have helped me in the preparation of BeamFinder and its accompanying documentation that it is impossible to acknowledge them all personally. I have gained much from the many conversations on the 2m-band with my
friends and fellow radio amateurs. I have been inspired by many ham radio
magazines and their authors discussing radio propagation phenomena and ex-
Page 10
periments. I am grateful to Reiner Hess from XCAD AG for supporting the BeamFinder web appearance and to The Living Earth Inc. And the NOAA National
Geophysical Data Center for providing valuable data supporting the design of the
screen map of the world. I am grateful to my wife Aileen for the corrections and
for making this manual somewhat more acceptable to English readers.
I hope BeamFinder will support amateur radio propagation studies and would encourage in particular the young people’s interest in science and engineering.
Enjoy ...
Installation
System requirements
In order to use BeamFinder, you need the following:
-
an Apple Macintosh Power PC (PPC) running at least System M AC OS 8.0
(BeamFinder does not support native Mac OS X at the present time),
a minimum of 60 megabytes free RAM (Random Access Memory),
a hard disk with approximately 12 megabytes available to store BeamFinder
and related files,
a computer monitor supporting high resolution and a minimum of 32,768
screen colors.
Installation
Copy the BeamFinder folder into the DF5AI’s DX Toolbox directory, see Figure
2. Please make sure that the Runtime Libs folder is also available in the toolbox
directory.
Figure 2
DF5AI’s DX Toolbox directory
To open the BeamFinder application from the Finder, double-click on the BeamFinder icon.
When you want to quit using the application, choose the Quit item in the File
menu.
Page 12
Getting started
About this manual
It is assumed that the user is familiar with the basic operations of Macintosh
computers i.e. clicking, double-clicking and dragging. Familiarity is also assumed
with the Macintosh user interface, such as pulldown menus, windows, dialog
boxes, buttons, radio buttons and checkboxes. If you are not familiar with these
you are requested to review the documentation of your operating system.
The following fonts, styles, symbols and terminology is used in this manual:
•
•
•
•
•
•
•
•
Descriptions and labels adopted from BeamFinder’s graphical user interface
are displayed in bold characters. For example: Quit denotes the item in the
pulldown menu File which forces the BeamFinder application to quit.
Text and information to be entered by the user are highlighted, as in HideLoc.
The same style indicates results and outputs generated by BeamFinder.
Commands and parameters in the BeamFinder command language (BFCL)
are shown in the format Keyword parm1 parm2 [parm3] where keyword
denotes the command code and parm a parameter required for code execution. The parameters may represent a numerical value, a text string or a geographical coordinate. Optional parameters are written in brackets e.g.
[parm].
Numerical parameters are represented by a leading “#” character. For example: ShowAnt #bwidth denotes the syntax of the “ShowAnt” command and
ShowAnt 3 4 represents its usage in practice.
String parameters are indicated by a “$”-sign. For examle: SetMapTitle$mytitle denotes the syntax of the “SetMapTitle” command and SetMapTitle Logbook2002 denotes a practical example.
Grid locators are indicated by a leading “&” character e.g. SetRef &myloc
where &myloc may correspond to JO40DF or any other grid locator, for example: SetRef JO40DF.
Shaded areas provide additional informations the user may find useful.
The following characters denote special keys on the Macintosh keyboard:
- Command-key, - Shift-key,
- Alt-key, CTRL – Control-key. The sequence
M denotes, for example, the following: hit the ”M” key on the
keyboard while keeping the Shift and Command-key depressed.
Page 13
BeamFinder
User Manual
Overview
BeamFinder provides unique functions, analyses and graphical features in amateur radio propagation studies:
General
•
•
•
•
•
•
•
•
•
•
•
•
•
•
•
•
•
•
easy-to-use graphical user interface
English operation language
advanced mathematical and physical models
applicable in all geographical regions
BFCL (BeamFinder Command Language)
build-in parser and Command Editor
mouse operations on the world map
keyboard operations
file operations
remote control using Apple Events
customisation of the user interface
autoexe file to be loaded on start-up
program and model parameters restored when re-launching the program
supports Maidenhead grid locators
supports the grid system of Europe preceding the Maidenhead system
supports Apple Bubble Help
optimised runtime performance
fast execution code
Graphics
•
•
•
•
•
•
•
•
•
•
•
•
•
•
•
•
•
large screen world map
fast scroll functions to change the map view
map navigation tools
clickable navigation map
“home” and “last target” centering tool
map zoom ranging from 0.3 to 4.0
two map orientations centering the screen map to the Greenwich meridian or,
alternatively, to the 180° meridian
plots radio beams along the short path
plots radio beams along the long path
plots Maidenhead grid squares
plots beamer maps
versatile colour settings, e.g. for geographical targets, atmospheric layers etc.
“smart mouse cursor” displays the actual grid locator
“rubberband” feature previews the path of radio waves
precise great-circle-distance, line-of-sight and elevation calculations
dynamic calculations corresponding to the actual mouse position on the map
saving map views to harddisk
Page 14
BeamFinder
User Manual
Radio propagation and geophysics
-
Multiple-hop propagation analysis (segmenting and extrapolating mode)
Sporadic-E monitor
MUF predictions and estimated Sporadic-E dx targets
calculates “hot spots“ of Sporadic-E
calculates total Aurora and FAI access area
calculates “hot spots“ of Aurora and FAI
calculates curves of backscattering
estimates Aurora and FAI positions in real time
estimates Aurora/FAI dx targets in realtime
plots the zero-elevation radio horizon and range of vision
penetration path of radio waves into the atmosphere
distance and azimuth bar chart analyses
site information panel
Earth magnetic field data supports all world and atmosphere locations.
The grid map of the world
The screen map of the world is probably BeamFinder’s most eye-catching feature. The map shows continents, oceans, political borders and the worldwide
Maidenhead grid locator system. Because of its large size your computer screen
may not be capable to display the total map area, but only a section depending
on the size of your computer screen (see Figure 3). However, you may change
the map view by using BeamFinder’s zoom controls and its navigation tools (see
below).
Figure 3
Map dimensions (in pixels)
The map window shows the actual segment of the map of the world and also
some numerical informations (see Figure 4). The geographical information remain available as long as the mouse cursor is positioned within the map area.
However, if the mouse cursor is positioned somewhere else the geographical inPage 15
BeamFinder
User Manual
formation is replaced by BeamFinder’s zoom and navigation tools. Hence, moving the mouse cursor on and off the map toggles the header display in accordance to Figure 4a and Figure 4b, respectively.
Explore: Move the mouse cursor across the screen map and watch the geographical informations in the map header. Note that you may identify geographical coordinates, grid locator, distance and azimuth of any place in the world without typing data on the keyboard. Click any place on the screen map and see what
happens.
Figure 4
Map window
Centering the screen map
Note the small navigator map in the upper left corner of the map window in
Figure 4b. Clicking a place on the small navigator map centers the main map to
the corresponding location, i.e. the actual view of the continents and oceans may
be easily changed by clicking target areas in the navigator map.
Explore: Move the mouse cursor on the navigator map and start exploring the
world by clicking Australia, Greenland and other places and watch the main map
change its view.
The Home button (see Figure 4b) centers the main map to the user’s home location, which is indicated by a small square on the main map. The same function is
available by selecting the Center home item in the Edit menu.
Clicking a place in the main map defines a geographical target in BeamFinder
and enables the Last target button (see Figure 4b). Clicking the Home and the
Last target button toggles the map center from home to the actual target location and vice versa. The Last target button is not available if a geographical target has not yet been defined.
Page 16
BeamFinder
User Manual
Scrolling the screen map
The map of the world scrolls in longitudinal and latitudinal directions by dragging
the horizontal and the vertical slider in the map window, respectively. The arrow
keys on the keyboard may be used for the same purpose, however, this feature
requires the mouse cursor positioned in the map area.
An alternative method of scrolling the map of the world is obtained when moving
the mouse with the Shift-key depressed. In this case any scroll direction is available i.e. horizontal, vertical and even diagonal corresponding to the direction in
which the mouse is moved. Using the mouse as a scrolling device temporarily replaces the cross-hair cursor by the so-called hand icon.
Zooming the screen map
The map of the world may be zoomed in the range of 0.3 to 4.0 (see Figure 5).
The zoom level is controlled either by the corresponding buttons in the map
header, by the zoom slider or, alternatively, by the zoom edit field (see Figure
4b).
Note: BeamFinder refuses map views smaller than the actual size of the map
window. Please downsize the map window if small zoom levels are currently not
available.
Figure 5
BeamFinder zoom levels
Page 17
BeamFinder
User Manual
Inside BeamFinder
The Map Manager
Figure 6 is a the schematic diagram of BeamFinder’s core modules. All drawings
on the screen map originate from the Map Manager which controls the data
processing in the background, for example by splitting user commands into individual tasks and processes, demanding calculations from BeamFinder’s mathematical library and, finally, compiling the results and generating the graphical
output by using appropriate routines in the Macintosh operating system.
Figure 6
BeamFinder modules
Input devices
Output device
Pulldown
Keyboard
e
sc
F
1
0
"
§
F
1
1
F
1
2
&
ß
T
F
a
stell
e
b
st
tast
Umschal
e
t
a
ctrl
topti
on
Ü
Ö
Lös
che
^
+ n #
Retur
n
Umschal
t al
topti ctrl
on
File
Apple
Event
Screen map
Dru
A Pau
ck S
nf
ys
F
F se
F
1
1 1
tr.
3
4 5
Ei
Hi
nf
lf
.E
e
nt
f.
,
E
n
e
Mouse
BeamFinder
command
language
Command Editor
Command Database
Map Manager
Maths/geo libraries
The Command Editor
The BeamFinder user will never communicate directly with the Map Manager, but
will interact with the Command Editor. This module receives the data send by the
input devices, i.e. the mouse, the keyboard, the pulldown menu, harddisk files
and Apple Events. The Command Editor analyses the input data with its parameters and appends the command to the Command Database. The Command
Editor finally forwards the database items to the Map Manager and receives the
Page 18
BeamFinder
User Manual
Map Manager’s acknowledgement when an item has been processed successfully. Hence, whenever BeamFinder receives an input command the Command
Editor is responsible for scanning and validating the command before it is handed
over to any other BeamFinder module.
The BeamFinder command language (BFCL)
Communication between the Command Editor and the Map Manager is achieved
with text strings. For example: if the user wishes to change the actual grid square
of the user’s home location, the corresponding command is SetRef JO40DF. If
the user wishes to do the same thing using geographical coordinates, the command string is SetRef 50°13'45"N 8°17'30"E where 50°13'45"N and
8°17'30"E are to the geographical latitude and longitude, respectively. In other
words, the BeamFinder command language accepts key words and a number of
trailing parameters.
Pulldown menue, dialog boxes and keyboard commands
Use of the pulldown menu and its dialogs will therefore generate a text string to
be send to the Command Editor. The user may alternatively type the corrresponding command in the command edit field (see the botton of the Command
Editor window in Figure 7).
Explore: Choose the Set home coordinates... item from the Edit menu. Enter
the Maidenhead grid locator JO40DF , click the Check button and, finally, click
the Okay button. Watch the SetRef command in the Command Editor window
displayed at the end of the list. Now, type SetRef JO52CJ in the edit field at the
bottom of the Command Editor. Note the list in the Command Editor window
showing identical lines in both cases.
Uploading ASCII files from harddisk
Because BeamFinder is controlled by text commands, the user may also upload
a list of text commands from the harddisk, i.e. the user may design scripts and
may implement self-running analyses, plots and calculations very easily.
Explore: Choose the Open data... item from the File menu which opens the file
selection dialog. Navigate to the BF Examples folder which is part of the BeamFinder package and select the file 6m-Transatlantic. If the program should ask
clear data table before loading you may click one of the buttons, i.e. Yes or
No. You may use the “SimpleText” text editor on your computer to view the text
commands stored in that file.
Receiving AppleEvents
BeamFinder may also receive text commands from another application via the
AppleEvent pipeline implemented in the Macintosh operating system. This feature is useful if, for example, BeamFinder needs to receive actual dx observations from an electronic log book database.
Page 19
BeamFinder
User Manual
Protocols and device identifiers
The Command Database is a component of the Command Editor and protocols
incoming commands and the results of the build-in parser which validates the
command syntax and the integrity of its parameters. The database also tracks
the command’s execution status reported by the Map Manager.
Figure 7
Command Editor window
The Command Editor provides detailed information about BeamFinder’s internal
activities when enabling the checkboxes Input and Time in the Command Editor
window (see Figure 7). The example in Figure 7 is explained as follows:
•
•
•
•
Line 1: The Command Editor has received an incoming command on
04.04.2002, 00:06:56 CPU time. The device identifier KY indicates that
the command originated from the keyboard.
Line 2: The incomming command is SetRef JO40DF and has successfully
passed the Command Editor.
Line 3: The Map Manager processed the command on 04.04.2002 at
00:06:56 CPU time. The command corresponds to the first item in the
Command Database. However, the Map Manager has already processed a
total of nine items since program launch as indicated by the label #1/9.
Line 4: The command execution has been completed successfully (done).
Note: A complete list of device identifiers is given in Table 30 on page 94 in the
appendix.
Page 20
BeamFinder
User Manual
Clearing the data and clearing the map of the world
Clearing the data in the Command Editor and clearing the drawings on the map
are totally independent actions:
•
•
Clearing the data empties the Command Database without changing the map
and its actual drawings (see the Clear button in the Command Editor window
and also the Clear command list item in the Edit menu).
Clearing the map erases existing drawings (see the Clear button in the map
window and also the Clear map item in the Edit menu). However, the Command Database is not affected, i.e. all commands remain available and may
be restarted on demand.
Separating the graphical data from the Command Editor data is an advantage
because it provides the user with more flexibility. For example, if the user wishes
to redraw the data using a different colour, the map can be cleared without affecting the existing data in the Command Editor. After having changed the colours, the user may force the Command Editor to resend all existing commands to
the Map Manager by selecting the Restart all commands item in the Edit
menu.
Page 21
Basic functions
Introduction
The best way to understand BeamFinder’s basic functions is to use the program
and explore its menus and controls in practice.
Note: New users are advised to enable the BubbleHelp feature in the Macintosh
operating system while exploring the program.
Studying the manual will enable the user to apply BeamFinder more efficiently
because useful background knowledge, hints and other types of useful information not available in the program is supplied therein. This chapter enables the
user to apply the following functions and features:
•
•
•
•
•
•
•
•
•
•
•
•
•
configuring BeamFinder to the user’s home location
plotting the path of radio waves on the map of the world considering short and
long path radio propagation
plotting grid squares to display dx results and band openings
creating beamer maps, range circles and antenna bearings
analysing third-party observations, e.g. by adopting dx cluster information
plotting the antenna beamwidth, displaying the geographical area illuminated
with the actual antenna direction
displaying elevation data in the map header
displaying geomagnetic field data in the map header
using the site information table
enabling the smart cursor feature to identify Maidenhead grid locators
enabling the rubberband feature to preview the path of radio waves
using BeamFinder’s graphical user interface
operating BeamFinder’s build-in command language
Page 22
BeamFinder
User Manual
Setting the user’s home location
Usage
Before using BeamFinder the user is advised to store his personal geographical
data in the program, as the majority of
commands and functions refer to the user’s
home location, e.g. when calculating greatcirlce-distances, antenna headings etc..
Figure 8
Home location dialog
Page 23
BeamFinder
User Manual
Using the dialog
Choose the Set home coordinates... item from the Edit menu to open the dialog in Figure 8. Enter your personal Maidenhead grid locator or, alternatively,
your geographical coordinates and click the Check button. Finally, press the
Okay button to apply your settings. The Name field in the dialog is optional. A
small square indicates your home location on the screen map.
Note: The Okay button is not accessible if BeamFinder detects illegal statements
or data is missing. Please correct and click the Check button again.
Using the command language
To use the BeamFinder Command Language (BFCL), the user may enter the
command
SetRef &myLoc
or, alternatively, the command
SetRef #latitude #longitude
in the Command Editor where &myLoc denotes the user’s Maidenhead grid locator and #latitude and #longitude the geographical latitude and longitude, respectively. For example: the command SetRef JO40DF defines the grid square
JO40DF as the home location in BeamFinder. The command SetRef
50°13'45"N 8°17'30"E defines 50°13'45" northern latitude and 8°17'30" eastern longitude as the home location.
Important note: Please always enter the geographical latitude prior to the geographical longitude.
Formating geographical coordinates
BeamFinder accepts various formats for geographical coordinates. The following
formats are equivalent :
50°13'45"N
50°13'45"
50/13/45N
50/13/45
50.2291667
8°17'30"E ,
8°17'30" ,
8/17/30E ,
8/17/30,
8.2916667.
Page 24
BeamFinder
User Manual
The hemispheres are denoted by N , S , E and W respectively. BeamFinder assumes northern latitudes and longitudes east of Greenwich if the corresponding
specifier is not available.
Using the mouse
The user’s home location may be defined by depressing the - key on the ke yboard and by clicking the desired location on the map of the world.
The preferences file in the system folder
Typically, there is no need to enter the user’s home location on program start as
this data is permanently stored in the preference file in the system folder. However, this is only true if the dialog shown in Figure 8 was used, i.e. the preferences file does not consider the actual home location when typing the SetRef
command manually, when loading it from a harddisk file or, alternatively, when
using the mouse as decribed above. This behaviour allows the user to change
the home location temporarily without affecting the setting of his true home location in the preference file.
Note: Please distinguish between the preference file in the system folder and the
Preference dialog discussed further below. The preference file represents a feature in the operating system, while the Preference dialog is part of BeamFinder’s
graphical user interface.
Summary
Table 1
GUI (dialog)
GUI (mouse)
Home location
Menu
Item
Action
Action
Edit
Set home coordinates...
Enter data
Click desired location while depressing the
- key
Note: Resultant home location is not considered by
the preference file in the system folder.
BFCL
•
•
SetRef &myLoc – set Maidenhead grid locator
SetRef #myLatitude #myLongitude – set
geographical coordinates
Note: Resultant home location is not considered by
the preference file of the system folder.
Page 25
BeamFinder
User Manual
Entering geographical data and targets
Usage
Processing geographical data is one of
BeamFinder’s core functions. The geographical data is used to calculate the target
distance and heading and to draw a connection between the user’s home location and
the corresponding target. The connection
corresponds to the path of radio waves traveling between these geographical positions.
Settings
Please apply the following settings before entering a geographical target:
•
•
Enable the Short path or, alternatively, the Long path item in the Display
menu,
enable the Target marker item in the Display menu if you wish to place a
small bullet marker at the end of the path.
Using the mouse
By clicking any location on the map of the world, BeamFinder will consider the
corresponding position to be the geographical target.
Using the dialog
Select the Geographical target... item in the Functions menu and choose one
of the panels shown in Figure 9 to enter the geographical data.
Note: You may access the dialog faster by using the shortcut
board.
1 on the ke y-
You may change the actual panel selection at any time, however, any existing input data is erased when switching the format.
Page 26
BeamFinder
Figure 9
User Manual
Geographical target dialog
Using BeamFinder’s Command Language
Situations may arise where the user wants to enter geographical targets as quick
as possible, e.g. in the hot phase of a Sporadic-E band opening. Target data of
any format may be typed directly into the edit field at the bottom of the Command
Editor window (see Figure 7 on page 20). BeamFinder will automatically identify
the type of data, i.e. grid locator data and geographical coordinates.
Page 27
BeamFinder
User Manual
Entering grid locators
Maidenhead grid locators may be entered in the full six-digit code or, alternatively, in the short form providing only four digits. For example: the formats
JO40DF and JO40 are both accepted by BeamFinder.
Missing digits in the grid locator may be replaced by an asterisk. BeamFinder will
therefore also accept the following grid locators:
JO40** (equivalent to JO40, see above),
JO40*F,
JO40D*,
JO*0DF,
JO4*DF,
JO*0,
JO4*
and even JO**.
Missing digits in the grid locator are replaced by an appropriate estimate which
will, of course, reduce the accuracy of data. BeamFinder cannot accept grid locators such as **40DF .
Note: When entering JO instead of JO** BeamFinder assumes the grid square in
accordance to the predecessor of the Maidenhead grid system, i.e. the European
grid system used in the 1970s and 1980s. Please refer to the paragraph “Using
the European grid locator” on page 95 in the appendix for more details.
Entering geographical coordinates
Geographical coordinates may be entered in different formats, please refer to the
paragraph “Formating geographical coordinates” on page 24 of this manual.
Entering distance and azimuth
Situations might arise in which the target coordinates are unknown, however the
antenna direction and, possibly, the distance is available. In this case the DrawPath keyword is required, i.e.
DrawPath #distance #azimuth
where #distance and #azimuth denote the numerical value of the great-circledistance (or its estimate) in kilometers and the antenna direction in degrees. For
example: DrawPath 1250 2 3 4 will draw a radio path of 1250 km length in the
direction of 234° azimuth.
Page 28
BeamFinder
User Manual
Summary
Table 2
Geographical targets
GUI (dialog)
Menu
Item
Action
GUI (mouse) Action
BFCL
Functions
Geographical target...
Select one of the following panels:
• Loc – enter grid locator, see Figure 9a
• DMS – enter geographical coordinates in degrees, minutes, seconds, see Figure 9b
• Dec – enter decimal geographical coordinates, see Figure 9c
• Dist, az – enter distance and azimuth, see
Figure 9d
Click target location on the map
Type one of the following commands:
- &targetLoc – Maidenhead grid locator
- #latitude #longitude – geogr. coord.
- DrawPath #distance #azimuth
Page 29
BeamFinder
User Manual
Long and short path calculations
Usage
The short path is defined the shortest greatcircle-distance connecting two places on the
surface of the Earth. However, there are
situations in which radio waves travel more
efficiently through the ionosphere by using the
longest distance i.e. the long path around the
Earth. BeamFinder allows the user to select
short and long path calculations, or both at
the same time.
Enabling and disabling short path calculations
The short path function is activated and deactivated by using the Short path
item in the Display menu or, alternatively, by typing the keywords ShowSPath
and HideSPath, respectively, in the Command Editor.
Enabling and disabling long path calculations
The long path function is enabled and disabled by using the Long path item in
the Display menu or, alternatively, by typing the keywords ShowLPath and
HideLPath, respectively, in the Command Editor.
Summary
Table 3
GUI
Calculations along the short and the long path
Menu
Item
Action
BFCL
Display
Short path or, alternatively
Long path
Enable, disable menu item
•
•
•
•
ShowSPath – enables short path calculations
HideSPath – disables short path calculations
ShowLPath – enables long path calculations
HideLPath – disables long path calculations
Page 30
BeamFinder
User Manual
Plotting grid squares
Usage
Radio amateurs often communicate in terms
of grid squares when discussing the characteristics of a band opening or when comparing
their dx results. BeamFinder provides plot
functions to display grid squares on the map
of the world. In combination with the “from-tooperator” (see page 36), the user may generate displays of almost any situation in VHF
dxing.
Enabling and disabling grid squares
Select the Preferences... item in the Edit menu to select one of the three drawing styles i.e. crossed, rectangular and filled grid squares, respecively. Please
refer to the paragraph “Preferences” on page 82 of this manual for more details.
The function may be enabled and disabled by using the Grid marker item in the
Display menu or, alternatively, by typing the keywords ShowLoc and HideLoc,
respectively, in the Command Editor. To plot a grid square please apply the instructions outlined in the paragraph ”Entering geographical data and targets” on
page 26.
Note: If you wish to display grid squares without drawing the path of radio waves
and without drawing any target markers on the map, please disable the following
items in the Display menu: Short path , Long path and Target marker.
Summary
Table 4
GUI
BFCL
Plotting grid squares
Menu
Item
Action
Display
Grid markers
Enable, disable menu item
-
ShowLoc – enables grid squares
HideLoc – disables grid squares
Page 31
BeamFinder
User Manual
Plotting the antenna pattern
Usage
In long-distance communication it is often not
obvious which regions of the world are being
illuminated with the actual antenna direction.
BeamFinder allows the radio operator to draw
the antenna’s main lobe on the map, i.e. the
operator may easily identify the dx access
area corresponding to the actual antenna direction.
Using the dialog
Select the Antenna pattern... item in the Display menu to enter the desired
antenna beam width (see Figure 10). The function may be disabled by deselecting the Antenna pattern... item in the Display menu. To plot the antenna
beam, the user is requested to notice the instructions outlined in the paragraph
“Entering geographical data and targets” on page 26.
Figure 10
Antenna-beam-width dialog
Page 32
BeamFinder
User Manual
Using the command language
The following command enables the antenna function:
ShowAnt #bwidth
where #bwidth denotes the antenna beamwidth in degrees. For example: the
command ShowAnt 3 3 shows a 33 degrees antenna lobe targeting the geographical position on the map of the world.
The command
HideAnt
may be used to disable the function.
Summary
Table 5
GUI
BFCL
Antenna pattern
Menu
Item
Action
Display
Antenna pattern...
Enter data
•
•
ShowAnt #bwidth – displays antenna beam width
HideAnt – disables function
Page 33
BeamFinder
User Manual
Range circles and radials
Usage
A beamer map is a map of the world providing
range circles centered around the user’s
home location with radials indicating the antenna direction to distant continents. BeamFinder allows the user to draw the entire wind
rose or, alternatively, to draw individual range
circles and radials.
Using the dialog
Select the Circles and radials... item in the Functions menu to access the dialog displayed in Figure 11. Enter the diameter of the first range circle and the desired spacing between the circles as well as the number of cirlces required. Also
enter the analogous data to define the radials.
Note: If you wish to disable either the range circles or the radials you may enter
zero for the corresponding number of objects to be drawn.
Figure 11
Dialog for drawing range circles and radials
Page 34
BeamFinder
User Manual
Using the command language
Alternatively the user may enter the command
DrawRange #diameter
in the Command Editor where #diameter denotes the radius (in kilometers) of
the circle to be drawn. In order to draw a radial you may use the command
DrawRadial #azimuth
in the Command Editor where #azimuth denotes the azimuth in degrees. For
example: DrawRange 1 2 5 0 draws a radius of 1250 kilometers and DrawRadial
3 2 draws a line in the direction of 32° azimuth.
Note: The DrawRange command draws one cirlce at a time, i.e. if you wish to
draw a number of circles you have to apply the command sequentially. The same
holds for the DrawRadial command.
Note: The shape of the range circles may appear non-circular on the map of the
world because of the map projection.
Summary
Table 6
GUI
BFCL
Circles and radials
Menu
Item
Action
Functions
Circles and radials...
Enter data
•
•
DrawRange #diameter – draw s range circle
DrawRadial #azimuth – draws radial
Page 35
BeamFinder
User Manual
The “from-to-operator”
Usage
BeamFinder generally refers to the user’s
home location when calculating distances and
azimuths. Drawings therefore originate from
that square on the map which indicates the
user’s home location. However, the BeamFinder user may also plot observational data
from other radio amateurs. This function is particularly useful if the user wishes to display dx
cluster data, for example.
Using the dialog
Select the 3rd party data... item in the Functions menu to access the dialog
displayed in Figure 12. Enter the two grid squares, i.e. the geographical locations
defining the terminals of the wave path which needs to be displayed. Note that
the resulting path of radio waves does not connect the user’s home location to
the geographical target, but an alternative home location corresponding to another radio operator.
Figure 12
3rd-party-observation dialog
Page 36
BeamFinder
User Manual
Using the command language
The following command may be applied to draw 3rd party data by using the
BeamFinder Command Language:
&fromSquare > &toSquare
where &fromSquare and &toSquare denotes the grid square from where the
path of radio waves originates and where it terminates, respectively. For example: the command EL50SD > EL97GT will draw a path from the grid square
EL50SD to the square EL97GT.
Should the full six-digit locator code not be avaialble you may also use its short
form, e.g. EL50 > EL97.
Note: The “>” symbol is called the “from-to-operator” which will also appear in
another format further below. Please note both the leading and trailing blank
which are required for operation, i.e. BeamFinder would refuse the statement
JO40DF>IO64WA, for example, but will accept JO40DF > IO64WA.
Summary
Table 7
GUI
BFCL
3rd-party-data, the “from-to-operator”
Menu
Item
Action
Functions
3rd party data...
Enter data
&fromSquare > &toSquare – draws the path of radio
waves connecting the geographical targets
&fromSquare and &toSquare.
Page 37
BeamFinder
User Manual
Display skip markers
Usage
In a simplified form, ionospheric skip propagation may be described by a zigzag path of radio
waves bouncing between the ionospheric layer
and the surface of the Earth. BeamFinder can
display the footprints of such a zigzag path on
the map of the world and allows the operator to
extrapolate a single hop propagation to a multiple hop scenario. This allows, for example, a
what-if analysis of Sporadic-E, i.e. what dx targets might become available if the current Sporadic-E band opening develops
into a double-hop scenario.
Using the dialog
Select the Skip markers... item in the Display menu to access the dialog displayed on the left hand side of Figure 13. Drag the slider to the number of skips
to be analysed. To disable the skip markers, drag the slider to its outer left position.
Figure 13
Skip marker dialogs
Page 38
BeamFinder
User Manual
The user may extrapolate a single-hop to a multiple hop scenario by clicking the
extarpolate path button in the dialog. Refer to the paragraph further below to
understand the difference between the segment path and extrapolate path
option.
Using the command language
The following commands enable the skip marker function by using the BeamFinder Command Language:
ShowSkips s#skips,
ShowSkips e#skips
where #skips denotes the number of skips to be analysed. For example: the
command ShowSkips s2 enables the skip marker option using the segment
path option in the case of a double-hop scenario. The command ShowSkips e3
enables the extrapolate path option by extrapolating single-hop propagation to
a 3-skip scenario. To quit the skip maker function use the command:
HideSkips.
Interpreting the results
When selecting the segment path option, circular markers indicate the geographical locations where the zigzag ray path hits the Earth’s surface (see the
explanations in Figure 14).
Figure 14
Skip markers
Page 39
BeamFinder
User Manual
Selecting the extrapolate path option allows the radio operator to identify the
touch-down area of the radio waves if an existing single-hop situation would develop into a multiple-hop scenario. For example: a radio operator in Poland observing Sporadic-E signals from the south of Sweden on the 2m-band is alerted
to possible signals from Scotland (see Figure 15). In order not to miss an opportunity, he may decide to check the signals from the Scotch radio beacons.
Figure 15
Extrapolated skip propagation
It is, however, important to note that BeamFinder’s skip markers are not based
on any ionospheric models, but are purely geometrical in nature. The segment
path option divides a given path length by the number of skips and the extrapolate path option multiplies the path length by the number of skips. Hence,
the skip marker function is a fairly simple method of evaluating multiple-skip
propagation. Nevertheless, it may often provide useful information for the radio
operator.
Summary
Table 8
GUI
BFCL
Skip markers
Menu
Item
Action
Display
Skip markers...
Enter data
•
•
•
ShowSkips s#skips – enables the “segment path”
option
ShowSkips e#skips – enables the “extrapolate path”
option
HideSkips – disables skip markers
Page 40
BeamFinder
User Manual
Range of vision (radio horizon)
Usage
The radio horizon defines the geographical
region in which, for example, a balloon remains in view without disappearing below the
observer’s topographic horizon. Its radius depends, of course, on the object’s height above
ground, i.e. the radio horizon corresponding to
a ballon, for example, is much smaller compared to that of a satellite. The radio horizon
function is also useful for analysing the area in
which the user may access Sporadic-E clouds, Aurora and FAI backscatter volumes or any other phenomena in the upper atmosphere.
Figure 16
Height-above-ground dialog
Page 41
BeamFinder
User Manual
Using the dialog
Select the Range of vision... item in the Functions menu to access the dialog
displayed in Figure 16a. Enter the object’s height above ground and press the
Okay button. If the height data is not available, the user may calculate this using
the object’s actual distance and elevation (see Figure 16b). Press the Calc.
height button to transfer the calculated result to the edit field on the left.
Using the command language
Alternatively, the user may enter the command
DrawHorizon #height
in the Command Editor, where #height denotes the object’s height above ground
in kilometers. For example, the command DrawHorizon 1 0 5 will draw the radio
horizon corresponding to the E-Region in the ionosphere. Any Sporadic-E layer
within the circle may be accessed from the user’s home location or, in other
words, the user cannot access any Sporadic-E patch located outside of this area.
Note: The shape of the radio horizon may appear non-circular on the map of the
world because of the map projection.
Summary
Table 9
GUI
BFCL
Range of vision
Menu
Item
Action
Functions
Range of vision...
Enter data
DrawHorizon #height – draws range of vision
Page 42
BeamFinder
User Manual
Calculating elevation and line-of-sight data
Usage
In BeamFinder, the mouse cursor acts as a
geographical pointing device moving over the
oceans and continents of the screen map. By
specifying a height, the mouse cursor may
also simulate an airborne object in the atmosphere. This function adds extra data to the
map header, i.e. the elevation and the line-ofsight distance (LOS) corresponding to the position in space which is represented by the
mouse cursor. The calculations take the curvature of the Earth into consideration.
Enabling and disabling elevation and line-of-sight data
Select the Elevation data... item in the Display menu to access the dialog box
similiar to the one of Figure 16. Enter the height and watch the extra line available in the map header (see Figure 17). To quit the function, click the Elevation
data... item in the Display menu again.
Figure 17
Elevation and line-of-sight (LOS) data
Summary
Table 10 Enabling and disabling the elevation display
GUI
BFCL
Menu
Item
Action
Display
Elevation data...
Enter data
n/a
Page 43
BeamFinder
User Manual
Calculating geomagnetic field data
Usage
BeamFinder can calculate the spherical harmonics of the Earth’s magnetic field using the
latest coefficients available. The geomagnetic
data is used, for example, to calculate the geometry of Aurora and FAI backscattering. The
geomagnetic field data is also available in the
map header in which the magnetic dip (inclination) and declination may be displayed
which correspond to the actual mouse position on the screen map. The function may be
used, for example, to identify the so-called
conjugate magnetic point of the user’s home location for analysing transequatorial radio propagation (TEP).
Enabling and disabling elevation and line-of-sight data
Select the Geomagnetic field data... item in the Display menu to access the
dialog box similiar to the one of Figure 16. Enter the height and watch the extra
line available in the map header (see Figure 18). To quit the function, click the
Geomagnetic field data... item in the Display menu again.
Figure 18
Geomagnetic field data
Geomagnetic inclination and declination
Figure 19 shows the North, East and Down component of the topographical coordiante system. The geomagnetic declination is defined as the angle between
the north and the horizontal component of the Earth’s magnetic field (see the H
component in the figure). Deflections to the east and west are indicated by positive and a negative declination, respectively. The geomagnetic inclination (or
Page 44
BeamFinder
User Manual
geomagnetic dip) is defined the angle between the horizontal component of the
field vector and the field vector itself. The inclination is counted positive in the
northern hemisphere and negative in the southern hemisphere.
Figure 19
Geomagnetic Inclination and declination
North
H
D
I
East
geomag. Field
Down
Summary
Table 11
GUI
BFCL
Enabling and disabling the geomagnetic field data display
Menu
Item
Action
Display
Geomagnetic field data...
Enter data
n/a
Page 45
BeamFinder
User Manual
Creating a map title
Usage
A user-defined title can be given to make the
map display more intelligible and to provide additional information describing the actual map
display, e.g. the date and time of observational
data. The title is also useful if you wish to submit your personal dx report to an amateur radio
magazine or if you decide to publish your dx
results on your personal homepage.
Using the dialog
Select the Map title... item in the Edit menu to access the dialog displayed in
Figure 20. Enter the map title and press the Okay button. The title appears in the
lower left corner of the map window. Clearing the edit field removes an existing
title from the map window.
Figure 20
Map title dialog
Using the command language
The following command creates a title in the map window:
SetTitle $myTitle
where $myTitle denotes the string to be displayed. For example: SetTitle Logbook data, 1998-2002 will place the title “Logbook data, 1998-2002” in the
Page 46
BeamFinder
User Manual
map window. The string is removed by the same command without any parameter, i.e. SetTitle.
Note: The string parameter may include any number of blanks (see the example
above).
Summary
Table 12
GUI
BFCL
Map title
Menu
Item
Action
Edit
Map title...
Enter data
• SetTitle $anyString – displays map title
• SetTitle – removes an existing title
Page 47
BeamFinder
User Manual
The site information table
Usage
BeamFinder handles different types of geographical information depending on
the function and analysis to be processed. The following dialog allows the user to
study the data for any position on the surface of the Earth or within the atmosphere.
Using the dialog
Select the Site information... item in the Functions menu to access the dialog
in Figure 21. Enter the geographical position and the height above ground and
press the Check button to update the site information table. Quit the dialog by
pressing the Done button.
Figure 21
Site information dialog
Page 48
BeamFinder
User Manual
Types of data
The site information table displays the following information:
•
•
•
•
•
•
•
•
•
•
•
locator: the Maidenhead grid locator
decimal coordinates: the geographical coordinates in decimal notation
geographical coordinates: geographical latitude and longitude in degrees,
minutes and seconds
geocentric position vector: the X, Y and Z component of the position vector
used by BeamFinder
radius spherical Earth: the length of the position vector using a spherical
model of the Earth and the length of a 1° latitudinal segment in kilometers
radius elliptical Earth: the length of the position vector using an elliptical
model of the Earth
topo: the N, E and Z component of the topographical coordinate system expressed in X,Y and Z vector components
geomagnetic field: the total field strength of the geomagnetic field in Gauss
(nT) and its declination and inclination
geomagnetic field vector: the N, E and vertical component of the Earth magnetic field vector
Mag: the UP, E and S component of the Earth magnetic field expressed in X,
Y and Z vector components
radio horizon: visible range in longitude and latitude; this data is only available when entering non-zero height data
Summary
Table 13
GUI
BFCL
Site infromation
Menu
Item
Action
Functions
Site information...
Enter data
n/a
Page 49
BeamFinder
User Manual
The “smart mouse cursor”
Usage
The user may identify the actual Maidenhead
grid locator by considering the horizontal and
vertical ruler of the map window. However, a
more convinient method is provided by the
“smart mouse cursor” feature which displays
the actual grid locator beside the mouse cursor. The “smart mouse cursor” updates automatically when moving the mouse across the
map.
Enabling and disabling the smart mouse cursor
Enable or disable the Smart cursor item in the Display menu to use and to quit
the feature, respectively.
Summary
Table 14
GUI
BFCL
The “smart mouse cursor”
Menu
Item
Action
Display
Smart cursor
Enable, disable menu item
n/a
Page 50
BeamFinder
User Manual
The “rubberband”
Usage
The so-called rubberband is a graphical feature displaying dot marks along the radio path.
This function is highly dynamical because the
dot marks permanently change in accordance
to the actual mouse position on the map of the
world. The rubberband is a calibrated tool
providing dot marks each 100 km.
Enabling and disabling the rubberband
Enable or disable the Rubberband (100km/dot) item in the Display menu to
use and to quit the feature, respectively.
Summary
Table 15
GUI
BFCL
The “rubberband”
Menu
Item
Action
Display
Rubberband (100km/dot)
Enable, disable menu item
n/a
Page 51
Analysing radio wave propagation
Introduction
BeamFinder supports radio propagation studies by a large number of unique
analysis tools emerging from the practice of vhf dxing. Studying this chapter the
user is enabled to apply the following analyses:
•
•
•
•
•
•
•
•
•
•
Evaluating the penetration path of radio waves into the atmosphere,
identifying ionospheric ”hot spots” in the Sporadic-E dxing,
analysing the maximum dx access area corresponding to 1-, 2- and 3-hop
propagation,
using the Sporadic-E monitor for calculating the maximum-usable-frequency
(MUF), the frequency of optimum traffic (FOT), the geographical position of
Sporadic-E patches and for estimating possible dx targets,
identifying ”hot spots” of Aurora and FAI backscattering,
analysing the maximum dx radius in Aurora and FAI propagation,
calculating the scatter curve in Aurora and FAI radio propagation,
estimating the geographical positions of Aurora and FAI in realtime,
predicting possible dx in an Aurora and FAI bandopenings,
plotting bar charts of observational data.
Page 52
BeamFinder
User Manual
Penetration path into the atmosphere
Usage
BeamFinder displays the penetration path of
radio waves into the atmosphere. This function
is in particular useful with satellite and moonbounce communication at low antenna elevation. As an example: Moonbounce operators
claim geomagnetic storms may degrade the
signal-to-noise ration in EME operation. Using
this function, the EME-operator may identify
EME-signals travelling through the polar ionosphere.
Using the dialog
Select the Layer penetration... item in the RadioProp menu to enter the
height layers in the atmosphere and to enter the actual antenna direction, see
Figure 22.
Figure 22
Layer penetration dialog
Using the command language
Alternatively you may enter the command
DrawLayer #minheight #maxheight #elevation
Page 53
BeamFinder
User Manual
in the Command Editor where #minheight denotes the lower layer boundary,
#maxheight the upper layer boundary (in kilometers) and #elevation the antenna elevation (in degrees). This command draws two circles corresponding to
the heights of layer entry and exit.
Alternatively, the user may also specify the actual antenna azimuth i.e.
DrawLayer #minheight #maxheight #elevation #azimuth
where #azimuth denotes the antenna azimuth in degrees. This command displays a line segment along the antenna beam. As an example: DrawLayer 1 0 0
400 1 2 2 8 6 draws the pentration path throught the E- and F-layer in the ionosphere (100 km and 400 km, respectively) assuming the antenna beams at 12°
elevation and 286° azimuth.
Summary
Table 16
GUI
BFCL
Layer penetration
Menu
Item
Action
RadioProp
Layer penetration...
Enter data
1) DrawLayer #minheight #maxheight #elevation – draws
layer penetration for omnidirectional antennas, i.e. neglecting antenna azimuth
2) DrawLayer #minheight #maxheight #elevation #azimuth –
draws layer penetration for directional antenna, i.e. considering antenna azimuth
Page 54
BeamFinder
User Manual
Reflection areas in the ionosphere
Usage
Assuming the Earth is surrounded by a spherical
mirror at high altitude, we would see the image of
the continents and oceans mirrored in the sky.
This situation is somewhat comparable to a radio
antenna in ionospheric skip propagation because
it ”sees” radio waves in the sky mirrored from the
ionosphere. BeamFinder may simulate this
situation by projecting the ionospheric mirror on
the world map. This function identifies the geographical position of the reflection areas in the ionosphere (“hot spots”) resulting
in an unusual display of the continents.
Using the dialog
Select the Reflection areas... item in the RadioProp menu to open the dialog
displayed in Figure 23. Enter the height of the ionospheric layer (in kilometers)
and the maximum antenna elevation (in degrees). The user may select 1-, 2- and
3-skip propagation by using the corresponding radio button.
Note: In typical situations, the maximum elevation should not exceed approximately 15°. However, the setting only affects the size of the so-called dead-zone
in ionospheric skip propagation which surrounds the user’s home location, see
Figure 23.
Figure 23
”Hot spots” dialog
Page 55
BeamFinder
User Manual
Using the command language
Alternatively you may enter the command
DrawEsSpots #skips #height #elevation
in the Command Editor where #skips denotes the number of ionospheric skips
(1, 2 and 3, respectively), #height the layer height in kilometers and #elevation
the maximum antenna elevation in degrees. As an example: the command
DrawEsSpots 2 110 1 0 analyses 2-skip propagation via the E-layer in the ionosphere (110 km) at a maximum antenna elevation of 10°.
Interpreting the results
Figure 24 displays the example of a hot-spot analysis assuming 1-skip propagation. Note that the green area reflects the shape e.g. of the Bristish Isles, the Iberian peninsula, Italy and other parts of Europe. This feature denotes the reflecting
areas in the ionosphere from where the skip is directed to Ireland, England,
Spain and so on.
Figure 24
Ionospheric ”hot spots” (1-skip propagation)
Figure 25 displays a closer view for the example of Ireland. Note the blue rays
emerging from the home location (red square) to the northern and southern tip of
Ireland. The corresponding reflection area in the ionosphere is located in the
middle between the two ray paths, i.e. the green area may be interpreted the
projection of Ireland onto the ionosphere. Thus, whenever the user wants to
communicate to Irish radio stations the skip must pass the displayed area in the
ionosphere, the skip will miss the geographical target otherwise.
Page 56
BeamFinder
User Manual
Figure 25
Interpreting the hot-spot analysis
Figure 24 and Figure 25 analyse the situation of single skip propagation. A very
different view is obtained in the case of two and three skip propagation. Note, for
example, the double image of Iceland and Greenland in Figure 26 indicating the
corresponding ”hot spots” in double-hop propagation.
Figure 26
Ionospheric ”hot spots” (2-skip propagation)
Summary
Table 17
GUI
BFCL
Hot-spot analysis
Menu
Item
Action
RadioProp
Ionospheric hot spots...
Enter data
DrawEsSpots #skips #height #elevation – draws the
reflection areas (”hot spots”) in the ionosphere
Page 57
BeamFinder
User Manual
Dx range in ionospheric skip propagation
Usage
The skip distance in ionospheric radio propagation depends on the layer height and the antenna’s vertical beam width. Long skip distances
are achieved with low antenna elevation and
vice versa. BeamFinder enables the user to predict the maximum dx access area in the case of
1-, 2- and 3-skip propagation.
Using the dialog
Select the Dx target areas... item in the RadioProp menu to open the dialog
similiar to the one displayed in Figure 23. Enter the height of the ionospheric
layer (in kilometers) and the maximum antenna elevation (in degrees). The user
may analyse 1-, 2- and 3-skip propagation by clicking the corresponding radio
button.
Note: The maximum antenna elevation only affects the size of the so-called
dead-zone surrounding the user’s home location.
Using the command language
Alternatively you may enter the command
DrawEsDX #skips #height #elevation
in the Command Editor where #skips denotes the number of ionospheric skips
(1, 2 and 3, respectively), #height the layer height in kilometers and #elevation
the maximum antenna elevation in degrees. As an example: the command
DrawEsDX 2 110 1 0 analyses double-hop propagation via the E-layer at a
height of 110 km and at a maximum antenna elevation of 10°.
Interpreting the results
Figure 27 shows the example of an Irish radio station and its dx target area in the
case of double-hop propagation via the ionosphere. The blue area denotes the
geographical regions in which the second skip returns to Earth. Please note the
silhouettes of the seas and oceans in dark blue color which correspond to ionoPage 58
BeamFinder
User Manual
spheric skips hitting oceans and seawater along its zigzag path between the
ionosphere and the ground. Hence, considering the dark blue areas allows the
radio operator to identify skip propagation across ocean terrain which is believed
to provide better reflections at ground level in multiple-skip propagation.
Figure 27
Ionospheric dx targets (2-skip propagation)
Note: BeamFinder considers
different colors to indicate
ground targets and atmospheric
targets, respectively. The green
color in Figure 24 therefore denotes areas in the ionosphere,
the blue color in Figure 27 correspond to areas at ground
level, see Figure 28.
Figure 28
Height colors
”Hot spots”
Dx target areas
Summary
Table 18
GUI
BFCL
Ionospheric dx access area
Menu
Item
Action
RadioProp
Dx access area...
Enter data
DrawEsDX #skips #height #elevation – plotting the dx
access area in ionospheric skip propagation
Page 59
BeamFinder
User Manual
The Sporadic-E analyser
Usage
Sporadic-E propagation is a very directive
propagation mode in general i.e. watching radio
operators establishing Sporadic-E connections
does not guarantee any Sporadic-E spot at the
user’s home location. BeamFinder’s unique Sporadic-E analyser identifies possible Sporadic-E
conditions available to the user based on
observations made by other stations. The
Sporadic-E analyser calculates the geographical
position of the Sporadic-E and estimates the corresponding dx target and the frequencies suitable for spotting Sporadic-E at the user’s home location.
Using the dialog
Geographical analysis
Select the Sporadic-E analyser... item in the RadioProp menu to open the
dialog displayed in Figure 29. Enter the grid locator of the station that actually
establishs any Sporadic-E connection and enter the grid locator of the corresponding Sporadic-E target. Press the any frequency button if you wish to
analyse the Es-geography without taking frequenies into consideration.
Press the Analyse button to start the calculation. The result may be transfered to
the screen map by selecting the Plot button.
Extended analysis (geography and frequencies)
Alternatively you may press the above button to enter the minimum operating
frequency you prefer. In this case you have to enter also the Sporadic-E operating frequency of the two radio stations from above.
Press the Analyse button to start the calculation. The result may be transfered to
the screen map by selecting the Plot button.
Page 60
BeamFinder
Figure 29
User Manual
Sporadic-E analyser dialog
Using the command language
Geographical analysis
Alternatively you may enter the command
FindEs &fromSquare &toSquare
in the Command Editor where &fromSquare and &toSquare denote the Maidenhead grid locators of the radio stations reporting Sporadic-E. As an example:
the command FindEs JO01 JN35 analyses the Sporadic-E link between JO01
and JN35 and estimates possible Sporadic-E targets in respect to the user’s
home location.
Extended analysis (geography and frequencies)
If you wish to consider frequencies you may enter the command
FindEs &fromSquare &toSquare #opsFreq #yourFreq
in the Command Editor where #opsFreq denotes the operating frequency (in
Megahertz) of the radio stations from above and #yourFreq the minimum frequency (in Megahertz) you wish to monitor. As an example: the command FindEs
JO01 JN35 91.7 1 4 3 analyses the Sporadic-E link established between JO01
and JN35 on 91.7 MHz and estimates whether the same Sporadic-E region may
support Sporadic-E observations above 143 MHz from the user’s home location.
Page 61
BeamFinder
User Manual
Interpreting the results
The Sporadic-E analyser provides numerical and geographical informations, see
Figure 29 and Figure 30, respectively. The dialog in Figure 29 states the critical
frequency as well as the maximum usable frequency (MUF) which both denote a geophysical quantity. The frequency relevant to the user is however the
operating frequency which the user may monitor for possible Sporadic-E observations (± 200 kHz or so). The Es position calculates the grid locator corresponding to the Sporadic-E patch in the ionosphere. Your target locator finally
estimates the position of a possible dx target which might be available in the current situation.
Figure 30 shows an example of the Sporadic-E analyser’s plot results. Note the
Sporadic-E link between JO01 (England) and JN35 (Italy) and the corresponding
position of Sporadic-E in the ionosphere, see the ”Es” bullet. The path between
the south of Sweden (home location) and Spain denotes the Sporadic-E analyser’s prediction. In the case the Sporadic-E analyser denies any Es observation
from the user’s home location no path is displayed on the screen map, of course.
This may result from geographical reasons or, alternatively, from the frequency
setting in the extended analysis described above.
Note: The Sporadic-E analyser assumes single hop propagation in all cases i.e.
multiple-hop scenarios cannot be evaluated by the Sporadic-E analyser.
Figure 30
Plot results of the Sporadic-E analyser
Page 62
BeamFinder
User Manual
Optimum usage of the Sporadic-E analyser
It is important to understand that no significant data is achieved if the user enters
his personal Sporadic-E observations into the Sporadic-E analyser. On the other,
applying Sporadic-E observations made by radio stations at a distance of many
thousand kilometers also provides little informations in general because the corresponding Sporadic-E patch probably remains invisible below the user’s local
horizon i.e. the Sporadic-E cannot be accessed from the user’s home location.
Optimum conditions in Sporadic-E dxing are obtained if the Sporadic-E patch is
viewed just above the local horizon because longest skip distances and highest
operating frequencies are supported by this scenario.
Figure 31
Sporadic-E range circle for long distance communications
Figure 31 shows, as an example, the geographical ring area in which Sporadic-E
clouds would appear between 0° and 5° elevation in respect to a radio station in
central France. The Sporadic-E link between Sweden and Italy represents optimum data to the Sporadic-E analyser because of the geographical position of the
Sporadic-E cloud which locates within the ring area, see the ”Es” bullet in Figure
31.
Explore: Connect your computer to your favourite dx cluster in Packet radio or
the internet to retrieve realtime Sporadic-E informations from the 10m-, 6m- and
the 2m-band, respectively. Alternatively, you may refer to ham radio magazines
providing Sporadic-E dx informations from the past to feed the Sporadic-E analyser with real observational data. Experiment with the data and explore which
type of data is most useful in the hot phase of a Es-bandopening.
Page 63
BeamFinder
User Manual
Summary
Table 19
GUI
BFCL
Sporadic-E analyser
Menu
Item
Action
RadioProp
Sporadic-E analyser...
Enter data
•
•
FindEs &fromSquare &toSquare – geographical
analysis
FindEs &fromSquare &toSquare #opsFreq #yourFreq – extended analysis (geography and frequenies)
Page 64
BeamFinder
User Manual
Hot spot analysis in Aurora/FAI propagation
Usage
BeamFinder incorporates the model of
backscattering of radio waves caused by irregularities in the E-layer which are oriented
along the Earth magnetic field lines. This
model can precisely describe the corresponding scatter geometry i.e. the geographical orientation of the transmitter and
the receiver, respectively, in respect to the
the scatter volume and its local magnetic
field lines. The following function calculates the regions in the ionosphere fulfilling
the geometrical requirements for Aurora and FAI propagation.
Using the dialog
Select the A/FAI hot spots... item in the RadioProp menu to open the dialog
displayed in Figure 32 in which the user specifies the height of backscattering.
Figure 32
Aurora/FAI-hot-spot dialog
In typical situations it is recommended to adopt the height setting of the preferences dialog i.e. by enabling the radio button xxx km (see ‘Preferences’ dialog) where xxx corresponds to the slider position in the preferences dialog, see
Figure 43 in the paragraph “Preferences on page Fehler! Textmarke nicht
definiert. of this manual. However, if the user wishes to consider any other
height without affecting the preferences the Temporary height button may be
used to enter an alternative value.
Page 65
BeamFinder
User Manual
Using the command language
The following command may be used to launch the function from the Command
Editor:
DrawFAISpots #height
where #height denotes the height of the scatter volumes in kilometers. As an
example: the command DrawFAISpots 1 0 5 calculates the regions in 105 km
height where the scatter geometry is fulfilled in respect to the user’s home location.
Figure 33
Aurora/FAI hot spots analysis
Page 66
BeamFinder
User Manual
Interpreting the results
The radio operator in B and C, see Figure 33, may observe Aurora and FAI
backscattering if field-aligned irregularietes would exist in the corresponding
green areas. Field-aligned irregularities may also exist outside of this areas, of
course, but cannot be utilized because the backscattering would not meet the
geometrical requirements. The green areas therefore identify E-layer regions
suitable for Aurora and FAI propagation and may be called ”hot spots” for this
reason. Please note that no green area exist corresponding to the location A i.e.
Aurora backscattering is not available in the far north which is a consequence of
too high geomagnetic inlination in high latitudes.
Summary
Table 20
GUI
BFCL
Aurora/FAI hot spot analysis
Menu
Item
Action
RadioProp
A/FAI hot spots...
Enter data
DrawFAISpots #height – calulates hot spots of Aurora
and FAI backscattering
Page 67
BeamFinder
User Manual
Dx target analysis in Aurora/FAI propagation
Usage
The function discussed in this paragraph is
closely related to the “Hot spot analysis in
Aurora/FAI propagation”, see page 65 of this
manual. Based on the hot spot analysis
BeamFinder may calculate the corresponding dx access area i.e. the geographical
area in which dx stations may be expected
when observing Aurora or FAI propagation.
Using the dialog
Select the A/FAI dx targets... item in the RadioProp menu to open the dialog
similiar to the one shown in Figure 32. Please refer to the discussion on page 65
of this manual to use the dialog.
Using the command language
The following command launches the dx analysis from the Command Editor:
DrawFAIDX #height
where #height denotes the height of the scatter volumes in kilometers. As an
example: the command DrawFAIDX 1 0 5 calculates the dx access region of
Aurora/FAI corresponding to a height of 105 kilometers.
Interpreting the results
The results displayed in the
Figure 34 correspond to the location B discussed in Figure 33 of the hot spot
analysis. The blue area indicates all the Aurora/FAI dx targets available to the radio operator at the baltic see coast. Please note the sharp border in the north indicating the highest northern latitudes available for Aurora dxing. There is no
such border in the south i.e. the availability of Aurora and FAI fades away resulting in an irregular pattern caused by BeamFinder’s calculation method.
Note: Figure 33 and
Page 68
BeamFinder
User Manual
Figure 34 provide different colors i.e. green and blue areas, respectively, because very different height levels are shown in both cases. The green areas in
the hot spot analysis correspond to regions in the E-layer of the ionosphere, the
blue area discussed in this paragraph corresponds, on the other hand, to geographical targets at ground level. Please refer to Figure 28 for more details.
Figure 34
Aurora/FAI dx target analysis
Summary
Table 21
GUI
BFCL
Aurora/FAI dx targets
Menu
Item
Action
RadioProp
A/FAI dx targets...
Enter data
DrawFAIDX #height – displays maximum dx access area
in Aurora/FAI propagation
Page 69
BeamFinder
User Manual
Aurora/FAI scatter curve
Usage
In FAI propagation tests the transmitting and
receiving antenna must target an identical
scatter volume, the test will probably fail otherwise. BeamFinder may calculate all the scatter
volumes which are principally available in the
test i.e. the program will calculate and display
the so-called scatter curve. With this informations appropriate antenna directions may be
planned and scheduled very precisely.
Using the dialog
Select the A/FAI scatter curve... item in the RadioProp menu to open the dialog displayed in Figure 35. Enter the target grid locator of the station which participates in the test.
Figure 35
Scatter curve dialog
Using the mouse
The target location may also be defined by depressing the - key on the ke yboard and by clicking the desired location on the map of the world.
Page 70
BeamFinder
User Manual
Using the command language
The following command launches the dx analysis from the Command Editor:
FAI &targetLoc
where &targetLoc denotes the target grid locator of the station participating in
the test. As an example: the command FAI IO64WR draws the scatter curve corresponding to the grid square IO64WR and the user’s home location. If the full
grid locator is not available, its short form may be applied as an alternative i.e.
FAI IO64.
Interpreting the results
The example in Figure 36 displays the scatter curve corresponding to a station in
Vienna and another station in the northern part of Spain near Barcelona. The
scatter curve is given in green color.
Note: The height of FAI backscattering is specified in the preferences, see
Fehler! Textmarke nicht definiert. of this manual.
Figure 36
Aurora/FAI scatter curve
BeamFinder also calculates the short path between the two stations, however, in
FAI backscatter geometry this path does not correspond to the true path of the
radio waves. The true path of the radio waves is actually unknown to BeamFinder
because the stations may align to different segments along the scatter curve, see
the lower panel in Figure 36. Choosing one end of the scatter curve reduces the
distance between one of the stations and the scatter volume and, at the same
Page 71
BeamFinder
User Manual
time, extends the distance from the other station’s perspective. Selecting the
midpoint of the scatter curve might be a good compromise in practice.
Explore: Calculate the scatter curve corresponding to a station at a distance of
approximately 1000 kilometers in respect to your home location. Enable the Elevation data... item in the Display menu, see the paragraph “Calculating elevation and line-of-sight data” on page 43 for more details. Make shure that the elevation data is calculated in accordance to the height setting in the preferences,
see page Fehler! Textmarke nicht definiert. in this manual. Now, move the
mouse cursor along the scatter curve and watch the elevation and line-of-sight
data in the map header.
Summary
Table 22
Aurora/FAI scatter curve
GUI (dialog)
GUI (mouse)
BFCL
Menu
Item
Action
RadioProp
A/FAI scatter kurve...
Enter data
Click desired location while depressing the
FAI &targetLoc – display scatter curve
- key
Page 72
BeamFinder
User Manual
Aurora/FAI synoptics
Usage
Using the dialog
Figure 37
Scatter curve dialog
Page 73
BeamFinder
User Manual
Using the command language
Summary
Table 23
Aurora/FAI synoptic
GUI (dialog)
GUI (mouse)
BFCL
Menu
Item
Action
RadioProp
A/FAI synoptic...
Enter data
Click desired location while depressing the CTRLkey on the keyboard to define a scatter volume
&targetLoc A - hlkjhlkj
&targetLoc F - lkjöl
Page 74
BeamFinder
User Manual
Bar chart analyses
Usage
BeamFinder provides bar charts analysing the great-circle-distance and the azimuth corresponding to the data actually available in the Command Editor. This
function is useful, as an example, if the user wishes to analyse the results of a
contest or a bandopening. The azimuth bar chart is in particular useful when
analysing dx data over a long period of time because the resulting profile may indicate the most effective antenna directions for dx purposes.
Drawing the chart
Select the Distance bar chart... or, alternatively, the Azimuth bar chart... in
the Functions menu. The function loads the geographical data from the Command Editor and displays the result in a dialog, see Figure 38.
The color of the bar chart may be changed by pressing the Change button which
opens the color selection box of the operation system. Drag the slider back and
forth to adjust the horizontal scaling of the diagram.
Figure 38
Distance bar chart
Page 75
BeamFinder
User Manual
Summary
Table 24
GUI
Bar chart analyses
Menu
Item
Action
BFCL
Functions
• Distance bar chart... – display distance bar chart
• Azimuth bar chart... – displays azimuth bar chart
Adjust scale by using the slider
n/a
Page 76
Controlling BeamFinder
Introduction
BeamFinder provides versatile functions to manipulate data, graphics and to
handle disk files. BeamFinder also enables the user to customize the appearance
of the map of the world and its graphical objects.
With this chapter the user may apply the following features:
•
•
•
•
•
•
•
•
•
•
•
Saving the current map display to harddisk,
erasing existing drawings from the map of the world,
saving data from the Command Editor to harddisk,
loading data from harddisk into the Command Editor,
erasing the data in the Command Editor,
restarting the data in the Command Editor,
changing the graphical appearance of the Maidenhead grid squares,
changing the colors to be used with map drawings,
changing the map orientation,
selecting the appearance of the zoom control in the map window,
tuning model parameters used by BeamFinder’s calculations.
Page 77
BeamFinder
User Manual
File functions
Usage
Any map display may be saved to harddisk by using BeamFinder’s save map
functions. The function creates a PICT file on the user’s harddisk corresponding
to the actual size of the map window.
Saving the map
Select the Save map as... item in the File menu to access the file selector dialog
in which the user specifies the name and the location of the map file. As soon as
a file name is available BeamFinder will also enable the Save map item in the
File menu. This function overwrites the initial map file with a new copy of the map
window display.
Summary
Table 25
GUI
Save file functions
Menu
Item
Action
BFCL
File
• Save map – saves map using existing file name
• Save map as... – saves map under another file name
Enter file name if required
n/a
Page 78
BeamFinder
User Manual
Clearing the map
Clear map
Select the Clear map item in the Edit menu to clear the map. The same function
is obtained by pressing the Clear button in the map window. Enter
ClearMap
in the Command Editor to clear the map by using BeamFinder’s Command Language.
Autoclear map
The user may instruct BeamFinder to clear previous drawings before placing any
new objects on the screen map. To enable this function select the Auto clear
map item in the Edit menu.
Summary
Table 26
GUI
Clear map
Menu
Item
Action
BFCL
Edit
• Clear map – clears the map
• Auto clear map – clears the map automatically before
drawing any new object
Clear map: click item
Auto clear: enable/disable item
ClearMap – clears the screen map
Page 79
BeamFinder
User Manual
Controlling the Command Editor
Usage
BeamFinder is actually controlled by text commands which are stored and maintained by the Command Editor, see the paragraph “The Command Editor” on
page 18 of this manual. The Command Editor window provides a list of the most
recent commands processed by BeamFinder. This paragraph describes the
methods the user may apply to manipulate the command list.
Loading commands from harddisk
Select the Open data... item in the File menu to load a text file from harddisk
containing BeamFinder commands. BeamFinder loads the data and will immediatly start processing the data.
However, before uploading the informations from harddisk BeamFinder may
prompt the user if data already exists in the Command Editor, see Figure 39.
Clickling the No button appends the file data to the existing informations, clicking
the Yes button will erase existing data from memory i.e. the new data will overwrite the old data in the Command Editor.
Figure 39
Clear data dialog
Saving commands to harddisk
Select the Save data as... item in the File menu to save the command list to
harddisk using the file name and location specified by the user. The Save data
item in the File menu overrides the text file by using the file name from above.
Page 80
BeamFinder
User Manual
Clear command list
To clear all data in the Command Editor select the Clear command list item in
the Edit menu or, alternatively, press the Clear button in the Command Editor
window.
Note: Clearing the command list does not affect the screen map. To clear the
screen map apply the corresponding clear function described in paragraph
“Clearing the map” on page 79 of this manual.
Restart all commands
The command list is actually a history file displaying the commands which have
been recently processed by BeamFinder. However, the user may force the program to re-execute the commands in the same sequence they were initially entered. This function is useful if the user wishes to redraw the map with alternative
styles and settings. To do so select the Restart all commands item in the Edit
menu.
Summary
Table 27
GUI (1)
GUI (2)
Command editor functions
Menu
Item
Action
Menu
Item
Action
BFCL
File
• Open data... – opens data file
• Save data – save data using an existing file name
• Save data as... – save data using another file name
Enter file name if required
Edit
• Clear command list – clears all data in the Command
Editor
• Restart command list – executes all commands from
the beginning
Click item
n/a
Page 81
BeamFinder
User Manual
Preferences
Usage
The preferences dialog enables the user to control the appearance of the drawings and graphics and to tune the parameters of the Aurora/FAI model of backscattering. BeamFinder stores the user settings in the preference file in the system folder i.e. the data is restored on startup when launching BeamFinder the
next time.
Setting preferences
The locator preferences controls the appearance of the grid squares when enabling the Grid marker... item in the Edit menu, see Figure 40. Please refer to
page 31 of this manual where the grid marker function is explained in full detail.
Figure 40
Locator preferences
BeamFinder’s screen map considers six types of graphical objects with individual
color settings, see Figure 41.
Page 82
BeamFinder
User Manual
•
Home position denotes the square which indicates the user’s home location
on the map of the world.
Ground targets denotes positions on the surface of the Earth including the
path of radio waves and dx access areas.
Airborne targets correspond, as an example, to hot spots in the ionosphere or
to any other non-ground based objects.
Locator squares correspond to the Maidenhead grid squares.
Text information denotes text labels, legends and map titles.
Circles and radials correspond to range circles, radials and the windrose
when drawing beamer maps.
•
•
•
•
•
Figure 41
Color preferences
The map of the world provides two orientations i.e. the Atlantic mode and the
Pacific mode, respectively. The Atlantic mode is advatageous to users e.g. in
Europe and Africa. The Pacific mode, on the other hand, is most suitable for users located e.g. at the west coast of North and South America, in the Far East, in
Australia and New Zealand, respectively.
The map orientation may be changed at any time by using the dialog displayed in
Figure 42 i.e. exisiting drawings on the map of the world are not affected when
switching from one mode to the other.
Page 83
BeamFinder
Figure 42
User Manual
Map preferences
The map references also enables the user to change the type of zoom controls
in the header area of the map window, see Figure 4 on page 16 of this manual.
Figure 43
Model preferences
Page 84
BeamFinder
User Manual
BeamFinder incorporates a sophisticated model of Aurora and FAI backscattering of radio waves in the ionosphere. There are two important parameters in this
model i.e. the angle between the Earth magnetic field line and the difference of
the k-vectors in the vicinity of the scatter volume and, on the other hand, the
height of the scatter volume above ground level. The corresponding values may
be changed by dragging the sliders displayed in Figure 43.
Note: Changing the model parameters is not recommnded if the user is not familiar with Booker’s model of backscattering, see the References in the Appedix
of this manual.
Summary
Table 28
GUI
BFCL
Preferences
Menu
Item
Action
Edit
Preferences...
Select one of the following
• Locator – grid squares preferences
• Colors – color preferences
• Map – map preferences
• Models – model parameter
n/a
Page 85
Scripts and AppleEvents
Introduction
The user may control BeamFinder manually by using its graphical user interface
or, alternatively, automatically by using BeamFinder scripts and Apple Events.
Page 86
BeamFinder
User Manual
Using scripts in BeamFinder
Usage
In this manual BeamFinder commands have already been discussed as an alternative method of entering data i.e. typing a command into the Command Editor is
fully equivalent to the usage of the graphical user interface which involves
menus, dialogs, buttons and other types of controls. However, the primary focus
of the BeamFinder Command Language (BFCL) is advanced data processing by
using scripts i.e. text files including statements compatible to the syntax of the
BeamFinder Command Language. BeamFinder’s capabilities are in fact significantly enhanced by using scripts, see the following list of possible applications.
Table 29
Applications using BeamFinder scripts
Automated program
control
-
Data processing
-
Linking external
applications
-
Archiving and exchanging materials
-
launching recurring analyses without typing data
manually
recovering standard displays e.g. user defined beamer
maps, range circles etc.
generating configuration files specific to Sporadic-E,
Aurora or any other dx situation
uploading large data volumes for analysis purposes
generating dx reports including observational data from
many operators
comparing observational data on a worldwide scale
plotting the geographical locations of stations and operators the user considers important
plotting the geographical distribution of radio beacons
e.g. on 2m, 6m, shortwave or any other frequency
band
plotting other types of dx indicators e.g. VOR data
importing informations from databases and spread
sheets e.g. electronic logbooks and station lists
enabling alternative applications to adopt BeamFinder’s graphical capabilities e.g. programs retrieving
dx cluster informations from the internet
retrieving useful analyses and displays
creating the user’s library of important dx events
creating a worldwide dx database in the internet
exchanging observational data between operators
exchanging experimental data e.g. FAI scatter curves
submitting dx reports to ham radio magazines
generating figures and displays in publications and
articles
Page 87
BeamFinder
User Manual
Creating BeamFinder scripts
Creating BeamFinder scripts is a very simple procedure:
•
•
•
•
Launch an empty file in your prefered text editor e.g. the SimpleText editor
which is part of the Macintosh standard installation,
enter BeamFinder commands and its accompaning parameters line by line
i.e. you may not queue commands in a single line,
save the file to harddisk, make shure that the text format is selected if the
editor considers different types of file formats,
choose the Open data... item in the File menu to launch the script, see the
paragraph “Controlling the Command Editor” on page 80 of this manual for
more details.
Placing comments in the script file
Any line starting with the / character (slash) is considered a comment by BeamFinder. Comments do not have any effect and may therefore be used for documentary purposes.
As an example: the line
/ this is a comment
represents a comment line which may be placed anywhere in the script file.
Sample script
Figure 44 demonstrates a simple example of BeamFinder scripts which is explained line by line for educational purposes:
/ Sample script
(empty line)
ClearMap
ShowSPath
ShowPos
SetRef JO40DF
this is a comment, see the paragraph above
empty lines may be included anywhere in the
script file, empty lines do not have any effect
on the code execution of the script
erases any existing drawings on the map of
the world, please refer to the paragraph
“Clearing the map” on page 79 of this manual
enables short path analyses, see the paragraph “Enabling and disabling short path calculations” on page 30 of this manual
enables the target marker function of BeamFinder, see the paragraph “Entering geographical data and targets” on page 26 of this
manual
defines the Maidenhead grid square JO40DF
as the user’s home location, see the paraPage 88
BeamFinder
User Manual
DrawRange 1 0 0 0
IO64WA
EN24f
graph “Setting the user’s home location” on
page 23 of this manual
draws a range circle of a diameter of 1000
km, see the paragraph “Range circles and
radials” on page 34 of this manual
draws the path of radio waves to the target
grid square IO64WA, see again the paragraph “Entering geographical data and targets” on page 26 of this manual
draws the path of radio waves to the target
locator EN24f, note that this grid square corresponds to the locator system preceding the
nowadays Maidenhead system, see the
paragraph “Using the European grid locator”
in the Appendix of this manual
Please note that BeamFinder scripts are easy to read once the user is familiar
with the BeamFinder Command Language. The user is advised to study and to
run the example scripts available in the BF Examples folder of the BeamFinder
directory.
Figure 44
Sample script
Page 89
BeamFinder
User Manual
Using Apple Events
Usage
Apple Events are system-level commands sent between applications on Apple
Macintosh computers. This powerful feature is also available with BeamFinder
i.e. the BeamFinder application may receive BFCL commands from any other
Macintosh application.
Figure 45 shows the example of an electronic logbook designed with the FileMaker Pro database. Pressing the Apple Event button in the database tells
BeamFinder to draw the corresponding path of radio waves i.e. the radio operator may update BeamFinder’s screen map by using the controls of the FileMaker
database.
Figure 45
Example of a logbook database
Page 90
BeamFinder
User Manual
Event class and Event ID
BeamFinder accepts the Event class
aevt
in conjunction with the Event ID
Bfdr or quit.
The Event ID Bfdr transfers a BFCL command as a string parameter, the Event
ID quit may be used to shut down BeamFinder.
Configuring FileMaker Pro databases
In order to discuss the implementation of Apple Events in more detail a Filemaker
Pro database is used as a sample project. The database may represent, as an
example, a logbook database feeding the BeamFinder application with actual grid
square informations by using Apple Events.
Note: Instead of using Apple Events the user may also decide to apply BeamFinder’s scripting capabilities by exporting grid square informations from the database into a text file which BeamFinder may upload.
It is good practice in database programming to consider a separate data field in
the following in order not to affect any original items in the database. The data
field Command is therefore assumed available in the database maintaining the
BFCL command to be send to BeamFinder. The BeamFinder command must, of
course, correspond to a legal statement in accordance to the syntax of the
BeamFinder Command Language. The data field Command may therefore
maintain text strings such as IO64WA , FAI JN49 , JN18 A or any other BFCL
command.
Note: The FAI command is described in the paragraph “Aurora/FAI scatter curve”
on page 70 of this manual. The A -suffix is decribed in the paragraph “Aurora/FAI
synoptics” on page 73 of this manual.
Step 1: Allocate an empty FileMaker Pro skript within the FileMaker pro application. Name the script “Launch BF command” or any use any other prefered
name.
Step 2: FileMaker Pro opens the dialog displayed in Figure 46. Select Send Apple Event [...] in the list on the left hand side of the dialog to define a new script
command in FileMaker Pro. Doing so the Send Apple Event [...] becomes
available on the right hand of the dialog too. Double click that command to define
its parameters.
Page 91
BeamFinder
User Manual
Figure 46
FileMaker Pro script using Apple Events
Figure 47
Specify Apple Events in the Filemaker Pro (1)
Page 92
BeamFinder
User Manual
Step 3: FileMaker Pro opens another dialog, see Figure 47, where you must
specify the Apple Event parameters. Press the Specify Application ... button to
select the BeamFinder application as target application. Click the radio button
Field value and, finally the button Specify field to select the Command field we
have initially discussed.
Step 4: Select the Send Other... event with item to open the dialog shown in
Figure 48. Enter the Event Class and the Event ID as shown in the figure.
Figure 48
Specify Apple Events in the Filemaker Pro (2)
Note: The user is requested to consult the Filemaker Pro documentation for more
details on the design of FileMaker scripts
Whenever the FileMaker Pro script is launched the database will send the actual
content of the Command field to the BeamFinder application.
Page 93
Appendix
Device identifier
The device identifier indicates the input device from which an incoming command
originates. The device identifier may be displayed in the Command Editor window
when enabling the Inputs checkbox.
Table 30
Device identifiers
Input device
Internal
Mouse
Menu
Keyboard
Harddisk file
Apple Event
Identifier
-MS
MN
KY
FI
AE
Page 94
BeamFinder
User Manual
Using the European grid locator
European grid system
In the 1980s the Maidenhead system was introduced by the International Amateur Radio Union (IARU) Region 1 Conference to replace the previous system
which was used by European radio amateurs for many years. In fact, there was a
need for a global system which does not involve any ambiguities resulting in the
same grid code for different geographical locations. The grid locator HV13f , as
an example, corresponds to a place in Sweden and also to the island of Malta in
the Mediterranean Sea.
Figure 49
Extensions to the European grid locator system
Grid extensions introduced by the QTH_LOC program
The existence of ambigous grid locators was in particular a problem to the early
home and personal computers used by radio amateurs to calculate geographical
distances and antenna headings. it was therefore also a problem to BeamFinder’s predecessor i.e. the QTH_LOC program which was introduced in the
1980s, see QTH_LOC’s screen map of Europe in Figure 49.
Page 95
BeamFinder
User Manual
The European grid system comprises 676 grid squares ranging from the AAsquare at the west coast of Spain to the ZZ-square in the north-eastern part of
the former USSR. The same set of 676 grid squares is repeated outside of central Europe resulting in a total number of nine sets indicated by the red frames in
Figure 49 (note that the sets adjacent to central Europe are only partly visible in
this map).
In the central Euopean area the QTH_LOC program considers the grid code ”as
it is” e.g. HV13f corresponding to the grid square in Sweden. However, when
specifying a grid locator outside of central Europe a suffix is required i.e. ”N”,
”NE”, ”E”, ”SE”, ”S”, ”SW”, ”W” and ”NW” corresponding to the directions north,
north-east, east and so on. As an example: the island of Malta now corresponds
to HV13f S, see Figure 49.
Using the European grid system in BeamFinder
The European grid system may be used in the BeamFinder Command Language
whenever a Maidenhead grid locator is also applicable. However, the European
grid system is not available in the dialog boxes of the graphical user interface.
Note: You may apply the European grid system when entering data in the Command Editor or when editing a text file to be uploaded from harddisk. You cannot
apply European grid squares when using the dialog boxes from the pulldown
menu.
BeamFinder applies identifiers which are identical to the arrangement in
QTH_LOC, however, the @-charcter is required to separate the grid code and its
suffix e.g. HV13f@S.
European grid locators may be entered in its full five-digit code or, alternatively, in
its short form providing only two characters. As an example: the formats HV and
HV@S are both accepted by BeamFinder.
Page 96
BeamFinder
User Manual
References
Langverzögerte Radioechos, Beobachtungen und Deutungen
Grassmann, V., UKW-Berichte 3/92, S. 163-169
Ein Verfahren zur Ortsbestimmung von erdmagnetfeld-parallelen Irregularitäten
in der E-Region
Grassmann, V., Kleinheubacher Berichte, Band Nr. 35, S. 123-134, FTZ Darmstadt, 1992
Die Beobachtung des Mehrton-Effektes
Grassmann, V., UKW-Berichte 3/91, S. 175-178
Incoherent-Scatter: Grundlagen und Anwendungen
Grassmann, V., UKW-Berichte 3/91, S. 170-174
Long delayed echoes
Grassmann, V., URSI-News, 1990
QTH-LOC: Funkstrecken am Computer
Grassmann, V., Dubus, 1, S. 37-39, 1990
Zum Dopplereffekt bei Aurora-Verbindungen
Grassmann, V., Dubus, 3, S. 59-61, 1989
Ein einfaches Modell zur Identifizierung von Sporadisch-E
Grassmann, V., Dubus, 2, S. 128-132, 1988
Amadeus - Satelliten-Bahnverfolgung de Luxe
Grassmann, V., Beam, 5, S. 32-34, 1988
Gibt es einen FAI-Scatterer über Budapest?
Grassmann, V., Dubus, 1, S. 21-23, 1988
Aurora - Ein Computerprogramm zur Analyse von Aurora- und FAI Rückstreuungen
Grassmann, V., Dubus, 1, S. 18-21, 1988
Long delayed echoes on EME-circuits
Grassmann, V., Dubus, 3, S. 244-245, 1987
Rückstreuungen ultrakurzer Wellen an Feldlinien-orientierten Irregularitäten
Grassmann, V., Dubus, 3, S. 182-189, 1987
Vorhersage der Schaueraktivität bei Meteor-Scatter-Verbindungen
Grassmann, V., Dubus, 2, S. 169-170, 1986
Verschlechterung des Signal/Rauschverhältnisses durch Drehung der Polarisationsebene
Page 97
BeamFinder
User Manual
Grassmann, V., Dubus, 2, S. 155-156, 1986
Der Mehrton-Effekt
Grassmann, V., Dubus, 1, S. 89-90, 1986
A scattering theory of VHF transequatorial propagation
Ferguson, J. A., Booker, H. G., Journal of Atmospheric and Terrestrial Physics,
Vol. 45, No. 8/9, pp. 641-657, 1983
Ionospheric Scatter by Field-Aligned Irregularities at 144 MHz
Kneisel, T. F., K4GFG, QST, 1982
IARU Region 1 locator
Rasvall, F., Dubus, 3, S. 174-177, 1980
Die Untersuchung von Irregularitäten in der F-Schicht der äquatorialen Ionosphäre mit Hilfe der transäquatorialen Kurzwellenausbreitung
Röttger, J., Dissertation, Universität Göttingen, 1974
Analyse von Rückstreubeobachtungen ultrakurzer Wellen an Polarlichtern
Czechowsky, P., Diplomarbeit, Max-Planck-Institut für Aeronomie, 1966
Page 98
BeamFinder
User Manual
Quick reference chart
SetRef
New target location
DrawPath
> operator
SetRange
SetRadial
Remarks (! operator)
ClearMap
ClearData
SetTitle
ShowPos
HidePos
ShowSPath
HideSPath
ShowLPath
HideLPath
ShowLoc
HideLoc
ShowAnt
HideAnt
ShowHops
HideHops
DrawVisRange
DrawLayer
CheckEs
FAI
A suffix
Abbildung 1. Reference table of BeamFinder commands and its cooresponding
pulldown-menus.
Page 99