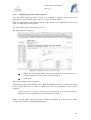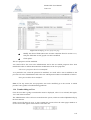
1
MANATEE: USER MANUAL
Code:
MANATEE/TEC/001
Issue:
1.D
Date:
10/06/11
Number of pages:
195
FRACTAL S.L.N.E.
www.fractal-es.com
[email protected]
MANATEE User Manual
Issue 1.D
Authors:
Ana Pérez Calpena
Emma Mujica Alvarez
María Luisa García Vargas
Revised by:
María Luisa García Vargas
Approved by:
María Luisa García Vargas
2
MANATEE User Manual
Issue 1.D
Document Distribution List:
Name
Affiliation
Date
3
MANATEE User Manual
Issue 1.D
Acronyms:
CD
Conceptual Design
DD
Detailed Design
PD
Preliminary Design
PRD
PRoDuction Phase
PTR
Personnel Time Report
WBS
Work Breakdown Structure
WP
Work Package
4
MANATEE User Manual
Issue 1.D
Change Control
Issue
1.A
1.B
Date
16/11/09
06/10/10
Section
All
3.3.2
12.1
12.2.2
12.3
Page
All
16
170
174
176
1.C
14/10/10
12.1
170
1.D
10/06/11
3.4.2.2
6.1.7
6.2
6.3
6.3.6
6.5
6.5.3
11.2
11.7
12.1.2
12.1.3
21
41
56
66
77
89
93
160
169
171
172
Change Description
First issue
Second issue
- MANATEE Logo included in the header and
front page.
- Security Manager in Tomcat Server section
added.
- Import WBS´s section added.
- Add new section (12.2.2).
- Change the restore application aspect (with
the application logo).
- Add a new field in the MySQL Users Restore
window.
Third issue
- Import WBS’s section modified to include the
selection of the operative system where the file
to be imported is generated
Fourth issue
- Add parameters for the secure mail SMTP
service.
- Change the access rights to displaying and
printing the information of the project and
add the possibility to export the gantt charts
to txt and xml files (compatibles with MS
Project and Merlin project softwares).
- Field added in the WP form.
- Fields added in the WBS form.
- Change the access rights to print WBS
information.
- Field added in the Milestone form.
- Print the complete or filtered milestones list.
- Search users section added.
- Delete user section added.
- Import WP´s section added.
- Import Milestones section added.
Reference Documents
N#
Document Name
Code
5
MANATEE User Manual
Issue 1.D
INDEX
1! SUMMARY ..........................................................................................................................11!
2! MANATEE OVERVIEW ...................................................................................................12!
2.1! MANATEE Functionality: A quick look....................................................................... 12!
3! INSTALLING MANATEE .................................................................................................14!
3.1! Software requirements ................................................................................................... 14!
3.2! MySQL Server configuration......................................................................................... 14!
3.3! Tomcat Server configuration ......................................................................................... 15!
3.3.1! Security JDBC Realm ............................................................................................. 15!
3.3.2! Security Manager in Tomcat Server ....................................................................... 16!
3.3.3! Define the MANATEE Web application ................................................................ 19!
3.3.4! Add libraries to Tomcat Server............................................................................... 19!
3.3.5! Setting JVM options for Tomcat Server ................................................................. 20!
3.4! MANATEE Web Application Installation and Configuration ...................................... 20!
3.4.1! MANATEE Web Application installation.............................................................. 20!
3.4.2! MANATEE Web Application configuration .......................................................... 21!
3.4.2.1! Web.xml configuration .................................................................................... 21!
3.4.2.2! manatee.props configuration............................................................................ 21!
3.4.3! Start the Services..................................................................................................... 23!
3.5! MANATEE Restore Installation.................................................................................... 24!
4! MANTEE USER’S PROFILES..........................................................................................25!
5! STARTING MANATEE .....................................................................................................27!
5.1! Logging in ...................................................................................................................... 27!
5.2! Accessing the data according to the User access rights ................................................. 28!
5.3! Logging out .................................................................................................................... 29!
6! PROJECT MANAGEMENT..............................................................................................30!
6.1! Project administration .................................................................................................... 30!
6.1.1! Creating a new project ............................................................................................ 31!
6.1.2! Searching projects ................................................................................................... 33!
6.1.3! Defining the dates of a new project ........................................................................ 37!
6
MANATEE User Manual
Issue 1.D
6.1.4! Displaying the properties of a project ..................................................................... 38!
6.1.5! Modifying the properties of an existing project...................................................... 38!
6.1.5.1! Modifying the project general properties......................................................... 39!
6.1.5.2! Modifying the start and end dates of a project................................................. 40!
6.1.6! Display a summary of a project .............................................................................. 40!
6.1.7! Displaying and printing the information of a project.............................................. 41!
6.1.7.1! Project plan summary....................................................................................... 43!
6.1.7.2! Project plan ...................................................................................................... 43!
6.1.7.3! Project Plan Gantt chart ................................................................................... 45!
6.1.7.4! Project Plan Gantt chart (WP only).................................................................. 46!
6.1.7.5! Project Plan Gantt chart (print selected WP and the associated WBS) ........... 46!
6.1.7.6! Quality data summary ...................................................................................... 47!
6.1.7.7! Project Budget Control .................................................................................... 49!
6.1.7.8! Milestone summary.......................................................................................... 50!
6.1.7.9! Cash flow summary ......................................................................................... 50!
6.1.7.10! External expenses........................................................................................... 50!
6.1.8! Archiving a project.................................................................................................. 51!
6.1.9! Activating an archived project ................................................................................ 53!
6.1.10! Removing a project ............................................................................................... 54!
6.1.11! Restoring a project ................................................................................................ 55!
6.2! WP administration ......................................................................................................... 56!
6.2.1! Creating a new WP ................................................................................................. 57!
6.2.2! Searching WP’s....................................................................................................... 58!
6.2.3! Displaying the properties of a WP .......................................................................... 62!
6.2.4! Modifying the properties of an existing WP........................................................... 62!
6.2.5! Printing the WP details ........................................................................................... 63!
6.2.6! Printing a WP Report .............................................................................................. 64!
6.2.7! Deleting a WP ......................................................................................................... 65!
6.3! WBS administration....................................................................................................... 66!
6.3.1! Creating a new WBS............................................................................................... 67!
6.3.2! Searching WBS’s .................................................................................................... 70!
7
MANATEE User Manual
Issue 1.D
6.3.3! Displaying the properties of a WBS ....................................................................... 74!
6.3.4! Modifying the properties of an existing WBS ........................................................ 75!
6.3.5! Validate a WBS....................................................................................................... 76!
6.3.6! Printing the WBS information ................................................................................ 77!
6.3.7! Deleting a WBS ...................................................................................................... 78!
6.4! WBS Report administration ........................................................................................... 79!
6.4.1! Creating a new WBS Progress Report .................................................................... 79!
6.4.2! Searching WBS’s Progress Report ......................................................................... 81!
6.4.3! Displaying the information in a WBS Progress Report .......................................... 85!
6.4.4! Modifying the information in an existing WBS Progress Report........................... 86!
6.4.5! Printing the WBS Progress Report ......................................................................... 87!
6.4.6! Deleting an existing WBS Progress Report ............................................................ 88!
6.5! Milestones administration .............................................................................................. 89!
6.5.1! Creating a new Milestones...................................................................................... 89!
6.5.2! Searching Milestones .............................................................................................. 90!
6.5.3! Print the complete or filtered milestone list ............................................................ 93!
6.5.4! Displaying the properties of a Milestone ................................................................ 94!
6.5.5! Modifying the properties of an existing Milestone................................................. 94!
6.5.6! Deleting a Milestone ............................................................................................... 95!
6.6! Cash flow milestones administration ............................................................................. 96!
6.6.1! Creating a new Cash Milestones............................................................................. 96!
6.6.2! Searching Cash Milestones ..................................................................................... 98!
6.6.3! Displaying the properties of a Cash Milestone ..................................................... 101!
6.6.4! Modifying the properties of an existing Cash Milestone...................................... 102!
6.6.5! Deleting a Cash Milestone .................................................................................... 103!
7! PROJECT QUALITY CONTROL ..................................................................................104!
7.1! Risk administration ...................................................................................................... 104!
7.1.1! Creating a new risk ............................................................................................... 104!
7.1.2! Searching risks ...................................................................................................... 106!
7.1.3! Displaying the risk information ............................................................................ 110!
7.1.4! Modifying the information in an existing risk ...................................................... 111!
8
MANATEE User Manual
Issue 1.D
7.1.5! Printing the risk information ................................................................................. 112!
7.1.6! Deleting a risk ....................................................................................................... 112!
7.2! Non-conformities administration ................................................................................. 113!
7.2.1! Creating a new non-conformity ............................................................................ 114!
7.2.2! Searching non-conformities .................................................................................. 115!
7.2.3! Displaying the non-conformity information ......................................................... 119!
7.2.4! Modifying the information in an existing non-conformity ................................... 119!
7.2.5! Printing the non-conformity information.............................................................. 120!
7.2.6! Deleting a non-conformity .................................................................................... 121!
7.3! Actions administration ................................................................................................. 122!
7.3.1! Creating a new action............................................................................................ 122!
7.3.2! Searching actions .................................................................................................. 124!
7.3.3! Displaying the action information......................................................................... 128!
7.3.4! Modifying the information in an existing action .................................................. 129!
7.3.5! Printing the action information ............................................................................. 130!
7.3.6! Deleting an action ................................................................................................. 130!
8! HUMAN RESOURCES TOOLS......................................................................................132!
8.1! User’s hourly cost administration ................................................................................ 132!
8.1.1! Define a new User’s hourly cost ........................................................................... 132!
8.1.2! Searching User’s hourly costs............................................................................... 133!
8.1.3! Modifying the information in an existing User’s hourly cost............................... 136!
8.1.4! Deleting a User’s hourly cost................................................................................ 137!
8.2! PTR .............................................................................................................................. 138!
8.2.1! Filling a new PTR ................................................................................................. 138!
8.2.2! Searching weekly PTR’s....................................................................................... 139!
8.2.3! Displaying the PTR information ........................................................................... 142!
8.2.4! Modifying the information in an already created weekly PTR............................. 143!
8.2.5! Printing the PTR information................................................................................ 144!
8.2.6! Deleting a PTR...................................................................................................... 144!
8.3! People occupation ........................................................................................................ 145!
9! MANAGEMENT ANALISYS TOOLS ...........................................................................147!
9
MANATEE User Manual
Issue 1.D
9.1! Global control .............................................................................................................. 147!
9.1.1! Global budget control............................................................................................ 147!
9.1.2! Global cash flow control ....................................................................................... 148!
9.2! Graphics ....................................................................................................................... 149!
9.2.1! User occupation pie charts .................................................................................... 149!
9.2.2! Project manpower pie charts ................................................................................. 151!
9.2.3! Cash flow charts.................................................................................................... 152!
9.2.4! Total budget charts................................................................................................ 154!
10! CHECKING NOTIFICATIONS ....................................................................................157!
10.1! Displaying the notification list................................................................................... 157!
10.2! Deleting notifications................................................................................................. 158!
10.3! Deleting all notifications............................................................................................ 158!
11! USERS MANAGEMENT ...............................................................................................159!
11.1! Creating a new user.................................................................................................... 159!
11.2! Searching users .......................................................................................................... 160!
11.3! Modifying the properties of an User .......................................................................... 164!
11.4! Unsubscribing an User ............................................................................................... 165!
11.5! Deactivate or activate the user access to MANATEE ............................................... 166!
11.6! Activate PTR.............................................................................................................. 168!
11.7! Deleting an User......................................................................................................... 169!
12! MANATEE ADMINISTRATION..................................................................................170!
12.1! Tools .......................................................................................................................... 170!
12.1.1! Import WBS’s ..................................................................................................... 170!
12.1.2! Import WP’s........................................................................................................ 171!
12.1.3! Import Milestones ............................................................................................... 172!
12.2! Backups Management ................................................................................................ 173!
12.2.1! MANATEE Database Backup ............................................................................ 173!
12.2.2! MANATEE Documentation Backup .................................................................. 174!
12.2.3! MANATEE Web Application Backup ............................................................... 175!
12.3! Restores...................................................................................................................... 176!
12.3.1! MANATEE Database Restore ............................................................................ 177!
12.3.2! MANATEE MySQL Users Restore.................................................................... 179!
10
MANATEE User Manual
Issue 1.D
12.3.3! MANATEE Web Application Restore ............................................................... 182!
12.3.4! MANATEE Documentation Restore .................................................................. 184!
12.3.5! MANATEE Full Restore .................................................................................... 187!
13! TROBLESHOOTING .....................................................................................................194!
14! SETTING-UP MANATEE..............................................................................................195!
1
SUMMARY
This is the User Manual of the Fractal Project Management Tool (MANATEE).
In this manual, you can learn:
! The MANATEE functionality,
! How to install the application
! How to use the application step by step and
! How to handle the problems that could arise.
11
MANATEE User Manual
Issue 1.D
2
MANATEE OVERVIEW
The Project Management Tool (MANATEE) is mainly intended to:
• define the projects,
• facilitate the management of the project,
• maintain the project quality,
• make the project information available to all authorised users according to the access
rights given to them (as described in section 4) and
• maintain the affected users informed.
MANATEE is especially suited when a company is geographically distributed or when several
companies collaborate in a multi-discipline and complex project. As the projects evolve, the
information generated in the diverse work centres by several individuals gets unmanageable
very fast and the need for a specific computer-aided tool becomes essential.
MANATEE user interface is made by using WEB forms. This means that anyone who has
access to the Internet may gain access to a project’s information, if this person has an account in
the system and the suitable permissions have been granted to him/her. The main advantage is
that there is no need to install any specific software on the client computers; the WEB browser
is enough. Similarly, the user does not need to access the e-mail, as the notifications are
managed by the Tool and made available to the user via the WEB-based interface. The
information is stored internally using a public relational database.
2.1
MANATEE Functionality: A quick look
The MANATEE functionality can be divided into the following areas:
• Project management:
o
Project administration: define new projects; set or modify their properties; end a
project, removal or archive the project; print the project summary, the project
plan (which includes all WPs and WBS´s), the project Gantt chart, a quality
summary, the project budget summary, the milestone summary, the cash flow
summary and/or the external expenses summary.
o
WP management: define new WP’s; set or modify their properties; delete a WP;
print the WP information.
o
Milestones management: define new Milestones; set or modify their properties;
delete a Milestone.
o
Cash Milestones management: define new Cash Milestones; set or modify their
properties; delete a Cash Milestone.
o
WBS management: define new WBS’s; set or modify their properties; delete a
WBS; print the WBS information.
o
WBS Reports generation: define new WBS Reports; set or modify the
information introduced in the report; print the WBS Report.
12
MANATEE User Manual
Issue 1.D
• Project quality control:
o
Risks administration: define new risks; set or modify their properties; delete a
risk, print the risk information.
o
Non-conformities administration: define new non-conformities; set or modify
their properties; delete a non-conformity; print the risk information.
o
Actions administration: define new actions; set or modify their properties;
delete an action; print the action information.
• Human resources utilities:
o
Man-hours cost management: define man-hours cost for the personnel; set or
modify their properties.
o
PTRs administration: fill the weekly PTRs; display and print the PTR
information.
o
Display a people occupation summary
• Management analysis tools utilities:
o
Global control: display and print a summary of the global budget; display a
summary of the global cash flow.
o
Graphics: provide a visual image of the user occupation, project manpower and
cash flow.
• Information control:
o
Controlled access to the information introduced in the application according to
the permissions defined for each user.
o
Keep all the involved users informed (via e-mail and internal notifications)
about the creation, modification or removal of a project, WP, Milestone, WBS,
risks, non-conformities and actions.
• System administration:
o
User administration: define new users; modify their attributes and permissions
in connection with each project; unsubscribe users.
o
Tools: import WBS’s from a text file.
o
Database administration: data backup or restore; upgrades.
13
MANATEE User Manual
Issue 1.D
3
INSTALLING MANATEE
3.1
Software requirements
The minimum software requirements to install MANATEE on your server computer are the
following:
"
Windows XP/Vista or Linux 2.4 or greater
"
The Java Runtime Environment 6.0 or greater
(http://www.java.com/en/download/manual.jsp)
"
MySql Server v5.0 or greater (http://dev.mysql.com/downloads/)
"
MySQL Connector/J 5.0 or greater (http://dev.mysql.com/downloads/)
"
Tomcat Server 5.5 or greater (http://tomcat.apache.org/)
"
e-mail account (through SMTP protocol) to manage the MANATEE mail service.
3.2
MySQL Server configuration
After MySQL Server is installed, there are a couple of parameters to be modified at my.ini
MySQL options file in order to have working properly the MANATEE database.
The options to add or modify are described in the following lines:
"
Character set and collation.
Add the following lines in the options file:
[mysql]
default-character-set=utf8
[mysqld]
default-character-set=utf8
default-collation=utf8_general_ci
"
max_allowed_packet
Add the following lines in the options file:
[mysqld]
max_allowed_packet=100M
14
MANATEE User Manual
Issue 1.D
Note: When a MySQL client or the mysqld server receives a packet bigger than
max_allowed_packet bytes, it issues a Packet too large error and closes the connection. If
it happens, the max_allowed packet value can be increased from 100 MB to as much as
1GB.
3.3
Tomcat Server configuration
After Tomcat Server is installed, the server must be configured.
3.3.1
Security JDBC Realm
A JDBCRealm is accesses authentication information stored in a relational database, accessed
via a JDBC driver.
To configure the JDBCRealm for the MANATEE Web application:
#
add the following lines in the file $CATALINA_HOME/conf/server.xml1 (only the
bold lines):
...
<!-- Define the Tomcat Stand-Alone Service -->
<Service name="Catalina">
...
<!-- Define the top level container in our container hierarchy -->
<Engine name="Catalina" defaultHost="localhost">
...
<!-- Because this Realm is here, an instance will be shared globally -->
<Realm
className="org.apache.catalina.realm.JDBCRealm" debug="99"
driverName="com.mysql.jdbc.Driver"
connectionURL="jdbc:mysql://localhost:3306/$DATABASENAME?autoReconnect=true"
connectionName="user_m" connectionPassword="modificar"
userTable="usuarios" userNameCol="usuario" userCredCol="clave"
userRoleTable="roles" roleNameCol="rol"
digest="md5" />
1
$CATALINA_HOME is the
application is installed.
home
pathname
where
the
tomcat
server
15
MANATEE User Manual
Issue 1.D
where
$DATABASENAME is the database name (by default geco).
# Copy the MySQL Connector/J to the directory $CATALINA_HOME/common/lib/
3.3.2
Security Manager in Tomcat Server
If you choose to run Tomcat Server with the Security Manager, it is necessary to modify the
configuration file.
#
//
//
//
//
//
//
//
//
//
//
//
//
Add the following lines in the file $CATALINA_HOME/conf/catalina.policy
(only the bold lines):
============================================================================
catalina.corepolicy - Security Policy Permissions for Tomcat 5
This file contains a default set of security policies to be enforced (by the
JVM) when Catalina is executed with the "-security" option. In addition
to the permissions granted here, the following additional permissions are
granted to the codebase specific to each web application:
* Read access to the document root directory
$Id: 01system.policy 2783 2006-11-22 10:50:31Z marcusb-guest $
============================================================================
// ========== SYSTEM CODE PERMISSIONS =========================================
. . . .
. . . .
// ========== CATALINA CODE PERMISSIONS =======================================
. . . .
. . . .
// ========== WEB APPLICATION PERMISSIONS =====================================
// These permissions are granted by default to all web applications
// In addition, a web application will be given a read FilePermission
// and JndiPermission for all files and directories in its document root.
grant {
// Required for JNDI lookup of named JDBC DataSource's and
// javamail named MimePart DataSource used to send mail
permission java.util.PropertyPermission "java.home", "read";
permission java.util.PropertyPermission "java.naming.*", "read";
permission java.util.PropertyPermission "javax.sql.*", "read";
// OS Specific properties to allow read
permission java.util.PropertyPermission
permission java.util.PropertyPermission
permission java.util.PropertyPermission
permission java.util.PropertyPermission
permission java.util.PropertyPermission
permission java.util.PropertyPermission
permission java.util.PropertyPermission
access
"os.name", "read";
"os.version", "read";
"os.arch", "read";
"file.separator", "read";
"path.separator", "read";
"line.separator", "read";
"catalina.base", "read";
16
MANATEE User Manual
Issue 1.D
permission java.util.PropertyPermission "catalina.home", "read";
// JVM properties to allow read access
permission java.util.PropertyPermission
permission java.util.PropertyPermission
permission java.util.PropertyPermission
permission java.util.PropertyPermission
permission java.util.PropertyPermission
"read";
permission java.util.PropertyPermission
"read";
permission java.util.PropertyPermission
permission
"read";
permission
"read";
permission
"read";
permission
permission
permission
"java.version", "read";
"java.vendor", "read";
"java.vendor.url", "read";
"java.class.version", "read";
"java.specification.version",
"java.specification.vendor",
"java.specification.name", "read";
java.util.PropertyPermission "java.vm.specification.version",
java.util.PropertyPermission "java.vm.specification.vendor",
java.util.PropertyPermission "java.vm.specification.name",
java.util.PropertyPermission "java.vm.version", "read";
java.util.PropertyPermission "java.vm.vendor", "read";
java.util.PropertyPermission "java.vm.name", "read";
// Required for OpenJMX
permission java.lang.RuntimePermission "getAttribute";
// Allow read of JAXP compliant XML parser debug
permission java.util.PropertyPermission "jaxp.debug", "read";
// Precompiled JSPs need access to this package.
permission java.lang.RuntimePermission
"accessClassInPackage.org.apache.jasper.runtime";
permission java.lang.RuntimePermission
"accessClassInPackage.org.apache.jasper.runtime.*";
permission java.util.PropertyPermission "org.apache.jasper.runtime.*",
"read";
// Required for JODBC
permission java.lang.RuntimePermission
"accessClassInPackage.org.apache.tomcat.dbcp.*";
// Permission needed for web application
permission java.lang.RuntimePermission
"accessClassInPackage.org.apache.coyote.*";
// Permissions needed for user language
permission java.util.PropertyPermission "user.language", "write";
// Permissions to make database backup from web applications
permission java.io.FilePermission "<<ALL FILES>>", "execute";
};
// The permissions granted to the balancer WEB-INF/classes and WEB-INF/lib
directory
grant codeBase "file:/usr/share/tomcat5.5-webapps/balancer/-" {
permission java.lang.RuntimePermission
"accessClassInPackage.org.apache.tomcat.util.digester";
permission java.lang.RuntimePermission
17
MANATEE User Manual
Issue 1.D
"defineClassInPackage.org.apache.tomcat.util.digester";
};
grant codeBase "file:${catalina.home}/bin/tomcat-juli.jar" {
permission java.io.FilePermission "/usr/share/tomcat5.5-webapps/jspexamples/WEB-INF/classes/logging.properties", "read";
permission java.io.FilePermission "/usr/share/tomcat5.5webapps/servlets-examples/WEB-INF/classes/logging.properties", "read";
// Permissions needed to can send mails from Web applications
permission java.io.FilePermission "$MANATE_HOME/WEBINF/classes/logging.properties","read";
};
// These permission apply to the JDBC MySQL connector
grant {
permission java.net.SocketPermission "localhost", "resolve";
permission java.net.SocketPermission "127.0.0.1:3306", "connect,resolve";
};
// WEB MANATEE permissions
grant codeBase "file: $MANATEE_HOME/-" {
// Permissions needed to use the temporal dir
permission java.util.PropertyPermission "java.io.tmpdir", "read,write";
permission java.io.FilePermission “$SYSTEM_TEMP_DIR/-", "read,write,delete";
// Permissions needed to read and write files
permission java.io.FilePermission "$MANATEE_BACKUP/-",
"read,write,delete,execute";
permission java.io.FilePermission $MANATEE_HOME/private/doc/-",
"read,write,delete,execute";
// Permissions needed to send e-mails
permission java.net.SocketPermission "$MAILSERVER", "connect,resolve";
};
Where
$MANATEE_HOME is the home pathname where the MANATEE web application is
installed.
$MANATEE_BACKUP is the home pathname where the MANATEE web application
save backups (path user defined).
$MAILSERVER is the SMTP Mail Server the company is going to use.
$SYSTEM_TEMP_DIR is the pathname of the system temporal directory.
18
MANATEE User Manual
Issue 1.D
3.3.3
Define the MANATEE Web application
To define the MANATEE web application:
# Add the following lines in the file $CATALINA_HOME/conf/server.xml (only the
bold lines):
...
<!-- Define the Tomcat Stand-Alone Service -->
<Service name="Catalina">
...
<!-- Define the top level container in our container hierarchy -->
<Engine name="Catalina" defaultHost="localhost">
...
<!-- Define the default virtual host
-->
<Host name="localhost" appBase="webapps" unpackWARs="true" autoDeploy="true"
xmlValidation="false" xmlNamespaceAware="false">
...
<Context path="/manatee" docBase="$MANATEE_HOME" debug="0">
<Logger className="org.apache.catalina.logger.FileLogger"
prefix="localhost_manatee_log." suffix=".txt" timestamp="true"/>
<!-- Database connector configuration -->
<Resource name="jdbc/manatee" auth="Container" type="javax.sql.DataSource"
maxActive="100" maxIdle="30" maxWait="10000" username="user_m"
password="modificar" driverClassName="com.mysql.jdbc.Driver"
url="jdbc:mysql://localhost:3306/$DATABASENAME?autoReconnect=true"/>
</Context>
</host>
Note: the attribute docBase defines the directory for the Web application associated with
this <Context>. This is the pathname of a directory that contains the resources for the
MANATEE Web application (see the section 3.4).
3.3.4
Add libraries to Tomcat Server
The MANATEE Web application needs two Jakarta Apache libraries.
For this, you have to add to $CATALINA_HOME /common/lib/ the followings libraries:
# Apache
Commons
Object
Pooling
Library
(http://commons.apache.org/downloads/download_pool.cgi)
1.3
or
greater
19
MANATEE User Manual
Issue 1.D
# Apache Commons Database Connection Pooling Services
(http://commons.apache.org/downloads/download_dbcp.cgi)
3.3.5
1.2.1 or greater
Setting JVM options for Tomcat Server
There are one important Java options which should be set for Tomcat.
•
Maximum heap size: this is the maximum amount of heap memory the Java Virtual
Machine (JVM) is allowed to allocate. In the case of most JVMs, the default setting of
the maximum heap size is 64MB. You can increase the maximum heap size of
applications by setting the -Xmx JVM parameter. For example -Xmx1024m allows
maximum 1GB (1024MB) heap to be allocated for the JVM.
Note: it is recommended to specify a considerably lower value than the amount of physical
RAM in your system, so the operating system and other applications will also have enough
space. Otherwise the swap memory of the operating system will be used, which can result in
high disk activity, and reduced system performance.
For MANATEE application it is recommended to increase the memory pool to 250MBs.
You can change this setting doing the following:
# For Windows XP: Go to the "Apache Tomcat x.x" folder in the Start Menu. Start the
"Configure Tomcat".
Select the "Java" tab in the configuration dialog:
o
Maximum heap size: The "Maximum memory pool" text box corresponds to the
heap size limit. Fill it with the value 250 (If using this text box it is not needed
to specify "-Xmx" Java option.)
# For Linux: place the Java options into the CATALINA_OPTS environment variable. For
example: "-server –Xmx250m".
3.4
3.4.1
MANATEE Web Application Installation and Configuration
MANATEE Web Application installation
To install MANATEE Web application, follow the steps:
# Unzip the file manatee-wapp-1.0.zip to the directory you want to install the MANATEE
Web Application ($MANATEE_HOME).
# Changes the permissions in the directories $MANATEE_HOME/doc and
$MANATEE_BACKUP to permit to Tomcat user to can read, write, delete and execute
files.
# Changes,
if
it
is
necessary,
the
attribute
docBase
in
the
file
$CATALINA_HOME/conf/server.xml (see section 3.3.2).
# Install the MANATEE database into the MySQL server executing in the terminal the
MySQL command: mysql < geco.sql -u root –p
20
MANATEE User Manual
Issue 1.D
3.4.2
MANATEE Web Application configuration
To configure MANATEE Web Application, it is necessary to changes some parameters in the
configuration files:
# The file $MANATEE_HOME/WEB-INF/web.xml
# The file $MANATEE_HOME/WEB-INF/classes/com/fractal/manatee/manatee.props
3.4.2.1
Web.xml configuration
In the $MANATEE_HOME/WEB-INF/web.xml, change the variable $MANATEE_HOME with
the real (the path where unzip the application, see 3.4.1).
...
<servlet>
<servlet-name>main</servlet-name>
<servlet-class>com.fractal.manatee.Main</servlet-class>
<init-param>
<param-name>config</param-name>
<param-value>
$MANATEE_HOME/WEB-INF/classes/com/fractal/manatee/manatee.props
</param-value>
</init-param>
</servlet>
...
3.4.2.2
manatee.props configuration
The file manatee.props is the MANATEE Web Application configuration file.
The parameter to configure are (the file
INF/classes/com/fractal/manatee/manatee.props) :
o
manateePath -> path
($MANATEE_HOME)
where
you
path
unzip
is
$MANATEE_HOME/WEB-
MANATEE
Web
Application
manateePath=$MANATEE_HOME/2
o
backupPath -> pathname to save the backups files (path user defined)
backupPath=$MANATEE_BACKUP/
o
mysqlPath -> path to the MySQL Server bin dir ($MYSQL_HOME is MySQL
Server home dir).
mysqlPath=$MYSQL_HOME/bin/
o
2
mySQLPort -> MySQL port (for example 3306).
The “ / ” at the end of the path is mandatory.
21
MANATEE User Manual
Issue 1.D
mySQLPort=3306
o
mySQLHost -> MySQL host name (for example localhost).
mySQLHost=localhost
o
dbName -> MySQL database name (by default geco).
dbName=geco
o
mail.smtp.host -> Mail SMTP Host name of the company (for example mail.fractales.com).
mail.smtp.host=mail.fractal-es.com
o
mail.smtp.auth -> TRUE if the SMTP Mail Server need authentication, FALSE if
not.
mail.smtp.auth=TRUE
o
mail.smtp.user -> e-mail user to manage the MANATEE e-mail service (for
example [email protected]).
[email protected]
o
mail.smtp.password -> e-mail user password to manage the MANATEE e-mail
service.
mail.smtp.password=password
o
mail.from -> e-mail user to manage the MANATEE e-mail service (for example
[email protected]).
[email protected]
In the case the mail SMTP server is secure (SSL), you have to add this others parameters:
o
mail.smtp.port -> Mail SMTP port (for example 465).
mail.smtp.port=465
o
mail.smtp.socketFactory.por -> Mail SMTP socketFactory port (for example 465).
It is the same that in the paremeter mail.smtp.port.
mail.smtp.socketFactory.port=465
o
mail.smtp.socketFactory.class -> Mail SMTP socketFactory class. The value for
this parameter has to be javax.net.ssl.SSLSocketFactory.
mail.smtp.socketFactory.class=javax.net.ssl.SSLSocketFactory
22
MANATEE User Manual
Issue 1.D
Note: If you change the user and/or password of the generic user_m user, you have to
change the username and/or the password values in the manatee.props parameter
userAdmin and/or passwordAdmin.
3.4.3
Start the Services
After the configurations, the MySQL Server and Tomcat Server services have to be started (or
restart if the services were started before).
# Start/Restart MySQL Server
# Start/Restart Tomcat Server
23
MANATEE User Manual
Issue 1.D
3.5
MANATEE Restore Installation
The MANATEE Restore application is a Java application to manage the MANATEE restore
tool.
This application has to be installed in the server computer.
To install MANATEE Restore application is only necessary:
# Copy
the
file
MANATEERestore.jar
($MANATEERESTORE_HOME).
to
your
server
computer
24
MANATEE User Manual
Issue 1.D
4
MANTEE USER’S PROFILES
The User’s Profiles that can be defined in MANATEE are the following ones:
1. Administrator
The administrator has full access to all MANATEE administration capabilities.
The administrator also has the access rights to visualize project information, which
allow him/her to clarify any doubt about permission that the users can arise.
2. Project manager
The project manager (or project managers of a particular project) has the access rights to
create, modify and delete the WP’s, WBS’s, risks, non-conformities and actions
associated to this project, decide which documents are related with this project and,
also, decide the authors, reviewers and approvers to be assigned the documents of this
project. The project manager can use in his/her project all analysis and visualization
functions provided by MANATEE.
Each project must have at least one project manager.
The same user can be authorized as project manager for more than one project.
3. WP manager
The WP manager has the access rights to create and modify the WBS´s associated to
this WP, although the project manager of the project related with this WP must validate
the created or modified WBS.
Each WP must have only one WP manager.
4. WBS responsible
The WBS responsible can visualize the corresponding WBS and generate WBS
Progress Reports in this WBS.
Each WBS must have only one WBS responsible.
5. Human Resources manager
The Human Resources manager has the access rights to manage all human resources
utilities, which include the administration of the hourly cost and PTR’s and the use of
the analysis and visualization capabilities related with the human resources functions.
The Human Resources manager also has the access rights to use the analysis, reporting
and visualization tools provided by MANATEE to allow project track and organization
control.
6. Quality manager
The Quality manager has the access rights to define, modify and delete the risk, nonconformities and actions.
7. Authorized in all documents versions
25
MANATEE User Manual
Issue 1.D
The authorized users to see all documents versions in a particular project are the users
that can see and have a read-only copy to all documents in this project (i.e., not only
approved documents but also draft versions of the documents).
8. Authorized in approved documents only
The authorized users to see only the approved versions in a particular project are the
users that can see and have a read-only copy to all documents approved in this project.
26
MANATEE User Manual
Issue 1.D
5
STARTING MANATEE
5.1
Logging in
MANATEE can be executed from any WEB Browser.
So, in order to start the application, first, start a WEB browser instance in your machine and,
then, type the MANATEE address into the address text box as follows:
http://CompanyWebServer/manatee
The following Login web page will appear:
Figure 1: Login web page
!
Introduce the Username,
!
Introduce the Password,
!
click Login,
If the login information is correct, the MANATEE initial web page will be opened.
Figure 2: Initial web page
27
MANATEE User Manual
Issue 1.D
5.2
Accessing the data according to the User access rights
In order to provide the functionality described in section 2, MANATEE provides access to the
following data sets:
! Projects:
"
Definition of the projects
"
WP’s
"
Milestones
"
Cash Milestones
"
WBS’s
"
WBS reports
! Project quality control:
"
Risks
"
Non-conformities
"
Actions
! Human resources:
"
User´s hourly cost
"
PTRs
! Users
! Notifications
! Backups
The access to each data set is quite straight forward following the corresponding tab in the main
bar in most of the MANATEE web pages.
To manage project data, select the Project label.
!
!
The projects are defined and managed as described in section 6.
!
To perform actions related with the quality control of the project, select the
Quality label.
!
To do any actions (i.e., create, delete, modify or search) related with Risk,
Non-conformities and actions see section 7.
!
To perform actions related with the human resources data of the company,
select the Human resources label.
!
To do any actions (i.e., create, delete, modify or search) related with
manpower cost or PTRs see section 8.
!
To use the analysis and visualization capabilities provided by MANATEE,
select the Tools label.
28
MANATEE User Manual
Issue 1.D
!
To analyze and visualize the information kept in MANATEE, such as
manpower, cash flow and workload, see section 9.
To manage the Notifications, select the Notification label.
!
!
To do any actions related with Notifications see section 10.
To manage the Users accounts, select the Users label.
!
!
To do any actions (i.e., create, unsubscribe, modify or search) related with
Users see section 11.
To work with the Backups, select the Backup label.
!
!
To do any actions related with Backup see section 12.
Depending of the access rights and the roles that has been assigned to the user who has
logged in the application, the data that will be displayed and the actions that could be done
will be different, as described in section 4.
If any doubt about permissions, ask the administrator.
5.3
Logging out
In the any MANATEE web page, select Logout
The application will end.
29
MANATEE User Manual
Issue 1.D
6
PROJECT MANAGEMENT
A project is a strategy to reach a goal. All projects must be defined in terms of Scope, Schedule
and Price, or Performance, Time, and Budget. The three parameters must be considered (and,
therefore, controlled) in order to optimize the achievement of the project objectives meeting the
planned schedule and assigned budget.
In order to organize and manage the project, the Project Manager has to propose the Work
Breakdown Structure. The WBS is a deliverable-oriented grouping of project elements, which
organizes and defines the total scope of the project.
The WBS technique uses a hierarchical tree structure. Each task is an activity and it is an
element of work with clear project parameters.
The set of tasks managed by the same overall responsible, oriented to produce a single
deliverable or to offer certain kind of services to the project are called Work Packages. The WPs
are usually divided by the nature of the tasks to do (divided by the skills of the people that have
to carry out the work). Each Work Package has an associated deliverable in such a way that the
sum of the Work Packages is the system to be delivered.
Each WP is divided in sub-work packages and these into smaller pieces of work, tasks, and all
together constitutes the Work Breakdown Structure, WBS.
6.1
Project administration
MANATEE provides the capabilities required to manage the projects that are kept into the
system during their whole lifecycle.
The figure below shows all the states that a project could have during its lifecycle; i.e., since the
project is created until it is deleted from the system or, even, afterwards, if the project is again
restored.
Restoring
Archiving
Finished
Re-activating
Active
Removing
Removed
Figure 3: Project lifecycle diagram
Regarding the administration of the projects point of view, MANATEE provides the following
functionality:
"
Create a new project
"
Search projects using different criteria
"
Display the complete or filtered project list
30
MANATEE User Manual
Issue 1.D
"
Display the projects properties
"
Modify the definition of a project
"
Change the dates associated to a project
"
Display a summary of the information included in a project
"
Print a summary of the project plan
"
Print a project plan
"
Print a Gantt view of the project plan (the whole project, only the WP’s or only a
selected WP and the associated WBS’s)
"
Print all risk, non-conformities and actions that have been initiated in a project
"
Print a summary of the project budget in a selected period (organized by WP´s or
WBS’s)
"
Print a summary of the project milestones
"
Print a summary of the project cash flow
"
Archive a project
"
Remove a project
"
Restore a project
It is important to remember that each user can only do actions on the projects according to the
access rights that this particular user has (see sections 4 or 5.2 for more information).
6.1.1
Creating a new project
To start working with projects, select Project Management tab and, then, Projects tab.
In order to create a new project, select New Project tab. Only the Administrator can create new
projects.
The following form will appear.
31
MANATEE User Manual
Issue 1.D
Figure 4: Creating a project page
!
Fill the following fields (all mandatory fields are marked with a star):
"
Code: Introduce a code for the project. This is a text field and the maximum
length of this field is 32 characters. The project code cannot include the
separator character as defined in 14.
"
Title: Introduce the project title. This is a text field and the maximum
length of this field is 200 characters.
"
Creation date: The creation date is automatically filled with the current
date (i.e., the date when the project is being created). This date can only be
modified at the definition of the project.
"
Closed: This box is automatically marked when the project is finished.
"
Removed: This box is automatically marked when the project is removed.
"
Project managers: Select which users are going to be the Project managers
of the current project from the left list using the arrows between the boxes.
The users selected will be kept in the right list.
"
Authorized in all document versions: Select which users are going to be
authorized to see all versions of the documents in the current project from
the left list using the arrows between the boxes. The users selected will be
kept in the right list.
"
Authorized in approved documents only: Select which users are going to
be authorized to see only approved versions of the documents in the current
project from the left list using the arrows between the boxes. The users
selected will be kept in the right list.
"
Project Documents: This box displays the codes of the documents that are
created in the current project. This list will be automatically filled at the
creation of the documents.
32
MANATEE User Manual
Issue 1.D
!
Click add project.
The project will be created.
The project status is changed to “Active”.
A notification will be also sent (internally, a MANATEE notification and, externally, an e-mail)
to the corresponding users in order to inform them about the creation of the project.
“The project (Code) has been created” to be sent to the Project managers and to the
project authorized users.
A notification will be also sent (internally, a MANATEE notification) to the corresponding
users in order to inform them about they are designed project manager.
“You have been named manager of the project (Code)” to be sent to the Project
managers.
Note: If, for any reason, the project cannot be created, go to the section 13, which provides
some guides to troubleshooting problems.
6.1.2
Searching projects
To start looking for projects, select Project Management tab and, then, Projects tab.
The complete list of projects that the current user can see will be displayed.
Figure 5: Projects List
As shown in the figure, the following issues could be available for each project in the list:
"
Code: The code of the project.
"
Title: The title of the project.
33
MANATEE User Manual
Issue 1.D
"
Status: The current status of the project.
"
Show / Modify: Two different action buttons can appear in this position:
"
-
The show button displays the project properties.
-
The modify button allows modifying the project properties.
Finish / Active: Two different action buttons can appear in this position:
-
The finish button allows finishing the project. So, the project will be archived
and it will not be active any more (i.e., any new document can now be created
in this project).
-
The active button allows activating again a project that has been previously
finished.
"
Remove: The remove button allows removing the project completely from the system
"
Restore: The restore button allows restoring the project into the system.
"
Define dates / Change dates / View dates: Three different action buttons can appear in
this position:
-
The define dates button allows defining the (planned and real) start and
(planned and real) end dates of a project.
-
The change dates button allows modified the (planned and real) start and
(planned and real) end dates of a project.
-
The view dates button shows the (planned and real) start and (planned and real)
end dates of a project
"
Summary: The summary button shows a summary of the project.
"
Track: The track button allows printing different views of the information related with
the project.
Some actions buttons (remove, restore and define dates) will be only displayed for the
Administrator login because he/she is the only user with the capability to perform these actions.
The actions buttons of each project will also not be enabled (i.e., they will be displayed as
greyed out) according to the access rights of the user and, also, to the current project status.
The projects are always arranged by the code.
Each screen will show 10 projects, to move among the screens select the other pages numbers or
use the arrows that appear in the bottom of the project list.
Figure 6: Page selectors
In order to search a particular project or to constrain the number of project to be displayed,
select Search Project tab.
The following form will appear.
34
MANATEE User Manual
Issue 1.D
Figure 7: Search projects form
!
!
Fill as many fields as desired in order to filter the project list.
"
Code: Introduce any number of alphanumerical characters (this is not case
sensitive); any project which contains this sequence of characters in its code
will be selected.
"
Title: Introduce any number of alphanumerical characters (this is not case
sensitive); any project which contains this sequence of characters in its title
will be selected.
"
Closed: Select “Yes” or “No” in the list; any project meeting the requested
state will be selected. By default, the option “Yes” is selected.
"
Project manager: Select a user in the list; any project whose project
managers list includes the introduced one will be selected.
"
Authorized in all document versions: Select a user in the list; any project
in which the selected user is authorized in all document versions will be
selected.
"
Authorized in approved documents only: Select a user in the list; any
project in which the selected user is authorized in approved document
versions will be selected.
"
Project Documents: Select a document in the list; any project which
includes the introduced document will be selected.
Click search.
A new project list will be displayed taken all the filtering constrains introduced into account
(i.e., the filtered projects match all constrains introduced).
Example:
35
MANATEE User Manual
Issue 1.D
The user is searching projects, which code starts as "P" and which project
manager name is "Perez Calpena, Ana"
Then, the Search form must be filled as shown in the figure below
Figure 8: Example of a filled search project form
and the list of projects displayed would be the following one.
Figure 9: Example of a filtered projects list
36
MANATEE User Manual
Issue 1.D
Note: If the desired project does not appear in any screen, go to the section 13 which provides
some guides to troubleshooting problems.
6.1.3
Defining the dates of a new project
Once a project has been created, the (planned and real) start and the (planned and estimated o
real) end dates must be defined.
First, the project, which dates are going to be defined, must be displayed, which can be done
following the steps described in the section 6.1.2. Then, click the define dates button.
Only the Administrator and the project manager of the corresponding project have the access
rights to define the project dates.
The current status of the project must be “active”.
The following form will appear.
Figure 10: Defining the project dates page
!
Fill the following fields (all mandatory fields are marked with a star):
"
Start planned date: The planned start date as agreed in the project contract
must be introduced.
"
Start real date: The real start date (the date when the project is really
starting) must be introduced.
"
End planned date: The planned end date as agreed in the project contract
must be introduced.
"
End real date: The real end date (the date when it is estimated than the
project is going to end or, at the end of the project, the date when the project
has been really ended) must be introduced.
37
MANATEE User Manual
Issue 1.D
!
Move all the WP’s and milestones: Select (tick with the mouse) this option to
move all the WP’s and WBS’s date according to the difference between the
previous Start real date and the new Start real date.
Note: This action is only applied if no manpower hours have been already
assigned in the PTR’s to the WBS´s that must be modified.
!
Click add properties.
The project dates will be defined.
Note: If, for any reason, the project properties cannot be defined, go to the section 13 which
provides some guides to troubleshooting problems.
6.1.4
Displaying the properties of a project
Once the desired project is displayed, which can be done following the steps described in the
section 6.1.2, click the show button (note: the projects manager of a particular project can
display the properties of this project using the modify button instead, see section 6.1.5).
The project properties will be displayed.
Figure 11: Project properties view
Note: If the show or modify buttons of the desired project (i.e., the modify button will be
enabled instead of the show button when the user is the project manager of this project) are not
available, go to the section 13 which provides some guides to troubleshooting problems.
6.1.5
Modifying the properties of an existing project
The projects properties include the project general properties and the project dates. Both can be
modified as described in the following subsections.
38
MANATEE User Manual
Issue 1.D
6.1.5.1
Modifying the project general properties
Once the project which properties are going to be modified is displayed, which can be done
following the steps described in the section 6.1.2, click the modify button.
Only the Administrator and Project managers of the projects to be modified have the access
rights to modify the project properties.
The current status of the project must be “active”.
The following form will appear.
Figure 12: Modifying the project properties page
!
Modify the desired fields (taken into account constrains listed in section 6.1.1).
Only the fields that are not greyed out can be modified.
!
Click update.
The project properties will be modified.
A notification will be also sent (internally, a MANATEE notification and, externally, an e-mail)
to the corresponding users in order to inform them about the modification of the project
properties.
“The properties of the project (Code) have been modified” to be sent to the Project
managers and to the authorized users in all document versions.
Note: If, for any reason, the project properties cannot be modified, go to the section 13 which
provides some guides to troubleshooting problems.
39
MANATEE User Manual
Issue 1.D
6.1.5.2
Modifying the start and end dates of a project
Once the project, which dates are going to be modified, is displayed, which can be done
following the steps described in the section 6.1.2, click the change dates button.
Only the Administrator and Project managers of the projects to be modified have the access
rights to modify the project dates.
The current status of the project must be “active”.
The following form will appear.
Figure 13: Modifying the project dates page
!
Modify the desired fields (taken into account constrains listed in section 6.1.3).
Only the fields that are not greyed out can be modified.
!
Click update.
The project dates will be modified.
Note: If, for any reason, the project properties cannot be modified, go to the section 13 which
provides some guides to troubleshooting problems.
6.1.6
Display a summary of a project
Once the desired project is displayed, which can be done following the steps described in the
section 6.1.2, click the summary button.
Only the Human Resources manager and Project managers of the projects have the access rights
to display the project summary.
This option is only available when the current status of the project is “active” and the projects
dates are already defined.
40
MANATEE User Manual
Issue 1.D
A project summary will be displayed. The project summary contains the following information:
"
Project code (as defined in the project general properties).
"
Project title (as defined in the project general properties).
"
Project managers (as defined in the project general properties).
"
Start planned date (as defined in the project dates).
"
Start real date (as defined in the project dates).
"
End planned date (as defined in the project dates).
"
End real date (as defined in the project dates).
"
Manpower total hours (total manpower hours assigned in the different WBS’s defined
in this project).
"
Total cost associated to manpower (total manpower cost, taking into account the manhours and the cost of each person, assigned in the different WBS’s defined in this
project).
"
Total cost associated to other resources (other resources, different to personnel cost,
assigned in the different WBS’s defined in this project).
"
Total project cost (total cost associated to manpower plus total cost associated to other
resources).
"
A manpower table where the total manpower assigned to the project is displayed
(detailing the hours to be dedicated by each person) as well as the total hours already
spent (detailing the hours that have been spent by each person).
Note: If the show or modify buttons of the desired project (i.e., the modify button will be
enabled instead of the show button when the user is the project manager of this project) are not
available, go to the section 13 which provides some guides to troubleshooting problems.
6.1.7
Displaying and printing the information of a project
Once the desired project is displayed, which can be done following the steps described in the
section 6.1.2, click the track button.
People authorized to the project have the access rights to display and print the project
information described in this section.
This option is only available when the current status of the project is “active” and the projects
dates are already defined.
The following window will be displayed.
41
MANATEE User Manual
Issue 1.D
Figure 14: Track project information menu
The following options are available:
"
Project plan summary (print WP structure only), which includes the project
properties, the project dates and the definitions of the WP’s associated to this project.
"
Project plan (print WP structure and the associated WBS), which includes the
project properties, the project dates, the definition of the WP’s associated to this project
and the definition of the WBS’s associated to the WP’s.
"
Project Plan Gantt chart, which includes the Gantt view of all the WP’s and WBS’s
of the project. If the Export to option is selected, a txt file (compatible with the project
software MS Project) or an xml file (compatible with the project software Merlin) is
obtained. These files allow importing the project plan to the corresponding programs.
"
Project Plan Gantt chart (print WP structure only), which includes the Gantt view
of only the WP’s of the project. If the Export to option is selected, a txt file (compatible
with the project software MS Project) or an xml file (compatible with the project
software Merlin) is obtained. These files allow importing the project plan to the
corresponding programs.
"
Project Plan Gantt chart (print selected WP and the associated WBS), which
includes the Gantt view of the selected WP and WBS’s of the project. If the Export to
option is selected, a txt file (compatible with the project software MS Project) or an xml
file (compatible with the project software Merlin) is obtained. These files allow
importing the project plan to the corresponding programs.
"
Quality data summary, which include the information recorded in the risk, nonconformities and actions that have been opened in the project.
42
MANATEE User Manual
Issue 1.D
"
Project budget control, which include the project budget information for the selected
period (the budget information can be organized by WP’s or WBS’s).
"
Milestone summary, which include a summary of the milestones of the project.
"
Cash flow summary, which include a summary of the project cash flow.
"
External expenses, which include a summary of the external expenses of the project.
Select the desired option and, then, click print.
6.1.7.1
Project plan summary
The project plan summary contains the following information:
"
Project code (as defined in the project general properties).
"
Project title (as defined in the project general properties).
"
Project managers (as defined in the project general properties).
"
Start planned date (as defined in the project dates).
"
Start real date (as defined in the project dates).
"
End planned date (as defined in the project dates).
"
End real date (as defined in the project dates).
"
Information about each WP associated to this project, which includes:
o WP code (as defined in the WP properties).
o WP title (as defined in the WP properties).
o WP manager (as defined in the WP properties).
o WP project (as defined in the WP properties).
o WP scope (as defined in the WP properties).
o WP description (as defined in the WP properties).
The project plan summary can be printed or saved in pdf format.
6.1.7.2
Project plan
The project plan contains the following information:
"
Project code (as defined in the project general properties).
"
Project title (as defined in the project general properties).
"
Project managers (as defined in the project general properties).
"
Start planned date (as defined in the project dates).
"
Start real date (as defined in the project dates).
"
End planned date (as defined in the project dates).
43
MANATEE User Manual
Issue 1.D
"
End real date (as defined in the project dates).
"
Information about each WP associated to this project, which includes:
o WP code (as defined in the WP properties).
o WP title (as defined in the WP properties).
o WP manager (as defined in the WP properties).
o WP project (as defined in the WP properties).
o Scope (as defined in the WP properties).
o Description (as defined in the WP properties).
o Information about each WBS associated to this WP, which includes:
-
WBS code (as defined in the WBS properties).
-
WBS title (as defined in the WBS properties).
-
WBS responsible (as defined in the WBS properties).
-
WP manager (as defined in the WBS properties).
-
WP project (as defined in the WBS properties).
-
Scope (as defined in the WBS properties).
-
Description (as defined in the WBS properties).
-
Goal (as defined in the WBS properties).
-
Inputs (as defined in the WBS properties).
-
Tasks (as defined in the WBS properties).
-
Deliverables (as defined in the WBS properties).
-
Planned start date (as defined in the WBS properties).
-
Real start date (as defined in the WBS properties).
-
Planned end date (as defined in the WBS properties).
-
Real end date (as defined in the WBS properties).
-
Associated milestones (as defined in the WBS properties).
-
Predecessor (as defined in the WBS properties).
-
Manpower (man-hours per each person as defined in the WBS
properties).
-
Hardware resources (as defined in the WBS properties).
-
Software resources (as defined in the WBS properties).
-
Sub-contracts (as defined in the WBS properties).
-
Cost associated to the manpower (as defined in the WBS properties).
44
MANATEE User Manual
Issue 1.D
-
Cost associated to other resources (as defined in the WBS properties).
-
% completion (as included in the WBS properties).
The project plan can be printed or saved in pdf format.
6.1.7.3
Project Plan Gantt chart
The Gantt chart provides a Gantt view of the WP´s, WBS´s and Milestones dates included in the
selected project.
Figure 15: Project Gantt chart view
WP bars span from the real start date (as defined in the WP properties) to the real end date (as
defined in the WP properties).
Outer WBS bars span from the real start date (as defined in the WBS properties) to the real end
date (as defined in the WBS properties).
Inner WBS bars represent the percentage of WBS completion (as estimated in the WBS
properties).
Milestones marks display the real milestones dates (as defined in the WBS properties).
The Gantt charge default range of the date axis includes all project dates (WP´s, WBS´s and
Milestones) to be displayed.
In order to display a smaller date axis, click and drag the left mouse button in the graph to select
the desired area.
Other operations related with the range axis and to modify the properties of the graph can be
done by clicking the right mouse button and selecting the right choice in the graph menu. The
following options are available:
"
Properties: Several graph properties such as the title, colours or fonts can be
customized.
"
Save as: The Gantt chart can be saving as png format.
45
MANATEE User Manual
Issue 1.D
"
Print: The Gantt chart can be printed or saved in pdf format.
"
Zoom in: A smaller area of the date axis is displayed
"
Zoom out: A bigger area of the date axis is displayed.
"
Auto range: The default range of the date axis is displayed.
Another function about the Gantt chart is that it can be exported to a txt or xml file to can use in
others compatibles project software. The txt file is compatible with the MS Project software,
and the xml file is compatible with the Merlin software.
6.1.7.4
Project Plan Gantt chart (WP only)
A Gantt chart is displayed, which provides a Gantt view of the WP´s included in the selected
project.
Figure 16: Project Gantt chart (ony WPs) view
WP bars span from the real start date (as defined in the WP properties) to the real end date (as
defined in the WP properties).
The Gantt charge default range of the date axis includes all project dates (WP´s) to be displayed.
Smaller date periods and other operations related with to modify the range axis and the
properties of the graph can be done as described in section 6.1.7.3.
Another function about the Gantt chart is that it can be exported to a txt or xml file to can use in
others compatibles project software. The txt file is compatible with the MS Project software,
and the xml file is compatible with the Merlin software.
6.1.7.5
Project Plan Gantt chart (print selected WP and the associated WBS)
After selecting this option, the WP’s associated to the selected project will be available in the
list.
!
Select a WP.
46
MANATEE User Manual
Issue 1.D
!
Click print.
A Gantt chart is displayed, which provides a Gantt view of the associated WBS included in the
selected WP of the project.
Figure 17: Project Gantt chart (only WPs) view
WP bars span from the real start date (as defined in the WBS’s properties) to the real end date
(as defined in the WBS´s properties).
The Gantt charge default range of the date axis includes all project dates (WBS´s) to be
displayed.
Smaller date periods and other operations related with to modify the range axis and the
properties of the graph can be done as described in section 6.1.7.3.
Another function about the Gantt chart is that it can be exported to a txt or xml file to can use in
others compatibles project software. The txt file is compatible with the MS Project software,
and the xml file is compatible with the Merlin software.
6.1.7.6
Quality data summary
The quality data summary contains the following information:
"
Project code (as defined in the project general properties).
"
Project title (as defined in the project general properties).
"
Information about any risk associated to this project, which includes:
o Risk code (as defined in the risk properties).
o Risk title (as defined in the risk properties).
o Project (as defined in the risk properties).
o Creation date (as defined in the risk properties).
o Modification date (as defined in the risk properties).
o Description (as defined in the risk properties).
o Effect (as defined in the risk properties).
47
MANATEE User Manual
Issue 1.D
o Severity (as defined in the risk properties).
o Probability (as defined in the risk properties).
o Actions (as defined in the risk properties).
o Conclusions (as defined in the risk properties).
"
Information about any action associated to this project, which includes:
o Action code (as defined in the action properties).
o Action title (as defined in the action properties).
o Project (as defined in the action properties).
o Creation date (as defined in the action properties).
o Modification date (as defined in the action properties).
o Due date (as defined in the action properties).
o Assigned to (as defined in the action properties).
o State (as defined in the action properties).
o Description (as defined in the action properties).
o Conclusions (as defined in the action properties).
o Due date (as defined in the action properties).
o Assigned to (as defined in the action properties).
o State (as defined in the action properties).
o Due date (as defined in the action properties).
o Assigned to (as defined in the action properties).
"
Information about any non-conformity associated to this project, which includes:
o Non-conformity code (as defined in the non-conformity properties).
o Non-conformity title (as defined in the non-conformity properties).
o Project (as defined in the non-conformity properties).
o Creation date (as defined in the non-conformity properties).
o Modification date (as defined in the non-conformity properties).
o Description (as defined in the non-conformity properties).
o Priority (as defined in the non-conformity properties).
o Actions (as defined in the non-conformity properties).
o Conclusions (as defined in the non-conformity properties).
The quality data summary can be printed or saved in pdf format.
48
MANATEE User Manual
Issue 1.D
6.1.7.7
Project Budget Control
After selecting this option, the following data must be introduced in order to display the project
budget information for a requested period.
!
Filter by: Chose to display the budget information grouped by WP’s or, in more
detail, by WBS’s.
!
Period Start date: Introduce the start date of the period.
!
Period End date: Introduce the end date of the period.
!
Click print.
The project budget data summary contains the following information:
"
Project code (as defined in the project general properties).
"
Project title (as defined in the project general properties).
"
Period Start date (as introduced by the user to display the project budget control
information).
"
Period End date (as introduced by the user to display the project budget control
information).
"
The budget information related with each WP or WBS (according to the selected
option) associated to the project, which includes:
o WP or WBS code (as defined in the WP or WBS properties)
o WP or WBS title (as defined in the WP or WBS properties)
o User spent/planned hours (a manpower table where the manpower hours already
spent or assigned to each WP or WBS are displayed for the selected period and
for each person involved in the WP or WBS)
o Total spent manpower budget (already spent manpower cost in this WP or WBS
for the selected period)
o Total planned manpower budget (total cost associated to manpower in this WP
or WBS for the selected period)
o Total spent other resources budget (already spent other resources cost in this
WP or WBS for the selected period)
o Total planned other resources budget (total cost associated to other resources in
this WP or WBS for the selected period)
o Total spent budget (already spent cost, adding the manpower and other
resources, in this WP or WBS for the selected period)
o Total planned budget (total cost, adding the manpower and other resources, in
this WP or WBS for the selected period)
"
The total project budget information, which is computed adding the values of each WP
or WBS, according to the selected option, listed in the previous list.
The project budget data summary can be printed or saved in pdf format.
49
MANATEE User Manual
Issue 1.D
6.1.7.8
Milestone summary
The milestone data summary contains the following information:
"
Project code (as defined in the project general properties).
"
Project title (as defined in the project general properties).
"
Information related with each milestone associated to the project, which includes:
o Milestone date (as defined in the milestone properties)
o Milestone name (as defined in the milestone properties)
o Milestone planned date (as defined in the milestone properties)
o Milestone critical (as defined in the milestone properties)
The milestone data summary can be printed or saved in pdf format.
6.1.7.9
Cash flow summary
The cash flow data summary contains the following information:
"
Project code (as defined in the project general properties).
"
Project title (as defined in the project general properties).
"
Information related with each cash flow milestone associated to the project, which
includes:
o Cash flow milestone date (as defined in the cash flow milestone properties)
o Cash flow milestone name (as defined in the cash flow milestone properties)
o Cash flow milestone code (as defined in the cash flow milestone properties)
o Cash flow milestone planned date (as defined in the cash flow milestone
properties)
o Cash flow milestone type (as defined in the cash flow milestone properties)
o Cash flow milestone amount (as defined in the cash flow milestone properties)
The cash flow data summary can be printed or saved in pdf format.
6.1.7.10 External expenses
After selecting this option, the following data must be introduced in order to display the external
expenses of the project for a requested period.
!
Period Start date: Introduce the start date of the period.
!
Period End date: Introduce the end date of the period.
!
Click print.
The external expenses summary contains the following information:
"
Project title (as defined in the project general properties).
50
MANATEE User Manual
Issue 1.D
"
Project code (as defined in the project general properties).
"
Period Start date (as introduced by the user to display the external expenses
information).
"
Period End date (as introduced by the user to display the external expenses
information).
"
Total planned expenses (total expenses planned in the project, human resources are not
considered, in the selected period according to the information included in the WBS’s).
"
Total real expenses (total expenses already done in the project, human resources are not
considered, in the selected period according to the information included in the WBS
Reports).
"
Total planned cash-out (total cash-out in the selected period according to the
information included in the planned cash-out milestones).
"
Total real cash-out (total cash-out in the selected period according to the information
included in the real cash-out milestones).
"
Total planned net expenses (total planned expenses minus total planned cash-out).
"
Total real net expenses (total real expenses minus total real cash-out).
The external expenses summary can be printed or saved in pdf format.
6.1.8
Archiving a project
Once the project that is going to be archived is displayed, which can be done following the steps
described in the section 6.1.2, click the finish button.
Only the Administrator and the Project managers of the project to be archived have the access
rights to archive projects.
The current status of the project must be “active”.
The following window displaying the project properties will appear.
51
MANATEE User Manual
Issue 1.D
Figure 18: Project properties view
!
Click finish.
MANATEE will check that the status of all document associated to this project is approved or
obsolete.
!
If all related documents are “approved” or “obsolete”, the project will be
finished.
The project status will change to “finished”.
The status of the project documents will be the same status (“approved” or
“obsolete”) they had before removing the project.
!
If there are documents in a different status to “approved” or “obsolete”, the
project cannot be finished.
In this case, the following window will appear to warn the user that the action
requested cannot be done.
52
MANATEE User Manual
Issue 1.D
Figure 19: Warning window to notify the user that the project can not be finished
If the project has been finished, a notification will be also sent (internally, a MANATEE
notification and, externally, an e-mail) to the corresponding users in order to inform that the
project has been finished.
“The project (Code) has been finished” to be sent to the Project managers and to the
authorized users in the project.
Note: If, for any reason, the finish button is not available, go to the section 13 which provides
some guides to troubleshooting problems.
6.1.9
Activating an archived project
Once the project that is going to be again activated is displayed, which can be done following
the steps described in the section 6.1.2, click the active button.
Only the Administrator and the Project managers of the project to be activated have the access
rights to do this action.
The current status of the project must be “finished”.
The following window displaying the project properties will appear.
53
MANATEE User Manual
Issue 1.D
Figure 20: Project properties view
!
Click active.
The project will be activated.
The project status will change to “active”.
The status of the project documents will be the same status (“approved” or “obsolete”) they had
before declaring the project as finished.
A notification will be also sent (internally, a MANATEE notification and, externally, an e-mail)
to the corresponding users in order to inform them that the project has been activated.
“The project (Code) is active” to be sent to the Project managers and to the authorized
users in the project.
Note: If, for any reason, the active button is not available, go to the section 13, which provides
some guides to troubleshooting problems.
6.1.10 Removing a project
Once the project that is going to be removed is displayed, which can be done following the steps
described in the section 6.1.2, click the remove button.
Only the Administrator has the access rights to remove projects.
The current status of the project must be “active” or “finished”.
The current status of the project documents must be “approved” or “obsolete”.
The following window displaying the project properties will appear.
54
MANATEE User Manual
Issue 1.D
Figure 21: Project properties view
!
Click remove.
The project will be removed from the system.
The project status will change to “removed”.
A notification will be also sent (internally, a MANATEE notification and, externally, an e-mail)
to the corresponding users in order to inform them about that the project has been removed.
“The project (Code) has been removed from the system” to be sent to the Project
managers and to the authorized users in the project.
Note: If, for any reason, the remove button is not available, go to the section 13, which provides
some guides to troubleshooting problems.
6.1.11 Restoring a project
Once the project that is going to be restored is displayed, which can be done following the steps
described in the section 6.1.2, click the restore button.
Only the Administrator has the access rights to restore projects.
The current status of the project must be “removed”.
The following window displaying the project properties will appear.
55
MANATEE User Manual
Issue 1.D
Figure 22: Project properties view
!
Click restore.
The project will be restored into the system.
The project status will change to “finished”.
The status of the project documents will be “approved”.
A notification will be also sent (internally, a MANATEE notification and, externally, an e-mail)
to the corresponding users in order to inform them about that the project has been restored.
“The project (Code) has been restored” to be sent to the Project managers and to the
authorized users in the project.
Note: If, for any reason, the restore button is not available, go to the section 13, which provides
some guides to troubleshooting problems.
6.2
WP administration
MANATEE provides the capabilities required to manage the WP’s that are defined in a project.
From the WP management point of view, MANATEE provides the following functionality:
"
Create a new WP
"
Search WP using different criteria
"
Display the complete or filtered WP list
"
Display the WP properties
"
Modify the definition of a WP
56
MANATEE User Manual
Issue 1.D
"
Print the WP details
"
Print the WP and all associated WBS’s details
"
Delete a WP
It is important to remember that each user can only do actions on the WP according to the
access rights that this particular user has (see sections 4 or 5.2 for more information).
6.2.1
Creating a new WP
To start working with WP’s, select Project Management tab and, then, WP tab.
In order to create a new WP, select New WP tab.
The current status of the project must be “active”.
Only Project Managers have this option available.
The following form will appear.
Figure 23: Creating a WP page
!
Fill the following fields (all mandatory fields are marked with a star):
"
Project: Select in the list the project to which the new WP is going to be
associated. A user must be the project manager of a project in order to
create a new WP in this project. Therefore, only projects that the login user
is project manager will be displayed in the list.
"
Code: The Code is created automatically following the pattern described
below (see section 14 for more information about which code patterns can
be used):
WP-PC-nnn
where,
57
MANATEE User Manual
Issue 1.D
WP is the acronym of Work Package,
PC will be the project code of the project assigned to the WP,
nnn will be a sequence number that is automatically generated
by the application
!
"
Title: Introduce the WP title. This is a text field and the maximum length of
this field is 300 characters.
"
Description: Introduce a description of the WP scope. This is a text field
and the length of the field is not limitated.
"
WP manager: Select in the list which user is going to be the WP manager.
All users created in MANATEE are available in the list.
"
Gantt title: Introduce the WP title that it will be used in the Gantt charts.
This is a text field and the maximum length of this field is 100 characters.
"
Active: Click this box to activate the WP (i.e., if the WP is created but it is
not activated, WBS’s could be created associated to this WP but no other
actions, related with manpower, could be done. Otherwise, if the WP is
created and activated, the WP is taken into account in the project budget
control summaries and it appears in the PTR’s lists). This option is activated
by default.
Click add WP.
The WP will be created.
A notification will be also sent (internally, a MANATEE notification and, externally, an e-mail)
to the corresponding users in order to inform them about the creation of the WP.
“The WP (Code) has been created” to be sent to the Project managers and WP
manager.
A notification will be also sent (internally, a MANATEE notification) to the corresponding
users in order to inform them about they are designed project manager.
“You have been named manager of the WP (Code)” to be sent to the WP manager.
Note: If, for any reason, the WP cannot be created, go to the section 13, which provides some
guides to troubleshooting problems.
6.2.2
Searching WP’s
To start looking for WP’s, select Project Management tab and, then, WP tab.
The complete list of WP that the current user can see will be displayed.
58
MANATEE User Manual
Issue 1.D
Figure 24: WP List
As shown in the figure, the following issues could be available for each WP in the list:
"
Project: The code of the project associated to the WP.
"
Code: The code of the WP.
"
Title: The title of the WP.
"
WP manager: The manager of the WP.
"
Show / Modify/print: Two different action buttons can appear in this position:
-
The show button displays the WP properties.
-
The modify/print button allows modifying the WP properties and printing the
WP details.
"
WP report: The WP report button allows printing a summary of the WP and associated
WBS´s information.
"
Delete: The delete button allows removing the WP completely from the system.
The actions buttons of each WP will not be enabled (i.e., they will be displayed as greyed out)
according to the access rights of the user that has login into the system.
The WP’s are always arranged by the code.
Each screen will show 10 WP’s, to move among the screens select the other pages numbers or
use the arrows that appear in the bottom of the WP’s list.
59
MANATEE User Manual
Issue 1.D
Figure 25: Page selectors
In order to search a particular WP or to constrain the number of WP to be displayed, select
Search WP tab.
The following form will appear.
Figure 26: Search WP form
!
Fill as many fields as desired in order to filter the WP list.
"
Project: Introduce any number of alphanumerical characters (this is not
case sensitive); any WP whose project contains this sequence of characters
in its title will be selected.
"
Code: Introduce any number of alphanumerical characters (this is not case
sensitive); any WP which contains this sequence of characters in its code
will be selected.
"
Title: Introduce any number of alphanumerical characters (this is not case
sensitive); any WP which contains this sequence of characters in its title
will be selected.
"
Description: Introduce any number of alphanumerical characters (this is
not case sensitive); any WP which contains this sequence of characters in its
description will be selected.
"
WP manager: Select a user in the list; any WP whose manager
corresponds to the introduced one will be selected.
"
Gantt title: Introduce any number of alphanumerical characters (this is not
case sensitive); any WP which contains this sequence of characters in its
Gantt title will be selected.
"
Active: Select “Yes” or “No” in the list; any WP meeting the requested state
will be selected. By default, the option “Yes” is selected.
60
MANATEE User Manual
Issue 1.D
!
Click search.
A new WP list will be displayed taken all the filtering constrains introduced into account (i.e.,
the filtered WP match all constrains introduced).
Example:
The user is searching all WP included in the project “TST”, which WP
manager name is "Pérez, Ana"
Then, the Search form must be filled as shown in the figure below
Figure 27: Example of a filled search WP form
and the list of WP displayed would be the following one.
61
MANATEE User Manual
Issue 1.D
Figure 28: Example of a filtered WP list
Note: If the desired WP does not appear in any screen, go to the section 13, which provides
some guides to troubleshooting problems.
6.2.3
Displaying the properties of a WP
Once the desired WP is displayed, which can be done following the steps described in the
section 6.2.2, click the show button (note: project managers of the particular project associated
to the WP can display the properties of this WP using the modify button instead, see section
6.2.4).
The Administrator and the people authorized to the project (including project managers and WP
manager) associated to the WP have the access rights to display the properties of this WP.
The WP properties will be displayed.
Figure 29: WP properties view
Note: If the show or modify buttons of the desired WP (i.e., the modify button will be enabled
instead of the show button when the user is a project manager of this project or the WP
manager) are not available, go to the section 13 which provides some guides to troubleshooting
problems.
6.2.4
Modifying the properties of an existing WP
Once the WP, which properties are going to be modified, is displayed, which can be done
following the steps described in the section 6.2.2, click the modify/print button.
Only Project managers of the project associated to the WP have the access rights to modify the
WP properties.
The current status of the project must be “active”.
The following form will appear.
62
MANATEE User Manual
Issue 1.D
Figure 30: Modifying the WP properties page
!
Modify the desired fields (taken into account constrains listed in section 6.2.1).
Only the fields that are not greyed out can be modified.
!
Click update.
The WP properties will be modified.
A notification will be also sent (internally, a MANATEE notification and, externally, an e-mail)
to the corresponding users in order to inform them about the modification of the WP properties.
“The properties of WP (Code) have been modified” to be sent to the Project managers
and the WP manager.
Note: If, for any reason, the WP properties cannot be modified, go to the section 13, which
provides some guides to troubleshooting problems.
6.2.5
Printing the WP details
Once the WP, which properties are going to be printed, is displayed, which can be done
following the steps described in the section 6.2.2, click the modify/print button.
Only project managers of the project associated to the WP and the WP manager of this
particular WP have the access rights to print the WP properties.
The current status of the project must be “active”.
The WP properties will be displayed.
!
Click print WP button.
A summary of the WP properties that contains the following information will be generated:
"
WP code (as defined in the WP properties).
"
WP title (as defined in the WP properties).
63
MANATEE User Manual
Issue 1.D
"
WP manager (as defined in the WP properties).
"
WP project (as defined in the WP properties).
"
WP description (as defined in the WP properties).
The WP details can be printed or saved in pdf format.
Note: If, for any reason, the modify/print button is not available, go to the section 13 which
provides some guides to troubleshooting problems.
6.2.6
Printing a WP Report
Once the WP, which WP Report is going to be generated, is displayed, which can be done
following the steps described in the section 6.2.2, click the WP report button.
Only project managers of the project associated to the WP and the WP manager of this
particular WP have the access rights to generate WP Reports.
The current status of the project must be “active”.
The WP report contains the following information:
"
WP code (as defined in the WP properties).
"
WP title (as defined in the WP properties).
"
WP manager (as defined in the WP properties).
"
WP project (as defined in the WP properties).
"
WP description (as defined in the WP properties).
"
Information about each WBS associated to this WP, which includes:
o WBS code (as defined in the WBS properties).
o WBS title (as defined in the WBS properties).
o WBS responsible (as defined in the WBS properties).
o WP manager (as defined in the WBS properties).
o WP project (as defined in the WBS properties).
o Scope (as defined in the WBS properties).
o Description (as defined in the WBS properties).
o Goal (as defined in the WBS properties).
o Inputs (as defined in the WBS properties).
o Tasks (as defined in the WBS properties).
o Deliverables (as defined in the WBS properties).
o Planned start date (as defined in the WBS properties).
64
MANATEE User Manual
Issue 1.D
o Real start date (as defined in the WBS properties).
o Planned end date (as defined in the WBS properties).
o Real end date (as defined in the WBS properties).
o Associated milestones (as defined in the WBS properties).
o Predecessor (as defined in the WBS properties).
o Manpower (man-hours per each person as defined in the WBS properties).
o Hardware resources (as defined in the WBS properties).
o Software resources (as defined in the WBS properties).
o Sub-contracts (as defined in the WBS properties).
o Cost associated to the manpower (as defined in the WBS properties).
o Cost associated to other resources (as defined in the WBS properties).
o % completion (as included in the WBS properties).
The WP report can be printed or saved in pdf format.
Note: If, for any reason, the WP print button is not available, go to the section 13 which
provides some guides to troubleshooting problems.
6.2.7
Deleting a WP
Once the WP, which is going to be deleted, is displayed, which can be done following the steps
described in the section 6.2.2, click the delete button.
Only the project managers of the project associated to the WP have the access rights to delete
the WP.
The current status of the project must be “active”.
The following window displaying the WP properties will appear.
65
MANATEE User Manual
Issue 1.D
Figure 31: WP properties view
!
Click delete.
The WBS´s associated to the WP will be also deleted. A warning about this fact will be
displayed to the user to confirm that the WP must be deleted.
Figure 32: Warning before deleting a WP with associated WBS’s
A notification will be also sent (internally, a MANATEE notification and, externally, an e-mail)
to the corresponding users in order to inform them about that the WP has been deleted.
“The WP (Code) has been deleted” to be sent to the Project managers and the WP
manager.
A notification will be also sent (internally, a MANATEE notification and, externally, an e-mail)
to the corresponding users in order to inform them about that the WBS has been deleted (if any).
“The WBS (Code) has been deleted” to be sent to the Project managers, the WP manager
and the WBS responsible.
Note: If, for any reason, the delete button is not available, go to the section 13, which provides
some guides to troubleshooting problems.
6.3
WBS administration
MANATEE provides the capabilities required to manage the WBS’s that are defined in a WP.
From the WBS management point of view, MANATEE provides the following functionality:
"
Create a new WBS
66
MANATEE User Manual
Issue 1.D
"
Search WBS using different criteria
"
Display the complete or filtered WBS list
"
Display the information included in the WBS
"
Modify the information included in the WBS
"
Print the WBS information
"
Delete a WBS
It is important to remember that each user can only do actions on the WBS according to the
access rights that this particular user has (see sections 4 or 5.2 for more information).
6.3.1
Creating a new WBS
To start working with WBS’s, select Project Management tab and, then, WBS tab.
In order to create a new WBS, select New WBS tab.
Only project managers and WP managers have this option available.
The following form will appear.
Figure 33: Creating a WBS page
!
Fill the following fields (all mandatory fields are marked with a star):
"
WP Code: Select in the list the WP to which the new WBS is going to be
associated. The user must be the project manager of the associated project
or the WP responsible in order to create a new WBS in this WP. Therefore,
only WP that the login user is WP or project manager will be displayed in
the list.
"
WP manager: This field is automatically filled after the WP Code has been
already selected.
67
MANATEE User Manual
Issue 1.D
"
Code: Introduce a WBS code (any combination of alphanumeric
characters). The application automatically fills this field with the WP Code
(changing the “WP” acronym in the code by “WBS”) because it is
recommended to choose a WBS code based in the corresponding WP code.
The suggested text can be changed as desired by the user. The maximum
length of this field is 45 characters.
Note: The application will check that no WBS duplicated codes are
introduced.
"
WBS Title: Introduce the WBS title. This is a text field and the maximum
length of this field is 300 characters.
"
WBS Responsible: Select in the list which user is going to be the WBS
responsible. All users created in MANATEE are available in the list.
"
Description: Introduce a description of the WBS scope. This is a text field
and the length of the field is not limited.
"
Gantt title: Introduce the WBS title that it will be used in the Gantt charts.
This is a text field and the maximum length of this field is 100 characters.
"
Goals: Introduce the goals of the WBS. This is a text field and the length of
the field is not limited.
"
Inputs: Introduce the inputs of the WBS. This is a text field and the length
of the field is not limited.
"
Tasks: Introduce the tasks of the WBS. This is a text field and the length of
the field is not limited.
"
Deliverables: Introduce as many deliverables as desired.
New deliverables are introduced clicking the Add deliverable button and
filling the following fields:
o
Milestone: Select the milestone associated to the deliverable from
the list. Only milestones created in this particular project are
available in the list.
o
Deliverable code: The Code is created automatically following the
pattern described below (see section 14 for more information about
which code patterns can be used):
DEL-PC-nnn
where,
DEL is the acronym of Deliverable,
PC will be the project code of the project assigned to
the Deliverable,
nnn will be a sequence number that is automatically
generated by the application
o
Description: Introduce a description of the deliverable content.
This is a text field and the maximum length limit is 300 characters.
68
MANATEE User Manual
Issue 1.D
o
Delete: Click this box to delete the Deliverable.
"
Start planned date: Introduce the planned start date for the WBS or select
a start planned date from a milestone of the associated project.
"
Start real date: Introduce the real start date for the WBS or select a start
real date from a milestone of the associated project.
"
End planned date: Introduce the planned end date for the WBS or select an
end planned date from a milestone of the associated project.
"
End real date: Introduce the real date for the WBS (or, before the WBS is
really ended, the date when it is estimated than the WBS is going to end) or
select an end real date from a milestone of the associated project.
"
WBS predecessor: Introduce as many WBS predecessors as desired.
A WBS predecessor is introduced clicking the Add WBS predecessor button
and filling the following fields:
"
o
WBS: Select the WBS predecessor from the list. Only WBS
existing in this particular project are available in the list.
o
Delete: Click this box to delete the WBS predecessor.
Associated Milestone: Associate as many milestones to the WBS as
desired.
An Associated Milestone is introduced clicking the Asociate Milestone
button and filling the following fields:
"
o
Milestone: Select the Milestone from the list. Only Milestone
existing in this particular project are available in the list.
o
Delete: Click this box to delete the Associated milestone.
Manpower: Introduce the manpower that is going to participate in the
WBS.
The manpower required from each user is introduced clicking the Add User
button and filling the following fields:
o
User: Select the Users from the list. All Users introduced in
MANATEE are available.
o
Hours: Introduce the estimated hours that each user must work in
the WBS.
"
Hardware resources: Introduce a description of the hardware required for
the WBS. This is a text field and the length of the field is not limited.
"
Software resources: Introduce a description of the software required for
the WBS. This is a text field and the length of the field is not limited.
"
Sub-contracts resources: Introduce a description of the sub-contracts
required for the WBS. This is a text field and the length of the field is not
limited.
69
MANATEE User Manual
Issue 1.D
!
"
Cost associated to manpower: This field is automatically filled taken into
account the manpower resources introduced in the WBS.
"
Cost associated to other resources: Introduce the cost associated to other
resources. Only numbers are valid values in this field.
"
% Completion: This field is automatically filled from the level of
completion estimated by the WBS responsible in the last generated WBS
report.
Click add WBS.
The WBS will be created.
A notification will be also sent (internally, a MANATEE notification and, externally, an e-mail)
to the corresponding users in order to inform them about the creation of the WP.
“The WBS (Code) has been created” to be sent to the Project managers, the WP
manager and the WBS responsible.
A notification will be also sent (internally, a MANATEE notification and, externally, an e-mail)
to the corresponding user in order to inform him/her about he has been assigned as responsible
of the WBS.
“You have been named responsible of the WBS (Code)” to be sent to the WBS
responsible.
A notification will be also sent (internally, a MANATEE notification and, externally, an e-mail)
to the corresponding users in order to inform them about they have been assigned to the WBS.
“You have been assigned to the WBS (Code) with (Hours) hours” to be sent to the users
assigned to the WBS.
Note: If, for any reason, the WBS cannot be created, go to the section 13 which provides some
guides to troubleshooting problems.
6.3.2
Searching WBS’s
To start looking for WBS, select Project Management tab and, then, WBS tab.
The complete list of WBS’s that the current user can see will be displayed.
70
MANATEE User Manual
Issue 1.D
Figure 34: WBS List
As shown in the figure, the following issues could be available for each WBS in the list:
"
Code: The code of the WBS.
"
Title: The title of the WBS.
"
WBS responsible: The responsible of the WBS.
"
Start date (real): The real start date of the WBS.
"
End date (real): The real end date of the WBS.
"
Validate: Indicates if the WBS has been validated by the project manager.
"
Show/print: The show/print button allows displaying the WBS properties and printing
the WBS details.
"
Modify/print: The modify/print button allows modifying the WBS properties and
printing the WBS details.
"
Delete: The delete button allows removing the WBS completely from the system.
The actions buttons of each WBS will not be enabled (i.e., they will be displayed as greyed out)
according to the access rights of the user that has login into the system.
The WBS is always arranged by the code.
Each screen will show 10 WBS’s, to move among the screens select the other pages numbers or
use the arrows that appear in the bottom of the WBS’s list.
Figure 35: Page selectors
In order to search a particular WBS or to constrain the number of WBS to be displayed, select
Search WBS tab.
The following form will appear.
71
MANATEE User Manual
Issue 1.D
Figure 36: Search WBS form
!
Fill as many fields as desired in order to filter the WBS list.
"
WBS Code: Introduce any number of alphanumerical characters (this is not
case sensitive); any WBS which contains this sequence of characters in its
code will be selected.
"
WBS Title: Introduce any number of alphanumerical characters (this is not
case sensitive); any WBS which contains this sequence of characters in its
title will be selected.
"
Responsible: Select a user in the list; any WBS whose responsible
corresponds to the introduced one will be selected.
"
WP Code: Select a WP in the list; any WBS associated to the introduced
WP will be selected.
"
Description: Introduce any number of alphanumerical characters (this is
not case sensitive); any WBS which contains this sequence of characters in
its description will be selected.
"
Gantt title: Introduce any number of alphanumerical characters (this is not
case sensitive); any WBS which contains this sequence of characters in its
Gantt title will be selected.
"
Goals: Introduce any number of alphanumerical characters (this is not case
sensitive); any WBS which contains this sequence of characters in its goals
will be selected.
"
Inputs: Introduce any number of alphanumerical characters (this is not
case sensitive); any WBS which contains this sequence of characters in its
inputs will be selected.
"
Tasks: Introduce any number of alphanumerical characters (this is not case
sensitive); any WBS which contains this sequence of characters in its tasks
will be selected.
"
Start planned date: Introduce a date; any WBS whose Start planned date
meets the introduced one will be selected.
"
Start real date: Introduce a date; any WBS whose Start real date meets the
introduced one will be selected.
"
End planned date: Introduce a date; any WBS whose End planned date
meets the introduced one will be selected.
"
End real date: Introduce a date; any WBS whose End real date meets the
introduced one will be selected.
"
Hardware resources: Introduce any number of alphanumerical characters
(this is not case sensitive); any WBS which contains this sequence of
characters in its hardware resources field will be selected.
72
MANATEE User Manual
Issue 1.D
!
"
Software resources: Introduce any number of alphanumerical characters
(this is not case sensitive); any WBS which contains this sequence of
characters in its software resources field will be selected.
"
Sub-contracts resources: Introduce any number of alphanumerical
characters (this is not case sensitive); any WBS which contains this
sequence of characters in its sub-contracts resources will be selected.
"
% Completion: Introduce a number; any WBS whose percentage of
completion meets the introduced number will be selected.
Click search.
A new WBS list will be displayed taken all the filtering constrains introduced into account (i.e.,
the filtered WBS match all constrains introduced).
Example:
The user is searching all WBS included which code contains "TST" and which
WP responsible name is "Pérez, Ana"
Then, the Search form must be filled as shown in the figure below
Figure 37: Example of a filled search WBS form
and the list of WBS displayed would be the following one.
73
MANATEE User Manual
Issue 1.D
Figure 38: Example of a filtered WBS list
Note: If the desired WBS does not appear in any screen, go to the section 13 which provides
some guides to troubleshooting problems.
6.3.3
Displaying the properties of a WBS
Once the desired WBS is displayed, which can be done following the steps described in the
section 6.3.2, click the show button.
The Administrator, the WBS responsible, the WP manager and the people authorized to the
project (including the project managers) associated to the WBS have the access rights to display
the properties of this WBS.
Most of the WBS properties will be displayed (i.e., costs associated to manpower and other
resources are not displayed).
74
MANATEE User Manual
Issue 1.D
Figure 39: WBS properties view
Note: If the show button of the desired WBS is not available, go to the section 13 which
provides some guides to troubleshooting problems.
6.3.4
Modifying the properties of an existing WBS
Once the desired WBS is displayed, which can be done following the steps described in the
section 6.3.2, click the modify/print button.
Only project managers of the project associated to the WBS and the WP manager of the WP
associated to the WBS have the access rights to modify the WBS properties.
The current status of the project must be “active”.
The following form, which contains all WBS properties, will appear.
75
MANATEE User Manual
Issue 1.D
Figure 40: Modifying the WBS properties page
!
Modify the desired fields (taken into account constrains listed in section 6.3.1).
Only the fields that are not greyed out can be modified.
!
Click update.
The WBS properties will be modified.
A notification will be also sent (internally, a MANATEE notification and, externally, an e-mail)
to the corresponding users in order to inform them about the modification of the WP properties.
“The properties of WBS (Code) have been modified” to be sent to the Project managers,
the WP manager and the WBS responsible.
Note: If, for any reason, the WBS properties cannot be modified, go to the section 13 which
provides some guides to troubleshooting problems.
6.3.5
Validate a WBS
Once the desired WBS is displayed, which can be done following the steps described in the
section 6.3.2, click the modify/print button.
The project manager must review the information introduced for the WBS responsible and
perform any modification (if desired) as described in 6.3.4.
Once the project manager has finished the review and clicks the update button, the WBS is
validated.
The notification corresponding to the WBS properties update will be also sent (internally, a
MANATEE notification and, externally, an e-mail) to the corresponding users.
“The properties of WBS (Code) have been modified” to be sent to the Project managers,
the WP manager and the WBS responsible.
76
MANATEE User Manual
Issue 1.D
Note: If the modify/print button of the desired WBS is not available, go to the section 13 which
provides some guides to troubleshooting problems.
6.3.6
Printing the WBS information
Once the WBS, which information is going to be printed, is displayed, which can be done
following the steps described in the section 6.3.2, click the modify/print button.
The Administrator, the WBS responsible, the WP manager and the people authorized to the
project (including the project managers) associated to the WBS have the access rights to print
the information of the WBS.
The current status of the project must be “active”.
The WBS properties will be displayed.
!
Click print WBS button.
A summary of the WBS properties that contains the following information will be generated:
"
WBS code (as defined in the WBS properties).
"
WBS title (as defined in the WBS properties).
"
WBS responsible (as defined in the WBS properties).
"
WP manager (as defined in the WBS properties).
"
Project code (as defined in the WBS properties).
"
Description (as defined in the WBS properties).
"
Goal (as defined in the WBS properties).
"
Inputs (as defined in the WBS properties).
"
Tasks (as defined in the WBS properties).
"
Deliverables (as defined in the WBS properties).
"
Planned start date (as defined in the WBS properties).
"
Real start date (as defined in the WBS properties).
"
Planned end date (as defined in the WBS properties).
"
Real end date (as defined in the WBS properties).
"
WBS predecessor (as defined in the WBS properties).
"
Associated milestones (as defined in the WBS properties).
"
Manpower (man-hours per each person as defined in the WBS properties).
"
Hardware resources (as defined in the WBS properties).
"
Software resources (as defined in the WBS properties).
"
Sub-contracts (as defined in the WBS properties).
"
Cost associated to the manpower (as defined in the WBS properties).
77
MANATEE User Manual
Issue 1.D
"
Cost associated to other resources (as defined in the WBS properties).
"
% completion (as included in the WBS properties).
The WBS information can be printed or saved in pdf format.
Note: If, for any reason, the modify/print button is not available, go to the section 13 which
provides some guides to troubleshooting problems.
6.3.7
Deleting a WBS
Once the WBS, which is going to be deleted, is displayed, which can be done following the
steps described in the section 6.3.2, click the delete button.
Only project managers of the project associated to the WBS have the access rights to delete the
WBS.
The current status of the project must be “active”.
The following window displaying the WBS properties will appear.
Figure 41: WBS properties view
!
Click delete.
A notification will be also sent (internally, a MANATEE notification and, externally, an e-mail)
to the corresponding users in order to inform them about that the WBS has been deleted.
“The WBS (Code) has been deleted” to be sent to the Project managers, the WP manager
and the WBS responsible.
Note: If, for any reason, the delete button is not available, go to the section 13 which provides
some guides to troubleshooting problems.
78
MANATEE User Manual
Issue 1.D
6.4
WBS Report administration
MANATEE provides the capabilities required to generate and manage the reports that are
periodically created in each WBS in order to describe the progress reached in this WBS during
the reported period.
From the WBS Reports management point of view, MANATEE provides the following
functionality:
"
Create a new WBS Report
"
Search WBS Reports using different criteria
"
Display the complete or filtered WBS Report list
"
Display the information included in the WBS Report
"
Modify the information included in the WBS Report
"
Print the WBS Report information
It is important to remember that each user can only do actions on the WBS Reports according to
the access rights that this particular user has (see sections 4 or 5.2 for more information).
6.4.1
Creating a new WBS Progress Report
To start working with WBS’s Reports, select Project Management tab and, then, WBS Reports
tab.
In order to create a new WBS Report, select New WBS Report tab.
Only the users assigned as WBS responsible have this option available.
The following form will appear.
Figure 42: Creating a WBS Report page
79
MANATEE User Manual
Issue 1.D
!
Fill the following fields (all mandatory fields are marked with a star):
"
WBS Code: Select in the list the WBS to which the new WBS Report is
going to be associated. The user must be the WBS responsible in order to
create a new WBS Report associated to this WBS. Therefore, only the
WBS’s that the login user is WBS responsible and that are not completed
(the level of completion is less than 100%) will be displayed in the list.
"
WBS Title: This field is automatically filled after the WBS Code has been
already selected.
"
WBS Responsible: This field is automatically filled after the WBS Code
has been already selected.
"
Period Start date: Introduce the start date of the period that is going to be
reported in the WBS Report.
"
Period End date: Introduce the end date of the period that is going to be
reported in the WBS Report.
"
Estimated % Completion: Introduce the estimated percentage of the level
of completion for the WBS.
"
WBS Start real date: This field is automatically filled after the WBS Code
has been already selected.
"
WBS End real date: This field is automatically filled after the WBS Code
has been already selected.
"
WBS Estimated end date: Introduce the estimated end date for the WBS.
"
Period spent manpower: This field is automatically filled according to the
WBS Report period that has been introduced (the application takes into
account the hours spent in this WBS as reported in the PTR’s for the
selected period).
"
Total spent manpower: This field is automatically filled according to the
WBS Report period that has been introduced (the application takes into
account the total hours spent in this WBS as reported in the PTR’s until the
end date of the period).
"
Total assigned manpower: This field is automatically filled after the WBS
Code has been already selected (the application takes into account the hours
assigned to this WBS).
"
Period spent other cost Budget: Introduce the other costs (different to
manpower) spent during the selected period related in this WBS.
"
Total spent other cost Budget: This field is automatically filled taken into
account the value introduced in the previous field and the other costs
already reported in the previous WBS reports of this WBS.
"
Total manpower exceeded: This box is automatically marked when the
total spent manpower is greater than the total assigned manpower.
"
End planned day exceeded: This box is automatically marked when the
End real day exceeds the End planned day.
80
MANATEE User Manual
Issue 1.D
!
"
Comments: Introduce any additional comment in this field. This is a text
field and the length of the field is not limited.
"
PR Comments attached file: Attach a file with additional information that
the user wants to annex to the WBS Report. Click in the Choose file button
to search the file.
Click add WBS Report.
The WBS Report will be created.
A notification will be also sent (internally, a MANATEE notification and, externally, an e-mail)
to the corresponding users in order to inform them about the creation of the WP.
“New WBS (Code) Progress Report created” to be sent to the Project managers and the
WP manager associated to this WBS.
A notification could be also sent (internally, a MANATEE notification and, externally, an email) to the corresponding users in order to inform them about a WBS delay (whenever the End
real day exceeds the End planned day).
“The responsible of the WBS (Code) reports a delay” to be sent to the Project managers
and the WP manager associated to this WBS.
A notification could be also sent (internally, a MANATEE notification and, externally, an email) to the corresponding users in order to inform them about the WBS has been finished (i.e.,
the percentage of completion is 100%).
“The WBS (Code) has been finished” to be sent to the Project managers, the WP
manager associated to this WBS and the WBS responsible.
Note: If, for any reason, the WBS Report cannot be created, go to the section 13, which
provides some guides to troubleshooting problems.
6.4.2
Searching WBS’s Progress Report
To start looking for WBS Reports, select Project Management tab and, then, WBS’s Reports
List tab.
The complete list of WBS Reports that the current user can see will be displayed.
81
MANATEE User Manual
Issue 1.D
Figure 43: WBS Reports List
As shown in the figure, the following issues could be available for each WBS Report in the list:
"
Code: The code of the WBS.
"
Title: The title of the WBS.
"
Responsible: The responsible of the WBS.
"
Period Start date: The start date of the period used in the WBS Report.
"
Period End date: The end date of the period used in the WBS Report.
"
PR Comment: The attached file of the WBS Report.
"
Show / Modify/print: Two different action buttons can appear in this position:
-
The show button displays the WBS Report.
-
The modify/print button allows modifying the WBS Report and printing the
WBS Report details.
The actions buttons of each WBS Report will not be enabled (i.e., they will be displayed as
greyed out) according to the access rights of the user that has login into the system.
The WBS Reports are always arranged by the period dates.
Each screen will show 10 WBS Reports, to move among the screens select the other pages
numbers or use the arrows that appear in the bottom of the list.
Figure 44: Page selectors
In order to search a particular WBS Report or to constrain the number of WBS Reports to be
displayed, select Search WBS’s Report tab.
82
MANATEE User Manual
Issue 1.D
The following form will appear.
Figure 45: Search WBS Report form
!
Fill as many fields as desired in order to filter the WBS Report list.
"
WBS Code: Select a WBS Code from the list; any WBS Report associated
to this WBS will be selected.
"
WBS Title: Introduce any number of alphanumerical characters (this is not
case sensitive); any WBS Report associated with a WBS, which contains
this sequence of characters in its title, will be selected.
"
WBS Responsible: Select a user in the list; any WBS Report associated to
a WBS, whose responsible meets the selected one, will be selected.
"
Period Start date: Introduce a date; any WBS Report whose period start
date meets the introduced one will be selected.
"
Period End date: Introduce a date; any WBS Report whose period end
date meets the introduced one will be selected.
"
Estimated % Completion: Introduce a number; any WBS Report whose
estimated percentage level of completion meets the introduced one will be
selected.
"
WBS Start real date: Introduce a date; any WBS Report associated to a
WBS, whose Start real date meets the introduced one, will be selected.
"
WBS End real date: Introduce a date; any WBS Report associated to a
WBS, whose End real date meets the introduced one, will be selected.
"
WBS Estimated end date: Introduce a date; any WBS Report whose WBS
Estimated start date meets the introduced one will be selected.
83
MANATEE User Manual
Issue 1.D
!
"
Total manpower exceeded: Select a value in the list; any WBS report
which Total manpower exceeded field meets the introduced value will be
selected. By default, the searching results are not constrains by this value.
"
End planned date exceeded: Select a value in the list; any WBS report
which End planned date exceeded field meets the introduced value will be
selected. By default, the searching results are not constrains by this value.
"
Comments: Introduce any number of alphanumerical characters (this is not
case sensitive); any WBS Report that contains this sequence in its
comments will be selected.
Click search.
A new WBS Reports list will be displayed taken all the filtering constrains introduced into
account (i.e., the filtered WBS Reports match all constrains introduced).
Example:
The user is searching all WBS Reports whose associated WBS code is "WBSTST-1.1" and whose WBS responsible name is “Pérez, Ana"
Then, the Search form must be filled as shown in the figure below
Figure 46: Example of a filled search WBS Report form
and the list of WBS Report displayed would be the following one.
84
MANATEE User Manual
Issue 1.D
Figure 47: Example of a filtered WBS Report list
Note: If the desired WBS Report does not appear in any screen, go to the section 13, which
provides some guides to troubleshooting problems.
6.4.3
Displaying the information in a WBS Progress Report
Once the desired WBS Report is displayed, which can be done following the steps described in
the section 6.4.2, click the show button.
The people authorized to the project associated to the WBS have the access rights to display the
information included in this WBS Report.
The WBS Report information will be displayed.
Figure 48: WBS properties view
85
MANATEE User Manual
Issue 1.D
Note: If the show button of the desired WBS Report is not available, go to the section 13, which
provides some guides to troubleshooting problems.
6.4.4
Modifying the information in an existing WBS Progress Report
Once the desired WBS Report is displayed, which can be done following the steps described in
the section 6.4.2, click the modify/print button.
Only project managers of the project associated to the WBS, the WP manager associated to the
WBS and the WBS responsible have the access rights to modify the information included in the
WBS Progress Report.
The current status of the project must be “active”.
The following form will appear.
Figure 49: Modifying the WBS Report properties page
!
Modify the desired fields (taken into account constrains listed in section 6.4.1).
Only the fields that are not greyed out can be modified.
!
Click update.
The WBS Report properties will be modified.
A notification will be also sent (internally, a MANATEE notification and, externally, an e-mail)
to the corresponding users in order to inform them about the modification of the WBS
properties.
“The WBS (Code) Progress Report (period (Period start date) – (Period end date)) has
been modified” to be sent to the Project managers, the WP manager and the WBS
responsible.
A notification could be also sent (internally, a MANATEE notification and, externally, an email) to the corresponding users in order to inform them about a WBS delay (whenever the End
real day exceeds the End planned day).
86
MANATEE User Manual
Issue 1.D
“The responsible of the WBS (Code) reports a delay” to be sent to the Project
managers, the WP manager and the WBS responsible.
A notification could be also sent (internally, a MANATEE notification and, externally, an email) to the corresponding users in order to inform them about the WBS has been finished (i.e.,
the percentage of completion is 100%).
“The WBS (Code) has been finished” to be sent to the Project managers, the WP
manager and the WBS responsible.
Note: If, for any reason, the WBS properties cannot be modified, go to the section 13, which
provides some guides to troubleshooting problems.
6.4.5
Printing the WBS Progress Report
Once the WBS Report that is going to be printed is displayed, which can be done following the
steps described in the section 6.4.2, click the modify/print button.
Only project managers of the project associated to the WBS, the WP manager associated to the
WBS and the WBS responsible have the access rights to print the information included in the
WBS Progress Report.
The current status of the project must be “active”.
The content of the WBS Report will be displayed.
!
Click Print WBS Progress Report button.
A summary of the WBS report that contains the following information will be generated:
"
WBS code (as defined in the WBS Report).
"
WBS title (as defined in the WBS Report).
"
Responsible (as defined in the WBS Report).
"
Period covered (as defined in the WBS Report).
"
Start date (real) (as defined in the WBS Report).
"
Start date (estimated) (as defined in the WBS Report).
"
Estimated % Completion (as defined in the WBS Report).
"
Total manpower exceeded (as defined in the WBS Report).
"
End planned date exceeded (as defined in the WBS Report).
"
Period spend manpower (as defined in the WBS Report).
"
Total spent manpower (as defined in the WBS Report).
"
Total assigned manpower (as defined in the WBS Report).
"
Period spent other cost budget (as defined in the WBS Report).
"
Total spent other cost budget (as defined in the WBS Report).
87
MANATEE User Manual
Issue 1.D
"
Comments (as defined in the WBS Report).
The WBS Report can be printed or saved in pdf format.
Note: If, for any reason, the modify/print button is not available, go to the section 13, which
provides some guides to troubleshooting problems.
6.4.6
Deleting an existing WBS Progress Report
Once the desired WBS Progress Report is displayed, which can be done following the steps
described in the section 6.4.2, click the delete button.
Only project managers of the project associated to the WBS Progress Report have the access
rights to delete the WBS Progress Report.
The current status of the project must be “active”.
The following form will appear.
Figure 50: Deleting the WBS Report properties page
!
Click delete.
The WBS Report properties will be modified.
A notification will be also sent (internally, a MANATEE notification and, externally, an e-mail)
to the corresponding users in order to inform them that the WBS Progress Report has been
deleted.
“The WBS (Code) Progress Report (period (Period start date) – (Period end date)) has
been deleted” to be sent to the Project managers, the WP manager and the WBS
responsible.
88
MANATEE User Manual
Issue 1.D
6.5
Milestones administration
MANATEE provides the capabilities required to manage the milestones that are defined in a
project.
From the milestones management point of view, MANATEE provides the following
functionality:
"
Create a new milestone
"
Search milestones using different criteria
"
Display the complete or filtered milestone list
"
Display the milestone properties
"
Modify the definition of a milestone
"
Delete a milestone
It is important to remember that each user can only do actions on the milestone according to the
access rights that this particular user has (see sections 4 or 5.2 for more information).
6.5.1
Creating a new Milestones
To start working with milestones, select Project Management tab and, then, Milestones tab.
In order to create a new milestone, select New Milestone tab.
Only project managers have the access rights to create new milestones.
The following form will appear.
Figure 51: Creating a Milestone page
!
Fill the following fields (all mandatory fields are marked with a star):
"
Project: Select in the list the project to which the new milestone is going to
be associated. A user must be the project manager of a project in order to
create a new milestone in this project. Therefore, only projects that the login
user is project manager will be displayed in the list.
89
MANATEE User Manual
Issue 1.D
"
Code: The Code is created automatically following the pattern described
below (see section 14 for more information about which code patterns can
be used):
MIL-PC-nnn
where,
MIL is the acronym of Work Package,
PC will be the project code of the project assigned to the WP,
nnn will be a sequence number that is automatically generated
by the application
!
"
Name: Introduce the milestone name. This is a text field and the maximum
length of this field is 250 characters.
"
Planned date: Introduce the initial planned date for the milestone.
"
Date: Introduce the real date (or estimated real date) for the milestone.
"
Gantt title: Introduce the Milestone title that it will be used in the Gantt
charts. This is a text field and the maximum length of this field is 10
characters.
"
Critical: Click this box to indicate that this milestone is critical to
accomplish the project schedule.
Click add Milestone.
The milestone will be created.
A notification will be also sent (internally, a MANATEE notification and, externally, an e-mail)
to the corresponding users in order to inform them about the creation of the milestone.
“The Milestone (Code) has been created” to be sent to the Project managers.
Note: If, for any reason, the milestone cannot be created, go to the section 13 which provides
some guides to troubleshooting problems.
6.5.2
Searching Milestones
To start looking for milestones, select Project Management tab and, then, Milestones tab.
The complete list of milestones that the current user can see will be displayed.
90
MANATEE User Manual
Issue 1.D
Figure 52: Milestones List
As shown in the figure, the following issues could be available for each Milestone in the list:
"
Project: The code of the project associated to the milestone.
"
Date: The real (or estimated) date of the milestone.
"
Name: The name of the milestone.
"
Planned date: The planned date of the milestone.
"
Critical: The level of criticality of the milestone.
"
Show / Modify: Two different action buttons can appear in this position:
"
-
The show button displays the milestone properties.
-
The modify button allows modifying the milestone properties.
Delete: The delete button allows removing the milestone completely from the system.
The actions buttons of each milestone will not be enabled (i.e., they will be displayed as greyed
out) according to the access rights of the user that has login into the system.
The milestone are always arranged, first, by the project and, then, by the date.
Each screen will show 10 milestones, to move among the screens select the other pages
numbers or use the arrows that appear in the bottom of the milestones list.
Figure 53: Page selectors
In order to search a particular milestone or to constrain the number of milestones to be
displayed, select Search Milestone tab.
The following form will appear.
91
MANATEE User Manual
Issue 1.D
Figure 54: Search Milestone form
!
!
Fill as many fields as desired in order to filter the milestones list.
"
Project: Introduce any number of alphanumerical characters (this is not
case sensitive); any milestone whose associated project contains this
sequence of characters in its title will be selected.
"
Name: Introduce any number of alphanumerical characters (this is not case
sensitive); any milestone which contains this sequence of characters in its
name will be selected.
"
Planned date: Introduce a date period (start and end dates); any milestone
whose planned date is included in the introduced interval will be selected.
"
Date: Introduce a date period (start and end dates); any milestone whose
date is included in the introduced interval will be selected.
"
Gantt title: Introduce any number of alphanumerical characters (this is not
case sensitive); any milestone which contains this sequence of characters in
its Gantt title will be selected.
"
Critical: Select the criticality in the list; any milestone meeting the
requested criticality will be selected. By default, the searching results are
not constrains by this value.
Click search.
A new milestones list will be displayed taken all the filtering constrains introduced into account
(i.e., the filtered milestones match all constrains introduced).
Example:
The user is searching all milestones belonging to the project “TST” that are
scheduled in 2009.
Then, the Search form must be filled as shown in the figure below
92
MANATEE User Manual
Issue 1.D
Figure 55: Example of a filled search milestones form
and the list of milestones displayed would be the following one.
Figure 56: Example of a filtered milestones list
Note: If the desired milestone does not appear in any screen, go to the section 13 which
provides some guides to troubleshooting problems.
6.5.3
Print the complete or filtered milestone list
Once the desired milestone list (complete or filtered) is displayed, which can be done following
the steps described in the section 6.5.2.
!
Click print list button.
A summary of the milestones list that contains the following information will be generated:
"
Project code associated to the milestone (as defined in the milestone properties).
"
Milestone date (as defined in the milestone properties).
"
Milestone planned date (as defined in the milestone properties).
93
MANATEE User Manual
Issue 1.D
"
Milestone critical level (as defined in the milestone properties).
The milestone list can be printed or saved in pdf format.
6.5.4
Displaying the properties of a Milestone
Once the desired milestone is displayed, which can be done following the steps described in the
section 6.5.2, click the show button (note: project managers of the project associated to this
particular milestone can display the milestone properties using the modify button instead, see
section 6.5.5).
People authorized to the project associated to the milestone have the access rights to display the
properties of this milestone.
The milestone properties will be displayed.
Figure 57: Milestone properties view
Note: If the show or modify buttons of the desired milestone (i.e., the modify button will be
enabled instead of the show button when the user is a project manager of this project) are not
available, go to the section 13 which provides some guides to troubleshooting problems.
6.5.5
Modifying the properties of an existing Milestone
Once the WP which properties are going to be modified is displayed, which can be done
following the steps described in the section 6.5.2, click the modify button.
Only project managers of the project associated to this particular milestone have the access
rights to modify the milestone properties.
The current status of the project must be “active”.
The following form will appear.
94
MANATEE User Manual
Issue 1.D
Figure 58: Modifying the milestone properties page
!
Modify the desired fields (taken into account constrains listed in section 6.5.1).
Only the fields that are not greyed out can be modified.
!
Click update.
The milestone properties will be modified.
A notification will be also sent (internally, a MANATEE notification and, externally, an e-mail)
to the corresponding users in order to inform them about the modification of the milestone
properties.
“The properties of the Milestone (Code) have been modified” to be sent to the Project
managers of the project associated to the milestone.
Note: If, for any reason, the milestone properties cannot be modified, go to the section 13 which
provides some guides to troubleshooting problems.
6.5.6
Deleting a Milestone
Once the milestone, which is going to be deleted, is displayed, which can be done following the
steps described in the section 6.5.2, click the delete button.
Only project managers of the project associated to the milestone have the access rights to delete
the milestone.
The current status of the project must be “active”.
The following window displaying the milestone properties will appear.
95
MANATEE User Manual
Issue 1.D
Figure 59: Milestone properties view
!
Click delete.
A notification will be also sent (internally, a MANATEE notification and, externally, an e-mail)
to the corresponding users in order to inform them about that the milestone has been deleted.
“The Milestone (Code) has been deleted” to be sent to the Project managers of the
project associated to the milestone.
Note: If, for any reason, the delete button is not available, go to the section 13 which provides
some guides to troubleshooting problems.
6.6
Cash flow milestones administration
MANATEE provides the capabilities required to manage the cash flow that is defined in a
project.
From the Cash milestones management point of view, MANATEE provides the following
functionality:
"
Create a new Cash milestone
"
Search Cash milestones using different criteria
"
Display the complete or filtered Cash milestone list
"
Display the Cash milestone properties
"
Modify the definition of a Cash milestone
"
Delete a Cash milestone
It is important to remember that each user can only do actions on the Cash milestone according
to the access rights that this particular user has (see sections 4 or 5.2 for more information).
6.6.1
Creating a new Cash Milestones
To start working with Cash milestones, select Project Management tab and, then, Cash Flow
tab.
96
MANATEE User Manual
Issue 1.D
In order to create a new Cash milestone, select New Cash Milestone tab.
Only project managers have the access rights to create new Cash milestones.
The following form will appear.
Figure 60: Creating a Cash Milestone page
!
Fill the following fields (all mandatory fields are marked with a star):
"
Project: Select in the list the project to which the new Cash flow milestone
is going to be associated. A user must be the project manager of a project in
order to create a new Cash flow milestone in this project. Therefore, only
projects that the login user is project manager will be displayed in the list.
"
Code: The Code is created automatically following the pattern described
below (see section 14 for more information about which code patterns can
be used):
CASMIL-PC-nnn
where,
CM is the acronym of Cash Milestone,
PC will be the project code of the project assigned to the Cash
milestone,
nnn will be a sequence number that is automatically generated
by the application
"
Name: Introduce the milestone name. This is a text field and the maximum
length of this field is 400 characters.
"
Planned date: Introduce the initial planned date for the milestone.
97
MANATEE User Manual
Issue 1.D
!
"
Date: Introduce the real date (or estimated real date) for the milestone.
"
Type: Select in the list the type of the Cash milestone. The options “cashin” and “cash-out” are available.
"
Amount: Introduce the amount of money associated to this particular Cash
milestone. This field must be a number.
Click add Cash milestone.
The Cash milestone will be created.
A notification will be also sent (internally, a MANATEE notification and, externally, an e-mail)
to the corresponding users in order to inform them about the creation of the milestone.
“Cash milestone (Code) has been created” to be sent to the Project managers.
Note: If, for any reason, the Cash milestone cannot be created, go to the section 13 which
provides some guides to troubleshooting problems.
6.6.2
Searching Cash Milestones
To start looking for milestones, select Project Management tab and, then, Cash Flow tab.
The complete list of Cash milestones that the current user can see will be displayed.
Figure 61: Cash milestones List
As shown in the figure, the following issues could be available for each Cash milestone in the
list:
"
Project: The code of the project associated to the milestone.
"
Code: The code of the Cash milestone.
"
Name: The name of the Cash milestone.
98
MANATEE User Manual
Issue 1.D
"
Planned date: The planned date of the Cash milestone.
"
Date: The real (or estimated) date of the Cash milestone.
"
Show / Modify: Two different action buttons can appear in this position:
"
-
The show button displays the Cash milestone properties.
-
The modify button allows modifying the Cash milestone properties.
Delete: The delete button allows removing the Cash milestone completely from the
system.
The actions buttons of each Cash milestone will not be enabled (i.e., they will be displayed as
greyed out) according to the access rights of the user that has login into the system.
The Cash milestones are always arranged by code.
Each screen will show 10 milestones, to move among the screens select the other pages
numbers or use the arrows that appear in the bottom of the Cash milestones list.
Figure 62: Page selectors
In order to search a particular milestone or to constrain the number of milestones to be
displayed, select Search Cash Milestone tab.
The following form will appear.
Figure 63: Search Cash Milestone form
!
Fill as many fields as desired in order to filter the Cash milestones list.
"
Project: Introduce any number of alphanumerical characters (this is not
case sensitive); any Cash milestone whose associated project contains this
sequence of characters in its title will be selected.
99
MANATEE User Manual
Issue 1.D
!
"
Code: Introduce any number of alphanumerical characters (this is not case
sensitive); any milestone that contains this sequence of characters in its
code will be selected.
"
Name: Introduce any number of alphanumerical characters (this is not case
sensitive); any Cash milestone which contains this sequence of characters in
its name will be selected.
"
Planned date: Introduce a date; any Cash milestone whose planned date
meets the introduced one will be selected.
"
Date: Introduce a date; any Cash milestone whose date meets the
introduced one will be selected.
"
Type: Select the Cash flow type in the list; any Cash milestone meeting the
requested type will be selected. By default, the searching results are not
constrains by this value.
Click search.
A new Cash milestones list will be displayed taken all the filtering constrains introduced into
account (i.e., the filtered Cash milestones match all constrains introduced).
Example:
The user is searching all Cash-in milestones belonging to the project “TST”.
Then, the Search form must be filled as shown in the figure below
Figure 64: Example of a filled search Cash milestones form
and the list of Cash milestones displayed would be the following one.
100
MANATEE User Manual
Issue 1.D
Figure 65: Example of a filtered Cash milestones list
Note: If the desired Cash milestone does not appear in any screen, go to the section 13 which
provides some guides to troubleshooting problems.
6.6.3
Displaying the properties of a Cash Milestone
Once the desired Cash milestone is displayed, which can be done following the steps described
in the section 6.6.2 click the show button (note: project managers of the particular project
associated to the Cash milestone can display the properties of this Cash milestone using the
modify button instead, see section 6.6.4).
People authorized to the project associated to the Cash milestone have the access rights to
display the properties of this Cash milestone.
The Cash milestone properties will be displayed.
Figure 66: Cash milestone properties view
101
MANATEE User Manual
Issue 1.D
Note: If the show or modify buttons of the desired Cash milestone (i.e., the modify button will
be enabled instead of the show button when the user is a project manager of this project) are not
available, go to the section 13 which provides some guides to troubleshooting problems.
6.6.4
Modifying the properties of an existing Cash Milestone
Once the Cash milestone which properties are going to be modified is displayed, which can be
done following the steps described in the section 6.6.2, click the modify button.
Only project managers of the project associated to this particular Cash milestone have the
access rights to modify the Cash milestone properties.
The current status of the project must be “active”.
The following form will appear.
Figure 67: Modifying the Cash milestone properties page
!
Modify the desired fields (taken into account constrains listed in section 6.6.1).
Only the fields that are not greyed out can be modified.
!
Click update.
The Cash milestone properties will be modified.
A notification will be also sent (internally, a MANATEE notification and, externally, an e-mail)
to the corresponding users in order to inform them about the modification of the Cash milestone
properties.
“Cash Milestone (Code) properties have been modified” to be sent to the Project
managers of the project associated to the Cash milestone.
102
MANATEE User Manual
Issue 1.D
Note: If, for any reason, the Cash milestone properties cannot be modified, go to the section 13
which provides some guides to troubleshooting problems.
6.6.5
Deleting a Cash Milestone
Once the Cash milestone, which is going to be deleted, is displayed, which can be done
following the steps described in the section 6.6.2, click the delete button.
Only project managers of the project associated to the milestone have the access rights to delete
the Cash milestone.
The current status of the project must be “active”.
The following window displaying the Cash milestone properties will appear.
Figure 68: Cash milestone properties view
!
Click delete.
A notification will be also sent (internally, a MANATEE notification and, externally, an e-mail)
to the corresponding users in order to inform them about that the Cash milestone has been
deleted.
“Cash Milestone (Code) has been deleted” to be sent to the Project managers of the
project associated to the Cash milestone.
Note: If, for any reason, the delete button is not available, go to the section 13 which provides
some guides to troubleshooting problems.
103
MANATEE User Manual
Issue 1.D
7
PROJECT QUALITY CONTROL
MANATEE provides some utilities to mantain the quality control in a project, which includes
the following issues.
-
Define and manage the risks, which are identified in each project.
-
Define and manage the non-conformities, which are identified in each project.
-
Define and manage the preventive and corrective actions, which are defined to control
the risks and non-conformities identified in each project.
7.1
Risk administration
MANATEE provides the capabilities required to manage the risks that are identified in a
project.
From the risk administration point of view, MANATEE provides the following functionality:
"
Introduce a new risk
"
Search risks using different criteria
"
Display the complete or filtered risk list
"
Display the risk properties
"
Modify the definition of a risk
"
Print the risks details
"
Delete a risk
It is important to remember that each user can only do actions on the risks according to the
access rights that this particular user has (see sections 4 or 5.2 for more information).
7.1.1
Creating a new risk
To start working with risks, select Quality Control tab and, then, Risks tab.
In order to create a new risk, select New Risk tab.
Only the Quality manager and project managers have the access rights to create new risks.
The following form will appear.
104
MANATEE User Manual
Issue 1.D
Figure 69: Creating a Risk page
!
Fill the following fields (all mandatory fields are marked with a star):
"
Project: Select in the list the project to which the new risk is going to be
associated. Only the project manager of the associated project and the
Quality manager can create new risks. Therefore, for project managers, only
projects that the login user is project manager will be displayed in the list.
If the login user is the Quality manager, all active projects will be displayed
in the list
"
Code: The Code is created automatically following the pattern described
below (see section 14 for more information about which code patterns can
be used):
RI-PC-nnn
where,
RI is the acronym of Risk,
PC will be the project code of the project assigned to the risk,
nnn will be a sequence number that is automatically generated
by the application
"
Title: Introduce the risk title. This is a text field and the maximum length of
this field is 300 characters.
"
Creation date: The creation date is filled automatically using the current
date (i.e., the date when the risk is being created).
"
Modification date: The modification date is filled automatically using the
current date (i.e., the date when the risk is being modified).
"
Description: Introduce a description of the risk. This is a text field and the
length of this field is not limited.
105
MANATEE User Manual
Issue 1.D
!
"
Effect: Describe the effects that the risk could have. This is a text field and
the maximum length limit is 300 characters.
"
Severity: Select the severity of the risk among the options offered in the
combo box, which include the following ones: Catastrophic, Critical, Major,
Minor and Negligible.
"
Probability: Select the probability of the risk among the options offered in
the combo box, which include the following ones: High, Medium, Low and
Negligible.
"
Actions: Describe the actions that are planned and/or have been taken to
mitigate the risk (if the actions have been registered in MANATEE, it is
recommended to include in this field the code of those actions). This is a
text field and the maximum length limit is 300 characters.
"
Conclusions: Describe the current status of the risk. If the actions taken to
mitigate the risk have been successful, it is convenient to indicate in this
field that the risk is currently controlled. This is a text field and the
maximum length limit is 300 characters.
Click add Risk.
The Risk will be created.
A notification will be also sent (internally, a MANATEE notification and, externally, an e-mail)
to the corresponding users in order to inform them about the creation of the risk.
“The Risk (Code) has been created” to be sent to the Project managers and the WP
managers of the associated project and to the Quality manager.
Note: If, for any reason, the risk cannot be created, go to the section 13 which provides some
guides to troubleshooting problems.
7.1.2
Searching risks
To start looking for risks, select Quality Control tab and, then, Risks tab.
The complete list of risks that the current user can see will be displayed.
106
MANATEE User Manual
Issue 1.D
Figure 70: Risk List
As shown in the figure, the following issues could be available for each risk in the list:
"
Project: The code of the project associated to the risk.
"
Code: The code of the risk.
"
Title: The title of the risk.
"
Creation date: The creation date of the risk.
"
Modification date: The last modification date of the risk.
"
Severity: The severity of the risk.
"
Probability: The probability of the risk.
"
Show / Modify/print: Two different action buttons can appear in this position:
"
-
The show button displays the risk content.
-
The modify/print button allows modifying the risk content and printing the risk
details.
Delete: The delete button allows removing the risk completely from the system.
The actions buttons of each risk will not be enabled (i.e., they will be displayed as greyed out)
according to the access rights of the user that has login into the system.
The risks are always arranged by the code.
Each screen will show 10 risks, to move among the screens select the other pages numbers or
use the arrows that appear in the bottom of the risks list.
Figure 71: Page selectors
107
MANATEE User Manual
Issue 1.D
In order to search a particular risk or to constrain the number of risks to be displayed, select
Search Risks tab.
The following form will appear.
Figure 72: Search risks form
!
Fill as many fields as desired in order to filter the risk list.
"
Project: Introduce any number of alphanumerical characters (this is not
case sensitive); any risk whose project contains this sequence of characters
in its title will be selected.
"
Code: Introduce any number of alphanumerical characters (this is not case
sensitive); any risk which contains this sequence of characters in its code
will be selected.
"
Title: Introduce any number of alphanumerical characters (this is not case
sensitive); any risk which contains this sequence of characters in its title
will be selected.
"
Creation date: Introduce a date; any risk whose creation date meets the
introduced one will be selected.
"
Modification date: Introduce a date; any risk whose modification date
meets the introduced one will be selected.
"
Description: Introduce any number of alphanumerical characters (this is
not case sensitive); any risk which contains this sequence of characters in its
description will be selected.
"
Effect: Introduce any number of alphanumerical characters (this is not case
sensitive); any risk which contains this sequence of characters in its effect
will be selected.
"
Severity: Select a severity level in the list; any risk whose severity date
meets the introduced one will be selected.
108
MANATEE User Manual
Issue 1.D
!
"
Probability: Select a probability level in the list; any risk whose
probability date meets the introduced one will be selected.
"
Actions: Introduce any number of alphanumerical characters (this is not
case sensitive); any risk which contains this sequence of characters in its
actions field will be selected.
"
Conclusions: Introduce any number of alphanumerical characters (this is
not case sensitive); any risk which contains this sequence of characters in its
conclusions field will be selected.
Click search.
A new risk list will be displayed taken all the filtering constrains introduced into account (i.e.,
the filtered risk match all constrains introduced).
Example:
The user is searching the risks in the project “TST”, which title includes the
word "requirements"
Then, the Search form must be filled as shown in the figure below
Figure 73: Example of a filled search risk form
and the list of risks displayed would be the following one.
109
MANATEE User Manual
Issue 1.D
Figure 74: Example of a filtered risk list
Note: If the desired risk does not appear in any screen, go to the section 13 which provides
some guides to troubleshooting problems.
7.1.3
Displaying the risk information
Once the desired risk is displayed, which can be done following the steps described in the
section 7.1.2, click the show button (note: project managers of the particular project associated
to the risk and the Quality manager can display the properties of this risk using the modify/print
button instead, see section 7.1.4).
The Administrator and people authorized to the project associated to the risk have the access
rights to display the properties of this risk.
The risk properties will be displayed.
Figure 75: Risk properties view
110
MANATEE User Manual
Issue 1.D
Note: If the show or modify/print buttons of the desired risk (i.e., the modify button will be
enabled instead of the show button when the user is the project manager of this project or the
Quality manager) are not available, go to the section 13 which provides some guides to
troubleshooting problems.
7.1.4
Modifying the information in an existing risk
Once the risk, which properties are going to be modified, is displayed, which can be done
following the steps described in the section 7.1.2, click the modify/print button.
Only project managers of the project associated to the risk and the Quality manager have the
access rights to modify the information of the risk.
The current status of the project must be “active”.
The following form will appear.
Figure 76: Modifying the risk properties page
!
Modify the desired fields (taken into account constrains listed in section 7.1.1).
Only the fields that are not greyed out can be modified.
!
Click update.
The risk will be modified.
A notification will be also sent (internally, a MANATEE notification and, externally, an e-mail)
to the corresponding users in order to inform them about the modification of the risk.
“The properties of the Risk (Code) have been modified” to be sent to the Project
managers and the WP managers of the associated project and to the Quality Manager.
Note: If, for any reason, the risk cannot be modified, go to the section 13 which provides some
guides to troubleshooting problems.
111
MANATEE User Manual
Issue 1.D
7.1.5
Printing the risk information
Once the risk, which properties are going to be printed, is displayed, which can be done
following the steps described in the section 7.1.2, click the modify/print button.
Only project managers of the project associated to the risk and the Quality manager have the
access rights to modify the information of the risk.
The current status of the project must be “active”.
The risk information will be displayed.
!
Click Print Risk button.
A summary of the risk that contains the following information will be generated:
"
Code (as defined in the risk properties).
"
Title (as defined in the risk properties).
"
Project (as defined in the risk properties).
"
Creation date (as defined in the risk properties).
"
Modification date (as defined in the risk properties).
"
Description (as defined in the risk properties).
"
Effect (as defined in the risk properties).
"
Severity (as defined in the risk properties).
"
Probability (as defined in the risk properties).
"
Actions (as defined in the risk properties).
"
Conclusions (as defined in the risk properties).
The risk details can be printed or saved in pdf format.
Note: If, for any reason, the modify/print button is not available, go to the section 13 which
provides some guides to troubleshooting problems.
7.1.6
Deleting a risk
Once the risk, which is going to be deleted, is displayed, which can be done following the steps
described in the section 7.1.2, click the delete button.
Only project managers of the project associated to the risk and the Quality manager have the
access rights to delete the risk.
The current status of the project must be “active”.
The following window displaying the risk properties will appear.
112
MANATEE User Manual
Issue 1.D
Figure 77: Risk properties view
!
Click delete.
A notification will be also sent (internally, a MANATEE notification and, externally, an e-mail)
to the corresponding users in order to inform them about that the risk has been deleted.
“The risk (Code) has been deleted” to be sent to the Project managers and the WP
managers of the associated project and to the Quality Manager.
Note: If, for any reason, the delete button is not available, go to the section 13 which provides
some guides to troubleshooting problems.
7.2
Non-conformities administration
MANATEE provides the capabilities required to manage the non-conformities that are
identified in a project.
From the non-conformity administration point of view, MANATEE provides the following
functionality:
"
Introduce a new non-conformity
"
Search non-conformities using different criteria
"
Display the complete or filtered non-conformity list
"
Display the non-conformity information
"
Modify the information of a non-conformity
"
Print the non-conformities details
"
Delete a non-conformity
It is important to remember that each user can only do actions on the non-conformities
according to the access rights that this particular user has (see sections 4 or 5.2 for more
information).
113
MANATEE User Manual
Issue 1.D
7.2.1
Creating a new non-conformity
To start working with non-conformities, select Quality Control tab and, then, Non-conformities
tab.
In order to create a new non-conformity, select New Non-conformity tab.
Only the Quality manager and project managers have the access rights to create newconformities.
The following form will appear.
Figure 78: Creating a Non-conformity page
!
Fill the following fields (all mandatory fields are marked with a star):
"
Project: Select in the list the project to which the new non-conformity is
going to be associated. For project managers, only projects that the login
user is project manager will be displayed in the list. If the login user is the
Quality manager, all active projects will be displayed in the list
"
Code: The Code is created automatically following the pattern described
below (see section 14 for more information about which code patterns can
be used):
NC-PC-nnn
where,
NC is the acronym of Non-conformity,
PC will be the project code of the project assigned to the nonconformity,
nnn will be a sequence number that is automatically generated
by the application
114
MANATEE User Manual
Issue 1.D
!
"
Title: Introduce the non-conformity title. This is a text field and the
maximum length of this field is 300 characters.
"
Creation date: The creation date is filled automatically using the current
date (i.e., the date when the non-conformity is being created).
"
Date: The modification date is filled automatically using the current date
(i.e., the date when the non-conformity is being modified).
"
Description: Introduce a description of the non-conformity. This is a text
field and length of this field is not limited.
"
Priority: Select the priority of the non-conformity among the options
offered in the combo box, which include the following ones: High, Medium
and Low.
"
Actions: Describe the actions that are planned and/or have been taken to
solve the non-conformity (if the actions have been registered in
MANATEE, it is recommended to include in this field the code of those
actions). This is a text field and the maximum length limit is 300 characters.
"
Conclusions: Describe the current status of the non-conformity. If the
actions taken to solve the non-conformity have been successful, it is
convenient to indicate in this field that the non-conformities is currently
solved or controlled. This is a text field and the maximum length limit is
300 characters.
Click add NC.
The Non-conformity will be created.
A notification will be also sent (internally, a MANATEE notification and, externally, an e-mail)
to the corresponding users in order to inform them about the creation of the non-conformity.
“The Non-conformity (Code) has been created” to be sent to the Project managers and
the WP managers of the associated project and to the Quality manager.
Note: If, for any reason, the non-conformity cannot be created, go to the section 13 which
provides some guides to troubleshooting problems.
7.2.2
Searching non-conformities
To start looking for non-conformities, select Quality Control tab and, then, Non-conformities
tab.
The complete list of non-conformities that the current user can see will be displayed.
115
MANATEE User Manual
Issue 1.D
Figure 79: Non-conformity List
As shown in the figure, the following issues could be available for each non-conformity in the
list:
"
Project: The code of the project associated to the non-conformity.
"
Code: The code of the non-conformity.
"
Title: The title of the non-conformity.
"
Creation date: The creation date of the non-conformity.
"
Date: The last modification date of the non-conformity.
"
Priority: The priority of the non-conformity.
"
Show / modify/print: Two different action buttons can appear in this position:
"
-
The show button displays the non-conformity content.
-
The modify/print button allows modifying the non-conformity content and
printing the non-conformity details.
Delete: The delete button allows removing the non-conformity completely from the
system.
The actions buttons of each non-conformity will not be enabled (i.e., they will be displayed as
greyed out) according to the access rights of the user that has login into the system.
The non-conformities are always arranged by the code.
Each screen will show 10 non-conformities, to move among the screens select the other pages
numbers or use the arrows that appear in the bottom of the non-conformities list.
Figure 80: Page selectors
116
MANATEE User Manual
Issue 1.D
In order to search a particular non-conformity or to constrain the number of non-conformities to
be displayed, select Search Non-conformities tab.
The following form will appear.
Figure 81: Search non-conformities form
!
Fill as many fields as desired in order to filter the non-conformity list.
"
Project: Introduce any number of alphanumerical characters (this is not
case sensitive); any non-conformity whose project contains this sequence of
characters in its title will be selected.
"
Code: Introduce any number of alphanumerical characters (this is not case
sensitive); any non-conformity which contains this sequence of characters
in its code will be selected.
"
Title: Introduce any number of alphanumerical characters (this is not case
sensitive); any non-conformity which contains this sequence of characters
in its title will be selected.
"
Creation date: Introduce a date; any non-conformity whose creation date
meets the introduced one will be selected.
"
Date: Introduce a date; any non-conformity whose modification date meets
the introduced one will be selected.
"
Description: Introduce any number of alphanumerical characters (this is
not case sensitive); any non-conformity which contains this sequence of
characters in its description will be selected.
"
Priority: Select a priority level in the list; any non-conformity whose
severity date meets the introduced one will be selected.
"
Actions: Introduce any number of alphanumerical characters (this is not
case sensitive); any non-conformity which contains this sequence of
characters in its actions field will be selected.
117
MANATEE User Manual
Issue 1.D
"
!
Conclusions: Introduce any number of alphanumerical characters (this is
not case sensitive); any non-conformity which contains this sequence of
characters in its conclusions field will be selected.
Click search.
A new non-conformity list will be displayed taken all the filtering constrains introduced into
account (i.e., the filtered non-conformity match all constrains introduced).
Example:
The user is searching the non-conformities in the project "TST" that includes
the word “time” in their title.
Then, the Search form must be filled as shown in the figure below
Figure 82: Example of a filled search non-conformity form
and the list of non-conformities displayed would be the following one.
Figure 83: Example of a filtered non-conformity list
118
MANATEE User Manual
Issue 1.D
Note: If the desired non-conformity does not appear in any screen, go to the section 13 which
provides some guides to troubleshooting problems.
7.2.3
Displaying the non-conformity information
Once the desired non-conformity is displayed, which can be done following the steps described
in the section 7.2.1, click the show button (note: the Administrator, project managers of the
particular project associated to the non-conformity and the Quality manager can display the
properties of this non-conformity using the modify/print button instead, see section 7.2.4).
The Administrator and People authorized to the project associated to the non-conformity have
the access rights to display the properties of this non-conformity.
The non-conformity properties will be displayed.
Figure 84: Non-conformity properties view
Note: If the show or modify/print buttons of the desired non-conformity (i.e., the modify button
will be enabled instead of the show button when the user is the project manager of this project
or the Quality manager) are not available, go to the section 13 which provides some guides to
troubleshooting problems.
7.2.4
Modifying the information in an existing non-conformity
Once the non-conformity, which properties are going to be modified, is displayed, which can be
done following the steps described in the section 7.2.1, click the modify/print button.
Only project managers of the project associated to the non-conformity and the Quality manager
have the access rights to modify the information of the non-conformity.
The current status of the project must be “active”.
The following form will appear.
119
MANATEE User Manual
Issue 1.D
Figure 85: Modifying the non-conformity properties page
!
Modify the desired fields (taken into account constrains listed in section 7.2.1).
Only the fields that are not greyed out can be modified.
!
Click update.
The non-conformity will be modified.
A notification will be also sent (internally, a MANATEE notification and, externally, an e-mail)
to the corresponding users in order to inform them about the modification of the nonconformity.
“The properties of the Non-conformity (Code) have been modified” to be sent to the
Project managers and the WP managers of the associated project and to the Quality
Manager.
Note: If, for any reason, the non-conformity cannot be modified, go to the section 13 which
provides some guides to troubleshooting problems.
7.2.5
Printing the non-conformity information
Once the non-conformity, which properties are going to be printed, is displayed, which can be
done following the steps described in the section 7.2.1, click the modify/print button.
Only project managers of the project associated to the non-conformity and the Quality manager
have the access rights to modify the information of the non-conformity.
The current status of the project must be “active”.
The non-conformity information will be displayed.
!
Click Print Non-conformity button.
A summary of the non-conformity that contains the following information will be generated:
"
Code (as defined in the non-conformity properties).
120
MANATEE User Manual
Issue 1.D
"
Title (as defined in the non-conformity properties).
"
Project (as defined in the non-conformity properties).
"
Creation date (as defined in the non-conformity properties).
"
Modification date (as defined in the non-conformity properties).
"
Description (as defined in the non-conformity properties).
"
Priority (as defined in the non-conformity properties).
"
Actions (as defined in the non-conformity properties).
"
Conclusions (as defined in the non-conformity properties).
The non-conformity details can be printed or saved in pdf format.
Note: If, for any reason, the modify/print button is not available, go to the section 13 which
provides some guides to troubleshooting problems.
7.2.6
Deleting a non-conformity
Once the non-conformity, which is going to be deleted, is displayed, which can be done
following the steps described in the section 7.2.1, click the delete button.
Only project managers of the project associated to the non-conformity and the Quality manager
have the access rights to delete the non-conformity.
The current status of the project must be “active”.
The following window displaying the non-conformity properties will appear.
Figure 86: Non-conformity properties view
!
Click delete.
121
MANATEE User Manual
Issue 1.D
A notification will be also sent (internally, a MANATEE notification and, externally, an e-mail)
to the corresponding users in order to inform them about that the non-conformity has been
deleted.
“The non-conformity (Code) has been deleted” to be sent to the Project managers and
the WP managers of the associated project and to the Quality Manager.
Note: If, for any reason, the delete button is not available, go to the section 13 which provides
some guides to troubleshooting problems.
7.3
Actions administration
MANATEE provides the capabilities required to manage the actions that are created in a
project.
From the action administration point of view, MANATEE provides the following functionality:
"
Introduce a new action
"
Search actions using different criteria
"
Display the complete or filtered action list
"
Display the action properties
"
Modify the definition of a action
"
Print the actions details
"
Delete a action
It is important to remember that each user can only do actions on the actions according to the
access rights that this particular user has (see sections 4 or 5.2 for more information).
7.3.1
Creating a new action
To start working with actions, select Quality Control tab and, then, Actions tab.
In order to create a new action, select New Action tab.
Only the Quality manager and project managers have the access rights to create new actions.
The following form will appear.
122
MANATEE User Manual
Issue 1.D
Figure 87: Creating a Action page
!
Fill the following fields (all mandatory fields are marked with a star):
"
Project: Select in the list the project to which the new action is going to be
associated. Only the project manager of the associated project and the
Quality manager can create new actions. Therefore, for project managers,
only projects that the login user is project manager will be displayed in the
list. If the login user is the Quality manager, all active projects will be
displayed in the list.
"
Code: The Code is created automatically following the pattern described
below (see section 14 for more information about which code patterns can
be used):
AC-PC-nnn
where,
AC is the acronym of Action,
PC will be the project code of the project assigned to the action,
nnn will be a sequence number that is automatically generated
by the application
"
Title: Introduce the action title. This is a text field and the maximum length
of this field is 100 characters.
"
Creation date: The creation date is filled automatically using the current
date (i.e., the date when the action is being created).
"
Date: The modification date is filled automatically using the current date
(i.e., the date when the action is being modified).
"
Due date: Introduce a date to establish a limit date to perform the action.
123
MANATEE User Manual
Issue 1.D
!
"
Assigned to: Select in the list the person that must perform the action (all
users registered in MANATEE are available).
"
Description: Introduce a description of the action. This is a text field and
the length of this field is not limited.
"
State: Select the state of the action among the options offered in the combo
box, which include the following ones: Started, On-going and Close. When
the action is created, the state of the action is filled automatically as Started
(the other options area not available).
"
Conclusions: Introduce any additional information about the action to be
done and/or the action taken. This is a text field and the maximum length
limit is 300 characters.
Click add action.
The Action will be created.
A notification will be also sent (internally, a MANATEE notification and, externally, an e-mail)
to the corresponding users in order to inform them about the creation of the action.
“The Action (Code) has been created” to be sent to the project managers, the WP
managers of the associated project, the Quality manager and the assigned person.
A notification will be also sent (internally, a MANATEE notification and, externally, an e-mail)
to inform the corresponding user about the action that has been assigned to him/her.
“You have been named responsible of the Action (Code)” to be sent to assigned person.
Note: If, for any reason, the action cannot be created, go to the section 13 which provides some
guides to troubleshooting problems.
7.3.2
Searching actions
To start looking for actions, select Quality Control tab and, then, Actions tab.
The complete list of actions that the current user can see will be displayed.
124
MANATEE User Manual
Issue 1.D
Figure 88: Action List
As shown in the figure, the following issues could be available for each action in the list:
"
Project: The code of the project associated to the action.
"
Code: The code of the action.
"
Title: The title of the action.
"
Creation date: The creation date of the action.
"
Date: The last modification date of the action.
"
Due date: The due date of the action.
"
State: The state of the action.
"
Show / Modify/print: Two different action buttons can appear in this position:
"
-
The show button displays the action content.
-
The modify/print button allows modifying the action content and printing the
action details.
Delete: The delete button allows removing the action completely from the system.
The actions buttons of each action will not be enabled (i.e., they will be displayed as greyed out)
according to the access rights of the user that has login into the system.
All actions, which due date is in the past and are not closed yet, will be displayed in red.
The actions are always arranged by the code.
Each screen will show 10 actions, to move among the screens select the other pages numbers or
use the arrows that appear in the bottom of the actions list.
Figure 89: Page selectors
125
MANATEE User Manual
Issue 1.D
In order to search a particular action or to constrain the number of actions to be displayed, select
Search Actions tab.
The following form will appear.
Figure 90: Search actions form
!
Fill as many fields as desired in order to filter the action list.
"
Project: Introduce any number of alphanumerical characters (this is not
case sensitive); any action whose project contains this sequence of
characters in its title will be selected.
"
Code: Introduce any number of alphanumerical characters (this is not case
sensitive); any action which contains this sequence of characters in its code
will be selected.
"
Title: Introduce any number of alphanumerical characters (this is not case
sensitive); any action which contains this sequence of characters in its title
will be selected.
"
Creation date: Introduce a date; any action whose creation date meets the
introduced one will be selected.
"
Date: Introduce a date; any action whose modification date meets the
introduced one will be selected.
"
Due date: Introduce a date; any action whose due date meets the
introduced one will be selected.
"
Assigned to: Select a person in the list; any action whose assigned person
meets the introduced one will be selected.
"
Description: Introduce any number of alphanumerical characters (this is
not case sensitive); any action which contains this sequence of characters in
its description will be selected.
126
MANATEE User Manual
Issue 1.D
!
"
State: Select a state in the list; any action whose state meets the introduced
one will be selected.
"
Conclusions: Introduce any number of alphanumerical characters (this is
not case sensitive); any action which contains this sequence of characters in
its conclusions field will be selected.
Click search.
A new action list will be displayed taken all the filtering constrains introduced into account (i.e.,
the filtered action match all constrains introduced).
Example:
The user is searching the actions in the project "TST", which status is "ongoing"
Then, the Search form must be filled as shown in the figure below
Figure 91: Example of a filled search action form
and the list of actions displayed would be the following one.
127
MANATEE User Manual
Issue 1.D
Figure 92: Example of a filtered action list
Note: If the desired action does not appear in any screen, go to the section 13 which provides
some guides to troubleshooting problems.
7.3.3
Displaying the action information
Once the desired action is displayed, which can be done following the steps described in the
section 7.3.2 click the show button (note: the Administrator, project managers of the particular
project associated to the action, the Quality manager and the assigned person can display the
properties of this action using the modify/print button instead, see section 7.3.4).
The Administrator and People authorized to the project associated to the action have the access
rights to display the properties of this action.
The action properties will be displayed.
Figure 93: Action properties view
128
MANATEE User Manual
Issue 1.D
Note: If the show or modify/print buttons of the desired action (i.e., the modify button will be
enabled instead of the show button when the user is the project manager of this project or the
Quality manager) are not available, go to the section 13 which provides some guides to
troubleshooting problems.
7.3.4
Modifying the information in an existing action
Once the action, which properties are going to be modified, is displayed, which can be done
following the steps described in the section 7.3.2, click the modify/print button.
Only project managers of the project associated to the action, the Quality manager and the
assigned person to this particular action have the access rights to modify the information of the
action.
The current status of the project must be “active”.
The following form will appear.
Figure 94: Modifying the action properties page
!
Modify the desired fields (taken into account constrains listed in section 7.3.1).
Only the fields that are not greyed out can be modified.
!
Click update.
The action will be modified.
A notification will be also sent (internally, a MANATEE notification and, externally, an e-mail)
to the corresponding users in order to inform them about the modification of the action.
“The properties of Action (Code) have been modified” to be sent to the Project managers
and the WP managers of the associated project, the Quality Manager and the assigned
person.
129
MANATEE User Manual
Issue 1.D
When the status of the action is changed to Close, a notification will be also sent (internally, a
MANATEE notification and, externally, an e-mail) to the corresponding users in order to
inform them about the action has been close and the status could not be changed again.
“The Action (Code) has been closed” to be sent to the Project managers and the WP
managers of the associated project, the Quality Manager and the assigned person.
Note: If, for any reason, the action cannot be modified, go to the section 13 which provides
some guides to troubleshooting problems.
7.3.5
Printing the action information
Once the action, which properties are going to be printed, is displayed, which can be done
following the steps described in the section 7.3.2, click the modify/print button.
Only project managers of the project associated to the action, the Quality manager and the
assigned person to this particular action have the access rights to modify the information of the
action.
The current status of the project must be “active”.
The action information will be displayed.
!
Click Print Action button.
A summary of the action that contains the following information will be generated:
"
Code (as defined in the action properties).
"
Title (as defined in the action properties).
"
Project (as defined in the action properties).
"
Creation date (as defined in the action properties).
"
Modification date (as defined in the action properties).
"
Due date (as defined in the action properties).
"
Assigned to (as defined in the action properties).
"
Description (as defined in the action properties).
"
State (as defined in the action properties).
"
Conclusions (as defined in the action properties).
The action details can be printed or saved in pdf format.
Note: If, for any reason, the modify/print button is not available, go to the section 13 which
provides some guides to troubleshooting problems.
7.3.6
Deleting an action
Once the action, which is going to be deleted, is displayed, which can be done following the
steps described in the section 7.3.2, click the delete button.
130
MANATEE User Manual
Issue 1.D
Only project managers of the project associated to the action and the Quality manager have the
access rights to delete the action.
The current status of the project must be “active”.
The following window displaying the action properties will appear.
Figure 95: Action properties view
!
Click delete.
A notification will be also sent (internally, a MANATEE notification and, externally, an e-mail)
to the corresponding users in order to inform them about that the action has been deleted.
“The action (Code) has been deleted” to be sent to the Project managers and the WP
managers of the associated project, the Quality Manager and the assigned person to this
action.
Note: If, for any reason, the delete button is not available, go to the section 13 which provides
some guides to troubleshooting problems.
131
MANATEE User Manual
Issue 1.D
8
HUMAN RESOURCES TOOLS
MANATEE provides several capabilities that have been designed to facilitate the human
resources activities that are usually performed in any organization. These capabilities includes:
"
Define and maintain the hourly cost of the people working in the organization.
"
Provide the PTR (Personal Time Report) forms to be filled by the people working in the
organization.
"
Summarize (taken into account the data introduced in the PTR’s) the people occupation
for a selected period.
It is important to remember that each user can only do actions on the actions according to the
access rights that this particular user has (see sections 4 or 5.2 for more information).
8.1
User’s hourly cost administration
MANATEE provides the capabilities required to define and maintain the hourly cost of the
people working in the organization.
From the user’s hourly cost administration point of view, MANATEE provides the following
functionality:
"
Define the hourly cost of a user
"
Search the hourly cost of a user
"
Modify the hourly cost of a user
"
Delete the hourly cost of a user
This administration of the user’s hourly cost is restricted to the Human Resources manager,
which is, therefore the only user that have available the functionality described in this section.
8.1.1
Define a new User’s hourly cost
To define a new hourly cost for a user, select Human Resources tab and, then, HHRR tab.
The Human Resources manager is the only user that can define a new User’s hourly cost.
The hourly cost already defined by the MANATEE users will be displayed.
In order to define a new hourly cost for a user, select New user’s hourly cost tab.
The following form will appear.
132
MANATEE User Manual
Issue 1.D
Figure 96: Defining a user’s hourly cost page
!
!
Fill the following fields (all mandatory fields are marked with a star):
"
User: Select a person in the list (all users registered in MANATEE are
available).
"
Year: Select a year in the list.
"
Hourly cost: Introduce the hourly cost of the selected person. This is a
numerical field.
"
Hours per year: Introduce the number of hour that the selected person
works in year. This is a numerical field.
Click add.
The hourly cost has been defined for the selected user and year.
Note: If, for any reason, the hourly cost cannot be created for a user, go to the section 13 which
provides some guides to troubleshooting problems.
8.1.2
Searching User’s hourly costs
To start looking for User’s hourly costs, select Human Resources tab and, then, HHRR tab.
Only the Human Resources manager can visualize the user’s hourly cost.
The User’s hourly cost already defined will be displayed.
133
MANATEE User Manual
Issue 1.D
Figure 97: User’s hourly cost List
As shown in the figure, the following issues could be available for each hourly cost defined in
the list:
"
User: The name of the user.
"
Year: The year corresponding to the hourly cost defined.
"
Hour cost: The cost per hour of the mentioned user and year.
"
Year hours: The number of hours per year that the mentioned user works.
"
Modify: The modify button allows modifying the user’s hourly cost definition.
"
Delete: The delete button allows deleting the user’s hourly cost definition.
The user’s hourly costs are always arranged, first, by user and, then, by year.
Each screen will show 10 user’s hourly costs, to move among the screens select the other pages
numbers or use the arrows that appear in the bottom of the user’s hourly costs list.
Figure 98: Page selectors
In order to search a particular user’s hourly cost or to constrain the number of user’s hourly
costs to be displayed, select Search user’s hourly cost tab.
The following form will appear.
134
MANATEE User Manual
Issue 1.D
Figure 99: Search user’s hourly cost form
!
!
Fill as many fields as desired in order to filter the action list.
"
User: Select a person in the list; any hourly cost corresponding to the
introduced user will be selected.
"
Year: Introduce a year; any hourly cost corresponding to the introduced
year will be selected.
"
Hourly cost: Introduce a number; any hourly cost that meets this figure
will be selected.
"
Hours per year: Introduce a number; any the hourly costs of the users that
works per year the introduced number will be selected.
Click search.
A new user’s hourly costs list will be displayed taken all the filtering constrains introduced into
account (i.e., the filtered user’s hourly costs match all constrains introduced).
Example:
The Human Resources manager is searching the hourly cost of the user “Pérez,
Ana”.
Then, the Search form must be filled as shown in the figure below
135
MANATEE User Manual
Issue 1.D
Figure 100: Example of a filled search user’s hourly cost form
and the list of user’s hourly cost displayed would be the following one.
Figure 101: Example of a filtered user’s hourly costs list
Note: If the desired user’s hourly cost does not appear in any screen, go to the section 13 which
provides some guides to troubleshooting problems.
8.1.3
Modifying the information in an existing User’s hourly cost
Once the user’s hourly cost that is going to be modified is displayed, which can be done
following the steps described in the section 8.1.2, click the modify button.
Only the Human Resources manager can modify the user’s hourly cost.
The following form will appear.
136
MANATEE User Manual
Issue 1.D
Figure 102: Modifying the user’s hourly cost definition page
!
Modify the desired fields (taken into account constrains listed in section 8.1.1).
Only the fields that are not greyed out can be modified.
!
Click update.
The user’s hourly cost will be modified.
Note: If, for any reason, the user’s hourly cost cannot be modified, go to the section 13 which
provides some guides to troubleshooting problems.
8.1.4
Deleting a User’s hourly cost
Once the user’s hourly cost, which is going to be deleted, is displayed, which can be done
following the steps described in the section 8.1.2, click the delete button.
Only the Human Resources manager can delete an user’s hourly cost.
The following window displaying the user’s hourly cost properties will appear.
137
MANATEE User Manual
Issue 1.D
Figure 103: User’s hourly cost information view
!
Click delete.
Note: If, for any reason, the delete button is not available, go to the section 13 which provides
some guides to troubleshooting problems.
8.2
PTR
MANATEE provides the capability to fill PTRs to all users registered in MANATEE that have
activated the PTR option (see 11.6).
The PTR’s spans for a week.
From PTR management point of view, MANATEE provides the following functionality:
"
Fill a new PTR.
"
Search for an existing PTR.
"
Display the PTR information.
"
Modify the information of an existing PTR.
"
Print the PTR details.
"
Delete a PTR.
As indicated in section 11, only the Administrator has the access right to activate the PTR for a
user.
8.2.1
Filling a new PTR
To fill a new PTR, select Human Resources tab and, then, PTR’s tab.
The PTR’s already filled by the user will be displayed.
In order to fill a new PTR, select New PTR tab.
138
MANATEE User Manual
Issue 1.D
The PTR form will appear.
Figure 104: Creating a PTR page
In the PTR form, each user will see the WBS’s assigned to him/her that have been active during
the period covered by the PTR to be filled (i.e., the PTR dates are between the start real date and
end read date of the WBS). The period of the new PTR would always be the following week to
the last PTR filled by this user.
!
Introduce the hours that have been spent in each WBS during the PTR period.
These are numerical fields.
!
Introduce any additional comment in the Comments box. This is a text field
and length of this field is not limited.
!
Click add PTR.
The PTR has been created for the corresponding PTR period.
Note: If, for any reason, the PTR cannot be created, go to the section 13 which provides some
guides to troubleshooting problems.
8.2.2
Searching weekly PTR’s
To start looking for PTR’s, select Human Resources tab and, then, PTR’s tab.
The PTR’s already filled by the login user will be displayed.
139
MANATEE User Manual
Issue 1.D
Figure 105: PTR’s List
As shown in the figure, the following issues could be available for each PTR in the list:
"
User: The username of the login user.
"
Week: The number of the week in the year corresponding to the PTR.
"
Year: The year corresponding to the PTR.
"
Show / modify: Two different action buttons can appear in this position:
"
-
The show button displays the PTR content and allows printing the PTR details.
-
The modify button allows modifying the PTR content and printing the PTR
details.
Delete: The delete button allows deleting the PTR.
The PTR’s are always arranged by date (from the most recent one to the oldest one).
Each screen will show 10 PTR’s, to move among the screens select the other pages numbers or
use the arrows that appear in the bottom of the PTR’s list.
Figure 106: Page selectors
In order to search a particular PTR or to constrain the number of PTR’s to be displayed, select
Search PTR’s tab.
The following form will appear.
140
MANATEE User Manual
Issue 1.D
Figure 107: Search PTR’s form
!
!
Fill as many fields as desired in order to filter the action list.
"
User: Select a person in the list; any PTR corresponding to the introduced
person will be selected. If the user is the Human Resources manager, all
users registered in MANATEE will be available. Other users can only see
themselves.
"
Week: Introduce a week; any PTR corresponding to the introduced week
will be selected.
"
Year: Introduce a year; any PTR corresponding to the introduced year will
be selected.
Click search.
A new PTR list will be displayed taken all the filtering constrains introduced into account (i.e.,
the filtered PTR’s match all constrains introduced).
Example:
An user is searching the PTR filled in the week 29.
Then, the Search form must be filled as shown in the next figure.
141
MANATEE User Manual
Issue 1.D
Figure 108: Example of a filled search PTR form
and the list of PTR’s displayed would be the following one.
Figure 109: Example of a filtered PTR’s list
Note: If the desired PTR does not appear in any screen, go to the section 13 which provides
some guides to troubleshooting problems.
8.2.3
Displaying the PTR information
Once the desired PTR is displayed, which can be done following the steps described in the
section 8.2.2 click the show button (note: the Human Resources manager will have available the
modify button to visualize the PTR. Other users will have available the modify button instead of
the show button for the last four filled PTR’s).
The PTR content will be displayed.
142
MANATEE User Manual
Issue 1.D
Figure 110: PTR information view
Note: If the show or modify buttons of the desired PTR are not available, go to the section 13
which provides some guides to troubleshooting problems.
8.2.4
Modifying the information in an already created weekly PTR
Once the PTR that is going to be modified is displayed, which can be done following the steps
described in the section 8.2.2 click the modify button.
The Human Resources manager can modify any PTR. Other users can only modify their last
four filled PTR’s.
The following form will appear.
Figure 111: Modifying the PTR information page
!
Modify the desired fields (taken into account constrains listed in section 8.2.1).
Only the fields that are not greyed out can be modified.
!
Click update.
143
MANATEE User Manual
Issue 1.D
The PTR will be modified.
Note: If, for any reason, the PTR cannot be modified, go to the section 13 which provides some
guides to troubleshooting problems.
8.2.5
Printing the PTR information
Once the PTR that is going to be printed is displayed, which can be done following the steps
described in the section 8.2.2 click the show or modify buttons (depending which one is
available for the desired PTR).
The PTR content will be displayed.
!
Click Print PTR button.
A summary of the PTR that contains the following information will be generated:
"
Name (PTR user name).
"
Week starts on (starting date of the PTR).
"
Week finishes on (ending date of the PTR).
"
Title and code of the WBS’s that have been active during the PTR period.
"
Hours reported as worked in each WBS´s during the PTR period.
"
Summary of the worked hours (per day and week).
Signature boxes for the user and the Human Resources manager will be also available in the
form to be printed. The PTR details can be printed or saved in pdf format.
Note: If, for any reason, the show or modify buttons is not available, go to the section 13 which
provides some guides to troubleshooting problems.
8.2.6
Deleting a PTR
Once the PTR, which is going to be deleted, is displayed, which can be done following the steps
described in the section 8.2.2, click the delete button.
The Human Resources manager is the only user that has the access rights to delete a PTR and
only can delete the last filled PTR by a user.
The following window displaying the PTR properties will appear.
144
MANATEE User Manual
Issue 1.D
Figure 112: PTR information view
!
Click delete.
Note: If, for any reason, the delete button is not available, go to the section 13 which provides
some guides to troubleshooting problems.
8.3
People occupation
Taken into account the data introduced in the PTR’s, MANATEE can provide a summary of the
people occupation for a selected period.
To display the people occupation, select Human Resources tab and, then, People Occupation
tab.
This option is only available to the Human Resources manager and to project managers.
The following form will appear.
Figure 113: Display people occupation form
145
MANATEE User Manual
Issue 1.D
!
!
Fill the following fields (all mandatory fields are marked with a star):
"
User: Select a person in the list. If the login user is the Human Resources
manager, all MANATEE users will be available. If the login user is a
project manager, only persons related with the project managed by the login
user will be available.
"
Period start date: Introduce a starting date for the period to be displayed.
"
Period end date: Introduce an ending date for the period to be displayed.
"
Filtered by: Select an option in the list. People occupation can be
displayed by projects, WP’s and WBS’s.
Click Print People occupation.
The people occupation summary will be displayed. It contains the following information:
"
Name (as selected in the previous form).
"
Period start date (as selected in the previous form).
"
Period end date (as selected in the previous form).
"
Information related with each project, WP or WBS (depending of the option selected in
the previous form) assigned to the selected user (i.e., all projects, WP’s or WBS’s where
the user have planned hours will be displayed), which includes:
o Code (as defined in the project, WP or WBS properties)
o Title (as defined in the project, WP or WBS properties)
o Spent hours (in each project, WP or WBS according to the information reported
in the user’s PTR’s)
o Percentage (in each project, WP or WBS considering the spent hours divided by
the total spent hours showed in this summary)
o Planned hours (in each project, WP or WBS according to the information
planned in each WBS’s assigned to the user)
o Left hours (in each project, WP or WBS considering the planned hour minus the
spent hours showed in this summary)
The people occupation summary can be printed or saved in pdf format.
146
MANATEE User Manual
Issue 1.D
9
MANAGEMENT ANALISYS TOOLS
MANATEE provides several additional analysis capabilities (to the ones described in the
previous sections) that helps to control and visualize the information managed by the tool such
as the manpower, the cash flow or the workload.
Those capabilities are described in more detail in the following subsections.
9.1
Global control
Taking into account the information introduced in projects and PTRs, MANATEE allows
summarizing the global budget and global cash flow of an organization.
9.1.1
Global budget control
To display the global budget for a selected period, select Tools tab; then, Global control tab and,
finally, Global budget control tab.
This option is only available to the Human Resources manager.
The following form will appear.
Figure 114: Display global budget control form
!
!
Fill the following fields (all mandatory fields are marked with a star):
"
Period start date: Introduce a starting date for the period to be displayed.
"
Period end date: Introduce an ending date for the period to be displayed.
Click print.
The global budget control summary will be displayed. It contains the following information for
each project and the selected period:
"
Code of the project
"
Title of the project
147
MANATEE User Manual
Issue 1.D
"
Spent hours (in each project considering the information reported in the user’s
PTR’s)
"
Percentage (in each project considering the spent hours in a project divided by the
total spent hours in all projects showed in this summary)
"
Total spent manpower budget (total spent manpower cost in each project
considering the spent hours and the hourly cost of each user)
"
Total planned manpower budget (in each project considering the planned hours in
each WBS’s included in the project and the hourly cost of each user)
"
Total spent other resources budget (in each project considering the information
reported in the WBS’s reports of the WBS’s included in the project)
"
Total planned other resources budget (in each project considering the information
defined in the WBS’s included in the project)
"
Total spent budget (in each project adding the total spent manpower budget and the
total spent other resources budget showed in this summary)
"
Total planned budget (in each project adding the total planned manpower budget
and the total planned other resources budget showed in this summary)
The global budget control summary can be printed or saved in pdf format.
9.1.2
Global cash flow control
To display the global cash flow for a selected period, select Tools tab; then, Global control tab
and, finally, Global cash flow control tab.
This option is only available to the Human Resources manager.
The following form will appear.
Figure 115: Display global cash flow control form
148
MANATEE User Manual
Issue 1.D
!
!
Fill the following fields (all mandatory fields are marked with a star):
"
Period start date: Introduce a starting date for the period to be displayed.
"
Period end date: Introduce an ending date for the period to be displayed.
Click search.
The summary of the global cash flow for the selected period will be displayed.
9.2
"
Period start date (as selected in the previous form)
"
Period start date (as selected in the previous form)
"
Total cash-in (total cash-in in the selected period, taking into account the cash-in of
each project)
"
Total cash-out (total cash-out in the selected period, taking into account the cashout milestones defined in each project plus the total cost associated to the
employees3)
"
Total net (total cash considering the total cash-in minus the total cash-out)
Graphics
Taking into account the information introduced in projects and PTRs, MANATEE provides
several graphical utilities that helps to visualize different issues, such as:
"
Ocupation of the users.
"
Real and planned manpower distribution in the different projects.
"
Cash-flow overviews.
"
Budget charts.
9.2.1
User occupation pie charts
To have a visual image of the people occupation for a selected period, select Tools tab; then,
Graphics tab and, finally, User Occupation Pie Charts tab.
This option is only available to the Human Resources manager and project managers.
The following form will appear.
3
The application computes the employees cost taken into account full months inside the selected period
for all users that have already defined an hourly cost.
149
MANATEE User Manual
Issue 1.D
Figure 116: User occupation pie charts form
!
!
Fill the following fields (all mandatory fields are marked with a star):
"
User: Select a person in the list. If the login user is the Human Resources
manager, all MANATEE users will be available. If the login user is any
other user, only persons related with the project managed by the login user
will be available.
"
Period start date: Introduce a starting date for the period to be displayed.
"
Period end date: Introduce an ending date for the period to be displayed.
"
Group by: Select an option between the following ones:
o
All projects, to display the user occupation in all projects where the
user is working for the selected period.
o
A project, to display the user occupation in a particular project. In
this option, the following fields must be filled:
"
Project: Select the project in the list.
"
Filter by: Select an option in the combo box (the user
occupation can be grouped using WP’s or WBS’s).
Click OK
Two graphs will be displayed.
150
MANATEE User Manual
Issue 1.D
Figure 117: User occupation pie charts example
The upper one shows the real spent hours distribution and the lower one shows the planned
spent hour distribution for the selected user and the selected period.
The graphs can be saved, prined or their properties modified as described in section 6.1.7.3.
9.2.2
Project manpower pie charts
To have a visual image of the hours spent in a project for a selected period grouped by users or
WP’s, select Tools tab; then, Graphics tab and, finally, Project manpower Pie Charts tab.
This option is available to the Human Resources manager and project mangers.
The following form will appear.
Figure 118: Project manpower pie charts form
151
MANATEE User Manual
Issue 1.D
!
!
Fill the following fields (all mandatory fields are marked with a star):
"
Project: Select a project in the list. If the login user is the Human
Resources manager or the administrator, all projects will be available. If the
login user is any other user, only project managed by the login user will be
available.
"
Period start date: Introduce a starting date for the period to be displayed.
"
Period end date: Introduce an ending date for the period to be displayed.
"
Group by: Select how the information must be group. There two options
by Users (the hours spent by each person associated to the project will be
displayed) or by WP’s (the hours spent in each WP’s defined in the project
will be displayed).
Click OK
The project manpower pie charts will be displayed.
Figure 119: Power manpower pie charts example
The upper one shows the real spent hours distribution and the lower one shows the planned
spent hour distribution grouped by users or WP (as selected) and for the selected period.
The charts can be saved, printed or their properties modified as described in section 6.1.7.3.
9.2.3
Cash flow charts
To have a visual image of the cash flow for a selected period, select Tools tab; then, Graphics
tab and, finally, Cash Flow Charts tab.
This option is available to the Human Resources manager and project mangers.
152
MANATEE User Manual
Issue 1.D
The following form will appear.
Figure 120: Cash flow charts form
!
!
Fill the following fields (all mandatory fields are marked with a star):
"
Period start date: Introduce a starting date for the period to be displayed.
"
Period end date: Introduce an ending date for the period to be displayed.
"
Group by: Select an option between the following ones:
o
All projects, to display the total organization cash flow.
o
A project, to display the cash flow in a particular project. Select a
project in the list. If the login user is the Human Resources manager
or the administrator, all projects will be available. If the login user
is any other user, only project managed by the login user will be
available.
Click OK
The cash flow chart will be displayed.
153
MANATEE User Manual
Issue 1.D
Figure 121: Cash flow charts example
The graph can be printed, saved or its properties modified as described in section 6.1.7.3.
9.2.4
Total budget charts
To have a visual image of the total spent and planned budget, select Tools tab; then, Graphics
tab and, finally, Total budget Charts tab.
This option is available to the Human Resources manager and project mangers.
The following form will appear.
154
MANATEE User Manual
Issue 1.D
Figure 122: Total budget charts form
!
!
Fill the following fields (all mandatory fields are marked with a star):
"
All project: Select this option to display the spend budget (considering the
manpower as reported in PTR’s and other resources expenses as reported in
WBS reports) and the planned budget (considering the manpower and other
resources as planned in the WBS’s) for each project.
"
A project: Select this option to display the spend budget (considering the
manpower as reported in PTR’s and other resources expenses as reported in
WBS reports) and the planned budget (considering the manpower and other
resources as planned in the WBS’s) for each WP in the selected project. The
project must be selected in the combo box. If the login user is the Human
Resources manager or the administrator, all projects will be available. If the
login user is any other user, only project managed by the login user will be
available.
Click OK
The total budget chart will be displayed.
155
MANATEE User Manual
Issue 1.D
Figure 123: Total budget chart example
The graph can be saved, printed or its properties modified as described in section 6.1.7.3.
156
MANATEE User Manual
Issue 1.D
10 CHECKING NOTIFICATIONS
MANATEE displays the internal notifications to the users in two ways:
"
There is a column in the left part of all MANATEE main pages where a summary of all
users’ notifications is displayed.
"
A notification list where the complete notification text is displayed can be found
clicking the User Tools tab and, then, Notification tab.
In order to manage the notifications, MANATEE provides the following functionality:
"
Display the notification list.
"
Delete notifications one by one.
"
Delete all notifications
10.1 Displaying the notification list
To display all the information about the notifications, select User Tools tab and, then,
Notification tab.
The complete list of notifications that the current user has received will be displayed.
Figure 124: Notification List
As shown in the figure, the following issues could be available for each notification in the list:
"
Subject: A short text that describes the action that is reported in the notification.
"
Notification: The full text of the notification.
"
Date: The date when the notification was sent.
"
Delete: The delete button allows deleting the notification.
157
MANATEE User Manual
Issue 1.D
The notifications are always arranged by the sending date, from the most recent date to the
oldest one.
Each screen will show 10 notifications, to move among the screens select the other pages
numbers or use the arrows that appear in the bottom of the notification list.
Figure 125: Page selectors
10.2 Deleting notifications
After deciding which notification is going to be deleted, click the delete button of this
notification.
The notification will be deleted.
Note: If the delete button of the desired notification is not enabled, go to the section 13 which
provides some guides to troubleshooting problems.
10.3 Deleting all notifications
If the user wants to remove all notifications, it can be done by clicking the delete all
notifications button that appears at the bottom right corner of the notification list page.
All notifications will be deleted.
Note: If the delete all notifications button of the desired notification is not enabled, go to the
section 13 which provides some guides to troubleshooting problems.
158
MANATEE User Manual
Issue 1.D
11 USERS MANAGEMENT
Users must be first registered in MANATEE to be able to log into the application.
As Users management, MANATEE provides the following functionality:
"
Create a new user
"
Modify the properties of a user
"
Deactivate or activate an user access to MANATEE (i.e., MANATEE is usually used
integrated with DOCMA, FRACTAL Documentation Management Tool. Both
applications use the same database. So, the users created in DOCMA or MANATEE
could have access to both applications or, only, to DOCMA depending if the access to
MANATEE is activated or not).
"
Activate the PTR option for a user (i.e., this user should start to fill weekly his/her
PTR’s).
"
Unsubscribe a user
It is important to remember that only the Administrator has the access rights to create new users,
to unsubscribe the existing ones to deactivate the MANATEE access and to activate the PTR
option. Otherwise, each user can see their own profile and modify his/her properties.
11.1 Creating a new user
To start working with users, select Users tab and, then again, Users tab in the bar below.
In order to create a new user, select New User tab. Only the Administrator can create new users.
The following form will appear.
Figure 126: Creating a user page
159
MANATEE User Manual
Issue 1.D
!
!
Fill the following fields (all mandatory fields are marked with a star):
"
Name: Introduce the first name of the user. This is a text field and the
maximum length of this field is 45 characters.
"
Surname (1): Introduce the surname of the user. This is a text field and the
maximum length of this field is 45 characters.
"
Surname (2): Introduce the second surname of the user (if exists). This is a
text field and the maximum length of this field is 45 characters.
"
e-mail: Introduce the e-mail address of the user. This is a text field and the
maximum length of this field is 45 characters.
"
User: Introduce a user name for logging into DOCMA. This is a text field
and the maximum length of this field is 15 characters.
"
Password: Introduce a password for logging into DOCMA whenever using
the user name introduced in the previous text field. This is a text field and
the maximum length of this field is 32 characters.
"
Confirmation: Introduce again the same password (as done in the previous
text field). This is a text field and the maximum length of this field is 32
characters.
"
Organization: Introduce the name of the Organization to which the user
belongs. This is a text field and the maximum length of this field is 45
characters.
"
Location: Introduce the user’s address. This is a text field and the
maximum length of this field is 45 characters.
"
Phone: Introduce the user’s phone number. This is a text field and the
maximum length of this field is 45 characters.
"
Mobile: Introduce the user’s mobile number. This is a text field and the
maximum length of this field is 45 characters.
Click add user.
The user will be created.
An e-mail will be also sent to the Administrator and to the new user in order to inform them
about the creation of the user.
“You have been registered in MANATEE. Your password is (password)”
Note: If, for any reason, the user can not be created, go to the section 13 which provides some
guides to troubleshooting problems.
11.2 Searching users
To start looking for users, select Users tab.
This option is only available to the Administrator.
160
MANATEE User Manual
Issue 1.D
Figure 127: Users list.
As shown in the figure, the following issues could be available for each user in the list:
"
Name: The name of the user.
"
Modify: The modify button allows modifying the user properties.
"
Unsubscribe: The unsubscribe button allows unsubscribe the user from the system.
"
Delete: The delete button allows delete the user completely from the system.
"
Deactivate MANATE or activate MANATE: The deactivate or activate button allows
deactivate or activate the user from the system (see 11.5).
"
Activate PTR or modify activate PTR: The activate PTR or modify activate PTR
allows activate or modify activate PTR (see 11.6)
The actions buttons of some users will not be enabled (i.e., they will be displayed as greyed out)
according to the users role (i.e., special user such as the Human Resources, Quality Control and
admin cannot be unsubscribed or deleted).
Non-special users are always arranged by the name.
Each screen will show 10 users, to move among the screens select the other pages numbers or
use the arrows that appear in the bottom of the user list.
Figure 128: Page selectors
In order to search a particular user or to constrain the number of user to be displayed, select
Search User tab.
The following form will appear.
161
MANATEE User Manual
Issue 1.D
Figure 129: Search users form
!
Fill as many fields as desired in order to filter the user list.
"
Name: Introduce any number of alphanumerical characters (this is not case
sensitive); any user which contains this sequence of characters in its name
will be selected.
"
Surname (1): Introduce any number of alphanumerical characters (this is
not case sensitive); any user which contains this sequence of characters in
its surname (1) will be selected.
"
Surname (2): Introduce any number of alphanumerical characters (this is
not case sensitive); any user which contains this sequence of characters in
its surname (2) will be selected.
"
E-mail: Introduce any number of alphanumerical characters (this is not
case sensitive); any user which contains this sequence of characters in its email will be selected.
"
User: Introduce any number of alphanumerical characters (this is not case
sensitive); any user which contains this sequence of characters in its user
will be selected.
"
Organization: Introduce any number of alphanumerical characters (this is
not case sensitive); any user which contains this sequence of characters in
its organization will be selected.
"
Location: Introduce any number of alphanumerical characters (this is not
case sensitive); any user which contains this sequence of characters in its
location will be selected.
"
Phone: Introduce any number of alphanumerical characters (this is not case
sensitive); any user which contains this sequence of characters in its phone
will be selected.
162
MANATEE User Manual
Issue 1.D
"
!
Mobile: Introduce any number of alphanumerical characters (this is not
case sensitive); any user which contains this sequence of characters in its
mobile will be selected
Click search.
A new user list will be displayed taken all the filtering constrains introduced into account (i.e.,
the filtered users match all constrains introduced).
Example:
The admin is searching all users included which name starts as "de" and which
organization starts as "frac"
Then, the Search form must be filled as shown in the figure below
Figure 130: Example of a filled search user form
and the list of users displayed would be the following one.
163
MANATEE User Manual
Issue 1.D
Figure 131: Example of a filtered users list
Note: If the desired user does not appear in any screen, go to section 13 which provides some
guides to troubleshooting problems.
11.3 Modifying the properties of an User
First, the user, which properties are going to be modified, must be displayed, select Users tab
and, then again, Users tab in the bar below.
The Administrator will see all users created into the system, which are ordered alphabetically by
the first surname.
Each screen will show 10 users, to move among the screens select the other pages numbers or
use the arrows that appear in the bottom of the users list.
Figure 132: Page selectors
Any other user will see only his/her own user.
Once the user which properties are going to be modified is displayed, click the modify button.
The following form will appear.
164
MANATEE User Manual
Issue 1.D
Figure 133: Modifying the user properties page
!
Modify the desired fields (taken into account constrains listed in section 11.1).
Only the fields that are not greyed out can be modified.
!
Click update.
The user properties will be modified.
An e-mail will be also sent to the Administrator and to the user which properties have been
modified in order to inform them about the modification of the user properties.
“The User's properties have been modified”
As a particular case, when the password is modified, an e-mail will be sent in addition to the
previous one to the Administrator and to the user which password has been modified as follows:
“Your password has been modified”
Note: If, for any reason, the user properties can not be modified, go to the section 13 which
provides some guides to troubleshooting problems.
11.4 Unsubscribing an User
First, the user that is going to unsubscribe must be displayed, select Users tab and, then again,
Users tab in the bar below.
The Administrator will see all users created into the system, which are ordered alphabetically by
the first surname.
Each screen will show 10 users, to move among the screens select the other pages numbers or
use the arrows that appear in the bottom of the users list.
165
MANATEE User Manual
Issue 1.D
Figure 134: Page selectors
Once the user that is going to unsubscribed is displayed, click the unsubscribe button.
An e-mail will be also sent to the Administrator and to the user which has been unsubscribed in
order to inform them about the action done.
“You have been unregistered in MANATEE.”
The user will be unsubscribed. It means, the user cannot log again into the system and his/her
name cannot be selected anymore in the user’s list but his/her name will not disappear of the
system in order to maintain the history of the documents.
Note: The User will still appear in the left person lists of the projects where he had a
role before but greyed out (i.e., he/she can not selected anymore). The User will also
still appear in the right person lists of the projects where he had a role before. If he/she
is removed of the right person lists, he/she cannot be selected again.
Note: If, for any reason, the user can not be unsubscribed, go to the section 13 which provides
some guides to troubleshooting problems.
11.5 Deactivate or activate the user access to MANATEE
The users created in MANATEE have access to MANATEE. The access of those users to
MANATEE can be deactivated using the deactivate button as explained in this section.
The Users created in DOCMA do not have access to MANATEE. The access of those users to
MANATEE can be activated using the activate button as explained in this section.
The user access to MANATEE can be activated or deactivated any time.
First, the user, which access to MANATEE is going to be deactivated or activated, must be
displayed, select Users tab and, then again, Users tab in the bar below.
The Administrator will see all users created into the system, which are ordered alphabetically by
the first surname.
Each screen will show 10 users, to move among the screens select the other pages numbers or
use the arrows that appear in the bottom of the users list.
Figure 135: Page selectors
Once the user, which access to MANATEE is going to deactivated, is displayed, click the
deactivate MANATEE button.
The following form will appear:
166
MANATEE User Manual
Issue 1.D
Figure 136: Deactivate MANATEE form.
!
Click again deactivate MANATEE.
The user cannot log into MANATEE.
Once the user, which access to MANATEE is going to activated, is displayed, click the activate
MANATEE button.
The following form will appear:
Figure 137: Activate MANATEE form.
!
Click again activate MANATEE.
The user can log into MANATEE.
Note: If, for any reason, the user access to MANATEE cannot be deactivated or activated, go to
the section 13 which provides some guides to troubleshooting problems.
167
MANATEE User Manual
Issue 1.D
11.6 Activate PTR
First, the user, which is going to start filling the PTR’s, must be displayed, select Users tab and,
then again, Users tab in the bar below.
The Administrator will see all users created into the system, which are ordered alphabetically by
the first surname.
Each screen will show 10 users, to move among the screens select the other pages numbers or
use the arrows that appear in the bottom of the users list.
Figure 138: Page selectors
Once the user, which is going to start filling the PTR’s, is displayed, click the activate PTR
button.
Note: A user must have access (to be activated) in MANATEE before this option is
enabled.
The following form will appear:
Figure 139: Activate PTR form.
!
Fill the following field (all mandatory fields are marked with a star):
"
!
Date: Introduce any date of the week when the user must start to fill the
PTR’s.
Click activate PTR.
The PTR option will be activated for the selected user.
Note: If, for any reason, the PTR cannot be activated for the selected user, go to the section 13
which provides some guides to troubleshooting problems.
168
MANATEE User Manual
Issue 1.D
11.7 Deleting an User
Once the User, which is going to be deleted, is displayed, which can be done following the steps
described in the section 11.2, click the delete button.
Only the Administrator has the access rights to delete the user.
The following window displaying the User properties will appear.
Figure 140: User properties view
!
Click delete.
If the user is author, reviewer and/or approver of some documents a warning will be displayed
to the Administrator.
Figure 141: Warning before deleting a user that the user is author, reviewer and/or approver of some
documents.
If the warning is accepted, the users shall be completely removed from the system.
169
MANATEE User Manual
Issue 1.D
12 MANATEE ADMINISTRATION
MANTEE provides the tools needed to manage the MANTEE import WBS’s, backups and
restores.
12.1 Tools
12.1.1 Import WBS’s
A set of WBS’s can be imported in a row in MANATEE using the import WBS’s tool.
To make use of this functionality, select Administration tab, then Tools tab and finally Import
WBS’s tab. Only the MANATEE administrator can use this functionality.
The following form will appear:
Figure 142: Importing WBS’s
As explained in the form, the text file, where the information about each particular WBS is
included, must be prepared before filling the import WBS’s form.
A template of this text file is available in the import WBS’s page (see note at the page bottom).
Please, follow the instructions included in template file to fill it correctly. Once the template file
has been filled, the text file, which will be finally imported, must be generated as follows (this
instruction are provided for OpenOffice Calc, a similar sequence could be used with other
application in order to generate the text file with the required format):
"
In the Archive menu, select Save as and the “CSV text” filter.
"
Select “Kept current format”.
"
Choose “Unicode (UTF-8)” as character set, “{Tab}” as field delimiter and “`” as text
delimiter.
Once the text file is prepared, we can proceed to import the WBS´s as follows:
170
MANATEE User Manual
Issue 1.D
!
!
Fill the following field (mandatory fields are marked with a star):
"
Choose the operative system used to generate the text file: Select an
operative system (Windows, Linux or Mac Os) in the list.
"
Choose the text file: Introduce the path and name of the text file directly in
the text box or click in the Choose File button to select it using the
Document explorer.
Click import WBS records.
The WBS´s will be imported.
12.1.2 Import WP’s
A set of WP’s can be imported in a row in MANATEE using the import WP’s tool.
To make use of this functionality, select Administration tab, then Tools tab and finally Import
WP’s tab. Only the MANATEE administrator can use this functionality.
The following form will appear:
Figure 143: Importing WP’s
As explained in the form, the text file, where the information about each particular WP is
included, must be prepared before filling the import WP’s form.
A template of this text file is available in the import WP’s page (see note at the page bottom).
Please, follow the instructions included in template file to fill it correctly. Once the template file
has been filled, the text file, which will be finally imported, must be generated as follows (this
instruction are provided for OpenOffice Calc, a similar sequence could be used with other
application in order to generate the text file with the required format):
"
In the Archive menu, select Save as and the “CSV text” filter.
"
Select “Kept current format”.
171
MANATEE User Manual
Issue 1.D
"
Choose “Unicode (UTF-8)” as character set, “{Tab}” as field delimiter and “`” as text
delimiter.
Once the text file is prepared, we can proceed to import the WP´s as follows:
!
!
Fill the following field (mandatory fields are marked with a star):
"
Choose the operative system used to generate the text file: Select an
operative system (Windows, Linux or Mac Os) in the list.
"
Choose the text file: Introduce the path and name of the text file directly in
the text box or click in the Choose File button to select it using the
Document explorer.
Click import WP records.
The WP´s will be imported.
12.1.3 Import Milestones
A set of milestones can be imported in a row in MANATEE using the import milestones tool.
To make use of this functionality, select Administration tab, then Tools tab and finally Import
Milestones tab. Only the MANATEE administrator can use this functionality.
The following form will appear:
Figure 144: Importing Milestones
As explained in the form, the text file, where the information about each particular milestone is
included, must be prepared before filling the import Milestones form.
A template of this text file is available in the import Milestones page (see note at the page
bottom). Please, follow the instructions included in template file to fill it correctly. Once the
template file has been filled, the text file, which will be finally imported, must be generated as
172
MANATEE User Manual
Issue 1.D
follows (this instruction are provided for OpenOffice Calc, a similar sequence could be used
with other application in order to generate the text file with the required format):
"
In the Archive menu, select Save as and the “CSV text” filter.
"
Select “Kept current format”.
"
Choose “Unicode (UTF-8)” as character set, “{Tab}” as field delimiter and “`” as text
delimiter.
Once the text file is prepared, we can proceed to import the milestones as follows:
!
!
Fill the following field (mandatory fields are marked with a star):
"
Choose the operative system used to generate the text file: Select an
operative system (Windows, Linux or Mac Os) in the list.
"
Choose the text file: Introduce the path and name of the text file directly in
the text box or click in the Choose File button to select it using the
Document explorer.
Click import Milestones records.
The Milestones will be imported.
12.2 Backups Management
MANATEE provides you with a backup tool.
As Backups management, MANATEE provides the following functionality:
"
Backup the MANATEE Database
"
Backup the MANATEE Web Application
It is important to remember that only the Administrator has the access rights to manage the
MANATEE backups.
12.2.1 MANATEE Database Backup
To start working with backups, select Backups tab.
In order to make the MANATEE database backup, select Database backup tab. Only the
Administrator can make the database backup.
The following form will appear.
173
MANATEE User Manual
Issue 1.D
Figure 145: Making MANATEE database Backup
!
Click execute database backup.
The database backup will be made.
Note: If, for any reason, the database backup cannot be made, go to the section 13 which
provides some guides to troubleshooting problems.
12.2.2 MANATEE Documentation Backup
To start working with backups, select Backups tab.
In order to make the MANATEE documentation backup, select Documentation backup tab.
Only the Administrator can make the documentation backup.
The following form will appear.
174
MANATEE User Manual
Issue 1.D
Figure 146: Making MANATEE documentation Backup
!
Click execute documentation backup.
The documentation backup will be made.
Note: If, for any reason, the documentation backup cannot be made, go to section 13 which
provides some guides to troubleshooting problems.
12.2.3 MANATEE Web Application Backup
To start working with backups, select Backups tab.
In order to make the MANATEE Web application backup, select Web application backup tab.
Only the Administrator can make the Web application backup.
The following form will appear.
175
MANATEE User Manual
Issue 1.D
Figure 147: Making MANATEE Web application Backup
!
Click execute web application backup.
The Web application backup will be made.
Note: If, for any reason, the Web application backup can not be made, go to the section 13
which provides some guides to troubleshooting problems.
12.3 Restores
This tool is not integrated in the MANATEE Web Application because it needs to be
independent to MANATEE crashes.
In order to restore MANATEE, you must open the MANATEE Restore Java application.
To Start the MANATEE Restore application you must execute in a terminal the following
commands:
cd $MANATEERESTORE_HOME
java -jar MANATEERestore.jar
Once MANATEE Restore is executed, the following Main window will appear:
176
MANATEE User Manual
Issue 1.D
Figure 148: MANATEE Restore Main window
12.3.1 MANATEE Database Restore
Be sure you have installed and running the MySQL server service before restore MANATEE
database.
Starting at the Main Window of the application,
Figure 149: MANATEE Restore Main window
The following steps must be executed in order to restore MANATEE database:
A. Open the MANATEE Database Restore dialog:
In the Main window, the MANATEE database restore dialog can be opened in two different
ways:
A.I.
Going through the Restores Menu.
In the Main window, select Restores Menu ! MANATEE Database Restore or press
ALT+R+D.
The MANATEE Database restore dialog will be opened.
177
MANATEE User Manual
Issue 1.D
A.II.
Selecting the MANATEE Database Restore button.
In the Main window, click MANATEE Database Restore button.
The MANATEE Database restore dialog will be opened.
Figure 150: MANATEE Database Restore window
B. Fill the information about the MySQL server, the server name (networking name
or IP) as well as the MANATEE database backup file.
In the MANATEE Database Restore dialog (see fig. 141):
!
Introduce the MySQL Server workdir or select it from a Open dialog by clicking the
… button,
Figure 151: Open dir window
!
Introduce Server name
!
Introduce Database name
178
MANATEE User Manual
Issue 1.D
!
Introduce MySQL port
!
Introduce MySQL root user
!
Introduce MySQL root password
!
Introduce the MANATEE database backup file or select it from a Open dialog by
clicking the … button,
Figure 152: Open file window
!
Click OK
C. One of the following information windows will appear.
If MANATEE database were restored, it will appear:
Figure 153: Information confirmation MANATEE database restore
If MANATEE database were not restored, the following window will appear:
Figure 154: Information error DOCMA database restore
12.3.2 MANATEE MySQL Users Restore
For any database in MySQL, there are MySQL users that have different permissions through
this database.
In this case, the MANATEE database has defined two users:
179
MANATEE User Manual
Issue 1.D
# user_m -> this user have SELECT, INSERT, UPDATE, DELETE, CREATE, DROP,
INDEX, ALTER permissions through MANATEE database.
# user_l -> this user have SELECT permission through MANATEE database.
Only in the case that you have to reinstall the MySQL Server in you server computer, you will
have to restore the MANATEE MySQL users.
Be sure you have installed and running the MySQL server service before restoring MANATEE
MySQL users.
Starting at the Main Window of the application,
Figure 155: MANATEE Restore Main window
The following steps must be executed in order to restore MANATEE MySQL users:
A. Open the MANATEE MySQL users Restore dialog:
In the Main window, the MANATEE MySQL users restore dialog can be opened in two
different ways:
A.I.
Going through the Restores Menu.
In the Main window, select Restores Menu ! MySQL users Restore or press
ALT+R+M.
The MANATEE MySQL users restore dialog will be opened.
A.II.
Selecting the MANATEE MySQL Users Restore button.
In the Main window, click MANATEE MySQL Users Restore button.
The MANATEE MySQL users dialog will be opened.
180
MANATEE User Manual
Issue 1.D
Figure 156: MANATEE MySQL Users Restore window
B. Fill the information about the MySQL server as well as the server name
(networking name or IP)
In the MANATEE MySQL Users Restore dialog (see fig. 147):
!
Introduce the MySQL Server workdir or select it from a Open dialog by clicking the
… button,
Figure 157: Open dir window
!
Introduce Server name
!
Introduce Database name
!
Introduce MySQL port
!
Introduce MySQL root user
!
Introduce MySQL root password
181
MANATEE User Manual
Issue 1.D
!
Click OK
C. One of the following information windows will appear.
If MySQL users were restored, the following window will appear:
Figure 158: Information confirmation MySQL users restore
If MySQL users were not restored, the following window will appear:
Figure 159: Information error MySQL users restore
12.3.3 MANATEE Web Application Restore
Be sure you have installed Tomcat server (see section 3.3) before restore MANATEE Web
Application.
After restore MANATEE Web application configure the tomcat server (see section 3.4).
Starting at the Main Window of the application,
Figure 160: MANATEE Restore Main window
The following steps must be executed in order to restore MANATEE Web Application:
A. Open the MANATEE Web Application restore dialog:
182
MANATEE User Manual
Issue 1.D
In the Main window, the MANATEE Web Application restore dialog can be opened in two
different ways:
A.I.
Going through the Restores Menu.
In the Main window, select Restores Menu ! MANATEE Web application Restore or
press ALT+R+W.
The MANATEE Web application restore dialog will be opened.
A.II.
Selecting the MANATEE Web application Restore button.
In the Main window, click MANATEE Web application Restore button.
The MANATEE Web application Restore dialog will be opened.
Figure 161: MANATEE Web application Restore window
B. Fill the information about the MANATEE Web application backup file as well as
the MANATEE Web application workdir ($MANATEE_HOME).
In the MANATEE Web Application Restore dialog (see fig. 152):
!
Introduce the MANATEE Web application backup file or select it from a Open dialog
by clicking the … button,
Figure 162: Open file window
183
MANATEE User Manual
Issue 1.D
!
Introduce the MANATEE Web application workdir or select it from a Open dialog by
clicking the … button,
Figure 163: Open dir window
!
Click OK
C. One of the following information windows will appear.
If MANATEE Web application were restored, the following window will appear:
Figure 164: Information confirmation MANATEE Web application restore
If MANATEE Web application were not restored, the following window will appear:
Figure 165: Information error MANATEE Web application restore
12.3.4 MANATEE Documentation Restore
Be sure you restored MANATEE Web Application before restore MANATEE Documentation.
Starting at the Main Window of the application,
184
MANATEE User Manual
Issue 1.D
Figure 166: MANATEE Restore Main window
The following steps must be executed in order to restore MANATEE Documentation:
D. Open the MANATEE Documentation restore dialog:
In the Main window, the MANATEE Documentation restore dialog can be opened in two
different ways:
D.I.
Going through the Restores Menu.
In the Main window, select Restores Menu ! MANATEE Documentation Restore or
press ALT+R+W.
The MANATEE Documentation restore dialog will be opened.
D.II.
Selecting the MANATEE Documentation Restore button.
In the Main window, click MANATEE Documentation Restore button.
The MANATEE Documentation Restore dialog will be opened.
Figure 167: MANATEE Documentation Restore window
185
MANATEE User Manual
Issue 1.D
E. Fill the information about the MANATEE Documentation backup file as well as
the MANATEE Web application workdir ($MANATEE_HOME).
In the MANATEE Documentation Restore dialog (see fig. 158):
!
Introduce the MANATEE Documentation backup file or select it from a Open dialog
by clicking the … button,
Figure 168: Open file window
!
Introduce the MANATEE Web application workdir or select it from a Open dialog by
clicking the … button,
Figure 169: Open dir window
!
Click OK
F. One of the following information windows will appear.
If MANATEE Documentation were restored, the following window will appear:
186
MANATEE User Manual
Issue 1.D
Figure 170: Information confirmation MANATEE Documentation restore
If MANATEE Documentation were not restored, the following window will appear:
Figure 171: Information error MANATEE Documentation restore
12.3.5 MANATEE Full Restore
Be sure you have installed and running the MySQL server service and Tomcat server (see
section 3.3) before restore MANATEE.
After restore MANATEE configure the tomcat server (see section 3.4).
Starting at the Main Window of the application,
Figure 172: MANATEE Restore Main window
The following steps must be executed in order to restore MANATEE:
A. Open the MANATEE Full Restore Step 1 dialog:
In the Main window, the MANATEE Full restore dialog can be opened in two different
ways:
A.I.
Going through the Restores Menu.
187
MANATEE User Manual
Issue 1.D
In the Main window, select Restores Menu ! MANATEE Full Restore or press
ALT+R+F.
The first MANATEE restore dialog will be opened.
A.II.
Selecting the MANATEE Full Restore button.
In the Main window, click MANATEE Full Restore button.
The first MANATEE restore dialog will be opened.
Figure 173: MANATEE Full Restore: Step 1 window
B. Fill the information about the MySQL server, the server name (networking name
or IP) as well as the MANATEE database backup file.
In the MANATEE Full Restore Step1 dialog (see fig. 164):
!
Introduce the MySQL Server workdir or select it from a Open dialog by clicking the
… button,
188
MANATEE User Manual
Issue 1.D
Figure 174: Open dir window
!
Introduce Server name
!
Introduce Database name
!
Introduce MySQL port
!
Introduce MySQL root user
!
Introduce MySQL root password
!
Introduce the MANATEE database backup file or select it from a Open dialog by
clicking the … button,
Figure 175: Open file window
!
Click OK
C. One of the following information windows will appear.
If MANATEE database were restored, the following dialog will appear that must be
accepted to go to the next step (see D).
189
MANATEE User Manual
Issue 1.D
Figure 176: Information confirmation MySQL users and MANATEE database restore
If MANATEE database were not restored, the following dialog will appear to indicate
that the MANATEE Full restore is interrupted.
Figure 177: Information error MySQL users and MANATEE database restore
D. MANATEE Full Restore Step 2 dialog will appear:
Figure 178: MANATEE Full Restore: Step 2 window
E. Fill the information about the MANATEE Web application backup file as well as
the MANATEE Web application workdir ($MANATEE_HOME).
In the MANATEE Full Restore Step 2 dialog (see fig. 169):
!
Introduce the MANATEE Web application backup file or select it from a Open dialog
by clicking the … button,
190
MANATEE User Manual
Issue 1.D
Figure 179: Open file window
!
Introduce the MANATEE Web application workdir or select it from a Open dialog by
clicking the … button,
Figure 180: Open dir window
!
Click OK
F. One of the following information windows will appear.
If MANATEE Web application were restored, the following dialog will appear.
Figure 181: Information confirmation MANATEE Web application restore
If MANATEE Web application were not restored, the following window will appear to
indicate that the MANATEE Full restore is interrupted.
191
MANATEE User Manual
Issue 1.D
Figure 182: Information error MANATEE Web application restore
G. MANATEE Full Restore Step 3 dialog will appear:
Figure 183: MANATEE Full Restore: Step 3 window
H. Fill the information about the MANATEE Documentation backup file as well as
the MANATEE Web application workdir ($MANATEE_HOME).
In the MANATEE Full Restore Step 3 dialog (see fig. 174):
!
Introduce the MANATEE Documentation backup file or select it from a Open dialog
by clicking the … button,
Figure 184: Open file window
!
Introduce the MANATEE Web application workdir or select it from a Open dialog by
clicking the … button,
192
MANATEE User Manual
Issue 1.D
Figure 185: Open dir window
!
Click OK
I. One of the following information windows will appear.
If MANATEE Documentation were restored, the following dialog will appear.
Figure 186: Information confirmation MANATEE Documentation restore
If MANATEE Documentation were not restored, the following window will appear to
indicate that the MANATEE Full restore is interrupted.
Figure 187: Information error MANATEE Web application restore
193
MANATEE User Manual
Issue 1.D
13 TROBLESHOOTING
In this section, some guidelines are provided to help user troubleshooting the problems that can
be encountered.
1. A new user, project or any other item can not be created
This problem could happen whenever the user is trying to add a new user, project or any
other item without filling all mandatory fields, which are identified with an “*”.
2. The properties of an existing user, project or any other item can not be modified
This problem could happen whenever the user is trying to modify the information
included in the item without taking into account constrains associated to each field.
Check the field’s definition in each section.
3. The desired project can not be displayed
If the user is not able to find a particular project, it could happen that this user have not
the required access rights. Check with the Administrator or the Project managers of that
particular project that the user has been authorized to this project (as Project manager,
Authorized to all documents or Authorized only to approved version).
4. The desired item (WP, WBS, etc.) can not be displayed
If the user is not able to find a particular item, it could happen that this user have not the
required access rights to visualize the associated project. Check with the Administrator
or the Project manager of the project associated to this item that the user has been
authorized to this project (Authorized to all documents or Authorized only to approved
version).
5. The desired button is not enabled or not displayed
If a user wants to do a particular action and the desired button is not enabled or not
displayed, the following questions can be raised:
"
Has the user the access rights to do this action?
i. Check again the information about permissions given to perform this
particular action in the corresponding section. The role that must have a
user before performing an action is indicated in the section where each
particular action is described.
ii. Check with the Project manager or with the Administrator to confirm
that the user has the access rights to perform the desired action.
"
Is the project or item currently in a status that allows doing this action?
i. Projects and items have constrains as described in the corresponding
sections (where the actions that can be performed in relation with each
item are detailed). Each action can be done only if the initial status is
the one expected by the application. Check again in the corresponding
step that the initial status that must have the item before doing the
action is the right one.
194
MANATEE User Manual
Issue 1.D
14 SETTING-UP MANATEE
MANATEE gives some flexibility to establish the way that the data codes are defined.
Whenever an Organization starts to use MANATEE, the Organization must decide how they
want the codification convention for the code of the information managed by MANATEE and
these decisions will be inserted in MANATEE database and used as constrains during the life of
each particular application.
In this section, we describe the rules and restrictions to define the code conventions. It is
important to mention that once they are established, they must not be changed afterwards, to
avoid any incoherencies in the data.
WP code follows the pattern described bellow:
WP-PC-n
where,
-: separator
PC: Project Code
n: Sequence number that will be automatically generated by the application
The user must define:
o
The character to be used as separator inside the WP code. In this example and
along this manual, we have selected the “-”. The only character no allowed is
“%”.
195