1
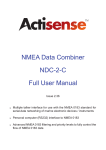
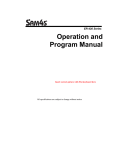
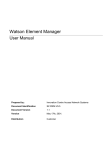
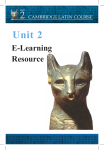
Skillsbank User Manual CONTENT ENDUSER ............................................................................................................................................. 3 1. How to enter Skillsbank .............................................................................................................. 3 2. How to change language and personal details ........................................................................... 4 3. How to add education/courses and work experience into Skillsbank ......................................... 4 4. How to get an overview of the qualifications units in Skillsbank................................................ 5 5. How to see offered courses linked to your qualification ............................................................. 5 6. How to upload documents ........................................................................................................... 6 7. How Recognition of Prior Learning (RPL) assessment is done in Skillsbank ............................ 7 8. How to get an overview of RPL Assessment ............................................................................... 8 9. How to see the qualification matrixes displayed......................................................................... 8 MENTOR .............................................................................................................................................. 9 10. How to enter Skillsbank ........................................................................................................ 10 11. How to change language and personal details in Skillsbank ............................................... 10 12. How to see education/courses and work experience of the Users ........................................ 11 13. How to see courses registered .............................................................................................. 11 14. How to get an overview of User’s details ............................................................................. 12 15. How to get an overview of the qualifications units in Skillsbank.......................................... 12 16. How to see documents uploaded by Users ............................................................................ 13 17. How to see the qualification matrixes displayed................................................................... 13 ASSESSOR .......................................................................................................................................... 15 18. How to enter Skillsbank ........................................................................................................ 15 19. How to change language and personal details ..................................................................... 15 20. How to get an overview of the qualifications units in Skillsbank.......................................... 16 21. How to make a Recognition of Prior Learning (RPL) assessment of a User........................ 16 1 22. How to get an overview of RPL Assessment ......................................................................... 17 COMPETENT BODY ........................................................................................................................ 18 23. How to enter Skillsbank ........................................................................................................ 18 24. How to change language and the login details of the organisation...................................... 19 25. How to add new qualifications.............................................................................................. 20 26. How to register new learning outcomes ............................................................................... 21 27. How to link qualification units to learning outcomes ........................................................... 23 28. How to register new organisations ....................................................................................... 24 29. How to register new Assessors.............................................................................................. 25 30. How to add Recognition of Prior Learning (RPL) assessment questions ............................. 25 31. How to see the qualification matrixes displayed................................................................... 26 32. How to translate qualifications in Skillsbank ....................................................................... 27 33. How to translate learning outcomes in Skillsbank............................................................... 28 INSTITUTION .................................................................................................................................... 30 34. How to enter Skillsbank ........................................................................................................ 30 35. How to change language and the login details of the organisation...................................... 31 36. How to register courses you are offering into Skillsbank ..................................................... 31 37. How to register new Mentors into Skillsbank ....................................................................... 32 38. How to register new Users into Skillsbank ........................................................................... 33 39. How to get an overview of RPL Assessment ......................................................................... 33 40. How to see the qualification matrixes displayed................................................................... 33 COURSE PROVIDER........................................................................................................................ 35 41. How to enter Skillsbank ........................................................................................................ 35 42. How to change language and the login details of the organisation...................................... 36 43. How to get an overview of the qualifications units in Skillsbank.......................................... 36 44. How to register courses you are offering into Skillsbank ..................................................... 37 2 ENDUSER Dear User, welcome to Skillsbank! 1. How to enter Skillsbank Login screen: o In order to access the database, you must have been given a login ID and password by the school, organisation or training centre you belong to. o If you were given access, but you have lost your password, click ‘my password is lost!’ fill in your email address, click the send button, and a new password is sent to you. When receiving a login, enter login and password, and click ‘Skillsbank login.’ 3 2. How to change language and personal details Home screen: o On the home screen along the top, all the main functions of Skillsbank displayed. There is an option to change the language of your preference of the interface in the top right hand corner. Select your language in the drop down menu. o If you click on your own name beside the log out button in the top right hand corner, you have the option to update your personal details as well as changing your access password. Click ‘save’ to update information. 3. How to add education/courses and work experience into Skillsbank Education screen: o Under the ‘education’ tab you have the option to add all education and courses you have taken. Click the ‘add’ button and fill in the dates of the course or study, school or organisation attended, and the title of the course. Click ‘add’ to save information. If you later want to edit the information you have saved, click the pencil icon and change the information. Furthermore, if you want to delete a whole study or course, click the X icon beside the individual course. Work experience screen: o The tab ‘work experience’ gives you the option to add all work experience and certificates you have accumulated so far. This is done by the same principles as under the education tab. 4 Home screen: o There is a short cut for building your CV in Skillsbank. If you have a LinkedIn profile, there is an option to click the ‘import LinkedIn’ button on the home screen and all your education and work experience already saved in your LinkedIn profile will be displayed in Skillsbank. You can do this instead of filling in everything manually. 4. How to get an overview of the qualifications units in Skillsbank Qualifications search screen: o The ‘qualifications search’ tab gives you the option to get an overview of the content of the qualification of your interest. Tick the dropdown menu and click on the wanted qualification. Then you will get a complete list of all the units in the qualification. Furthermore there is an option to print the whole content by clicking on the ‘print LO selected’ button. All the learning outcomes that are ticked off will be printed. 5. How to see offered courses linked to your qualification 5 Courses screen: o Under the next tab, courses registered by a course provider are listed. The courses are linked to the qualification of your interest. Search for the specific qualification in the drop down menu, click ‘search’, and the courses offered will be listed. Click on the arrow icon to view the content. Not all qualifications are currently prepared with courses linked to them. When necessary, check your national or sectoral directories of providers and training opportunities. 6. How to upload documents Documents screen: o The documents tab provides for the option to upload documents of your choice. Examples of documents would be supporting material to your education and work experience. Click the button ‘upload,’ select the wanted file already saved on your computer and click ‘save.’ Keep in mind that your mentor will be able to see the documents you have uploaded. 6 7. How Recognition of Prior Learning (RPL) assessment is done in Skillsbank o o o o RPL Assessment screen: The RPL Assessment tab provides for the option for self-assessment of your current qualifications. Not all qualifications are currently prepared with questions for selfassessment, but the learning outcome description will give a good indication of what matters. If you need further explanatory information on what RPL Assessments are, then you might consider taking a look at our introduction material. To use this tab, select your qualification of interest in the first menu, and select the wanted qualifications unit in the next menu. You are then shown a list of all assessment questions to the particular unit. To do the self-assessment consider your own competence according to each question and evaluate yourself. The colour red tick box means that you do not have any knowledge of the field, and green tick box means you are an expert in the field. Tick off either box you feel describes your level of competence. The ‘check assessments’ button ensures you to fill in the whole assessment. The fields that turn yellow are fields that are not filled in yet. When you are finished, click the ‘save assessment’ button. After this, you cannot edit your self-assessment anymore. When saved, your assessor can see your self-assessment scores, however not before he or she has finished the RPL assessment of you. Remember to go through every qualification unit to do the whole assessment. You find them in the select qualification drop down menu. 7 8. How to get an overview of RPL Assessment RPL Assessment summary screen: o The RPL Assessment summary tab provides for the option to see your assessor’s evaluation of you, compared to your self-assessment. Click the menu and find your qualification. Your name will be listed with the self-assessment score, and the score of the assessor. Click on the individual units to see the details of the assessment of every learning outcome. 9. How to see the qualification matrixes displayed Qualifications overview screen: 8 o The qualification overview tab gives you the option to display the whole matrix of the qualifications you are interested in. Select your qualification in the menu, and all the qualification units are displayed. On the right hand side of every unit, you have the option to click on the arrow icon, which then shows you the qualification matrix of the particular unit. In the matrix you can see how learning outcomes are divided into competence, knowledge and skills. For more information on how a qualification matrix is structured, I recommend you to take a look at our introduction materials. MENTOR 9 Dear Mentor, welcome to Skillsbank! 10. How to enter Skillsbank Login screen: o In order to access the database, you must have been given a login ID and password by the institution you belong to. o If you were given access, but you have lost your password, click ‘my password is lost!’ fill in your email address, click the send button, and a new password is sent to you. When receiving a login, enter login and password, and click ‘Skillsbank login.’ 11. How to change language and personal details in Skillsbank Home screen: o On the home screen along the top, you see all the main functions of Skillsbank displayed. There is an option to change the language of your preference of the interface in the top right hand corner. o If you click on your own name beside the log out button in the top right hand corner, you have the option to update your personal details as well as changing your access password. 10 12. How to see education/courses and work experience of the Users Education screen: o Under the ‘education’ tab you have the option to see all the education and courses your Users have attended. Click in the menu and select the wanted User. You will then be presented for the training that particular User has saved into Skillsbank. Work experience screen: o The ‘work experience’ tab is built up by the same principles as the latter tab. You select the wanted User in the menu, and you will be presented to the work experience of the particular User. You will only be able to read it, not edit it. 13. How to see courses registered Courses screen: o Under the next tab, courses registered by a course provider are listed. The courses are linked to the qualification of your interest. Search for the specific qualification in the menu, click ‘search’, and the courses offered will be listed. Not all qualifications are currently prepared with courses linked to them. When necessary, check your national or sectoral directories of providers and training opportunities. 11 14. How to get an overview of User’s details Users screen: o The Users tab gives you the option to get an overview of the users you are mentoring, and you can see the personal details of the Users. Click in the menu and select wanted user and the personal information will be displayed. 15. How to get an overview of the qualifications units in Skillsbank Qualifications search screen: o The qualifications search tab gives you the option to get an overview of the content of the qualification of your interest. Tick the dropdown menu and click on the wanted qualification. Then you will get a complete list of all the units in the qualification. Furthermore there is an option to print the whole content by clicking on the ‘print LO selected’ button. All the learning outcomes that are ticked off will be printed. 12 16. How to see documents uploaded by Users Documents screen: o The documents tab gives you the option to look at the documents each User you are mentoring has uploaded. Select the user searched for in the menu, and the documents will be listed. 17. How to see the qualification matrixes displayed Qualification overview screen: o The qualification overview tab gives you the option to display the whole matrix of the qualifications you are interested in. Select your qualification in the menu, and all the qualification units are displayed. On the right hand side of every unit, you have the option to click on the arrow icon, which then shows you the qualification matrix of the particular unit. In the matrix you can see how learning outcomes are divided into 13 competence, knowledge and skills. For more information on how a qualification matrix is structured, take a look at our introduction materials. 14 ASSESSOR Dear Assessor, welcome to Skillsbank! 18. How to enter Skillsbank Login screen: o In order to access the database, you must have been given a login ID and password by the competent body you are assigned to. o If you were given access, but you have lost your password, click ‘my password is lost!’ fill in your email address, click the send button, and a new password is sent to you. When receiving a login, enter login and password, and click ‘Skillsbank login.’ 19. How to change language and personal details Home screen: o On the home screen along the top, you see all the main functions of Skillsbank displayed. There is an option to change the language of your preference of the interface in the top right hand corner. o If you click on your own name beside the log out button in the top right hand corner, you have the option to update your personal details as well as changing your access password 15 20. How to get an overview of the qualifications units in Skillsbank Qualification search screen: o The qualifications search tab gives you the option to get an overview of the content of the qualification of your interest. Tick the dropdown menu and click on the wanted qualification. Then you will get a complete list of all the units in the qualification. Furthermore there is an option to print the whole content by clicking on the ‘print LO selected’ button. All the learning outcomes that are ticked off will be printed. 21. How to make a Recognition of Prior Learning (RPL) assessment of a User RPL Assessment screen: 16 o The RPL Assessment tab gives the option to assess the competences of Users assigned to you in Skillsbank. If you need further explanatory information on what RPL Assessments are, then you might consider watching our introduction materials on Skillsbank. o To use this tab select the organisation you are assigned to in the first menu, then select User, then the qualification of interest, and finally select the wanted qualifications unit in the last menu. You are then shown a list of all assessment questions to the particular unit. To do the assessment consider the competence of the User according to each question and evaluate him or her. The colour red tick box means that the User does not have any knowledge of the field, and green tick box means he or she is an expert in the field. Tick off either box you feel depicts the User’s level of competence. o The ‘check assessments’ button ensures you to fill in the whole assessment. The fields that turn yellow are fields that are not filled in yet. When you are finished, click the ‘save assessment’ button. When you have done this, there are no options to edit your assessment anymore. When saved, the User assessed can see your assessment scores, however not before he or she has finished their own RPL self-assessment. o Furthermore, remember to go through every qualification unit to do the whole assessment. You find them in the select qualification unit menu. 22. How to get an overview of RPL Assessment RPL Assessment summary screen: o The RPL Assessment summary tab provides for the option to see the self-assessment of the Users, compared to the assessment you have done of the Users. Click the menu and find the relevant qualification. The names of the Users evaluated will be listed with their own self-assessment score, and your score of them as assessor. Click on the individual names to see the details of the assessment for every learning outcome. The score is an average of each unit. 17 COMPETENT BODY Dear user with access as a Competent Body, welcome to Skillsbank! 23. How to enter Skillsbank Login screen: o In order to access the database, you must have been given a login ID and password by the system administrator. o If you were given access, but you have lost your password, click ‘my password is lost!’ fill in your email address, click the send button, and a new password is sent to you. When receiving a login, enter login and password, and click ‘Skillsbank login.’ 18 o If you are given access by having several roles into the system, you will be asked to choose your connection at this stage. It is possible to have three roles at the same time in Skillsbank: competent body, institution and course provider. For more information I recommend you to take a look at our introduction material. 24. How to change language and the login details of the organisation o o o o o Home screen: On the home screen along the top, you see the main functions of Skillsbank displayed. There is an option to change the language of your preference of the interface in the top right hand corner. If you click on your organisation’s name beside the log out button, you have the option to update your personal details and of the organisation you are representing as well as changing your access password. When you log in for the first time, make sure the information about your organisation and the organisation specifications in the drop down menus are correct. Furthermore, you have the option to add new contact persons by clicking the ‘add contact person,’ fill in the information of the new contact person and click save. You can use the pencil icon to look at and edit the information of a contact person. Use the X icon to delete persons, however make sure there is always a contact person with login details in the system, otherwise you have blocked yourself out of Skillsbank. Furthermore, in the case of more than one contact person, keep in mind that all of them have the same rights in the system. Click ‘save and close’ to save your updates. Continuing, in case you have several roles in Skillsbank, you can navigate between the roles by selecting the wanted role in the dropdown menu beside your name. On the home screen you are given the option to add news to the wall which all persons using Skillsbank under your organisation will see on their home screen. Click the ‘add news’ button and fill in the news you want to publish, and click ‘save.’ 19 25. How to add new qualifications Qualifications screen: o The qualification tab is the option to add new qualifications. It is important to notice that qualifications and qualifications units and learning outcomes are registered separately and afterwards linked together. o You can search for already registered qualifications in the search box, and look at them or editing them by clicking on the pencil icon on the right side of the qualification. You will however only be presented with qualifications, you or your organisation have added into Skillsbank. o The grey boxes presented on the right hand side are translation options of the qualifications, however this is such a big topic this is explained in our translation materials. o Therefore, to add new qualifications click the ‘add new qualifications’ button. This interface is very complex. Fill in the title of the qualification and fill in a suitable acronym. The acronym should be easy to recognise in order to keep Skillsbank tidy and lucid. You need to fill in the revision date and the revision number as well. All other fields are not mandatory. o In the bottom text box, you can fill in the main bullet points of what this qualification is about. Then click ‘save and next page’ and you will be directed to the page where you add qualification units to the qualification. Click at the ‘add new qualification units’ button. I recommend you to fill in a sensible title which very consistently describes the content of the qualification and an acronym that clearly depicts the unit. Remember to save the unit. Continue adding new units to the qualification until it is complete. 20 26. How to register new learning outcomes Learning outcomes screen: o The second stage in adding qualifications, is to add learning outcomes under the ‘learning outcomes’ tab. The list of learning outcomes you are presented for, are however not only your own registered learning outcomes, but all learning outcomes ever registered in Skillsbank’s database. You can view learning outcomes that are not yours by clicking on the pencil icon, however you are not allowed to edit or delete the learning outcome. o In most situations you will however only need your own registered learning outcomes. Tick the ‘display only own LO’s’ box. Then the list in the dropdown menu will be reduced to display only your own learning outcomes, then click search. o To add new learning outcomes click the ‘add new LO’ button. Fill in the title of the learning outcome. This should be the same title as the corresponding qualifications unit, however without the acronym before. This is because Skillsbank is a database, thus the qualifications pick suitable learning outcomes from the database of learning outcomes. As learning outcomes not necessarily only correspond with one qualification, but possibly with several, the title of the learning outcomes should be 21 qualification neutral and just describe what the learning outcome is about. Click ‘save and next page.’ o You will then be directed to the page where you can add learning outcomes. Click on the ‘add new LO details’ and the window where the content of the LO will be filled in. Learning outcomes can be registered on different levels. On the first registering the learning outcome will always be in the top level. On the next entry, you can choose to enter it as well on the first level, or as a sub-learning outcome of the first entry. In the first drop down menu there is the option to level the learning outcomes. Therefore, in the title box I recommend you to use numbering to indicate which level the learning outcome belongs to. For more information on levelling learning outcomes, take a look at our introduction material. 22 o Furthermore, when the qualification matrix and its learning outcomes are structured by only description, fill in the description box. However when the learning outcomes are split into competence, knowledge and skills, fill in relevant text in those boxes. Click ‘add’ and the learning outcome is saved to the database. Continue to add learning outcomes to the unit until it is complete. 27. How to link qualification units to learning outcomes Unit building screen: o 23 o The unit building tab finalises the process of entering qualification matrixes into Skillsbank. This is the process of linking qualification units to the learning outcomes. o Select your qualification in the dropdown menu. Here you have the option to tick the ‘only own LO’s’ button as well. All the qualification units of that qualification are listed. To link the qualification units with the learning outcomes, click the arrow icon. The next window gives you again the option to tick off for only your own LO’s. Select the unit of learning outcome in the drop down menu, and click the ‘link’ button. You have as well the option to link your qualification unit to units of learning outcomes that are registered by others. They will be listed in the drop down menu if you don’t tick of the ‘display only own LO’s’ box. Use the X icon to remove links you have created. 28. How to register new organisations My organisations screen: o The my organisations tab gives you the option to add new organisations that will have access to your qualification matrixes. Click the ‘add new organisation’ button. Fill in all the required information. You have the option to give the new organisation the status as institution or course provider, or both by ticking off the boxes beside the organisation name. Click ‘save’ o 24 o Then add a contact person to the organisation by clicking on the ‘add new contact person’ button. Fill in the required information, and click ‘save’. Keep in mind you have to add at least one contact person to an organisation in order to have login access to Skillsbank. Click ‘save and close’ to add it to the system. 29. How to register new Assessors RPL Assessors screen: o The RPL Assessors tab provides for the option to register new assessors. To add new RPL assessors click the ‘add new assessors’ button, enter all the relevant information including login details and click ‘save.’ Use the search box to look for a particular assessor and the pencil icon to view or edit information. It is not possible to delete an assessor. 30. How to add Recognition of Prior Learning (RPL) assessment questions 25 RPL Assessments screen: o The RPL Assessments tab gives you the option to enter the assessment questions that are used as self-assessment by the user and assessor. Keep in mind that the qualification matrix must be entered into Skillsbank before the questions can be entered. o Select the qualification in the first drop down menu, the unit in the second and the learning outcome in the third drop down menu. The content of the learning outcome will be displayed, with a text field where you can fill in the assessment question. The assessment question refers back to the content of the learning outcome. Click ‘save.’ To update or delete an already existing question, click on the question itself on the left hand side and change it in the text field. Update or delete by ticking save or delete. You can add as many assessment questions as you want to each learning outcome. o Prepare the whole RPL assessment by adding questions to every single learning outcome in the menu. 31. How to see the qualification matrixes displayed 26 Qualifications overview screen: o The qualification overview tab gives you the option to display the whole matrix of the qualifications you are interested in. Select your qualification in the dropdown menu, and all the qualification units are displayed. On the right hand side of every unit, you have the option to click on the arrow icon, which then shows you the qualification matrix of the particular unit. Qualifications are built up by one or more unit. To every unit, one or more learning outcomes are linked. In the matrix you can see how learning outcomes either are depicted in descriptions or are divided into competence, knowledge and skills with individual numbering which indicates the level of detail of the learning outcomes. They are all linked to the European credit systems and levels. o For more information on how a qualification matrix is structured and how they are linked to the different European concepts, take a look at our introduction materials. TRANSLATION 32. How to translate qualifications in Skillsbank Qualifications screen: o Before starting translating, make sure that the interface language is in the language you want to translate into. You can change the language of the interface by selecting your language of preference in the dropdown menu in the top right hand corner. o First of all, the grey boxes on the right hand side of all the already entered qualifications are the buttons that provide for the translation options. Currently Skillsbank comes in eight languages. Click on the abbreviation of your language beside the qualification you want to translate. 27 o The next window is the page where you fill in the title and the acronym of the qualification in the language you are translating to. Remember that the fields are filled out in the original language firstly, and that you manually have to delete the content of those fields. Then fill in with your language. In the bottom text field you fill in the bullet points of what the qualification is about. Note that you are only allowed to translate the title, acronym and the text field. Click ‘save and next page.’ o In the next window, in order to translate the particular units, you click on the pencil icon beside the units, and again you remove the existing text in the text fields, and replace it with the correct translation. Update to save the translation. Repeat this with all individual units. 33. How to translate Learning Outcomes in Skillsbank Learning outcomes screen: o Same as with entering qualifications, translating them is done separately as well. Therefore, the learning outcomes are translated under the learning outcomes tab. Again make sure the interface is in the right language before you start translating. Select the learning outcome you are looking for in the dropdown menu and click search. You can tick of the ‘display only own LO’s’ button to reduce the list to your own entered learning outcomes. You are only allowed to translate your own learning outcomes. o Click on the grey box of your language on the right side of the learning outcome you want to translate, and in the next window you replace the original text with your translation of the learning outcome title. Click ‘save and next page’ 28 o In the following window all the learning outcome details are listed. Click on the pencil icon beside the details and replace the original text in the text fields with your translation. Update to save the translation. Do the same for all the details of the learning outcome. Continue with translating all learning outcomes in the whole qualification to your language. o The linking of qualifications is done automatically, as this link is made in the original language. Therefore you do not need to build units after translating them. 29 INSTITUTION Dear user with access as an Institution, welcome to Skillsbank! 34. How to entre Skillsbank Login screen: o In order to access the database, you must have been given a login ID and password by the competent body you are assigned to. o If you were given access, but you have lost your password, click ‘my password is lost!’ fill in your email address, click the send button, and a new password is sent to you. When receiving a login, enter login and password, and click ‘Skillsbank login.’ o If you are given access by having several roles into the system, you will be asked to choose your connection at this stage. It is possible to have three roles at the same time in Skillsbank: competent body, institution and course provider. For more information I recommend you to watch our introduction material. 30 35. How to change language and the login details of the organisation o o o o Home screen: On the home screen along the top, you see the main functions of Skillsbank displayed. There is an option to change the language of your preference of the interface in the top right hand corner. If you click on your organisations name beside the log out button in the top right hand corner, you have the option to update your personal details as well as changing your access password. When you log in for the first time, make sure the information about your organisation and the organisation specifications in the drop down menus are correct. Furthermore, you have the option to add new contact persons by clicking the ‘add contact person,’ button and fill in the required information and click save. You can use the pencil icon view and edit the information of a contact person. Use the X icon to delete persons, however make sure there is always a contact person with login details in the system, otherwise you block yourself out of Skillsbank. Furthermore, in the case of more than one contact person, keep in mind that all of them have the same rights in the system. Click ‘save and close’ to save your updates. Continuing, in case you have several roles in Skillsbank, you can navigate between the roles by selecting the wanted role in the dropdown menu beside your name. 36. How to register courses you are offering into Skillsbank Courses screen: o The courses tab gives you as course provider the option to add courses that you are offering into Skillsbank. The courses are linked to a particular qualification, so that users of the database can get an overview of courses that are offered, if they need further training to be fully qualified in a new qualification. o Therefore, to add courses, click the ‘add new courses’ button. Fill in all the information required about the courses you are offering. Keep in mind you have to link the course to a qualification. Then click ‘save and next page’ to specify the modules of the course. You have to fill in all the required fields in order to continue. 31 o On the next page, click the ‘add new modules’ button, fill in the required fields, as well as linking the module to a relevant learning outcome. The latter you do by selecting the relevant learning outcome in the LO menu. Click ‘add’ to save the module, and ‘cancel’ if you have changed your mind. Use the ‘save and previous page’ and ‘save and next page’ buttons to navigate within the course. 37. How to register new Mentors into Skillsbank Mentors screen: o Under the mentors tab you can add new mentors to the system. Click the ‘add new mentors’ button, fill in the asked information and click save. Use the search box to look for a particular mentor and the pencil icon to view or edit information. It is not possible to delete a mentor. 32 38. How to register new Users into Skillsbank Users screen: o As an institution you have the option to add users to Skillsbank. Click the ‘add new end users’ button, and fill in the information. Here it must be mentioned that all users have to be linked up with a mentor and an assessor. Click on the drop down menus in the bottom right hand corner and select from the list in the menu. Click ‘save’ and you have added a user with access as learner in the system. 39. How to get an overview of RPL Assessment RPL Assessment summary screen: o The RPL Assessment summary tab provides for the option to see the score of the User’s self-assessment compared to the assessor’s evaluation of the User. Click the drop menu and select qualification and the list of assessments will be displayed. Click on the individual names to see the details of the assessment of every qualification unit. 40. How to see the qualification matrixes displayed Qualifications overview screen: 33 o The qualification overview tab gives you the option to display the whole matrix of the qualifications you are interested in. Select your qualification in the menu, and all the qualification units are displayed. On the right hand side of every unit, you have the option to click on the arrow icon, which then shows you the qualification matrix of the particular unit. In the matrix you can see how learning outcomes are divided into competence, knowledge and skills. For more information on how a qualification matrix is structured, take a look at our introduction material. 34 COURSE PROVIDER Dear user with an access as a Course Provider, welcome to Skillsbank! 41. How to enter Skillsbank Login screen: o In order to access the database, you must have been given a login ID and password by the competent body you are assigned to. o If you were given access, but you have lost your password, click ‘my password is lost!’ fill in your email address, click the send button, and a new password is sent to you. When receiving a login, enter login and password, and click ‘Skillsbank login.’ o If you are given access by having several roles into the system, you will be asked to choose your connection at this stage. It is possible to have three roles at the same time in Skillsbank: competent body, institution and course provider. For more information I recommend you to watch our introduction material. 35 42. How to change language and the login details of the organisation o o o o Home screen: On the home screen along the top, you see the main functions of Skillsbank displayed. There is an option to change the language of your preference of the interface in the top right hand corner. If you click on your organisations name beside the log out button, you have the option to update your personal details as well as changing your access password. When you log in for the first time, make sure the information about your organisation and the organisation specifications in the drop down menus are correct. Furthermore, you have the option to add new contact persons by clicking the ‘add contact person,’ and fill in the information of the new contact person and click save. You can use the pencil icon to look and edit the information of a contact person. Use the X icon to delete persons, however make sure there is always a contact person with login details in the system, otherwise you have blocked yourself out of Skillsbank. Furthermore, in the case of more than one contact person, keep in mind that all of them have the same rights in the system. Click ‘save and close’ to save your updates. In case you have several roles in Skillsbank, you can navigate between the roles by selecting the wanted role in the dropdown menu beside your name. 43. How to get an overview of the qualifications units in Skillsbank Qualification search screen: 36 o The qualifications search tab gives you the option to get an overview of the content of the qualification of your interest. Tick the dropdown menu and click on the wanted qualification. Then you will get a complete list of all the units in the qualification. Furthermore there is an option to print the whole content by clicking on the ‘print LO selected’ button. All the learning outcomes that are ticked off will be printed. 44. How to register courses you are offering into Skillsbank Courses screen: o The courses tab gives you as course provider the option to add courses that you are offering into Skillsbank. The courses are linked to a particular qualification, so that users of the database can get an overview of courses that are offered. o To add courses click the ‘add new courses’ button and fill in all the information required about the courses you are offering. Keep in mind you have to link the course to a qualification. Then click ‘save and next page’ to specify the modules of the course. You have to fill in all the required fields in order to continue. o On the next page, click the ‘add new modules’ button, fill in the required fields, as well as linking the module to a relevant learning outcome. The latter you do by selecting the relevant learning outcome in the LO menu. Click ‘add’ to save the module, and ‘cancel’ if you have changed your mind. Use the ‘save and previous page’ and ‘save and next page’ buttons to navigate within the course. 37 38