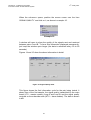
1
Watson Element Manager
User Manual
Prepared by:
Innovation Centre Access Network Systems
Document Identification
SZ.WEM.V9-5
Document Version
1.1
Version
May 17th, 2001.
Distribution
Customer
th
Revision A – Preliminary Document
Innovation Center Access Network System
17 of May 2001
Version History
User Manual
Version
Related Version
1.0
1.0
Warning
Read this manual carefully before carrying out any operation.
Copyright 2001 by Schmid Telecommunication, Zurich, Switzerland. All rights reserved. Reproduction of part or all
of the contents in any form is expressly prohibited without the prior written consent of Schmid Telecommunication.
Schmid Telecommunication has used its discretion, best judgements and efforts in preparing this document. Any
information contained in this document is provided without any warranty of any kind. Schmid Telecommunication
hereby disclaims any liability to any person for any kind of damage. Schmid Telecommunication may make
improvements and/or changes of this document at any time without giving prior notice.
2
th
Revision A – Preliminary Document
Innovation Center Access Network System
17 of May 2001
Contents
1
Watson Element Manager................................................................................................................... 6
1.1
2
3
Introduction................................................................................................................ 6
Windows Components........................................................................................................................ 7
2.1
Installing Windows 2000 components ....................................................................... 7
2.2
Configuring the Network............................................................................................ 8
Installing the Software ........................................................................................................................ 9
3.1 HP OPEN VIEW NNM ................................................................................................... 9
3.2 JRE 1.2.2, Interbase 6.0, Interclient and main application .......................................... 11
3.2.1 Installing the Programs................................................................................. 11
4
5
Running WATSON ELEMENT MANAGER ....................................................................................... 12
4.1
First steps................................................................................................................ 12
4.2
HP OPEN VIEW Displays and Icon Functions ........................................................ 12
4.2.1 Start-up Window (ROOT) ........................................................................ 13
4.2.2 Alarm Categories Window ....................................................................... 13
HP OPEN VIEW ICONS...................................................................................................................... 14
5.1 The ROOT Window ..................................................................................................... 14
5.2 Alarm Categories Window ........................................................................................... 14
6
HP OPEN VIEW Colours.................................................................................................................... 15
6.1 Colour Coding for Icon Application .............................................................................. 15
7
8
9
Relationship of the Icons.................................................................................................................. 16
7.1
Using the icons........................................................................................................ 16
7.2
Associated Figures.................................................................................................. 17
7.3
Management Application......................................................................................... 20
Using the application ............................................................................................................................... 21
8.1
Program Architecture .............................................................................................. 21
8.2
User access to the application ................................................................................ 22
8.3
Operations............................................................................................................... 23
8.4
Alarms and Priorities ............................................................................................... 25
WATSON ELEMENT MANAGER Features....................................................................................... 29
9.1
DIAGNOSTIC .......................................................................................................... 29
3
th
Revision A – Preliminary Document
Innovation Center Access Network System
9.2
10
17 of May 2001
Signal Quality .......................................................................................................... 31
Configuration Parameters ................................................................................................................ 34
10.1 Menu Configuration ................................................................................................. 34
10.2 Remote Configuration Menu.................................................................................... 35
10.3 Other Configurations ............................................................................................... 36
10.4 Making Changes to Remote Modems ..................................................................... 38
11
Performance Monitoring ................................................................................................................... 39
11.1 To view the window ................................................................................................. 39
11.2 Monitoring of sub-items ........................................................................................... 39
12
Application ......................................................................................................................................... 42
13
User…………………………………………………………………………………………………………….43
14
Consulting Alarms............................................................................................................................. 45
15
Inserting the CMU card ..................................................................................................................... 47
16
Description of the Management System ......................................................................................... 48
16.1 Description of the Management System SNMP Protocol........................................ 49
16.2 Local Interconnect Bus (LIB) ................................................................................... 50
16.3 Agent Element (AE)................................................................................................. 50
16.3.1 Agent Element (AE) Architecture ............................................................. 50
16.4 Management Unit (MU) ........................................................................................... 51
16.4.1 Expanded Management Unit (EMU) ........................................................ 51
16.4.2 Management Unit (MU) Architecture ....................................................... 51
17
CMU Monitor ...................................................................................................................................... 53
17.1 Monitor Features ..................................................................................................... 53
17.2 Description of the X.25 Connector .......................................................................... 53
17.3 Connection to a Terminal ........................................................................................ 54
18
Boot Program (Initialisation) ............................................................................................................ 56
18.1 Main Menu............................................................................................................... 56
18.2 Updating the BOOT program .................................................................................. 57
18.2.1 Choose Download Option ........................................................................ 57
18.2.2 File Transfer ............................................................................................. 58
18.2.3 Result of Remote Load ............................................................................ 58
18.2.4 Finalising the Process.............................................................................. 59
19
System Program ................................................................................................................................ 60
19.1 Main Menu............................................................................................................... 60
19.1.1 Boot System............................................................................................. 61
19.1.2 Modules Configuration ............................................................................. 61
19.1.3 LAN/SNMP/IP/NET Configuration............................................................ 62
19.1.3.1 Previous Menu....................................................................................... 63
19.1.3.2 SNMP Configuration.............................................................................. 64
19.1.3.3 Ethernet Interface.................................................................................. 65
4
th
Revision A – Preliminary Document
Innovation Center Access Network System
17 of May 2001
19.1.3.4 Ethernet Address................................................................................... 66
19.1.3.5 Local IP Address Table ......................................................................... 67
19.1.3.6 Networks Table ..................................................................................... 68
19.1.3.7 IP-X.25 Table ........................................................................................ 69
19.1.3.8 Table of Gateways ................................................................................ 70
19.1.4 X.25 Configuration ................................................................................... 71
19.1.4.1 Previous Menu ...................................................................................... 71
19.1.4.2 X.25 Interface Section ........................................................................... 72
19.1.4.3 X.25 Link Section .................................................................................. 73
19.1.4.4 X.25 Packet Section .............................................................................. 74
19.1.4.5 X.25 Address......................................................................................... 75
19.1.5 RS485 Configuration................................................................................ 76
19.1.6 Configuration Default ............................................................................... 77
19.1.7 Store Configuration .................................................................................. 77
19.1.8 Switch Language ..................................................................................... 78
19.2 Ethernet Connection................................................................................................ 79
20
Appendix………………………………………………………………………………………………………81
20.1 Connector Description............................................................................................. 81
20.1.1 X.25 Connector ........................................................................................ 81
20.1.2 TPI Connector.......................................................................................... 82
20.1.3 Rear Panel Connector ............................................................................. 82
Table of figures
Figure 1: Root…………………………………………………………………………………….13
Figure 2: Alarm Categories................................................................................................ 13
Figure 3: Internet Icon ....................................................................................................... 16
Figure 4: IP Node .............................................................................................................. 17
Figure 5: IP Node Icon....................................................................................................... 17
Figure 6: Segment1 Window ............................................................................................. 18
Figure 7: Country Selection and Subrack View ................................................................. 19
Figure 8: Example of Modem Selection ............................................................................ 22
Figure 9: Card Configuration Local Modem ...................................................................... 23
Figure 10: Card Configuration Remote Modem ................................................................ 24
Figure 11: Alarm Status Local Modem .............................................................................. 25
Figure 12: Events Severity Configuration .......................................................................... 27
Figure 13: Diagnostic Window Local ................................................................................. 30
Figure 14: Signal Quality View........................................................................................... 32
Figure 15: Signal Quality View II........................................................................................ 33
Figure 16: Local Modem Configuration ............................................................................. 35
Figure 17: Remote Modem Configuration ......................................................................... 35
Figure 18: Local Interface Configuration ........................................................................... 37
Figure 19: Remote Interface Configuration ....................................................................... 38
Figure 20: G.826 Error Performance Measurements........................................................ 39
Figure 21: G.826 Performance Measurements with Regenerators................................... 40
Figure 22: G.826 E1 Error Performance ........................................................................... 41
Figure 23: CMU Rolling Settings ....................................................................................... 42
Figure 24: HPOV Login Window ....................................................................................... 43
Figure 25: Adding New User ............................................................................................. 44
Figure 26: Errors and Warnings ........................................................................................ 46
5
th
Revision A – Preliminary Document
Innovation Center Access Network System
17 of May 2001
1 Watson Element Manager
1.1 Introduction
WATSON ELEMENT MANAGER functions as an integral part of the HP OPEN
VIEW NETWORK NODE MANAGER (NNM) 6.x, enabling users to manage
Watson family modems and the CMU Management card.
The application uses information supplied by the management card through the
MIB (Management Information Base), the proprietary HDSL-MIB database.
An MIB module consists of a specification containing definitions of the data to
be managed by the SNMP agent (which is a part of the CMU Management
Card), so that this equipment can be accessed remotely by an SNMP
management station.
WATSON ELEMENT MANAGER, when installed as part of a central
management system, enables monitoring of local and remote modem alarms
and of single or more regeneration stages. It supports different configurations,
to test local and remote loops, to verify connection signal quality, and to define
priorities for alarms. This will be achieved by means of commands executed at
a mouse-click using a graphical screen displays which contain diagrams of
each pre-defined stage, right up to the connection itself, as we shall see below.
6
th
Revision A – Preliminary Document
Innovation Center Access Network System
17 of May 2001
2 Windows Components
The following components should be installed on workstations running WATSON
ELEMENT MANAGER:
-
Windows NT 4.0 or 2000;
-
All Windows components should be installed (applications not installed at the
time of the original set-up should now be installed).
2.1 Installing Windows 2000 components
-
Click on the My Computer icon;
-
In my Computer, click on Control Panel;
-
In Control Panel, click on Add/Remove Programs;
-
In Add/Remove Programs, click on Add/Remove Windows components;
-
Check what software are installed under Add/Remove Windows components.
Components which are not installed will have a tick in the box beside them;
-
Check (place a tick beside) all Windows components which are not installed,
in particular Management and Monitoring Tools (when you tick this item, click
Details in the box in the lower window, and under Details check that the
Simple Network Management Protocol – SNMP is ticked for installation).
When all items have been checked, click Continue to get Windows to install these
components.
7
th
Revision A – Preliminary Document
Innovation Center Access Network System
17 of May 2001
2.2 Configuring the Network
In order to avoid any problems during set-up, certain procedures should be
observed before you install the Commander software components,.
-
You should be logged on as Administrator;
-
Restart Windows and click on the My Computer icon;
-
In my Computer, click on Control Panel;
-
Click on Network and Dial-Up Connections (for Windows 2000);
-
Click on the Local Area Connection icon;
-
Check that the Internet (TCP/IP) protocol is installed and click on the TCP/IP
icon once with the left mouse button. Now click on Properties, and on the
General tab enter an IP address for the computer, for example IP =
193.148.33.x. The number below is for the sub-network mask. The remaining
items should be left as installed by Windows;
-
Having completed all of the above steps, restart the computer so that
Windows finalises the changes to the set-up.
-
To check that changes have been made successfully, connect the computer
to another PC in a network, or to a CMU. Open an MS-DOS box and execute
the Ping command followed by the IP address of the other computer and wait
for the return.
8
th
Revision A – Preliminary Document
Innovation Center Access Network System
17 of May 2001
3 Installing the Software
WATSON ELEMENT MANAGER operates in conjunction with a package of
software programs previously installed under Windows (NT or 2000). In order to
ensure that they interact perfectly with each other, these programs should be
installed strictly in sequence, as explained in this manual.
3.1 HP OPEN VIEW NNM
This software program is of fundamental importance for WATSON ELEMENT
MANAGER. It interrogates the managed units (CMU’s) and interprets the
responses received, which it then displays in graphical form, in specific icons and
colours for any given connection situation it identifies.
HP OPEN VIEW works in a similar way to Windows. The icons generated by this
program work with interactive sub-windows that can be explored with just one
mouse-click according to the nature of the problem that has occurred or as
defined by the user.
The user can facilitate interactive management of the WATSON ELEMENT
MANAGER system by inserting, for example, city maps, states, regional centres,
etc., as will be shown below.
To install this software insert the HP OPEN VIEW CD into the CD-ROM drive and
follow its set-up instructions step by step until it asks you to restart the computer.
Note: Follow the set-up procedures correctly, and remember that the HP OPEN
VIEW software should be installed first.
9
th
Revision A – Preliminary Document
Innovation Center Access Network System
17 of May 2001
Do not forget to install the SNMP agent.
If using Windows NT, re-install Service Pack 5.0 or 6.0.
10
th
Revision A – Preliminary Document
Innovation Center Access Network System
17 of May 2001
3.2 JRE 1.2.2, Interbase 6.0, Interclient and main application
These software programs are part of a group of programs which works with HP
OPEN VIEW. To avoid potential conflicts it is essential to install them in the right
order, as set out below:
1. JRE 1.2.2;
2. Interbase 6.0;
3. Interclient;
4. WATSON ELEMENT MANAGER.
3.2.1 Installing the Programs
These software programs are all contained on a single CD, which has separate
folders for each one. Open these folders in the order stated above, click on the
setup program icon in the relevant folder and then follow the setup wizard’s onscreen instructions.
Once all these programs are installed (please do not forget that WATSON
ELEMENT MANAGER should be the last one to be installed), reboot your
computer for these programs’ set-up options to take effect.
The WATSON ELEMENT MANAGER application is now ready to be started.
11
th
Revision A – Preliminary Document
Innovation Center Access Network System
17 of May 2001
4 Running WATSON ELEMENT MANAGER
After the computer has been restarted, the Windows Start Menu should contain
the programs, which you have just installed, and there should be a shortcut icon
to HP OPEN VIEW on the desktop. If everything has been done correctly, then
you are now ready to run the WATSON ELEMENT MANAGER application.
4.1 First steps
Double-click on the shortcut. When you start this program for the first time, you
will be asked for a password. This password is supplied together with the HP
OPEN VIEW software license.
Once you enter the password, OPEN VIEW will start up and two windows will
open. We will look at the relevant applications and their meanings in the next
chapter.
4.2 HP OPEN VIEW Displays and Icon Functions
When you start the application, two different windows pop up:
-
A main window entitled ROOT, which contains an icon named INTERNET
(see Figure 1);
-
A smaller window entitled ALARM CATEGORIES (see Figure 2).
12
th
Revision A – Preliminary Document
Innovation Center Access Network System
17 of May 2001
4.2.1 Start-up Window (ROOT)
Figure 1: Root
4.2.2 Alarm Categories Window
Figure 2: Alarm Categories
13
th
Revision A – Preliminary Document
Innovation Center Access Network System
17 of May 2001
5 HP OPEN VIEW ICONS
Two different windows open up when you start this application:
5.1 The ROOT Window
This window shows the application starting up and contains an icon named
INTERNET (see Figure 1). The use of this icon will be described in the following
chapters.
Both this and the following windows show various functions and resources of the
HP OPEN VIEW program. Our main emphasis in this manual will be on the
WATSON ELEMENT MANAGER applications.
5.2 Alarm Categories Window
The smaller window, entitled ALARM CATEGORIES (Figure 2), generally stays
open at the top right corner of the screen and has the following functions:
Ÿ
Error Alarms
Ÿ
Threshold Alarms
Ÿ
Status Alarms
Ÿ
Application Alert Alarms
Ÿ
SCHMID CMU
Ÿ
All Alarms
Note: The most frequently used item above will be SCHMID CMU, since this is
the item which stores all the information on alarms, changes in connection
status and other events in a database. This information may be used for
future inspections and reports.
14
th
Revision A – Preliminary Document
Innovation Center Access Network System
17 of May 2001
6 HP OPEN VIEW Colours
The HP OPEN VIEW software shows the status of its alarms in a fairly simple
visual form, using coloured icons.
Each icon colour has a different meaning, thereby implying different actions to be
taken in each case.
6.1 Colour Coding for Icon Application
• BBLLUUEE:: When OPEN VIEW cannot find manageable equipment
attached to the server (through a different network: an IP
network);
• G
N:: When OPEN VIEW detects no alarm severe enough to
EN
EE
RE
GR
generate failures in the network system;
• RREEDD:: When OPEN VIEW detects an urgent or severe alarm for
equipment on the network;
• YYEELLLLO
W:: When OPEN VIEW detects a test condition of major
OW
severity for any equipment on the network.
Note: Whenever the icons change colour, that occurs, whenever there is a
change form their original state, such change is recorded as an event in
ALARM CATEGORIES, within the SCHMID CMU sub-item, for future
consultations and reports.
15
th
Revision A – Preliminary Document
Innovation Center Access Network System
17 of May 2001
7 Relationship of the Icons
As we saw in the section entitled Displays and Icon Functions, when you launch
OPEN VIEW a start-up screen called ROOT appears (Figure 1). In this window
there is an icon named INTERNET (see Figure 3) which has a certain colour (as
explained in the previous chapter). In general terms this icon represents the
network and the equipment connected to it. In this particular case, it will represent
the monitoring system for the modems connected to a particular network.
Figure 3: Internet Icon
7.1 Using the icons
Once the INTERNET icon (Figure 3) has appeared in the OPEN VIEW window,
double-click the left mouse button to access the modem network management
system. This will open another window named INTERNET (in other words we are
now inside the INTERNET icon, as shown in Figure 4) and next we have another
icon named IP (see Figure 5).
16
th
Revision A – Preliminary Document
Innovation Center Access Network System
17 of May 2001
7.2 Associated Figures
Figure 4: IP Node
Figure 5: IP Node Icon
Note: Figure 5 shows an enlarged view of the network symbol from Figure 4,
containing a particular IP number. That number is determined by the
network and by nodes, in other words, if more nodes are connected, other
similar icons will appear in the window with different IP addresses and with
different colours.
17
th
Revision A – Preliminary Document
Innovation Center Access Network System
17 of May 2001
In the INTERNET window, double-click the left mouse button on the IP icon.
Another window will open, showing the address mentioned in the upper part of
the window (see Figure 6).
Figure 6: Segment1 Window
Figure 6 shows another icon named SEGMENT. Depending on the number of IP
addresses, and on the complexity and the number of nodes in the network, this
window may show various icons with other network segments, since IP numbers
are allocated automatically. Continuing to explore HP OPEN VIEW, double-click
with the left mouse button on the SEGMENT icon. When you enter the
SEGMENT sub-item, you will be able to see a RACK showing a certain predetermined IP number. An example of this is shown in Figure 7.
18
th
Revision A – Preliminary Document
Innovation Center Access Network System
17 of May 2001
Figure 7: Country Selection and Subrack View
Figure 7 shows a sub-item (within the SEGMENT item), which has been given a
name (Sorocaba) for the purposes of illustration. Note also that the wallpaper for
this window is a provisional map (also used as an illustration). On this map there
is a rack containing the (hypothetical) IP number 193.148.33.220. This IP number
has been placed on the CMU management card, and the rack has taken on that
particular identification number. Within this sub-item there may be other racks,
with other IP numbers attributed to other CMU’s.
19
th
Revision A – Preliminary Document
Innovation Center Access Network System
17 of May 2001
7.3 Management Application
The following steps should be observed in order to use the management
modules:
-
Right-click the figure containing the rack;
-
A shortcut window will appear automatically to enable monitoring of SCHMID
modems, as in example 1 below:
Example 1
-
Position the cursor on the required line and over the menu item, and the
application will immediately open one or more windows as requested (these
may be opened simultaneously);
-
Within each menu item there are additional resources which can be activated
and opened simply by positioning the cursor on the required item (alarm
monitoring, configuration, etc.).
The following chapters provide greater detail on the sub-items in the Commander
program and how to use them.
20
th
Revision A – Preliminary Document
Innovation Center Access Network System
17 of May 2001
8 Using the application
8.1 Program Architecture
The application is made up of several modules, implemented in different
processes. Some modules operate as servers. Other modules are client modules,
used to organise and display management information to the user. Within the
client modules there are modules for monitoring and diagnosing faults,
performance, configuration and security.
Server modules and client modules use data stored in the application’s purposebuilt database, held in a data bank. This database contains all the information
needed for running the application, such as:
-
Monitored data and events. This includes the modem status, status of the
management card and the events associated with it and others;
Record of faults, which have occurred. This includes a description of the
problem, associated events, date and time, etc;
Data on the configuration of the application, such as the severity of events as
defined by the user;
Registered users;
Data on location of management cards, such as country, city, building;
Modem data, such as location.
21
th
Revision A – Preliminary Document
Innovation Center Access Network System
17 of May 2001
8.2 User access to the application
The application can be accessed automatically from HP OPEN VIEW NNM,
whenever a user wants to carry out an operation on modems managed in the
sub-rack in question. There are several points in HP OPEN VIEW from which the
user can access the program, as described in earlier chapters.
The CMU card is used to send data from the modems to the WATSON
ELEMENT MANAGER application. Information is exchanged on a continuous
basis, so that the system is permanently updated with data and alarms for
consultation and analysis. Figure 8 shows a graphical representation of a subrack containing examples of the Watson II Single and Dual modems. Each card
has a different colour (see table of colours/alarms). For a more detailed
diagnostic of each alarm that has been recorded, the user just clicks on the
appropriate card.
In this example, we are working with both SINGLE and DUAL modems, in other
words there are two modems represented in slots 1 and 4, and another set of
modems below these (13 and 16). To access these other modems the user
should click (in this particular case) on the second red LED counting from top to
bottom (modem 13) in order to view its configuration.
(Modem 13) (Modem 16)
Figure 8: Example of Modem Selection
22
th
Revision A – Preliminary Document
Innovation Center Access Network System
17 of May 2001
8.3 Operations
After selecting the appropriate card, the application will display information on the
current state of the modem (Figure 9), such as synchronism status (loop A and B),
Losd-bit status, remote feeding, Ps-bit status, whether or not regenerators are present
on the line and how many there are (in this example there is one regenerator, between
loops A and B), analog loop (ON or OFF. If ON, the modem is carrying out an internal
test in its analog interface).
Figure 9: Card Configuration Local Modem
Double-clicking with the mouse on the figure representing the slave modem
(the smaller diagram) will bring up a window containing information on the user
side (slave modem), shown in Figure 10. This information is transmitted
remotely by the HDSL link and provides the synchronism status, Losd-bit
status, and remote power status. (Always OFF, since the modem which is
configured as slave does not feed remote power through the HDSL line),
number of regenerators (in this case it will be either PRESENT or OFF), and
Analog Loopback (ON – OFF).
23
th
Revision A – Preliminary Document
Innovation Center Access Network System
17 of May 2001
Deactivated
Activated
Figure 10: Card Configuration Remote Modem
Note: Whenever a particular modem is selected, it will appear with the WHITE
colour highlighted. Modems that are not selected will be greyed out.
It is also possible to use the configuration menu from the upper part of the
window (Figure 9 or 10), or to refresh the alarms in order to obtain more details
on them. Detailed information on alarms is shown in the Alarm Status window
(Figure 11). Whenever any type of alarm is generated, it will be interpreted by the
system and passed to the application, appearing with ON against its name if it is
activated and OFF if it is deactivated.
24
th
Revision A – Preliminary Document
Innovation Center Access Network System
17 of May 2001
Figure 11: Alarm Status Local Modem
Note: In the above example all alarms are deactivated (OFF). When this happens the
modem status box will appear green, indicating that it is operating correctly within the
system. If any alarm occurs, the status box will change colour and indicate Failure
(depending on the priority given to the alarm). Please refer to the according Watson
modem users manual for detailed alarm explanation.
8.4 Alarms and Priorities
It is possible to define the priority to be assigned to the alarms which appear in the
colours of the boards, the sub-racks and the Alarm Status window shown in Figure 11.
To define these priorities it is necessary to proceed as follows:
- Click on the Fault menu in Example 2, which appears on the menu in the upper part
of Figure 9 or 10;
25
th
Revision A – Preliminary Document
Innovation Center Access Network System
17 of May 2001
Example 2
-
Move the mouse down and click on Events Severity Configuration (Example
3);
Example 3
A new window will open specifically to allow the configuration of equipment priorities.
They may be URGENT/MAJOR, NON EVENT/NORMAL, NON URGENT/MINOR, or
CRITICAL, as shown in Figure 12.
26
th
Revision A – Preliminary Document
Innovation Center Access Network System
17 of May 2001
Figure 12: Events Severity Configuration
In order to set the right priority, select the right Modem Type by clicking in the Card
Types window and selecting the right modem from the list (Example 4). In this example
we are using a Watson 2 – Local modem.
Example 4
27
th
Revision A – Preliminary Document
Innovation Center Access Network System
17 of May 2001
Next click on the item IP: select the desired IP number and click on the load CMU
button to get the modem configuration up on the screen. This will provide the current
modem configuration, and from here the displayed configuration can be changed as
desired (see example 5).
Load CMU
“has IP”
Example 5
28
th
Revision A – Preliminary Document
Innovation Center Access Network System
17 of May 2001
9 WATSON ELEMENT MANAGER Features
DIAGNOSTIC and SIGNAL QUALITY.
9.1 DIAGNOSTIC
The WATSON ELEMENT MANAGER application contains a feature called Diagnostic.
To access this part of the Watson Element Manager, click on the Fault menu (as in the
previous chapter) and then on Diagnostic, as shown in example 6 below.
Example 6
Once inside Diagnostic, as shown in Figure 13, the following commands are available:
-
Reset Local Device and Reset Remote Device;
Test Loop 1, Loop 2, and Loop 2 Reg 1;
Alarm Cut Off.
29
th
Revision A – Preliminary Document
Innovation Center Access Network System
17 of May 2001
Figure 13: Diagnostic Window Local
When activated, the Reset Local and Reset Remote options carry out a reset of the
local and remote units, re-initialising the synchronisation and connection activation
procedure.
The Loop 1, Loop 2 and Loop Reg. Commands are monitoring mechanisms to detect
possible defects in the units or in other linked equipment (Central System and User). To
understand how the system of Loops works, see example 7 below:
Loop 2
Central
System
User
Loop 1
Loop 1
Example 7
30
th
Revision A – Preliminary Document
Innovation Center Access Network System
17 of May 2001
In example 8 a Regenerator has been placed between the Central Office
and the remote modem. In order to test the connection between the
Central System and the Regenerator, click on Loop 2 Reg. 1 (see
Figure 13). When this command is activated the user modem is
disconnected for the duration of the Loop2 REGn test.
Loop 1
Loop 1
Central
System
REGn
User
Loop 1 of
Loop
21
reLoop
2
Loop Reg x
Example 8
Finally there is the ACO on/off function, which enables or disables audible
modem alarms.
9.2 Signal Quality
This is a simple function which monitors the state of the connection by
cyclically returning to the central control system data on the quality of the
signals sent and received by the Local and Remote modems.
To enable this function, click on Fault in the upper part of the menu as in
example 9.
Example 9
31
th
Revision A – Preliminary Document
Innovation Center Access Network System
17 of May 2001
When the sub-menu opens, position the mouse cursor over the item
SIGNAL QUALITY and click on it, as shown in example 10.
Example 10
A window will open to show the quality of the signals sent and received
between pairs A and B. To have this information displayed permanently,
just keep the window open longer (the data is refreshed every 50 to 60
seconds).
Figures 14 and 15 show the above information in detail.
Figure 14: Signal Quality View
This figure shows the first information cycle for the pair being tested. It
shows time of the first sample, the signal quality transmitted by the main
board (LTU - master modem) Loop A and Loop B, and the signal quality
received on the subscriber side (NTU – slave modem). The data is shown
in dB.
32
th
Revision A – Preliminary Document
Innovation Center Access Network System
17 of May 2001
Figure 15: Signal Quality View II
The above figure shows a more complete cycle, enabling the analysis
wether the signal being carried by this connection is good or not in terms
of enabling exchange of information between the central system and the
user. This example shows an excellent link.
33
th
Revision A – Preliminary Document
Innovation Center Access Network System
17 of May 2001
10 Configuration Parameters
10.1 Menu Configuration
This item is an important tool for identifying Watson modems. When there
is a large number of modems on the map, in different regions, these
modems must be identified so that they can be rationally and effectively
managed, making it easier to maintain connections and reducing
downtime.
There is no better way to understand how these tools work than to see a
visual representation of how they operate. In order to do so, click on the
word Configuration in the upper menu bar (example 11):
Example 11
When the small window opens with the sub-menu, click on Modem ID
Config, as in example 12.
Example 12
The main system modem identification window will now open, as shown in
Figure 16.
34
th
Revision A – Preliminary Document
Innovation Center Access Network System
17 of May 2001
Figure 16: Local Modem Configuration
This window shows us the Circuit ID, the Serial number and Notes (if
required).
10.2 Remote Configuration Menu
To access remote configuration for this item, all you have to do is access
the remote modem as explained in chapter 8.3, and repeat the steps
carried out in section 10.1. This will bring up the result shown in Figure 17.
Click here to save
Figure 17: Remote Modem Configuration
35
th
Revision A – Preliminary Document
Innovation Center Access Network System
17 of May 2001
Remote modems can be given an identification label, as in figure 17,
which makes them easier to identify in case they need to be repaired, for
example. The identification can show data from the local modem and also
remote data such as country, state, city, office, room, rack and IP number
of the management card (CMU).
Having configured the remote modem, click “Save” for the new description
to take effect.
If you need to make changes in the future, all you have to do is alter the
existing data and click on Save once again.
10.3 Other Configurations
This part of the program shows the current configuration for all equipment
and enables the user to alter it according to the needs of the connection.
To get a better idea of this part of the Watson Element Manager, click on
Configuration (example 13) and then on Device Config (example 14).
Example 13
Example 14
36
th
Revision A – Preliminary Document
Innovation Center Access Network System
17 of May 2001
The following window will be shown(Figure 18).
To change any
Configuration click
here to see options
Click here to save
desired
configuration
Figure 18: Local Interface Configuration
Figure 18 shows the current configuration of the equipment. To make
changes to this configuration, position the mouse cursor on the item to be
changed (the cursor changes shape to an inverted triangle) and the
options for changing the item will immediately appear.
To apply the changes to the configuration, click on Save.
37
th
Revision A – Preliminary Document
Innovation Center Access Network System
17 of May 2001
10.4 Making Changes to Remote Modems
To see the remote side follow the steps described under section 8.3
(substituting Remote for Local), then carry out the steps described under
section 10.3. The following window will appear (Figure 19).
Figure 19: Remote Interface Configuration
To change configurations follow the steps described under section 10.3 in
connection with making changes and saving.
38
th
Revision A – Preliminary Document
Innovation Center Access Network System
17 of May 2001
11 Performance Monitoring
The Performance Monitoring window shows potential errors that may occur
between the local and remote modems.
11.1 To view the window
Click on the Performance tab in the menu bar. A sub-item named Instant
Report will open up. If you click on this you can see the errors which have
occurred in the connection. This procedure is shown in Figure 20 below.
Figure 20: G.826 Error Performance Measurements
11.2 Monitoring of sub-items
Other items can be monitored as part of error performance checking, such
as the Regeneration stage and the 2 Bits bundle.
39
th
Revision A – Preliminary Document
Innovation Center Access Network System
17 of May 2001
To activate these sub items click on the Performance tab in the menu bar
in the window opened as in chapter 11.1, and select either monitoring of
the Regenerator (if the connection has one or two stages) and monitoring
of the 2M Bits bundle, as in example 15. (The Line HDSL item is exactly
as shown previously).
Example 15
By following these steps we can see the current state of the Regenerator
(if one is present) and any errors, as shown in Figure 21. If we select the
item 2Mbits E1, this will show the inbound signal on the Local and Remote
boards, as shown in Figure 22.
Figure 21: G.826 Performance Measurements with Regenerators
40
th
Revision A – Preliminary Document
Innovation Center Access Network System
17 of May 2001
Figure 22: G.826 E1 Error Performance
Note: There may be up to two regeneration stages, and therefore up to
two regeneration stage performance windows (example 16).
Regenerator 1
Regenerator 2
Example 16
41
th
Revision A – Preliminary Document
Innovation Center Access Network System
17 of May 2001
12 Application
The function of the Application option is to set the timing intervals between
WATSON ELEMENT MANAGER and the CMU management card. This
information is queried every time the user requests an alarms update, or
when modem boards are configured, and so on.
To activate this option, click on Application, then select Application
Configuration from the sub-menu, as shown in example 17.
Example 17
After opening the CMU Polling Settings window, set the timing intervals
between the board and the application. Under normal circumstances this
timing should be set to between 110 (seconds) and 130 (seconds), the
normal setting being 120 (seconds). See Figure 23.
Figure 23: CMU Rolling Settings
Click on Save to apply the changes you have made.
42
th
Revision A – Preliminary Document
Innovation Center Access Network System
17 of May 2001
13 User
This item was developed in order to restrict access to the application, or
rather, it enables pre-defined users to be authorised to use WATSON
ELEMENT MANAGER, by means of user-specific passwords.
In HP OPEN VIEW a Login window for WATSON ELEMENT MANAGER
will appear. The factory default User Name is administrator and the
password is also administrator.
The application allows access to the following settings, as shown in Figure
24. New users can be added here if desired.
New Users
Figure 24: HPOV Login Window
To include new users or edit existing users click on User, as shown in
Figure 24, and a sub-menu with three options will appear (example 18).
To add new users click on Add User, as shown in Figure 25.
Add new users
Example 18
43
th
Revision A – Preliminary Document
Innovation Center Access Network System
17 of May 2001
Figure 25: Adding New User
In the settings window, give the new user a name, password, e-mail
address and telephone number and define the level of access allowed.
See example 19.
Access level definition
Example 19
44
th
Revision A – Preliminary Document
Innovation Center Access Network System
17 of May 2001
14 Consulting Alarms
The Watson Element Manager contains a storage area that holds
information on all the alarms that have occurred as a result of tests or of
faults in the system. They are grouped in the order in which they occur
and highlighted in orange according to their priority.
To access this information click on the Alarm Categories menu (as seen in
earlier chapters) and on the Schmid CMU icon, as in example 20.
Example 20
Figure 26 shows the view of this function. It contains the following
parameters:
-
Month,
-
Day,
-
Hour,
-
IP number of CMU board,
-
Rack number,
-
Slot number on the board,
-
Type of alarm,
-
Type of board (NTU/LTU),
-
Alarm priority.
45
th
Revision A – Preliminary Document
Innovation Center Access Network System
17 of May 2001
Figure 26: Errors and Warnings
This window monitors modems. Short reports can be generated and sent
to Printer or to File as desired.
46
th
Revision A – Preliminary Document
Innovation Center Access Network System
17 of May 2001
15 Inserting the CMU card
This part of the manual describes the SNMP CMU Agent. The relevant
topics include:
•
Introduction to the Management System.
•
Description of the CMU BOOT program.
•
Description of the CMU SYSTEM program.
The CMU Agent Element consists of three separate programs. The BOOT
program takes control after initialisation, the LOADER program is a BOOT
utility which provides download facilities for new FLASH ROM versions
and the SYSTEM program is the CMU’s SNMP program. Both the BOOT
and the SYSTEM program have their own configuration menus.
47
th
Revision A – Preliminary Document
Innovation Center Access Network System
17 of May 2001
16 Description of the Management System
The management system was designed to cater for the need to manage
modems remotely and to obtain statistical data on their operation. The
main functions of this system are:
•
Remote modem configuration.
•
Monitoring of parameters.
•
Receiving modem alarms.
•
Managing modems.
•
Statistics, etc.
In order to operate this management system effectively it is necessary to
connect the various modems to a Management Centre (MC). For this
purpose we divide up the modems into smaller, more functional units,
which we call Management Units (MU).
A Management Unit is made up of the following elements:
•
A group of local modems connected together in a local group and to an
Agent Element (AE).
•
A group of modems connected to the local modems.
•
An SNMP Agent Element (AE) which controls the local and remote
modems and establishes the connection to the Management Centre.
This Agent Element has two external interfaces: X.25 and Local Area
Network (LAN). These enable us to establish the connection to the
MC (Management Centre).
48
th
Revision A – Preliminary Document
Innovation Center Access Network System
17 of May 2001
16.1 Description of the Management System SNMP Protocol
The management system is based on the SNMP communications
protocol. This protocol uses the basic SET and GETS commands between
the Management Centre (MC) and the elements to be managed. It is
implemented in the TCP/UDP connection layer of the Internet Protocol
(IP).
The SNMP protocol provides a security and protection system for access
to management variables, and creates the idea of community for this
purpose. Access rights for each community and each variable can be
defined in any Management Centre.
If access rights are violated, error-trapping messages are sent to the
Management Centre, as configured by the Agent.
The IP protocol defines addressing criteria for its elements. The usual
form used for such addresses is n.n.n.n (where n is a number between 0
and 255).
Different types of networks are defined according to the elements that
belong to them. What they have in common is the address fields. In this
way Type A, B, C and D networks are set up.
The addresses for the different types of network are:
•
Type A: nnn.
•
Type B: nnn.nnn
•
Type C: nnn.nnn.nnn
•
Type D: nnn.nnn.nnn.nnn
Thus:
•
The Management Centre belongs to a Type B network.
•
Each of the Local Area Network (LAN) segments and the Management
Centre segment belong to a Type C network.
•
The X.25 network belongs to a Type C network.
•
Each device (component) connected to this network, including the MC,
has a Type D IP address.
When an Agent Element (AE) is connected simultaneously to an X.25
Network and a Local Area Network, it has two IP addresses allocated, one
for each Network. This Agent Element (AE) operates as a gateway.
49
th
Revision A – Preliminary Document
Innovation Center Access Network System
17 of May 2001
16.2 Local Interconnect Bus (LIB)
The bus through which all modems belonging in the same Management
Unit are interconnected is called the Local Interconnect Bus (LIB).
LIB is implemented by a shared bus system (a server and multiple clients),
using the RS485 electrical standard.
The Server (Master) function in the RS485 bus is carried out by the Agent
Element (AE).
The Client (Slave) elements of LIB are the modems.
In this shared (server - client) bus system, the AE sends messages to the
LIB and the modems transmit messages back only when requested
(polled) by the AE. In this way the AE sends messages to all modems,
both local and remote, on a continuous and cyclical basis.
Each element in the LIB has an ID reference which represents its address
in the bus node. The AE uses this ID to address the various different
modems connected to the LIB. A modem will only respond to messages
which contain its own ID or the ID of its associated remote modem.
16.3 Agent Element (AE)
As already shown above, the Agent Element operates as the server for
LIB. The AE controls all local and remote modems.
The AE has two external interfaces: an X.25 line of the V.24/V.28 type
and an Ethernet Local Area Network (LAN) interface. It communicates
through these interfaces with the Management Centre and with other
Agent Elements.
16.3.1 Agent Element (AE) Architecture
The AE is made up of the following Modules and Interfaces:
•
Process Module:
This is made up of a 16-bit micro-processor, operating at a frequency
of 10 MHz. It has 512 Kbytes of static memory and 512 Kbytes of
Flash ROM memory.
•
X.25 Module:
Consists of a communications controller with direct access memory. It
has an external data interface of the V.24/V.28 type, configured as
DTE with a line speed of up to 200 KBPS.
•
LAN Module.
Consists of a LAN controller with local memory.
50
th
Revision A – Preliminary Document
Innovation Center Access Network System
17 of May 2001
It has two external interfaces: twisted pair (10BASET) and Thin
Ethernet or 10BASE2.
•
RS485 Module.
Consists of communications controller with direct access memory.
It has an external data interface of the RS485 type.
•
Control Module.
Monitors the correct operation of the element.
16.4 Management Unit (MU)
We have designated as Management Unit (MU) the system that is made
up of the Agent Element and the local and remote modems it controls.
The Management Centre (MC) together manages all the Management
Units.
Communication between the various different Management Units and the
Remote Management Centre takes place through the X.25 network or
through the Local Area Network (LAN).
16.4.1 Expanded Management Unit (EMU)
When the number of Management Units in the central offices becomes
relatively large and there are several X.25 links, it is possible to group
together several Management Units to form an Expanded Management
Unit (EMU).
In this case we connect all the Agent Elements together in a Local Area
Network (LAN), and only one Agent is connected to the X.25 Network.
We call the AE with the link to the X.25 Network the “Agent Element” and
the others which are connected to the LAN "Expanded Agent Elements"
(EAE).
Expanded Agent Elements are nodes in a local area network; we can
therefore have as many modes as are specified by the relevant standard
(10BASET or 10BASE2).
16.4.2 Management Unit (MU) Architecture
As explained above, each Management Unit is made up of an Agent
Element and up to 32 modems (in accordance with the RS485 standard),
and all of them are interconnected through the LIB (Local Interconnect
Bus).
To install them in the central office, sub-racks are used, which can take up
10 modems per unit.
51
th
Revision A – Preliminary Document
Innovation Center Access Network System
17 of May 2001
To accommodate a complete Management Unit, we require between one
and four sub-racks, installing them in the AE and up to 32 modems.
We designate the sub-racks as 0, 1, 2 and 3, and number the elements
located in each sub-rack from position 0 to 10.
As explained earlier, all the management elements connected to the LIB
must have an ID reference. The address (ID) of an element in the
Management Unit (MU) is obtained by the address of its sub-rack
(address 0 to 3) and by the address of the element in the sub-rack
(address 0 to 9).
The ID reference is made up of 8 bits (ID 7:0). The first five bits (ID 4:0)
indicate the address of the element in the sub-rack (0 to 9), and the
following two bits (ID 6:5) indicate the address of the Sub-rack (0 to 3). Bit
7 is used to address the remote modem; thus if a modem has the address
ID=00000001, the ID address of its corresponding remote modem will be
ID=10000001.
The AE is always given the fixed address ID=0.
ID Address of RS485 Bus Element
7
6
5
Local
Modem /
Remote
Modem
Sub-rack
address
4
3
Board Address
52
2
1
0
th
Revision A – Preliminary Document
Innovation Center Access Network System
17 of May 2001
17 CMU Monitor
Connecting a terminal or a PC (with terminal emulation) to the X.25
Connector accesses the menus of the BOOT and SYSTEM programs.
To update the CMU with new versions of the programs, the terminal must
be a PC with a communications program able to transfer files and to
operate in terminal emulation mode. Once the agent configuration is
complete, the monitor can disconnect from the X.25 Connector.
17.1 Monitor Features
The CMU terminal must comply with the following requirements:
•
Asynchronous communications.
•
19200 bps, no parity, 8 characters bits, 1 stop bit.
•
XON/XOFF.
•
VT100 emulation.
•
The ability to transfer ASCII files without a communications protocol
17.2 Description of the X.25 Connector
The X.25 agent connector is of the V.24/V.28 type, configured as DTE.
We must therefore use a connection that complies with these standards.
The pin allocation of the connector is shown below, although only send
and receive signals are necessary.
53
th
Revision A – Preliminary Document
Innovation Center Access Network System
17 of May 2001
X.25 Connector
Pin
Circuit Name
Circuit
1
Earth
c101
2
Data Transmit (DT)
c103
3
Data Receive (DR)
c104
4
Request to send (RTS)
c105
5
Clear to send (CTS)
c106
6
Data Stream Ready (DSR)
c107
7
Common return
c102
8
Data Carrier Detect (DCD)
c109
15
Signal clock Transmit, origin: DCE ( TxClk)
c114
17
Signal clock Receive, origin: DCE (RxClk)
c115
20
Data Terminal Ready (DTR)
c108
22
Ring Indicator (RI)
c125
24
Signal clock Transmit, origin: DTE (TxClk)
c113
17.3 Connection to a Terminal
In order to be configured, the CMU must be connected to a terminal or a
computer running a terminal program. The following gateway
configurations will work (for example: Hyperterminal in Windows NT):
•
Bits per second: 19200
•
Data Bits: 8
•
Parity: None (zero)
•
Stop Bits: 1
•
Flow control: None (zero)
Since both the CMU and the terminal have DTE connectors, the CMU
must be connected to the terminal using a Null Modem cable or device.
This will connect Data Transmit (Pin 2) of the CMU to Data Receive (Pin
3) of the terminal, and Data Receive (Pin 3) of the CMU to Data Transmit
(Pin 2) of the terminal.
54
th
Revision A – Preliminary Document
Innovation Center Access Network System
17 of May 2001
The connection can be tested as follows:
•
Insert the MON jumper on the CMU board,
•
Connect the terminal to the CMU,
•
Reset the CMU, or power down and restart, and the BOOT program’s
main menu should appear in the terminal window.
55
th
Revision A – Preliminary Document
Innovation Center Access Network System
17 of May 2001
18 Boot Program (Initialisation)
The job of this program is to update the FLASH ROM with new versions of
the code.
In order to start this program, the MON jumper on the CMU board must be
correctly set.
After power-up, the main menu will appear on the screen.
18.1 Main Menu
** AGT-CMU2 BOOT V5.0 **
------------------------
1.- Start SYSTEM.
2.- Download BOOT from RS232.
3.- Download SYSTEM from RS232.
4.- Download SYSTEM from LAN.
5.- Download BOOT from LAN.
6.- Check IO-Boot Params.
7.- Maintenance Test.
8.- Init board as Master.
Self-Test Result: 0000
CRC16 Flash Boot: B48A
(Push an Option...)
These are the options available in this menu:
1. Start SYSTEM.
Start the system application directly (SYSTEM program).
56
th
Revision A – Preliminary Document
Innovation Center Access Network System
17 of May 2001
2. Download BOOT from RS232.
Enables updating of the BOOT program.
3. Download SYSTEM from RS232.
Enables you to update the System program.
4. Download SYSTEM from LAN.
5. Download BOOT from LAN.
6. Check IO-Boot Parameters.
7. Maintenance Test.
8. Initialise board as Server (Master).
The files to be downloaded are in ASCII format and have the following
names:
File Name
Description
Menu Choice
BOOT.HEX
BOOT Program
2
SYSCMU2.HEX
SYSTEM Program
3
18.2 Updating the BOOT program
This will show an example of updating the BOOT program in the agent’s
flash memory.
The load sequence is the same for all the programs:
18.2.1 Choose Download Option
To update the BOOT program, select option 2 and the CMU Agent to
await transfer of the file.
Ready to download boot.hex from RS232...
57
th
Revision A – Preliminary Document
Innovation Center Access Network System
17 of May 2001
18.2.2 File Transfer
We transmit the ASCII file using the communications program and the
following protocol:
•
ASCII file transfer with no flow control.
•
19200 bps. No parity, 8 data bits, 1 stop bit.
When using HyperTerminal you must use the Transfer/Send Text File
(download) menu option.
From the list of files to select, choose the BOOT.HEX file.
18.2.3 Result of Remote Load
As soon as the file transfer is complete, the result will appear in the
terminal window.
Loading boot.hex File ... ..........................
... Load Ok, Flash Ok (Push <Space>)
If the file transfer is successful: Load OK.
If the FLASH memory update is successful: Flash OK.
58
th
Revision A – Preliminary Document
Innovation Center Access Network System
17 of May 2001
18.2.4 Finalising the Process
After pressing the Space Bar, the CMU will go to Reset and it will return to
the BOOT menu.
Now remove the MON jumper and reset the CMU. Wait until the LED
Status light goes green (without blinking) and press the <CTRL> and <J>
keys together to access the applications configuration menu.
59
th
Revision A – Preliminary Document
Innovation Center Access Network System
17 of May 2001
19 System Program
This program configures the applications that run on the CMU: SNMP,
Ethernet, X.25 and modem control (RS485).
19.1 Main Menu
This is the main menu for configuring the applications. This menu is
accessed as follows:
•
Remove the MON jumper from the CMU board, wait until the LED
Status light stops blinking (10 seconds) and press the <CTRL>and <J>
keys together
** AGT-SNMP V9.5 **
------------------1.- Boot System.
2 - Modules Configuration.
3 - LAN/SNMP/IP/NET Configuration.
4 - X.25 Configuration.
5 - RS485 Configuration.
6.- Default Configuration.
7.- Save Configuration.
8.- Change Language.
(Push a Key ...)
60
th
Revision A – Preliminary Document
Innovation Center Access Network System
17 of May 2001
The options under this menu are described in the following sections.
19.1.1 Boot System
Starts the SYSTEM program directly.
There are no sub-menus under this option.
Booting the System ...
19.1.2 Modules Configuration
In this menu, we select the applications that we will run on the CMU.
** AGT-SNMP V9.5 **
------------------Modules Configuration
-----------------------------
Start RS485: 1
Start X25 : 0
Start LAN : 1
Do you agree with this configuration (Y/N) ?
Possible values are:
•
0: Do not activate the application.
•
1: Activate the application.
61
th
Revision A – Preliminary Document
Innovation Center Access Network System
17 of May 2001
The RS485 Local Interconnect Bus (LIB) application for modem control
will be activated as soon as the CMU is controlling some modems through
the bus.
The X.25 application will be activated if the agent is being connected to an
X.25 network.
The LAN application will be activated only if the CMU is connected to a
segment of the Local Area Network (LAN).
If the agent should be able to rotate between the X.25 network and the
LAN, then both applications must be enabled.
19.1.3 LAN/SNMP/IP/NET Configuration
This menu sets the parameters for configuring the Local Area Network
(LAN), namely SNMP parameters, accessible networks, IP address,
gateways, etc.
** AGT-SNMP V9.5 **
------------------1.- Previous Menu.
2.- SNMP Configuration.
3.- Ethernet Interface.
4.- Ethernet Address.
5.- Local IP Address Table.
6.- Networks Table.
7.- IP-X25 Table.
8.- Gateways Table.
(Push a Key ...)
The following sections describe the sub-menus, which appear in this
window.
62
th
Revision A – Preliminary Document
Innovation Center Access Network System
17 of May 2001
19.1.3.1 Previous Menu
Returns to the Previous Menu (the Main Menu).
63
th
Revision A – Preliminary Document
Innovation Center Access Network System
17 of May 2001
19.1.3.2 SNMP Configuration
This is used to configure the IP address for the Management Centre and
the SNMP community to which it belongs.
** AGT-SNMP V9.5 **
-------------------
1.- Previous Menu.
2.- X.25 Interface Section
3.- X.25 Link Section
4.- X.25 Packet Section
5.- X.25 Address
(Push a Key ...)
•
NMS IP Address:
IP address for the Management Centre.
•
Community:
SNMP community to which it belongs.
64
th
Revision A – Preliminary Document
Innovation Center Access Network System
17 of May 2001
19.1.3.3 Ethernet Interface
This configures the physical interface type being used in the Local Area
Network (LAN).
** AGT-SNMP V9.5 **
-------------------
Ethernet Interface (0=10BT, 1=10B2, 2=10B5): 0
10BaseT Link Test (0=disable, 1=enable):
1
Do you agree with this configuration (Y/N) ?
•
Interface Ethernet.
Type of interface being used: twisted pair (10BASET) or Thin Ethernet
(10BASE2).
•
10BASET Link Test.
Enables or disables test pulse generation and verification of the
integrity of the link.
65
th
Revision A – Preliminary Document
Innovation Center Access Network System
17 of May 2001
19.1.3.4 Ethernet Address
Location where the configuration of the list of Ethernet addresses
associated with the CMU can be done. This parameter is used in all Agent
Elements that are connected to the same network segment. Only one of
them has an X.25 connection.
The CMU and all other elements, which are on the same segment of the
Local Area Network (LAN) should each have a different address.
This parameter is not required for Agent Elements configured with a direct
X.25 connection and without a Local Area Network (LAN).
** AGT-SNMP V9.5 **
-------------------
Ethernet Address
-----------------00108C00A047
Do you agree with this configuration (Y/N) ?
Ethernet Address
020305060704
020305060705
66
th
Revision A – Preliminary Document
Innovation Center Access Network System
17 of May 2001
19.1.3.5 Local IP Address Table
Location where the configuration of the table of Agent Element addresses
for X.25 and Ethernet networks can be done.
** AGT-SNMP V9.5 **
-------------------
Local IP Address Table:
193.148.33.220
Do you agree with this configuration (Y/N) ?
Local IP Address Table: n.n.n.N
Where N is the number allocated to the Agent Element.
67
th
Revision A – Preliminary Document
Innovation Center Access Network System
17 of May 2001
19.1.3.6 Networks Table
Location containing the set up of the table of networks, which are
accessible to the Agent Element.
If the Agent Element is connected to a Local Area Network (LAN), the
configuration of the IP address of the (Type C) network to which it has
access; local IP addresses in this segment of the LAN belong to this
network. If the Agent Element is connected to an X.25 network, setup the
IP-X.25 accessible to the (Type C) network to which the Agent Element
belongs, in addition to the Management Centre.
For each configured network, it is necessary to select the type of network
(1-Ethernet, 2-X.25) and the maximum packet size.
** AGT-SNMP V9.5 **
-------------------
IP Address
IP-X25 Table
X25 Address
: ------------
--------------------
Do you agree with this configuration (Y/N) ?
•
Address: (Type C) network address.
•
Type: Type of network (Ethernet or X.25).
•
MaxLenPaq: maximum packet length in bytes.
68
th
Revision A – Preliminary Document
Innovation Center Access Network System
17 of May 2001
19.1.3.7 IP-X.25 Table
This is the table of rotation between IP addresses and X.25 addresses.
If the Management Centre is connected to the X.25 Network, its IP
address and the X.25 address will be configured here.
** AGT-SNMP V9.5 **
-------------------
IP Address
IP-X25 Table
X25 Address
: ------------
--------------------
Do you agree with this configuration (Y/N) ?
69
th
Revision A – Preliminary Document
Innovation Center Access Network System
17 of May 2001
19.1.3.8 Table of Gateways
This menu configures those elements which act as gateways for
accessible networks.
An example of a situation in which values must be set in this menu is
where the Management Centre (MC) is part of a Type C network (for
example a LAN) which uses different equipment for outside access
(through X.25, for example). In this case it is the other equipment which
acts as a gateway for the network containing the MC.
** AGT-SNMP V9.5 **
-------------------
Net
Host
Gateways Table : ------------
------------
Do you agree with this configuration (Y/N) ?
Net is the network address of the Type C equipment containing the
Management Center and Host (Server) is the IP address of the equipment
which is acting as gateway.
70
th
Revision A – Preliminary Document
Innovation Center Access Network System
17 of May 2001
19.1.4 X.25 Configuration
Configuration of the parameters for levels 1, 2 and 3 of the X.25 network
and the identification of the network (NRI).
** AGT-SNMP V9.5 **
-------------------
1.- Previous Menu.
2.- X.25 Interface Section
3.- X.25 Link Section
4.- X.25 Packet Section
5.- X.25 Address
(Push a Key ...)
19.1.4.1 Previous Menu
Returns to the previous menu (main menu).
71
th
Revision A – Preliminary Document
Innovation Center Access Network System
17 of May 2001
19.1.4.2 X.25 Interface Section
Configuration level 1 parameters, the physical interface and line speed.
** AGT-SNMP V9.5 **
------------------Interface Section
------------------
Interface (1=DTE, 2=DCE):
1
Speed (13=9600,14=19200):
13
Do you agree with this configuration (Y/N) ?
•
Physical Interface: 1 (1:DTE; 2:DCE)
The physical interface can be selected as DTE or DCE: the signal
configuration on the connector is DTE. If DCE is selected, a special
cable is required.
•
Line speed
The various different line speeds are shown in the following table.
Value Speed
Value Speed
Value Speed
Value Speed
0
50
1
75
2
100
3
110
4
134.5
5
150
6
200
7
300
8
600
9
1200
10
1800
11
2400
12
4800
13
9600
14
19200
72
th
Revision A – Preliminary Document
Innovation Center Access Network System
17 of May 2001
19.1.4.3 X.25 Link Section
Configuration X.25 level 2 parameters.
** AGT-SNMP V9.5 **
------------------Link Section
------------------
Interface (1=DTE, 2=DCE):
1
Module (0=8,1=128):
Retry Number:
Retry Interval:
0
15
30
Do you agree with this configuration (Y/N) ?
•
Logical Interface: DTE or DCE.
•
Module in sequence: Module 8 or Module 128.
•
Number of retries:
•
Time between retries: in milliseconds.
73
th
Revision A – Preliminary Document
Innovation Center Access Network System
17 of May 2001
19.1.4.4 X.25 Packet Section
Level 3 Configuration for X.25.
** AGT-SNMP V9.5 **
------------------Packet Section
------------------
Module (0=8,1=128):
0
LCN Two-ways Number:
3
Packet Size (7=128,8=256):
8
Do you agree with this configuration (Y/N) ?
•
Module in sequence: 8 or 128.
•
Number of Virtual Bi-directional Commuted Circuits: maximum 100.
•
Packet size: 128 or 256.
74
th
Revision A – Preliminary Document
Innovation Center Access Network System
17 of May 2001
19.1.4.5 X.25 Address
The agent’s X.25 address is set here.
** AGT-SNMP V9.5 **
-------------------
Network Address:
1234567890
Do you agree with this configuration (Y/N) ?
•
X.25 address: nnnnnnnnnn (NRI)
NRI is designated to the Agent.
75
th
Revision A – Preliminary Document
Innovation Center Access Network System
17 of May 2001
19.1.5 RS485 Configuration.
This menu is used to configure RS485 bus parameters.
** AGT-SNMP V9.5 **
------------------RS485 Parameters
----------------------Polling Time (mls):
500
Local Modem Time-out (mls):
3000
Remote Modem Time-out (mls):
7000
Modems In/Out Relation:
5
Remote Modems Watch (0=N,1=Y): 0
Remote Connect Report (0=N,1=Y): 1
Retry Number:
3
Speed (6=200,11=2400,13=9600): 12
RS485 Stop Bits (1=1,2=1.5,3=2): 3
RS485 Parity (0=NP, 1=Even, 2=Odd): 2
RS485 Prot.(2=V58,1=MN1, 0=HDSL): 0
RS485 Wire Number (2/4):
2
Last Modem Address:
Rack Address: 0
Board Address: 12
Do you agree with this configuration (Y/N) ?
•
Request Time (polling).
This is the time period, in milliseconds, between consecutive accesses
to elements connected in the RS485 bus.
•
Local Modem Time-out).
This is the maximum period of time, in milliseconds, that the CMU will
wait for a response from the local modem.
•
Remote Modem Time-out).
This is the maximum period of time, in milliseconds, that the CMU will
wait for a response from the remote modem.
•
Modem In/Out.
This is the relationship between the number of times the CMU monitors
active modems (in) and the number of possible modems (out). The
maximum number of possible modems is defined by the parameter
“Last modem address”.
76
th
Revision A – Preliminary Document
Innovation Center Access Network System
•
17 of May 2001
Remote Modem Watch.
Enables or disables remote modem watching.
•
Number of retries.
This is the number of attempts to connect to an active modem after a
communications failure.
•
RS485 Speed.
This is the speed of RS485 bus. Supported speeds are:
Value
•
Speed
Value
Speed
Value
Speed
Value
Speed
0
50
1
75
2
100
3
110
4
134.5
5
150
6
200
7
300
8
600
9
1200
10
1800
11
2400
12
4800
13
9600
14
19200
RS485 Bit Stop.
The number of stop bits in asynchronous characters.
•
RS485 Parity.
Enables or disables parity in asynchronous characters.
•
RS485 Protocol.
Selects the types of protocols used by RS485. Value 1 means the
protocol implemented for a speed of 200 baud, Value 0 1 means the
protocol implemented for 9600 baud.
•
RS485 Wire number.
Select the number of wires barred.
•
Last modem address.
Selects the address of the last installed modem (Rack Address and
Board Address).
19.1.6 Configuration Default
Resets all configuration parameters to their default values.
19.1.7 Store Configuration
Stores all configuration parameters in non-volatile memory.
77
th
Revision A – Preliminary Document
Innovation Center Access Network System
17 of May 2001
19.1.8 Switch Language
Switches between Spanish and English language.
78
th
Revision A – Preliminary Document
Innovation Center Access Network System
17 of May 2001
19.2 Ethernet Connection
Once the CMU has been configured, it is possible to test the Ethernet link.
Select the Ethernet interface being used (10Base-T or 10Base-2) (item
19.1.3.3) and allocate it a local IP address which is valid for that CMU
(item 19.1.3.5). Make sure that the MON jumper on the board of the CMU
is removed and reset the CMU. Pinging the CMU (checking there is
satisfactory communication using the Ping program) can carry out the
communication test.
Example:
CMU (193.148.33.220) and a PC (193.148.33.147) are connected to a
hub through a 10Base-T link.
[c:\]ping 193.148.33.220
Pinging 193.148.33.220with 32 bytes of data:
Reply from 193.148.33.220: bytes=32 time<10ms TTL=10
Reply from 193.148.33.220: bytes=32 time<10ms TTL=10
Reply from 193.148.33.220: bytes=32 time<10ms TTL=10
Reply from 193.148.33.220: bytes=32 time<10ms TTL=10
If pinging fails, the program will give a “Request timed out” response.
79
20 Appendix
20.1 Connector Description
13
20.1.1 X.25 Connector
25
Front View
Sub-25, female
14
1
Pin allocation: X.25 Connector
Pin
Circuit Name
Circuit
1
Earth
c101
2
Data Transmit (DT)
c103
3
Data Receive (DR)
c104
4
Request to Send (RTS)
c105
5
Clear to Send (CTS)
c106
6
Data Stream Ready (DSR)
c107
7
Common return
c102
8
Carrier Detect (DCD)
c109
15
Signal clock Transmit, origin: DCE (TxCk)
c114
17
Signal clock Receive, origin: DCE (RxCk)
c115
20
Data Terminal Ready (DTR)
c108
22
Ring Indicator (RI)
c125
24
Signal clock Transmit, origin: DTE (TxCk)
c113
20.1.2 TPI Connector
Connector Type: RJ45
1
8
Front View
RJ45-8
Pin allocation:
TPI Connector (CN2)
20.1.3
Pin
Circuit Name
1
Data Transmission +
2
Data Transmission -
3
Data Receive +
4
NC
5
NC
6
Data Receive -
7
NC
8
NC
Rear Panel Connector
Pin allocation:
Rear Panel Connector (CN1)
82
Pin
Circuit name
1a
NC
1c
NC
2a
0 Volt
2c
0 Volt
4a
48 V_1
4c
48 V_2
6c
SYS_GND2
10a RS485 TD_A
10c
RS485 TD_B
18a RS485 RD_A
83
18c
RS485 RD_B
60c
ALARM STATUS