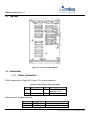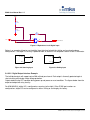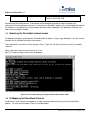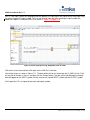
1
ECM2 Control Platform
Ethernet Control Module™
User Manual AS01023G-01
Controls Product Group
134 W. Rio Robles Drive
San Jose, CA 95134
Main: 408.750.0300
Fax: 408.750.2990
ECM2 User Manual Rev. 1.5
Copyright
This manual and the software described therein are copyrighted with all rights reserved.
Under copyright laws, this manual and software may not be copied, in whole or part,
without the prior written consent of MKS Instruments. The same proprietary and
copyright notices must be affixed to any permitted copies as were affixed to the original.
This exception does not allow copies to be made for others whether or not sold, but all of
the materials purchased may be sold, given, or loaned to another person. Under the
law, copying includes translating into another language or format.
© MKS Instruments - Controls Product Group, 2012
134 W. Rio Robles Drive
San Jose, CA 95134
Export Regulation
MKS Products provided subject to the US Export Regulations. Diversion or transfer
contrary to U.S. law is prohibited.
Preface
About this manual
This manual is designed to serve as a guideline for the installation, setup, operation and
basic maintenance of the ECM2 Control Platform. The information contained within this
manual, including product specifications, is subject to change without notice. Observe all
safety precautions and use appropriate procedures when handling the ECM2 product
and its related software.
Technology protected by U.S. patent numbers 7,620,516 and 6,993,404.
Page 2 of 121
© MKS Instruments CIT Products 2012, All rights reserved
ECM2 User Manual Rev. 1.5
Table of Contents
Revision History ......................................................................................................................................... 5
1
General Information ............................................................................................................................ 6
1.1
2
CONVENTIONS USED IN THIS USER MANUAL ....................................................................................... 6
Hardware Description & Setup .......................................................................................................... 7
2.1
HARDWARE DESCRIPTION ................................................................................................................. 7
2.2
PHYSICAL SPECIFICATIONS ................................................................................................................ 7
2.3
TOP VIEW ....................................................................................................................................... 12
2.4
CONNECTORS ................................................................................................................................. 12
2.4.1
Power Connectors ................................................................................................................. 12
2.4.2
IO Connectors ....................................................................................................................... 13
2.4.3
Interlock-IN Connectors ......................................................................................................... 21
2.4.4
Interlock-OUT Connectors ..................................................................................................... 23
2.4.5
Other Connectors .................................................................................................................. 25
2.5
LCD ............................................................................................................................................... 26
2.6
LED’S ............................................................................................................................................ 26
2.7
SWITCHES ...................................................................................................................................... 27
2.8
DIAGNOSTIC CONSOLE SERIAL ........................................................................................................ 29
2.8.1
Connecting via a Diagnostic Console Serial ......................................................................... 29
2.8.2
RS232 Serial Communication Ports ...................................................................................... 30
3
Quick Start ......................................................................................................................................... 32
3.1
NETWORK CONFIGURATION ............................................................................................................. 32
3.2
CONNECTING TO A COMPUTER VIA TCP/IP AND OVER THE CONSOLE PORT AND PREPARING TO BOOT THE ECM2 32
3.2.1
LCD Power Start up Sequence ............................................................................................. 32
3.3
CHANGING THE IP ADDRESS FOR THE UNIT ....................................................................................... 36
3.3.1
IEC Start Up Rotary Switch Setting ....................................................................................... 37
3.4
SETTING THE UNIT DATE ................................................................................................................. 38
3.5
SETTING THE UNIT TIME .................................................................................................................. 39
3.6
TROUBLESHOOTING NETWORK CONFIGURATION ............................................................................... 40
4
DeviceNet Master Capabilities ......................................................................................................... 41
4.1
FIRST-TIME SETUP OF DEVICENET NETWORKS OR ADDING ADDITIONAL DEVICENET NETWORKS ........ 41
4.1.1
Deleting the DeviceNet config file ......................................................................................... 42
4.2
DEVICENET MASTER DIAGNOSTICS AND INFORMATION ..................................................................... 42
4.3
DEVICENET MASTER DETECTION MECHANISM.................................................................................. 42
4.4
SCANNING THE DEVICENET NETWORK NODES .................................................................................. 43
4.5
IO MAPPING FOR SLAVE/NODE DEVICES .......................................................................................... 43
5
IEC61131-3 Compliant Programming Interface .............................................................................. 45
5.1
SOFTWARE REQUIREMENTS ............................................................................................................ 45
5.1.1
Configuration ......................................................................................................................... 52
5.1.2
IEC LED status ...................................................................................................................... 52
6
Tutorial - Creating a Multiprog Project ........................................................................................... 54
6.1
W RITING IEC CODE AND COMPILING AND DOWNLOADING TO UNIT ...................................................... 68
6.1.1
Compiling ............................................................................................................................... 73
6.1.2
KW Multiprog Project Control and Download ........................................................................ 76
6.1.3
MKS Firmware Library ........................................................................................................... 81
Page 3 of 121
© MKS Instruments CIT Products 2012, All rights reserved
ECM2 User Manual Rev. 1.5
7
Programmable Interlocks ................................................................................................................. 86
7.1
OVERVIEW ...................................................................................................................................... 86
7.2
MAIN FEATURES ............................................................................................................................. 86
7.3
OPERATION DESCRIPTION ............................................................................................................... 86
7.3.1
Prog/Debug Mode ................................................................................................................. 87
7.3.2
Operational Mode .................................................................................................................. 88
7.3.3
Debounce on the Inputs ........................................................................................................ 88
7.4
INTERLOCK STATUS BIT MAP TABLE................................................................................................. 90
7.5
INTERLOCK OUTPUT LOGIC .............................................................................................................. 92
7.6
VISIM TOOL FOR INTERLOCK OUTPUT LOGIC COMMISSIONING........................................................... 92
7.6.1
Installation ............................................................................................................................. 93
7.7
TUTORIAL – CREATING A LOGIC FILE USING VISIM............................................................................. 95
7.7.1
Create New File: .................................................................................................................... 95
7.7.2
I/O Map File: .......................................................................................................................... 95
7.7.3
Edit the Visio File: .................................................................................................................. 95
7.7.4
Draw The Logic: .................................................................................................................... 96
7.7.5
Assign Inputs and Output. ..................................................................................................... 97
7.7.6
Generate CSV (Coma-Separated Value) File. .................................................................... 100
7.7.7
Logic example ..................................................................................................................... 103
7.7.8
The Default CSV File: .......................................................................................................... 103
7.7.9
Simulate the Design ............................................................................................................ 103
7.8
LOGIC STRUCTURE ....................................................................................................................... 105
7.8.1
Combined AND/OR Logic Term .......................................................................................... 105
7.8.2
Latch Structure .................................................................................................................... 106
7.8.3
Download the Logic to ECM2 .............................................................................................. 107
7.8.1
Troubleshooting ................................................................................................................... 110
7.9
MAINTENANCE AND SAFETY ........................................................................................................... 110
7.9.1
System Periodic Test/Monitoring ......................................................................................... 110
7.9.2
Self-Test .............................................................................................................................. 110
7.9.3
User Relay Diagnostic Test ................................................................................................. 111
7.9.4
Proof Test ............................................................................................................................ 111
8
WARRANTY ..................................................................................................................................... 115
Appendix A: Troubleshooting ............................................................................................................... 116
Appendix B: Available Shell Commands ............................................................................................. 118
AVAILABLE COMMANDS BY OS DESIGN: ..................................................................................................... 121
Page 4 of 121
© MKS Instruments CIT Products 2012, All rights reserved
ECM2 User Manual Rev. 1.5
Revision History
Revision
0.9
1.0
1.5
Description of changes
First Release
Final Release, with “Arrow First Release” image
Update per SW release 1.5
Date
03/27/2012
04/20/2012
06/21/2012
Revision method:
Rev X.Y
X = 'major revision' - Any change that affects functional safety shall affect this numeral and will require reassessment by the certification body
Y = 'minor' revision' - Any change that does not affect functional safety should be recorded by this numeral
which will not require re-assessment by the certification body
Page 5 of 121
© MKS Instruments CIT Products 2012, All rights reserved
ECM2 User Manual Rev. 1.5
1 General Information
The ECM2 is a control platform that provides an integrated solution with I/O, interlock, and signal
distribution/conditioning in a compact, low cost package. The unit can be implemented as a complete control
platform for a single location or tool or for a complete manufacturing line. The ECM2 can be used to manage
all required tool control needs: handles detailed execution tasks using common programming languages
including C and IEC-61131-3 (such as ladder logic, structure text, sequential function chart….) to run certified
programmable safety interlocks.
There are multiple control and data monitoring interfaces for the ECM2:
• Modbus/TCP (supported in the future)
• DeviceNetTM Slave (supported in the future) as well as Master(s) via external module(s)
• EtherCATTM Slave and Master. (supported in the future)
• ProfibusTM DP (supported in the future)
1.1 Conventions used in this User Manual
Warning
The WARNING sign denotes a hazard to personnel. It calls attention
to a procedure, practice, condition, or the like, which, if not correctly
performed or adhered to, could result in injury to personnel.
Caution
The CAUTION sign higlights information that is important to the safe
operation of the ECM2, or to the integrity of your files. .
Note
The NOTE sign denotes important information. It calls attention to a
procedure, practice, condition, or the like, which is essential to
highlight.
On screen buttons or menu items appear in bold and italics.
Example: Click OK to save the settings.
Keyboard keys appear in brackets.
Example: [ENTER] and [CTRL]
Pages with additional information about a specific topic are cross-referenced within the text.
Example: (See page xxx)
Page 6 of 121
© MKS Instruments CIT Products 2012, All rights reserved
ECM2 User Manual Rev. 1.5
2 Hardware Description & Setup
This section describes the ECM2 hardware setup and the interface with the Ethernet network, Modbus/TCP,
ProfibusTM, DeviceNetTM, EtherCATTM.
2.1 Hardware Description
The ECM2 provides the following interfaces.
• I/O Capability
o Digital (210) or up to 354 with expansion cards
o Analog In (32 differential)
o Analog Out (16 single-ended with offset)
o 48 interlock digital inputs (24V) + 1 Watch Dog Input (TTL).
o Support 32 Interlock functions.
o 4 Serial Ports (RS232) (1 dedicated Serial Monitor, 3 Serial)
• KW Multiprog software with IEC61131-3 compliant development environment for IEC programming
capabilities
• LCD for IP address display
• Network Status LEDs
• IP Address Switches
This user manual is based on general market configuration and SW
at the time of this writing. Customer’s specific configuration, layout,
IO counts and functional features might differ. Please contact MKS
for specific feature and information on customized ECM2 products.
2.2 Physical Specifications
Criteria
Dimensions
Ethernet Connector
RS-232 Connector
Material chassis
Material front
Cooling
Specifications
2U(h) x 13”(w) x 10”(d)
100 BaseT auto-software switched
TXD, RXD; DB9 connector
Plate/chromate
Paint black
Internal Fan
Environmental Specifications
Criteria
Operating Temperature
Storage
Humidity
Altitude
MTBF minimum
Specifications
0 to +45°C
-40 to +85°C
5 to 95% non-condensing
Up to 2000 meters
>10 years @ 80% confidence level
(87K Hours @ 80% confidence level)
Communication Protocol Specifications
Page 7 of 121
© MKS Instruments CIT Products 2012, All rights reserved
ECM2 User Manual Rev. 1.5
Protocols Supported
Modbus/TCP
TM
DeviceNet
TM
EtherCAT
Profibus
Master
Coming soon
Yes
Coming soon
Coming soon
Slave
Coming soon
Coming soon
Coming Soon
Coming soon
Page 8 of 121
© MKS Instruments CIT Products 2012, All rights reserved
ECM2 User Manual Rev. 1.5
Power Input Specifications
General
Main Power Supply
Power Consumption
18VDC – 30VDC
Typical – 1.2Amp
Max – 10Amp
±15V @ ±1%
Max – 6.7Aamp
Power Supply Analog
Power Consumption
Internally limited.
Fuse Status Detection and Power Measurements
Fuse detection
Fuse detection
Thresholds
Powers measurements
Power measurements
resolution
4 Fuses:
1. 24V_PWR_1
2. 24V_PWR_2
3. 24V_PWR_3
4. 24V_FUSED
17V for the 24V powers
12.5V for 15V powers.
Can be expanded to up to 48 by different
distribution board design.
Fuses are reported as pass or fail to the
application software.
1. 24V_Main
2. +15V
3. –15V
High and low limits for each power are
configurable via application software.
Power measurements are reported to the
application SOFTWARE and compared against
the predefined limits.
Fuses are resettable. A power down of 5
minutes is required.
10 bits
Input/Output Specifications
Digital Input
Number of Inputs
Sink
Input Current
Input Low Voltage range(ON)
Input High Voltage range(OFF)
Source
Input Current
Input High Voltage range(ON)
Input Low Voltage range(OFF)
Debounce filter
Isolation
DI refresh rate
Digital Output
Number of Outputs
Output Type
Output Drive Current
Sink:
Output High Voltage
Output Low Voltage
210 up to 354 with expansion
board
shared with outputs, each
functions as I/O
Max -2.2mA at Vin=0V
Min 0V to Max 9.2V
Min 9.9V to Max 24V
Max 2.35mA at Vin=24V
Min 12.5V to Max 24V
Min 0V to Max 11.7V
0 msec to 999 msec
2.5KVrms
1msec
1 msec resolution,
210, up to 354 with expansion
boards
Open collector
200 mA per output, maximum
750 mA per 6 outputs
shared with inputs,
each functions as I/O
Pull up value – 10K
Sinked/sourced from
24VDC
Min 23.7V @ 0.16mA
Max 0.3V @200mA
Pull up value-10K
Page 9 of 121
© MKS Instruments CIT Products 2012, All rights reserved
ECM2 User Manual Rev. 1.5
Source:
Output High Voltage
Output Low Voltage
Isolation
Max update rate
EMC Protections
Min 23.7V @ 200mA
Max 0V @ 0µA
2.5KVrms
1msec
± 2kv (Immunity to EFT/Burst)
Current Protection:
Each channel
~1.5A
Total
Polarity
Analog Input
Number of Inputs
Differential
Resolution
±10V
Accuracy
Differential
±10V
Input DC resistance
-3db filter frequency
EMC Protections
Isolation
~10A
Sink / Source , HW selectable
per 16 IOs for DIO 0-185,
per 2 IOs for DIO186-207,
per 1 IO for DIO208,209.
Pull down value-10K
EN60490-1
EN61000-4-2
DO driver internal Current
limit.
Current limit circuit
32
16 Bit
0.05 % FS (10V)
For 0.05% periodic calibration is needed
0.4MΩ (Diff) 0.2M (Single
ended)
0.76kHz
Clamping diodes to ± 15V
No Isolation
Pull Down Res
Calculated as f = 1/2πRC
Same Net, different planes
For Analog and Digital part
Page 10 of 121
© MKS Instruments CIT Products 2012, All rights reserved
ECM2 User Manual Rev. 1.5
Analog Output
Number of Outputs
Single-ended with offset
Resolution
Range ±10V
Accuracy
Range ±10V
Output Drive Current
EMC Protection
Isolation
Programmable Interlocks
Certification
Inputs
Output Relays
Output current
Standard Output
High power
Modes of operation
16
16 Bit
0.03 % (3mv) FS (10V)
(required 0.1%)
10mA per output,
(Capacitive load max 1nF)
± 2kv (Immunity to
EFT/Burst)
No Isolation
SIL3
48
1 (for watchdog function)
32 dry contact type N.O.
2A
16A
Run / Prog
EN60490-1
EN61000-4-2
Redundant PLD design,
Implement 1out of 2 programmable logic
architecture
Active high or low contact inputs, jumper
selectable in groups of 12
32 are monitored
Software monitored
Run- normal operation mode.
Prog - Load the Interlock Logic and
Access special FPGA registers for
debug
Page 11 of 121
© MKS Instruments CIT Products 2012, All rights reserved
ECM2 User Manual Rev. 1.5
2.3 Top view
Figure 2-1 Top View of AS01023G-01
2.4 Connectors
2.4.1 Power Connectors
ECM2 is powered by a single 24VDC source. I/O is internally powered.
Table 2-1 Power Pinouts and Fuse Ratings
J1 -1
J1-2
J1-3
+24V
Chassis GND
GND
Current limit
protection circuit
10Amp
Mating connector for power connector
Mftg PN
350689-1
350766-1
Manufacturer
Description
AMP/Tyco
AMP/Tyco
Socket crimping type
3 circuit plug
Page 12 of 121
© MKS Instruments CIT Products 2012, All rights reserved
ECM2 User Manual Rev. 1.5
2.4.2 IO Connectors
2.4.2.1 Combo (Mixed) Input/Output 37 Pin D-SUB Connector
The analog interface provides 16 single-ended with offset outputs and 32 differential analog inputs (or 64
single-ended analog inputs).
NOTE: Currently ECM2 only supports differential analog inputs. Single-ended analog outputs from user can be
connected to the differential input on ECM2 using the same differential pair
AI (+)
To core circuit
(-) or GND
Figure 2-2 Analog Inputs
Protection
AO
8
+
AO offset
Figure 2-3 Analog Outputs
Table 2-2 Analog Voltage 2's complement Conversion for 16 bits A/D
Analog Value(V)
+10
+9
+8
+7
+6
+5
+4
DEC
32767
29491
26214
22937
19660
16383
13107
HEX
0x7FFF
0x7333
0x6666
0x5999
0x4CCC
0x3FFF
0x3333
Page 13 of 121
© MKS Instruments CIT Products 2012, All rights reserved
ECM2 User Manual Rev. 1.5
+3
+2
+1
0
-1
-2
-3
-4
-5
-6
-7
-8
-9
-10
9830
6553
3276
0
62259
58982
55705
52428
49152
45875
42598
39321
36044
32768
0x2666
0x1999
0x0CCC
0x0000
0xF333
0XE666
0XD999
0xCCCC
0xC000
0xB333
0xA666
0x9999
0x8CCC
0x8000
Table 2-3 - 37 Pin D-SUB Combo I/O Legend
AI
Analog Input
AO
Analog Output
DIO
Digital Input Output
AGND
Analog Ground
AGND_E
External Analog Ground
GND
Ground
Notes:
For diffrential analog inputs:
AI0, AI2, AI4....AI62 = AI_Positive
AI1, AI3, AI5....AI63 = AI_Negative
Same pair order must be used for differential: AI0/AI1, AI2/AI3.....AI62/AI63
Figure 2-4 Combo Connector Pinouts
Connectors: J8, J9, J10, J11, J12
Page 14 of 121
© MKS Instruments CIT Products 2012, All rights reserved
ECM2 User Manual Rev. 1.5
Table 2-4 – COMBO (MIXED) I/O - DSUB 37 Pin Assignments
Connector:
J8
J9
J10
J11
J12
Pin #
1
2
3
4
5
6
7
8
9
10
11
12
13
14
15
16
17
18
19
20
21
22
23
24
25
26
27
28
29
30
31
32
33
34
35
36
37
+15V DC
AO1AO1+
AO0AO0+
AGND_E
AGND
AI5
AI4
AGND
AI3
AI2
AI1
AI0
24_GND
DIO184
DIO183
DIO182
24VDC
-15V DC
AO3AO3+
AO2AO2+
AGND
AI11
AI10
AI9
AGND
AI8
AI7
AI6
24_GND
DIO187
DIO186
DIO185
24VDC
+15V DC
AO5AO5+
AO4AO4+
AGND_E
AGND
AI17
AI16
AGND
AI15
AI14
AI13
AI12
24_GND
DIO190
DIO189
DIO188
24VDC
-15V DC
AO7AO7+
AO6AO6+
AGND
AI23
AI22
AI21
AGND
AI20
AI19
AI18
24_GND
DIO193
DIO192
DIO191
24VDC
+15V DC
AO9AO9+
AO8AO8+
AGND_E
AGND
AI29
AI28
AGND
AI27
AI26
AI25
AI24
24_GND
DIO196
DIO195
DIO194
24VDC
-15V DC
AO11AO11+
AO10AO10+
AGND
AI35
AI34
AI33
AGND
AI32
AI31
AI30
24_GND
DIO199
DIO198
DIO197
24VDC
+15V DC
AGND_E
AGND_E
AO12AO12+
AGND_E
AGND
AI41
AI40
AGND
AI39
AI38
AI37
AI36
24_GND
DIO202
DIO201
DIO200
24VDC
-15V DC
AO13AO13+
AI49
AI48
AGND
AI47
AI46
AI45
AGND
AI44
AI43
AI42
24_GND
DIO205
DIO204
DIO203
24VDC
+15V DC
AGND_E
AGND_E
AO14AO14+
AGND_E
AGND
AI55
AI54
AGND
AI53
AI52
AI51
AI50
24_GND
NC
DIO207
DIO206
24VDC
-15V DC
AO15AO15+
AI63
AI62
AGND
AI61
AI60
AI59
AGND
AI58
AI57
AI56
24_GND
NC
DIO209
DIO208
24VDC
Page 15 of 121
© MKS Instruments CIT Products 2012, All rights reserved
ECM2 User Manual Rev. 1.5
2.4.2.2 Digital Input/Output
Connectors J13-J19 provide 210 digital I/O points. DIO 0-108 are direct IO. DIO 109-209 are only enabled
through completion of an interlock chain. DIOs through expansion board 210-354 are also always enabled
(direct IO) Any IO point can be used as either an input or an output. DIDO points can be used as output in
conjunction with interlocked logic. If the interlock string for that DO driver is not satisfied, the DO point will not
operate and stay off.
NOTE: Interlock outputs 0-16 each enables DIDO driver 17-31 (six DIDOs per driver). If the interlock logic is
not satisfied, the DIDO associated for that driver will not be enabled.
Figure 2-5 High level Interconnect for DIDO and Interlock
Figure 2-6 Combo Connector Pinouts
Connectors: J13, J14, J15, J16, J17, J18, J19
Table 2-5 - Digital I/O Legend
DIO
Digital Input Output
24_GND Ground
24VDC
+ 24 Volts DC
Page 16 of 121
© MKS Instruments CIT Products 2012, All rights reserved
ECM2 User Manual Rev. 1.5
Table 2-6 - Digital I/O - DSUB 37 Pinout Summary
Connector:
Pin#
1
2
3
4
5
6
7
8
9
10
11
12
13
14
15
16
17
18
19
20
21
22
23
24
25
26
27
28
29
30
31
32
33
34
35
36
37
J13
J14
J15
J16
J17
J18
J19
24VDC
24_GND
DIO12
DIO11
DIO10
DIO9
24_GND
DIO8
DIO7
DIO6
24_GND
DIO5
DIO4
DIO3
24_GND
DIO2
DIO1
DIO0
24VDC
24VDC
DIO25
DIO24
DIO23
DIO22
24_GND
DIO21
DIO20
DIO19
24_GND
DIO18
DIO17
DIO16
24_GND
DIO15
DIO14
DIO13
24VDC
24VDC
24_GND
DIO38
DIO37
DIO36
DIO35
24_GND
DIO34
DIO33
DIO32
24_GND
DIO31
DIO30
DIO29
24_GND
DIO28
DIO27
DIO26
24VDC
24VDC
DIO51
DIO50
DIO49
DIO48
24_GND
DIO47
DIO46
DIO45
24_GND
DIO44
DIO43
DIO42
24_GND
DIO41
DIO40
DIO39
24VDC
24VDC
24_GND
DIO64
DIO63
DIO62
DIO61
24_GND
DIO60
DIO59
DIO58
24_GND
DIO57
DIO56
DIO55
24_GND
DIO54
DIO53
DIO52
24VDC
24VDC
DIO77
DIO76
DIO75
DIO74
24_GND
DIO73
DIO72
DIO71
24_GND
DIO70
DIO69
DIO68
24_GND
DIO67
DIO84
DIO65
24VDC
24VDC
24_GND
DIO90
DIO89
DIO88
DIO87
24_GND
DIO86
DIO85
DIO84
24_GND
DIO83
DIO82
DIO81
24_GND
DIO80
DIO79
DIO78
24VDC
24VDC
DIO103
DIO102
DIO101
DIO100
24_GND
DIO99
DIO98
DIO97
24_GND
DIO96
DIO95
DIO94
24_GND
DIO93
DIO92
DIO91
24VDC
24VDC
24_GND
DIO116
DIO115
DIO114
DIO113
24_GND
DIO112
DIO111
DIO110
24_GND
DIO109
DIO108
DIO107
24_GND
DIO106
DIO105
DIO104
24VDC
24VDC
DIO129
DIO128
DIO127
DIO126
24_GND
DIO125
DIO124
DIO123
24_GND
DIO122
DIO121
DIO120
24_GND
DIO119
DIO118
DIO117
24VDC
24VDC
24_GND
DIO142
DIO141
DIO140
DIO139
24_GND
DIO138
DIO137
DIO136
24_GND
DIO135
DIO134
DIO133
24_GND
DIO132
DIO131
DIO130
24VDC
24VDC
DIO155
DIO154
DIO153
DIO152
24_GND
DIO151
DIO150
DIO149
24_GND
DIO148
DIO147
DIO146
24_GND
DIO145
DIO144
DIO143
24VDC
24VDC
24_GND
DIO168
DIO167
DIO166
DIO165
24_GND
DIO164
DIO163
DIO162
24_GND
DIO161
DIO160
DIO159
24_GND
DIO158
DIO157
DIO156
24VDC
24VDC
DIO181
DIO180
DIO179
DIO178
24_GND
DIO177
DIO176
DIO175
24_GND
DIO174
DIO173
DIO172
24_GND
DIO171
DIO170
DIO169
24VDC
Page 17 of 121
© MKS Instruments CIT Products 2012, All rights reserved
ECM2 User Manual Rev. 1.5
Table 2-7 – Digital Expansion I/O – Female DSUB 50 Pinout Summary
Pin#
1
2
3
4
5
6
7
8
9
10
11
12
13
14
15
16
17
18
19
20
21
22
23
24
25
Connector J20
Pin#
24VDC
26
EXP_DIO35
24_GND
27
24_GND
EXP_DIO0
28
EXP_DIO34
EXP_DIO1
29
EXP_DIO33
EXP_DIO2
30
EXP_DIO32
EXP_DIO3
31
EXP_DIO31
EXP_DIO4
32
EXP_DIO30
24_GND
33
24_GND
EXP_DIO5
34
24VDC
EXP_DIO6
35
24VDC
EXP_DIO29
36
EXP_DIO28
EXP_DIO7
37
EXP_DIO27
EXP_DIO8
38
EXP_DIO26
24_GND
39
24_GND
EXP_DIO9
40
EXP_DIO25
EXP_DIO10
41
EXP_DIO24
EXP_DIO11
42
EXP_DIO23
EXP_DIO18
43
EXP_DIO22
EXP_DIO12
44
EXP_DIO21
24_GND
45
24_GND
EXP_DIO13
46
EXP_DIO20
EXP_DIO14
47
EXP_DIO19
EXP_DIO15
48
24VDC
EXP_DIO16
49
24VDC
EXP_DIO17
50
24_GND
Pin#
1
2
3
4
5
6
7
8
9
10
11
12
13
14
15
16
17
18
19
20
21
22
23
24
25
Connector J21
Pin#
24VDC
26
24_GND
27
24VDC
28
EXP_DIO37
29
EXP_DIO38
30
EXP_DIO39
31
EXP_DIO40
32
24_GND
33
EXP_DIO41
34
EXP_DIO42
35
EXP_DIO36
36
EXP_DIO43
37
EXP_DIO44
38
24_GND
39
EXP_DIO45
40
EXP_DIO46
41
EXP_DIO47
42
EXP_DIO71
43
EXP_DIO48
44
24_GND
45
EXP_DIO49
46
EXP_DIO50
47
EXP_DIO51
48
EXP_DIO52
49
EXP_DIO53
50
EXP_DIO54
24_GND
EXP_DIO55
EXP_DIO56
EXP_DIO57
EXP_DIO58
EXP_DIO59
24_GND
24VDC
EXP_DIO60
EXP_DIO61
EXP_DIO62
EXP_DIO63
24_GND
EXP_DIO64
EXP_DIO65
EXP_DIO66
EXP_DIO67
EXP_DIO68
24_GND
EXP_DIO69
EXP_DIO70
24VDC
24VDC
24_GND
2.4.2.2.1 Digital Input Interface Example
The individual outputs will support up to a 200 mA load per channel. Each output is thermally protected against
short-circuiting and includes under voltage protection.
Outputs default to the OFF condition during power up and processor reset conditions. The figures below show the
output and output with relay circuitry.
For AS01023G-01, digital I/O is configured as sourcing (active high). Other ECM2 part numbers or
configurations, digital I/O can be configured as either sinking or sourcing by the factory.
Page 18 of 121
© MKS Instruments CIT Products 2012, All rights reserved
ECM2 User Manual Rev. 1.5
VCC
R1
si nk
R3
source
R4
0
3
DI
2
+
6
To Core Ci rcui t
-
Reference=12.5V
Figure 2-7 Equivalent circuit Digital input
Below is an example of how to use the digital input interface for both the sinking and sourcing hardware
configurations. The digital I/O circuitry is powered from an external +24-volt power source via the I/O connector.
24V GND
+24 V IN
DIO1
DIO1
Figure 2-8 Sourcing Input
Figure 2-9 Sinking Input
2.4.2.2.2 Digital Output Interface Example
The individual outputs will support up to a 200 mA load per channel. Each output is thermally protected against
short-circuiting and includes under voltage protection.
Outputs default to the OFF condition during power up and processor reset conditions. The figures below show the
output and output with relay circuitry.
For AS01023G-01, digital I/O is configured as sourcing (active high). Other ECM2 part numbers or
configurations, digital I/O can be configured as either sinking or sourcing by the factory.
Page 19 of 121
© MKS Instruments CIT Products 2012, All rights reserved
ECM2 User Manual Rev. 1.5
Figure 2-10 Digital Output
Below is an example of how to interface with the digital outputs for both the sinking and sourcing hardware
configurations. The digital I/O circuitry is again powered from an external +24-volt power source via the I/O
connector.
+24 V IN
+
24V GND
+
DIO1
DIO1
Figure 2-11Sinking Output
Figure 2-12 Sourcing Output
Page 20 of 121
© MKS Instruments CIT Products 2012, All rights reserved
ECM2 User Manual Rev. 1.5
2.4.3 Interlock-IN Connectors
Up to 48 physical interlocks Inputs are available via connectors J22, J23, and J24. The pin assignments are
shown below.
Figure 2-13 Interlock IN Connector Pinouts
Connector J22, J23, J24
Table 2-8 - Interlock IN - Legend
IN_ILK
Interlock Input
24_GND 24VGround
Page 21 of 121
© MKS Instruments CIT Products 2012, All rights reserved
ECM2 User Manual Rev. 1.5
Table 2-9 - INTERLOCK – IN - DSUB 37 Pinouts Summary
Connector:
Pin
1
2
3
4
5
6
7
8
9
10
11
12
13
14
15
16
17
18
19
20
21
22
23
24
25
26
27
28
29
30
31
32
33
34
35
36
37
J22
J23
J24
24VDC
24_GND
IN_ILK7
24_GND
IN_ILK6
24_GND
IN_ILK5
24_GND
IN_ILK4
24_GND
24_GND
IN_ILK3
24_GND
IN_ILK2
24_GND
IN_ILK1
24_GND
IN_ILK0
24_GND
24VDC
IN_ILK8
24_GND
IN_ILK9
24_GND
IN_ILK10
24_GND
IN_ILK11
24_GND
24_GND
IN_ILK12
24_GND
IN_ILK13
24_GND
IN_ILK14
24_GND
IN_ILK15
24_GND
24VDC
24_GND
IN_ILK23
24_GND
IN_ILK22
24_GND
IN_ILK21
24_GND
IN_ILK20
24_GND
24_GND
IN_ILK19
24_GND
IN_ILK18
24_GND
IN_ILK17
24_GND
IN_ILK16
24_GND
24VDC
IN_ILK24
IN_ILK24_RTN
IN_ILK25
IN_ILK25_RTN
IN_ILK26
IN_ILK26_RTN
IN_ILK27
IN_ILK27_RTN
24_GND
IN_ILK28
IN_ILK28_RTN
IN_ILK29
IN_ILK29_RTN
IN_ILK30
IN_ILK30_RTN
IN_ILK31
IN_ILK31_RTN
24VDC
24_GND
IN_ILK39
24_GND
IN_ILK38
24_GND
IN_ILK37
24_GND
IN_ILK36
24_GND
24_GND
IN_ILK35
24_GND
IN_ILK34
24_GND
IN_ILK33
24_GND
IN_ILK32
24_GND
24VDC
IN_ILK40
24_GND
IN_ILK41
24_GND
IN_ILK42
24_GND
IN_ILK43
24_GND
24_GND
IN_ILK44
24_GND
IN_ILK45
24_GND
IN_ILK46
24_GND
IN_ILK47
24_GND
Page 22 of 121
© MKS Instruments CIT Products 2012, All rights reserved
ECM2 User Manual Rev. 1.5
2.4.4 Interlock-OUT Connectors
Figure 2-14 Interlock OUT Connector Pinouts
Connector J25, J26
Table 2-10 - Interlock OUT - Legend
ILK_NC Interlock Normally Close
ILK_NO Interlock Normally Open
GND
Ground
Page 23 of 121
© MKS Instruments CIT Products 2012, All rights reserved
ECM2 User Manual Rev. 1.5
Table 2-11 - Interlock – OUT - DSUB 37 Pinout Summary
Connector:
Pin
1
2
3
4
5
6
7
8
9
10
11
12
13
14
15
16
17
18
19
20
21
22
23
24
25
26
27
28
29
30
31
32
33
34
35
36
37
J25
J26
24VDC
24_GND
ILK_NC7
ILK_NO7
ILK_NC6
ILK_NO6
ILK_NC5
ILK_NO5
ILK_NC4
ILK_NO4
24_GND
ILK_NC3
ILK_NO3
ILK_NC2
ILK_NO2
ILK_NC1
ILK_NO1
ILK_NC0
ILK_NO0
24VDC
ILK_NC8
ILK_NO8
ILK_NC9
ILK_NO9
ILK_NC10
ILK_NO10
ILK_NC11
ILK_NO11
24_GND
ILK_NC12
ILK_NO12
ILK_NC13
ILK_NO13
ILK_NC14
ILK_NO14
ILK_NC15
ILK_NO15
24VDC
24_GND
ILK_NC23
ILK_NO23
ILK_NC22
ILK_NO22
ILK_NC21
ILK_NO21
ILK_NC20
ILK_NO20
24_GND
ILK_NC19
ILK_NO19
ILK_NC18
ILK_NO18
ILK_NC17
ILK_NO17
ILK_NC16
ILK_NO16
ILK_NC24
ILK_NO24
ILK_NC25
ILK_NO25
ILK_NC26
ILK_NO26
ILK_NC27
ILK_NO27
ILK_NC28
ILK_NO28
ILK_NC29
ILK_NO29
ILK_NC30
ILK_NO30
ILK_NC31
ILK_NC31
ILK_NO31
ILK_NO31
Page 24 of 121
© MKS Instruments CIT Products 2012, All rights reserved
ECM2 User Manual Rev. 1.5
2.4.5 Other Connectors
Please note that not all versions of the ECM2 include all connectors. Your version may be customized and
may not include all of the described features.
2.4.5.1 Profibus Connector
A 9-pin D-Sub female connector is used for the Profibus Interface. The pin assignments are as the following:
5
4
9
3
8
2
7
1
6
Figure 2-15 9-Pin D-Sub
Table 2-12 - Profibus female DB9 Connector pinout
PIN
1
2
3
4
5
6
7
8
9
FUNCTION
NC
NC
B-line (RS485-)
RTS
GND (Iso.)
+5 (Iso.)
NC
A-line (RS485+)
NC
2.4.5.2 EtherCat
EtherCat uses standard RJ45 connectors with the following pin assignments. The same pin assignments exist
on both U16 (In) and U17 (Out)
Table 2-13 – EtherCat RJ45 Connector pinout
PIN
ECAT IN U16
ECAT OUT U17
1
2
3
4
5
6
7
8
ECAT_IN_TX+
ECAT_IN_TXECAT_IN_RX+
NC
NC
ECAT_IN_RXNC
NC
ECAT_OUT_TX+
ECAT_OUT_TXECAT_OUT_RX+
NC
NC
ECAT_OUT_RXNC
NC
Page 25 of 121
© MKS Instruments CIT Products 2012, All rights reserved
ECM2 User Manual Rev. 1.5
2.4.5.3 Ethernet Ports
There are two Ethernet ports. Currently, only one is enabled and active (U19).
2.4.5.4 DeviceNet Connector
2
1
5
3
4
DeviceNet Connector
(female 5-pin micro connector)
PIN
SIGNAL
1
2
3
4
5
SHIELD
V+
VCAN H
CAN L
Figure 2-16 DeviceNet Connector
The ECM2 has a Euro micro 5-pin female connector for the DeviceNet Interface.
2.5 LCD
After boot up sequence (see 3.2.1 for more information), the LCD screen will show the ECM2 unit IP address.
An example is shown below:
Figure 2-17 The ECM2 LCD Screen, after boot
2.6 LED’s
The LED’s are used to communicate status of the IEC run-time engine.
Page 26 of 121
© MKS Instruments CIT Products 2012, All rights reserved
ECM2 User Manual Rev. 1.5
Table 2-14 The ECM2 LED Status
IEC61131-3 State
On
Stop
Running
Halt
Health LED
Solid Amber
Blinking Amber
Solid Green
Blinking Green
If there is an error
N/A
Solid Red
Blinking Red
Blinking Red
2.7 Switches
Table 2-15 Switch 3 (Right-Most Switch) Setting refers to the right most rotary switch shown with an arrow in
the picture below on the ECM2 front panel. This dictates how the IEC program boot project (if already existing)
will be started at system boot up.
The ‘boot project’ is the IEC code that will be executed upon boot of the ECM2.
←
Figure 2-18 Front Panel Image of Reset button and 3 Switches
Note: the use of “IP Address” is not applicable to the functions of these switches. Currently, these
switches are not used for IP Address setting.
Table 2-15 Switch 3 (Right-Most Switch) Setting
Switch value
0
Function
IEC Boot project will not
start.
1
Cold Boot
Description
IEC program will not be
executed by the system and
will wait for Multiprog
command. For the next step,
please refer to section 6.
IEC starts with boot project
Page 27 of 121
© MKS Instruments CIT Products 2012, All rights reserved
ECM2 User Manual Rev. 1.5
2
3-9
Warm Boot
IEC Not Active
with initial data. For the next
step, please refer to section 6.
IEC starts boot project with
retained value from the
previous execution. For the
next step, please refer to
section 6.
IEC will not be running.
Multiprog cannot be
connected to ECM2. In this
scenario, the ECM2 can be
programmed via C or other
languages. For the next step,
please refer to the Arrow SDK
document. *
* available at: http://www.mksinst.com/product/product.aspx?ProductID=1155
Page 28 of 121
© MKS Instruments CIT Products 2012, All rights reserved
ECM2 User Manual Rev. 1.5
2.8 Diagnostic Console Serial
The ECM2 has an available RS-232 serial diagnostics interface. The serial port is used to send all legally
required copyright messages, current version information and hardware configuration information during the
unit's power-up sequence to a display.
Table 2-16 - Diagnostic Serial Port Connector Pin-Out (DB-9 Female Connector)
Pin
1
2
3
4
5
6
7
8
9
RS232 Function
NC
TXD
RXD
NC
SGND
NC
NC
NC
NC
2.8.1 Connecting via a Diagnostic Console Serial
Connect your computer to the diagnostics port (DB9) using a standard straight-through cable.
User can now communicate via the diagnostics port of the unit using a terminal program such as Microsoft®
HyperTerminal or TeraTerm Pro. The serial connection parameters are listed in Table 2-17e. The screenshot
in Figure 2-19 shows examples of the messages output on the Console Serial port.
.
Table 2-17 - Serial Connection Parameters
Parameter
Value
Baud rate
115200
Data bits
8
Parity
None
Stop bits
1
Flow Control None
Page 29 of 121
© MKS Instruments CIT Products 2012, All rights reserved
ECM2 User Manual Rev. 1.5
The screenshot below shows examples of the messages output on the Console Serial port:
Figure 2-19 Console Serial Port, Sample Screenshot
This information available through the console serial port is valuable when troubleshooting-with the aid of MKS
applications engineering.
2.8.2 RS232 Serial Communication Ports
In addition to the dedicated RS232 console port, the ECM2 supplies three additional RS232 communication
ports.
J31 will be wired to the same console serial port for diagnostic.
J28, J29 are additional serial ports that can be accessed over IEC61131 interface. Please see Multiprog
chapter for the serial port function block on how to access these ports through IEC programming.
J30 is not currently enabled and cannot be used.
Page 30 of 121
© MKS Instruments CIT Products 2012, All rights reserved
ECM2 User Manual Rev. 1.5
Figure 2-20 RS-232 - DB9 Connector Pinouts J28, J29, J30, J31
Table 2-18 – RS-232 Connector Pinout Summary
Pin
1
2
3
4
5
6
7
8
9
RS232 Function
DCD – Data Carrier Detect
RXD – Receive Data
TXD – Transmit Data
DTR – Data Terminal Ready
GND – Ground
DSR – Data Set Ready
RTS – Request to Send
CTS – Clear to Send
RI – Ring Indicator
Page 31 of 121
© MKS Instruments CIT Products 2012, All rights reserved
ECM2 User Manual Rev. 1.5
3 Quick Start
3.1 Network Configuration
The ECM2 network settings are factory configured as shown in Table 3-1:
Table 3-1 Default Ethernet setting
Parameter
Setting
IP-Address
192.168.1.3
Subnet mask
255.255.255.0
Default Gateway
None
3.2
•
•
Connecting to a computer via TCP/IP and over the Console Port and
Preparing to boot the ECM2
The following are required:
• Laptop or PC (including TeraTerm Pro or equivalent, and Multiprog Express/Pro)
• Ethernet cable connected directly, or over a Hub, to the ECM2
• Optionally, a Serial port cable
Attach the Ethernet cable between the unit (U19) and your computer, or use a HUB to build a small
network. Your computer must be on the same subnet as the ECM2.
NOTE: Currently only the U19 port is enabled for Ethernet access. Ethernet port U18 is not enabled.
•
To start with Multiprog Pro or Multiprog Express (IEC61131-3), refer to chapter 5.
•
Power the ECM2 by supplying +24 volts to the power connector (P2). If troubleshooting requires
viewing the boot status messages over the Console port, refer to instructions in section 2.8.
• Analog +/-15 volts for Analog modules and 24V for Digital IO are supplied internally. No
additional power is required for the unit.
3.2.1 LCD Power Start up Sequence
The front LCD panel goes through a status sequence during boot. Depending on the network setting, some
LCD screen displays and unit status might differ due to initialization. The expected display and unit status
based on LCD display are shown below:
First Power Up, LCD display will display a default screen with double vertical lines as seen below
Page 32 of 121
© MKS Instruments CIT Products 2012, All rights reserved
ECM2 User Manual Rev. 1.5
Figure 3-1 Initial LCD View on boot
ECM2 software booting sequence will indicate the booting start as shown below
Figure 3-2 LCD View during boot sequence
Then ECM2 will check network setting. The following image may flash quickly or not at all if the IP address is
configured for static IP address
Figure 3-3 LCD View during boot sequence
Page 33 of 121
© MKS Instruments CIT Products 2012, All rights reserved
ECM2 User Manual Rev. 1.5
3.2.1.1 With Static IP Address
As default, the unit is configured with the static IP address 192.168.1.3. If network configuration remains as
static, no Ethernet cable connection is required for unit to be complete IP detection mechanism as part of boot
sequence. A screen such as that shown below with static IP address will be displayed indicating that the unit
completed the boot sequence and is ready.
Figure 3-4 LCD screen showing IP address
3.2.1.2 With DHCP network setting
If the ECM2 network setting is configured to DHCP, an Ethernet cable connected to a switch or network
capable of assigning an IP address for a node on the network is required. ECM2 will continue to query for IP
address and remain in wait mode until an IP addressed is assigned to it. The screen shown below with
continuously scrolling dots will continue until an IP address is assigned.
Figure 3-5 LCD screen during DHCP IP assignment
Once an IP addressed is assigned and detected, the ECM2 displays its IP address as shown in the next figure
indicating that the boot up is complete and the unit is ready. (Note that the IP address in the figures is only
given as an example and your IP address may be different).
Page 34 of 121
© MKS Instruments CIT Products 2012, All rights reserved
ECM2 User Manual Rev. 1.5
Figure 3-6 LCD screen after DHCP IP assignment
3.2.1.3 Resetting the Unit and Possible Boot error
During a re-boot, the unit software may fail to start in some cases. This is typically due to a power glitch
caused by a quick power toggle. When power cycling the unit, please ensure you allow for at least 10 seconds
between shutting the unit off, and power restoration. If the power is toggled too quickly, the ECM2 will enter a
fault mode and the LCD will display a static block as shown below.
Figure 3-7 LCD screen during boot error
If a fault state such as that shown above is observed, power the ECM2 off completely off by removing the
power connector to the ECM2 or shut down main 24V DC power source, wait for 10 seconds and power the
ECM2 back up.
Alternatively, the “Reset” button found on the front panel of the unit can be used for proper power cycling
Page 35 of 121
© MKS Instruments CIT Products 2012, All rights reserved
ECM2 User Manual Rev. 1.5
Figure 3-8 Reset button on front panel of the ECM2
To properly reboot the ECM2, press and hold the Reset button until the 3.3V LED turns amber. Release the
reset button, and wait approximately 10 seconds for the boot messages to appear on the LCD screen.
3.3 Changing the IP address for the unit
Follow the steps below to change the IP address from the default value.
Note: Changing the IP address of the unit is not required as the unit can operate with the default setting of
192.168.1.3.
1. Open a telnet session to the default unit IP address. NOTE: your PC has to have the same subnet as the ECM2 to
do this. (To launch telnet, in Windows, click Start, then Run, then type “telnet” and hit Enter).
2. Then, type ‘Open 192.168.1.3’ or the IP address shown on the LCD screen if different.
3. At the command prompt, type ”ipsetup” and press ENTER key, the following screen will appear
Figure 3-9 Telnet view during IP address change
Page 36 of 121
© MKS Instruments CIT Products 2012, All rights reserved
ECM2 User Manual Rev. 1.5
4. Type “1” to enable DHCP, or “0” to specify a static IP address. Then follow the prompts for IP address settings.
Figure 3-10 Telnet view after successful IP address change
5. Reset (power toggle) the unit for change to take effect. Be careful to toggle the power with sufficient wait time
as described in section 3.2.1.3.
Note the reset will disconnect your Telnet session.
3.3.1 IEC Start Up Rotary Switch Setting
The following table refers to the right most rotary switch on the ECM2 front panel. This dictates how the IEC
program boot project (if already in existence) will be started at system boot up.
The ‘boot project’ is the IEC code that will be executed upon boot of the ECM2.
Page 37 of 121
© MKS Instruments CIT Products 2012, All rights reserved
ECM2 User Manual Rev. 1.5
Figure 3-11 Front Panel Image of Reset button and 3 Switches
Table 3-2 Switch 3 (Right-Most Switch) Setting
Switch value
0
Function
IEC Boot project will not
start.
1
Cold Boot
2
Warm Boot
3-9
IEC Not Active
Description
IEC program will not be
executed by the system and
will wait for Multiprog
command. For the next step,
please refer to section 5.
IEC starts with boot project
with initial data. For the next
step, please refer to section 5.
IEC starts boot project with
retained value from the
previous execution. For the
next step, please refer to
section 5.
IEC will not be running.
Multiprog cannot be
connected to ECM2. For the
next step, please refer to the
Arrow SDK document. *
* available at: http://www.mksinst.com/product/product.aspx?ProductID=1155
3.4 Setting the Unit Date
Telnet to the unit, by typing “telnet” and the unit IP address in the Windows/Start/Run field.
When the telnet session opens, type “date” followed by Enter. Type the date and hit Enter.
Page 38 of 121
© MKS Instruments CIT Products 2012, All rights reserved
ECM2 User Manual Rev. 1.5
Figure 3-12 Telnet view during date change
3.5 Setting the Unit Time
Telnet to the unit, by typing “telnet” and the unit IP address in the Windows/Start/Run field.
When the telnet session opens, type “time” followed by Enter. Then type in the time (using a 24hour clock
format) and hit Enter.
Page 39 of 121
© MKS Instruments CIT Products 2012, All rights reserved
ECM2 User Manual Rev. 1.5
Figure 3-13 Telnet view during time change
3.6 Troubleshooting Network configuration
•
•
•
•
Make sure your PC or laptop has the same subnet as the ECM2
Ensure that all Ethernet cable connections are inserted correctly and ethernet cable is in U19 Ethernet port on
ECM2.
From your PC command prompt, issue a “ping 192.168.1.3” (or to the IP address shown on the LCD screen) and
see if ECM2 replies. If there is no reply, please check your network configuration, cable connection, PC IP
address setting and whether the correct NIC card is used.
Refer to the LCD screen on the unit front for the unit IP address.
Page 40 of 121
© MKS Instruments CIT Products 2012, All rights reserved
ECM2 User Manual Rev. 1.5
4 DeviceNet Master Capabilities
If the ECM2 is used as a DeviceNet master, it can control up to 16 completely separate DeviceNet networks
with a maximum of 63 devices per network using separate Brad Ethernet DeviceNet modules. Note, as
DeviceNet nodes and networks are added, the IO latency of the process code may be affected.
Figure 4-1 DeviceNet Master with two Brad Modules.
4.1 First-Time Setup of DeviceNet networks or Adding Additional DeviceNet
Networks
To setup the DeviceNet network (or networks if more than one is available), a scan command must be
performed in the ECM2 telnet session as described below. If additional DeviceNet networks are added, this
step must be repeated.
Note: One network is added at a time. Connect the DeviceNet module to the network in the order you wish the
networks to appear.
For the first network, telnet to the unit, by typing “telnet” and the unit IP address in the Windows/Start/Run field.
When the telnet session opens, type “ednbrowse” followed by Enter. This command will allow the ECM2 to
scan the network the module.
Page 41 of 121
© MKS Instruments CIT Products 2012, All rights reserved
ECM2 User Manual Rev. 1.5
Figure 4-2 Telnet view during browse for DeviceNet networks
Repeat the above steps for additional networks.
4.1.1 Deleting the DeviceNet config file
To remove the DeviceNet network (or networks if multiple are connected,): in the telnet session, type “dir” and
Enter. Then, type “del dnrapiproxy.cfg” and Enter. This will reset the ECM2 to a state in which no DeviceNet
networks are connected. New DeviceNet networks can be added at this, or later time.
4.2 DeviceNet Master Diagnostics and Information
For additional information and diagnostics of the Master modules, please see Molex documentation.
4.3 DeviceNet Master Detection Mechanism
Currently, ECM2 only supports the Molex/Brad Ethernet DeviceNet Masters. Source: www.molex.com.
Table 4-1 Molex Part Numbers
Molex PN
SST-EDN-1
Manufacturing PN
112034-0021
Description
SST Remote DeviceNet Scanner, Ethernet
remote connection, Din Rail mounting, IP30
Page 42 of 121
© MKS Instruments CIT Products 2012, All rights reserved
ECM2 User Manual Rev. 1.5
DRL-280P
112036-0037
Direct-Link® Series 200 Unmanaged Ethernet
Switch, 8-Port RJ45, IP30
Brad Ethernet DeviceNet Masters, if connected, will be detected automatically upon unit power up if
connected. Since the detection mechanism is based on the Brad MAC address, the scanned detection order of
the networks is not deterministic for the purpose of master index mapping for IEC application. However, this
order can be changed if needed.
4.4 Scanning the DeviceNet network nodes
For diagnostic purposes, and to confirm DeviceNet Mac ID address settings, type “dnbrowse”, this will scan the
networks for all available DeviceNet slave devices.
Type “dnbrowse” in the telnet session and press Enter. Type “all” and Enter if you wish to have all networks
scanned.
Note: Card names are case sensitive, but ‘all’ is not.
Note: This step may take a few minutes to complete.
Figure 4-3 Telnet view during scanning for DeviceNet network nodes
4.5 IO Mapping for Slave/Node Devices
All devices on each network are mapped as a single continuous block of memory per DeviceNet MacID
address. To illustrate an example is given in the table below:
Page 43 of 121
© MKS Instruments CIT Products 2012, All rights reserved
ECM2 User Manual Rev. 1.5
Table 4-2 IO Mapping Example
DeviceNet Network
Node
1
1
1
2
2
2
…
Slave1, MacID=2
Slave2, MacID=3
Slave3, MacID=6
Slave1, MacID=22
Slave2, MacID=3
Slave9, MacID=2
Input/Output Size
(also known as
Produce/Consume)*
5/5 bytes
10/6 bytes
7/12 bytes
2/5 bytes
10/10 bytes
5/7 bytes
With the above example, the input for network 1 will be 22 bytes, and output will be 23.
Table 4-3 IO Mapping Example, summary of network requirements
DeviceNet Network
1
2
Input
22 bytes
17 bytes
Output
23 bytes
22 bytes
Continuing with the above example, the memory mapping of the DeviceNet slave IO nodes will be as follows:
Table 4-4 IO Memory mapping in ECM2
DeviceNet Network
1
1
1
2
2
2
DeviceNet Network
MacID
2
3
6
2
3
22
Input Byte
Output Byte
%IB00-%IB04 **
%IB05-%IB14
%IB15-%IB21
%IB100-%IB104***
%IB105-%IB114
%IB115-%IB117
%QB00-%QB04**
%QB05-%QB10
%QB11-%QB22
%QB200-%QB206
%QB207-%QB216
%QB217-%QB221
* As defined by the perspective of the ECM2.
** Assumes starting address is x00. This can be set at any available byte address.
*** Each additional network memory mapping is not required to be continuous to the previous network(s). In
this example, the memory assignments are not continuous.
Page 44 of 121
© MKS Instruments CIT Products 2012, All rights reserved
ECM2 User Manual Rev. 1.5
5 IEC61131-3 Compliant Programming Interface
The ECM2 is implemented with Multiprog KW-Software run time engine for IEC61131-3 compliant
Programmable Logic Controller (PLC) programming capabilities including all five IEC supported languages:
• Ladder Diagram (LD)
• Function Block Diagram (FDB)
• Instruction List (IL)
• Sequential Function Chart (SFC)
• Structured Text (ST)
According to KW-Software, Multiprog Express/Pro Development platform allows full GUI and editor fully
compliant with IEC61131-3 development interface and PLCOpen XML format (see http://www.plcopen.org/ for
more information) import of structure text from other PLCs.
5.1 Software Requirements
MKS provides three installation packages that include the following SW
1) Multiprog Pro version 5.35 or later, with the option to install eCLR and MKS ECM2 drivers.
2) Multiprog Express version 5.35 or later, with the option to install ECLR and MKS ECM2 drivers.
3) eCLR and MKS ECM2 drivers. Use this option if you already have the Multiprog Pro or Multiprog Express
software installed on your laptop or PC.
These installation files are available in the “Documents and Downloads” section of the MKS Instruments
ECM2 website at:
http://www.mksinst.com/product/product.aspx?ProductID=1155
Note: Multiprog Pro is available for purchase from MKS Instruments. Please contact your local sales
representative for pricing and availability information. Multiprog Express is available free of charge via
download.
The installation for Multiprog Express and Multiprog Pro are similar. Installation on Windows XP and Windows
7 are both supported, though the installation screens may appear slightly different. For reference purposes,
the installation of the “ECM2_MULTIPROG_Express_Setup.exe” on a WindowsXP computer is shown below.
Start by double-clicking on the “ECM2_MULTIPROG_Express_Setup.exe” file.
NOTE: there are options to select installation packages; however installation must be done in the exact order
listed in the installation, i.e. the user cannot install eCLR ARM before installing Multiprog.
Page 45 of 121
© MKS Instruments CIT Products 2012, All rights reserved
ECM2 User Manual Rev. 1.5
Click Install on the following dialogue box:
Figure 5-1 ECM2 Multiprog installation screen
Upon completion of the installation, you should see the following dialogue box:
Figure 5-2 ECM2 Multiprog installation completed
Select OK to continue. Next, you should see the following screen. Select Next to continue.
Page 46 of 121
© MKS Instruments CIT Products 2012, All rights reserved
ECM2 User Manual Rev. 1.5
Figure 5-3 eCLR setup screen
On the following screen, please review and accept the license terms by clicking Next.
After accepting the terms and conditions, the following dialogue box will appear. Select Next or select another
Multiprog location.
Page 47 of 121
© MKS Instruments CIT Products 2012, All rights reserved
ECM2 User Manual Rev. 1.5
Figure 5-4 eCLR setup screen
Select Next to obtain support for Visual Studio C#:
Figure 5-5 eCLR setup screen, support for Visual Studio
Page 48 of 121
© MKS Instruments CIT Products 2012, All rights reserved
ECM2 User Manual Rev. 1.5
Finally, select Install on the following screen:
Figure 5-6 eCLR ready to install screen view
Following the completion of the installation, select Finish. After clicking Finish, select Next on the following
screen:
Page 49 of 121
© MKS Instruments CIT Products 2012, All rights reserved
ECM2 User Manual Rev. 1.5
Figure 5-7 eCLR for ECM2 setup
On the following dialogue box, confirm that the location for installation is correct, and select Install.
Page 50 of 121
© MKS Instruments CIT Products 2012, All rights reserved
ECM2 User Manual Rev. 1.5
Figure 5-8 eCLR installation screen, select install location
Once installation has completed, select Finish. At this point, you will be asked to reboot your computer to
finish the installation.
Page 51 of 121
© MKS Instruments CIT Products 2012, All rights reserved
ECM2 User Manual Rev. 1.5
Figure 5-9 eCLR installation screen, reboot for completed installation
After the installation program has completed, a new folder, called KW-Software, will be available in “Programs”
under the Windows, Start menu.
To create a project in Multiprog, refer to section 6.
5.1.1 Configuration
1) The user development laptop/PC should contain the following items:
a. TeraTerm (available at: http://www.ayera.com/teraterm/)
b. Telnet (available on all Windows PC’s)
c. MKS provided installed packages as described in section 5.1.
5.1.2 IEC LED status
The health LED status would indicate what status and state the IEC engine is in.
Page 52 of 121
© MKS Instruments CIT Products 2012, All rights reserved
ECM2 User Manual Rev. 1.5
Table 5-1 The ECM2 LED Status
IEC61131-3 State
On
Stop
Running
Halt
Health LED
Solid Amber
Blinking Amber
Solid Green
Blinking Green
If there is an error
N/A
Solid Red
Blinking Red
Blinking Red
Page 53 of 121
© MKS Instruments CIT Products 2012, All rights reserved
ECM2 User Manual Rev. 1.5
6 Tutorial - Creating a Multiprog Project
Open Multiprog Pro application software; go to File->New Project. Select Project Wizard and follow the steps
below
1. Create a project name. The example below uses FirstProject as project name.
Figure 6-1 Creating a project name
2. Select the desired IEC language for the Program Organization Unit (POU) and name. The example
uses MyPOU, and Ladder logic as the desired language.
Page 54 of 121
© MKS Instruments CIT Products 2012, All rights reserved
ECM2 User Manual Rev. 1.5
Figure 6-2 Selecting the name and language
Page 55 of 121
© MKS Instruments CIT Products 2012, All rights reserved
ECM2 User Manual Rev. 1.5
3. Create configuration name and select “eCLR_ECM2” as Type. Note, for Multiprog Express, this step is
skipped.
Figure 6-3 eCLR configuration
Page 56 of 121
© MKS Instruments CIT Products 2012, All rights reserved
ECM2 User Manual Rev. 1.5
4. Create a resource name and select eCLR_ECM2 as the type.
Figure 6-4 Creating a resource name
Page 57 of 121
© MKS Instruments CIT Products 2012, All rights reserved
ECM2 User Manual Rev. 1.5
5. Create Task name and use default for Type.
Figure 6-5 Creating a task name
Page 58 of 121
© MKS Instruments CIT Products 2012, All rights reserved
ECM2 User Manual Rev. 1.5
6. Click Finish when prompted .
Figure 6-6 Reviewing the project description
Page 59 of 121
© MKS Instruments CIT Products 2012, All rights reserved
ECM2 User Manual Rev. 1.5
7. Right click on MyResource->Settings.
Figure 6-7 Opening resource settings
Page 60 of 121
© MKS Instruments CIT Products 2012, All rights reserved
ECM2 User Manual Rev. 1.5
8. Choose TCP/IP for communication Type and enter the unit IP address of the ECM2 (displayed in the
ECM2 LCD window) in the Parameter window, and select eCLR 3.0 (Core 3.0.0) for Version Build
settings, then click OK.
Figure 6-8 Identifying the ECM2 unit IP address in Multiprog
Page 61 of 121
© MKS Instruments CIT Products 2012, All rights reserved
ECM2 User Manual Rev. 1.5
9. Double-click on the IO Configuration item in the explorer tree (on the left side of the screen). A pop-up
window for device IO configuration will appear.
Figure 6-9 Starting IO configuration in Multiprog
10. Delete the default entries (there may only be one) in the IO group list (on INPUT tab) as well as the
default out (on OUTPUT tab). New IO groups can be created with appropriate name for each project.
Follow the steps below to create IO groups.
a. On the INPUT tab, click Add to create an Input IO group. A new window will pop up as shown
below. Create the IO group name and select the task created for this project (Task1).
Page 62 of 121
© MKS Instruments CIT Products 2012, All rights reserved
ECM2 User Manual Rev. 1.5
Figure 6-10 Setting Digital Inputs as example for adding an IO Group
b. In the Board IO module window, high-light ECM2 then click Driver Parameter .
c. A window will pop up for user to select the type of IO: digital, analog or Programmable Interlock
as shown below. Select the desired I/O type, and the first IO byte that the user wants to access.
The text below the window shows the maximum number of bytes if I/O group 1-8 is selected.
For example if first DI group is 9-16 is selected, the first 8 DI cannot be accessed by user and
total length will be reduced by one byte.
Page 63 of 121
© MKS Instruments CIT Products 2012, All rights reserved
ECM2 User Manual Rev. 1.5
.
Figure 6-11 Selecting the driver and group
11. Similar mapping can be done for other I/O groups.
Figure 6-12 Maximum analog inputs size is 64 bytes
Figure 6-13 Different Options to map Progammable Interlock Inputs
Page 64 of 121
© MKS Instruments CIT Products 2012, All rights reserved
ECM2 User Manual Rev. 1.5
Figure 6-14 Maximum analog Outputs size is 32 bytes
Figure 6-15 Maximum Progammable Clear Debounce Status size is 1 bytes
12. Details for the Input and Output settings are as follows:
Input/Output
Input
Driver
Analog
Function
0-31
Digital
1-210
Programmable
Interlock
Status
Inputs
Comments
Each AI is setup as a differential
input. 2 bytes are used per
analog input. For pin mapping,
see Error! Reference source
not found.
Each bit will correspond to a
physical DIO point. For pin
mapping, see Error! Reference
source not found.. Note in
Error! Reference source not
found. there is an offset and 0209 in that table matches 1-210
in the Multiprog software.
2 bytes. Gives the status of the
Interlock board. Refer to 7.4 for
more information.
Reads the state of the physical
inputs on the interlock board.
Note 64 bits are on the ECM2
but only the first 48 bits are
available. Bit 65 is used for the
watchdog. For pin mapping, see
Error! Reference source not
found.
Page 65 of 121
© MKS Instruments CIT Products 2012, All rights reserved
ECM2 User Manual Rev. 1.5
Outputs
Relay Feedback
Debounce Status
Output
Analog
0-15
Output
1-210
Programmable
Interlock
Clear Debounce
Status
Reads the status of the result of
the interlock logic.
Reads the status of the physical
relay. Meaning: what is
occurring on the interlock output
pins.
Reads the presence of a
debounce error for each input.
Each interlock input is a single
bit, with value 0 equals no error,
and value 1 equals error. Refer
to Error! Reference source not
found. for more information.
Each AO is setup as a
differential output. 2 bytes are
used per analog output. For pin
mapping, see Error! Reference
source not found.
Each bit will correspond to a
physical DIO point. For pin
mapping, see Error! Reference
source not found.. Note in
Error! Reference source not
found. there is an offset and 0209 in that table matches 1-210
in the Multiprog software.
Allows clearing the debounce
error. Bit value of 1 clears all
debounce statuses. Note the
debounce status cannot be
cleared one at a time.
Table 6-1 Input/Output Mapping Definitions Table
13. If DeviceNet slave devices are available on the DeviceNet network, follow the steps below to configure
mapping for each device. The example in the figure below adds a slave with 10 byte inputs
a. Click “Add IO Group” as in step 10 above.
b. Create a name and select the task associated with the IO. The example below create an IO
group for a DeviceNet slave on Network 1 with 10 input bytes, a scan rate of 50ms, and a
reconnect time out of 50ms.
c. Make sure the length in the logical address area matches that which you enter for the Driver
Parameters below.
Page 66 of 121
© MKS Instruments CIT Products 2012, All rights reserved
ECM2 User Manual Rev. 1.5
Figure 6-16 Example of setting DeviceNet IO group
d. Click on the MKS DeviceNet then click on Driver Parameters
Figure 6-17 Setting DeviceNet driver parameters
Page 67 of 121
© MKS Instruments CIT Products 2012, All rights reserved
ECM2 User Manual Rev. 1.5
6.1.1 ECM2 IO Mapping detail
Process Input Image (PII) and Process Output Image (PIQ) are mapped directly to ECM2 physical I/Os,
i.e. the actual I/O point on the ECM2 physical connectors
1. User has to create IO Group Name and assign the Task associated with this IO group.
2. Start address (can be any address within range of 32 bit addressing), overlapped is NOT allowed within
process image and will create errors.
3. PII and PIQ have totally separate addressing range.
4. Length: total number of bytes based on the first IO group selected and how many IO point user want to
map to the specific group
Page 68 of 121
© MKS Instruments CIT Products 2012, All rights reserved
ECM2 User Manual Rev. 1.5
6.1.1.1 Digital Input Mapping
1. Click on Add if user wants to create a new IO group
Page 69 of 121
© MKS Instruments CIT Products 2012, All rights reserved
ECM2 User Manual Rev. 1.5
2.
3.
4.
5.
6.
Create a meaning full name for the IO group: ECM2_DI for ECM2 digital inputs was used as example.
Select the Task associated with the IO mapping
Select by task for refresh and Driver for Device (other options are not supported)
Highlighted ECM2 as driver option and click on Driver parameters for further configuration
Start address can be any address where the combination of start address and length is not overlapping
with other already mapped IO groups.
7. Length will be explained in later slide
8. Choose the driver you want to map and select the first physical IO group where your mapping first start.
9. The total number of bytes available for logical memory for all 210 Digital Inputs of ECM2 is 27 bytes.
Page 70 of 121
© MKS Instruments CIT Products 2012, All rights reserved
ECM2 User Manual Rev. 1.5
10. Each logical byte is mapped to 8 digital inputs, each bit in a byte represent a physical digital input of
ECM2
Example 1: If user only wishes to map the first 16 digital inputs (1-16) to this group, select DI
Group 1-8 then click OK. Starting address could be anything not used before (within available 32
bits addressing allocation) and length will be 2 bytes.
11. In the example 1 above, the logical address will be mapped to physical IO of the ECM2 as
follow:
Page 71 of 121
© MKS Instruments CIT Products 2012, All rights reserved
ECM2 User Manual Rev. 1.5
12. Example 2 for digital input 17-48 mapping: starting address is 8, length is 4 bytes. The logical
address will be mapped to physical IO of the ECM2 as follow:
6.1.1.2 Analog Mapping
1. Currently, analog inputs are differential
2. A pair of pins forms one differential analog input
3. For example: AI0- and AI0+ (from AI0 and AI1 pair) forms differential analog input 1 (as based 1
reference from the mapping)
4. Each analog requires two bytes of data (single-ended or differential does not change the number of
bytes needed for data representation
Page 72 of 121
© MKS Instruments CIT Products 2012, All rights reserved
ECM2 User Manual Rev. 1.5
5. This example maps only one analog input (AI0) to the group called ECM_AI, starting at an address 20,
and length of 2 bytes
6.2 Writing IEC code and compiling and downloading to unit
IEC coding will be created in the MyPOU (as created by user when the project is created). After the IEC code
is completed, it needs to be compiled and downloaded to the ECM2.
For full reference of using Multiprog, please refer to the KW-Software documentation.
6.2.1 Compiling
There are several ways to compile the project once you have finished editing. The corresponding menu items
are provided in the 'Build' submenu. Additionally each command is available as a toolbar icon.
Page 73 of 121
© MKS Instruments CIT Products 2012, All rights reserved
ECM2 User Manual Rev. 1.5
Figure 6-18 Compiling the Multiprog code
•
'Make' - Standard mode for compiling the project once you have finished editing. The menu item can
be used to compile all worksheets which have been edited. These worksheets are marked with an
asterisk in the project tree. After using 'Make' the specific code is generated and the project is ready for
downloading to the PLC.
•
'Patch POU' - This command is used to compile only modifications, which have been made e.g. after
debugging a project. The changes are automatically downloaded to the PLC while the IEC keeps on
running, i.e. the program execution on the PLC is not aborted. So you can view changes immediately
after switching the corresponding worksheet into online mode. While patching a POU it is not necessary
to stop the program execution on the PLC.
Page 74 of 121
© MKS Instruments CIT Products 2012, All rights reserved
ECM2 User Manual Rev. 1.5
Alternatively send and apply program modifications to the target using the 'Download changes' feature.
•
'Compile worksheet' - This menu item is used to compile a single worksheet after editing it. Choosing
this menu item means, that syntax errors within the current code body worksheet and the related
variable worksheet are going to be detected by the compiler. All detected errors and warnings are
displayed in the message window. By double clicking on an error or warning you can open the related
worksheet, where the error was detected.
No code is generated when Using 'Compile Worksheet'!
When closing or saving a worksheet, the system automatically compiles this worksheet. Additionally the
variables worksheet is compiled.
This automatic compilation makes each user defined function or function blockavailable in the Edit
Wizard immediately after saving the corresponding worksheet.
•
'Rebuild Project' - This menu item is used to compile the whole project for the first time or if a user
library has been changed. It should only be used, if 'Make' generates compiler errors, if you have
unzipped your project without the front end code or if changes have been made in an announced user
library.
Using 'Rebuild Project' all worksheets are going to be compiled and linked. Detected errors and
warnings are displayed in the message window. After the syntax checking the IEC code as well as the
PLC specific code is generated automatically. The project is then ready for downloading to the PLC.
Automatic cross references update before compilation:
The 'Build' tab of the 'Options' dialog (menu item 'Extras > Options...') provides the checkbox 'Update cross
references before compilation'. After marking this option, the cross reference list is automatically updated prior
to compiling the project using the commands 'Make' or 'Rebuild Project'. The progress of this update operation
is displayed in the 'Build' tab of the message window.
Excluding resources from compilation:
If your project contains several resources, you can exclude individual resources when making or rebuilding the
project or when patching POUs. For that purpose right-click on the resource node to be excluded (in the subtree
'Physical Hardware') and select 'Exclude' from the context menu.
The context menu item of the affected resource is now checked and the resource node icon as well as all
included elements are put in parenthesis as shown in the following example:
To re-include an excluded resource into the compilation process, select the context menu item 'Exclude' again
(the item is then shown unmarked).
KW-Soft Multiprog help file has lots of information on creating PLC code and compiling.
Page 75 of 121
© MKS Instruments CIT Products 2012, All rights reserved
ECM2 User Manual Rev. 1.5
Figure 6-19 Locating the Multiprog help contents
The KW-Soft Multiprog Help File provides information on creating PLC code and compiling. For additional
information on programming in Multiprog, refer to the KW website on Multiprog project at:
http://www.kw-software.com/com/service/2680.jsp
6.2.2 KW Multiprog Project Control and Download
Once a project is compiled using 'Make' or 'Rebuild Project' , it must bedownloaded to the target simulation(s) or to the connected
PLC(s).
The system recognizes, whether the program must be downloaded to only one or to several available target resources. Depending on
the number of resources in the subtree 'Physical Hardware', different dialogs can be used for downloading as shown in the following
figure:
On the left side, only one resource is available. Therefore, clicking the 'Project Control' icon directly calls the resource control dialog (1).
Clicking 'Download' in the control dialog opens the 'Download' dialog (2).
On the right side, 2 resources are included in the project. Therefore, clicking the 'Project Control' icon on the toolbar opens the 'Project
Page 76 of 121
© MKS Instruments CIT Products 2012, All rights reserved
ECM2 User Manual Rev. 1.5
Control' dialog (3). In this dialog, all selected and connected PLCs can be controlled together. Clicking the 'Control' button opens the
resource control dialog for the selected resource (4), thus enabling the individual PLC control.
Figure 6-20 Opening the Multiprog Project Control dialog box
Control Dialog box
Page 77 of 121
© MKS Instruments CIT Products 2012, All rights reserved
ECM2 User Manual Rev. 1.5
Figure 6-21 The Multiprog Project Control dialog
Figure 6-22 Multiple Resource control in Multiprog
Additionally you have the possibility to download changes (without stopping the program execution on the PLC), to download the
project source or a file of any type individually to each connected resource, in order to store it or for any other future usage.
Table 6-2 Dialog Element table and description
Dialog element
Meaning
Page 78 of 121
© MKS Instruments CIT Products 2012, All rights reserved
ECM2 User Manual Rev. 1.5
Dialog element
resources list
Meaning
This selection list contains all resources which are defined in the subtree 'Physical Hardware'.
Each available resource is represented as one line in the selection list.
The list consists of several columns:
Resource: indicates the resource name.
Configuration: indicates the name of the configuration to which the resource belongs.
Status: indicates the state of this PLC or simulation. The status 'Offline' means, that no
communication connection is established between the dialog and the resource.
Please refer to the note below this table.
Info: shows a short information about the current PLC state or the progress of operations (e.g. project download).
The dialog 'Project control' always starts offline, except a communication channel already is
established to a particular resource, because at least one related worksheet is opened in
online mode.
Please refer to the note below this table.
Using the commands in the dialog area 'Online' you can control the connections between the dialog 'Project control'
and the resources.
Online
'Connect'
'Disconnect'
Both buttons in this area relate to each resource selected in the resources list.
Connect: The system tries to establish the connection to each PLC IEC or simulation marked in the resource
selection list.
Disconnect: The system terminates the connection to each PLC or simulation selected in the resources list.
If you are disconnecting a particular resource by clicking this button, this only affects the communication connection
between the dialog 'Project control' and this resource. Worksheets in online mode of the same resource are not
switched offline by this operation! (See note below this table.)
The state of each selected resource is displayed in the selection list column 'Status' after executing the command.
Select all
Marks all resources in the resources list.
Using the buttons in the dialog area 'Download' you can initiate the download procedure. Both
buttons in this area relate to each resource selected in the resources list.
Precondition for starting a download is that the connection to a resource has already been
established (using the 'Connect' button).
Download
'Project'
'More...'
A button appears inactive (i.e. grey) if you have selected a resource in the resources list, for
which the command relating to the grey button cannot be executed at this moment. A possible
reason may be that one of the selected resources is in the TIMEOUT state or the connection
has not been established properly. In this case you have to deselect the affected resource in
order to activate the button for the remaining resources which are ready for the download.
'Project': After clicking this button, the system sends the whole project to each selected and connected simulation
or PLC. The download progress is indicated as a percentage value in the column 'Info' of the resources list.
'More...': This button calls the 'Download' dialog, which is used to initiate further operations for all selected
resources. Click here for a description of this dialog.
Both buttons in the area 'Download' remain inactive (grey) while the download is in progress for at least one
resource.
Control
'Cold'
Using the buttons in the dialog area 'Control' you can control all selected resources, i.e. an
invoked command is executed for all resources marked in the selection list.
Page 79 of 121
© MKS Instruments CIT Products 2012, All rights reserved
ECM2 User Manual Rev. 1.5
Dialog element
'Warm'
'Hot'
'Stop'
'Reset'
'Control...'
Meaning
A button appears inactive (i.e. grey) if only one of the selected resources is not able to execute
the related command. A possible reason may be, that one of the selected resources is in the
TIMEOUT state or the download has not been finished successfully. In this case you have to
deselect the affected resource in order to activate the button for the remaining resources which
are ready to execute the command.
If, for example, one resource is in 'Run' state and the others in the 'Stop' state, the 'Cold'
button remains active. In this case, the start command is downloaded only to those resources
which are in the 'Stop' state.
'Cold': executes a cold start on all selected resources. During a cold start all data are initialized.
'Warm': executes a warm start on all selected resources. During a warm start only non-retentive data are
initialized.
'Hot': executes a hot start on all selected resources. During a hot start no data are initialized.
The hot start can be disabled by checking the checkbox 'Disable Hotstart' on the 'Debug' tab in
After changing this option, the resource control dialog must be closed in
order to apply the changed setting.
the 'Options' dialog.
'Stop': stops the program execution on all selected PLCs or simulations.
'Reset': resets all selected PLCs or simulations.
'Control...': Calls the control dialog for each selected resource. If breakpoints are set for one
resource, the related control dialog 'Resource_name' displays the buttons 'Step', 'Trace', etc.
automatically.
Close
closes the dialog 'Project control'. The communication path between the dialog and the
connected resources are terminated. When re-opening the dialog, the communication status
'Offline' is displayed for each resource and you have to re-connect the desired resources in
order to control them using the dialog 'Project control'.
Please refer to the note below this table.
NOTE: Communication channels between the system and a resource:
Each time you access a PLC (in order to download a program, control the PLC using the buttons 'Cold', 'Stop'
etc., or switch a worksheet into online mode) the system establishes a communication connection to the
requested PLC. In the dialog 'Project control' this is done using the button 'Connect'. In the control dialog
'Resource_name' and when switching a worksheet into online mode, it is performed automatically. When
closing the dialog 'Project control' or the control dialog 'Resource_name' or switching an online worksheet back
into offline mode, the communication connection is terminated.
For that reason the connection between dialog and PLC is already established if you are calling the dialog
'Project control' while a worksheet is in online mode.
This does not mean, that the resource state changes, because the program execution on the PLC is still
executed, although the communication path between the programming system and the resource has been
canceled.
Page 80 of 121
© MKS Instruments CIT Products 2012, All rights reserved
ECM2 User Manual Rev. 1.5
6.2.3 MKS Firmware Library
This includes the function blocks for the additional serial ports and the switches and LEDS. Follow the steps
below to insert and use the serial ports and LED from your IEC program.
1. On your Multiprog project, right-click on Libraries->Insert->FW Library as shown below
Table 6-3 Inserting the ECM2 firmware library
2. On your Multiprog project, right-click on Libraries->Insert->FW Library then select the path for the libraries as
shown below. Normally, this is the default path.
Page 81 of 121
© MKS Instruments CIT Products 2012, All rights reserved
ECM2 User Manual Rev. 1.5
Table 6-4 Locating the installed firmware library
3. Then select ECM2.FWL and click Include. This allows access to the built-in function block for the serial ports.
NOTE: Only two ports are enabled:
Port 1: J28
Port 2: J29
Page 82 of 121
© MKS Instruments CIT Products 2012, All rights reserved
ECM2 User Manual Rev. 1.5
Table 6-5 Selecting the firmware library
4. To use the serial ports in your PLC, it is necessary to open and use the handle to read and/or write. The screen
below shows how to open and use the handle to read the port with the file handle thru ladder logic language.
a. The blocks can be located via the right-side drop-down labeled “Group”. This is the list of built-in
functions that were just added in the steps above. Select ECM2 for the blocks specific to the ECM2.
Page 83 of 121
© MKS Instruments CIT Products 2012, All rights reserved
ECM2 User Manual Rev. 1.5
Figure 6-23 Example of serial port function blocks
The configuration parameters for your COM ports are shown below. These are based on the built-in function
blocks above:
6.2.3.1 ECM_RS232_OPEN block
Table 6-6 Parameters of the RS232 Open block
Parameter Data
type
Description
EXECUTE BOOL
Open serial port to read if a rising edge is detected.
PortNum
USINT
1 = Serial port J28
2 = Serial port J29
Baud
UDINT
300= 300 Baud.
9600 = 9600 baud
Up to 115200
Serial baud support: 300, 600, 1200, 2400, 4800, 9600, 14400, 19200, 38400, 57600,
115200
Bits
USINT
7 = 7 data bits
8 = 8 data bits
Page 84 of 121
© MKS Instruments CIT Products 2012, All rights reserved
ECM2 User Manual Rev. 1.5
Parity
USINT
0: No parity.
1: odd
2: even
3: mark
4: Space
Stop
USINT
0: 1 stop bit.
1: 1 ½ stop bits.
2: 2 stop bits
BufferSz
UINT
HW buffer size. Limit to 1KB HW buffer. New data will be discarded when buffer is
full.
Done
BOOL
0: The function block was not executed.
1: The function block was executed.
Handle
UINT
File handle of the file from which should be read.
Error
BOOL
0: No error occurs while opening/creating the file.
1: error occurs while opening/creating the file.
ErrorID
DWORD Windows last error code on opening the port.
6.2.3.2 ECM_RS232_READ and WRITE block
Table 6-7 Parameters of the RS232 Read and Write block
Parameter
Data type Description
EXECUTE
BOOL
Read serial data from buffer if a rising edge is detected.
Handle
DWORD
File handle of the file from which should be read.
MaxLength
UDINT
Number of characters to be read.
Buffer
Any
Data buffer for the data to be read. This should be an array.
Done
BOOL
0: The function block was not executed.
1: The function block was executed.
LengthAvailable
UDINT
Number of read characters.
BufferSz
UINT
HW buffer size. Limit to 1KB HW buffer. New data will be discarded when
buffer is full.
Error
BOOL
0: No error occurs while opening/creating the file.
1: error occurs while opening/creating the file.
ErrorID
DWORD Windows last error code on reading data.
Page 85 of 121
© MKS Instruments CIT Products 2012, All rights reserved
ECM2 User Manual Rev. 1.5
7 Programmable Interlocks
7.1 Overview
Interlock is a safety function that protects a system from hazardous states. It disables the operation of external
devices if a pre-defined state of input conditions is not met. Programmability enables the user to define
interlock functions without having to rewire the board each time. The design concept is based on one common
design code that processes a user file.
Section 7 details the safety features and show how to program an Interlock on the ECM2 programmable
Interlock module.
No logic file is loaded on the ECM2 unit as shipped from the factory.
7.2 Main Features
1.
2.
3.
4.
5.
6.
7.
8.
9.
Implement 1oo2 programmable logic architecture.
Meets SIL-3 reference: IEC61508 (SIRA FSP 08005)
Based on single form factor boards.
The interlock logic file is downloaded via FTP.
Self-Diagnostic.
Programmable De-bounce on inputs.
48 interlock digital inputs (24V) + 1 Watch Dog Input (TTL).
32 real output functions (1-32)
24V, 3.3V input Power protection against: Over Voltage (OV), Under Voltage (UV), and Over Current (OC).
This product is only intended to be used within the 61508 'overall
lifecycle'.
7.3 Operation Description
There are two modes of operation:
1. Prog/Debug
2. Operational
In the Prog/Debug mode the following functions are available:
1. Load the Interlock Logic (IL) and the Product Data EEPROM.
2. Read the content of the EEPROM.
In Operational mode the access is limited to few registers for monitoring:
Status register.
Inputs register.
Page 86 of 121
© MKS Instruments CIT Products 2012, All rights reserved
ECM2 User Manual Rev. 1.5
Outputs register.
A mechanical rotary switch is used for mode selection. It is designated in Figure 7.1. Operational mode is set
with the rotary switch pointing to ‘0’. Prog/Debug mode is set with the rotary switch pointing to ‘9’. Other
positions of the rotary switch are not defined. The switch is not easily accessible to avoid unintentional change.
Prog/Debug will set the outputs to off regardless of the IL functions. Further control on the outputs is possible
via the debug registers as described in HW support for Debug.
Figure 7-1 Locating the programmable interlock board switches
Moving the switch from Prog/Debug to Operational mode will take effect any time.
The other direction, from Operational mode to Prog/Debug will take effect only after
system reset or recycle of the board power.
7.3.1 Prog/Debug Mode
The user must set the switch to Prog/Debug and turn the power off and on. This will set the outputs to their off
position for each channel. The user can program the interlock logic via FTP (File Transfer Protocol). The
configuration file includes an integrity check value.
Page 87 of 121
© MKS Instruments CIT Products 2012, All rights reserved
ECM2 User Manual Rev. 1.5
7.3.2 Operational Mode
When the unit is set to Operational mode, it will perform an integrity check on the data (based on CRC). If no
errors are detected, the outputs will be set to follow the IL functions
7.3.3 Debounce on the Inputs
A debounce mechanism is applied on the inputs (Except Watch Dog Input). The input signal must be stable
during a predefined period of time in order to be resample and used by the IL. This period of time is a
parameter set by the user in the DEB_DELAY 3 bit field of the Status Control register as follows:
Table 7-1 – Interlock Inputs Debounce Values
DEB_DELAY Period of time for which the input signal
Value (3 bit) must be stable in order to be sampled in.
Otherwise previous signal value is kept.
0
1
2
3
4
5
6
7
125 us
250 us
375 us
500 us
625 us
750 us
875 us
1000 us
Default value for the debounce delay DEB_DELAY is 0 which is 125uS
7.3.3.1 Set Debounce for Interlock Inputs
Follow the instruction steps below to set the debounce for the interlock inputs.
1. Open a telnet session to the unit IP address.
2. Change directory to Windows by typing “cd Windows”
Page 88 of 121
© MKS Instruments CIT Products 2012, All rights reserved
ECM2 User Manual Rev. 1.5
Figure 7-2 Telnet view for setting debounce
3. To set the debounce value at 750uS, at command prompt, type “PrgIntlk SETDB 5”. User should get a similar
screen to below confirming the new debounce values
Figure 7-3 Completing the setup of debounce
Page 89 of 121
© MKS Instruments CIT Products 2012, All rights reserved
ECM2 User Manual Rev. 1.5
7.4 Interlock Status Bit Map Table
Position
Field Name
Access
Meaning
RDONE
Value after
reset
0
0
R
A '1' indicates completion of IL and DP load
from EEPROM into the FPGA.
1
ILRST
0
R
2
DPRST
0
R
3
ILV
0
R
4
FORC
0
R
5
NAL
0
R
6
SWMOD
X
R
7
RLY_24V_EN
X
R
8
OUTSEL
0
R/W
9
INSEL
0
R/W
IL EEPROM Read Status
0 – OK.
1 – Error.
DP EEPROM Read Status:
0 – OK.
1 – Error.
Interlock Logic Valid:
1 – IL EEPROM revision matches PD
EEPROM (P/N).
0 - No match, or the ILK is in programming
mode.
FPGA Outputs to Relay Compare:
0 – No match between the FPGA and
Relay.
1 – Match.
FPGA Neighbor Not Alive bit.
1 – The neighbor FPGA is alive.
0 - The neighbor FPGA is not alive.
(see Self Test section).
Position of the Switch Mode for the user
Interface SW.
1 – Operational mode
0 – Prog/debug mode
Status of FW code verifier which is used to
enable the 24V to the relays.
1 – FW is ok, 24V is enabled.
0 – FW doesn't match, 24V is disabled.
Select the source for Output:
1 – The Output ON/OFF Register is
selected for output. The output
value will be according to that
register.
0 – The IL function is selected for
output.
Effective in Prog/Debug mode only. In Oper
mode the IL function is selected for the output
at the end of FPGA init process regardless of
this bit state.
Select the source for the Input:
0 – The actual input (Opto out) is
selected.
Page 90 of 121
© MKS Instruments CIT Products 2012, All rights reserved
ECM2 User Manual Rev. 1.5
10-12
DEB_DELAY
0
R/W
13
14
Global Reset
0
24V_MONITOR X
R/W
R
15
ILOAD
W/R
0
1 – The Input Emulation Register is
selected.
Defines the debounce time period. See
section: Debounce on Inputs.
Resets the entire FPGA, active high.
Status of 24V voltage monitoring
0- The 24V level out of correct range of
operation.
1- The 24V level within the correct range
of operation.
Used in Prog/Debug mode:
Writing a '1' will launch the process of loading
the IL file from the EEPROM into the FPGA
with check. The '1' is latched. At the end of
the process the FPGA will clear this bit.
Any access in other mode has no effect.
Before each new launch the process of
loading, after the first launch, needed to be
issued Global reset via bit “Global Reset” in
CSR register.
RDONE
ILRST
DPRST
ILV
FORC
NAL
Meaning of Status bits (examples):
1
0
0
1
1
1
Enabled
1
1
0
0
0
X
Disabled
0
0
0
0
0
0
Disabled
1
0
0
0
0
0
Disabled
Output
State
Meaning
This is operational normal run state: The FPGA had
successfully loaded the IL and DP files, IL file match
PD P/N, IL output matches Relay state, and second
FPGA is alive.
An example of an error: FGPA had completed the
read of IL file but with error. The ILV and FORC will
remain 0 and the output will be disabled.
The FPGA didn't complete the read of IL and DP files.
Within time period of … after power up or ILOAD
command, it is normal. Beyond this time period it's an
error.
Files IL and PD had been loaded successfully but no
match of IL with PD P/N.
Page 91 of 121
© MKS Instruments CIT Products 2012, All rights reserved
ECM2 User Manual Rev. 1.5
7.5 Interlock Output Logic
Each Interlock output logic can have up to a combination of eight AND gates that all feed into an OR gate.
Each AND gate can be any combination of the available interlock inputs or output feedback channel.
Figure 7-4 Non-Inverted Interlock Output Logic
The interlock output can also be inverted. Figure 7-5 showsthe inverted Interlock output logic.
Figure 7-5 Inverted Interlock Output
7.6
ViSim Tool for Interlock Output Logic Commissioning
The ViSim is a GUI tool based on MS Office VISIO with underlying Visual Basic code. The tool enables the
user to build interlock logic by interconnecting relays and I/O symbols, simulate the design, and generate a
‘csv’ file. This file can then be loaded into the Prog Interlock platform via FTP.
Page 92 of 121
© MKS Instruments CIT Products 2012, All rights reserved
ECM2 User Manual Rev. 1.5
7.6.1 Installation
7.6.1.1 Requirements
The following applications need to be installed.
1. MS Office Excel 2007 or 2010.
NOTE: Other versions of MS Office Excel are not supported at this time of writing.
2. MS Office Visio 2007 or 2010.
3. In some cases, registration of the below Dynamic Libraries are needed in order to make ViSim works
with Visio
C:\Windows\system32\scrrun.dll
C:\Program Files\Common Files\Microsoft Shared\DAO\dao350.dll
C:\Program Files\Common Files\Microsoft Shared\DAO\dao360.dll
To register the above dll, at window Start->Run type regsvr32 “path to dll location”. An example of the
first dll registration with regsvr32 is shown below
A message similar like below will indicate that dll registration is successful. If not, please check syntax
and location of the dll.
Page 93 of 121
© MKS Instruments CIT Products 2012, All rights reserved
ECM2 User Manual Rev. 1.5
7.6.1.2 Installation
1. Copy the ViSim folder into your local drive. This folder is available via download from the MKS website
at:
http://www.mksinst.com/product/product.aspx?ProductID=1227
Visim Logic MS-Visio sample files (referenced in the Visim User Guide)
2. Change the security level for macros to ‘Low’ as follows:
•
Open blank Visio document.
•
On the menu bar: File->Options->Trust Center.
•
Once in the Trust Center, click on Macro Settings, and select the radio button labeled “Enable all
macros”. Then, check the box labeled “Trust access to the VBA project object model”.
Note
If you check a higher security option the macros will be blocked
Note
You may need to restart the Visio for the changes to take effect
after changing security option.
•
Page 94 of 121
© MKS Instruments CIT Products 2012, All rights reserved
ECM2 User Manual Rev. 1.5
7.7 Tutorial – Creating a Logic file using ViSim
This section details the process of design, simulation and generation of the cvs file through the use of example.
7.7.1 Create New File:
Open the ViSim folder and double-click on ‘ViSim Drawing Template.vsd’. This file is a template with
underlying VB code. ‘Save As’ this file into the same folder with your selected name.
7.7.2 I/O Map File:
Before drawing the logic, you need to have an Excel file with the I/O definition. By default the tool will refer to
the following file:
.....\ViSim\work\IO_MAP.xlsx
The file contains two sheets, the first for the inputs, second for the outputs. Use default labeling of the first
sheet as “In” and the second sheet as “Out”.
The sheet structure is shown below: The first column contains the input user name (or signal name), and the
second column contains the index of this input in the Programmable Interlock. The third column contains the
location of this input on the Distribution board. Use a similar structure for the second sheet.
7.7.3 Edit the Visio File:
Open the ViSim folder and double click on ‘ViSim Master.vsd’. This file is a template with underlying VB code.
‘Save As’ this file into the same folder with your selected name. You may notice the new tab item ‘Add-Ins’ on
the ribbon and a new sub-item labeled ‘Interlock’.
Figure 7-6 Locating the Add-Ins tab on the MS-Visio ribbon
Page 95 of 121
© MKS Instruments CIT Products 2012, All rights reserved
ECM2 User Manual Rev. 1.5
Following any modification of the IO_MAP file, run the ‘Validate IO_MAP file’ in the ‘Interlock’ menu. This
function checks the file for the following errors:
1. Illegal sheet names
2. In or Out indexes out of range (in < 0 or in > 64, out < 0 or out > 65) or illegal chars.
3. Duplicate indexes.
4. Duplicate Descriptions.
The tool will not let you edit and compile a design without validated IO_MAP file.
Figure 7-7 Example of IO Map Excel Spreadsheet file.
7.7.4 Draw The Logic:
If you have anything already drawn on the page, just select and delete.
From the ‘Drawing’ stencil on the left of the page, drag two ‘INPUT’ one RELAY and one OUTPUT symbols
and drop them on the page. Drag the LINE symbol and drop it on the page. Then stretch the edges of the line
Page 96 of 121
© MKS Instruments CIT Products 2012, All rights reserved
ECM2 User Manual Rev. 1.5
by using the mouse with the left click button held down and tie them to the symbol pins as shown in the
following figure. You’ll need to drag the LINE three times.
Figure 7-8 Simple one AND gate logic example with ViSim
7.7.5 Assign Inputs and Output.
Place the mouse pointer close to the INPUT symbol, untila small menu item appears as shown inFigure 7-9.
Figure 7-9 Selecting Input using drop down menu in ViSim
Page 97 of 121
© MKS Instruments CIT Products 2012, All rights reserved
ECM2 User Manual Rev. 1.5
NOTE: If the input symbols are spaced too closely together, the input menu may not be easily accessible using
the mouse to cover the input symbol. The user can change input signal by selecting the input symbol with
ribbon tab->Add-Ins->Interlock->Edit I/O as shown in Figure 7-10Figure 7-10.
Figure 7-10 Selecting Input using drop down menu in ViSim
Click on this menu item and then click again on the ‘Edit Pin #’ sub item.
You will get a form as shown in Figure 7-11. The data within this form is taken from the IO_MAP.xlsx file. Click
on any one of the items in the list, and then click the ‘Assign’ button. The form will be closed and the selected
data will appear on the INPUT symbol. Do the same for the second INPUT symbol and the OUTPUT symbol.
At this point the I/O is assigned to the input and output symbols.
Page 98 of 121
© MKS Instruments CIT Products 2012, All rights reserved
ECM2 User Manual Rev. 1.5
Figure 7-11 IO selection from spreadsheet IO file
Page 99 of 121
© MKS Instruments CIT Products 2012, All rights reserved
ECM2 User Manual Rev. 1.5
7.7.6 Generate CSV (Coma-Separated Value) File.
Click on the Visio tool bar icon as shown inFigure 7-12.
The created file is:
…\ViSim\work\intlkcfg_user.csv
Figure 7-12 Generating CSV file from Visio ViSim Tool.
This will activate the netlist generator and the csv file generator. At the end of the netlist generation a message
‘Connections Complete’ will appear, then a message ‘csv File creation completed’ will appear. Press OK to
both messages.
At this point, the following should appear on the Visio page. Note that the symbols are designated, and also
note that the small red circles around the pins disappeared to indicate the connection has been made.
Page 100 of 121
© MKS Instruments CIT Products 2012, All rights reserved
ECM2 User Manual Rev. 1.5
Figure 7-13 Complete interlock sample design ready for simulation
Page 101 of 121
© MKS Instruments CIT Products 2012, All rights reserved
ECM2 User Manual Rev. 1.5
Note: All input symbols used in interlock design must be assigned a signal name. Leaving a connected input
symbol with “no name” will result in an error. The error path will be highlighted with red wire to the un-assigned
input signal as shown in Figure 7-14
Figure 7-14 Complete interlock sample design ready for simulation
Page 102 of 121
© MKS Instruments CIT Products 2012, All rights reserved
ECM2 User Manual Rev. 1.5
7.7.7 Logic example
The example above will generate the below logic in Figure 7-15 Equivalent Logic for the simple example
above.:
OUT1 = IN4 and IN5
Figure 7-15 Equivalent Logic for the simple example above.
7.7.8 The Default CSV File:
The file created is: …\ViSim\work\intlkcfg_user.csv
Figure 7-16 shows the logic definition section in this file, in which one AND term is composed of the inputs 4
and 5. This AND term is assigned to output 1.
Figure 7-16 CSV file generated by ViSim Tool for example above
7.7.9 Simulate the Design
Turn the inputs ON and OFF by moving the mouse pointer as shown in Figure 7-17to activate the drop down
menu.
Page 103 of 121
© MKS Instruments CIT Products 2012, All rights reserved
ECM2 User Manual Rev. 1.5
Figure 7-17 Button to toggle inputs for simulation.
Then click ON or OFF to simulate the output
Figure 7-18 Toggle an input ON or OFF to simulate programmable logic design
Figure 7-19 shows the result when both inputs are ON:
Figure 7-19 Result of simulation when logic is TRUE and activates the output.
To reset the simulator click on the tool bar icon as shown below:
Figure 7-20 Reset simulation condition on ViSim tool.
Page 104 of 121
© MKS Instruments CIT Products 2012, All rights reserved
ECM2 User Manual Rev. 1.5
7.8
Logic Structure
7.8.1 Combined AND/OR Logic Term
Relays can be connected to form various logic structures. The following example shows a combination of AND
and OR terms.
Figure 7-21 More complex logic structure
The logic term represented by this structure would be:
Out1 = (1 and 2 or 3 and 4) and 5 and 6 and (7 and 9 or 8 and 10)
Figure 7-22 Equivalent logic gate for figure 14
Note
The logic above depicts the equivalent logic equation for
interlock logic condition, not the actual TTL gate level for timing
analysis purposes.
Page 105 of 121
© MKS Instruments CIT Products 2012, All rights reserved
ECM2 User Manual Rev. 1.5
The resulting ‘csv’ is shown on the
right.
Note that the tool uses other free
outputs (actual or virtual in this case
O2 and O3) to form the logic parts
and feed them back to output 1.
Figure 7-23 ViSim generated CSV file for more complex
logic design above
7.8.2 Latch Structure
The following structure realizes a latch function. Given that the upper AND term (1 * 2 * 5 * 6) is true, when the
inputs 3 and 4 (the latch condition) turns ON, the relay U5 will be energized for a short period as dictated by
the capacitor, and then due to the feedback on U5 (pin 4 to pin3) the relay will be kept energized. Once the
upper condition turns false, the relay U5 will be de-energized.
Page 106 of 121
© MKS Instruments CIT Products 2012, All rights reserved
ECM2 User Manual Rev. 1.5
Figure 7-24 Example of Latch and Clear Interlock design
The example in Figure 7-24 is translated
into the csv file shown on the right:
The latch condition is assigned to AND
term #1 (A1). The latched function is
assigned to A3. The clear condition is the
same latched function inverted by using a
free output (in this case O2) and then fed
back to O1 as term #2.
Figure 7-25 CSV file with Latch condition
7.8.3
Download the Logic to ECM2
Once the interlock logic is simulated successfully and csv file is generated, following the below step to
download the logic file in csv format to the ECM2 and program it to EEPROM
1. NOTE: Make sure the rotary switch for interlock is switched to program mode (switch pointing to 9 position then
power toggle the unit) for the EEPROM program to take effect.
Page 107 of 121
© MKS Instruments CIT Products 2012, All rights reserved
ECM2 User Manual Rev. 1.5
2. Open a command window from your PC where you create the Visio Interlock file. Change directory to where the
csv file resides.
(a) This should be in the same Visim folder with the Visio file under work directory, for example if you
put the Visim folder in the root C:\ directory, the generated csv file will be in C:\ visim\work
(b) The generated csv file name is fixed as intlkcfg_user.csv. Make sure to rename existing
intlkcfg_user.csv file to a different name for archive before generating a new logic csv file. Existing
intlkcfg_user.csv will be overwritten.
3.
4.
5.
6.
7.
8.
9.
From the same command window in step 1, Open an FTP session to the ECM2 unit by typing “ftp 192.168.1.3”
Enter anonymous/anonymous for user name and password, respectively when prompted for.
Type “put intlkcfg_user.csv”
When FTP transfer completes, close the FTP window.
Open a telnet session to the ECM2 unit. You can open a command window and type “telnet 192.168.1.3”
Change directory to Windows by typing on the command prompt “cd Windows”
Type “PrgIntlk SETIL \Temp\intlkcfg_user.csv”. If unit is already in program mode, user should see a screen
similar to the below
Page 108 of 121
© MKS Instruments CIT Products 2012, All rights reserved
ECM2 User Manual Rev. 1.5
10. Make sure the rotary switch for interlock is switched to program mode (switch pointing to 9 position then power
toggle the unit) for the EEPROM program to take effect.
Page 109 of 121
© MKS Instruments CIT Products 2012, All rights reserved
ECM2 User Manual Rev. 1.5
7.8.1 Troubleshooting
1. After opening the IO_MAP excel file no sheets are visible.
Resolution: In the menu bar select ‘View’ and then ‘Unhide’. Select the IO_MAP workbook and then press ‘OK’.
2. For Visio 2010 version, if you have an error popped up saying ActiveX Cannot Create Object with error code
429. Please refer to section 7.5.1.1 for dll registration of Microsoft Dynamic Libraries.
7.9 Maintenance and Safety
7.9.1
System Periodic Test/Monitoring
User must periodically monitor the internal status bits of the Prog Ilk over the network for any indication of
failure. The monitoring system will alarm in the case of a failure, alerting the user that the tool’s safety process
requirement and specification indicate a need to replace the unit.
7.9.2
Self-Test
A periodic test of the HW can decrease probability of failure. In our case, since there is a redundant
architecture (1oo2), after a channel failure, a functioning channel still remains to provide the time necessary to
replace the board. The self-test is based on two functions: Channels Output Comparison, and Mutual Alive
Sign.
Page 110 of 121
© MKS Instruments CIT Products 2012, All rights reserved
ECM2 User Manual Rev. 1.5
7.9.3
User Relay Diagnostic Test
The programmable Interlock has self-diagnostics features that can diagnose internal circuit failures while in
operational mode. This is achieved through the 1oo2 topology of the design.
Each output channel has two Relays connected serially such that if one fails to open (safe state) the other will
back up.
These Relays are not diagnosed by the design for a case of contact fail to open. They need be tested once a
year in order to comply with the SIL-3.
This test is supported by a dedicated circuit that is part of the Programmable Interlock design and requires
human activation.
7.9.4
Proof Test
Proof Test Interval: Every 12 Months.
For certain industries, the maintenance of IEC61508 SIL3 certification requires that this proof test be
performed yearly.
7.9.4.1 Proof Test Definition
The periodic test should include short circuit test on output relays, transistor switch test, and input connector
short circuit test.
7.9.4.2 User Test Procedure
1. Turn off the power to the unit.
2. Disconnect all DI/O cables from connector’s panel.
3. Remove the cover on the side panel as illustrated in the following figure (Layout of I/O connector for illustration
purpose only, they may differ between systems).
Page 111 of 121
© MKS Instruments CIT Products 2012, All rights reserved
ECM2 User Manual Rev. 1.5
Figure 7-26 Removing the interlock board side panel
Image is for illustration purpose only. Actual layout might be slightly
different than 3D model rendering.
IMPORTANT: Keep side panel cover on during normal operation and affix temper proof sticker to detect
unauthorized access to switches.
Figure 7-27 Cover layout for DIP switches access (for illustration purposes only).
Page 112 of 121
© MKS Instruments CIT Products 2012, All rights reserved
ECM2 User Manual Rev. 1.5
4. Set DIP SWITCH position of all 64 switches to ON position (upper position).
TOP
POSITION
BOTTOM
POSITION
Figure 7-28 DIP positions (for illustration purpose only)
Image is for illustration purpose only.
Rotate the ROTARY SWITCH to position 9. This will set the unit into test mode.
Turn the power on.
Verify TEST STATE LED is green.
To start the test, move the TEST SWITCH to its left position then back to right immediately. The TEST STATE LED
will start blinking to indicate test is running. It may take few seconds for the test to complete. You should hear
the relays clicking while test is running.
9. On test completion the both LEDs will be turned green to indicate pass, any red LED indicates failure.
5.
6.
7.
8.
Warning In case TEST RESULT LED is turned Red do not use the
unit.
Unit need to be repaired.
10.
11.
12.
13.
14.
15.
Rotate the ROTARY SWITCH to 0 position and make sure the TEST STATE LED is turned off.
Turn the power off.
Move the DIP SWITCHES back to their lower position.
Assemble the cover.
Connect the DI/O cabled back to the connector’s panel.
Unit is ready for use.
7.9.4.3 Input Connector Short Circuit Test.
Set each of the inputs, one at a time to ON and read the FPGA input register. The read should result with only
one bit set with respect to the input.
Page 113 of 121
© MKS Instruments CIT Products 2012, All rights reserved
ECM2 User Manual Rev. 1.5
Page 114 of 121
© MKS Instruments CIT Products 2012, All rights reserved
ECM2 User Manual Rev. 1.5
8 WARRANTY
Please refer to MKS Website below for warranty term and legal disclaimer
http://www.mksinst.com/about/warranties.aspx
http://www.mksinst.com/about/legal.aspx
Page 115 of 121
© MKS Instruments CIT Products 2012, All rights reserved
ECM2 User Manual Rev. 1.5
Appendix A: Troubleshooting
Boot:
•
LCD displays “ECM2: Booting” for over 1
min
•
•
•
LCD displays “ECM2: Loading” for over
1min
•
•
Make sure power supply provides enough
amperes for ECM2
Unplug power. Wait for a few seconds and
plug back power.
Unit is waiting for network interface to be
plugged in.
Unit’s IP address might be set as DHCP and
it’s waiting for an assigned IP address.
Make sure your PC is not set as static with
different subnet mask and your network
must be able to assign IP address
automatically.
Network:
•
User cannot telnet or FTP to the unit
•
•
•
•
Make sure PC IP address is set to the same
subnet as unit IP.
Make sure Ethernet cable is plugged to
U19 (NOTE: U18 is not enabled)
Make sure no other device on the network
is set with the same IP address as host or
ECM2
Make sure unit complete booting and unit
IP address is displayed on the front panel
LCD.
Visio or Visim:
•
•
Visio 2010 returns an error popped up
saying ActiveX Cannot Create Object with
error code 429
After opening the IO_MAP excel file no
sheets are visible.
•
•
•
Please refer to section 7.5.1.1 to Register
dao360.dll and runsrv.dll using regsrv32
NOTE: Refer to Microsoft knowledge
database for helpful solution to Visio
related issue.
In the Visio menu bar select ‘View’ and
then ‘Unhide’. Select the IO_MAP
Page 116 of 121
© MKS Instruments CIT Products 2012, All rights reserved
ECM2 User Manual Rev. 1.5
workbook and then press ‘OK’.
IEC61131-3:
•
Project Control Dialog does not seem to
response with a pop up control
•
Make sure the Project resource setting
matched the unit IP address.
•
Project error or warning with wrong
resource
•
Make sure the project resource for PLC
type select eCLR_ECM2 as PLC/Processor
type.
•
Multiprog cannot connect to unit after all
have been confirmed
•
Make sure IEC rotary switch is not on
position 3 or higher.
Page 117 of 121
© MKS Instruments CIT Products 2012, All rights reserved
ECM2 User Manual Rev. 1.5
Appendix B: Available Shell Commands
ednbrowse
This command will allow the ECM2 to scan the DeviceNet network module, create the dnrapiproxy.cfg file at
the root directory. The same command can be repeated for each additional dnet master module. The order of
the DNET network is based on order of when the command was executed. If the order of the network was not
as desired, the file dnrapiproxy.cfg can be deleted and the process can be started from beginning with the
master modules in desired order.
Below figure shows the command was executed when there is one dnet network master module as network 1.
Second added network with same command will append EDN2 to the dnrapiproxy.cfg file, and so on.
Page 118 of 121
© MKS Instruments CIT Products 2012, All rights reserved
ECM2 User Manual Rev. 1.5
dnbrowse
This command scans the networks for all available DeviceNet slave devices.
Type “dnbrowse” in the telnet session and press Enter. Type “all” and Enter if you wish to have all networks
scanned.
Note: card names are case sensitive, but ‘all’ is not.
Note: this step may take a few minutes to complete.
Page 119 of 121
© MKS Instruments CIT Products 2012, All rights reserved
ECM2 User Manual Rev. 1.5
ipsetup:
This command allows user to change the IP address of the ECM2. Type ”ipsetup” and press ENTER key,
follow option prompt for unit IP address change. Unit has to be power cycled for the change to take effect.
Page 120 of 121
© MKS Instruments CIT Products 2012, All rights reserved
ECM2 User Manual Rev. 1.5
plc
This command starts the execution of the PLC program if existed. If rotary switch is set on 1, this command will
be executed automatically when ECM is booted up. This command is only on AS01023G-01
prgintlk
This command is for interlock program and debug. Type “prgintlk” without any option then press enter key will
display synopsis and available option for the command.
version
This command will return the following features for the unit:
a. Product Name
b. Part Number
c. Serial Number
d. Product Version
e. Product HW Version
f. User Manual
g. Test Fixture Part Number
h. Test Fixture Version
i. Manufacturing Date
j. Product Install Date
dniotest
Test the IO connection for DeviceNet slaves.
-Scans for and adds all detected slaves for all EDN cards configured on the ECM2.
-Opens an IO polled connection and increments each byte by 1 every 100ms.
-Runs forever until the user quits by entering 'q' in the command window.
Available commands by OS design:
date
This command will return the current setting date on the ECM2
time
This command will return the current time on the ECM2
Page 121 of 121
© MKS Instruments CIT Products 2012, All rights reserved