1
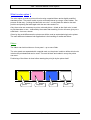
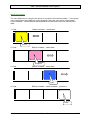
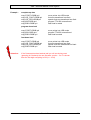
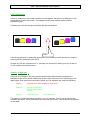
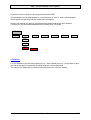
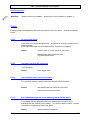
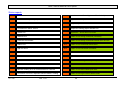
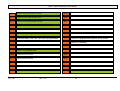
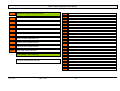
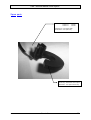
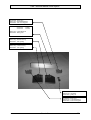
User / Service Manual Color Option
User / Service
Manual
Color Option
06.10.1998
Rev. 1.03
1
User / Service Manual Color Option
Chapter 0 General
06.10.1998
Rev. 1.03
2
User / Service Manual Color Option
Copyright
General notes:
This Service Manual and its contents are subject to copyright. The publisher’s prior written
consent must be obtained for reproduction of the manual as a whole or part thereof.
Names are generally given without any reference to existing patents, registered patterns or
designs, or trademarks. The omission of a corresponding note does not imply that the names
can be used freely. All trademarks are acknowledged.
The manufacturer reserves the right to technical and other alterations without prior notice.
The publisher cannot warrant the accuracy of the content of this manual.
Attention :
The following sign is used to mark up - that this is an important point !
Note: Please follow the notes shown in this text - it will help to cover all
situations and keep your engine working.
If in the manual is used the name TTX 650 - it is as well meant the
TTX 450 the Puma and Tiger or the S 45 !
06.10.1998
Rev. 1.03
3
User / Service Manual Color Option
Contents
CHAPTER 0 GENERAL ............................................................................................. 2
Copyright ...................................................................................................................... 3
General notes: .............................................................................................................. 3
Contents ....................................................................................................................... 4
CHAPTER 1 INITIATION............................................................................................ 6
What is color option ? ................................................................................................... 7
Ribbon .......................................................................................................................... 7
Media movement .......................................................................................................... 8
Unpack .........................................................................................................................9
Assemble Option .......................................................................................................... 9
Connect the sensor to the I/O board ........................................................................... 10
Release ...................................................................................................................... 11
CHAPTER 2 SET UP MODE.................................................................................... 12
Update new firmware.................................................................................................. 13
Downloading a new version ........................................................................................ 13
CHAPTER 3 MODES OF OPERATION - OPERATION........................................... 15
Programming .............................................................................................................. 16
Quantity of label per color field.................................................................................... 17
#CP command............................................................................................................ 17
4 color ribbon.............................................................................................................. 17
All other multi color ribbon (a<>4) ............................................................................... 17
Offset adjustment........................................................................................................ 18
Quantity of label per ................................................................................................... 18
Limitation .................................................................................................................... 19
CHAPTER 4 INFORMATION PRINTOUT / PARAMETER ...................................... 20
Parameter Menu ......................................................................................................... 21
Status printout ............................................................................................................ 22
Status ......................................................................................................................... 22
ST34
no color code found.................................................................................... 22
ST35
logo does not fit to the color card ............................................................... 22
ST36
can not find a color card or not write to....................................................... 22
ST37
#CP command sequence is not matching with the used ribbon.................. 22
Example ..................................................................................................................... 23
Status reports ............................................................................................................. 24
CHAPTER 5 MAINTENANCE, CLEANING AND SERVICE .................................... 28
Maintenance and cleaning .......................................................................................... 29
Service ....................................................................................................................... 29
CHAPTER 6 DIAGRAM, COMPONENT, WIRING................................................... 30
06.10.1998
Rev. 1.03
4
User / Service Manual Color Option
Color Sensor Cable .................................................................................................... 31
CHAPTER 7 APPENDIX .......................................................................................... 32
Spare parts ................................................................................................................. 33
INDEX ........................................................................................................................ 36
06.10.1998
Rev. 1.03
5
User / Service Manual Color Option
Chapter 1 Initiation
06.10.1998
Rev. 1.03
6
User / Service Manual Color Option
What is color option ?
The color option is used to print multi color using a special ribbon and a slightly modified
standard printer. The printer is able to print coloured pictures by using a 4 color ribbon. The
process is that way – printing the label with one color – moving back the label to the start
position and printing the label again with the next color and so on.
Only three color are necessary to print a coloured picture – black as the forth color is used
to print barcodes or text – reasoned by the matter that matching 3 color will never give you a
solid black – its more a brown.
Given by the small differences the printer can still be used as a standard single color printer.
The main difference between both applications is the handling of media and ribbon.
Ribbon
The ribbon can hold a minimum of one panel – up to more fields.
The color panel are separated with a special mark, so the printer is able to define which color
is below the printhead and can be used. The mark is black and coded in a way the printer
can react .
Positioning of the ribbon is done before starting the print job by the printer itself.
yellow
06.10.1998
magenta
Rev. 1.03
cyan
black
7
User / Service Manual Color Option
Media movement
The main difference to a single color printer is movement of media and ribbon – in the single
color mode ribbon and media are moved forwards! Using the color option means ribbon
moves forwards – media forwards and backwards until all used colours are printed to the
label.
1. Feed
Ribbon forwards – media back
yellow
2. Feed
Ribbon forwards – media back
magenta
3. Feed
Ribbon forwards – media back
cyan
4. Feed
Ribbon forwards – media forwards – print done
black
06.10.1998
Rev. 1.03
8
User / Service Manual Color Option
Unpack
• remove packing parts - take care of documentation and parts
• remove option from packaging
• the option consists out of
-
a special sensor, mounted into a plastic cover
a special firmware (visible by reset after the first digit a C
is shown i.e. 1C34)
a guiding part used to guide the media outside of the printer
SRAM card (if pictures should be printed, or the printer
drivers are used)
Assemble Option
The option is sledded over the ribbon guiding axle and pushed back to the front plate of the
printer
move the option in a way that the ribbon feeds through the two sensor parts
ribbon
sensor
06.10.1998
Rev. 1.03
9
User / Service Manual Color Option
Connect the sensor to the I/O board
Move the cable through the hole in the front cover (media sensor is using the same) and
connect the plug to CN 10 on the I/O board.
Use Pot P2 (see picture) to adjust the sensor in a way, that measured on CN 31 (see picture)
a voltage of 0,18 V – 0,19 V shows up – with no ribbon in the sensor.
This should be done only by a service technician – unplug printer before from main power !
Pot P2
CN 10
CN 31
Check the sensor by using the menu point SCHK – and there point CLxx
Sensor
Display
Sensor blocked
Sensor free
CL 15
CL 0
OFFLINE
INFO
PRTP
IFAC
SYSP
JCLR
SCLR
OTHR
DOWN
LCLR
CCLR
ICLR
ADJS
MCHK
CLxx
06.10.1998
Rev. 1.03
SCHK
10
User / Service Manual Color Option
Release
The color option is released for the printer TTX 450, Puma, S 45 – TTX 650, Lion and S 65.
The option is not released for the other printer !
Reason for that limitation is given by the media forwards and backwards movement. It is
necessary to have a very correct back feed of the media – this is not possible with the wider
units.
06.10.1998
Rev. 1.03
11
User / Service Manual Color Option
Chapter 2 Set up mode
06.10.1998
Rev. 1.03
12
User / Service Manual Color Option
Update new firmware
To set up he printer for color option you have to download a new firmware version. If you
ordered the printer together with the color option the firmware is imbedded.
To flash the new firmware please follow the steps below.
The printer is using a memory (flash ram) - the user can program from outside.
The memory stores firmware and fonts - as well the barcodes. This feature gives the
possibility to store new firmware in the printer without opening the cover and/or
changing EPROMS.
Attention:
Only the Centronics parallel interface can be used to download new firmware.
If the download procedure is started – do not interrupt it – otherwise the board
can be locked and only the factory is able to reset it. Transmission of data
can be done by using a COPY command - it has to be done with the
parameter /B - so no additional data will be added to the transmitted
data.
A loader is programmed into the flash RAM from the factory – this is a base program. This
loader is used to receive the first firmware – handling the code, barcode and fonts.
Downloading a new version
• switch in the printer – go into ONLINE mode
• send the file
START.LDR
to the printer
• the printer is reset and displays ‘.LDR’
• now it is possible to transmit the data with the different files
V55_FONT.LDR
V55_SPD.LDR
650.LDR
- internal font generator
- scaleable font generator
- firmware (TTX 650 or other)
• to finish the download
END.LDR
06.10.1998
- finished
Rev. 1.03
13
User / Service Manual Color Option
Example :
complete up date
copy START.LDR/B lpt1
copy V55_FONT.LDR/B lpt1
copy V55_SPD.LDR/B lpt1
copy 650.LDR/B lpt1
copy END.LDR/B lpt1
move printer into LDR mode
fonts are transferred into flash
speedo fonts are transferred into flash
program TTX 650 is transferred
flash load is ended
program down load
copy START.LDR/B lpt1
copy 650.LDR/B lpt1
copy END.LDR/B lpt1
move printer into LDR mode
program TTX 650 is transferred
flash load is ended
font down load
copy START.LDR/B lpt1
copy V55_FONT.LDR/B lpt1
copy V55_SPD.LDR/B lpt1
copy END.LDR/B lpt1
Attention:
06.10.1998
move printer into LDR mode
fonts are transferred into flash
speedo fonts are transferred into flash
flash load is ended
If the firmware download worked well you will see during reset
(pressing all 3 buttons) the new firmware version – if a C is shown
after the first digit everything is OK (i.e. 1C34)
Rev. 1.03
14
User / Service Manual Color Option
Chapter 3 Modes of operation - operation
06.10.1998
Rev. 1.03
15
User / Service Manual Color Option
Programming
For the use with the color option a new EASY PLUG command was designed. The #RC
command is used to specify which color panel is used to print the elements after the
command. This color will be used until a new #RC command or a new #ER command is
detected.
Command:
#RCn/
n
=
0
black
=
1
yellow
=
2
magenta
=
3
cyan
The #RC commands have to stay between the #ER and the #Q command. If coloured
pictures should be printed or the printer drivers are used a SRAM PCMCIA card has to
be used (up to 2 MB). The card is used to store the image data of the picture between
transmission and printout.
Attention.
The printer will not separate the picture into the three ground colours !
This has to be done outside of the printer with a colour separation program.
Only EASY PLUG information or data with a #YI command can be send to the
printer.
If the card is used – the card has to be a color card formatted one. This format can be done
in the printer using the menu point OTHR – CCLR – YES? (see as well card manual)
OFFLINE
INFO
PRTP
IFAC
SYSP
JCLR
SCLR
OTHR
DOWN
LCLR
CCLR
YES?
After you have accepted to format – SLOT0 is checked for a card able to write on (means a
SRAM PCMCIA card – not write protected). If a card is found it will be formatted – if not
SLOT1 is used if a card is there.
Attention:
06.10.1998
The card will be formatted – as well if a working format is on !
Rev. 1.03
16
User / Service Manual Color Option
Quantity of label per color field
#CP command
Syntax:
#CPa/b/
#CP
command
a
quantity of color fields per set
b
quantity of labels printed with one
color set
Calculation of b
If the printer is not in the foil save mode - b is the result out of the division – length
of the color field / length of the label.
Example:
field length = 100 mm, label length = 20 mm,
b=5
If the label is not printed 100% coloured – normally more then the calculated labels
can be printed.
But therefore b is influenced by
quantity of elements printed on the label
print position
print speed
endless or cutted label
The #CP command is used between the #IM command and the #ER command.
Reasoned by the availability of 2 color ribbon and 3 color ribbon it is necessary to
know more about the positioning of the colours on the ribbon
4 color ribbon
#RC0 : black
#RC1 : yellow
#RC2 : magenta
#RC3 : cyan
All other multi color ribbon (a<>4)
#RC0 : first color after the double stroke
#RC1 : second color after the double stroke
and so on
06.10.1998
Rev. 1.03
17
User / Service Manual Color Option
Offset adjustment
Given by variances in the media movement it can happen, that there is a difference in the
print position of each color panel. This happens mainly with endless media (without
registration gap).
Following you can see the layout position and the print position
feed
If the shown variance is always the same there is a possibility to work around by using the
menu point FBY below the point PRTP.
In steps of 0.25 mm a maximum of +/- 40 steps can be keyed in which gives you a total of
10 mm variance in both directions.
Quantity of label per ...
Given by the principal of the print process (back wards and forwards) compared to a
standard single colour printer a difference in the output is there as well. Depending on the
label length, print speed and used colour panel you can calculate the output as following
Output =
(((print speed : label length):2):used color)
Example:
200 mm print speed
100 mm label length
4 colour
Output =
(((200:100):2):4)
= 0.25 label /sec
The printout of a label like above will take around 4 seconds . This is only an idea how to
calculate the output. Other parameters can influence this as well – like slow down and speed
up the label.
06.10.1998
Rev. 1.03
18
User / Service Manual Color Option
As well this can be influenced by using the parameter SSPD
This parameter can be programmed to a value between 4” and 12” and is influencing the
ribbon speed (not printing) and the media back feed speed.
Reason can be that you want to get excellent print quality and set the print speed to
4 inches /sec, but the backward speed can be easily set to 10 inches.
OFFLINE
INFO
PRTP
IFAC
SYSP
JCLR
SCLR
OTHR
PSPD
....
SSPD
10
Limitation
It is not allowed to stop the printer during a run – start a status print out – and go back to print
the rest of the label if consecutive counting fields are used in the format.
The value of the fields can be influenced and the printout is not more correct!
06.10.1998
Rev. 1.03
19
User / Service Manual Color Option
Chapter 4 Information printout / parameter
06.10.1998
Rev. 1.03
20
User / Service Manual Color Option
Parameter Menu
OFFLINE
INFO
PRTP
IFAC
SYSP
JCLR
SCLR
OTHR
STA0
PSPD
PORT
EMUL
DOWN
STA1
MTYP
SPOL
NACH
LCLR
STA2
MLEN
BMOD
SENS
CCLR
STA3
MWID
<20H
PUNS
ICLR
DOT1
PUNO
BAUD
FMOD
ADJS
DOT2
BCHI
PARI
OMOD
MCHK
UPCA
DBIT
SMOD
SCHK
CSPD
SBIT
EXTR
PCHK
CPOS
HAND
SGMO
FACT
CWID
PRID
CODE
SERV
CDIS
HRES
NULL
ASPD
HVOF
HADJ
ADIS
CLCK
ACSC
MPOS
USMD
XPOS
LREP
YPOS
CSET
SSPD
MEND
GAP
SCAN
CMOD
SERR
DMOD
PEPH
Standard / standard
Nur mit Messer / cutter only
Spender mit Applikator / dispenser with applicator
Für Spender (MPOS – auch mit Abreißkante) / dispenser only (MPOS – tear off as well)
Nur mit Scanner / scanner only
Nur mit Color Option / with color option only
Nur für Service / for service only
06.10.1998
Rev. 1.03
21
User / Service Manual Color Option
Status printout
Attention:
Status printout are available – please refer to the limitation in chapter 3.
Status
Following status messages are the most important for the color option – all other are shown
below.
ST34
no color code found
If the code is not found during printing – the printer is moving a maximum of 6
panel forwards.
If the right colour was not found Status ST34 is shown in the display.
Action:
check if there is a color ribbon in the printer
check sensor using the menu point
(OTHER/SCHK/CLxx)
ST35
logo does not fit to the color card
- self accepting Action:
ST36
use a bigger card
can not find a color card or not write to
This can only happen if a #RC command follows a #YI command.
Action:
use SRAM card and format as color card
check if card is write protected
ST37
#CP command sequence is not matching with the used ribbon
It is possible that the quantity of the color fields in the command is not
matching with the quantity on the ribbon – or a 2 color ribbon is used – and the
command is searching for field 3 like #RC3
Action:
06.10.1998
check command sequence
Rev. 1.03
22
User / Service Manual Color Option
Example
Example:
This example will print the word GERMANY and color fields
in 8 colours.
#!A1
#IMS48/58
#ERN
#RC0/
#J2#T10#M1/1#YT106/0///GERMANY
#J2#T30#YL0/0/5/15
#RC1/
#J8#T10#M1/1#YT106/0///GERMANY
#J26#T10#M1/1#YT106/0///GERMANY
#J32#T10#M1/1#YT106/0///GERMANY
#J38#T10#M1/1#YT106/0///GERMANY
#J20#T30#YL0/0/5/10
#RC2/
#J14#T10#M1/1#YT106/0///GERMANY
#J26#T10#M1/1#YT106/0///GERMANY
#J32#T10#M1/1#YT106/0///GERMANY
#J44#T10#M1/1#YT106/0///GERMANY
#J15#T30#YL0/0/5/10
#RC3/
#J20#T10#M1/1#YT106/0///GERMANY
#J26#T10#M1/1#YT106/0///GERMANY
#J38#T10#M1/1#YT106/0///GERMANY
#J44#T10#M1/1#YT106/0///GERMANY
#J28#T30#YL0/0/5/10
#Q1/
06.10.1998
Rev. 1.03
23
User / Service Manual Color Option
Status reports
ST 00
ST 15
head sensor not found (system will be locked)
ST 01
NOVRAM error (factory set)
ST 16
applicator home position not found
ST 02
NOVRAM write error
ST 17
dispenser pressure roller not closed
ST 03
no material in SNGL sensor
ST 18
dispenser backing paper rewinder full
ST 04
stacker full
ST 19
applicator – touch down not found
ST 05
material end
ST 20
EASY PLUG wrong command (imedeate)
ST 06
printhead overheated
ST 21
EASY PLUG wrong command between #ER and #Q
ST 07
ribbon end
ST 22
EASY PLUG command without #ER
ST 08
gap not found
ST 23
EASY PLUG not known command
ST 24
receive error RS 232
ST 09
ST 10
ramcard error
ST 25
spooler overflow
ST 11
ramcard error
ST 26
EASY PLUG wrong size or print adjustment
ST 27
EASY PLUG counter overflow
ST 12
ST 13
barcode reading error or media broken for rewinder
ST 28
EASY PLUG field outside print area
ST 14
cut sensor not found, dispenser second feeder, nothing
ST 29
EASY PLUG logo number doesn’t exist
06.10.1998
Rev. 1.03
24
User / Service Manual Color Option
ST 30
EASY PLUG logo buffer to small
ST 45
ST 31
EASY PLUG logo number error
ST 46
ST 32
EASY PLUG postbarcode not OK
ST 47
ST 33
EASY PLUG range command #PA to #IM wrong
ST 48
ST 34
COLOR PANEL color code not found
ST 49
ST 35
COLOR PANEL logo does not fit to the card
ST 50
no read of scanner
ST 36
COLOR PANEL color card not found or programmable
ST 51
scanner not programmable (system will be locked)
ST 37
ST 52
stacker full (standard)
ST 38
ST 53
ST 39
EASY PLUG speedo error
ST 54
ST 40
receive error RS 232
ST 55
ST 41
receive error RS 232
ST 56
ST 42
ST 57
ST 43
ST 58
ST 44
06.10.1998
ST 59
ID matrix barcode error
Rev. 1.03
acess denied for setting printer to zero
25
User / Service Manual Color Option
ST 60
memory allocation error (system will be locked)
ST 75
ST 61
font allocation error (system will be locked)
ST 76
ST 62
update or numberfield overflow
ST 77
ST 63
ST 78
ST 64
ST 79
ST 65
ST 80
EASY CARD wrong name of file in #FO command
ST 66
ST 81
EASY CARD field number not found
ST 67
ST 82
EASY CARD syntax of #YT or #YB command wrong
ST 68
wrong board installed for selected peripherie option
ST 83
EASY CARD number of data field to big
ST 69
interrupt error (system stands)
ST 84
EASY CARD quantity of variable characters = 0
ST 70
TDI stepper does not respond
ST 85
EASY CARD no card found
ST 71
headstrobe checksum wrong (system will be locked)
ST 86
DATA BASE not enough space for index file
ST 72
speedo system error
ST 87
DATA BASE no possibility to build index file
ST 73
speedo scaling wrong
ST 88
DATA BASE no possibility to sort index file
ST 89
DATA BASE barcode onformation nor found in
ST 74
06.10.1998
Rev. 1.03
26
User / Service Manual Color Option
ST 90
database contains identical records
ST 91
barcode not readable
POFF
Power OFF – printer is switched OFF
FAIL
Image card could not be formatted
SCAN
Scanner was unable to decode the information
OPEN
cover open – switch is open
LOCK
the printer is locked
DATA
data receive mode
STOP
printer in STOP mode
SNGL
printer in single start mode
WAIT
printer in wait condition
HOST
printer stopped by host
ST 92
ST 93
ST 94
ST 95
ST 96
EASY CARD undefined error
ST 97
EASY PLUG undefined error
INIT
ST 98
ST 99
INTERFACE undefined error
DOWN
SYSTEM undefined derror
UP
just warning – self confirming
must be confirmed by the user
TDI table goes down
printer in loader mode
.EMU
printer in emulation mode
.SYS
printer in system mode
SORT
data base information is sorted
LOAD
Rev. 1.03
TDI table goes up
.LDR
----
06.10.1998
printer is initialised
printer was switched on to early after power down
barcodes loaded from card
27
User / Service Manual Color Option
Chapter 5 maintenance, cleaning and service
06.10.1998
Rev. 1.03
28
User / Service Manual Color Option
Maintenance and cleaning
Clean as a standard printer – sometimes the sensor should be cleaned from paper dust.
Service
No special service is necessary.
06.10.1998
Rev. 1.03
29
User / Service Manual Color Option
Chapter 6 diagram, component, wiring
06.10.1998
Rev. 1.03
30
User / Service Manual Color Option
Color Sensor Cable
06.10.1998
Rev. 1.03
31
User / Service Manual Color Option
Chapter 7 Appendix
06.10.1998
Rev. 1.03
32
User / Service Manual Color Option
Spare parts
Part Number : A0221-xx-1
A0222-xx-1
A0223-xx-1
TTX 450
TTX 650
TTX 950
Bezeichnung : Color Option ZSB
Identification : color option assy.
Part Number : A0145-xx-2
Bezeichnung : ZSB Sensor Color Option
Identification : color option sensor assy.
06.10.1998
Rev. 1.03
33
User / Service Manual Color Option
Part Number : A0135-xx-1
A0136-xx-1
A0137-xx-1
TTX 450
TTX 650
TTX 950
Bezeichnung : ZSB Refeed Guiding
Identification : refeed guiding assy.
06.10.1998
Rev. 1.03
34
User / Service Manual Color Option
Part Number : A0142-xx-0
Bezeichnung : äußere Befestigung
Identification : outer mounting part
Part Number : A0138-xx-0
A0139-xx-0
A0140-xx-0
TTX 450
TTX650
TTX 950
Bezeichnung : Verschiebeprofil
Identification : sliding profil
Part Number : A0144-xx-0
Bezeichnung : äußere Führung
Identification : outer guiding
Part Number : A0143-xx-0
Bezeichnung : innere Führung
Identification : inner guiding
Part Number : 98774-xx-0
Bezeichnung : Nut Mutter
Identification : guiding nut
Part Number : A0141-xx-0
Bezeichnung : innere Befestigung
Identification : inner mounting part
06.10.1998
Rev. 1.03
35
User / Service Manual Color Option
INDEX
A
Assemble Option ................................................................................................................................ 9
B
barcodes.......................................................................................................................................... 13
C
cleaning ...................................................................................................................................... 28, 29
Coloured ribbon .............................................................................................................................. 7, 8
Contents ............................................................................................................................................. 4
Copyright ............................................................................................................................................ 3
D
Downloading a new version ............................................................................................................. 13
E
Example................................................................................................................................ 14, 18, 23
F
firmware............................................................................................................................................ 13
fonts................................................................................................................................................. 13
G
General ........................................................................................................................................... 2, 3
General notes ..................................................................................................................................... 3
I
INDEX............................................................................................................................................... 36
L
Limitation .......................................................................................................................................... 19
M
Media movement ................................................................................................................................ 8
06.10.1998
Rev. 1.03
36
User / Service Manual Color Option
N
new firmware .................................................................................................................................... 13
O
Offset adjustment ............................................................................................................................. 18
P
parameter ........................................................................................................................................ 13
Programming .................................................................................................................................... 16
Q
Quantity of label per ......................................................................................................................... 18
R
Released printer ............................................................................................................................... 11
S
Service...................................................................................................................................... 1, 3, 29
Set up mode ..................................................................................................................................... 12
Spare parts ....................................................................................................................................... 33
ST34 ................................................................................................................................................. 22
ST35 ................................................................................................................................................. 22
ST36 ................................................................................................................................................. 22
Status printout .................................................................................................................................. 22
Status reports ................................................................................................................................... 24
U
Unpack ............................................................................................................................................... 9
Update new firmware........................................................................................................................ 13
W
What is color option ? ......................................................................................................................... 7
06.10.1998
Rev. 1.03
37