1
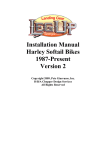
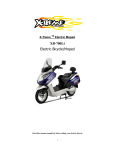
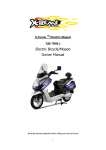
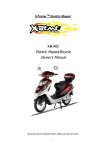
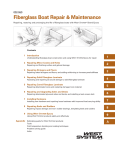
Sport Bike Rearset Kit
PKT-041
Introduction:
Made in USA
This easy to install, high quality, Powerlet™ kit provides a convenient way to
access the battery on most sport bikes. The operator can supply power to the
battery (i.e. battery charger), draw power from the battery (i.e. heated vest), or
monitor the state of charge on the battery using the Powerlet socket.
Parts List:
•
1 – Wiring harness w/15A fuse
•
1 – Mounting bracket w/socket
•
1 – 1/8” Spacer
•
Ty-wrap(s)
Please read all of the instructions carefully before attempting the
installation of this product. Have this kit installed by a trained
technician if you are not familiar with these procedures.
Quick Start Instruction:
STEP #1 Remove the seat.
STEP #2 Route wires starting at the battery and finishing at the bracket.
STEP #3 Attach the wires to the socket
STEP #4 Mount the bracket.
STEP #5 Attach the ty-wrap; examine your work.
STEP #6 Test & reassemble.
Detailed Instruction:
STEP #1 – Remove the seat. See the service manual.
RED WIRE = BATTERY POSITIVE
BLACK WIRE = CHASSIS GROUND
For example, the chassis bolt [D] is shown for the Yamaha R6. If a chassis bolt
is not available connect the black wire to the battery negative terminal. Tuck
the fuse holder into a cavity in front of the plus terminal of the battery [C].
Do not allow the red lead between the battery plus terminal and fuse-holder
to cross any metal objects[C]. Ty-wrap the fuse-holder to the nearby wiring.
D
B
C
STEP #3 – Install the fuse in the fuse-holder. Next attach the spade
connectors to the socket. The center terminal of the Powerlet socket is plus
and the outer ring is negative (see dwg below). Apply either dielectric grease
or Vaseline to the terminals. The boot on the back of the socket are oriented
so the wiring harness will route straight up from the socket, hiding it under
the tail fairing.
FRONT
POSITIVE
NEGATIVE
POWERLET
CONNECTOR
POSITIVE
A
REAR
STEP #2 – Stretch out the wiring harness. Grab the socket end of the
harness and start routing the harness by looping the wires down through the
gap between the frame member and the battery compartment plastic [B]. Let
the wire hang down by the bracket for now. Next remove the negative battery
connection, followed by the positive battery connection. Slip the red wire
under the red battery boot [C]. You may need to trim the red boot to
accommodate the added wire. Connect the red & black wire as follows:
NEGATIVE
Copyright 2006-2009 Coliant Corporation
PATENTS PENDING
August 31, 2009
PHONE: 877-752-7835 FAX: 586-276-0907 WEB SITE: www.powerlet.net
Sport Bike Rearset Kit
PKT-041
STEP #4 – The Powerlet bracket can be configured to be either forward
facing or rear facing (see diagrams to the right). Select the direction that best
suits your needs.
Spacer [E]
From the factory the socket comes pre-built on the bracket to be forward
facing. The white T connector is intentionally left off to make it easy to covert
to a rear facing application.
For forward facing applications snap the red and black wires into the white T
connector [A].
For rear facing applications slide the black boot [B] off over the wires and
terminals [D].
Remove the brass jam nut and aluminum washer [C].
Remove the socket and re-install the socket from the other side of the bracket.
Reassemble the washer, jam nut and rubber boot. Snap the red and black
wires into the white T connector [A].
Spacer [E]
STEP #5 – Apply the remaining ty-wrap to the wiring harness and the frame
rail. Do NOT allow the harness to directly contact the motor or exhaust.
Many times the exhaust is hanging from the rearset and this can be heavier
than expected. If your exhaust is hanging from the rearset, loosen both
rearset bolts but do not remove them from the tail section sub-frame. By
removing only one bolt at a time the weight of the exhaust will hang on the
installed bolt. The bracket fits between the sub-frame and rearset and the
supplied spacer [E] must be placed between the sub-frame and other rearset
mounting point to maintain proper alignment.
STEP #6 – Use a voltmeter to check if the polarity is correct.
seat. Enjoy!
Reinstall the rearset with the bracket & spacer sandwiched between the rearset
& the frame. Re-use the stock bolts,; tighten to the manufacturers torque
specification.
Copyright 2006-2009 Coliant Corporation
PATENTS PENDING
August 31, 2009
PHONE: 877-752-7835 FAX: 586-276-0907 WEB SITE: www.powerlet.net
Replace the