Transcript
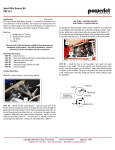
Ducati Monster Installation Instructions
PKT-023
Introduction:
Made in USA
This easy to install, high quality, Powerlet™ kit provides a convenient way to
access the battery on Ducati Monster motorcycles. The operator can supply
power to the battery (i.e. battery charger), draw power from the battery (i.e.
heated vest), or monitor the state of charge on the battery using the Powerlet
socket.
Parts List:
•
1 - Wiring harness w/ 15A fuse
•
1 - Mounting bracket w/ socket
•
1 – 1/8” spacer
•
Ty-wrap(s)
Please read all of the instructions carefully before attempting the
installation of this product. Please have a trained professional install
this kit if you are not familiar with these procedures.
Quick Start Instruction:
STEP #1 Lift gas tank.
STEP #2 Route wires starting at the battery and finishing at the bracket.
STEP #3 Attach the wires to the socket and test.
STEP #4 Mount the bracket.
STEP #5 Look over your work.
STEP #6 Put everything you took off back on.
E
B
STEP #3 –Install the fuse in the fuse-holder. Attach the wires to the socket.
The center terminal is plus and the outer ring is negative (see dwg below).
Apply either dielectric grease or Vaseline to the terminals. Use a voltmeter to
check if the polarity is correct.
D
C
Detailed Instruction:
STEP #1 – Rotate gas tank to expose the battery. See the Ducati service
manual.
FRONT
POSITIVE
NEGATIVE
A
POWERLET
CONNECTOR
REAR
STEP #2 – Stretch out the wiring harness. Grab the socket end of the
harness and start routing the harness by looping the wires up through the gap
between the frame members just behind the battery [B]. The wires will exit in
the underside of the seat area. [D]. Attach the ground (black) wire under the
hinge mounting bolt[C]. Tie wrap the harness under the cross member. Go
back to the battery area and tuck the fuse holder under the rubber strap in
front of the plus terminal of the battery [E]. Connect the fuse to the battery
holder by a ty-wrap on the lower part of the hook where the battery holder
plastic is connected. This hook is at the back part of the battery close to the
rider. [E]. Connect the red wire to the battery posts as follows:
RED WIRE = BATTERY POSITIVE
POSITIVE
NEGATIVE
STEP #4 – Remove the left driver foot peg bolts. The Powerlet bracket and
the 1/8” spacer are mounted between the footpeg bracket and the frame.
Attach the bracket to the back mounting lug [A], the 1/8” spacer is used on the
front hole. The above picture is for a high mount pipe; the installation is the
same for a stock exhaust except high pipes require some modification of the
spacers. Reuse the stock bolts and torque them down to the specification in
the Ducati service manual.
STEP #5 - Apply the remaining ty-wraps in useful locations. It is important to
have two ty-wraps close to the sockets. This will ensure that the wire will not
touch the exhaust pipes and header. Do NOT allow the harness to directly
contact the motor or exhaust.
STEP #6 –Replace tank & seat. Enjoy!
Copyright 2006-2009 Coliant Corporation
PATENTS PENDING
August 28, 2009
PHONE: 877-752-7835 FAX: 586-276-0907 WEB SITE: www.powerlet.net