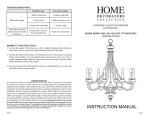
1
VK 7025 Dissolution
Apparatus Operator’s
Manual
P/N 70-9033
January 2006
Revision G
Limitation of Liability
The information in this document is subject to change without notice.
Varian, Inc. makes no warranty of any kind with regard to this material,
including, but not limited to, the implied warranties or merchantability and
fitness for a particular purpose. Varian, Inc. shall not be liable for errors
contained herein or for incidental consequential damages in connection
with the furnishing, performance, or use of this material.
All rights are reserved. Reproduction, adaptation, or translation without
prior written permission is prohibited, except as allowed under copyright
laws.
First Edition (January 2006)
VK 7025 Dissolution Apparatus Operator’s Manual
Part Number 70-9033 Revision G
Printed in the United States of America
The following terms are trademarks of Varian, Inc.:
•
•
•
•
•
BenchsaverTM
BIO-DIS III®
Enhancer Cell®
Full Flow FiltersTM
Peak VesselTM
•
•
•
•
•
Practical Solutions®
QA and QAIITM
TruCenterTM
VanKel®
VK®
Varian, Inc.
13000 Weston Parkway
Cary, North Carolina 27513-2250
800.229.1108
919.677.1108
Fax: 919.677.1138
www.varianinc.com
Copyright (c) 2002 - 2006 by Varian, Inc.
Table of Contents
Chapter 1
Safety Practices and Hazards 9
Electrical Hazards 10
Other 10
General 13
WEEE Directive 13
Chapter 2
Introduction 15
Conventions Used in this Manual 17
Quick Key Guide 18
Screen Saver 18
Chapter 3
Setup
19
Unpacking Your VK 7025 19
Setting Up the VK 7025 22
Raising and Lowering the Drive Unit
Varian, Inc.
23
Table of Contents
Sliding Back the Drive Unit 24
Setting Up the Water Bath and Heater / Circulator 25
Filling the Water Bath 27
Installing and Centering the Vessels 28
Installing Paddle / Basket Shafts 28
Installing Paddles 29
Installing Basket Shafts 30
Installing Rotating Cylinders 31
Installing the Intrinsic Dissolution Apparatus 32
Removing the Dissolution Apparatus 33
Centering Verification 34
Installing Cannula Assemblies 35
Installing Standard Evaporation Covers 36
Installing Basket / Low-loss Evaporation Covers 37
Setting the Manual Sampling Cannula 38
Programming Administrative Control 40
Security Levels 40
Setting Up the User List 41
Deleting Preset User Definitions 42
Vessel Plate Layout 43
Chapter 4
Administrator Operation 45
User Settings 45
Administration 47
Calibration 48
Bath Vessel Difference 48
Setting an Alternate Drive Unit Position 49
Cannula Height Calibration 50
Alarms 52
Calibration Calendar 53
Diagnostics 54
Menu 2 55
Setting the Clock 56
Setting Communication Port Functions 56
Setting Serial Numbers 57
Varian, Inc.
Table of Contents
Chapter 5
Operation
59
Main Menu 59
Manual Operation 60
Starting a Test 64
Paddles 65
Baskets 67
Paddle Over Disk 69
Rotating Cylinder 70
Setting Delayed Heating
Start Method 73
Method Editor 84
Chapter 6
Fiber Optics
93
Installing Fiber Optics
Chapter 7
72
93
Maintenance and Troubleshooting
97
Maintenance 97
Daily Maintenance 97
Paddle / Basket Shaft Care 99
Basket Care 100
Water Bath / Acrylic Care 101
Repairing Leaking Fittings 102
Removing the Top Cover 103
Replacing the Top Cover 103
Cleaning the Cannulas 103
Cleaning the Cannulas Using the VK 8000 Clean System
Function 104
Replacing the Flanges 106
Report Center Impact Printer 107
Installing the Cartridge Ribbon 107
Replacing the Paper Roll 108
Toggling Your Printer Online 110
Printer Self Test 110
Varian, Inc.
Table of Contents
Printer Configuration 111
Fuse Replacement 113
Troubleshooting 114
Chapter 8
Service and Warranty
117
Exclusions and Limitations 118
Obtaining Warranty Service 118
Warranty Limitations 118
Exclusive Remedies 119
Index 121
Tell Us How We Are Doing
Varian, Inc.
125
List of Figures
FIGURE 1.
Lifting Straps
FIGURE 2.
VK 7025 Lifting Guide
FIGURE 3.
VK 7025 Foot
FIGURE 4.
Drive Unit Guide Rods
FIGURE 5.
Drive Unit Release Lever 24
FIGURE 6.
Centering Verification Gauge
FIGURE 7.
EaseAlign Centering Ring
FIGURE 8.
Standard Evaporation Cover 36
FIGURE 9.
Evaporation Cover for Low Loss or Baskets 37
Varian, Inc.
20
21
23
24
34
34
List of Figures
FIGURE 10.
Manual Sampling through the Top Cover 39
FIGURE 11.
Vessel Plate Layout
FIGURE 12.
Spindle Housing
FIGURE 13.
Standard Evaporation Cover, Dropping Dosage Unit
and Sampling
FIGURE 14.
43
50
65
Basket / Low-loss Evaporation Cover, Positioning
and Sampling
68
FIGURE 15.
Fiber Optic Assembly
FIGURE 16.
Fiber Optic Assembly Setting
FIGURE 17.
Fiber Optic Probe in Vessel
FIGURE 18.
Cannula Cleaning Tray
FIGURE 19.
TruCenter Vessel—exploded view 106
Varian, Inc.
93
94
96
105
Chapter 1
Safety Practices
and Hazards
The VK 7025 has been carefully designed so that when used properly you have an
accurate, fast, flexible, and safe instrument.
If the equipment is used in a manner not specified by the manufacturer, the protection
provided by the equipment may be impaired.
Operation of a VK 7025 involves the use of aqueous liquids and various pharmaceutical
dosage forms. Unskilled, improper, or careless use of this instrument can create shock
hazards, fire hazards, or other hazards which can cause death, serious injury to
personnel, or severe damage to equipment and property.
Information on safety practices is provided with your instrument and operation manuals.
Before using your instrument or accessories, you must thoroughly read these safety
practices.
Observe all relevant safety practices at all times.
Varian, Inc.
Page 10
Safety Practices and Hazards
VK 7025 Dissolution Apparatus
Operator’s Manual
Revision G, 01/06
P/N 70-9033
Electrical Hazards
The dissolution apparatus contains electrical circuits, devices, and components
operating at dangerous voltages. Contact with these circuits, devices, and
components can cause death, serious injury, or painful electric shock.
Panels or covers that are retained by fasteners which require the use of a tool for
removal may be opened only by Varian-trained, Varian-qualified, or Varian-authorized
service engineers. Consult the manuals or product labels supplied with the dissolution
apparatus to determine which parts are operator-accessible.
Application of the wrong supply voltage, connection of the instrument to an incorrectly
wired supply outlet, or lack of proper electrical grounding can create a fire hazard or a
potentially serious shock hazard and could seriously damage the instrument and any
attached ancillary equipment.
Always use a three-wire outlet with ground connection which is adequately rated for
the load. The installation must comply with local, state, and federal safety regulations.
Do not connect the instrument to the main power supply until you have made sure
that the operating voltage is correctly set for the main power supply in the specific
outlet in your laboratory to which the equipment will be connected.
Other
Other specific warnings and cautions appear in the manuals where appropriate and
detail the specific hazard, describe how to avoid it, and specify the possible
consequences of not heeding the warning or caution.
Warning
A ‘Warning’ message appears in the manual when failure to observe instructions or
precautions could result in death or injury. Symbols depicting the nature of the specific
hazard are also placed alongside warnings.
Varian, Inc.
Revision G, 01/06
P/N 70-9033
VK 7025 Dissolution Apparatus
Operator’s Manual
Page 11
Safety Practices and Hazards
These symbols are also used on warning labels attached to the instrument. When you
see one of these symbols, you must refer to the relevant operation or service manual for
the correct procedure referred to by that warning label.
The meaning of the symbols that appear alongside warnings in this manual are as
follows:
Electrical shock
Pinch point
Caution
Refer to accompanying documents
Read all warnings and cautions carefully and observe them at all times.
Varian, Inc.
Page 12
Safety Practices and Hazards
VK 7025 Dissolution Apparatus
Operator’s Manual
Revision G, 01/06
P/N 70-9033
Caution
A ‘Caution’ message appears in the manual when failure to observe instructions could
result in damage to equipment (Varian supplied and / or other associated equipment).
A ‘Note’ appears in the manual to give advice or information.
Information Symbols
I
0
Switches main power on
Switches main power off
Indicates single-phase alternating current
Indicates the product complies with the requirements of one
or more European Union (EU) directives
Indicates that this product must not be disposed of as
unsorted municipal waste (see “WEEE Directive” on
page 13)
Varian, Inc.
Revision G, 01/06
P/N 70-9033
VK 7025 Dissolution Apparatus
Operator’s Manual
Page 13
Safety Practices and Hazards
General
CE Compliant Products
The VK 7025 has been designed to comply with the requirements of the Electro-magnetic
Compatibility (EMC) Directive and the Low Voltage Directive (LVD) of the EU.
Varian, Inc. has confirmed that each product complies with the relevant directives by
testing a prototype against the prescribed European Norm (EN) standards.
Proof that a product complies with the directives is indicated by:
• the CE marking appearing on the rear of the product.
• the documentation package that accompanies the product containing a copy of
the declaration of conformity. This declaration is the legal declaration by Varian,
Inc. that the product complies with the directives and also shows the EN standards
to which the product was tested to demonstrate compliance. The declaration of
conformity is signed by the representative of the manufacturing plant.
WEEE Directive
All Varian products that are subject to the WEEE directive shipped after August 13, 2005
are compliant with the WEEE marking requirements. Such products are marked with the
“crossed out wheelie bin” WEEE symbol shown on page 12 in accordance with European
Standard EN 50419.
This symbol on the product or on its packaging indicates that this product must not be
disposed of as unsorted municipal waste. The separate collection and recycling of your
waste equipment at the time of disposal will help to conserve natural resources and
ensure that it is recycled in a manner that protects human health and the environment.
For more information on collection, reuse, and recycling systems, please contact your
local/regional waste administration, your local distributor, or Varian, Inc.
Varian, Inc.
Page 14
Safety Practices and Hazards
VK 7025 Dissolution Apparatus
Operator’s Manual
Revision G, 01/06
P/N 70-9033
This page was intentionally left blank, except for this message.
Varian, Inc.
Chapter 2
Introduction
The VK 7025 is designed for dissolution testing of a variety of pharmaceutical products,
including tablets, capsules, transdermal patches, and membranes. It can be configured
as USP Apparatus 1, 2, 5, or 6.
The unique design of the VK 7025 has a lower profile than existing dissolution apparatus.
The drive unit moves up and down with the touch of a key to move paddles or basket
shafts into and out of the vessels. In order to allow clear access to the vessels, the drive
unit slides back rather than continuing to move upwards. This compact design has the
evaporation covers attached to the spindle housings on the drive unit and offers
convenient access to the mechanics of the system through a hinged top cover.
The front panel displays the Method Status screen during a run, providing full information
on spindle speed, elapsed time, temperature and more. Most operating parameters are
programmable including spindle speed, test length, bath temperature, and test start
times.
The built-in Report Center Printer provides a complete report, either at pre-programmed
time intervals or on demand, of several important test parameters. Printouts are on plain
paper which will not fade or discolor over time or with exposure to chemical fumes.
Varian, Inc.
Page 16
Introduction
VK 7025 Dissolution Apparatus
Operator’s Manual
Revision G, 01/06
P/N 70-9033
The VK 7025 Dissolution Apparatus comes with all accessories needed for proper
function:
•
•
•
•
•
•
•
•
•
•
PETG water bath
Heater / circulator
USP dissolution paddles or rotating basket assemblies (14.5-inch shaft length)
TruCenter Vessels, 1000 mL, with upper and lower magnetic ring flanges
Standard evaporation covers
Complete set of alignment tools to ensure full USP compliance
Built-in Report Center Printer
Sampling cannulas
Dosage Delivery Module (DDM)
AutoTemp Vessel Temperature Sensing System
These features are optional on the VK 7025:
•
Individual clutches
•
Fiber optic probes
Warning
The dissolution apparatus contains electrical circuits, devices,
and components operating at dangerous voltages. Contact with
these circuits, devices, and components can cause death,
serious injury, or painful electric shock.
Caution
Panels or covers that are retained by fasteners which require
the use of a tool for removal may be opened only by
Varian-trained, Varian-qualified, or Varian-authorized service
engineers.
Varian, Inc.
Revision G, 01/06
P/N 70-9033
VK 7025 Dissolution Apparatus
Operator’s Manual
Page 17
Introduction
The following illustration shows a VK 7025.
Conventions Used in this Manual
•
•
•
Quick keys you are asked to press are in bold. For example, “press MENU”.
To perform functions that require making selections from the display screen, for
example, “select MANUAL OPERATION” means to press the key to the left or
right of MANUAL OPERATION.
Key sequences you are asked to press appear like this: 0 > ENTER.
Note
Remember to return the warranty card supplied with this
manual. Completing and returning the card ensures your right to
protection under the terms and conditions of your warranty. It
also enables us to better assist you in the event of any
problems. Additionally, it guarantees you will be informed of any
issues that arise concerning your equipment, such as upgrades,
retrofits, or regulatory changes.
Varian, Inc.
Page 18
Introduction
VK 7025 Dissolution Apparatus
Operator’s Manual
Revision G, 01/06
P/N 70-9033
Quick Key Guide
ESC
Press ESC to return to the previous screen.
MENU
From any point after the Main Menu, press MENU to return to the
Main Menu.
ENTER
After entering any input, press ENTER to complete the process.
STOP / PAUSE
Press STOP / PAUSE to pause or abort the present program.
RUN
To manually begin operations that were not programmed to delay
start, press RUN.
CLEAR
Press CLEAR to instantly clear an entry.
DRIVE UP
Press DRIVE UP to raise the drive unit. The drive unit
automatically rises to the home position unless another key is
pressed. Pressing DRIVE UP or DRIVE DOWN stops the upward
movement of the drive unit.
DRIVE DOWN
Press and hold DRIVE DOWN to lower the drive unit. Release
the key when the drive unit is in the appropriate position.
Screen Saver
The VK 7020 / 7020 S / 7025 screen saver initiates after 30 minutes of inactivity and no
program running. Press any key to reactivate the dissolution apparatus.
If security has been disabled, the last screen displays.
If security has been enabled, a screen requesting the current user’s password displays.
Enter the password and press ENTER. The last screen displays.
Varian, Inc.
Chapter 3
Setup
Unpacking Your VK 7025
The VK 7025 is shipped in one carton containing the following:
• VK 7025 drive unit assembly, PETG water bath, power supply box, glassware, and
accessories
• heater / circulator
Follow these steps to safely unpack your tester and accessories:
Step 1.
Open the carton and check the contents for damage which may have
occurred during shipping. Shipping damage rarely occurs, but if it does
contact both the carrier who delivered the instruments and the
Dissolution Systems Service Department. Though claims for damage
should be filed with the carrier, we can help you file a claim.
Varian, Inc.
Page 20
Setup
Step 2.
VK 7025 Dissolution Apparatus
Operator’s Manual
Revision G, 01/06
P/N 70-9033
Remove all packing from the dissolution apparatus.
Warning
The VK 7025 weighs approximately 200 pounds and therefore
requires special handling.
Step 3.
There are four lifting straps included with the dissolution apparatus. One
is positioned around each of the four legs.
Step 4.
Place the straps around your wrist as indicated in Figure 1, “Lifting
Straps,” below.
FIGURE 1. Lifting Straps
Warning
Because of its heavy weight, two people should lift the tester. Do
not lift the tester by the drive unit. Lift by holding the base plate.
Step 5.
Use the lifting straps to lift the dissolution apparatus off of the packing
platform. Place the dissolution apparatus on the ground.
Varian, Inc.
Revision G, 01/06
P/N 70-9033
Step 6.
VK 7025 Dissolution Apparatus
Operator’s Manual
Page 21
Setup
Once clear of the packaging materials, use the hand holds grooved into
the base plate to lift the dissolution apparatus onto a sturdy benchtop
(see Figure 2, “VK 7025 Lifting Guide,” below).
Warning
The electrical connection at the back of the tester is the primary
disconnect for the instrument. The tester should be positioned
to allow accessibility to the power cords for easy disconnection.
FIGURE 2. VK 7025 Lifting Guide
drive unit (do not lift)
vessel plate (do not lift)
base plate (lift)
Varian, Inc.
Page 22
Setup
VK 7025 Dissolution Apparatus
Operator’s Manual
Revision G, 01/06
P/N 70-9033
Setting Up the VK 7025
Complete the following steps to safely set up your VK 7025:
Warning
Ensure the tester is configured at the factory for the voltage
supplied.
Step 1.
Ensure the power switch on the power supply box is in the OFF position.
Warning
The electrical connection at the back of the tester is the primary
disconnect for the instrument.
Step 2.
Step 3.
Connect the power cord between the receptacle on the side of the
dissolution apparatus and an outlet of the appropriate voltage.
Turn on the dissolution apparatus. PRESS DRIVE UP TO INITIALIZE
displays.
INSTRUMENT
Step 4.
Press and release DRIVE UP to lift the drive unit to its home position.
Step 5.
Turn off the dissolution apparatus.
Step 6.
Remove the cushioning material between the drive unit and vessel plate.
Step 7.
Level the instrument by placing the bubble level provided in the
accessory kit on the vessel plate. Check for level in the center of the
front and rear of the instrument and on the left and right sides of the
instrument. The feet supporting the tester are adjustable. Turn them
counterclockwise with a 3/4-inch open wrench until the bubble in the
level is in the center at all four check points.
Step 8.
Lock the feet in place by tightening the nut snugly against the base plate
(see Figure 3, “VK 7025 Foot,” on page 23).
Varian, Inc.
Revision G, 01/06
P/N 70-9033
VK 7025 Dissolution Apparatus
Operator’s Manual
Page 23
Setup
FIGURE 3. VK 7025 Foot
Raising and Lowering the Drive Unit
Warning
Ensure your hands are not in the path of the drive unit as it rises
and lowers.
Note
There is a safety mechanism in the bottom of the left side guide
rod which keeps the drive unit from lowering improperly. If the
rods do not line up precisely with the holes in the vessel plate,
the mechanism engages and the drive unit stops lowering and
rises to the home position. See Figure 4, “Drive Unit Guide
Rods,” on page 24.
To raise the drive unit, press DRIVE UP. The drive unit stops automatically when it
reaches the home position. To stop the drive unit before it reaches the home position,
press DRIVE UP again.
To lower the drive unit, ensure the drive unit is latched in the forward-most position and
press and hold DRIVE DOWN. Release the key when the drive unit reaches the desired
position. The drive unit stops automatically when at the lowest position. There is a safety
mechanism located in the bottom of the left side guide rod which keeps the drive unit from
lowering improperly. If the rods do not line up precisely with the holes in the vessel plate,
the mechanism engages and the drive unit stops lowering and rises to the home position.
Varian, Inc.
Page 24
Setup
VK 7025 Dissolution Apparatus
Operator’s Manual
Revision G, 01/06
P/N 70-9033
The guide rods also serve to guarantee the drive unit is positioned with the apparatus in
the correct centering location for operation. See Figure 4, “Drive Unit Guide Rods,” below.
FIGURE 4. Drive Unit Guide Rods
guide rod
safety mechanism
Sliding Back the Drive Unit
There are two release levers for the drive unit which keep it from sliding back. One is
located on either side of the drive unit.
FIGURE 5. Drive Unit Release Lever
latch Ç
unlatch È
To slide the drive unit back, complete the following steps:
Step 1.
Ensure the drive unit has been fully raised to the home position.
Step 2.
Place both hands on the two release levers and use your index fingers to
depress the release levers.
Step 3.
Use your thumbs to slide the drive unit back far enough to disengage it
from the latching mechanism.
Step 4.
Move your hand to the handle at the front of the drive unit and slide the
drive unit back until it stops.
Varian, Inc.
Revision G, 01/06
P/N 70-9033
Step 5.
VK 7025 Dissolution Apparatus
Operator’s Manual
Page 25
Setup
When in the forward position, ensure the drive unit latches into place.
This guarantees it is positioned in the correct centering location for
operation.
Setting Up the Water Bath and Heater / Circulator
The removable water bath connects directly to the inlet and outlet of the heater /
circulator. Following are the connection procedures for the VK 7025 Dissolution
Apparatus:
Step 1.
Ensure the water bath is positioned under the vessel plate and rests
firmly on the base plate. Secure the vessel plate to the frame with three
screws. Finger-tighten the screws. overtightening the screws could
damage the vessel plate.
Step 2.
Locate the two tubing clamps.
Step 3.
The heater / circulator has two liquid ports, one on each end. The inlet is
connected to the water bath outlet and the outlet (which is located next
to the power switch) is connected to the water bath inlet.
Step 4.
Slip a tubing clamp over one end of the short length of tubing that is
connected to the underside of the water bath. Carefully place this end of
the tubing over the inlet port on the heater / circulator. Slide it on until it
meets the heater / circulator.
Step 5.
Slide the clamp toward the end until it is over the inlet port and secure.
This ensures a leak-free connection.
Caution
Do not overtighten the tubing clamps. Damage to the plastic
tubing could result.
Varian, Inc.
Page 26
Setup
VK 7025 Dissolution Apparatus
Operator’s Manual
Revision G, 01/06
P/N 70-9033
Step 6.
Slip a tubing clamp over one end of the longer length of tubing that is
connected to the back of the water bath. Carefully place this end of the
tubing over the outlet port on the heater / circulator. Slide it on until it
meets the heater / circulator.
Step 7.
Slide the clamp toward the end until it is over the outlet port and tighten
with a screwdriver. This ensures a leak-free connection.
Caution
Do not overtighten the tubing clamps. Damage to the plastic
tubing could result.
Step 8.
Plug the supplied bath temperature probe into the jack on the rear panel
of the tester labeled BATH TEMP. Place the end of the temperature
probe through the small hole in the back of the vessel plate. Do not fill
the water bath at this time.
Step 9.
Plug one end of the six-pin DIN cable into the rear of the heater /
circulator and the other end of the cable into the jack on the rear panel of
the tester labeled HEATER CIRC. The heater / circulator uses the
temperature measured by the bath temperature probe to control the
water bath temperature.
Step 10.
Ensure the power switch on the heater / circulator is in the OFF position.
Step 11.
Locate the accessory kit. Remove the power cord and plug the female
end into the AC line / fuse connector on the rear panel of the heater /
circulator.
Step 12.
Plug the heater / circulator into an AC outlet of the proper voltage.
Varian, Inc.
Revision G, 01/06
P/N 70-9033
VK 7025 Dissolution Apparatus
Operator’s Manual
Page 27
Setup
Filling the Water Bath
Step 1.
Raise the drive unit to its home position and slide it back to allow full
access to the vessels.
Step 2.
If applicable, remove one of the vessels and set it aside. Fill the water
bath with ultrapure water by pouring the water through the hole in the
vessel plate. Fill to the level indicated by the operating water level tag
located on the right side of the water bath.
Note
If possible, preheat the water to speed achievement of the
desired bath temperature. Use purified water whenever possible
to minimize scale and mineral buildup. Algaecides may be used
to inhibit algae and bacteria growth. Check the label to ensure
the formulation is compatible with the plastic materials used in
the bath construction. See “Water Bath / Acrylic Care” on
page 101.
Step 3.
Turn on the heater / circulator.
Step 4.
Check all connections for leaks. You may notice bubbles from the water
bath inlet as the air in the system is purged. After a few minutes flow into
the bath should be smooth and steady.
Note
Though the heater / circulator is designed to be self-priming, it
might be necessary to help the priming process in a dry unit.
With the unit below the level of the water bath, lift one end and
then the other for a minute or two to help air clear from the unit.
Varian, Inc.
Page 28
Setup
VK 7025 Dissolution Apparatus
Operator’s Manual
Revision G, 01/06
P/N 70-9033
Installing and Centering the Vessels
The tester is supplied with specially designed vessels and magnetic ring flanges. The
magnetic ring flanges will keep the vessels centered at all times, without the use of tools,
and prevent the vessels from “floating” even when they are empty.
Step 1.
Raise the drive unit to its home position and slide it back until it stops.
Step 2.
Place the vessel in the hole in the vessel plate. Press down so that the
vessel and magnetic ring flanges fit securely in place and are flush with
the vessel plate.
Step 3.
Twist the vessel slightly until the magnets in the ring flanges make
contact with the magnets in the vessel plate.
Step 4.
Repeat steps 2 and 3 for each vessel.
Step 5.
The vessels are automatically centered and require no further
adjustment.
Installing Paddle / Basket Shafts
USP guidelines require that the paddle or basket shaft be aligned with the center vertical
axis of the vessel and that the bottom of each paddle or basket be 25 ± 2 mm above the
bottom of the vessel. See the current USP for a complete explanation.
Varian, Inc.
Revision G, 01/06
P/N 70-9033
VK 7025 Dissolution Apparatus
Operator’s Manual
Page 29
Setup
Installing Paddles
Note
If using paddles, it is easier to install the evaporation covers
prior to installing the paddles. See “Installing Standard
Evaporation Covers” on page 36 or “Installing Basket / Low-loss
Evaporation Covers” on page 37 as appropriate for the type of
evaporation covers included with your system.
Step 1.
Raise the drive unit to its home position.
Step 2.
Carefully insert a paddle into each spindle until approximately half of the
shaft is above the top of the spindle.
Step 3.
Place a 25 mm height sphere in each of the vessels.
Note
When using paddle over disk, insert the disk in the vessel and
set the paddle height to 25 ± 2 mm over the disk.
Step 4.
Press and hold DRIVE DOWN until the drive unit is at its lowest position.
Note
There is a safety mechanism in the bottom of the left side guide
rod which keeps the drive unit from lowering improperly. If the
rods do not line up precisely with the holes in the vessel plate,
the mechanism engages and the drive unit stops lowering and
rises to the home position. See Figure 4, “Drive Unit Guide
Rods,” on page 24.
Step 5.
Gently press down each paddle shaft until the bottom of the paddle
blade rests against the height sphere.
Step 6.
Place a shaft locking ring on the top of each shaft and slide it down until
it rests on the shaft collar.
Varian, Inc.
Page 30
Setup
VK 7025 Dissolution Apparatus
Operator’s Manual
Revision G, 01/06
P/N 70-9033
Step 7.
Rotate each shaft locking ring so the drive positioning teeth on both the
shaft locking ring and the shaft collar rest against one another, locking
the shaft in place.
Step 8.
Tighten the set screws using the 7/64-inch T-handle Allen wrench
provided.
Step 9.
Raise the drive unit to its home position. Remove the height spheres
from the vessels.
Step 10.
Lower the drive unit until it stops. The paddles are set at the
USP-specified height of 25 ± 2 mm above the bottom of the vessel.
Installing Basket Shafts
Step 1.
Raise the drive unit to its home position.
Step 2.
Carefully insert a basket shaft into each spindle until approximately half
of the shaft is above the top of the spindle.
Step 3.
Clip the basket height gauge onto a shaft.
Step 4.
Press and hold DRIVE DOWN until the drive unit is at its lowest position.
Note
There is a safety mechanism in the bottom of the left side guide
rod which keeps the drive unit from lowering improperly. If the
rods do not line up precisely with the holes in the vessel plate,
the mechanism engages and the drive unit stops lowering and
rises to the home position. See Figure 4, “Drive Unit Guide
Rods,” on page 24.
Step 5.
Gently press down the basket shaft until the bottom of the gauge rests
against the bottom of the vessel. Be careful not to use excessive
pressure or the bottom of the vessel may crack.
Varian, Inc.
Revision G, 01/06
P/N 70-9033
VK 7025 Dissolution Apparatus
Operator’s Manual
Page 31
Setup
Step 6.
Place a shaft locking ring on the top of the shaft and slide it down until it
rests on the shaft collar.
Step 7.
Rotate the shaft locking ring so the drive positioning teeth on both the
shaft locking ring and the shaft collar rest against one another, locking
the shaft in place.
Step 8.
Tighten the set screw using the 7/64-inch T-handle Allen wrench
provided.
Step 9.
Raise the drive unit to its home position. Remove the height gauge from
the basket shaft.
Step 10.
Repeat steps 3 - 9 for each of the remaining positions.
Step 11.
The basket shafts are set at the appropriate height so when the baskets
are installed and the drive unit lowered they are at the USP-specified
height of 25 ± 2 mm above the bottom of the vessel.
Installing Rotating Cylinders
Note
If using rotating cylinders, it is easier to install the evaporation
covers prior to installing the rotating cylinders. See “Installing
Standard Evaporation Covers” on page 36 or “Installing Basket /
Low-loss Evaporation Covers” on page 37 as appropriate for the
type of evaporation covers included with your system.
Step 1.
Raise the drive unit to its home position.
Step 2.
Carefully insert a rotating cylinder shaft into the spindle until
approximately half of the shaft is above the top of the spindle.
Varian, Inc.
Page 32
Setup
Step 3.
VK 7025 Dissolution Apparatus
Operator’s Manual
Revision G, 01/06
P/N 70-9033
Press and hold DRIVE DOWN until the drive unit is at its lowest position.
Note
There is a safety mechanism in the bottom of the left side guide
rod which keeps the drive unit from lowering improperly. If the
rods do not line up precisely with the holes in the vessel plate,
the mechanism engages and the drive unit stops lowering and
rises to the home position. See Figure 4, “Drive Unit Guide
Rods,” on page 24.
Step 4.
Using a height gauge tool (optional), gently press down the rotating
cylinder shaft to set the height to the USP-specified height of 25 ± 2 mm
above the bottom of the vessel.
Step 5.
Place a shaft locking ring on the top of the shaft and slide it down until it
rests on the shaft collar.
Step 6.
Rotate the shaft locking ring so the drive positioning teeth on both the
shaft locking ring and the shaft collar rest against one another, locking
the shaft in place.
Step 7.
Tighten the set screw using the 7/64-inch T-handle Allen wrench
provided.
Step 8.
Repeat steps 3 - 7 for each of the remaining positions.
Step 9.
Lower the drive unit until it stops. The rotating cylinders are set at the
USP-specified height of 25 ± 2 mm above the bottom of the vessel.
Installing the Intrinsic Dissolution Apparatus
Step 1.
Raise the drive unit to its home position.
Step 2.
Carefully insert an intrinsic dissolution apparatus shaft into a spindle until
approximately half of the shaft is above the top of the spindle.
Varian, Inc.
Revision G, 01/06
P/N 70-9033
Step 3.
VK 7025 Dissolution Apparatus
Operator’s Manual
Page 33
Setup
Press and hold DRIVE DOWN until the drive unit is at its lowest position.
Note
There is a safety mechanism in the bottom of the left side guide
rod which keeps the drive unit from lowering improperly. If the
rods do not line up precisely with the holes in the vessel plate,
the mechanism engages and the drive unit stops lowering and
rises to the home position. See Figure 4, “Drive Unit Guide
Rods,” on page 24.
Step 4.
Gently press down the shaft until the desired height is reached.
Step 5.
Place a shaft locking ring on the top of the shaft and slide it down until it
rests on the shaft collar.
Step 6.
Rotate the shaft locking ring so the drive positioning teeth on both the
shaft locking ring and the shaft collar rest against one another, locking
Tighten the set screw using the 7/64-inch T-handle Allen wrench
provided. The intrinsic dissolution apparatus is set at the desired height
above the bottom of the vessel.
Step 7.
Repeat this procedure as applicable for additional positions.
Removing the Dissolution Apparatus
To remove paddles, baskets, rotating cylinders or intrinsic dissolution apparatus,
complete the following steps:
Step 1.
Loosen the set screw on the shaft locking ring using the 7/64-inch
T-handle Allen wrench and remove the shaft locking ring. Repeat this
step for all positions.
Step 2.
Raise the drive unit to its home position and gently remove the shafts
taking care not to drop them into the vessels.
Varian, Inc.
Page 34
Setup
VK 7025 Dissolution Apparatus
Operator’s Manual
Revision G, 01/06
P/N 70-9033
Centering Verification
To verify the centering of the paddle / basket shafts, complete the following steps:
Step 1.
Locate the centering verification gauge and the EaseAlign centering ring.
FIGURE 6. Centering Verification Gauge
radial cutout
FIGURE 7. EaseAlign Centering Ring
Step 2.
Place the EaseAlign centering ring on the first vessel (see Figure 7,
“EaseAlign Centering Ring,” above).
Step 3.
Place the centering verification gauge against the shaft with the shaft
resting in the radial cutout (see Figure 6, “Centering Verification Gauge,”
above).
Varian, Inc.
Revision G, 01/06
P/N 70-9033
VK 7025 Dissolution Apparatus
Operator’s Manual
Page 35
Setup
Step 4.
Slide the centering verification gauge down the shaft until the tapered
ends rest in two opposing slots of the EaseAlign centering ring.
Step 5.
Rotate the centering verification gauge 90 degrees and slide the gauge
down the shaft until the tapered ends rest in the other two opposing slots
of the EaseAlign centering ring. The shaft should remain within the
confines of the radial cutout of the gauge at both settings.
Step 6.
Repeat steps 2 - 5 for the remaining vessel positions.
Installing Cannula Assemblies
Step 1.
Ensure the sampling and return lines are connected to the sampling and
return cannulas of each cannula assembly according to the following
order: red (1), white (2), blue (3), purple (4), yellow (5), clear (6), green
(7), and brown (8).
Step 2.
Install the cannula assemblies in the appropriate opening in the top
cover according to the order listed in step 1. Use the alignment pin and
coordinating notch to guide each assembly through the opening in the
top cover.
Step 3.
Complete “Cannula Height Calibration” on page 50 to perform the
electronic adjustment.
Varian, Inc.
Page 36
Setup
VK 7025 Dissolution Apparatus
Operator’s Manual
Revision G, 01/06
P/N 70-9033
Installing Standard Evaporation Covers
To place the evaporation covers onto the spindles, complete the following steps:
Step 1.
For vessel position 1, place the knobbed evaporation plug in the left
manual sampling hole and the evaporation plug in the right manual
sampling hole (see Figure 8, “Standard Evaporation Cover,” below).
FIGURE 8. Standard Evaporation Cover
opening for
cannula assembly
opening for DDM tube
knobbed evaporation plug
in right manual sampling hole
evaporation plug in left
manual sampling hole
Step 2.
Align the appropriate openings in the evaporation cover with the plastic
DDM tube extending from the bottom of the drive unit and the cannula
assembly.
Step 3.
Apply gentle upward pressure until the top of the evaporation cover
slides over the O-ring on the spindle housing. The evaporation cover
floats in place.
Step 4.
Repeat steps 1 - 3 for vessel positions 2 and 3.
Step 5.
For vessel position 4, place the knobbed evaporation plug in the right
manual sampling hole and the evaporation plug in the left manual
sampling hole (see Figure 8, “Standard Evaporation Cover,” above).
Step 6.
Repeat steps 2, 3, and 5 for the remaining vessel positions.
Varian, Inc.
Revision G, 01/06
P/N 70-9033
VK 7025 Dissolution Apparatus
Operator’s Manual
Page 37
Setup
Installing Basket / Low-loss Evaporation Covers
The evaporation cover for low loss or baskets comes with two DDM alignment
attachments. Both attachments aid the alignment of the evaporation cover on the vessel.
The open alignment attachment allows use of the DDM. The solid alignment attachment
reduces evaporation and blocks use of the DDM.
If using the optional evaporation cover for use with baskets or for low loss, complete the
following steps:
Step 1.
Determine which DDM alignment attachment is appropriate for your
system and screw the attachment into the opening in the evaporation
cover (see Figure 9, “Evaporation Cover for Low Loss or Baskets,”
below).
FIGURE 9. Evaporation Cover for Low Loss or Baskets
open DDM
alignment attachment
solid DDM
alignment attachment
Step 2.
If using paddles or rotating cylinders, remove the apparatus from vessel
position 1. Feed the shaft through the center hole of the evaporation
cover and replace the apparatus following the instructions under
“Installing Paddles” on page 29 or “Installing Rotating Cylinders” on
page 31, as appropriate. Repeat for each vessel position.
If using baskets, place an evaporation cover on the vessel at each
vessel position. Visually align the DDM tube with the DDM alignment
attachment and the cannula assembly with the opening in the
evaporation cover.
Varian, Inc.
Page 38
Setup
Step 3.
VK 7025 Dissolution Apparatus
Operator’s Manual
Revision G, 01/06
P/N 70-9033
When lowering the drive unit to run the method, stop the downward
movement two inches above the vessel plate. Align the evaporation
cover with the cannula assembly and the DDM tube at each vessel
position. Lower the drive unit completely. The DDM tube should rest
within the DDM alignment attachment.
Setting the Manual Sampling Cannula
To sample manually from positions 7 and 8, it is necessary to set the manual sampling
cannulas to the correct length.
For positions 7 and 8, complete the following steps:
Step 1.
From the System Setup Menu 1 screen, select DIAGNOSTICS. The
Diagnostic Menu screen displays.
Step 2.
Select DDM TEST.
Step 3.
Position a DDM manual override adapter over the DDM at position 7. Do
not press down on the adapter.
Step 4.
Select the corresponding location on the screen and the appropriate
DDM opens. Gentle downward pressure slides the adapter into place.
The adapter prevents the DDM from closing.
Step 5.
Press ESC twice to return to the System Setup Menu 1 screen.
Step 6.
Attach the cannula (part number 17-3315) to the syringe.
Step 7.
Place the manual sampling cannula through the DDM manual override
adapter and into the vessel (see Figure 10, “Manual Sampling through
the Top Cover,” on page 39).
Varian, Inc.
Revision G, 01/06
P/N 70-9033
VK 7025 Dissolution Apparatus
Operator’s Manual
Page 39
Setup
FIGURE 10. Manual Sampling through the Top Cover
cannula bushing
Step 8.
Loosen the hex screw on the cannula bushing and slide the bushing up
or down the cannula until it is positioned for the correct USP-specified
sampling location.
Step 9.
If sampling from a 500 mL volume, remove the bushing.
Step 10.
When positioned correctly, tighten the hex screw.
Step 11.
Remove the manual sampling cannula and set aside for use during the
test.
Step 12.
Gently remove the DDM manual override adapter.
Varian, Inc.
Page 40
Setup
VK 7025 Dissolution Apparatus
Operator’s Manual
Revision G, 01/06
P/N 70-9033
Programming Administrative Control
Note
For initial setup, the preprogrammed user identification is 9 and
the preprogrammed password is 9. It is recommended that you
immediately change the user identification and password for
Administrative control of the VK 7020 / 7020 S / 7025 Dissolution
Apparatus once your unit is operational.
Security Levels
ADMINISTRATOR
Allows access to all functions.
SUPERVISOR
Allows method editor privileges.
Does not allow access to the System Setup Menu 1 screen which
includes administration and calibration functions.
OPERATE ONLY
Allows access to user functions.
Does not allow access to the System Setup Menu 1 screen which
includes administration and calibration functions.
Does not allow method editor privileges.
Up to 24 user identifications and passwords can be stored on the VK 7020 / 7020 S /
7025. User identifications are alphabetic and / or numeric combinations no longer than
nine characters in length. Passwords are numeric and no longer than eight characters in
length.
Note
If you erase or forget all system administrator passwords,
contact the Dissolution Systems Service Department.
Varian, Inc.
Revision G, 01/06
P/N 70-9033
VK 7025 Dissolution Apparatus
Operator’s Manual
Page 41
Setup
Setting Up the User List
For initial set up of user identifications and passwords, the preprogrammed user
identification is 9 and the preprogrammed password is 9. It is recommended that you
immediately change the user identification and password for Administrative control of the
VK 7025 Dissolution Apparatus once your unit is installed.
To set up the user list, complete the following steps:
Step 1.
Ensure the dissolution apparatus is turned on.
Step 2.
If directed, press DRIVE UP to initialize the dissolution apparatus. The
drive unit moves to the home position and the Login screen displays.
Step 3.
Enter the user identification (Login ID) and press ENTER.
Step 4.
Enter the password and press ENTER. The System Setup Menu 1
screen displays.
Step 5.
Select ADMINISTRATION. The Administration screen displays.
Step 6.
Select ADD USER. The Enter User ID and Password screen displays.
Step 7.
Enter the new user identification and press ENTER.
Note
To display a letter, hold down the number key until the
appropriate letter displays, then release the key. For example, to
display the letter C, press and hold 2. As you hold the number
key, the 2 displays and is replaced by an A, then a B and finally a
C. If you continue to hold the 2, these characters continue to
scroll until you release the number key.
Step 8.
Enter the new user password and press ENTER.
Step 9.
Confirm the new password and press ENTER.
Varian, Inc.
Page 42
Setup
VK 7025 Dissolution Apparatus
Operator’s Manual
Revision G, 01/06
P/N 70-9033
Step 10.
Determine the security level for the new user by selecting
ADMINISTRATOR, SUPERVISOR, or OPERATE ONLY. The
Administration screen displays.
Step 11.
Repeat steps 6 - 10 until all users’ identifications, passwords, and
security levels have been entered.
Step 12.
Delete the preprogrammed user identification and password that came
with your dissolution apparatus (see “Deleting Preset User Definitions”
below).
Deleting Preset User Definitions
It is recommended that you immediately change the user identification and password for
Administrative control of the VK 7025 Dissolution Apparatus once your unit is installed.
Step 1.
After entering the user identifications, passwords, and security levels,
select LIST / DELETE USERS. The List and Delete Users screen
displays.
Step 2.
Select the preset user identification and password by selecting NEXT
until the cursor flashes over the number of the appropriate user
identification.
Step 3.
Select DELETE.
Step 4.
Select YES to confirm deletion. The List and Delete Users screen
displays.
Step 5.
Press ESC to return to the Administration screen.
Varian, Inc.
Revision G, 01/06
P/N 70-9033
VK 7025 Dissolution Apparatus
Operator’s Manual
Page 43
Setup
Vessel Plate Layout
The vessels on the VK 7025 are numbered counterclockwise beginning with the back left
corner.
FIGURE 11. Vessel Plate Layout
8
1
7
2
6
5
3
4
Varian, Inc.
Page 44
Setup
VK 7025 Dissolution Apparatus
Operator’s Manual
Revision G, 01/06
P/N 70-9033
This page was intentionally left blank, except for this message.
Varian, Inc.
Chapter 4
Administrator
Operation
If your security level is “supervisor” or “operate only,” continue to Chapter 5,
“Operation,” on page 59.
User Settings
To add, list, or delete users, see “Programming Administrative Control” on page 40.
After adding the user identifications, passwords, and security, press ESC to return to the
System Setup Menu 1 screen.
Varian, Inc.
Page 46
Administrator Operation
VK 7025 Dissolution Apparatus
Operator’s Manual
Revision G, 01/06
P/N 70-9033
Following is a description of the System Setup Menu 1 screen options:
Option
Response
Main Menu
All operation functions begin at the Main Menu. See “Main Menu” on
page 59.
Administration
Select ADMINISTRATION to add, list or delete users, set edit method
authority and set up security override. See “Administration” on page 47.
Calibration
Select CALIBRATION in order to set the calibration information, and if
applicable, the cannula height, the bath vessel difference and the
alternate start drive position. See “Calibration” on page 48.
Alarms
Select ALARMS to enter the preventative maintenance (PM) expiration
date and the bath temperature limit and to view the calibration calendar
menu. See “Alarms” on page 52.
Diagnostics
This option is for diagnostic purposes and if applicable, independent
operation of the DDMs, cannulas and clutches. See “Diagnostics” on
page 54.
Temp Display
Select TEMP DISPLAY to toggle between ENABLED and DISABLED. If temp
display is enabled, the vessel temperatures / cannula positions display at
the bottom of the system monitor screen. If temp display is disabled, the
vessel temperatures / cannula positions do not display. This option is
applicable only if AutoTemp is installed.
Paddle Spin
Select PADDLE SPIN to toggle between ENABLED and DISABLED.
If paddle spin is disabled, the paddles do not spin prior to the start of the
test. Note: if an initial temperature is taken in the method, the
paddles spin regardless of whether paddle spin is enabled or
disabled.
If paddle spin is enabled, the paddles spin prior to the start of the test
which allows the vessel temperature to equilibrate. This removes the
possibility of a temperature gradient—allowing for a more accurate
vessel temperature reading.
Menu 2
Select MENU 2 to access menus for the setting the clock and
communication port functions; entering serial numbers, the number of
vessels, and the tester identification number; enabling or disabling all
position spin; and to set a delay between the initial temperature
measurement and the opening of the DDMs. See “Menu 2” on page 55.
Varian, Inc.
Revision G, 01/06
P/N 70-9033
VK 7025 Dissolution Apparatus
Operator’s Manual
Page 47
Administrator Operation
Administration
From the System Setup Menu 1 screen, select ADMINISTRATION. The Administration
screen displays.
Following is a description of the Administration screen options:
Option
Response
Add User
Select ADD USER to enter user identifications and passwords.
See “Setting Up the User List” on page 41 for instructions on
adding a user.
List / Delete Users
Select LIST / DELETE USERS to list and delete user
identifications and passwords. See “Deleting Preset User
Definitions” on page 42 for instructions on deleting user
identifications and passwords.
Edit Method Authority
Select EDIT METHOD AUTHORITY to toggle between ALL
USERS and ADMINISTRATOR. This function grants method editor
privileges to the administrator and supervisor or all users.
Select ALL USERS to override the limited access levels for
OPERATE ONLY.
Security Override
Select SECURITY OVERRIDE to toggle between ENABLED and
DISABLED.
If security override is enabled:
•
when the machine is turned on, the System Setup Menu 1
screen displays without requiring you to log in.
•
you cannot log out.
If security override is disabled, when the machine is turned on,
the Login screen displays and you must log in.
Last User
The user identification of the last user and the date and time of
last login displays on the screen.
Varian, Inc.
Page 48
Administrator Operation
VK 7025 Dissolution Apparatus
Operator’s Manual
Revision G, 01/06
P/N 70-9033
Calibration
From the System Setup Menu 1 screen, select CALIBRATION. Spindle hours are
displayed under the screen title. The Calibration Menu screen displays.
Following is a description of the Calibration Menu screen options:
Option
Response
Bath Vessel Diff.
Enter the difference between the water bath temperature and
the vessel temperature. See “Bath Vessel Difference” below.
Set Alternate Start
Drive Position
When performing a staggered start under manual operation
with Apparatus 1, you must set the drive unit to an alternate
start position. See “Setting an Alternate Drive Unit Position” on
page 49.
Cannula Height
Calibration
This option displays only if AutoTemp and / or sampling
cannulas are installed.
To set the sampling position for the cannulas, see “Cannula
Height Calibration” on page 50.
Bath Vessel Difference
Note
For this option, if you enter a value outside of the acceptable
range, an error message displays indicating appropriate values.
To set the bath vessel difference, complete the following steps:
Step 1.
From the System Setup Menu 1 screen, select CALIBRATION. The
Calibration Menu screen displays.
Step 2.
From the Calibration Menu screen, select BATH VESSEL DIFF.
Varian, Inc.
Revision G, 01/06
P/N 70-9033
Step 3.
VK 7025 Dissolution Apparatus
Operator’s Manual
Page 49
Administrator Operation
Enter the observed difference in the temperature between the water bath
temperature and the vessel temperature. The acceptable range is 0.0 to
10.0 °C. Press CLEAR to delete the entry or press ENTER to continue.
The Calibration Menu screen displays with the new bath vessel
difference value.
Note
This value is automatically set when a vessel temperature start
is performed. See “Vessel Temp Start” on page 83.
When all appropriate parameters on the Calibration Menu screen have been entered,
press ESC to return to the System Setup Menu 1 screen.
Setting an Alternate Drive Unit Position
When performing a staggered start and sampling manually with Apparatus 1, you must
set an alternate drive unit start position.
Note
Ensure the basket assemblies are installed and the standard
evaporation covers are removed prior to beginning this
procedure.
To set the height to an alternate position, complete the following steps:
Step 1.
From the System Setup Menu 1 screen, select CALIBRATION. The
Calibration Menu screen displays.
Step 2.
Raise the drive unit to its home position.
Step 3.
If applicable, remove the cannula assembly.
Step 4.
Raise the basket shafts so the basket shaft heads rest against the
spindle housings (see Figure 12, “Spindle Housing,” on page 50).
Varian, Inc.
Page 50
Administrator Operation
VK 7025 Dissolution Apparatus
Operator’s Manual
Revision G, 01/06
P/N 70-9033
FIGURE 12. Spindle Housing
spindle housing
Step 5.
Ensure the optional basket evaporation covers are in place.
Step 6.
Lower the drive unit to position the baskets just above the evaporation
covers.
Step 7.
Select SET ALTERNATE START DRIVE POSITION to set the height.
The drive unit automatically lowers to this position when a staggered
start test is started with Apparatus 1 while under manual operation.
Step 8.
With the drive unit in this position, reset the basket height to the
USP-specified 25 ± 2 mm above the bottom of the vessel.
When all appropriate parameters on the Calibration Menu screen have been entered,
press ESC to return to the System Setup Menu 1 screen.
Cannula Height Calibration
Note
This section does not apply if you are manually sampling or
using staggered baskets or paddles.
If it is necessary to adjust the factory-set sampling heights for the cannulas, complete the
following steps:
Step 1.
Ensure the drive unit is in its lowest position.
Varian, Inc.
Revision G, 01/06
P/N 70-9033
Step 2.
VK 7025 Dissolution Apparatus
Operator’s Manual
Page 51
Administrator Operation
From the Calibration Menu screen, select CANNULA HEIGHT
CALIBRATION. The Set Sampling Depth screen displays with
factory-set values for each apparatus.
SET SAMPLING DEPTH
BASKET 900 mL
200
MOVE
UP
BASKET 500 mL
400
MOVE
DOWN
PADDLE 900 mL
200
PADDLE 500 mL
400
MENU 2
CANNULA POSITION = 0
Note
The factory-set number displayed under each option is not a
distance measurement. It refers to the number of steps the
cannula motor moves.
Step 3.
If you are using paddle over disk or rotating cylinder, select MENU 2 to
view these apparatus.
Step 4.
To ensure the cannulas are in their home position, select MOVE DOWN
to move the cannulas to their lowest position, then select MOVE UP to
move the cannulas to their highest position.
Step 5.
Select MOVE UP or MOVE DOWN to position the cannulas at the
appropriate height in the vessels.
Varian, Inc.
Page 52
Administrator Operation
Step 6.
VK 7025 Dissolution Apparatus
Operator’s Manual
Revision G, 01/06
P/N 70-9033
When the cannulas are in the correct position, select the appropriate
apparatus and volume. The number of steps the cannula motor moved
to reach that position displays under the selected apparatus and volume.
Note
For volumes between 500 mL and 900 mL, the appropriate cannula
height is interpolated from the 500 mL and 900 mL settings. For
volumes greater than 900 mL, the appropriate cannula height is
extrapolated from the 500 mL and 900 mL settings.
Step 7.
Press ESC. The cannulas return to the home position and the
Calibration Menu screen displays.
When all appropriate parameters on the Calibration Menu screen have been entered,
press ESC to return to the System Setup Menu 1 screen.
Alarms
From the System Setup Menu 1 screen, select ALARMS. The Setup Alarms screen
displays the basket and paddle expirations dates and the following options:
Option
Response
PM Expiration Date
Use this option to set the preventative maintenance alarm.
Select PM EXPIRATION DATE. The cursor flashes. Enter the
date in the appropriate format and press ENTER. The date
displays.
USP Cal Menu
Use this option to enter calibration and expiration dates. See
“Calibration Calendar” on page 53.
Bath Temp. Limit
Use this option to set an alarm to sound if the water bath
temperature exceeds the set limit. Select BATH TEMP. LIMIT.
The cursor flashes. Enter the limit and press ENTER. The bath
temperature limit displays on the screen. Entering a value of
0.0 disables the alarm.
Varian, Inc.
Revision G, 01/06
P/N 70-9033
VK 7025 Dissolution Apparatus
Operator’s Manual
Page 53
Administrator Operation
Calibration Calendar
From the Setup Alarms screen, select USP CAL MENU. The Calibration Calendar screen
displays.
Following is a description of the Calibration Calendar screen options:
Option
Response
Basket Calibration Date
Enter the date the calibration was performed in the
appropriate format and press ENTER.
Paddle Calibration Date
Enter the date the calibration was performed in the
appropriate format and press ENTER.
Basket Expiration Date
Enter the calibration expiration date in the
appropriate format and press ENTER.
Paddle Expiration Date
Enter the calibration expiration date in the
appropriate format and press ENTER.
An alarm sounds when an entered date is reached. ALARM BASKET CAL DUE, ALARM PADDLE
CAL DUE, or ALARM PM DUE displays. Press CLEAR to silence the alarm.
Press ESC to return to the Setup Alarms screen. When all appropriate parameters on the
Setup Alarms screen have been entered, press ESC to return to the System Setup Menu
1 screen.
Varian, Inc.
Page 54
Administrator Operation
VK 7025 Dissolution Apparatus
Operator’s Manual
Revision G, 01/06
P/N 70-9033
Diagnostics
To check the operation of applicable options for your instrument, select DIAGNOSTICS
from the System Setup Menu 1 screen. The Diagnostic Menu screen displays.
Following is a description of the Diagnostic Menu screen options:
Option
Response
DDM Test
(if installed)
Select DDM TEST. Select each location and verify the
corresponding DDM opens and closes. Press ESC to return to
the Diagnostic Menu screen.
Cannula Test
(if installed)
Select CANNULA TEST. Select a location and verify the
corresponding cannula moves down. UP changes to DOWN.
Select the location again and verify the corresponding
cannula moves up. Repeat for all cannula positions. Press
ESC to return to the Diagnostic Menu screen.
Shaft Brake &
Clutch Test (if
installed)
Select SHAFT BRAKE & CLUTCH TEST. Select a location
and verify the clutch activates. OFF changes to ON. Select the
location again and verify the brake activates. Repeat for all
shaft positions. Press ESC to return to the Diagnostic Menu
screen.
Read Bath &
Heater Temp
Select READ BATH & HEATER TEMP. The Bath and Heater
Temp screen displays with the bath and heater temperatures.
This is the only screen where the heater temperature
displays.
Press ESC to return to the Diagnostic Menu screen.
Communications Bus Diagnostic, Lift Board Input Test, and Input & Output Tests also
display, but these options are for qualified service personnel only. If you have any
questions about the operation of your VK 7025, see Chapter 8, “Service and Warranty,”
on page 117 or contact the Dissolution Systems Service Department.
Varian, Inc.
Revision G, 01/06
P/N 70-9033
VK 7025 Dissolution Apparatus
Operator’s Manual
Page 55
Administrator Operation
Menu 2
From the System Setup Menu 1 screen, select MENU 2. The System Setup Menu 2
screen displays.
Following is a description of the System Setup Menu 2 screen options:
Option
Response
Clock
Select CLOCK to set the date, time, and date format. See “Setting
the Clock” on page 56.
Comm. Port
Functions
Select COMM. PORT FUNCTIONS to set the baud rate,
communication port, and external control. The Comm. Functions
screen displays. See “Setting Communication Port Functions” on
page 56.
Serial Numbers
Select SERIAL NUMBERS to enter the serial numbers of
equipment being used. See “Setting Serial Numbers” on page 57.
Vessels
Select VESSELS to select the number of vessels being used.
Note: it is imperative to set the correct number of vessels
being used or the instrument will not function properly.
All Position Spin
Select ALL POSITION SPIN to toggle between ENABLED and
When disabled, the paddles or baskets rotate only when
the drive unit is at the correct operating height.
When enabled, the paddles or baskets rotate when the drive unit is
at any height.
DISABLED.
Tester ID
Select TESTER ID to enter an identification number for the
dissolution apparatus. This number appears with the dissolution
apparatus serial number on the printout.
Dly After Ini Tmp
Select DLY AFTER INI TMP to enter a delay duration between the
measuring of the initial temperature and the DDMs opening.
Varian, Inc.
Page 56
Administrator Operation
VK 7025 Dissolution Apparatus
Operator’s Manual
Revision G, 01/06
P/N 70-9033
Setting the Clock
From the System Setup Menu 2 screen, select CLOCK. The Clock Functions screen
displays.
Following is a description of the Clock Functions screen options:
Option
Response
Set Date
Select SET DATE. The cursor flashes. Enter the correct date and press
ENTER. The correct date displays.
Set Time
Select SET TIME. The cursor flashes. Enter the correct time in 24-hour
format and press ENTER. The correct time displays.
Date Format
Select DATE FORMAT to toggle between MM/DD/YYYY and DD/MM/YYYY.
Press ESC to return to the System Setup Menu 2 screen.
Setting Communication Port Functions
From the System Setup Menu 2 screen, select COMM. PORT FUNCTIONS. The Comm.
Functions screen displays.
Following is a description of the Comm. Functions screen options:
Option
External Control
Response
Select EXTERNAL CONTROL to toggle between DISABLED and ENABLED.
If external control is enabled, a VK 8000 or Total Solution software can
control the VK 7025. To use external control, you must log off the
dissolution apparatus.
Varian, Inc.
Revision G, 01/06
P/N 70-9033
VK 7025 Dissolution Apparatus
Operator’s Manual
Page 57
Administrator Operation
Option
Response
Baud Rate
Select BAUD RATE to toggle between 2400, 4800, 9600, 19200, 28800,
and 38400. The baud rate must be set to 9600 when connected to a
VK 8000 or Total Solution system.
Comm. ID
Select COMM. ID. The cursor flashes. Enter the correct communications
port identification number in xx format and press ENTER. The correct
communications port identification number displays. The
communications port identification number must be 01 when connected
to a VK 8000 or single Total Solution system.
Note: a leading zero is necessary when entering a communications
port identification number between 01 and 09.
Press ESC to return to the System Setup Menu 2 screen.
Setting Serial Numbers
To enter the serial numbers of your accessories, complete the following steps:
Step 1.
Select SERIAL NUMBERS from the System Setup Menu 2 screen. The
Enter Serial Numbers screen displays.
Step 2.
Select VESSEL, PADDLE, BASKET / SHAFT, or ROTATING
CYLINDER. The corresponding serial number screen displays with
numbers 1 through 8 listed down the left side of the screen. If BASKET /
SHAFT is selected, two columns display. The left column is for basket
serial numbers and the right column is for shaft serial numbers.
Varian, Inc.
Page 58
Administrator Operation
Step 3.
VK 7025 Dissolution Apparatus
Operator’s Manual
Revision G, 01/06
P/N 70-9033
Enter the serial numbers for the vessel, paddle, basket and shaft, or
rotating cylinder for each of the corresponding spindle locations. See
“Vessel Plate Layout” on page 43.
Note
To display a letter, hold down the number key until the
appropriate letter displays, then release the key. For example, to
display the letter C, press and hold 2. As you hold the number
key, the 2 displays and is replaced by an A, then a B, and finally
a C. If you continue to hold the 2, these characters continue to
scroll until you release the number key.
To delete an entry, select PREVIOUS or NEXT to place the cursor
on the appropriate line. Press ENTER.
Step 4.
Press ENTER to accept an entry and move to the following line until all
the serial numbers have been entered. When entering basket and shaft
serial numbers, the cursor moves from basket location 1 to shaft location
1 and then to basket location 2 followed by shaft location 2 and so on.
Step 5.
Press ESC to return to the Enter Serial Numbers screen.
Step 6.
Repeat steps 2 - 5 to enter serial numbers for the remaining appropriate
accessories. Press ESC to return to the System Setup Menu 2 screen.
When all appropriate parameters on the System Setup Menu 2 screen have been
entered, press ESC to return to the System Setup Menu 1 screen.
Varian, Inc.
Operation
Chapter 5
Main Menu
From the System Setup Menu 1 screen, select Main Menu. The Main Menu displays.
MAIN MENU
MANUAL
OPERATION
START
METHOD
BATH TEMPERATURE
SET POINT: 37.5
METHOD
EDITOR
DELAYED
HEATING
PRINT
REPORTS
RPM 000.0 BATH 37.2
1:UP
2:UP
3:UP
4:UP
5:UP
6:UP
7:UP
8:UP
WED DEC 3 08:32:42 2003
Varian, Inc.
Page 60
Operation
VK 7025 Dissolution Apparatus
Operator’s Manual
Revision G, 01/06
P/N 70-9033
Following is a description of the Main Menu options:
Option
Response
Manual Operation
Select MANUAL OPERATION to set parameters for manual
operation. See “Manual Operation” below.
Bath Temperature
Set Point
Select BATH TEMPERATURE SET POINT. The cursor flashes.
Enter the desired bath temperature and press ENTER.
Note: use this option to heat the bath independent of
running a program or performing manual operation.
Delayed Heating
Select DELAYED HEATING to enter date, time and temperature
for heating to begin. See “Setting Delayed Heating” on page 72.
Start Method
Select START METHOD to select the method to run, print the
method parameters, enter information about the product being
tested or start the test. See “Start Method” on page 73.
Method Editor
Select METHOD EDITOR to display options to create / modify,
copy or store a method. See “Method Editor” on page 84.
Print Reports
Select PRINT REPORTS to print the current method parameters,
serial numbers or the results from the preceding method, set
print frequency and turn on or off the printer. See “Print Reports”
on page 90.
Manual Operation
From the Main Menu, select MANUAL OPERATION. The Manual Operation screen
displays.
Varian, Inc.
Revision G, 01/06
P/N 70-9033
VK 7025 Dissolution Apparatus
Operator’s Manual
Page 61
Operation
Following is a description of the Manual Operation screen options:
Note
For the following options, if you enter a value outside the
acceptable range, an error message displays indicating
appropriate values.
Option
Response
RPM Set
If a speed setting has previously been entered, the setting displays
next to RPM SET.
To change the setting, select RPM SET. The cursor flashes. Enter
the desired speed in xx format. The acceptable range is 10 to
250 RPM. Press ← or CLEAR to clear unwanted or incorrect
entries. Press ENTER to accept the speed setting.
Bath Temperature
Set Point
If a temperature setting has previously been entered, the setting
displays next to BATH TEMPERATURE SET POINT.
To change the setting, select BATH TEMPERATURE SET POINT.
The cursor flashes. Enter the desired temperature in xx.x format.
The acceptable range is 20.0 to 55.0 °C. Press ← or CLEAR to
clear unwanted or incorrect entries. Press ENTER to accept the
temperature setting.
Volume
If a volume setting has previously been entered, the setting displays
below VOLUME.
To change the setting, select VOLUME. The cursor flashes. Enter
the media volume in xxxx format. The acceptable range is 500 to
1050. Press ← or CLEAR to clear unwanted or incorrect entries.
Press ENTER to accept the volume setting.
Apparatus
If an apparatus setting has previously been entered, the setting
displays below APPARATUS.
To change the apparatus selection, select APPARATUS. The Select
Apparatus screen displays. The options listed include: Baskets,
Paddles, Paddle Over Disk, and Rotating Cylinder. Select the
apparatus being used. The Manual Operation screen displays and
the newly selected apparatus is listed below APPARATUS.
Varian, Inc.
Page 62
Operation
VK 7025 Dissolution Apparatus
Operator’s Manual
Revision G, 01/06
P/N 70-9033
Option
Response
Sample Point Alarm
The sample point alarm allows the user to set an alarm to sound at
some time interval prior to the sample point. By default, the sample
point alarm is disabled.
See “Setting Sample Points and Alarms” below.
Use Alternate /
Standard Start Height
Select ALTERNATE / STANDARD START HEIGHT to toggle
between the two options. This selection is necessary only when
using Apparatus 1 (baskets). See “Setting an Alternate Drive Unit
Position” on page 49.
Manual Sample
See “Manual Sampling of Temperature” on page 63.
Setting Sample Points and Alarms
To enable the alarm, complete the following steps:
Step 1.
Select SAMPLE POINT ALARM. DISABLED changes to ENABLED and
displays.
TIME MM:SS
Step 2.
Enter the time and press ENTER. SAMPLE POINTS displays. Press ← to
clear unwanted or incorrect entries.
Step 3.
Select SAMPLE POINTS. The Sample Points screen displays.
Step 4.
Enter up to 24 timepoints in hhh:mm:ss format and press ENTER to
move to the next timepoint location. The maximum acceptable value is
999:59:59. Press ← to clear unwanted or incorrect entries.
Note
Set the sample timepoints far enough apart to allow for the
operation of the DDMs and cannulas (at least three minutes). If
there is not enough time between sample timepoints, the
sample timepoint clock counts negative time.
Step 5.
Select PREVIOUS and NEXT to scroll up and down the timepoints.
Press CLEAR to delete unwanted timepoints.
Varian, Inc.
Revision G, 01/06
P/N 70-9033
Step 6.
VK 7025 Dissolution Apparatus
Operator’s Manual
Page 63
Operation
After all sample timepoints have been entered, press ESC to return to
the Manual Operation screen.
Note
Press CLEAR to silence the alarm.
Manual Sampling of Temperature
From the Manual Operation screen, select MANUAL SAMPLE. The Manual Sampling
screen displays.
MANUAL SAMPLING
UP
SELECT ALL
DOWN
UP
INDIVIDUAL PROBE
DOWN
SELECT POSITION = 1
VESSEL TEMPS
1:UP
2:UP
3:UP
4:UP
5:UP
6:UP
7:UP
8:UP
The vessel temperatures / cannula positions display only if temp display is enabled (see
“Temp Display” on page 46).
To check the temperature in all vessels, select DOWN corresponding to SELECT ALL. The
cannulas lower and the temperature readings display next to all vessel position numbers
at the bottom of the screen. Wait one minute for the readings to stabilize. To raise all
probes, select UP corresponding to SELECT ALL.
To check the temperature in a specific vessel location, enter the vessel position number
and select DOWN corresponding to INDIVIDUAL PROBE. The temperature reading displays
next to the appropriate vessel position number. Wait one minute for the reading to
stabilize. To raise the individual probe, select UP corresponding to INDIVIDUAL PROBE.
Press ESC to return to the Manual Operation screen.
Varian, Inc.
Page 64
Operation
VK 7025 Dissolution Apparatus
Operator’s Manual
Revision G, 01/06
P/N 70-9033
Starting a Test
Before starting the test, complete the following steps to set the DDM manual override
adapters in place at vessel positions 7 and 8:
Step 1.
From the System Setup Menu 1 screen, select DIAGNOSTICS. The
Diagnostic Menu screen displays.
Step 2.
Select DDM TEST.
Step 3.
Position a DDM manual override adapter over the DDM at vessel
position 7. Do not press down on the adapter.
Step 4.
Select the corresponding location and the appropriate DDM opens.
Gentle downward pressure slides the adapter into place. The adapter
prevents the DDM from closing.
Step 5.
Repeat steps 3 and 4 for vessel position 8.
Step 6.
Press ESC until the Main Menu displays.
Step 7.
Select MANUAL OPERATION. The Manual Operation screen displays.
When all parameters listed on the Manual Operation screen have been entered and the
DDM manual override adapters are in place for vessel positions 7 and 8, complete the
steps listed under the appropriate apparatus on the following pages to start the test
immediately.
Apparatus
Procedures
Paddles
See “Paddles” on page 65.
Baskets
See “Baskets” on page 67.
Paddle over disk
See “Paddle Over Disk” on page 69.
Rotating cylinder
See “Rotating Cylinder” on page 70.
Varian, Inc.
Revision G, 01/06
P/N 70-9033
VK 7025 Dissolution Apparatus
Operator’s Manual
Page 65
Operation
Paddles
Note
If performing a staggered drop, remove the cannula assemblies, if
applicable, to prevent the raised paddles from damaging them.
Before starting the test, ensure the paddle spin is enabled or
disabled depending on your configuration (see “Paddle Spin” on
page 46).
Step 1.
Press RUN. If paddle spin is disabled, METHOD STARTUP STATUS / MANUAL
TABLET DROP / PRESS RUN TO CONTINUE displays. If paddle spin is
enabled, METHOD STARTUP STATUS / MANUAL TABLET DROP / PRESS STOP
TO STOP PADDLES / PRESS RUN TO CONTINUE displays.
Step 2.
If paddle spin is enabled, press STOP. If paddle spin is disabled, skip this
step and continue to step 3.
Step 3.
Pull up the shaft locking ring to lift each paddle out of the medium.
Step 4.
Remove the knobbed evaporation plug on the outside of the evaporation
cover at vessel position 1, drop the dosage unit and replace the knobbed
evaporation plug. See Figure 13, “Standard Evaporation Cover,
Dropping Dosage Unit and Sampling,” below.
FIGURE 13. Standard Evaporation Cover, Dropping Dosage Unit and Sampling
Varian, Inc.
Page 66
Operation
VK 7025 Dissolution Apparatus
Operator’s Manual
Revision G, 01/06
P/N 70-9033
Step 5.
Push down the paddle shaft at vessel position 1.
Step 6.
Press RUN. The Method Status screen displays and the paddles rotate.
Note
To quit the test from the Method Status screen, press ESC and
select EXIT. The Manual Operation screen displays.
Step 7.
At the desired time intervals, manually drop a dosage unit into each
additional vessel and push down the corresponding paddle shaft.
Note
For vessel positions 2 - 6, remove the knobbed evaporation plug
on the outside of each evaporation cover, drop the dosage unit,
and replace the knobbed evaporation plug (see Figure 13,
“Standard Evaporation Cover, Dropping Dosage Unit and
Sampling,” on page 65). For vessel positions 7 and 8, drop a
dosage unit into each vessel through the corresponding DDM
tube.
Step 8.
Continue the dissolution test according to the prescribed method. At the
desired time interval, pull samples from each vessel. Two minutes after
the final keystroke, the Test in Progress screen displays.
Note
For vessel positions 1 - 6, remove the knobbed evaporation plug,
pull the sample, and replace the knobbed evaporation plug (see
Figure 13, “Standard Evaporation Cover, Dropping Dosage Unit
and Sampling,” on page 65). For vessel positions 7 and 8, place
the long cannula (part number 17-3315) into the vessel through
the opening in the DDM. See “Setting the Manual Sampling
Cannula” on page 38.
To quit the test from the Test in Progress screen, press ESC once
to return to the Method Status screen and a second time to quit
the test.
Varian, Inc.
Revision G, 01/06
P/N 70-9033
VK 7025 Dissolution Apparatus
Operator’s Manual
Page 67
Operation
Baskets
Note
On the Manual Operation screen, USE STANDARD START HEIGHT
displays. To use this setting, continue with the directions
indicated below. To switch to the alternate height setting, select
USE STANDARD START HEIGHT. USE ALTERNATE START HEIGHT
displays. Ensure the alternate drive position is set (see “Setting
an Alternate Drive Unit Position” on page 49).
Step 1.
Press RUN. RAISE DRIVE TO INSTALL BASKETS / PRESS RUN TO MOVE
DRIVE TO STANDARD (ALTERNATE) / START POSITION displays.
/
Step 2.
Press DRIVE UP to raise the drive unit to the home position.
Step 3.
Install the baskets containing the dosage units.
Step 4.
Press RUN. If using the standard start height, LOWERING DRIVE displays
and the drive unit lowers to the operating position. If using the alternate
start height, MOVING DRIVE INTO POSITION displays. The drive unit lowers
to the previously entered alternate start position.
Note
If using the standard start height and low-loss evaporation
covers, press STOP to stop the drive unit approximately two
inches above the vessel plate.
Align the evaporation cover with the cannula assembly and the
DDM tube at each vessel position.
Press DRIVE DOWN to lower the drive unit to the operating
position. The Method Status screen displays.
Varian, Inc.
Page 68
Operation
VK 7025 Dissolution Apparatus
Operator’s Manual
Revision G, 01/06
P/N 70-9033
FIGURE 14. Basket / Low-loss Evaporation Cover, Positioning and Sampling
Step 5.
The Method Status screen displays and the baskets rotate.
Note
To quit the test from the Method Status screen, press ESC and
select EXIT. The Manual Operation screen displays.
Step 6.
If using an alternate start height, manually press the basket shafts down
so the baskets are lowered into the vessel at the desired time intervals.
Step 7.
Continue the dissolution test according to the prescribed method. At the
desired time interval, pull samples from each vessel. Two minutes after
the final keystroke, the Test in Progress screen displays.
Note
For vessel positions 1 - 6, remove the knobbed evaporation plug,
pull the sample, and replace the knobbed evaporation plug (see
Figure 14, “Basket / Low-loss Evaporation Cover, Positioning and
Sampling,” above). For vessel positions 7 and 8, place the long
cannula (part number 17-3315) into the vessel through the
opening in the DDM. See “Setting the Manual Sampling Cannula”
on page 38.
To quit the test from the Test in Progress screen, press ESC once
to return to the Method Status screen and a second time to quit
the test.
Varian, Inc.
Revision G, 01/06
P/N 70-9033
VK 7025 Dissolution Apparatus
Operator’s Manual
Page 69
Operation
Paddle Over Disk
Note
If performing a staggered drop, remove the cannula assemblies, if
applicable, to prevent the raised paddles from damaging them.
Before starting the test, ensure the paddle spin is enabled or
disabled depending on your configuration (see “Paddle Spin” on
page 46).
Step 1.
Press RUN. If paddle spin is disabled, METHOD STARTUP STATUS / MANUAL
DISK DROP / PRESS RUN TO CONTINUE displays. If paddle spin is enabled,
METHOD STARTUP STATUS / MANUAL DISK DROP / PRESS STOP TO STOP
PADDLES / PRESS RUN TO CONTINUE displays.
Step 2.
If paddle spin is enabled, press STOP. If paddle spin is disabled, skip this
step and continue to step 3.
Step 3.
Pull up the shaft locking ring to lift each paddle out of the medium.
Step 4.
Lift the evaporation cover at vessel position 1, manually drop the disk
assembly into the vessel, and push down the paddle shaft.
Note
In order to drop the disk assembly, it may be necessary to raise
the drive unit. Press DRIVE UP to raise the drive unit slightly, lift
each vessel evaporation cover, drop the disk assembly into each
vessel, and press DRIVE DOWN until the drive unit is completely
lowered.
Step 5.
Press RUN. The Method Status screen displays and the paddles rotate.
Note
To quit the test from the Method Status screen, press ESC and
select EXIT. The Manual Operation screen displays.
Varian, Inc.
Page 70
Operation
VK 7025 Dissolution Apparatus
Operator’s Manual
Revision G, 01/06
P/N 70-9033
Step 6.
At the desired time intervals, lift each evaporation cover, manually drop
the disk assembly into each vessel and push down the corresponding
paddle shaft.
Step 7.
Continue the dissolution test according to the prescribed method. At the
desired time interval, pull samples from each vessel. Two minutes after
the final keystroke, the Test in Progress screen displays.
Note
For vessel positions 1 - 6, remove the knobbed evaporation plug,
pull the sample, and replace the knobbed evaporation plug. For
vessel positions 7 and 8, place the long cannula (part number
17-3315) into the vessel through the opening in the DDM. See
“Setting the Manual Sampling Cannula” on page 38.
To quit the test from the Test in Progress screen, press ESC once
to return to the Method Status screen and a second time to quit
the test.
Rotating Cylinder
Note
When using rotating cylinders, ensure USE STANDARD START
HEIGHT displays. If not, select USE ALTERNATE START HEIGHT.
USE STANDARD START HEIGHT displays.
Step 1.
Press RUN. RAISE DRIVE TO INSTALL PATCHES / PRESS RUN TO MOVE
DRIVE TO STANDARD / START POSITION displays.
Step 2.
Press DRIVE UP to raise the drive unit to the home position.
Step 3.
Install the patches on the rotating cylinders.
Varian, Inc.
/
Revision G, 01/06
P/N 70-9033
Step 4.
VK 7025 Dissolution Apparatus
Operator’s Manual
Page 71
Operation
Press RUN. LOWERING DRIVE displays and the drive unit lowers to the
operating position. The Method Status screen displays and the cylinders
rotate.
Note
To quit the test from the Method Status screen, press ESC and
select EXIT. The Manual Operation screen displays.
Step 5.
Continue the dissolution test according to the prescribed method. At the
desired time interval, pull samples from each vessel. Two minutes after
the final keystroke, the Test in Progress screen displays.
Note
For vessel positions 1 - 6, remove the knobbed evaporation plug,
pull the sample, and replace the knobbed evaporation plug (see
Figure 14, “Basket / Low-loss Evaporation Cover, Positioning and
Sampling,” on page 68). For vessel positions 7 and 8, place the
long cannula (part number 17-3315) into the vessel through the
opening in the DDM. See “Setting the Manual Sampling Cannula”
on page 38.
To quit the test from the Test in Progress screen, press ESC once
to return to the Method Status screen and a second time to quit
the test.
Varian, Inc.
Page 72
Operation
VK 7025 Dissolution Apparatus
Operator’s Manual
Revision G, 01/06
P/N 70-9033
Setting Delayed Heating
Note
For this option, if you enter a value outside of the acceptable
range, an error message displays indicating appropriate values.
By default, the delayed heating option is disabled. To enable delayed heating, complete
the following steps:
Step 1.
Step 2.
From the Main Menu, select DELAYED HEATING. The Delayed Heating
screen displays.
Enter the desired start date in the appropriate format and press ENTER.
displays.
ENTER TIME HH:MM:SS
Note
Any time and day of the week is acceptable. Pumping functions
are not affected by the delay. This feature inhibits the growth of
organisms and evaporation by allowing the water bath to be
heated only when necessary rather than continuously.
Step 3.
Enter the time in 24-hour format (for example, 3:00 pm is entered as
15:00:00).
Step 4.
Press ENTER. SET POINT 0.0 displays.
Step 5.
Enter the desired temperature in xx.x format. The acceptable range is
20.0 to 55.0 °C. Press ← or CLEAR to clear unwanted or incorrect
entries. Press ENTER to accept the temperature setting. TIME TO
HEATING START displays with a countdown in hh:mm:ss format.
Step 6.
To stop the delayed heating and reset it to the disabled mode, press
ESC. The Main Menu displays.
Varian, Inc.
Revision G, 01/06
P/N 70-9033
VK 7025 Dissolution Apparatus
Operator’s Manual
Page 73
Operation
Start Method
Note
Methods are not write-protected. Check with other users before
proceeding.
From the Main Menu, select START METHOD. The Start Method screen displays.
Following is a description of the Start Method screen options:
Option
Response
Select Method
Use this option to enter a number between 1 and 23 corresponding to the
method desired. This is most easily achieved by using List Methods (see
below).
If a previous method has been selected, the method number displays
next to CURRENT and the method name displays next to METHOD. If a
different method is required, select SELECT METHOD. The cursor
flashes next to CURRENT.
Enter the method number and press ENTER. The method name displays
next to METHOD.
If no method exists, see “Creating / Modify Method” on page 84 to create
a method.
List Methods
Use this option to display a list of the methods stored on the VK 7025 in
order to select a specific method.
To list the currently available methods by number and name, select LIST
METHODS. The Select Method to Load screen displays.
Scroll up or down the list by selecting NEXT or PREVIOUS.
When the correct method is highlighted, select SELECT. The Start
Method screen displays with the new method number and name in place.
If no method exists, see “Creating / Modify Method” on page 84 to create
a method.
Varian, Inc.
Page 74
Operation
VK 7025 Dissolution Apparatus
Operator’s Manual
Option
Response
Print Method
Use this option to print the method parameters.
Revision G, 01/06
P/N 70-9033
To print the information stored under the method number displayed on
the Start Method screen, select PRINT METHOD. The printer must be
turned on and enabled.
To enable the Report Center Printer, see “Print Reports” on page 90.
Lot / Batch Data
To enter information about the product being tested, select LOT / BATCH
DATA. The Lot / Batch Data Menu 1 screen displays. The following
options are listed: Product Name, Lot Number, Batch Number, Note, and
Menu 2 (which displays Ref. Number and Strength).
Select the parameter and the cursor flashes on the corresponding line.
Enter the appropriate information for each item up to 25 characters.
Additional notes and comments up to 30 characters can be entered by
selecting NOTE. Complete each field using any combination of letters or
numbers. To display a letter, hold down the number key until the
appropriate letter displays, then release the key. Press ESC to return to
the Start Method screen.
When running a method, the text displays on the printout along with the
method parameters. In manual operation, the lot / batch data note does
not display on the printout.
Instant Start
Use this option to begin the test according to the currently selected
method. See “Instant Start” on page 75.
Delay Start
(VK 7025 with
Paddles)
This option displays only when using paddles with a VK 7025.
Use this option to program the test to begin automatically on a specific
date and time. See “Delay Start” on page 82.
Varian, Inc.
Revision G, 01/06
P/N 70-9033
VK 7025 Dissolution Apparatus
Operator’s Manual
Option
Response
Vessel Temp
Start (VK 7025
with Paddles)
This option displays only when using paddles with a VK 7025.
Wait External
Start
Page 75
Operation
You can program the test to begin automatically when the dissolution
medium reaches a programmed temperature. See “Vessel Temp Start”
on page 83.
The VK 7025 can be used with an external device (for example, the
Waters Alliance System). The external start command is supplied as a
simple TTL closure through a four-pin DIN cable (supplied separately)
connected to the START INPUT port located on the rear panel of the
VK 7025.
Select WAIT EXTERNAL START. WAITING EXTERNAL START displays. The
test runs according to the program entered on the VK 7025 once the
external start command is received.
Instant Start
Depending upon the apparatus listed in the method and the options installed on your
tester, complete the steps listed under the appropriate apparatus on the following pages
to start the test immediately.
Apparatus
Procedures
Paddles
See “Paddles” on page 76.
Baskets
See “Baskets” on page 78.
Paddle over disk
See “Paddle Over Disk” on page 79.
Rotating cylinder
See “Rotating Cylinder” on page 80.
Varian, Inc.
Page 76
Operation
VK 7025 Dissolution Apparatus
Operator’s Manual
Revision G, 01/06
P/N 70-9033
Paddles
Note
Before starting the test, ensure DDM is enabled or disabled (see
“Controlling Dosage Delivery Module (VK 7025 with Paddles
only)” on page 87), paddle spin is enabled or disabled (see
“Paddle Spin” on page 46) and initial and final temp are enabled
or disabled (see “Sample Vessel Temp” on page 88) depending
on your configuration.
Step 1.
DDM
disabled
From the Start Method screen, select INSTANT START.
Paddle
Spin
Initial
Temp
Final
Temp
After selecting INSTANT START, the
following information displays:
enabled or
disabled
enabled
enabled or METHOD STARTUP STATUS / SAMPLING
disabled
INITIAL TEMPERATURE / MANUAL TABLET
DROP / PRESS STOP TO STOP PADDLES /
PRESS RUN TO CONTINUE
disabled
enabled
disabled
enabled or METHOD STARTUP STATUS / MANUAL
disabled
TABLET DROP / PRESS STOP TO STOP
PADDLES / PRESS RUN TO CONTINUE
disabled
disabled
disabled
enabled or METHOD STARTUP STATUS / MANUAL
disabled
TABLET DROP / PRESS RUN TO CONTINUE
enabled—
simultaneous or
sequential
enabled or
disabled
enabled
enabled or METHOD STARTUP STATUS / SAMPLING
disabled
INITIAL TEMPERATURE / SIMULTANEOUS
(SEQUENTIAL) DELIVERY STARTED
enabled—
simultaneous or
sequential
enabled or
disabled
disabled
enabled or METHOD STARTUP STATUS /
disabled
SIMULTANEOUS (SEQUENTIAL) DELIVERY
STARTED
Varian, Inc.
Revision G, 01/06
P/N 70-9033
Step 2.
VK 7025 Dissolution Apparatus
Operator’s Manual
Page 77
Operation
If DDM is disabled and paddle spin or initial temp is enabled, press
STOP to drop the dosage unit into non-rotating media. Manually drop a
dosage unit into each vessel.
Note
For vessel positions 1 - 6, remove the knobbed evaporation plug
on the outside of each evaporation cover, drop the dosage unit,
and replace the knobbed evaporation plug. For vessel positions 7
and 8, drop a dosage unit into each vessel through the
corresponding DDM tube.
Otherwise, skip this step and continue to step 3.
Step 3.
Press RUN. The Method Status screen displays and the paddles rotate.
Note
To quit the test from the Method Status screen, press ESC and
select EXIT. The Start Method screen displays.
Step 4.
Continue the dissolution test according to the prescribed method. Two
minutes after either the cannulas return to the home position or the final
keystroke, the Test in Progress screen displays.
Note
To quit the test from the Test in Progress screen, press ESC once
to return to the Method Status screen and a second time to quit
the test.
Varian, Inc.
Page 78
Operation
VK 7025 Dissolution Apparatus
Operator’s Manual
Revision G, 01/06
P/N 70-9033
Baskets
Note
If using baskets, ensure final temp is enabled or disabled. See
“Sample Vessel Temp” on page 88.
Step 1.
From the Start Method screen, select INSTANT START. RAISE DRIVE TO
/ DRIVE TO STANDARD / START
INSTALL BASKETS / PRESS RUN TO MOVE
POSITION displays.
Step 2.
Press DRIVE UP to raise the drive unit to the home position.
Step 3.
Install the baskets containing the dosage units.
Step 4.
If using the low-loss evaporation covers, replace the covers on the
vessels. Visually align the DDM tube with the DDM alignment
attachment and the cannula assembly with the opening in the
evaporation cover.
Step 5.
Press RUN. LOWERING DRIVE displays and the drive unit lowers. If using
the standard evaporation covers, the drive unit lowers to the operating
position. The Method Status screen displays and the baskets rotate.
Note
If using the low-loss evaporation covers, press STOP to stop the
drive unit approximately two inches above the vessel plate.
Align the evaporation cover with the cannula assembly and the
DDM tube at each vessel position.
Press DRIVE DOWN to lower the drive unit to the operating
position. The Method Status screen displays.
To quit the test from the Method Status screen, press ESC and
select EXIT. The Start Method screen displays.
Varian, Inc.
Revision G, 01/06
P/N 70-9033
Step 6.
VK 7025 Dissolution Apparatus
Operator’s Manual
Page 79
Operation
Continue the dissolution test according to the prescribed method. Two
minutes after either the cannulas return to the home position or the final
keystroke, the Test in Progress screen displays.
Note
To quit the test from the Test in Progress screen, press ESC once
to return to the Method Status screen and a second time to quit
the test.
Paddle Over Disk
Note
Before starting the test, ensure paddle spin is enabled or disabled
(see “Paddle Spin” on page 46) and final temp is enabled or
disabled (see “Sample Vessel Temp” on page 88) depending on
your configuration.
Step 1.
From the Start Method screen, select INSTANT START.
Paddle Spin
Final Temp
After selecting INSTANT START, the following
information displays:
enabled
disabled or enabled
METHOD STARTUP STATUS / MANUAL DISK DROP
STOP TO STOP PADDLES
disabled
disabled or enabled
/ PRESS
/ PRESS RUN TO CONTINUE
METHOD STARTUP STATUS / MANUAL DISK DROP
/ PRESS
RUN TO CONTINUE
Step 2.
If paddle spin is enabled, press STOP. If paddle spin is disabled, skip this
step and continue to step 3.
Varian, Inc.
Page 80
Operation
Step 3.
VK 7025 Dissolution Apparatus
Operator’s Manual
Revision G, 01/06
P/N 70-9033
Lift each vessel evaporation cover and manually drop the disk assembly
into each vessel.
Note
If using the low-loss evaporation covers, press DRIVE UP to raise
the drive unit slightly, lift each vessel evaporation cover, drop the
disk assembly into each vessel, and press DRIVE DOWN until the
drive unit is completely lowered.
Step 4.
Press RUN. The Method Status screen displays and the paddles rotate.
Note
To quit the test from the Method Status screen, press ESC and
select EXIT. The Start Method screen displays.
Step 5.
Continue the dissolution test according to the prescribed method. Two
minutes after either the cannulas return to the home position or the final
keystroke, the Test in Progress screen displays.
Note
To quit the test from the Test in Progress screen, press ESC
once to return to the Method Status screen and a second time to
quit the test.
Rotating Cylinder
Step 1.
From the Start Method screen, select INSTANT START. RAISE DRIVE TO
/ DRIVE TO STANDARD / START
INSTALL PATCHES / PRESS RUN TO MOVE
POSITION displays.
Step 2.
Press DRIVE UP to raise the drive unit to the home position.
Step 3.
Install the patches on the rotating cylinders.
Varian, Inc.
Revision G, 01/06
P/N 70-9033
Step 4.
VK 7025 Dissolution Apparatus
Operator’s Manual
Page 81
Operation
Press RUN. LOWERING DRIVE displays and the drive unit lowers to the
operating position. The Method Status screen displays and the cylinders
rotate.
Note
To quit the test from the Method Status screen, press ESC and
select EXIT. The Start Method screen displays.
Step 5.
Continue the dissolution test according to the prescribed method. Two
minutes after either the cannulas return to the home position or the final
keystroke, the Test in Progress screen displays.
Note
To quit the test from the Test in Progress screen, press ESC
once to return to the Method Status screen and a second time to
quit the test.
For the first two minutes of a test, the Method Status screen displays the following
information:
• method name
• current time
• selected apparatus
• current date
• set speed
• current speed
• set bath temperature
• current bath temperature
• next timepoint
• manual sample
(if autosampler is installed)
• elapsed time
• last vessel temperatures
(if AutoTemp is installed and enabled in your method)
• user id
After the first two minutes of a test, the Test in Progress screen displays. The Test in
Progress screen details the current speed and bath temperature, the time to the next
sample point (if applicable), the elapsed time, and the Manual Sample option (if
autosampler is installed). Press ESC to return to the Method Status screen.
Varian, Inc.
Page 82
Operation
VK 7025 Dissolution Apparatus
Operator’s Manual
Revision G, 01/06
P/N 70-9033
If you press STOP / PAUSE, the Method Paused screen displays. The time paused and
the current elapsed time display. Select EXIT to stop the current method. ABORTING
METHOD STAND BY displays and the screen returns to the Start Method screen. To continue
the test, select CONTINUE. The Method Status screen displays.
Delay Start
Note
For this option, if you enter a value outside of the acceptable
range, an error message displays indicating appropriate values.
If you are using paddles, DDMs, and an autosampler, you can program a delayed start
based on a specific date and time. If you do not select paddles and DDM in your method,
this option is not available. To set the delayed start, complete the following steps:
Step 1.
From the Start Method screen, select DELAY START. The Time Delay
Start Setup screen displays the current date and time below the RPM
and water bath temperature. If temp display is enabled (see “Temp
Display” on page 46), the vessel temperatures / cannula positions
display as well.
Step 2.
The cursor flashes under ENTER DATE. Enter the date in the appropriate
format and press ENTER. ENTER TIME displays.
Step 3.
Enter the time in 24-hour format (for example, 3:00 pm is entered as
15:00:00) and press ENTER. The Time Delay Start Status screen
displays the time until the test starts. Once the test begins, the Method
Status screen displays (see page 81).
Note
To abort the test from either the Time Delay Start Status screen
or the Method Status screen, press and hold ESC. Once the
method begins, press STOP / PAUSE or ESC and select EXIT.
The Start Method screen displays.
Varian, Inc.
Revision G, 01/06
P/N 70-9033
VK 7025 Dissolution Apparatus
Operator’s Manual
Page 83
Operation
Vessel Temp Start
Note
For this option, if you enter a value outside of the acceptable
range, an error message displays indicating appropriate values.
If you are using paddles, DDMs, and an autosampler, you can program the instrument to
start based on the dissolution medium reaching a specific temperature. To set the
temperature start, complete the following steps:
Step 1.
From the Start Method screen, select VESSEL TEMP START. VESSEL
TEMPERATURE START / BATH TEMP WILL BE ADJUSTED TO CONTROL VESSEL
TEMP / INPUT VESSEL START TEMP displays on the screen and the cursor
flashes.
Step 2.
Enter a temperature and press ENTER. The acceptable range is 20.0 to
55.0 °C.
Step 3.
The shafts rotate at 15 RPM and the cannulas lower. The following
screen displays:
VESSEL TEMP START STATUS
BATH TEMP WILL BE ADJUSTED
TO CONTROL VESSEL TEMP
WAITING FOR VESSELS TO
STABILIZE AT 37.0
TIME SINCE HEATING START
00H:01M:00S
RPM 015.0
BATH 037.2
1:37.1
2:36.9
3:37.1
4:37.0
5:37.0
6:36.9
7:36.9
8:37.1
FRI MAY 23 15:23:04 2003
Step 4.
To stop the heating process, press and hold ESC until the screen goes
blank. The cannulas return to the home position and the Start Method
screen displays.
Varian, Inc.
Page 84
Operation
VK 7025 Dissolution Apparatus
Operator’s Manual
Revision G, 01/06
P/N 70-9033
Method Editor
From the Main Menu, select METHOD EDITOR. The Method Menu screen displays. You
can view the method, but only those with appropriate security levels can change
information in this section. The Method Menu screen displays the following options:
Modify Method (see “Creating / Modify Method” below), Copy Method (see “Copying
Methods” on page 89) and Store Method (see “Storing Methods” on page 90).
Creating / Modify Method
To create a new method or modify an existing method, complete the following steps:
Step 1.
From the Method Menu screen, select MODIFY METHOD to display the
Select Method Location to Modify screen.
Step 2.
Scroll up or down the list by selecting NEXT or PREVIOUS until the
correct method number is highlighted.
Step 3.
Select SELECT. If no method exists, scroll through the list until the
desired method location is highlighted and select SELECT. The Method
Menu 1 screen displays.
Following is a description of the Method Menu 1 screen options:
Option
Response
Method
Select METHOD to name the method. The cursor flashes. Enter the
desired name and press ENTER. The method name displays.
Apparatus
Select APPARATUS to change the apparatus being used for the test.
See “Apparatus” on page 61.
RPM Set
Select RPM SET to set the speed in rotations per minute. See “RPM
Set” on page 61.
Bath Temperature
Set Point
Select BATH TEMPERATURE SET POINT to set the water bath
temperature in degrees Celsius. See “Bath Temperature Set Point” on
page 61.
Varian, Inc.
Revision G, 01/06
P/N 70-9033
VK 7025 Dissolution Apparatus
Operator’s Manual
Page 85
Operation
Option
Response
Sampling Setup
Use this option to enable or disable autosampling and set cannula
down time, AutoTemp, volume, sample points, and sample point
alarms. See “Sampling Setup” below.
DDM Disabled (if
installed)
This option indicates the status of the dosage delivery module. DDM
is disabled by default. See “Controlling Dosage Delivery Module
(VK 7025 with Paddles only)” on page 87 to enable the DDM.
Test Length
Select TEST LENGTH to set the desired test length. The cursor
flashes. Enter the desired test length in hhh:mm:ss format and press
ENTER. The maximum acceptable input is 999:59:59. Press ← to
clear incorrect or unwanted entries.
Menu 2
After the appropriate parameters have been entered on Method Menu
1, select MENU 2. The Method Menu 2 displays. See page 88 for
information on Method Menu 2.
Sampling Setup
To set the sample timepoints, select SAMPLING SETUP from the Method Menu 1 screen.
The Sampling Setup screen displays.
Following is a description of the Sampling Setup screen options:
Option
Auto Sampling
Response
Select AUTO SAMPLING to toggle between ENABLED and DISABLED.
If an autosampler is installed, ensure ENABLED displays next to the
option. If DISABLED displays on the screen, select DISABLED to enable
this option.
Once autosampling is enabled, you are prompted to enter the cannula
downtime. See Set Cannula Down Time and AutoTemp below.
Set Cannula
Down Time
Select SET CANNULA DOWN TIME to enter the amount of time the
cannula remains in the vessel. The cursor flashes. Enter a time in
mm:ss format and press ENTER. The minimum acceptable time is one
minute.
AutoTemp
(if installed)
Select AUTOTEMP to toggle between ENABLED and DISABLED.
AutoTemp must be enabled to measure vessel temperatures.
Varian, Inc.
Page 86
Operation
VK 7025 Dissolution Apparatus
Operator’s Manual
Revision G, 01/06
P/N 70-9033
Option
Response
Volume
Select VOLUME to enter the media volume. The cursor flashes. Enter
a volume and press ENTER. The acceptable range is 500 to 1050 mL.
Sample Points
Select SAMPLE POINTS to toggle between ENABLED and DISABLED. If
enabled, SET SAMPLE POINTS and SAMPLE POINT ALARM ENABLED /
DISABLED display. See below.
Set Sample Points
To set the sample timepoints, see “Setting Sample Points” below.
Sample Point
Alarm
The sample point alarm is disabled by default.
To enable the sample point alarm, select SAMPLE POINT ALARM
DISABLED from the Sampling Setup screen. SAMPLE POINT ALARM
ENABLED and TIME MM:SS display. Enter the time interval prior to the
sample point for the alarm to sound and press ENTER. Press CLEAR
to silence the alarm.
Setting Sample Points
Step 1.
Select SET SAMPLE POINTS. The Sample Points screen displays a list
of timepoints 01 through 24. The cursor flashes next to timepoint 01.
Step 2.
Enter the timepoint in hhh:mm:ss format and press ENTER to move to
the next timepoint location. Press ← to clear unwanted or incorrect
entries one character at a time. Press CLEAR or 0 > ENTER to delete
the current timepoint or any unwanted timepoints.
Note
Set the sample timepoints far enough apart to allow for the
operation of the DDMs and cannulas (at least three minutes). If
there is not enough time between sample timepoints, the sample
timepoint clock counts negative time.
If a value greater than the test length is entered, SAMPLE POINT IS
GREATER / THAN METHOD LENGTH / METHOD LENGTH WILL / BE
ADJUSTED / PRESS ANY KEY TO CONTINUE displays. The test length
automatically adjusts to the time of the sample point.
Step 3.
Select PREVIOUS or NEXT to scroll up or down the timepoints.
Varian, Inc.
Revision G, 01/06
P/N 70-9033
Step 4.
VK 7025 Dissolution Apparatus
Operator’s Manual
Page 87
Operation
Enter the desired timepoints and press ESC to return to the Sampling
Setup screen.
When all appropriate parameters have been entered on the Sampling Setup screen,
press ESC to return to the Method Menu 1 screen.
Controlling Dosage Delivery Module (VK 7025 with Paddles only)
Note
DDM caps are provided to keep dust out of the DDM tubes when
the equipment is not in use. These caps can also be used during
operation. Remove the cap, place the dosage unit in the DDM
opening in the top cover and replace the cap.
For the following options, if you enter a value outside of the
acceptable range, an error message displays indicating
appropriate values.
DDM can only be enabled if this option is installed on your tester and paddles are
selected as the apparatus. Sequential DDM is an option only if clutches are installed.
To enable the dosage delivery module, complete the following steps:
Step 1.
Step 2.
Select DDM DISABLED from the Method Menu 1 screen. The DDM
Setup Menu screen displays.
Select DOSAGE DELIVERY DISABLED. DOSAGE DELIVERY ENABLED and
display.
DOSAGE DELIVERY METHOD SIMULTANEOUS
Step 3.
To change to sequential, select DOSAGE DELIVERY METHOD
SIMULTANEOUS. DOSAGE DELIVERY METHOD SEQUENTIAL and DELIVERY
INCREMENT display. If clutches are not installed, the paddles rotate during
a sequential dosage delivery. If clutches are installed, the paddle stops
for approximately three seconds as the corresponding DDM opens.
Step 4.
Select DELIVERY INCREMENT. The cursor flashes.
Varian, Inc.
Page 88
Operation
VK 7025 Dissolution Apparatus
Operator’s Manual
Revision G, 01/06
P/N 70-9033
Step 5.
Enter a delivery increment time in mm:ss format and press ENTER. The
maximum acceptable value is 59:59.
Step 6.
Press ESC to return to the Method Menu 1 screen.
When all the appropriate parameters have been entered on the Method Menu 1 screen,
select MENU 2. The Method Menu 2 screen displays.
Following is a description of the Method Menu 2 screen options:
Option
Response
Final Spin RPM
To program a final spin, select FINAL SPIN RPM. The cursor
flashes. Enter the desired speed in xxx format. The acceptable
range is 10 to 250 RPM. Press ENTER. Press ← to clear
unwanted or incorrect entries.
Final Spin Time
Select FINAL SPIN TIME to set the final spin time. The cursor
flashes. Enter the desired spin time in hhh:mm:ss format and
press ENTER. The maximum allowable time is 999:59:59.
Sample Vessel Temp
This option is only available if AutoTemp is enabled.
To read the initial vessel temperature, select INITIAL to toggle
between ENABLED or DISABLED.
Note: initial vessel temperature is only available if the
apparatus selected is paddles.
To read the final vessel temperature, select FINAL to toggle
between ENABLED or DISABLED.
Alarm Point
Select ALARM POINT to set an alarm to sound during the test.
Enter the desired alarm time in hhh:mm:ss format and press
ENTER.
When all appropriate parameters have been entered on the Method Menu 2 screen,
press ESC twice to return to the Method Menu screen. Select STORE METHOD to save
the previously entered information (see “Storing Methods” on page 90). If you do not
Varian, Inc.
Revision G, 01/06
P/N 70-9033
VK 7025 Dissolution Apparatus
Operator’s Manual
Page 89
Operation
select STORE METHOD and press ESC to go back further in the system, the following
screen displays:
USER: xxxxx
CHANGES HAVE NOT BEEN STORED
PRESS CONTINUE TO CONTINUE
WITHOUT SAVING
OR RETURN TO RETURN
TO EDITOR
CONTINUE
RETURN
Select CONTINUE to disregard the changes and return to the Main Menu.
Select RETURN to display the Method Menu 1 screen and the current changes. The
changes have not been saved. To save the changes, see “Storing Methods” on page 90.
Copying Methods
To copy an existing method, complete the following steps:
Step 1.
From the Method Menu screen, select COPY METHOD. The Select
Method Location to Copy From screen displays.
Step 2.
Select the method location to copy from by selecting PREVIOUS and
NEXT until the desired method number is highlighted.
Step 3.
Select SELECT. The Select Method Location to Copy To screen
displays.
Step 4.
Select the location to copy to by selecting PREVIOUS and NEXT until
the desired method location is highlighted.
Step 5.
Select SELECT. The Method List screen displays with the copied
method listed.
Step 6.
Press ESC to return to the Method Menu screen.
Varian, Inc.
Page 90
Operation
Step 7.
VK 7025 Dissolution Apparatus
Operator’s Manual
Revision G, 01/06
P/N 70-9033
Press ESC again to return to the Main Menu.
Storing Methods
To save a new or modified method, complete the following steps:
Step 1.
From the Method Menu screen, select STORE METHOD to save the
information. The Select Method Location to Store At screen displays.
Step 2.
Scroll up or down the list by selecting NEXT or PREVIOUS until the
desired method location is highlighted.
Step 3.
Select SELECT. The Method List screen displays with the stored method
listed.
Step 4.
Press ESC to return to the Method Menu screen or press MENU to
return to the Main Menu.
Print Reports
To print information to the Report Center Printer, select PRINT REPORTS from the Main
Menu. The Print Reports screen displays.
PRINT REPORTS
PRINT
METHOD:
PRINT SERIAL
NUMBERS
PRINT
PREVIOUS RESULTS:
REPORT PRINTER
OFF
PRINT FREQUENCY
00:00:00
Varian, Inc.
Revision G, 01/06
P/N 70-9033
VK 7025 Dissolution Apparatus
Operator’s Manual
Page 91
Operation
Following is a description of the Print Reports screen options:
Note
In order to operate any of the printer functions listed, the printer
must be enabled. See “Report Printer On / Off” below.
Option
Response
Print Method
Select PRINT METHOD to print method parameters.
Enter a method number and press ENTER.
Print Previous
Results
Select PRINT PREVIOUS RESULTS to print the results from the last test
run.
The printer buffer is 8K. If you exceed the storage capacity, a complete copy
of the previous results will not print. The printer buffer resets to 0 whenever
a new test is started.
Report Printer
On / Off
Select REPORT PRINTER to toggle between ON and OFF. Once this option
is set, the selection becomes the default.
In order to use the Report Center Printer, this option must be set to ON.
Print Frequency
Select PRINT FREQUENCY to enter the time interval the current program
information should be sent to the Report Center Printer in hh:mm:ss format.
Do not enter 00:00:00 to turn off the printer function. See “Report Printer
On / Off” above.
Print Serial
Numbers
Select PRINT SERIAL NUMBERS to print the serial numbers of the vessels,
paddles, baskets and shafts, and rotating cylinders entered under the
System Setup Menu 2 screen (see “Setting Serial Numbers” on page 57).
Varian, Inc.
Page 92
Operation
VK 7025 Dissolution Apparatus
Operator’s Manual
Revision G, 01/06
P/N 70-9033
This page was intentionally left blank, except for this message.
Varian, Inc.
Chapter 6
Fiber Optics
Installing Fiber Optics
To install and set the height for the fiber optic assemblies, complete the following steps:
Step 1.
Log into the VK 7025 as an administrator.
Step 2.
Clip the ferrule onto the fiber optic probe (see Figure 15, “Fiber Optic
Assembly,” below).
FIGURE 15. Fiber Optic Assembly
fiber optic probe
ferrule
Varian, Inc.
Page 94
Fiber Optics
VK 7025 Dissolution Apparatus
Operator’s Manual
Revision G, 01/06
P/N 70-9033
Step 3.
Insert the fiber optic probe into the PEEK assembly housing.
Step 4.
Ensure the ferrule is positioned so once inside the assembly housing,
the window is oriented away from the set screws.
Step 5.
Ensure the upper locking clip is in place near the top of the thermistor
and insert the thermistor into the PEEK assembly housing (see
Figure 16, “Fiber Optic Assembly Setting,” below).
Step 6.
Slide both the fiber optic probe and thermistor through the assembly
housing so the top of the thermistor is 1.5 inches from the assembly
housing and the top of the fiber optic probe is 4.4 inches from the top of
the assembly housing (see Figure 16, “Fiber Optic Assembly Setting,”
below).
FIGURE 16. Fiber Optic Assembly Setting
fiber optic probe
thermistor
upper locking clip
3/8” set screw
alignment pin
1/8” set screw
Varian, Inc.
Revision G, 01/06
P/N 70-9033
VK 7025 Dissolution Apparatus
Operator’s Manual
Page 95
Fiber Optics
Step 7.
Tighten the two set screws to lock the fiber optic probe in place (see
Figure 16, “Fiber Optic Assembly Setting,” on page 94).
Step 8.
Ensure the locking clip is in place against the assembly housing.
Step 9.
Ensure the drive unit is in the lowest position.
Step 10.
Place the fiber optic assembly into the opening in the top of the drive unit
corresponding to vessel position 1.
Step 11.
Use the alignment pin and coordinating notch to guide the assembly
through the opening in the top cover leaving approximately 1/4 inch of
the PEEK assembly housing exposed.
Step 12.
Repeat steps 2 - 11 for all remaining vessel positions.
Step 13.
From the System Setup Menu 1 screen, select CALIBRATION >
CANNULA HEIGHT CALIBRATION. The Set Sampling Depth screen
displays with factory-set values for each apparatus. If you are using
paddle over disk or rotating cylinder, select MENU 2 to view these
apparatus.
SET SAMPLING DEPTH
BASKET 900 mL
200
MOVE
UP
BASKET 500 mL
400
MOVE
DOWN
PADDLE 900 mL
200
PADDLE 500 mL
400
MENU 2
CANNULA POSITION = 0
Note
The factory-set number displayed under each option is not a
distance measurement. It refers to the number of steps the
cannula motor moves.
Varian Inc.
Page 96
Fiber Optics
VK 7025 Dissolution Apparatus
Operator’s Manual
Revision G, 01/06
P/N 70-9033
Step 14.
To ensure the fiber optic probes are in their home position, select MOVE
DOWN to move the fiber optic probes to their lowest position, then select
MOVE UP to move the fiber optic probes to their highest position.
Step 15.
Select MOVE UP or MOVE DOWN to position the fiber optic windows at
the appropriate height in the vessels. See Figure 17, “Fiber Optic Probe
in Vessel,” on page 96.
FIGURE 17. Fiber Optic Probe in Vessel
Step 16.
When the fiber optic windows are in the correct position, select the
appropriate apparatus and volume. The number of steps the cannula
motor moved to reach that position displays under the selected
apparatus and volume.
Step 17.
Press ESC. The fiber optic probes return to the home position and the
Calibration Menu screen displays.
Step 18.
Press ESC again to return to the System Setup Menu 1 screen.
Varian, Inc.
Chapter 7
Maintenance and
Troubleshooting
Maintenance
Warning
The dissolution apparatus contains electrical circuits, devices,
and components operating at dangerous voltages. Contact with
these circuits, devices, and components can cause death, serious
injury, or painful electric shock.
Periodic maintenance needs may vary depending on frequency of instrument usage.
Daily Maintenance
See “Paddle / Basket Shaft Care” on page 99, “Basket Care” on page 100, and “Water
Bath / Acrylic Care” on page 101 as applicable for additional information on proper
maintenance of your equipment.
• All parts exposed to the dissolution media should be cleaned after each use. Parts
made from stainless steel, such as paddle and basket shafts, cannulas, and
temperature probes, are particularly susceptible to surface corrosion if not cleaned
Varian, Inc.
Page 98
Maintenance and Troubleshooting
VK 7025 Dissolution Apparatus
Operator’s Manual
Revision G, 01/06
P/N 70-9033
thoroughly after use. If any stainless steel parts show signs of surface
discoloration, lightly wipe the surface with a soft cloth or nonabrasive pad to
remove it.
• Carefully wipe the paddles or basket shafts after each use.
• Carefully wash the dissolution baskets after each use.
• Carefully wash the dissolution vessels after each use.
Caution
Use care when washing the TruCenter vessels as heat over 65 °C
can damage the plastic of the magnetic ring flanges.
Weekly Maintenance
See “Paddle / Basket Shaft Care” on page 99, “Basket Care” on page 100, and “Water
Bath / Acrylic Care” on page 101 as applicable for additional information on proper
maintenance of your equipment.
• Inspect the water bath and heater / circulator tubing for algae or other materials. If
algae is present, change the bath water and add an algaecide. If you use a water
bath algaecide or clear bath product, ensure it is compatible with PETG and
acrylic.
Monthly Maintenance
See “Paddle / Basket Shaft Care” on page 99, “Basket Care” on page 100, and “Water
Bath / Acrylic Care” on page 101 as applicable for additional information on proper
maintenance of your equipment.
• Drain the water from the water bath and clean the bath thoroughly. Refill the water
bath and add an algaecide.
• Clean and lubricate the upper and lower portion of the support legs with the
recommended synthetic lubricant.
Varian, Inc.
Revision G, 01/06
P/N 70-9033
VK 7025 Dissolution Apparatus
Operator’s Manual
Page 99
Maintenance and Troubleshooting
• It is recommended that the water bath temperature probe jack is checked for
surface corrosion and wiped clean with a soft cloth or nonabrasive pad every one
to three months.
Note
Depending on the frequency of use, it may be necessary to
complete this maintenance procedure more often.
Paddle / Basket Shaft Care
1. When using with corrosive materials such as hydrochloric acid or media containing
salts, be sure to rinse them thoroughly with deionized water immediately after each
use, and dry thoroughly with a soft towel or cloth.
2. Do not clean with abrasive cleansers or cloths. Use deionized water whenever
possible. If you must use a cleanser or solvent, be sure that it is as mild as possible,
non-abrasive, and fully compatible with fluorocarbons and stainless steel before use.
If in doubt, call the service department for advice before proceeding.
3. We recommend that you do not use a laboratory dishwasher. Clean paddles and
basket shafts only by hand. The high temperatures to which your items would be
subject in a dishwasher may damage the fluorocarbon coating.
4. Be sure to handle with care. Our QC laboratory has checked the shafts for
straightness, to ensure that they will operate without significant wobble. If you must
clean or handle them while they are still mounted on the instrument, use minimal
pressure on the shaft to prevent them from bending. While in the chucks, just a little
bit of pressure exerted on the shaft—especially near the blade or basket—can easily
bend the shaft and cause significant wobble.
5. Use care when removing vessels from the apparatus while the paddles or basket
shafts are installed so that you do not bump them.
6. When attaching or removing baskets, do not bend the clips excessively.
7. Please store paddles and basket shafts properly between uses. Do not simply place
these items in a drawer. They will be subject to nicks, chips, and scratches as they
Varian, Inc.
Page 100
Maintenance and Troubleshooting
VK 7025 Dissolution Apparatus
Operator’s Manual
Revision G, 01/06
P/N 70-9033
bump against each other. Place them back into the original styrofoam shipping
container or other appropriate container between uses. This will prevent them from
coming into contact with each other or anything else in the storage area.
Basket Care
1. When using with corrosive materials such as hydrochloric acid or media containing
salts, be sure to rinse them thoroughly with deionized water immediately after each
use, and dry thoroughly with a soft towel or cloth.
2. Please do not clean baskets or shafts with abrasive cleansers or cloths, especially if
they’re gold or Teflon coated. Mesh openings on baskets could enlarge, which could
have an effect on results. Use deionized water whenever possible. If you must use a
cleanser or solvent, be sure that it is as mild as possible, non-abrasive, and fully
compatible with fluorocarbons and stainless steel before use. If in doubt, contact the
service department for advice before proceeding.
3. We recommend that you do not use a laboratory dishwasher. Clean baskets only by
hand. The high temperatures to which your baskets would be subject in a dishwasher
may damage the fluorocarbon coating.
4. Use caution when handling baskets. It is important that they retain their cylindrical
shape, so take care not to kink or bend the mesh. Check frequently to ensure that the
mesh is completely open and that there are no rips or tears.
5. Please store baskets properly between uses. Do not simply place these baskets in a
drawer. They will be subject to nicks, chips, and scratches as they bump against each
other and they may get bent out of shape. Place them back into the original shipping
container or other appropriate container between uses. This will prevent them from
coming into contact with each other or anything else in the storage area.
Varian, Inc.
Revision G, 01/06
P/N 70-9033
VK 7025 Dissolution Apparatus
Operator’s Manual
Page 101
Maintenance and Troubleshooting
Water Bath / Acrylic Care
Note
The following information pertains to any items, in addition to the
water bath, made of acrylic.
Caution
Do not use cleaning compounds containing ammonia or abrasive
cleaners on your water bath.
The water bath supplied with the VK 7025 Dissolution Apparatus should be maintenance
free except for an occasional cleaning. If you use a water bath algaecide or clear bath
product, ensure it is compatible with PETG and acrylic. The flow paths in the heater /
circulator are primarily stainless steel and should tolerate most clear bath formulations.
Check with the product manufacturer to be sure the product is safe for your water bath.
1. All of our water baths are fabricated entirely of commercial grade acrylic. When using
them with corrosive materials such as hydrochloric acid or media containing salts, be
sure to rinse them thoroughly with deionized water immediately after each use, and
dry thoroughly with a soft towel or cloth.
2. Do not clean with abrasive cleansers or cloths. Use deionized water whenever
possible. If you must use a cleanser or solvent, be sure that it is as mild as possible,
non-abrasive, and fully compatible with PETG and acrylic before use. If in doubt, call
the service department for advice before proceeding.
3. Do not use ammonia, window-cleaning sprays, kitchen scouring compounds, or
solvents such as acetone, gasoline, benzene, alcohol, carbon tetrachloride, or
lacquer thinner. These can scratch the material’s surface and / or weaken it causing
small surface cracks called “crazing”.
4. Our recommendations include but are not limited to the following:
•
•
•
•
Hot water:< 150 °F
Household ammonia
Vinegar (5% Glacial Acetic Acid)
Ethyl alcohol: maximum 10%
Varian, Inc.
Page 102
Maintenance and Troubleshooting
VK 7025 Dissolution Apparatus
Operator’s Manual
Revision G, 01/06
P/N 70-9033
• Isopropyl alcohol: maximum 25%
Repairing Leaking Fittings
Complete these steps if any of your water bath fittings are leaking:
Step 1.
Turn off the heater / circulator and drain the water bath completely.
Step 2.
Remove the leaky bulkhead fitting.
Step 3.
Remove the elbow fitting from the bulkhead fitting.
Step 4.
Inspect the bulkhead fitting gaskets for damage and replace them as
necessary.
Step 5.
Remove the old Teflon tape from all male fittings. Inspect the threads for
damage and replace the fitting as necessary.
Step 6.
Apply new Teflon tape to the male fitting threads.
Step 7.
Reinstall and tighten the bulkhead fitting on the water bath.
Step 8.
Reinstall and tighten the elbow fitting to the bulkhead fitting.
Step 9.
Fill the water bath and turn on the heater / circulator.
Step 10.
Inspect the fitting for leaks. If the fitting still leaks, contact the Dissolution
Systems Service Department.
Varian, Inc.
Revision G, 01/06
P/N 70-9033
VK 7025 Dissolution Apparatus
Operator’s Manual
Page 103
Maintenance and Troubleshooting
Removing the Top Cover
Caution
Panels or covers that are retained by fasteners which require
the use of a tool for removal may be opened only by
Varian-trained, Varian-qualified, or Varian-authorized service
engineers.
Step 1.
Turn on the dissolution apparatus.
Step 2.
Lower the drive unit to the lowest position.
Step 3.
Turn off the dissolution apparatus and remove the power cord.
Step 4.
Remove the two screws in the top cover located just behind the display
screen.
Step 5.
Lift the top cover from the front of the machine. It hinges back to allow
access to the machinery.
Replacing the Top Cover
Step 1.
Pull down the front end of the top cover and rest it in place.
Step 2.
Replace the two screws in the cover behind the display screen.
Step 3.
Reconnect the power cord and turn on the instrument.
Cleaning the Cannulas
Step 1.
Turn off the dissolution apparatus.
Varian, Inc.
Page 104
Maintenance and Troubleshooting
VK 7025 Dissolution Apparatus
Operator’s Manual
Revision G, 01/06
P/N 70-9033
Step 2.
Remove the cannulas from the dissolution apparatus by pulling up the
entire cannula assembly housing which contains the cannulas and, if
applicable, the thermistor.
Step 3.
Disconnect the cannulas from the sample tubing.
Step 4.
Remove the sample cannulas from the cannula assembly and clean
using an appropriate cleaning solution.
Step 5.
Wipe any surface discoloration from the cannula assembly housings with
a clean, damp cloth.
Step 6.
Carefully place the sample cannulas back into the cannula assemblies.
Step 7.
Reconnect the sample tubing.
Step 8.
Use the guide pin and coordinating notch to position the cannula
assembly housing and reinsert it into the top cover of the dissolution
apparatus. Push the cannula down until it engages with the gears in the
motor housing.
Step 9.
Turn on the dissolution apparatus. The cannulas return to the home
position.
Cleaning the Cannulas Using the VK 8000 Clean
System Function
Step 1.
Ensure the VK 7020 S / 7025 is connected correctly to the VK 8000 and
that external control is enabled. See “External Control” on page 56.
Step 2.
Ensure the drive unit is raised to the home position.
Step 3.
Ensure the baskets or paddles are out of the way of the cleaning solution
containers by pushing them up against the spindle housings.
Varian, Inc.
Revision G, 01/06
P/N 70-9033
Step 4.
VK 7025 Dissolution Apparatus
Operator’s Manual
Page 105
Maintenance and Troubleshooting
Position the cannula cleaning tray on the vessel plate so the cannulas
are centered above the containers.
FIGURE 18. Cannula Cleaning Tray
Step 5.
From the Manual Operation screen, set the volume to 500 mL.
Step 6.
Select MANUAL SAMPLE. The Manual Sampling screen displays.
Step 7.
From the Manual Sampling screen, select DOWN corresponding to
SELECT ALL.
Step 8.
Lower the drive unit by pressing DRIVE DOWN until the tips of the
sample cannulas are below the surface of the cleaning solution.
Step 9.
Log off the dissolution apparatus.
Step 10.
Press CLEAN SYSTEM on the VK 8000. The cleaning process begins
immediately.
Step 11.
When the cleaning process is complete, press DRIVE UP to raise the
drive unit to the home position.
Step 12.
Remove the cannula cleaning tray from the vessel plate. Use a clean,
soft cloth to dry the exterior surfaces of the cannulas.
Varian, Inc.
Page 106
Maintenance and Troubleshooting
VK 7025 Dissolution Apparatus
Operator’s Manual
Revision G, 01/06
P/N 70-9033
Replacing the Flanges
The tester is supplied with specially designed vessels and magnetic ring flanges. The
magnetic ring flanges will keep the vessels centered at all times, without the use of tools,
and prevent the vessels from “floating” even when they are empty.
Note
The TruCenter vessels are shipped pre-assembled. Steps 1 - 5
below are necessary only when replacing a vessel.
Step 1.
Loosen the tangential screw on the lower ring flange.
Note
There are two flanges—an upper ring flange and a lower ring
flange. The lower ring flange is thicker and contains the
magnets which secure the vessel to the vessel plate.
FIGURE 19. TruCenter Vessel—exploded view
upper ring flange
magnets
lower ring flange
tangential screw
groove for the magnetic ring flanges
Varian, Inc.
Revision G, 01/06
P/N 70-9033
VK 7025 Dissolution Apparatus
Operator’s Manual
Page 107
Maintenance and Troubleshooting
Step 2.
To slide the upper and lower ring flanges off the old vessel, gently pull
out and up until they clear the groove in the vessel.
Step 3.
Align the upper and lower ring flanges so they nestle together and do not
slide.
Step 4.
Slide the ring flanges onto the new vessel so they rest in the groove in
the vessel.
Step 5.
Tighten the tangential screw on the ring flange.
Note
Do not overtighten the tangential screw or damage to the vessel
could occur.
Report Center Impact Printer
The following is helpful information for using your impact printer.
Installing the Cartridge Ribbon
If the printer is used infrequently, the print impression sometimes becomes weak because
the ribbon dries out. If the printed material is difficult to read and you suspect this is the
cause of the problem, advance to a new section of the ribbon by pressing the printer
toggle switch to the Paper feed position. If the printing is still faint, replace the cartridge.
To install the cartridge:
Step 1.
Toggle the printer off line by pressing the printer toggle switch to the
OnLine / Off Line position. When the printer is off line, the Ready LED
does not illuminate.
Varian, Inc.
Page 108
Maintenance and Troubleshooting
VK 7025 Dissolution Apparatus
Operator’s Manual
Revision G, 01/06
P/N 70-9033
Step 2.
Four small grooves are embossed on the printer cover. Gently push on
these grooves to tilt the cover. When the printer cover is tilted up, you
can lift it off completely.
Step 3.
Push down on the right side of the ribbon cartridge (marked PUSH) and
remove the old cartridge.
Step 4.
Install the new cartridge. If there is already paper in the printer, hold the
cartridge between your thumb and index finger, slide it over the paper
and into the printer compartment. Ensure the paper is between the
ribbon cartridge and the ink ribbon. Ensure the ink cartridge is inserted
firmly to prevent weak or irregular printing. The cartridge must be
properly seated and aligned for the best printing.
Step 5.
Turn the cartridge knob (marked by an arrow) clockwise to stretch the
ribbon taut.
Step 6.
Replace the cover.
Step 7.
Toggle the printer online by pressing the printer toggle switch to the
OnLine / Off Line position. The Ready LED illuminates.
Step 8.
Replace the paper if necessary.
If you get ribbon ink on the printer’s plastic cover, remove it immediately. Once dried, it is
difficult to remove.
Replacing the Paper Roll
Step 1.
Toggle the printer off line by pressing the printer toggle switch to the
OnLine / Off Line position. When the printer is off line, the Ready LED
does not illuminate.
Step 2.
Grasp the paper roll cover firmly by the grooves on the side and the front
edge. Pull outward to remove the cover.
Step 3.
Press the printer toggle switch to Paper feed to advance the paper
approximately one inch beyond the paper cutter.
Varian, Inc.
Revision G, 01/06
P/N 70-9033
VK 7025 Dissolution Apparatus
Operator’s Manual
Page 109
Maintenance and Troubleshooting
Step 4.
Using scissors, cut the paper feeding to the printer and remove the
paper roll.
Step 5.
Pull the remaining paper through the printer mechanism. Pull the paper
from the front (paper cutter side). Pulling the paper out of the back of the
printer will damage the print mechanism.
Step 6.
Unroll several inches of paper on the new roll.
Step 7.
If it is jagged, cut a straight edge on the paper roll to facilitate the entry of
the paper into the printer.
Step 8.
Slide the paper through the slot connecting the paper compartment and
the printer compartment. You can slide it in approximately 1/4 inch
before it stops.
Step 9.
While holding the paper in place, press the printer toggle switch to the
Paper feed position and hold until approximately one inch of paper has
emerged from the top of the printer. Make sure the roll of paper feeds
squarely. If it does not, the paper will jam and possibly damage the
printer mechanism.
Step 10.
Release the printer toggle switch.
Step 11.
Turn the paper roll to take up any slack in the paper feeding to the
printer.
Step 12.
Place the paper roll into the paper compartment.
Step 13.
Replace the paper roll cover. If the cover is difficult to remove or replace,
the left and right edges can be trimmed or shaved with a utility knife
allowing the cover to slide easier.
Step 14.
Toggle the printer online by pressing the printer toggle switch to the
OnLine / Off Line position. The Ready LED illuminates.
Varian, Inc.
Page 110
Maintenance and Troubleshooting
VK 7025 Dissolution Apparatus
Operator’s Manual
Revision G, 01/06
P/N 70-9033
Toggling Your Printer Online
Complete these steps to toggle your printer online:
Step 1.
Toggle the printer online by pressing the printer toggle switch to the
OnLine / Off Line position. When the printer is off line, the Ready LED
does not illuminate.
Step 2.
Release the switch and it returns to the center position. The Ready LED
illuminates and a READY message prints if the PRINT READY command
has not been turned off. See “Printer Configuration” on page 111 for
instructions on turning on and off the PRINT READY command. When you
first turn on the instrument, it prints a READY message to assure you that
the built-in microprocessor is operating properly.
When you turn off the printer, wait at least three seconds before turning it on again.
Printer Self Test
You can test the print head and ribbon only after inserting paper. Do not attempt to print
without paper. Follow these steps to perform a printer self test:
Step 1.
Turn off the dissolution apparatus.
Step 2.
Press and hold the printer toggle switch in the Paper feed position.
Step 3.
Turn on the dissolution apparatus.
Step 4.
Hold the printer toggle switch until printing begins. The printer prints a list
of the current configuration settings and performs a continuous print test.
Step 5.
Press the printer toggle switch to the OnLine / Off Line position to stop
the printing operation.
Step 6.
The printer is ready to resume normal operation.
Varian, Inc.
Revision G, 01/06
P/N 70-9033
VK 7025 Dissolution Apparatus
Operator’s Manual
Page 111
Maintenance and Troubleshooting
Printer Configuration
Note
The printer configuration is set by the factory. This procedure
should be performed only if the printer displays erroneous
characters. Contact the Dissolution Systems Service
Department for assistance, if necessary.
Step 1.
Turn off the dissolution apparatus.
Step 2.
Press and hold the printer toggle switch in the OnLine / Off Line position
while turning on the instrument. Hold the printer toggle switch in the
OnLine / Off Line position for six seconds after the instrument is turned
on, then release the switch.
Step 3.
The printer should print: *** SETUP MENU *** and CONFIGURE... [NEXT/OK].
If this message does not print, repeat steps 1 through 3.
Step 4.
The printer toggle switch is used to complete the configuration. Pressing
the left side of the printer toggle switch selects NEXT to advance to the
next menu item. Pressing the right side of the printer toggle switch
selects OK to accept what is stated on this line of the menu item. Each
time the switch is pressed, another part of the menu prints. Allow the
printer to finish printing before pressing the switch again. See the table of
commands on the following page.
Note
The printout is easier to read if the printer cover is removed.
Varian, Inc.
Page 112
Maintenance and Troubleshooting
VK 7025 Dissolution Apparatus
Operator’s Manual
Revision G, 01/06
P/N 70-9033
*** SETUP MENU***
CONFIGURE
[NEXT/OK]
Press NEXT to avoid configuration
CUSTOM
[NEXT/OK]
Press OK to enter custom mode
***CUSTOM MENU***
PRINT CUSTOM SETUP [NEXT/OK]
Press NEXT
AUTO SEQ = NO
[NEXT/OK]
Press OK
ZERO = Ø
[NEXT/OK]
Press OK
POUND SIGN = #
[NEXT/OK]
Press OK
_(UNDERSCORE)
[NEXT/OK]
Press OK
ONLINE/OFFLINE = YES
[NEXT/OK]
Press OK
EXT CH SET = NO
[NEXT/OK]
Press OK
PRINT READY = YES
[NEXT/OK]
Press NEXT
PRINT READY = NO
[NEXT/OK]
Press OK
READY...
Your printer is now configured correctly.
Varian, Inc.
Revision G, 01/06
P/N 70-9033
VK 7025 Dissolution Apparatus
Operator’s Manual
Page 113
Maintenance and Troubleshooting
Fuse Replacement
Warning
The dissolution apparatus contains electrical circuits, devices,
and components operating at dangerous voltages. Contact with
these circuits, devices, and components can cause death,
serious injury, or painful electric shock.
Panels or covers that are retained by fasteners which require
the use of a tool for removal may be opened only by Variantrained, Varian-qualified, or Varian-authorized service engineers.
The fuse is located in the power entry module on the rear of the heater / circulator.
Step 1.
Before checking or attempting to replace a fuse, remove the power cord
from the heater / circulator.
Step 2.
There is a release slot on the bottom of the fuse compartment. The fuse
compartment holder is released by inserting a small screw driver
beneath the slot.
Step 3.
A slight application of pressure upward releases the compartment.
Step 4.
Pull the fuse compartment holder out of the power entry module. The
fuse and a spare are located inside. The fuse is a 10 amp metric
(5 x 20 mm) fuse for 115 V and 5 amp metric (5 x 20 mm) fuse for 230 V.
Step 5.
Replace the fuse in the compartment.
Warning
Never replace a fuse with one of a higher amperage rating. Doing
so may compromise the safety margin and could result in damage
to the instrument or personal injury.
Step 6.
Push the fuse compartment holder into the power entry module until both
sides snap. Replace the power cord.
Varian, Inc.
Page 114
Maintenance and Troubleshooting
VK 7025 Dissolution Apparatus
Operator’s Manual
Revision G, 01/06
P/N 70-9033
Troubleshooting
The Dissolution Systems Service Department can assist you if you experience problems
or have questions concerning your dissolution apparatus. Many problems can be traced
to simple sources and are easily solved.
Following is a troubleshooting guide which may help you:
Problem
Suggested Solution
The display screen freezes.
Press STOP / PAUSE and ENTER at the same time to
restart the system.
All administrative passwords are
forgotten or deleted.
Contact the Dissolution Systems Service Department.
Following is a list of error messages that may display on your screen and the suggested
solution:
Error Message
Suggested Solution
Spindle board error:
Ensure nothing is blocking the paddle or basket
preventing it from rotating.
RPM NOT AT SETPOINT
Temperature board error:
HEATER SENSOR EXCEEDS BATH
SENSOR BY
Check bath water level. Ensure the heater /
circulator is primed and water is flowing.
5 DEGREES
Temperature board error:
HEATER TEMP RISE EXCEEDS
Check bath water level. Ensure the heater /
circulator is primed and water is flowing.
0.284 DEGREES PER SEC
Temperature board error:
HEATER SENSOR OPEN
Temperature board error:
Ensure the cable from the heater / circulator to the
back of the VK 7025 is connected.
BATH SENSOR OPEN
Ensure the bath temperature probe is plugged into
the back of the VK 7025.
Temperature board error:
70
Check the bath water level. Ensure the heater /
circulator is primed and water is flowing.
HEATER SENSOR OVER
Varian, Inc.
Revision G, 01/06
P/N 70-9033
VK 7025 Dissolution Apparatus
Operator’s Manual
Page 115
Maintenance and Troubleshooting
If any of the listed problems persist, contact the Dissolution Systems Service Department.
The Dissolution Systems Service Department can be reached at 800.229.1108 (inside the
US) or 919.677.1108 (outside the US). Optionally, you can send a fax to 919.677.1138.
You can also e-mail the Dissolution Systems Service Department at
[email protected].
Varian, Inc.
Page 116
Maintenance and Troubleshooting
VK 7025 Dissolution Apparatus
Operator’s Manual
Revision G, 01/06
P/N 70-9033
This page was intentionally left blank, except for this message.
Varian, Inc.
Chapter 8
Service and
Warranty
The warranty is provided by Varian, Inc. or one of its authorized representatives.
Service and Warranty Information
Varian dissolution products carry a one-year warranty on parts and labor. The Dissolution
Systems Service Department (or one of its representatives) will, at its option, either repair
or replace any mechanical and electrical components in your instrument which prove to
be defective. During the first year of warranty coverage, there is no charge for the labor to
repair your unit. The Dissolution Systems Service Department (or one of its
representatives) will determine the best site to repair the unit, either onsite or returned to
Varian, Inc. Any onsite warranty services are provided only at the initial installation point.
Installation and onsite warranty services are available only in Dissolution Systems service
travel areas.
Varian, Inc.
Page 118
Service and Warranty
VK 7025 Dissolution Apparatus
Operator’s Manual
Revision G, 01/06
P/N 70-9033
Exclusions and Limitations
Excluded from this warranty are expendable or consumable items such as, but not limited
to, paddles, baskets, vessels, and acrylic water baths. Also excluded are defects from
improper or inadequate maintenance by the customer, user-induced chemical action or
contamination, unauthorized modification or misuse, and improper site preparation and
maintenance.
Operation of software is not warranted to be uninterrupted or error-free.
Obtaining Warranty Service
To obtain warranty service in the United States, contact the Dissolution Systems Service
Department at 800.229.1108 to obtain authorization to return units for repair. At the option
of the customer, onsite warranty service is available, but travel charges may be incurred.
The customer should prepay all shipping charges for products returned to the Dissolution
Systems Service Department (unless otherwise authorized), and Varian, Inc. will pay all
charges for return to the customer.
Warranty Limitations
Varian, Inc. makes no other warranty, either express or implied, with respect to this
product. Specifically disclaimed are any implied warranties of merchantability and fitness
for a particular use. In no event will Varian, Inc. be liable for any indirect, incidental, or
consequential damages arising from the use of this product. This warranty gives you
specific legal rights which may vary from state to state or province to province, so you
may have other rights and some of these exclusions may not apply to you.
Varian, Inc.
Revision G, 01/06
P/N 70-9033
VK 7025 Dissolution Apparatus
Operator’s Manual
Page 119
Service and Warranty
Exclusive Remedies
The remedies provided herein are the customer’s sole and exclusive remedies. In no
event shall Varian, Inc. or its representatives be liable for any direct, indirect, special,
incidental, or consequential damages, whether based on contract, tort, or any other legal
theory. Some states or provinces do not allow the exclusion or limitation of incidental or
consequential damages, so the above limitation or exclusion may not apply to you.
Varian, Inc.
Page 120
Service and Warranty
VK 7025 Dissolution Apparatus
Operator’s Manual
Revision G, 01/06
P/N 70-9033
This page was intentionally left blank, except for this message.
Varian, Inc.
Index
a
acrylic care 101
administration screen 47
administrative control 40
administrator operation 45
apparatus, selecting 61
b
basket care 100
basket height, setting 30
basket shaft care 99
basket shaft installation 30
bath vessel difference 48
c
calibration calendar 53
calibration menu screen 48
cannula height calibration 50
cartridge ribbon 107
centering vessels 28
cleaning the cannulas 103
clear key 18
clock functions screen 56
Varian, Inc.
comm. port functions 56
conventions 17
copying methods 89
d
delay start 74, 82
delayed heating, setting 72
deleting user ids 42
diagnostic menu 54
drive down key 18
drive up key 18
e
enter key 18
esc key 18
exclusions 118
exclusive remedies 119
f
fiber optic assembly 94
fiber optics, installation 93
filling the water bath 27
Index
final sample vessel temp 88
final spin rpm 88
fuse replacement 113
h
hazards 9
i
initial sample vessel temp 88
installing fiber optics 93
installing paddle / basket shafts 28
installing the printer cartridge
ribbon 107
installing vessels 28
instant start 75
introduction 15
p
paddle care 99
paddle height, setting 29
paddle installation 29
print method 74
print reports 90
printer
configuration 111
self test 110
toggling online 110
r
reader comment form 125
repairing leaking fittings 102
rpm set 61
run key 18
s
k
key guide 18
l
leaking fittings, repairing 102
limitations 118
list methods 73
lot / batch data 74
m
main menu 59
maintenance 97
manual operation 60
manual operation screen 60
manual sampling screen 63
menu key 18
method editor 84
method menu 1 screen 84
method menu 2 screen 88
method status screen 81
modify method 84
monthly maintenance 98
o
obtaining warranty service 118
operation 59
Varian, Inc.
safety practices 9
sample point alarm, setting 62
sampling setup 85
sampling temperatures 63
screen saver 18
security levels 40
select method 73
selecting apparatus 61
self test, printer 110
service 117
setting alarms 52
setting alternate drive unit position 49
setting basket height 30
setting comm. port functions 56
setting delayed heating 72
setting paddle height 29
setting sample points 62, 86
setting serial numbers 57
setting speed 61
setting up the heater / circulator 25
setting up the vk 7025 22
setting up the water bath 25
setting volume 61, 86
setup 19
start method screen 73
starting a test 64
stop / pause key 18
store methods 90
system setup menu 1 screen 46
system setup menu 2 screen 55
Index
t
temp set 61
temperature start 75, 83
top cover 103
u
unpacking your vk 7025 19
user list 41
user settings 45
using the vk 8000 clean system
function 104
v
vessel installation 28, 106
vessel plate layout 43
vessel temperature start 83
volume, setting 61, 86
w
warranty 117
warranty limitations 118
water bath care 101
weekly maintenance 98
Varian, Inc.
Index
This page was intentionally left blank, except for this message.
Varian, Inc.
Tell Us How We Are Doing
We listen to our customers. We work hard to make our technical documentation user friendly, and
to make the information in our manuals easy to retrieve and use. We’d like you to tell us the kinds
of additional information you’d find helpful in our documentation. Your feedback will be carefully
considered when we prepare future editions of this manual.
This manual should contain the following additional information:
The most useful thing about this book is:
This manual would be more helpful if:
My general impressions of this book are:
May we contact you regarding your comments? ____ YES ____ NO (If yes, please write your
name, address, and telephone number here.)
Please return this form via mail to: Technical Writing / Dissolution Systems, Varian, Inc.,
13000 Weston Parkway, Cary, North Carolina 27513-2250 USA. Optionally, you can return
this form via fax at 1.919.677.1550. Always, feel free to telephone us to discuss your
comments at 1.800.229.1108.
VK 7025 Dissolution Apparatus Operator’s Manual
P/N 70-9033
Revision G