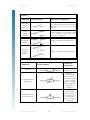
1
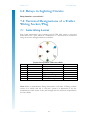
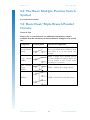
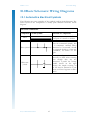
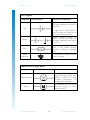
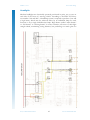
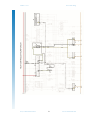
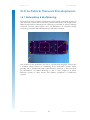
TRADE OF HEAVY VEHICLE MECHANIC PHASE 2 Module 7 Basic Vehicle Wiring, Electric Motors and Computers UNIT: 1 Basic Vehicle Wiring Module 7 – Unit 3 Computers Table of Contents 1.0 Learning Outcome................................................................................................. 1 1.1 Key Learning Points ................................................................................... 1 2.0 Schematic Electrical Wiring Diagram ................................................................. 2 2.1 Layout of Electrical Circuits ............................................................................. 2 2.2 Component Identification ‘Group’ Codes .............................................. 4 2.3 Connecting Wire Colour Code ................................................................. 4 2.4 Example Wiring Diagrams ........................................................................ 5 2.5 Symbols and Codes Used in the Example Diagrams ............................ 5 3.0 3.1 4.0 4.1 4.2 4.3 4.4 4.5 5.0 5.1 5.2 Primary Terminal Designation ..................................................................... 5 Electrical Connection (DIN) Numbers ................................................... 6 Electrical Connectors and Their Function ................................................. 7 Physical Requirements of Electrical Connections.................................. 7 Operational Requirements of Electrical Connections ........................... 7 Service Requirements of Electrical Connectors ..................................... 7 Consequences of Faulty Electrical Connections .................................... 8 Gold and Tin Coated Terminal Ends ...................................................... 8 Electromagnetic Relays and a Solenoids ..................................................... 8 Electromagnetic Relays .............................................................................. 8 Solenoids ....................................................................................................10 6.0 Relays in Lighting Circuits .......................................................................... 11 7.0 Terminal Designations of a Trailer Wiring Socket/Plug ........................ 11 7.1 Trailer Wiring Socket................................................................................11 8.0 The Basic Multiple Position Switch Symbol............................................. 12 9.0 Basic Dual/Triple Branch Parallel Circuits .............................................. 12 10.0 Basic Schematic Wiring Diagrams ............................................................. 13 10.1 11.0 11.1 Automotive Electrical Symbols ..............................................................13 Switch Controlled Fused Lighting Circuits............................................... 16 Sample Circuit Diagrams .........................................................................16 Heavy Vehicle Mechanic Phase 2 Revision 2.0 December 2013 Module 7 – Unit 3 Computers 12.0 Relay Controlled Auxiliary Lighting Circuits ............................................ 23 13.0 To Connect a Trailer Light Assembly ...................................................... 23 14.0 Diagram of Basic Standard Circuits ........................................................... 24 15.0 The Term 'BUS' as Used in Automotive Electrical Systems ................. 24 15.1’ 16.0 16.1 BUS’ Explained .........................................................................................24 In-Vehicle Network Developments ......................................................... 25 Networking & Multiplexing ....................................................................25 17.0 Location and Voltage Drops on the Earth Connections ....................... 26 18.0 Tungsten, Halogen and Xenon Bulbs ....................................................... 26 18.1 18.2 Light Bulbs .................................................................................................26 Xenon HID Headlights ...........................................................................28 19.0 Servicing Lamps............................................................................................ 28 20.0 NCT/DoT VTM Regulations for Condition of Lamps ......................... 29 20.1 NCT Body Wiring and Lighting Circuit Requirements.......................29 21.0 Focusing Headlights ..................................................................................... 29 22.0 Diagnosing Electrical Circuits .................................................................... 29 23.0 The Effect of Wrong Fuse or Bulb ........................................................... 30 23.1 24.0 24.1 Fuses ...........................................................................................................30 Crimped Joints on Light Cables ................................................................. 31 Stripping Wire Insulation .........................................................................31 Task Sheets.................................................................................................................. 33 Aiming Headlights ..................................................................................................33 Checking & Changing a Headlight Bulb .............................................................34 Checking & Changing an Exterior Light Bulb ...................................................37 Checking Lighting & Peripheral Systems ............................................................38 Heavy Vehicle Mechanic Phase 2 Revision 2.0 December 2013 Module 7– Unit 1 Basic Vehicle Wiring 1.0 Learning Outcome By the end of this unit each apprentice will be able to: Diagnose and rectify faults in basic lighting circuits using wiring diagrams and multi-meter Replace bulbs and fuses with the correct type State the effect of fitting a wrong fuse or bulb Carry out the correct procedure when a fuse blows repeatedly State the lighting regulations and focus head lights accordingly Make up crimped and soldered joints on light and heavy cables Wire a 7 pin truck/trailer connector (7 pin male/female) (12v and 24v types) Wire up a set of auxiliary spot lights on a vehicle 1.1 Key Learning Points Construction of earth system circuits Drawing of wiring diagrams and symbols of individual components to ISO and DIN standards Colour and number/letter coding used by different manufacturers Function, types, and carrying capacity of fuses, fusible links, (replaceable and re-settable). Calculate size of fuse required for a circuit Construction of basic head, side, tail, stop, reversing light circuits Drawing and construction of oil light, temperature and fuel circuits Drawing and construction of horn circuit, wiper and indicator circuits Function, operation and wiring of relays Method of headlamp focusing, bulb replacement and associated hazards Operation and procedure for carrying out tests on printed circuit tail lamps and gas operated headlamps Procedures for checking circuits for, shorting, open circuit, continuity and bad connections in vehicle circuits and associated hazards personal and vehicle component hazards Soldering and crimping procedures, fluxes, connectors Hazards. Wiring of vehicle/trailer suzie connectors and auxiliary spot lights Heavy Vehicle Mechanic Phase 2 1 Revision 2.0 December 2013 Module 7– Unit 1 Basic Vehicle Wiring 2.0 Schematic Electrical Wiring Diagram 2.1 Layout of Electrical Circuits The layout of electrical circuits and their components are shown as diagrams made up of symbols and connecting lines. Being able to read a circuit diagram is important when trying to trace and correct a fault in an electrical system. However, all manufacturers do not use the exact same symbols, codes or terminal numbers, but for you to get a successful beginning at reading wiring diagrams, it is best to follow one common system. The system described here is based on the European DIN standard that generally has current flowing from top (Terminal No.30) to the bottom earth (Terminal No.31) and from left to right. Refer to the manufacturer's service manual for specific details on how to read a particular circuit diagram. Heavy Vehicle Mechanic Phase 2 2 Revision 2.0 December 2013 Module 7– Unit 1 Basic Vehicle Wiring Volkswagen® Golf 1.4 petrol 1997-06 engine code AHW. Reproduce d courtesy of Autodata® Heavy Vehicle Mechanic Phase 2 3 Revision 2.0 December 2013 Module 7– Unit 1 Basic Vehicle Wiring Note: For training and testing purposes diagrams and information is available from automotive technical manuals. Overview A circuit diagram (also known as an electrical diagram or electronic schematic) is a pictorial representation of an electrical circuit. It shows the different components of the circuit and the power and signal connections between the devices. Arrangement of the components and interconnections on the diagram does not usually correspond to their physical locations in the finished device. Unlike a block diagram or layout diagram, a circuit diagram shows the actual wire interconnects being used (although the picture does not have to correspond to what the circuit actually looks like). 2.2 Component Identification ‘Group’ Codes The individual components shown on schematic wiring diagrams can be identified by a ‘Group’ code and also by a number.Then all similar items are described by the same ‘Group’ letter, e.g. assemblies i.e. Airbag, (driver) are identified by the letter ‘A’, switches ‘S’, all fuses are identified by the letter ‘F’. The number or mathematical figure after the letter will identify the circuit to which that fuse belongs to. Light bulbs are given the letter ‘E’, motors ’M’ and all relays ’K’, again, the number after the letter will identify the circuit to which that component belongs to The full list of these is available in the Technical support Information. 2.3 Connecting Wire Colour Code The colours of the individual connecting wires can be identified by letter code that may be an English or German language abbreviation of the actual wire colour. The principal differences are; White - ws (Weiss) Black- sw (Swartz) Red – rt (Rote) Yellow – ge (Gelb) The full list is available in the Technical support Information. Heavy Vehicle Mechanic Phase 2 4 Revision 2.0 December 2013 Module 7– Unit 1 Basic Vehicle Wiring 2.4 Example Wiring Diagrams The example wiring diagrams, beginning on page 17 are those of a Volkswagen® Golf 1.4 petrol 1997-06 engine code AHW. This first diagram is broadly representative of range of manufacturer’s schematic diagrams. A special feature of this diagram is the terminal identification code ‘X’. This terminal is the equivalent of terminal No.75 (accessories) this means that it is live with the ignition on but it is switched off during engine ‘cranking’. This is to retain maximum battery voltage for engine cranking. 2.5 Symbols and Codes Used in the Example Diagrams Some of the symbols used in these diagrams are not strictly to DIN standard, but instead they are a pictorial representation of the individual components, e.g. the dim lamps are indicated differently to the main beams. This is the system used by Autodata® and it is designed help you to ‘read’ or interpret diagrams from all motor manufacturers. The following diagrams in this unit are an attempt to ‘lift’ or highlight individual circuits from an overall diagram. You should study each diagram carefully and then, when you feel confident, go further and practice locating and tracing these circuits in other manufacturer’s similar diagrams. Remember, the aim of this exercise is for you to have the ability to develop and construct these circuits yourself. 3.0 Primary Terminal Designation The purpose of the terminal designation system for automotive electrical systems is to enable correct and easy connections of the conductors to the various devices especially in the event of repairs and equipment replacement. DIN* 72552 is a DIN standard for Automobile electric terminal numbers, standardizing almost every terminal in an automobile with a number code. If the number of terminal designations is not sufficient (multiple-contact connections), the terminals are consecutively numbered using numbers or letters whose representations of specific functions are not standardized. Heavy Vehicle Mechanic Phase 2 5 Revision 2.0 December 2013 Module 7– Unit 1 Basic Vehicle Wiring 3.1 Electrical Connection (DIN) Numbers Terminal Designations: (Excerpts from DIN Standard 72 552), these terminal designations do not identify the conductors, because device with different terminal designations can be connected at the two ends of each conductor. If the number of terminal designations is not sufficient (multiple-contact connections), the terminals are consecutively numbered using numbers or letters whose representations of specific functions are not standardized. Terminal Definition 15 Switched + downstream of battery (output of ignition/driving switch) Battery 30 Input from + battery terminal, direct 31 Return line to battery - battery terminal or ground, direct Turn Signal Flasher 49 and 49a, 49b and 49c All terminal no’s 49 have to with the turn signal indicators etc. Starter 50 54 Lighting Starter control, ignition switch to the starter switch Brake lamp 55 56(a, b) 56a 56b Fog lamps Headlamp system High beam and Main beam indicator lamp Low beam Side-marker lamps, tail lamps, license-plate lamps and instrumentpanel lamps 58 58L Side-marker lamp, left 58R Side-marker lamp, right Alternators and voltage regulators 61 Alternator charge indicator light Switching Relay 85 86 87 Output, actuator (end of winding to ground or negative) Start of winding Output to the load from terminal 30 87a Normally closed contact Heavy Vehicle Mechanic Phase 2 6 Revision 2.0 December 2013 Module 7– Unit 1 Basic Vehicle Wiring *DIN “Deutsches Institut für Normung” is the German national organization for standardization and is that country's ISO member body. Additional information is available from the automotive technical manuals. 4.0 Electrical Connectors and Their Function 4.1 Physical Requirements of Electrical Connections Electrical circuits require connections to assemble or join the power supply to the desired load. Complex circuits will have switches, fuses, possibly relays etc. and all the connectors and terminal connections on the live and earth sides of these circuits. Circuits in the vehicle are subjected to the stresses of vibration moisture and temperature change also the possible corrosion by corrosive fluids and gases. Vibration and movement due to thermal expansion also cause small movement that result in friction between any connectors that are simply clamped together. 4.2 Operational Requirements of Electrical Connections Therefore, electrical connectors must provide as easy a path as is possible for the electrons to leave one side of the connection and enter the adjoined connector. The connector must also provide adequate electrical insulation for the current flowing through it and it must prevent entry of moisture and dirt. Connections must also be designed so that they can be readily connected or disconnected and yet have a secure locking system. 4.3 Service Requirements of Electrical Connectors Electrical connections should not be dismantled and reassembled unless it is absolutely necessary, because each movement increases the risk of the frictional resistance affecting the quality of the surface to surface electrical contact. It should not be possible to pair incorrect connectors/connections together as the implications of this could be most serious, the greatest dangers being short circuits and fire! Heavy Vehicle Mechanic Phase 2 7 Revision 2.0 December 2013 Module 7– Unit 1 Basic Vehicle Wiring 4.4 Consequences of Faulty Electrical Connections Modern vehicles use a number of electrical connectors to join sections of the vehicle harness to vehicle system components. Maintaining proper and safe function of these connectors is very important as any corrosion that occurs in or on them can cause a reduction in voltage and thus a system problem due to insufficient voltage in a particular system. Poor connections are often the cause of many automotive electrical system faults because a faulty connection can increase current draw and have an adverse affect on vehicle system operation. They are generally water "resistant" but not "waterproof" and the use of a pressure washer (particularly if solvents are used in the washing process) directly on them should be avoided as this can start the deterioration process. 4.5 Gold and Tin Coated Terminal Ends Some connectors (terminal ends) are gold coated (plated) in order to reduce potential oxidation corrosion and therefore provide a better long term electrical connection between the items being connected together. Do not mix gold coated and tin coated connections together as the combination of the different metals will cause electrolysis, which will then damage the electrical conductivity of the connection. 5.0 Electromagnetic Relays and a Solenoids 5.1 Electromagnetic Relays Relays are switches that are turned on and off by a small electrical current. Inside a relay is an electromagnet. When a small current energizes this electromagnet, it attracts an armature blade and closes contact points. The large current that the relay is designed to switch “on or off” can then flow across these points. As long as the small switching current flows through the relay coil the much larger current will flow through its contact points. The function of a relay in the lighting circuits is to reduce the current demand on the control switch. Heavy Vehicle Mechanic Phase 2 8 Revision 2.0 December 2013 Module 7– Unit 1 Basic Vehicle Wiring These contacts can be either normally-open, normally-closed, or change-over contacts. Normally-open contacts connect the circuit when the relay is activated; the circuit is disconnected when the relay is inactive. Normally-closed contacts disconnect the circuit when the relay is activated; the circuit is connected when the relay is inactive. Change-over contacts control two circuits: one normally-open contact and one normally-closed contact. Heavy Vehicle Mechanic Phase 2 9 Revision 2.0 December 2013 Module 7– Unit 1 Basic Vehicle Wiring Pin No. Designation Description 85 Switching relay Earth (end of winding to ground or negative) 86 Switching relay Positive (start of winding) 87 Switching relay Output (to consumer eg: driving lamp) 87a Switching relay Alternative output (1st output, break side) 30 Battery Positive supply (Input from + battery terminal, direct) 5.2 Solenoids Solenoid definition: linear movement from an electrical signal. The modern starter motor is an example of where a solenoid switch, works in a similar way to a relay. It is used as a switch where very high amperage is required to start the vehicle. When low-current power from the lead-acid battery is applied to the solenoid usually through a key switch, its movement (caused by the magnetic effect acting on its centre component) pulls out a small pinion gear on the starter motor's shaft and meshes it with the ring gear on the flywheel of the engine. The solenoid also closes high-current contacts for the starter motor and it starts to run. If the engine starts the key switch is released, the solenoid is de-energised and a spring returns in to the rest position thereby disconnecting the supply from the starter motor and pulling the small gear back off the starter gear. Heavy Vehicle Mechanic Phase 2 10 Revision 2.0 December 2013 Module 7– Unit 1 Basic Vehicle Wiring 6.0 Relays in Lighting Circuits Relay function; covered in 4.1 7.0 Terminal Designations of a Trailer Wiring Socket/Plug 7.1 Trailer Wiring Socket The socket mentioned is the common 12N TYPE. This socket is coloured black and houses 7 pins which are numbered 1 to 7 and need to be connected using the correct wiring destinations as follows. Front view of trailer socket on vehicle. Pin 1. 2. 3. 4. 5. 6. 7. Cable Colour Yellow Blue White Green Brown Red Black Function Left turn signal Fog lights Earth return Right turn signal Right hand side light Brake lights Left hand side light Terminal L 54G 31 R 58R 54 58L Note: Refer to manufactures fitting instructions at all times. If fitting a trailer socket on a vehicle that has a “can bus” system it is important to use the manufactures trailer socket as this will comply with the necessary requirements for that vehicle. Heavy Vehicle Mechanic Phase 2 11 Revision 2.0 December 2013 Module 7– Unit 1 Basic Vehicle Wiring 8.0 The Basic Multiple Position Switch Symbol Covered in next section 9.0 Basic Dual/Triple Branch Parallel Circuits Practical Task Please refer to your instructor for additional information, which is available from the automotive technical manuals. Examples of in section 10.1 Component Circuit Symbol Function of Component On-Off Switch (SPST) SPST = Single Pole, Single Throw. An on-off switch allows current to flow only when it is in the closed (on) position. 2-way Switch (SPDT) SPDT = Single Pole, Double Throw. A 2-way changeover switch directs the flow of current to one of two routes according to its position. Dual On-Off Switch (DPST) DPST = Double Pole, Single Throw. (DPDT) DPDT = Double Pole, Double Throw. Heavy Vehicle Mechanic Phase 2 12 Revision 2.0 December 2013 Module 7– Unit 1 Basic Vehicle Wiring 10.0 Basic Schematic Wiring Diagrams 10.1 Automotive Electrical Symbols The following are some examples of the symbols used in circuit diagrams. The actual layout of the components is usually quite different from the circuit diagram. Wires and Connections Component Circuit Symbol Function of Component Wire To pass current very easily from one part of a circuit to another. Wires joined A 'blob' should be drawn where wires are connected (joined), but it is sometimes omitted. Wires connected at 'crossroads' should be staggered slightly to form two T-junctions, as shown on the right. Wires not joined In complex diagrams it is often necessary to draw wires crossing even though they are not connected. I prefer the 'hump' symbol shown on the right because the simple crossing on the left may be misread as a join where you have forgotten to add a 'blob'! Heavy Vehicle Mechanic Phase 2 13 Revision 2.0 December 2013 Module 7– Unit 1 Basic Vehicle Wiring Power Supplies Component Circuit Symbol Function of Component Supplies electrical energy. The larger terminal (on the left) is positive (+). Cell A single cell is often called a battery, but strictly a battery is two or more cells joined together. Battery Supplies electrical energy. A battery is more than one cell. The larger terminal (on the left) is positive (+). Fuse A safety device which will 'blow' (melt) if the current flowing through it exceeds a specified value. Earth (Ground) A connection to earth. It is also known as ground. Output Devices: Lamps, Motor. Component Circuit Symbol Function of Component Lamp (indicator) A transducer which converts electrical energy to light. This symbol is used for a lamp providing illumination, for example a car headlamp. Motor A transducer which converts electrical energy to kinetic energy (motion). Heavy Vehicle Mechanic Phase 2 14 Revision 2.0 December 2013 Module 7– Unit 1 Basic Vehicle Wiring Switches Component Circuit Symbol Function of Component On-Off Switch (SPST) SPST = Single Pole, Single Throw. An on-off switch allows current to flow only when it is in the closed (on) position. 2-way Switch (SPDT) SPDT = Single Pole, Double Throw. A 2-way changeover switch directs the flow of current to one of two routes according to its position. Dual OnOff Switch (DPST) DPST = Double Pole, Single Throw. Reversing Switch (DPDT) DPDT = Double Pole, Double Throw. Resistors Component Circuit Symbol Function of Component Resistor A resistor restricts the flow of current. Variable Resistor (Rheostat) This type of variable resistor with 2 contacts (a rheostat) is usually used to control current. Examples include: adjusting dash panel brightness. Variable Resistor (Potentiometer) This type of variable resistor with 3 contacts (a potentiometer) is usually used to control voltage e.g. fuel gauge. Heavy Vehicle Mechanic Phase 2 15 Revision 2.0 December 2013 Module 7– Unit 1 Basic Vehicle Wiring Meters and Oscilloscope Component Circuit Symbol Function of Component Voltmeter A voltmeter is used to measure voltage. Ammeter An ammeter is used to measure current. Ohmmeter An ohmmeter is used to measure resistance. 11.0 Switch Controlled Fused Lighting Circuits 11.1 Sample Circuit Diagrams Brake Lights Stop or brake lights are red lights fitted to the rear of the vehicle. According to the DIN 72552 they are number “54”. They are usually incorporated in the taillight cluster although many vehicles have a higher additional stop light mounted on top of the boot lid or on the rear window called a high-level stop lamp (H 85 in diagram). The stop lights are activated whenever the driver operates the foot brake to slow or to stop the vehicle. Heavy Vehicle Mechanic Phase 2 16 Revision 2.0 December 2013 Basic Vehicle Wiring Brake light bulbs. Module 7– Unit 1 Figure 1 This schematic diagram shows the brake light circuit, Figure1 above. Switch S13 is the brake pedal switch and the circuit is protected by fuse F13 which is 10 amps. Heavy Vehicle Mechanic Phase 2 17 Revision 2.0 December 2013 Module 7– Unit 1 Basic Vehicle Wiring Park & Tail Light Circuits For motor vehicles and trailers, two red tail lamps operate when the headlight switch is in the park position and the headlight position. According to the DIN 72552 they are number “58”. The two lights are located close to the widest points of the vehicle so that the vehicle width can be seen by other road users. The bulbs are connected in parallel to each other so that the failure of one filament will not cause total circuit failure. A number plate illumination lamp is usually connected in parallel to the tail lights and operates whenever the tail lights are on. This schematic diagram shows a conventional parking/side light circuit . The circuit is protected by fuses F4, F22, F23 and is switched through S3. (note the 58 on the switch contacts). Heavy Vehicle Mechanic Phase 2 18 Revision 2.0 December 2013 Module 7– Unit 1 Basic Vehicle Wiring Headlights Modern headlights are electrically operated, positioned in pairs, one or two on each side of the front of a moving vehicle. According to the DIN 72552 they are number “56a and 56b” A headlamp system is required to produce a low and a high beam, which may be achieved either by an individual lamp for each function or by a single multifunction lamp. High beams (called “main beams” or “full beams” or “driving beams” in some countries) cast most of their light straight ahead, maximizing seeing distance, but producing too much glare for Heavy Vehicle Mechanic Phase 2 19 Revision 2.0 December 2013 Module 7– Unit 1 Basic Vehicle Wiring safe use when other vehicles are present on the road. The schematic diagram on page 19 shows a conventional headlamp circuit (Terminal 56a and 56b on light switch) All bulbs are fused independently. Fuse numbers F18. F19, F20 and F21 are used. You will notice that the dim circuit (T.56b) remain on with the headlights. Components M35 and M36 are headlamp adjustment motors. Laws and Regulations Headlights must be kept in proper alignment (aim) and condition according to the NCT requirements for Headlamp Condition and Aim, Aux Lamps Condition and Aim Fog Lights Fog lights are used with other vehicle lighting in poor weather such as thick fog, driving rain or blowing snow. Because fog is made up of water droplets suspended in the air it can reflect headlights back into your eyes at night. In such conditions, fog lights can help drivers see further ahead and illuminate the road’s edges at reasonable speeds and are used with “park” lights instead of headlights. Fog lights will normally be wired with a relay. They may be wired to work only with park lights and to turn off when headlights are used. The schematic diagram on the following page shows a conventional fog light circuit. According to the DIN 72552 they are number “55”. The front lamps (E14 and E15) are switched by relay (K2). The earth for this relay is through the headlight filament which means that the fog lamps will only operate when the headlights are off. Fuse (F3) protects the relay and fuse (F36) protects the lighting circuit. Heavy Vehicle Mechanic Phase 2 20 Revision 2.0 December 2013 Module 7– Unit 1 Heavy Vehicle Mechanic Phase 2 Basic Vehicle Wiring 21 Revision 2.0 December 2013 Module 7– Unit 1 Basic Vehicle Wiring Reverse Lights The reversing lights are white lights fitted to the rear of a vehicle. They provide the driver with vision behind the vehicle at night and also alert other drivers to the fact that the vehicle is to be reversed. When the ignition switch is on and the vehicle is placed in reverse gear current flows from the battery, through the ignition switch, to the closed reversing light switch on the transmission. Electrical current flows across the closed switch to the reversing lights and then returns to the battery by the earth return system. Driving Lights Driving lights are used to supplement vehicle headlight systems. The driving lights are fitted to the front of the vehicle and provide higher intensity illumination over longer distances than standard headlight systems. NCT regulations specify the limitations in relation to the positioning of driving lights. There are many types of driving lights available. They come in different sizes, shapes and varying bulb wattage. Indicators The turn signal indicators are visual signalling devices to indicate the intention to turn. Once they are activated, they continue until the switch is cancelled either by the operator or by a cancelling mechanism in the switch. The cancelling mechanism operates after a turn has been completed and the steering wheel is returned to the straight ahead position. Heavy Vehicle Mechanic Phase 2 22 Revision 2.0 December 2013 Module 7– Unit 1 Basic Vehicle Wiring The circuit consists of: battery fusible links and fuses ignition switch flasher unit a three position switch used as the direction indicator switch lights at the front and rear of the vehicle pilot lights mounted in the instrument cluster to indicate to the driver which way the switch has been operated wiring to connect all of the components the ground circuit to return the electrical current to the battery If the indicator switch is turned to indicate a right-hand turn, current from the battery flows through the fusible link to the ignition switch, where it is directed through a fuse to the flasher unit. 12.0 Relay Controlled Auxiliary Lighting Circuits Practical Task This is a practical task. Please refer to your instructor for additional information, which is available from the automotive technical manuals. 13.0 To Connect a Trailer Light Assembly Practical Task This is a practical task. Please refer to your instructor. Heavy Vehicle Mechanic Phase 2 23 Revision 2.0 December 2013 Module 7– Unit 1 Basic Vehicle Wiring 14.0 Diagram of Basic Standard Circuits Practical Task This is a practical task. Please refer to your instructor for additional information, which is available from the automotive technical manuals. Examples of in section 10.1. 15.0 The Term 'BUS' as Used in Automotive Electrical Systems 15.1’BUS’ Explained In automotive systems the term “bus” can connect several control units or devices together over the same set of wires. A comparison can be made to a highway with two-way traffic and traffic emerging onto the highway from different locations. Access to the highway is controlled by traffic lights (canbus). This system is referred to as a Controlled Area Network BUS or CAN BUS. “CAN” stands for Controller Area Network meaning that control units are networked and they interchange data.It uses two thin wires to connect, or multiplex, all the control units and their sensors to each other. The advantage of a multiplex network is that it enables a decreased number of dedicated wires for each function and therefore a reduction in the number of wires in the wiring harness, reduced system cost and weight, improved reliability, serviceability and installation. In addition, common sensor data, such as vehicle speed, engine temperature, etc. are available on the network, so data can be shared, thus reducing the number of sensors. Also, networking allows greater vehicle content flexibility because functions can be added or modified through software changes. A diagnostic tool can be connected to the CANBUS to extract operational information to assist in diagnosis and fault finding. Heavy Vehicle Mechanic Phase 2 24 Revision 2.0 December 2013 Module 7– Unit 1 Basic Vehicle Wiring 16.0 In-Vehicle Network Developments 16.1 Networking & Multiplexing Even the most basic vehicles include many electronically controlled systems. If each electronic system had its own ECU, harness and sensors, the weight of the added components would negate any efficiency it provided. A vehicle’ multiple electronic systems could require over 1.6 Kilometres of insulated wiring, consisting of around 1000 individual wires and many terminals. One solution to the problem is the use of a system that integrates sensors into a common wiring harness by combining all the individual systems, where possible, into a multiplexed serial communications network, so they can share the information. An added advantage is that it saves weight as it allows different systems to share sensors and reduces complexity of stand-alone systems. Heavy Vehicle Mechanic Phase 2 25 Revision 2.0 December 2013 Module 7– Unit 1 Basic Vehicle Wiring 17.0 Location and Voltage Drops on the Earth Connections Practical Task This is a practical task. Please refer to your instructor for additional information, which is available from the automotive technical manuals. 18.0 Tungsten, Halogen and Xenon Bulbs 18.1 Light Bulbs A lamp bulb consists of a fine coil of tungsten wire, called a filament, enclosed in a clear glass envelope from which all air has been removed. Passing a current through the filament raises its temperature to a white heat and causes it to give off an incandescent light. Removing air from the glass envelope prevents oxidation of the filament when it is in operation and increases the filament life. In high wattage bulbs, particles of tungsten can boil off the filament, even though the air is removed and eventually cause filament failure. To prevent this, the glass envelope is filled with an inert gas - such as argon - which does not react with the tungsten and this slows the boiling off of the filament. In some applications special coated bulbs are fitted, this helps prevent “yellowing” of plastic lenses. Heavy Vehicle Mechanic Phase 2 26 Revision 2.0 December 2013 Module 7– Unit 1 Basic Vehicle Wiring All manufactures have procedures for removing and fitting bulbs these should be followed at all times. When fitting a halogen bulb is important not to contaminate the surface of the bulb with your hand as this will result in premature failure of the bulb. The focusing of the headlights is also advisable after fitting new headlight bulbs to ensure they are properly aligned to current NCT regulations. Bulb Information All bulbs have letters and numbers stamped on the bulb which indicate the power consumed by bulb operation at the nominal operating voltage. For instance, in a 12V/21W bulb the filament will consume 21 watts of power when 12 volts is applied across the filament. While the wattage is not necessarily an indication of light output, it can be generally assumed that the higher the wattage, the greater the light output will be. If a higher wattage bulb is inserted than what is recommended this could lead to more heat been generated and the possibility of a fire starting. The common bulbs used in automobiles are: Festoon bulbs used in many interior lights. Bayonet connectors used in circuits lighting for park lamps; stop lamps; tail lamps; number plate lamps; some early headlamps. Wedge bulb use in many dash clusters. Heavy Vehicle Mechanic Phase 2 27 Revision 2.0 December 2013 Module 7– Unit 1 Basic Vehicle Wiring 18.2 Xenon HID Headlights High Intensity Discharge or HID lights can be recognized by their extremely bright white or bluish light. They provide the motorist with better illumination than other types of lights. HID lights improve visibility. Drivers using HID lights are able to see the road ahead for approximately 100 meters, compared to about 60 meters for a halogen system. In comparison with halogen lights, HID headlights can be up to 3 times brighter, are more efficient in converting electrical energy into light energy, have a longer service life and the light colour is whiter or closer to daylight. They operate on a gas discharge bulb system and consist of a light, bulb, ballast and special high voltage circuitry. HID headlights systems do not use a filament in the bulb. They have the inert gas Xenon inside the bulb, with two electrodes that have an air gap between them in a glass tube. A high voltage is applied between the electrodes. This causes an arc to form, which vaporizes the gases and solids so they emit a bright light. The voltage required to strike and maintain the arc is very high - typically up to 20, 000 volts. Therefore when workings on these systems refer to manufactures procedures at all times. 19.0 Servicing Lamps Practical Task This is a practical task. Please refer to your instructor. Heavy Vehicle Mechanic Phase 2 28 Revision 2.0 December 2013 Module 7– Unit 1 Basic Vehicle Wiring 20.0 NCT/DoT VTM Regulations for Condition of Lamps 20.1 NCT Body Wiring and Lighting Circuit Requirements Please refer to the current NCT reference manual, item No’s 26 to 34 inclusive for NCT requirements for Passenger Vehicle lighting systems. 21.0 Focusing Headlights Practical Task This is a practical task. Please refer to your instructor. 22.0 Diagnosing Electrical Circuits Practical Task This is a practical task. Please refer to your instructor. Heavy Vehicle Mechanic Phase 2 29 Revision 2.0 December 2013 Module 7– Unit 1 23.0 Bulb Basic Vehicle Wiring The Effect of Wrong Fuse or 23.1 Fuses Fuses and circuit breakers are designed to break the circuit if current flow is excessive. The most common kinds are fuses, fusible links and circuit breakers. They are all rated in amperes. Their ratings are usually marked on them. It is important to fit the correct size of fuse. To small a rating will not allow enough current to flow in the circuit and too large a rating may not protect the circuit properly. Fuses are typically used in lighting and accessory circuits where current flow is usually moderate. Changing the wattage of the bulb i.e. (incorrect bulb type) will alter the current required. If a higher wattage bulb is inserted this could lead to over loading of the electrical system and the possibility of a fire starting. A fusible link is typically placed near the battery and, except for the starter motor; it carries the current needed to power an individual circuit, or a range of circuits. Heavy Vehicle Mechanic Phase 2 30 Revision 2.0 December 2013 Module 7– Unit 1 24.0 Basic Vehicle Wiring Crimped Joints on Light Cables 24.1 Stripping Wire Insulation Preparation and Safety Objective Correctly strip an electrical wire and connect a solderless connector. 3 videos to help deliver section Personal Safety Whenever you perform a task in the workshop you must use personal protective clothing and equipment that is appropriate for the task and which conforms to your local safety regulations and policies. Among other items, this may include: Work clothing - such as coveralls and steel-capped footwear Eye protection - such as safety glasses and face masks Ear protection - such as earmuffs and earplugs Hand protection – such as rubber gloves and barrier cream If you are not certain what is appropriate or required, ask your instructor. Heavy Vehicle Mechanic Phase 2 31 Revision 2.0 December 2013 Module 7– Unit 1 Basic Vehicle Wiring Safety Check Never use a sharp blade or knife to remove insulation. You can cut yourself seriously if the blade slips. Wire stripping pliers have sharp edges and require a tight grip. Do not trap your skin between the jaws; otherwise you risk a severe cut. When removing the insulation from wire, push away from you rather than towards you. Make sure that you understand and observe all legislative and personal safety procedures when carrying out the following tasks. If you are unsure of what these are, ask your instructor. Points to Note An insulating layer of plastic covers electrical wire used in automotive wiring harnesses. When electrical wire is joined to other wires or connected to a terminal, the insulation needs to be removed. Wire stripping tools come in various configurations. They all perform the same task. The type of tool you use or purchase will depend on the amount of electrical wire repairs you perform. Step-by-Step Instruction 1. Choose the correct stripping tool The purpose of a wire stripping tool is to allow you to remove the insulation from around the copper core of a cable without damaging the cable or yourself. Never use a knife or other type of sharp instrument to cut away insulation from a cable, as it is very easy for these to slip and you can injure yourself. Using side cutters or pliers can also be dangerous; and these are also less effective as they often cut away some of the strands of wire as well. This is known as ringing the wire, which effectively reduces the current carrying capacity of the wire. 2. Select the correct gauge hole Using the correct tool is much safer and more effective. Wire strippers can remove the insulation from different gauges of cable, so select the hole in the stripper that is closest to the diameter of the core in the cable to be stripped. Heavy Vehicle Mechanic Phase 2 32 Revision 2.0 December 2013 Module 7– Unit 1 Basic Vehicle Wiring 3. Cut the insulation Place the cable in the hole and close the jaws firmly around it to cut the insulation. If you have selected the right gauge, then this will cut through the insulation but not through the copper core. Only remove as much insulation as is necessary to do the job. Too little bare wire may not achieve a good connection and too much may expose the wire to a potential short circuit with other circuits or to ground. Removing more than 1.2 centimetres of insulation at a time can also stretch and damage the core. 4. Remove the insulation Some strippers automatically cut and remove the insulation. Others just make the cut and hold the cable tightly and you need to pull firmly on the wire to remove the insulation and strip out the copper core. To keep the strands together, give them a light twist. Task Sheets Aiming Headlights Preparation and Safety Objective Use a headlamp adjuster unit to aim headlights. Personal Safety Whenever you perform a task in the workshop you must use personal protective clothing and equipment that is appropriate for the task and which conforms to your local safety regulations and policies. Among other items, this may include: Work clothing - such as coveralls and steel-capped footwear Eye protection - such as safety glasses and face masks Ear protection - such as earmuffs and earplugs Hand protection – such as rubber gloves and barrier cream Respiratory equipment – such as face masks etc Safety Check Make sure that you understand and observe all legislative and personal safety procedures when carrying out the following tasks. If you are unsure of what these are, ask your instructor. Heavy Vehicle Mechanic Phase 2 33 Revision 2.0 December 2013 Module 7– Unit 1 Basic Vehicle Wiring Points to Note Check manufactures settings and current NCT settings. If you are unsure of what these are, ask your instructor. Refer to the manufacturer's manual for specific information regarding headlight aiming. They may also suggest that a load be placed in the vehicle. Step-by-Step Instruction 1. Check tire pressures Make sure the car is on an even and level surface and that the tires are inflated properly. Over loading the rear of the vehicle can alter the alignment, so make sure the check is done according to the manufacturers loading recommendations. 2. Position vehicle Move the vehicle into the correct position in relation to the headlamp aligner unit following the equipment manufacturer instructions. 3. Check low beam settings turn the headlights on to a low beam setting. Check readings against manufactures settings. 4. Check high beam settings the high beam should be cantered, falling on the intersections of the horizontal and vertical marks. 5. Adjust headlight alignment If necessary, locate the adjustment screws on the headlight and turn them so the lights point to the correct places. Checking & Changing a Headlight Bulb Preparation and Safety Objective Check and change a headlight bulb. Heavy Vehicle Mechanic Phase 2 34 Revision 2.0 December 2013 Module 7– Unit 1 Basic Vehicle Wiring Personal Safety Whenever you perform a task in the workshop you must use personal protective clothing and equipment that is appropriate for the task and which conforms to your local safety regulations and policies. Among other items, this may include: Work clothing - such as coveralls and steel-capped footwear Eye protection - such as safety glasses and face masks Ear protection - such as earmuffs and earplugs Hand protection – such as rubber gloves and barrier cream Respiratory equipment – such as face masks etc Safety Check Make sure that you understand and observe all legislative and personal safety procedures when carrying out the following tasks. If you are unsure of what these are, ask your instructor. Points to Note There are many types of headlight bulbs available. Always make sure that you replace a bulb with one of exactly the same type. Otherwise, change both lights at once, so they always show the same intensity in lumens. Sealed beam units require that the whole unit be replaced when one filament has failed. If the reflector in the lamp unit shows signs of internal blistering, that also indicates that you must change the unit. If both lights operate but are not bright when switched on, start the engine to see if this solves the problem. The battery may be in a poor state of charge. Another explanation is that the system may have a bad ground connection. This would have to be checked with a DVOM. Heavy Vehicle Mechanic Phase 2 35 Revision 2.0 December 2013 Module 7– Unit 1 Basic Vehicle Wiring Touching a new halogen bulb with your fingers can leave some greasy residue from your fingers on the outer surface. This can cause the bulb to burn out very quickly. If you inadvertently touch the bulb, clean it with an alcohol-based substance. Step-by-Step Instruction 6. Check headlight operation Assessing headlight operation is always best carried out in a low light environment. Switch the vehicle headlights on to low beam and then switch to high beam. Check that the main beam indicator on the instrument panel is operating. Note the change in the intensity of the lights. If one of the lights does not operate that headlight will need replacement. 7. Identify headlight type Determine the type of lamp fitted to the vehicle and obtain a replacement. Many vehicles today are equipped with halogen type headlights. These are twice as powerful as older sealed-beam units and need to be handled carefully. Always follow the manufacturer’s handling instructions. 8. Access the lamp socket Unplug the electrical connector at the back of the lamp unit. On most vehicles it is not necessary to remove the lamp unit from the vehicle. Unscrew the bulb-retaining ring. 9. Remove and replace the old bulb Remove the old bulb and replace it with the new one. Handle the new bulb only by its base or, if supplied, by the card cover. It is very important that you never touch the surface of the bulb with your fingers, as this will cause it to burn out very quickly. 10. Replace the headlight unit and test Replace the unit and the retaining ring or bulb assembly and then replug the connector. Switch on the lights again to confirm that they are both operating correctly. Heavy Vehicle Mechanic Phase 2 36 Revision 2.0 December 2013 Module 7– Unit 1 Basic Vehicle Wiring Checking & Changing an Exterior Light Bulb Preparation and Safety Objective Check and change an exterior light bulb. Personal Safety Whenever you perform a task in the workshop you must use personal protective clothing and equipment that is appropriate for the task and which conforms to your local safety regulations and policies. Among other items, this may include: Work clothing - such as coveralls and steel-capped footwear Eye protection - such as safety glasses and face masks Ear protection - such as earmuffs and earplugs Hand protection – such as rubber gloves and barrier cream Respiratory equipment – such as face masks etc Safety Check Make sure that you understand and observe all legislative and personal safety procedures when carrying out the following tasks. If you are unsure of what these are, ask your instructor. Points to Note Make sure that the fuses are in good condition before attempting to change a bulb in a circuit that has more than one bulb, such as the turn signal circuit. If none of the bulbs are working, there may be a bigger problem to resolve. Many light bulbs have more than one filament inside them. These bulbs normally have offset pins to ensure proper locking in the socket. Be sure to look carefully at the bulb you are replacing to make sure you do not try to force the bulb in the wrong way. Heavy Vehicle Mechanic Phase 2 37 Revision 2.0 December 2013 Module 7– Unit 1 Basic Vehicle Wiring Some bulbs have a coloured glass envelope that enables them to be used with a clear lens. If you replace a bulb of this type, make sure that you replace it with one of the same colour. Step-by-Step Instruction 11. Access the bulb Determine the method used to secure the lamp unit or lens cover and remove the cover to expose the bulb. If no screws are found on the lens cover, it may be necessary to remove the entire assembly to access the bulb. 12. Remove the bulb If the bulb is pin-mounted, gently grip the bulb and push it inwards. Turn the bulb in a counter-clockwise direction and remove it from the bulb holder. 13. Check bulb holder for corrosion Inspect the bulb holder to make sure there is no corrosion. If there is, clean it with abrasive tape. 14. Insert the new bulb Insert the new bulb into the bulb holder, depress it fully, turn it clockwise and release it. Make sure the bulb is secure and test its operation by switching it on and off. 15. Replace cover and test Replace the cover and test it again. Checking Lighting & Peripheral Systems Preparation and Safety Objective Check peripheral lighting systems. Heavy Vehicle Mechanic Phase 2 38 Revision 2.0 December 2013 Module 7– Unit 1 Basic Vehicle Wiring Personal Safety Whenever you perform a task in the workshop you must use personal protective clothing and equipment that is appropriate for the task and which conforms to your local safety regulations and policies. Among other items, this may include: Work clothing - such as coveralls and steel-capped footwear Eye protection - such as safety glasses and face masks Ear protection - such as earmuffs and earplugs Hand protection – such as rubber gloves and barrier cream Respiratory equipment – such as face masks etc Safety Check Make sure that you understand and observe all legislative and personal safety procedures when carrying out the following tasks. If you are unsure of what these are, ask your instructor. Points to Note Be sure to work in a systematic manner or you could miss a faulty bulb or another component. A vehicle may have warning lights that will activate only if that circuit is in use. You may need to turn that circuit on to see the warning light. If you are unsure of where these are, ask your instructor. Step-by-Step Instruction 16. Check instrumentation in a darkened area, turn on the ignition. The dash warning lights should be displayed. Start the engine. If any warning light stays on when the engine is started, it could indicate a problem in one of the car’s safety or mechanical systems. If you are unsure about what any of the warning lights mean, consult the manufacturer’s manual. 17. Check the car horn Make sure the car horn is working. If the horn is not working, locate it under the hood with the help of the manufacturer’s manual. Check the wiring to make sure there is a good contact. If necessary, use a DVOM to isolate the fault. 18. Check rear lights have someone stand behind the vehicle to report any problems and then turn the ignition on. Switch on the park lights and tail lights. Do the same for left and right turn indicator lights. Depress the brake pedal to make sure the brake lights work. Heavy Vehicle Mechanic Phase 2 39 Revision 2.0 December 2013 Module 7– Unit 1 Basic Vehicle Wiring 19. Check front lights with somebody in front of the vehicle, make sure the high and low headlight beams, the park lights and the turn indicators are all working properly. 20. Check interior lights with the interior light switch in the correct position, open the driver’s side door to make sure the interior lights work. If any of these lights do not operate, you may need to replace a bulb, or a fuse. Check the fuse first, using a DVOM to check continuity. If the fuse is at fault you should report this to your instructor, as there could be a more serious fault in the vehicle’s wiring system. Heavy Vehicle Mechanic Phase 2 40 Revision 2.0 December 2013 27-33 Upper Baggot Street Dublin 4