1
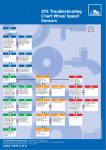
A5 BRAKES 6th Edition
Chapter 20 ABS Diagnosis and Service
Opening Your Class
KEY ELEMENT
EXAMPLES
Introduce Content
This course or class covers operation and service of Automotive
Brakes. It correlates material to task lists specified by ASE and NATEF.
Explain how the knowledge of how something works translates into
the ability to use that knowledge to figure why the engine does not
work correctly and how this saves diagnosis time, which translates
into more money.
Motivate Learners
State the learning
objectives for the chapter
or course you are about to
cover and explain this is
what they should be able
to do as a result of
attending this session or
class.
Explain the chapter learning objectives to the students.
Establish the Mood or
Climate
Complete Essentials
Clarify and Establish
Knowledge Base
Provide a WELCOME, Avoid put downs and bad jokes.
1. Identify and describe Bendix antilock braking systems.
2. Explain the operation and components of Bosch antilock
braking systems.
3. Describe the operation of Delphi antilock braking systems.
4. Identify and describe Kelsey-Hayes antilock braking systems.
5. Describe the operation and components of Teves antilock
braking systems.
6. Identify and describe Toyota rear-wheel and four-wheel
antilock braking systems.
Restrooms, breaks, registration, tests, etc.
Do a round robin of the class by going around the room and having
each student give their backgrounds, years of experience, family,
hobbies, career goals, or anything they want to share.
ICONS
Ch20 ABS Diagnosis and Service
1. SLIDE 1 ABS DIAGNOSIS & SERVICE
2. SLIDES 2-3 EXPLAIN OBJECTIVES
Check for ADDITIONAL VIDEOS & ANIMATIONS
@ http://www.jameshalderman.com/
WEB SITE IS CONSTANTLY UPDATED
ABS Traction Control (44 Links)
VIDEOS
4. SLIDE 4 EXPLAIN ABS Diagnostic Procedure
5. SLIDE 5 EXPLAIN Figure 20-1 On most vehicles
equipped with ABS, the amber ABS and red BRAKE
warning lamp should come on as a bulb check when the
ignition is first switched on.
DISCUSSION: DISCUSS PROCEDURE FOR
DIAGNOSING A FAULT IN ABS. ASK STUDENTS TO
TALK ABOUT WHAT RED BRAKE WARNING LAMP
(RBWL) INDICATES WHEN IT IS ILLUMINATED.
WHAT ABS PROBLEMS DOES IT SIGNAL? ASK
STUDENTS TO DISCUSS OPERATION OF AMBER
ABS WARNING LAMP.
DEMONSTRATION: SHOW STUDENTS HOW ABS
DIAGNOSTICS WORKS ON THE TRAINER
6. SLIDE 6 EXPLAIN Figure 20-2 A thorough visual
inspection should include carefully inspecting around the
electrohydraulic unit for signs of obvious problems or the
installation of aftermarket devices such as alarm systems.
DEMONSTRATION: SHOW HOW TO DO A VISUAL
INSPECTION LOOKING FOR TELLTALE CLUES OF
HOW VEHICLE HAS BEEN DRIVEN & MAINTAINED.
DISCUSSION: HAVE STUDENTS TALK ABOUT THE
IMPORTANCE OF DOING A COMPLETE VISUAL
INSPECTION OF THE ENTIRE VEHICLE BEFORE
MAKING A DIAGNOSIS
ICONS
Ch20 ABS Diagnosis and Service
HANDS-ON TASK: HAVE STUDENTS PERFORM A
COMPLETE VISUAL INSPECTION OF THE ANTILOCK
BRAKING SYSTEM.
DISCUSSION: ASK STUDENTS TO TALK ABOUT
THE IMPORTANCE OF A TEST DRIVE IN
DIAGNOSING AN ABS FAULT. WHAT SYMPTOMS
SHOULD TECHNICIANS LOOK FOR IN SUCH A
TEST?
DEMONSTRATION: SHOW HOW TO RETRIEVE
ABS-RELATED DIAGNOSTIC CODES BY USING A
SCAN TOOL. ASK THEM TO EXPLAIN THE RESULTS.
7. SLIDES 7-8 EXPLAIN Kelsey-Hayes Antilock
(Nonintegral)
DISCUSSION: ASK STUDENTS TO DISCUSS THE
PROCEDURES FOR CLEARING THE DIAGNOSTIC
TROUBLE CODES FOR THE VEHICLES ON WHICH
THEY ARE WORKING.
9. SLIDE 9 EXPLAIN Figure 20-3 GM diagnostic
connector on a pre- 1996 vehicle. Flash codes are available
by using jumper wire to ground (terminal A) to terminal H.
10. SLIDE 10 EXPLAIN Figure 20-4 Connecting a
jumper wire from the diagnostic connector to ground.
The exact location of this diagnostic connector varies
with the exact vehicle model and year.
ANIMATION: ABS DTC RETRIEVAL
WWW.MYAUTOMOTIVELAB.COM
L
HTTP://MEDIA.PEARSONCMG.COM/PH/CHET/CHET_MYAUTOMOTIVELAB_2/
BRAKES/AUTO_ANIMATIONS/CH19_FIG19_3/INDEX.HTM
11. SLIDE 11 EXPLAIN Figure 20-5 Chrysler diagnostic
connector location varies with model & year.
12. SLIDE 12 EXPLAIN Bosch 2 ABS (Nonintegral)
13. SLIDE 13 EXPLAIN Teves Mark IV
DISCUSSION: ASK STUDENTS TO DISCUSS THE
ANTILOCK BRAKING SYSTEMS COVERED IN THIS
CHAPTER. WHAT ARE THE ADVANTAGES AND
DISADVANTAGES OF EACH TECHNOLOGY? ON
WHAT TYPES OF VEHICLES DO YOU TYPICALLY
FIND EACH SYSTEM?
14. SLIDE 14 EXPLAIN Figure 20-6 A scan tool is the
recommended method to use to access General Motors
Teves Mark IV systems.
15. SLIDES 15-16 EXPLAIN Delphi (Delco) ABS-VI
(Nonintegral)
17. SLIDE 17 EXPLAIN Figure 20–7 Delphi (Delco) VI
attaches to the side of the master cylinder and connects
hydraulically through transfer tube assemblies.
DEMONSTRATION: DEMO WHEEL SENSOR
OPERATION
18. SLIDE 18 EXPLAIN Figure 20-8 breakout box is being
used to diagnose an ABS problem. The controller
(computer) is located in the trunk of this vehicle, and a
digital multimeter is being used to measure resistance
and voltage at various points in the system, following the
service manual procedure.
19. SLIDE 19 EXPLAIN Figure 20-9 Typical wheel
speed sensor. When a tooth on the sensor ring is close to
the sensor, the strength of the magnetic field is stronger
because the metal of the tooth conducts magnetic lines of
force better than air. When the tooth moves away, the
magnetic field strength is reduced. It is this changing
magnetic field strength that produces the changing
voltage. Frequency of the signal is determined by the
speed of the rotating sensor.
DEMONSTRATION: SHOW STUDENTS HOW TO
INSPECT THE CONNECTIONS INVOLVED IN THE
WHEEL SPEED SENSOR CIRCUIT FOR
DEFECTS AND CORROSION.
DISCUSSION: ASK STUDENTS TO TALK ABOUT
THE PROBLEMS CAUSED BY DAMAGED OR
CONTAMINATED WHEEL SPEED SENSORS (WSS).
WHAT ARE THE POSSIBLE CAUSES OF LOW
VOLTAGE READINGS?
HANDS-ON TASK: HAVE STUDENTS PERFORM
STEPS IN THE QUICK AND EASY WHEEL SPEED
SENSOR DIAGNOSIS TO TEST FOR A FAULT IN
WHEEL SPEED SENSOR.
20. SLIDE 20 EXPLAIN Figure 20-10 Measuring the
resistance of a wheel speed sensor
21. SLIDE 21 EXPLAIN Figure 20-11 A scope can be
used to check for proper operation of a wheel speed
sensor & EXPLAIN Figure 20-12 A broken tooth on a
wheel speed sensor tone ring shows on the scope trace as
a missing wave
DEMONSTRATION: SHOW STUDENTS HOW
TO TEST A WSS BY USING A SCOPE.
HANDS-ON TASK: HAVE STUDENTS TEST A
WSS BY USING A SCOPE ON A LAB VEHICLE
22. SLIDE 22 EXPLAIN Figure 20-13 Use a
nonmagnetic brass or plastic feeler gauge to check wheel
speed sensor gap. A steel gauge would be attracted by
magnet in sensor and would produce a drag on the gauge
as it is moved between the sensor and the tone ring. This
drag could be interpreted as a correct clearance reading.
DISCUSSION: ASK STUDENTS TO DISCUSS THE
PROCEDURES FOR ADJUSTING WHEEL SPEED
SENSORS. WHAT IS THE SIGNIFICANCE OF THE
PAPER OR PLASTIC PROTECTIVE COVERING ON
THE TIP END OF A WSS?
23. SLIDE 23 EXPLAIN Figure 20-14 (a) Always use a
nonferrous (brass or plastic) feeler (thickness) gauge
when measuring the gap between the toothed ring and the
wheel speed sensor. (b) Sometimes a sensor is
equipped with a paper spacer that is the exact thickness
of the spacing required between the toothed ring and the
sensor. If equipped, the sensor is simply installed with
the paper touching the toothed wheel. A typical gap
ranges from 0.020 to 0.050 in. (0.5 to 1.3 mm)
DEMONSTRATION: SHOW STUDENTS HOW TO
USE A NONMAGNETIC FEELER GAUGE TO CHECK
THE WHEEL SPEED SENSOR GAP.
HANDS-ON TASK: HAVE STUDENTS USE A
NONMAGNETIC FEELER GAUGE TO CHECK THE
WHEEL SPEED SENSOR GAP ON A LAB VEHICLE
ON-VEHICLE NATEF TASK: TEST, DIAGNOSE,
AND SERVICE ABS WHEEL SPEED SENSORS.
VIDEO: ABS LAMP DIAGNOSIS
WWW.MYAUTOMOTIVELAB.COM
HTTP://MEDIA.PEARSONCMG.COM/PH/CHET/CHET_MYLABS/AKAMAI/TEMPLATE/VIDEO640X480.PH
P?TITLE=ABS%20DASH%20LAMP&CLIP=PANDC/CHET/2012/AUTOMOTIVE/A5F3.MOV&CAPTION=CHET/CHET_MYLABS/AKAMAI/2012/AUTOMOTIVE/XML/A5-F3.ADB.XML
VIDEO: .5 MINUTES: ABS CODE DIAGNOSIS
WWW.MYAUTOMOTIVELAB.COM
HTTP://MEDIA.PEARSONCMG.COM/PH/CHET/CHET_MYLABS/AKAMAI/TEMPLATE/VIDEO640X480.PH
P?TITLE=RETRIEVING%20TROUBLE%20CODES&CLIP=PANDC/CHET/2012/AUTOMOTIVE/A5F4.MOV&CAPTION=CHET/CHET_MYLABS/AKAMAI/2012/AUTOMOTIVE/XML/A5-F4.ADB.XML
24. SLIDE 24 ABS EXPLAIN HYDRUALIC SERVICE
25. SLIDE 25 EXPLAIN FIGURE 20–15 Special bleed
valve tools are often required when bleeding some ABS
units such as the Kelsey-Hayes 4WAL system.
26. SLIDE 26 EXPLAIN FIGURE 20–16 Two bleed valve
tools are needed to bleed the Kelsey-Hayes 4WAL
system, which attach to the bleeder valves on the
accumulator.
27. SLIDE 27 EXPLAIN FIGURE 20–17 To perform an
automated brake bleed procedure on an antilock braking
system, first connect a factory or enhanced scan tool to
the data link connector (DLC) located under the dash on
this vehicle.
28. SLIDE 28 EXPLAIN FIGURE 20–18 Access the menu
that includes antilock brake system (ABS) functions
29. SLIDE 29 EXPLAIN FIGURE 20–19 Scroll through
the menus and select automated bleed procedure and
follow the on-screen instructions.
HANDS-ON TASK: HAVE STUDENTS USE A SCAN
TOOL TO TEST A WSS AND EXPLAIN THE RESULTS.
DEMONSTRATION: SHOW STUDENTS HOW TO
MAKE CERTAIN THAT THE ABS SYSTEM IS NOT
PRESSURIZED BEFORE YOU OPEN A BLEEDER
SCREW OR LOOSEN A HYDRAULIC LINE.
ON-VEHICLE NATEF TASK: IDENTIFY AND
INSPECT ELECTRONIC BRAKE CONTROL SYSTEM
COMPONENTS; DETERMINE NECESSARY ACTION
ON-VEHICLE NATEF TASK: DIAGNOSE
ELECTRONIC BRAKE SYSTEM FAULTS; DETERMINE
NECESSARY ACTION
ON-VEHICLE NATEF TASK: BLEED ELECTRONIC
BRAKE CONTROL SYSTEM HYDRAULIC CIRCUITS.
ON-VEHICLE NATEF TASK: REMOVE AND
INSTALL ELECTRONIC BRAKE CONTROL SYSTEM
ELECTRICAL/ELECTRONIC AND HYDRAULIC
COMPONENTS
30. SLIDES 30-32 EXPLAIN SUMMARY
ON-VEHICLE NATEF TASK: DIAGNOSE
ELECTRONIC BRAKE CONTROL SYSTEM BRAKING
CONCERNS CAUSED BY VEHICLE MODIFICATIONS
(TIRE SIZE, CURB HEIGHT, FINAL DRIVE RATIO)
SEARCH INTERNET: HAVE STUDENTS USE
INTERNET TO RESEARCH THREE VEHICLE
ANTILOCK BRAKING SYSTEMS. ASK THEM TO
WRITE A BRIEF DESCRIPTION OF THE ABS
TECHNOLOGY USED FOR EACH VEHICLE AND THE
ADDITIONAL COST OF THIS OPTION.