1
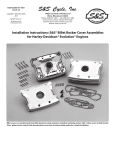
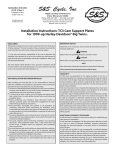
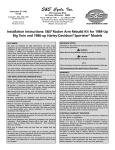
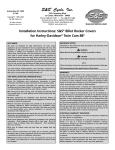
1
Instruction sheet No. 00-3885
Revised 8-14-98
Copyright5 ©, 1998
by S&S Cycle, Inc.
All rights reserved. Printed in the U.S.A.
S&S Cycle, Inc.
14025 County Hwy. G Box 215
Viola, Wisconsin 54664
Phone 608-627-1497
Fax 608-627-1488
Customer Service - [email protected]
Technical Assistance - [email protected]
Installation Instructions S&S V2 Style Rocker Cover Assemblies
Safe Installation and Operation Rules:
Before installing any S&S engine part, it is your responsibility
to read and follow all instructions. The rules below are for your
personal safety, and must be kept in mind at all times.
• Gasoline is extremely flammable and explosive under certain
conditions, and toxic when inhaled. Do not smoke around
gasoline. Perform the installation in a well-ventilated area away
from sparks or open flame.
• After installation, be sure all fuel lines are routed correctly
with clamps in place and tightened securely. Even with
protective cover, gas lines must not contact extremely hot
surfaces where they could melt or leak and catch fire.
• Compressed air and particles dislodged by compressed air
are potentially harmful. Wear protective goggles when using
compressed air and always direct the air stream away from
yourself and others nearby.
• Some solvents, degreasers and other chemicals are harmful,
especially to skin and eyes. Many chemical compounds such
as lacquer thinner are also flammable and present a fire
hazard. Read the manufacturer ’ s instruction label for
precautions and proper use. Use in a well ventilated area and
wear protective clothing to avoid personal injury.
• If the motorcycle has been running, wait until the engine
and exhaust pipes have cooled before performing any
mechanical work.
• Before beginning the installation, disconnect and remove
the battery to eliminate potential sparks and possible
inadvertent engagement of the electric starter while working
on the motorcycle.
• Read instructions thoroughly and carefully so all procedures
are completely understood before beginning installation.
Contact S&S if you have questions, if any steps are unclear,
or if any abnormalities occur during final assembly, installation,
or operation.
• Consult an authorized H-D service manual for correct
disassembly, reassembly, and installation procedures for any
parts that need to be removed or disassembled to facilitate
the installation.
• Use good judgment during assembly, installation, and when
operating the motorcycle. Good judgment begins with a clear
head. Don’t let alcohol, drugs, or fatigue impair judgment.
Perform installation when fresh and alert.
• For optimum performance and safety and to minimize potential
damage to the cylinder heads or other components, use correct
hardware and follow procedures outlined in S&S instructions
and authorized H-D service manual.
• Motorcycle exhaust fumes are toxic and must not be inhaled.
Run motorcycle only in a well ventilated area where fumes
can dissipate.
WARRANTY:
All S&S parts are guaranteed to the original purchaser to be
free of manufacturing defects in materials and workmanship for a
period of six (6) months from the date of purchase. Merchandise
that fails to conform to these conditions will be repaired or replaced
at S&S’s option if the parts are returned to S&S by the purchaser
within the 6 month warranty period or within 10 days thereafter.
In the event warranty service is required, the original purchaser
must notify S&S of the problem immediately. Some problems can
be rectified by a telephone call and need no further action. A part
that is suspected of being defective must not be replaced without
prior authorization from S&S. If it is deemed necessary for S&S to
make an evaluation to determine whether the part was defective, it
must be packaged properly to avoid further damage, and be
returned prepaid to S&S with a copy of the original invoice of
purchase and a detailed letter outlining the nature of the problem,
how the part was used, and the circumstances at the time of failure.
If after an evaluation was made by S&S and the part was found to
be defective, repair, replacement, or refund will be granted.
ADDITIONAL WARRANTY PROVISIONS:
(1) No part shall be returned to S&S without first contacting the
company and obtaining a Return Authorization (RA) number.
(2) S&S shall have no obligation in the event an S&S part is modified
by any other person or organization, or if another manufacturer’s
part is substituted for one provided by S&S.
(3) S&S shall have no obligation if an S&S part becomes defective
in whole or in part as a result of improper installation, improper
break-in or maintenance, improper use, abnormal operation, or
any other misuse or mistreatment.
(4) S&S shall not be liable for any consequential or incidental
damages resulting from the failure of an S&S part, the breech of
any warranties, the failure to deliver, delay in delivery, delivery in
non-conforming condition, or for any other breach of contract or
duty between S&S and a customer.
(5) S&S parts are designed exclusively for use on Harley-Davidson
motorcycles. S&S shall have no warranty or liability obligation if
an S&S part is used in any other application.
IMPORTANT NOTICE:
Statements in this instruction sheet preceded by the following words
are of special significance:
WARNING
Means there is the possibility of injury to yourself or others.
CAUTION
Means there is the possibility of damage to the motorcycle
or a component.
NOTE
Other information of particular importance has been placed in
italic type.
S&S urges you to take special notice of these advisories.
2
Picture 1
Kit Contents
Base, rocker cover S&S
Chrome billet (2 each) ............................................................ #90-4051
Plain billet (2 ecah) ................................................................. #90-4056
Cover, top rocker
Chrome billet (2 each) ............................................................ #90-4054
Plain billet ................................................................................ #90-4057
Support, rocker shaft left (2 each) .............................................. #90-4052
Support, rocker shaft right (2 each) ............................................ #90-4053
CAUTION - Failure to establish correct operating clearances can result
in extensive engine damage not covered under warranty.
S&S rocker covers are compatible with both crankcase and cylinder head
vent arrangements. Provided umbrella valves #90-4030 must be installed for
correct cylinder head vent operation, or combination crankcase-head venting
as utilized in V2 Style S&S Long Blocks.
S&S rocker covers can usually be installed with engine in frame. Taller
engines such as 98” and 103” S&S Long Blocks may require removal of
engine for installation and removal of rocker covers.
Capscrew, hex head, 5⁄16-18 x 2 1⁄2” (HD#3501) (4 each) .............. #50-0118
Capscrew, hex head, 5⁄16-18 x 241⁄4” (HD#3419) (4 each) ............. #50-0115
Capscrew, socket head, 1⁄4-20 x 3⁄4” (HD#4069A) (18 each) ......... #50-0067
Installation
1.
Washer, flat 1⁄4” x 7⁄16” x 1⁄16” (HD #6099) (18 each) ........................ #50-7017
Washer, flat 5⁄16” x .548” x 1⁄16” (8 each) ......................................... #50-7026
Wash motorcycle, taking care to remove sand and other abrasive debris
from engine and area of frame around engine. Remove battery, gas
tanks, and all parts required to access original rocker covers. Remove
top and center sections of OEM rocker housings. Refer to authorized
Harley-Davidson Service Manual as necessary.
Washer, flat fiber 1⁄4” x 7⁄16” x 1/32” (8 each) .................................. #50-7016
Gasket, Viton rocker cover (2 each) ........................................... #90-4048
O-ring, 15⁄8” x 1- 7⁄8” x 1⁄8” Viton (2 each) ......................................... #50-8044
Gasket, bottom rocker cover, right (HD#16778-84 (2 each) ...... #90-4058
Gasket, bottom rocker cover, left (HD#16779-84A) 2 each) ...... #90-4059
WARNING - Sparks from motorcycle electrical system can ignite gasoline
fumes. To prevent sparks as well as prevent electric starter from
becoming engaged inadvertently and causing personal injury,
disconnect battery and remove from motorcycle before proceeding.
Valve, rocker cover umbrella (HD#26586-89) (2 each) ............... #90-4030
WARNING - Gasoline is toxic when fumes inhaled, extremely flammable,
and explosive under certain conditions. Do not smoke around gasoline,
and perform installation in a well ventilated area away from sparks and
open flame.
Introduction
2.
S&S billet rocker covers are two piece style assemblies designed to fit
most Big Twin and Sportster style V2 engines that accept stock style rocker
covers.
NOTE - At present, S&S billet rocker covers are not recommended for
Buell motorcycles because of interference with the front cylinder headframe mount. S&S is currently testing a modified mount. Call Technical
Services at 608-627-1497 for additional information.
Remove pushrod cover retainer clips for front cylinder and collapse
covers. Remove sparkplugs and rotate engine to place pushrods at
lowest point on cam with front piston at TDC on compression stroke.
Referring to Harley-Davidson Service Manual as necessary, remove
rocker assemblies, pushrods and lower rocker cover from front
cylinder head.
S&S rocker covers are machined from billet aluminum, then polished
and chromed to a show quality finish. O-ring sealing insures reliable,
leakfree operation.
NOTE - Plain, unpolished and unplated versions are available for custom
applications. They may be powdercoated or otherwise finished to individual
specifications. S&S plain billet aluminum rocker covers must be inspected
and burrs/sharp edges carefully removed by customer before installation.
S&S rocker covers are designed to accept valve springs up to 1.660” O.D.
with no modification. In most instances, they will accept valve lifts to .710”
(S&S street head or OEM) or .810” (S&S Special Application cylinder head)
without modification.
NOTE - It remains engine builder’s responsibility to check operating clearances.
Clearances should be checked between valve spring/collar and rocker cover
base as well as between rocker arm and top rocker cover. S&S recommends
minimum of .060”. Cylinder head must also be “set up” for correct lift.
Picture 2
3
Left
Right
Rocker shaft reliefs must align with these holes.
Picture 3
Picture 4
NOTE - Observe correct location of pushrods. S&S pushrod kits have longest
pushrod for front exhaust, next longest for rear exhaust, shortest for rear
intake, and remaining one for front intake.
standard hex key. S&S recommends cutting or grinding short end of key for
access. Screws not accessible with torque wrench must be tightened by feel,
using tightness of properly torqued screw as guide. (Last applies only if engine
is in frame. All screws are accessible with engine out of frame.) S&S
recommends using torque wrench whenever possible.
Remove all traces of old rocker housing gaskets from cylinder head,
taking care to contain debris.
CAUTION - Debris such as gasket material can interfere with oil
circulation resulting in engine damage not covered under warranty.
WARNING - Improperly tightened fasteners may cause damage not
covered under warranty.
7.
3.
4.
Inspect S&S rocker cover assemblies. Remove rough or sharp edges
from plain (unchromed) assemblies. Clean all metal parts with solvent.
Dry with compressed air and remove any solvent residue with clean, lint
free cloth.
Install umbrella valves in rocker cover bases. See Picture 1. Valves
go in vent ports nearest intake manifold on both front and rear rocker
cover bases.
NOTE - If less than .060” clearance exists between rocker and top cover,
contact S&S Technical Services Dept.
8.
NOTE - Thin coat of motor oil or light grease on stem of valve will ease
installation. Valve often makes audible “snap” when correctly seated. T ug
valve gently and visually inspect to confirm proper, secure fit before proceeding.
5.
Clean gasket surfaces of rocker cover base and cylinder head with
lacquer thinner. Wipe dry with clean, dry cloth. Place right and left lower
rocker cover gaskets on cylinder head with factory-applied silicone bead
facing up.
NOTE - Small dab of grease or gasket sealant of choice in corners may be
used to hold gaskets in place. Otherwise they should be installed dry.
6.
Install 1⁄4” flat washers on 5 ea. socket head cap screws (per head),
apply Loctite 242 or equivalent to threads and install S&S rocker housing
base on cylinder head. See Picture 2. Torque screws to 10-13 ft-lbs.
NOTE - If engine is in frame, it is easiest to place screws in housing base
before placing housing base on head. Some screws are not accessible with
Measure clearance between valve spring and rocker cover with feeler
gauge. Minimum is .060”. See Picture 5. Same clearance must exist
between rocker arm and top cover.
Assemble right and left rocker shaft supports. See Picture 3. Inspect
rocker shafts for burrs and deburr as necessary. Lubricate shaft for
exhaust side rocker arm with assembly lube and pass through forward
opening in right support. Relief in shaft must align with bolt hole indicated
by arrow in Picture 3. Also note that relief in shaft support must face
center of engine. Install flat washer on 5⁄16” x 2 1⁄2” bolt, pass bolt through
opening in support and apply Loctite 242 or equivalent to threads.
Lubricate rocker arm bushings and shaft and place exhaust side rocker
arm on shaft. Repeat for intake and install second 5⁄16” x 2 1⁄2” bolt in
support. See Picture 4.
NOTE - S&S has experienced minor clearance problems when installing some
O.E.M. Harley-Davidson rocker arms in S&S billet rocker covers. Procedure
described in Step 9 should be performed prior to pushrod installation.
9.
To confirm adequate clearance between rocker arm and S&S rocker
cover:
A. Place rocker/support assembly in rocker cover base. Place left
side support over ends of shafts and install 5⁄16” x 2 1⁄4” bolts in support.
Evenly tighten 4 support bolts in X-pattern to 15-18 ft-lbs. Slowly
rotate rockers back and forth to insure that movement is free and
without bind.
NOTES ● Most Softails with OEM frames require that right support be placed in
lower rocker housing with rockers attached, then tilted up for installation
of left support. In some applications, notably those with “rubber mount”
engines and/or custom frames, both rocker supports can be installed on
shafts and assembly placed in rocker housing base as single unit.
● Rocker arm supports have locating dowels in bottom surface. Dowels
must align with openings in rocker housing base. Supports must pull down
evenly and without resistance. If resistance encountered, loosen screws
and shift supports to align dowels with openings.
B.
C.
Picture 5
Measure space between rocker arm and rocker cover with feeler
gauge. See Picture 6. Minimum acceptable clearance is .025”.
If clearance is less than .025”, remove rocker arm from cover and
carefully file or grind rocker arm to obtain correct clearance. See
Picture 7.
4
Picture 6
Picture 7
WARNING - Metal particles are potentially hazardous, especially to hands
and eyes. Always wear protective clothing such as goggles and gloves
when grinding or filing metal. When using compressed air, always direct
air stream away from yourself and others nearby.
11. Remove rocker/support assembly and replace pushrods, insuring correct
locations according to pushrod length. Lubricate valve tips and contact
areas of rocker arms and reinstall rocker/support assembly as in
previous step. Contact areas include roller, pushrod socket, and end
thrust surfaces.
CAUTION - S&S recommends clearancing rocker arm rather than rocker
cover. However, removing excessive material may weaken rocker arm
resulting in engine damage. In most instances, only a few thousandths
of an inch of metal must be removed for correct clearance. Also, grind
work piece for only brief periods to avoid overheating and possible
alteration of heat treatment.
D.
Remove burrs and rough areas of relieved area with fine file or
polishing wheel on hand held grinder. Clean rocker arm thoroughly
with solvent and compressed air observing warning above.
CAUTION - Failure to remove burrs and metal chips may result in engine
damage not covered under warranty.
E.
Reinstall rocker arm and confirm correct clearance.
10. Check rocker arm endplay by sliding rocker arm as far to one side as
possible and measuring gap between rocker arm and rocker arm support
on opposite end. Acceptable endplay is .001-.012”. If endplay is
insufficient, carefully remove material from end of rocker shaft to achieve
correct endplay, leaving smooth, nonabrasive surface.
NOTE - If endplay insufficient, remove minimum amount of material required
to achieve correct measurement.
CAUTION - Failure to establish correct end play can result in engine
damage not covered under warranty.
Picture 8
CAUTION - Insufficient clearance between rocker covers and valvetrain
components may cause engine damage not covered under warranty. It
remains the engine builder’s responsibility to verify all operating
clearances.
12. Confirm pushrod adjustment according to manufacturer’s instructions
and install pushrod cover retainers.
13. Place 17⁄8” o-ring and V iton gasket in rocker cover base. See Pictures
8 and 9. Install top cover with 4 ea. 1⁄4” socket head screws, flat washers
and fiber washers provided. (Fiber washers go between flat washers
and cover.) Apply Loctite 242 or equivalent to threads and tighten in
X-pattern to 10-13 ft-lbs.
14. Remove covers from rear cylinder pushrods. Rotate engine to place
pushrods at lowest point on cam with rear piston at TDC. Repeat
procedures described in Steps 5-13.
15. Replace parts removed for installation, start motorcycle and inspect for
gas and oil leaks.
NOTE - Chrome scratches easily. Clean chrome with degreaser as necessary,
then wash with hot soapy water. Rinse thoroughly before applying polish with
a clean cotton cloth. Many waxes and polishes contain abrasives which will
scratch chrome. S&S recommends non-abrasive polish specially formulated
for chrome and has used Mother’s Chrome Polish with good results.
Picture 9