Transcript
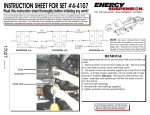
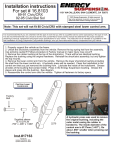
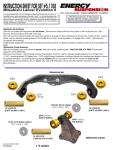
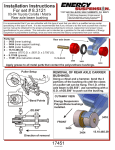
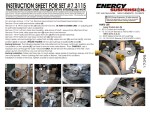
Installation instructions
For set # 5.5128 & 5.5129
R
1131 VIA CALLEJON, SAN CLEMENTE, CA 92673
66-69 B-Body & 67-72 A-Body
Energy Suspension. All rights reserved.
C 2008
Updated 8/JAN/03 BRH Updated 23/JAN/04 BRH
May not
be reproduced,
in any
form,10/JAN/06
or by anyBRH
means,
Updated
14/JAN/05 BRH
Updated
without
the written
consent
Updated
2/JAN/07
BRH of Energy Suspension.
It is recommended that if you are unfamiliar with this type of work that you refer to a qualified service center
specializing in this type of work. It is also recommended that if you choose to do this work yourself that a factory
service manual be obtained for the proper procedures pertaining to removal, replacement and proper torque
specifications for your vehicle. This instruction set is intended as a guideline for the safe installation of Energy
Suspension’s polyurethane bushings, once you have removed the factory components from your vehicle.
Energy suspension recommends that you read the installation instructions before you start.
(Before removing sway-bar and brackets, mark orientation of brackets appropriately for reinstallation.)
1. Remove sway-bar and brackets from vehicle.
2. Secure sway-bar in vise, remove old bushings from bracket and bar. (Note: if bracket is bent, straighten and deburr
bracket so that the bracket inside surface is a rough copy of the bushing outer surface.)
3. After putting the bracket back on the sway bar with the correct orientation, Lubricate the end-link eyelet leading edge and
the new bushing inside diameter.(dishsoap,motor oil,etc.),
4. Slide the bushing over the end-link eyelet and position the bushing just past the eyelet where the sway bar diameter is
the smallest (FIG 1).
5. Lubricate (dishsoap, motor oil, spray lube etc..) the outer bushing edges that are facing the bracket as well as the bracket
leading edges.
6. Slide the bracket over the bushing edges so that only the bushing center hump is keeping the bracket from sliding on
completely.
7. With a set of channel-lock pliers, press the triangular bushing in by squeezing the bushing in one side at a time (FIG 2).
8. Slide the bracket and bushing to approximately 1" from the finished bushing pivot point. Apply the supplied grease to the
sway-bar where the bushing will ride. Position bushing and bracket on top of grease.
9. Once the brackets and bushings are properly positioned you may reinstall the sway-bar assembly.
10. Retorque all bolts to factory specifications.
FIG. 2
FIG. 1
Note: If your O.E. brackets are beyond repair, Energy Suspension offers replacement
adaptor brackets. These adaptor brackets allow you to use our greaseable sway-bar
bushings and are offered in many different sizes.
17242
8/JAN/08 BRH